
L41SA - Laptop ECS - Free user manual and instructions
Find the device manual for free L41SA ECS in PDF.

| Product Type | Notebook Computer |
| Brand | ECS |
| Model | L41SA |
| Dimensions (W x D x H) | 334 x 244 x 32.5 mm (front) to 38.5 mm (back) |
| Weight | Less than 2.4 kg (with 6-cell battery) |
| Power Supply | 65W AC adapter, 100-240V AC |
| Battery | Rechargeable Li-ion, 4 or 6 cells |
| Processor | Intel Core Duo (Yonah) or Core 2 Duo (Merom) |
| Chipset | Intel 945GM + ICH7-M |
| Memory | Up to 2GB DDR2 SDRAM (533/667 MHz), 2 slots |
| Storage | 2.5" SATA HDD, 40-120GB capacity |
| Optical Drive | DVD Dual Layer or Combo drive |
| Display | 14.1" WXGA (1280x800) Glare type LCD |
| Graphics | Integrated Intel 945GM |
| Audio | Realtek ALC883, built-in stereo speakers, microphone |
| LAN | Realtek RTL8100CL 10/100 Ethernet |
| Wireless | Intel PRO/Wireless 3945ABG (optional) |
| Modem | 56K V.92 MDC (optional) |
| Card Reader | 4-in-1 (SD, MMC, MS) |
| ExpressCard | Type II, 54/34 mm |
| I/O Ports | 3x USB 2.0, VGA, S-Video, Headphone, Microphone, Ethernet, Modem, IEEE 1394 |
| Security | Kensington lock slot, BIOS password (supervisor/user) |
| Replaceable Parts | Battery, memory modules, hard drive, optical drive |
| Cleaning | Use soft cloth for LCD; avoid liquids or sprays directly on screen |
| Operating System | Windows XP, Windows Vista, Linux Fedora (compatible) |
Frequently Asked Questions - L41SA ECS
User questions about L41SA ECS
0 question about this device. Answer the ones you know or ask your own.
Ask a new question about this device
Download the instructions for your Laptop in PDF format for free! Find your manual L41SA - ECS and take your electronic device back in hand. On this page are published all the documents necessary for the use of your device. L41SA by ECS.
USER MANUAL L41SA ECS
natural_image
Exterior view of a modern laptop computer with open lid and keyboard (no visible text or symbols)Preface
©Copyright 2007
All Rights Reserved.
The information in this document is subject to change without prior notice in order to improve reliability, design and function and does not represent a commitment on the part of the manufacturer.
In no event will the manufacturer be liable for direct, indirect, special, incidental, or consequential damages arising out of the use or inability to use the product or documentation, even if advised of the possibility of such damages.
This document contains proprietary information protected by copyright. All rights are reserved. No part of this manual may be reproduced by any mechanical, electronic, or other means in any form without prior written permission of the manufacturer.
Limitation of Liability
While reasonable efforts have been made to ensure the accuracy of this manual, the manufacturer and distributor assume no liability resulting from errors or omissions in this manual, or from the use of the information contained herein.
Notices
Federal Communications Commission Radio Frequency Interference Statement
NOTE....
This equipment has been tested and
found to comply with the limits for a Class B digital device, pursuant to Part 15 of the FCC Rules. These limits are designed to provide reasonable protection against harmful interference in a residential installation. This equipment generates, uses, and can radiate radio frequency energy and if not installed and used in accordance with the instruction manual may cause harmful interference to radio communications. However, there is no guarantee that interference will not occur in a particular installation. If this equipment does cause harmful interference to radio or television reception, which can be determined by turning the equipment off and on, the user is encouraged to try to correct the interference by one or more of the following measures:
• Reorient or relocate the receiving antenna
- Increase the separation between the equipment and receiver
- Connect the equipment into an outlet on a circuit different from that to which the receiver is connected
Consult the dealer or an experienced radio TV technician for help This device complies with Part 15 of the FCC Rules. Operation is subject to the following two conditions: (1) This device may not cause harmful interference, and (2) this device must accept any interference received, including interference that may cause undesired operation.
FCC Caution: Any changes or modifications not expressly approved by the party responsible for compliance could void the user's authority to operate this equipment.
Notice:
Changes or modifications not expressly approved by the party responsible for compliance could void the user's authority to operate the equipment. Shielded interface cables and a non-shielded AC power cord must be used in order to comply with emission limits.
This equipment is to be used with power supply: 65W
There is no internal power supply.
Table of Content
CHAPTER 1: BEFORE YOU START....1
LET YOUR COMPUTER ACCLIMATE ITSELF....8
HEAT, COLD, HUMIDITY, AND GLARE 8
SUITABLE PLACE TO WORK....9
CHAPTER 2: INTRODUCTION ....11
OPENING THE LCD PANEL....11
FRONT VIEW 12
LED STATUS INDICATOR....13
RIGHT VIEW 14
LEFT VIEW 15
BOTTOM VIEW....16
CHAPTER 3: GETTING STARTED ....17
CONNECTING THE AC ADAPTER....17
TO REMOVE THE BATTERY PACK: 19
TO INSTALL THE BATTERY PACK:....19
CHAPTER 4: USING THE NOTEBOOK COMPUTER ....21
LCD CARE....21
EXTERNAL CRT DISPLAY....21
FUNCTION KEYS (QUICK KEYS)......22
TOUCHPAD PRECAUTIONS....22
FEATURES OF THE DVD DUAL 22
PRECAUTIONS FOR HANDLING CD DISCS 23
LOADING A DISC 23
DISPLAY SETTINGS....47
COLOR CORRECTION....48
HOT KEYS....48
LAUNCH ZOOM 49
CHAPTER 9: TROUBLESHOOTING....51
NO SPEAKER OUTPUT - 52
SOUND CANNOT BE RECORDED - 52
THE HARD DISK DRIVE DOES NOT WORK OR IS NOT RECOGNIZABLE......53
THE HARD DRIVE IS MAKING ABNORMAL WHINING NOISES ....53
THE HARD DISK DRIVE HAS REACHED ITS CAPACITY ....53
THE HARD DISK TAKES LONGER TO READ A FILE....54
THE FILES ARE CORRUPTED 54
THE OPTICAL DRIVE DOES NOT WORK 54
THE DRIVE DOSE NOT READ ANY DISKS 54
THE DISK CANNOT BE EJECTED....54
THE COMBO OR DVD RW DRIVE (OPTIONAL DEVICE) CANNOT RECORD 54
THE DISPLAY PANEL IS BLANK WHEN THE SYSTEM IS TURNED ON ....55
THE SCREEN IS DIFFICULT TO READ - 55
THE BUILT-IN KEYBOARD ACCEPTS NO INPUT - 55
THE CHARACTERS ON THE SCREEN REPEAT WHILE | TYPE. 55
A MESSAGE "CMOS CHECKSUM FAILURE" DISPLAYS DURING THE BOOTING PROCESS OR THE TIME (CLOCK) RESETS WHEN BOOTING .....56
THE POST DOES NOT SHOW AN INCREASED MEMORY CAPACITY WHEN YOU HAVE ALREADY INSTALLED ADDITIONAL MEMORY ....56
THE O/S ISSUES AN INSUFFICIENT MEMORY ERROR MESSAGE DURING OPERATION ....56
PC CARDS DO NOT FUNCTION-....57
THE PC CARD CANNOT BE RECOGNIZED - 57
WINDOWS CRASHES OR FREEZES WHEN YOU REMOVE THE PC CARD-..57
THE COMPUTER BECOMES HOT - 57
THE PROGRAM APPEARS STOPPED OR RUNS VERY SLOWLY - ....57
THE USB DEVICE DOES NOT WORK - 58
APPENDIX A: SPECIFICATION....59

Chapter I
Before you Start
Conventions of This Manual
Use this manual will help you get the most from your notebook computer.
- If you are an experienced user of computers and/or Microsoft's Windows operating systems, you might find it useful to read the Quick Start Guide that comes along with your accessories.
- If you are a less experienced user, you should through the manual carefully before using your system.
Whether or not you are an experienced user, you should consult on the Troubleshooting Chapter if you encounter any problems with your notebook.
NOTE....
This product incorporates copyright
protection technology that is protected by U.S. patents and other intellectual property rights. Use of this copyright protection technology must be authorized by Macrovision, and is intended for home and other limited viewing uses only unless otherwise authorized by Macrovision. Reverse engineering or disassembly is prohibited.
Safety Precautions
This section is designed to assist you in identifying potentially unsafe conditions while working with this product. Required safety features have been installed in the computer to protect you from injury. However, you should use good judgment to identify potential safety hazards:
- Please read these safety instructions carefully.
-
Please keep this User's Manual for later reference.
-
Please disconnect this equipment from AC outlet before cleaning. Don't use liquid or sprayed detergent for cleaning. Use moisture sheet or cloth for cleaning.
-
For pluggable equipment, that the socket-outlet shall be installed near the equipment and shall be easily accessible.
-
Please keep this equipment from humidity.
-
Lay this equipment on a reliable surface when installed. A drop or fall could cause injury.
-
Make sure to use the right voltage for the power source when connecting the equipment to the power outlet.
-
Place the power cord in such a way that people can not step on it. Do not place anything on top of the power cord.
-
All cautions and warnings on the equipment should be noted.
-
If the equipment is not use for a long time, disconnect the equipment from the main power outlet to avoid being damaged by transient overvoltage.
-
Never pour any liquid into the opening, this could cause fire or electrical shock.
-
Never open the equipment. For safety reason, the equipment should only be opened by a qualified service personnel.
-
If on the following situations arises, get the equipment checked by a service personnel:
a. The Power cord or plug is damaged.
b. Liquid has penetrated into the equipment.
c. The equipment has been exposed to moisture.
d. The equipment has not worked well or you cannot get it work according to the user's manual.
e. The equipment has dropped and damaged.
f. If the equipment has obvious sign of breakage.
-
Do not leave this equipment in an environment unconditioned, storage temperature above 60^ C ( 140^ f), it may damage the equipment.
-
The unit can be operated at an ambient temperature of max. 35^ C.
-
The sound pressure level at the operators position according to IEC 704-1: 1982 is equal or less than 70 dB(A).
-
Power Cord Requirements The power cord set used with the AC adaptor must meet the requirements of the country where you use the AC adaptor, whether it is 100-120 or 200-240 Vac. The following information explains the requirements for power cord set
selection.
The cord set must be approved for the country in which it is used.
The appliance coupler must have a configuration for mating with a CEE22/EN6032/IEC 320 appliance inlet.
A. For U.S. and Canada:
The cord set must be UL Listed and CSA Certified.
The minimum specifications for the flexible cord are No. 18 AWG.
B. For Japan:
All components of the cord set must bear a "PSE" or "T" mark and registration number in accordance with the Japanese Dentori Law.
The minimum specifications for the flexible cord are .75m m ^2 conductors.
C. For Other Countries:
The cord set fittings must bear the certification mark of the agency responsible for evaluation in a specific country.
The flexible cord must be of a HAR (harmonized) type H03VV-F.
The cord set must have a current capacity of a least 2.5 Amperes and voltage rating of 125 or 250 Vac.
18. When using your telephone equipment, basic safety precautions should always be followed to reduce the risk of fire, electric shock and injury to persons. These precautions include the following:
Do not use this product near water, for example, near a bathtub, washbowl, kitchen sink or laundry tub, in a wet basement or near a swimming pool.
Avoid using a telephone (other than a cordless type) during an electrical storm. There may be a remote risk of electric shock from lightning.
Do not use the telephone to report a gas leak in the vicinity of the leak.
Use only the power cord indicated in this manual.
-
Do not use the AC adapter near open water or other liquids. Never spill liquid into the AC adapter.
-
Laser Warning: Laser Class I Product Caution - Invisible laser radiation when open avoid exposure to beam.
-
The optical drive used with this computer is certified as a
Class1 laser device according to the U.S. Department of Health and Human Services (DHHS) Radiation Performance Standard and International Standards IEC 60825-1 (EN60825-1). The device is not considered harmful, but the following precautions are recommended:
Do not open the unit.
Avoid direct exposure to the laser beam.
If the unit requires service, contact an authorized service center.
➢ Ensure proper use by reading and following the instructions carefully.
Do not attempt to make any adjustment of the unit.
Class 1 Laser Product
Appareil A Laser De Classe 1
Do not attempt to disassemble the cabinet containing the laser. The laser beam used in this product is harmful to the eyes. The use of optical instruments, such as magnifying lenses, with this product increase the potential hazard to your eyes. For your safety, have this equipment serviced only by an authorized service provider.
- Danger of explosion if battery is incorrectly replaced. Replace only with the same or equivalent type recommended by the manufacturer. Dispose of used batteries according to the manufacturer's instructions. Never remove the battery pack while the power is on as this may result in data loss when the system loses power.
- The input receptacle is used as the main disconnecting device.
- Note to CATV System Installer – This reminder provided to call the CATV system installer's attention to Section 820-93 of the National Electric Code which provide guidelines for proper grounding and in particular, specify that the Coaxial cable shield shall be connected to the grounding system of the building, as close to the point of cable entry as practical

CAUTION...
This part is hot. Be careful.

VORSICHT...
When you see this symbol, be careful as this spot may be very hot.
Things you must remember before working on your computer
Let your computer acclimate itself
Your notebook can easily stand temperature extremes but it doesn't like rapid changes in temperature, like going from the cold outdoors to a warm office.
Rapid changes in temperature can cause water droplets to condense inside your case, threatening to damage the electronic parts inside.
After receiving your notebook when it's hot or cold outside, try not to power up the computer immediately, let the computer adjust to the room temperature gradually at least for three to four hours.

WARNING....
If your system arrives in cold weather, do not apply power to the computer or monitor until they have been allowed to come to room temperature.
Heat, Cold, Humidity, and Glare
Find a suitable place for your computer that's not too hot, too cold, too dark, or too bright. Glare can make it hard to read the screen.
- Try to avoid the computer components from being destroyed if it is over heated, so try to allow plenty of room for air to circulate around the case.
- Do not block the ventilation opening.
- Do not place your computer in direct sunlight.
Suitable place to work
Your computer will run well wherever you're comfortable but extremes of temperature and humidity can be challenging to your system's parts. There are some things you can tolerate that the computer can't – things like static electricity, dust, water, steam and oil. In case you decide to pull over for roadside computing, try to choose a clean, comfortable work area for your system.
A lithium-ion battery pack will be available when you are traveling. If you are running your system for the first time on battery power, remove the battery from the package, install it into the system and recharge the battery to fully prepare for service.

Chapter 2
Introduction
Welcome to the Notebook PC
Congratulations on your purchase of the Notebook PC. Your Notebook features the latest advances in portable computing technology. The Notebook's modular design provides maximum expandability without compromising portability.
Getting to Know Your Computer
Opening the LCD Panel

natural_image
Two-panel image showing a laptop and a keyboard with curved arrows indicating motion or function (no text or symbols)
WARNING....
To avoid damage to the display
panel:
- Try not to slam the display upon closing it.
- Try not to place any object on top when it is closed or open.
- Be sure the system is turned off or in suspend mode before you close the display panel.
With the LCD screen open, you will see several features important for operating your Notebook computer.
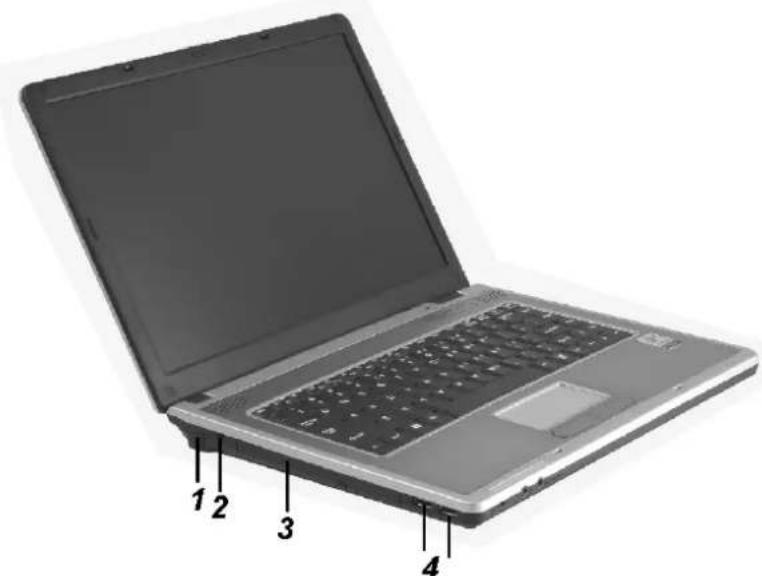
Front View


WARNING....
Do not place any heavy objects
on the top of notebook. This may damage the display
- LCD Latch
- LCD Display
- Internet Explorer Quick Key
- Silent Mode Button
Pressing the key enables the system to lower its power usage; therefore the fan speed is reduced to achieve lowest operating noise.
- Power / Suspend Button
➢ Press momentarily to turn on the system.
➢ Press and hold for at least 4 seconds to turn off the system.
➢ Press the power / suspend button again to return from the suspend mode.
- Built-in Stereo Speakers
-
Keyboard
-
Touch Pad
- Touchpad Buttons
- Built-in Microphone
- Wireless On/Off Switch
- LED Status Indicator
LED Status Indicator
System & Power Status Indicators
| LED Graphic Symbol | Indication | |
| Green light indicates the system is ON.Blinking green light indicates the notebook is in suspend mode. | ||
| Green light indicates the WLAN and Bluetooth module is active. | ||
| Blinking orange light indicates the battery is being charged.Blinking red light indicates the battery power is low when the system is turned ON.Persistent green light indicates the battery is Full. | ||
| Green light indicates the hard drive and/or optical drive is being accessed. | ||
| Green light indicates the cap-lock is activated. | ||
| Green light indicates the numeric keypad is activated. | ||
 | Persistent green light indicates the Silent Mode is enabled. | |
- Microphone/Audio Line-in Jack
- Stereo Headphone/SPDIF-out Jack
Right View

- Ventilation Grill
- Power Jack (DC-in)
- External VGA Port
- S-Video Port
- Ethernet / LAN Port
NOTE....
When using a LAN, please use an EMI
Shielding Cable to minimize an interference when transmitting.
- USB2.0 Port
- 1394A
- ExpressCard (New Card) Slot
The slot is where Express Card (Type 54) is inserted. ExpressCard Type 54 allows insertion of 54mm and 34mm cards. ExpressCard integrates both the PCI-Express bus technology and USB2.0 standards.
- 4-in-1 Card Reader
The 4-in-1 Card Reader supports SD Card, MMC Card, and MS Card.
Left View
- Modem Port (Option)
NOTE....
Always disconnect all telephone lines
from the wall outlet before servicing or disassembling this equipment. To reduce the risk of fire use only No. 26 AWG or larger telecommunication line cord.
-
Kensington Lock
-
Optical Drive and Disk Eject Button and Manual Eject Key Hole
-
USB Ports
Bottom View
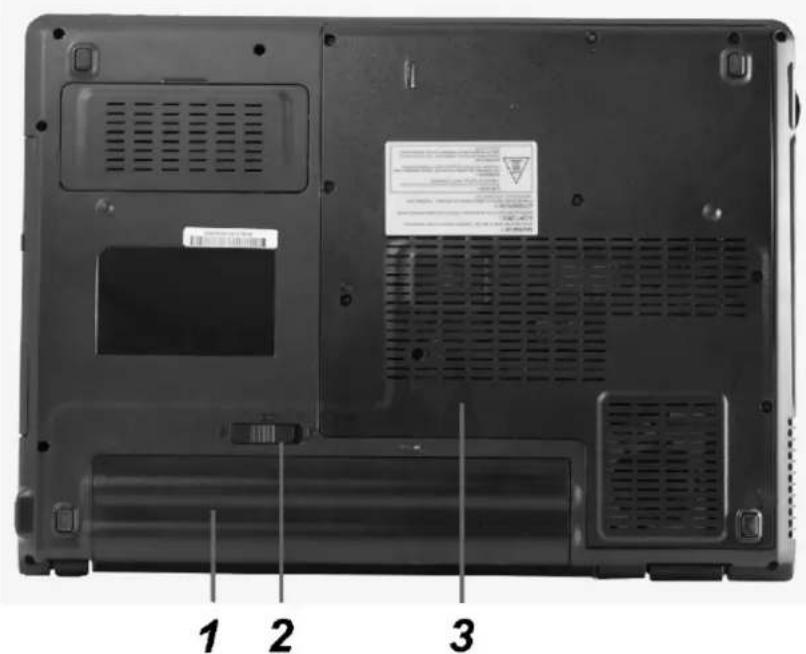
- Battery Compartment
- Battery Release Latch
- Expansion Compartment

Chapter 3
Getting Started
Connecting to a Power Source
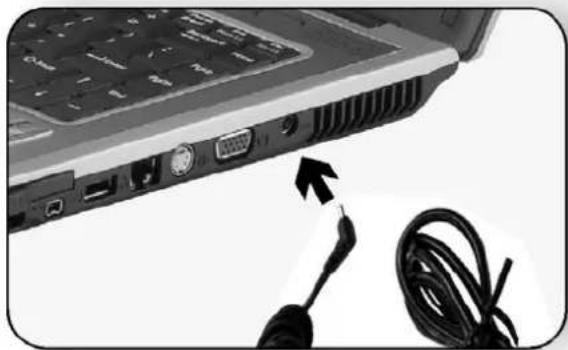
Connecting the AC Adapter
A universal AC adapter is provided to supply your computer with power and also charge the computer's battery pack. The adapter's AC input voltage can range anywhere from 100 to 240 volts, covering the standard voltages available in almost every country. To connect the computer to an external power source:
natural_image
Close-up of a laptop keyboard with attached cable and cable connector (no visible text or symbols)
WARNING....
Do not use inferior extension
cords as this may result in damage to your Notebook. The Notebook comes with its own AC adapter. Do not use a different adapter to power the computer and other electrical devices.
Whenever possible, keep the AC adapter plugged into the Notebook and an electrical outlet to recharge the battery.
WARNING....
Never turn off or reset your
Notebook while the hard disk is in use and the CD-ROM status icon is lit; doing so can result in loss or destruction of your data. Always wait at least 5 seconds after turning off your Notebook before turning it back on; turning the power on and off in rapid succession can damage the Notebook's electrical circuitry.
Turning On Your Notebook Computer
Turn on your Notebook by pressing the power button. Hold the button down for a second or two and release. The Power-On Self Test (POST) runs automatically.
After the POST is completed, the computer reads the operating system from the hard disk drive into computer memory (this is commonly referred to as "booting" a computer). If your OS (Operating System such as Windows Vista.... etc) is installed, it should start automatically.
To turn the Notebook off, save your work and close all open applications, click on Start, then Shut Down and select Shut down the computer and click "Yes" or press the power button for 4-6 seconds.
Operating on Battery Power
Your computer comes with a rechargeable battery pack that lets you operate the computer without an external power source. When the battery pack is fully charged, you can operate the computer under the following conditions:
• The battery pack initially has a full charge.
• No peripheral devices are installed.
• The disk/CD-ROM drives run no more than 10% of the time.
WARNING....
Only use batteries that are
approved by an authorized dealer. All batteries are not the same and therefore should not be treated as such. Using the wrong battery could cause serious damage to your computer and yourself through toxic emissions.
Installing and Removing the Battery Pack
To Remove the Battery Pack:
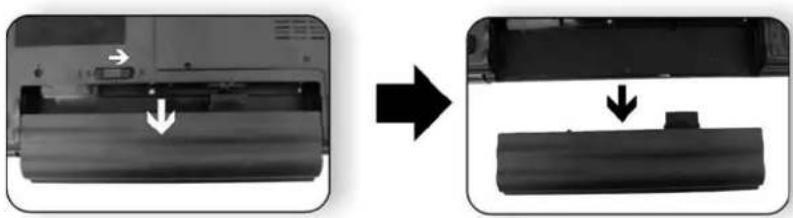
To Install the Battery Pack:

natural_image
Close-up of a printer's front panel with an arrow pointing to the cover (no visible text or symbols)

natural_image
Close-up of a computer ventilation grille and ventilation cover (no visible text or symbols)Charging the Battery Pack
The installed battery pack charges automatically any time the computer is connected to the AC adapter and an external power source. It is a good idea to occasionally discharge the battery pack fully to preserve its operating performance.

natural_image
Abstract horizontal gradient bars in blue, red, green, and gray (no text or symbols)
Chapter 4
Using the Notebook Computer
Adjusting the LCD Screen Display
The LCD screen display can be adjusted by the following key combinations.
KEYS FUNCTIONS
Fn + F7 Increases the brightness level.
Fn + F8 Decreases the brightness level.
Fn + F4 Changes Display Mode: LCD-only, CRT-only.
LCD Care
LCD screens are delicate devices that need careful handling. Please pay attention to the following precautions:
- When you are not using the computer, keep the LCD screen closed to protect it from dust.
- If you need to clean your LCD screen, use a soft tissue to gently wipe the LCD surface.
- Do not put your fingers or sharp objects directly on the surface and never spray cleaner directly onto the display.
- Do not press on, or store any objects on the cover when it is closed. Doing so may cause the LCD to break.
External CRT Display
You can hook up an external monitor through the 15-pin CRT connector.
- LCD only
- CRT only
You can switch between these display configurations by pressing the key combination [Fn] + [F4].
The Notebook's Hot Key Controls Function Keys (Quick Keys)
| Graphic Symbol | Action System Control |
 | Fn + F3 Turns On/Off the battery warning beep |
 | Fn + F4 Changes Display Mode: LCD-only, CRT-only |
 | Fn + F5 Increases the speaker volume. |
 | Fn + F6 Decreases the speaker volume. |
 | Fn + F7 Increases the brightness level. |
 | Fn + F8 Decreases the brightness level. |
The TouchPad
The touchpad is a rectangular electronic panel located just below your keyboard. You can use the static-sensitive panel of the touchpad and slit it to move the cursor. You can use the buttons below the touchpad as left and right mouse buttons.
TouchPad Precautions
The TouchPad is a pressure sensitive device.
Please take note of the following precautions.
- Make sure the TouchPad does not come into contact with dirt, liquids or grease.
- Do not touch the TouchPad if your fingers are dirty.
- Do not rest heavy objects on the TouchPad or the TouchPad buttons.
You can use the TouchPad with Microsoft Windows as well as non-Windows applications.
The DVD Dual
Features of the DVD Dual
The features of the DVD Dual are listed below.
• The Audio Play feature allows you to play music CDs
- Front panel load/unload button
- Supports CD-DA, CD-ROM mode 1 and mode 2, Multi-Session Photo CD™, CD-I/Video CD (pcs.)
- Low power consumption
- 12.7mm height
Precautions for Handling CD Discs
• Always hold the disc by the edges, avoid touching the surface.
- Use a clean, dry, cloth to remove dust, smudges, or fingerprints. Wipe from the center outward.
- Do not write or place objects on the surface of the disc.
- Store discs in a cool dry place not to damage the disc.
- Do not use benzene, thinners, or cleaners with detergent. Only use CD-ROM/DVD-ROM/Combo cleaning kits.
- Do not bend or drop the discs.
Loading a Disc
To play a CD disc, follow the instructions listed below.
- Push the DVD Dual eject button on the CD drive door. Gently pull the tray all the way out.
- Carefully lift the CD disc by the edges and make sure the shiny surface is face down (the side with no writing on it). Carefully insert the CD disc onto the tray. Push the CD disc down gently so that it snaps onto the center ring.
- Push the tray back into the drive.
To remove a CD disc, do the following:
- Check the LED display and make sure that the computer is not accessing the DVD Dual.
- Push the eject button and pull the tray all the way out.
- Carefully pick up the CD disc by the edges and – while pressing down on the center ring – remove the CD disc from the tray.
NOTE....
Do not insert any foreign objects into the disc tray. If you experience difficulty when ejecting the CD disc tray, stretch a paper clip (or use a pin or a thin metal rod) and insert it into the emergency eject hole located on the right side of the front panel. The CD disk tray should eject immediately. This procedure can also be used to remove a CD from the drive when the Notebook is powered off.
Power Saving Modes
This section contains information on the Notebook's power system, including the AC Adapter, the battery system, recharging the battery, and tips for conserving battery power.
The power system is comprised of two parts, the AC Adapter and the battery system. The AC Adapter converts AC power from a wall outlet to the DC power required by the computer.
The Battery Power System
Before using the computer on battery power for the first time, check the battery status icon on the Windows Toolbar to make sure the battery is fully charged.
See Battery Status later in this section for a description and explanation of the Windows Battery icon.
Charging the battery takes about 3 hours to charge when the system is in off state. If possible, always charge the battery completely.
Removing the Battery Pack
To remove the battery pack from its compartment, please refer to Chapter 3, Inserting and Removing the Battery Pack.
Preparing the Battery Pack for Use
Before using the battery pack for the first time, the Smart Battery IC within the battery pack should be calibrated in order to get accurate reporting of remaining battery life status.
To calibrate the battery pack follows the instructions below:
-
Insert the battery into the battery compartment and turn on the Notebook. If the battery is completely without power go to the next step. Otherwise, let the battery run down until the battery low-low warning beeps are heard. The system will automatically enter Suspend mode.
-
Turn the Notebook off. Connect the AC adapter and let the battery fully recharge. When the battery charge indicator turns off, the battery is fully charged.
-
Turn On the notebook, let the battery run down until the battery is in low-low state and you hear a warning beeps. The system will automatically enter the Suspend mode. You can now connect the AC adapter.
-
The battery pack is now calibrated properly.
In general, using the battery until the low-low battery-warning indicator appears and fully recharges the battery each time (full discharge/charge cycle) will ensure the accurate reporting of the battery gauge status.
Automatic Battery Pack Charging Function
To charge the battery, while the battery pack is in the notebook, plug the AC adapter into the notebook and an electrical outlet.
The charging time is approximately 4-6 hours when the notebook is turned off and approximately 6-10 hours when the notebook is turned on.
When the battery is fully charged, the battery charge indicator becomes green.
NOTE....
If system runs at heavy loading or in a high temperature environment, the battery may not be fully charged. You need to continue to charge it with the AC adapter plugged in until the charging LED turns green.
Battery Status
Windows Vista has an applet in the Control Panel that will display an icon in the Windows taskbar indicating when the Notebook is running on battery power or is attached to the AC adapter.
This applet also displays a meter that indicates how much charge is remaining in the battery.
Battery Low Warning
When the pack initially reaches the "Battery Low" state approximately 7 \~ 10 minutes of the usable battery life is left.
You will hear an audible beep signal every 15 seconds alerting you to the “Battery Low” status. When the battery power reaches the “Battery Low Low” status the beeping sound will accelerate.
Your battery now has 1 \~ 2 minutes of battery charge remaining. You must save your data or connect AC power immediately; otherwise, you may lose your data.
| Sound Meaning | |
| Continuous beeping every 5 seconds | Battery Low: Indicates that there is 7 to 10 minutes charge remaining. |
| Beeping accelerates | Battery Low Low: Indicates that there is 1 to 2 minutes of battery charge remaining. Save your work and turn off the Notebook, or connect the AC adapter. |
When there is only one minute of battery charge remaining, the Notebook will suspend to the HDD and power off. You should connect AC power and resume to save your work.
Small Battery for the Real Time Clock
There is a small built-in battery pack that supplies power to the system in order to maintain certain system information while the power is off. If the Notebook is left without a power source for long period of time, this battery will be exhausted and system information will be lost.

WARNING....
Danger of explosion if battery is
incorrectly replaced. Replace only with the same or equivalent type recommended by the manufacturer.
Dispose of used batteries according to the manufacturer's instructions. Never remove the battery pack while the power is on as this may result in data loss when the system loses power.
Resetting the System
After installing a software application package, you may be prompted to reset the system to load the changed operating environment. To reset the system, or "reboot," press the [Ctrl]+[Alt]+[Delete] keys simultaneously. This is known as "warm boot." This key combination acts as "software" reset switch when you encounter hardware or software problems, which lock up the Notebook.
If this key combination does not shut down the Notebook, you can reset the Notebook by using the Notebook's power button. Should the Notebook lock up for some reason, pressing this button powers the Notebook off.
Adjusting the Brightness
To adjust the brightness on the LCD screen, press and hold down the [Fn] key in the lower left hand corner of the keyboard and press the [F7] key to reduce the brightness or [F8] to increase the brightness.
Using the Windows
Help Windows
For Vista help, click Start → Help and Support icon will open the dialog box.

Desktop
Desktop may vary differently on the software installed in your notebook with different or additional shortcuts.
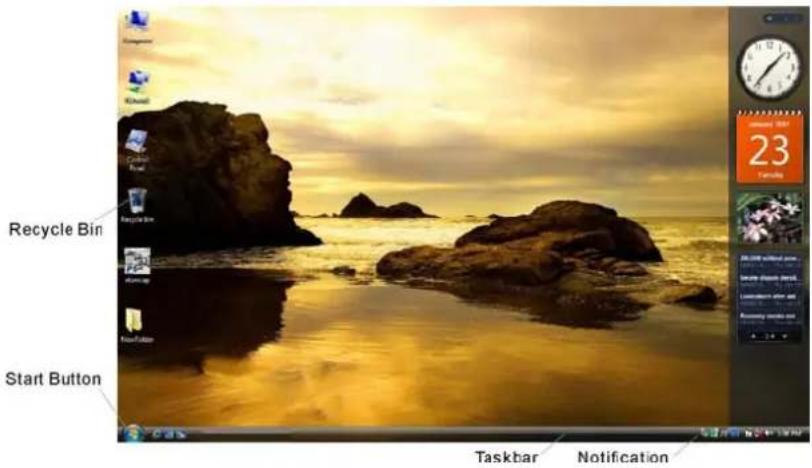
Recycle Bin
Used for storing deleted files in case you want to recover and save it in your system. The files will only be deleted from the Recycle Bin permanently only if you empty it by right clicking your mouse and select the "Empty Recycle Bin".
Start Button
Allows easy access to all Windows programs.

The Start menu allows you to adapt and show the programs used most frequently. If you wish to keep an item, right click the item and click Pin to Start menu.
Log Off will enable the current user to log off and allows a new user to log on.
Turn Off Computer allows you to shut down, restart, and Stand by modes for power saving purposes.
Taskbar
When you open a program, its icon is displayed at the taskbar for you to conveniently move between programs by clicking the relevant button.
To add or remove toolbars from the taskbar: right click an empty spot on the taskbar, select Toolbars → choose the toolbar you
want to add.
Notification
The icons that appear here are for quick access to some programs and computer functions that you frequently used. To prevent Windows Vista from hiding icons:
From an empty spot on the Taskbar, right click your mouse and select the Properties, remove the checked mark on the Auto-hide the taskbar.

Control Panel
It is in this area that you can change how Windows looks and works. Click Start → Control Panel dialog box. There are two interfaces – Classic View.


Chapter 5
Desktop Operation
Your notebook is capable of providing you with efficient and productive mobile computing, it also has the speed and capacity to service as a desktop system.
This chapter discusses those functions of your notebook that are typical of desktop systems.
Audio
The Multimedia Sound System
The Notebook's built-in audio capabilities allow you to take advantage of a wide range of education and entertainment multimedia software. The Notebook is equipped with two internal stereo speakers, a microphone, and input audio ports for external audio units.
An external microphone can be connected to the microphone jack. External speakers or headphones can be connected to the Notebook's audio-out jack.
External audio devices can be connected to the Line in jack. All audio features are software controlled. The Notebook's multimedia sound system includes the following features:
• Supports Windows Sound System compatibility
• Full Duplex operation
• Dynamic filtering reduces noise and distortion rate
• 16-bit digitized audio playback
• Built-in stereo speakers
- Digitized audio recording through the Notebook's built-in microphone or any external source
Audio Volume Control
The Notebook is equipped with hot-key volume controls: Pressing the [Fn]+[F6] hot-key combination decreases the audio output volume, press the [Fn]+[F5] hot-key combination increases the audio output volume.
Audio Software
Your notebook comes equipped with an integrated sound system capable of providing you with quality audio sound through the built-in speakers or through external speakers connected via the system ports.
Sound Recording
Your system allows you to record sounds and store them as files using the microphone via the microphone jack on the rear of the notebook computer. Check the Windows Help and Support Center in Windows for information on using the various elements in sound recording.

For a high-quality sound, click on the
"Volume Control" at the lower right end of your screen. From the Volume Control windows, click on the "Advanced" tab, click and select the "Microphone Boost" item.
Playing Sound Files
Your notebook can play audio files stored in MIDI, WAVE or MP3 file format. Check the Help and Support Center in Windows for information on the functions of the Media Player.
External Speakers and Microphone
The sound system is capable in providing high-quality sound to external speakers and receiving and processing sounds from an external microphone or external sound source.
Connecting Peripheral Devices
To expand your computing capabilities, you can add a variety of external devices to your computer.

Chapter 6
Internet Connection
There are numerous ways to connect to the Internet. This may vary from the user's working environment as well as system specifications.
• Using a modem and a telephone line (Optional)
• Using a wired LAN
• Using a wireless LAN
Using a modem for Connection to Internet (Optional)
- Use a telephone line to connect to the modem port of your computer. Do not use a digital telephone line.
- Please apply to an Internet Service Provider (ISP) for Internet service in order for you to connect the modem to the Internet and use e-mail.
NOTE....
For more detail on the Network key, please refer to your local ISP provider and follow the procedures describe in the "ISP Installation Guide" to proceed with the installation.
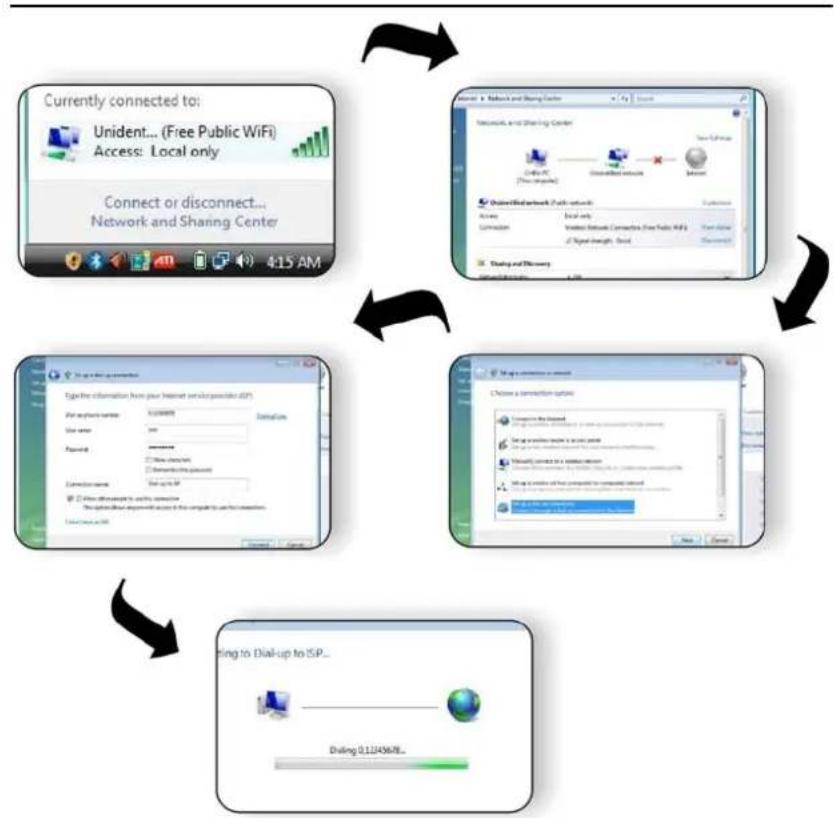
flowchart
graph TD
    A["Currently connected to: Unident... (Free Public WiFi) Access: Local only"] --> B["Connect or disconnect... Network and Sharing Center"]
    B --> C["To switch to a network connection"]
    C --> D["Select the information from your Internet service provider ISP. For example, user name: 100, Connection details: www.12345678"]
    D --> E["User access: http://www.12345678/12345679"]
    E --> F["User access: http://www.12345678/12345679/12345679/12345679/12345679/12345679/12345679/12345679/12345679/12345679/12345679/12345679/12345679"]
    F --> G["Linking to Dial-up to ISP..."]
    G --> H["Binding: 0.11JX43678..."]
Using a wired LAN for Connection to Internet
For you connect to the Internet, a wired LAN environment normally uses the company's LAN or a broadband modem.

Using Wireless LAN Network for Connection to Internet
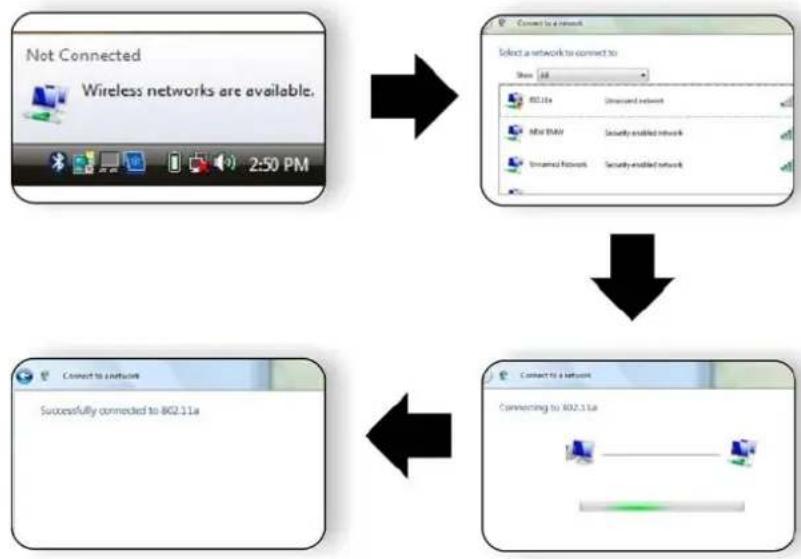
flowchart
graph TD
    A["Not Connected\nWireless networks are available."] --> B["Select a network to connect to:\nShow: 36\nRQ.11a\nUnsecured network\nNew RMA\nSecurity-enabled network\nUnsecured Network\nSecurity-enabled network\nOK..."]
    B --> C["Connect to a network\nSuccessfully connected to 802.11a"]
    C --> D["Connecting to 802.11a\nConnect to a network\nControl panel with progress bar"]

natural_image
Horizontal gradient bar with no text or symbols
Chapter 7
Running BIOS Setup
The Setup Utility is a hardware configuration program built into your computer's BIOS (Basic Input/Output System). It runs and maintains a variety of hardware functions. It is menu-driven software, which allows you to easily configure and change the settings.
The BIOS contains manufacture's default settings for the computer's standard operations. However, there are occasions when you may be required to modify the default settings in the BIOS. For example, you may need to configure the BIOS power management (APM) settings if you are using DOS, or non-Windows operating system.
The BIOS allows you to set up passwords to limit access to users. This is an important feature because a great deal of vital information is carried within the computer nowadays. Unauthorized access can be prevented. Later in this chapter, you will learn how to use this security feature.
Entering the BIOS Setup Screen
First turn on the power. When the BIOS performs the POST (Power-On Self Test), press F2 key quickly to activate the Phoenix BIOS Setup Utility.
NOTE....
You may need to press F2 key fairly quickly. Once the system begins to load Windows, you may have to retry by cycle-power on again
Leaving the BIOS Setup Screen
When you have finished modifying the BIOS settings, exit the BIOS. It takes a few seconds to record changes in the CMOS.
BIOS Action Keys
| Function Key | Command | Description |
| ESC | Exit | Leaves a sub-menu to return to the previous menu OR exits the BIOS setup while saving changes. |
| Enter | Go to Sub Screen Shows the Sub Menu | |
| F1 | General Help Shows the Help Screen | |
| F10 | Save and Exit | Saves changes and reboots the computer. |
| Select a field Selects the next field. | ||
| ↑ | Select an item Selects the next upper item. | |
| ↓ | Select an item Selects the next lower item. | |
| - | Lower value Selects the next value within a field. | |
| + | Higher value Selects the next value within a field. | |
Modifying the BIOS Settings
The Phoenix BIOS setup main menu is subdivided into sub-menus. Each menu item is described in this section.
Main Setup
Under this menu, you may change time/date and view basic processor and system memory information.
| PhoenixBIOS Setup Utility | ||||||
| Main | Info | Advance | Security | Power | Boot Exit | |
| System Time: [12:12:00]System Date: [02/12/2004]Standard IDE: [FUJITSU MHV2080BH-(S1)]Standard IDE: [TSSTcorpCD/DVDW TS-L632D-]System Memory: 640 KBExtended Memory: 1024 KB | Item Specific Help | |||||
| , ,orselects field. | ||||||
| F9 Setup Defaults | ||||||
| PhoenixBIOS Setup Utility | |
| Main | |
| Standard IDE : [FUJITSU MHV2080BH-(S1)] | Item Specific Help |
| Maximum Capacity: 80GB SATA1Transfer Mode: [FPIO 4 / DMA 2]Ultra DMA Mode: [Mode 5] | System Information |
| F1 Help ↑↓ Select Item -/+ Change Values F9 Setup DefaultsEsc Exit ↔ Select Menu Press Enter Select ▶ Sub-Menu F10 Save and Exit | |
| PhoenixBIOS Setup Utility | |
| Main | |
| Standard IDE : [TSSTcorpCD/DVDW TS-L632D-(PM)] | Item Specific Help |
| Transfer Mode: [FPIO 4 / DMA 2]Ultra DMA Mode: [Mode 5] | System Information |
| F1 Help ↑↓ Select Item -/+ Change Values F9 Setup DefaultsEsc Exit ←→ Select Menu Press Enter Select ▶ Sub-Menu F10 Save and Exit | |
Info Setup
| PhoenixBIOS Setup Utility | ||||||
| Main | Info | Advance | Security | Power | Boot | Exit |
| BIOS Information:BIOS Version: 0.02KBC Version: 0.01Processor:CPU Type Genuine Intel (R) CPU T2300CPU Info Intel Centrino (R) + Core (TM)Manufacturer: XXXXXXXXProduct Name: XXXXXXXX | Item Specific HelpSystem Information | |||||
| F1 Help ↑↓ Select Item -/+ Change Values F9 Setup DefaultsEsc Exit ↔ Select Menu Press Enter Select ▶ Sub-Menu F10 Save and Exit | ||||||
Advanced Setup
| PhoenixBIOS Setup Utility | ||||||
| Main | Info | Advance | Security | Power | Boot | Exit |
| Setup WarningSetting items on this menu to incorrect values may cause your system to malfunction. | Item Specific Help | |||||
| This feature activates a CPU support for the No Execution Memory Protection that is available in some O/S | ||||||
| Execute Disable Bit: [Enabled] [Enabled][Disabled] | ||||||
| F1 Help ↑↓ Select Item -/+ Change Values F9 Setup DefaultsEsc Exit ↔ Select Menu Press Enter Select ▶ Sub-Menu F10 Save and Exit | ||||||
Security
| PhoenixBIOS Setup Utility | |||||
| Main | Info | Advance | Security | Power | Boot Exit |
| Supervisor Password Is:User Password Is: | Not InstalledNot Installed | Supervisor Password controls access to the setup utility. | |||
| Set Supervisor PasswordSet User Password | [Enter][Enter] | ||||
| Password on boot: | [Enabled] | ||||
| F1 Help ↑↓ Select Item -/+ Change Values F9 Setup DefaultsEsc Exit ↔ Select Menu Press Enter Select ▶ Sub-Menu F10 Save and Exit | |||||
Power Setup
| PhoenixBIOS Setup Utility | |||||
| Main | Info | Advance | Security | Power | Boot Exit |
| Long Battery Life Mode: [Disabled]LCD panel power saving: [Enabled] | Item Specific Help | ||||
| Enable/Disable LongBattery Life Mode.Note:This's mode not supportCeleron (R) Processor. | |||||
| F1 Help ↑↓ Select Item -/+ Change Values F9 Setup DefaultsEsc Exit ↔ Select Menu Press Enter Select ▶ Sub-Menu F10 Save and Exit | |||||
Boot Setup
| PhoenixBIOS Setup Utility | ||||||
| Main | Info | Advance | Security | Power | Boot | Exit |
| LAN Remote Boot: [Disabled]► Boot Device Priority | Item Specific Help | |||||
| Select with LAN-Type is used for Boot. | ||||||
| F1 Help ↑↓ Select Item -/+ Change Values F9 Setup DefaultsEsc Exit ↔ Select Menu Press Enter Select ► Sub-Menu F10 Save and Exit | ||||||
Exit Setup
| PhoenixBIOS Setup Utility | ||||||
| Main Info Advance Security Power Boot Exit | ||||||
| Save Changes & ExitDiscard Changes & ExitGet Default ValuesLoad Previous Values | Item Specific Help | |||||
| Exit System Setup and save your changes to CMOS. | ||||||
| F1 Help ↑↓ Select Item -/+ Change Values F9 Setup DefaultsEsc Exit ↔ Select Menu Press Enter Select ▶ Sub-Menu F10 Save and Exit | ||||||

natural_image
Abstract horizontal gradient bars in blue, red, green, and gray (no text or symbols)
Chapter 8
VGA Utilities
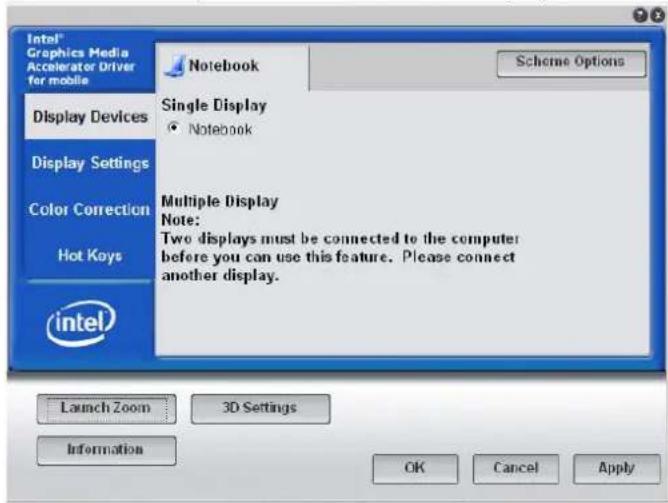
After you have restarted Windows, click on the "Intel® Graphics Media Accelerator Driver for Mobile" icon on the lower right corner of the screen.
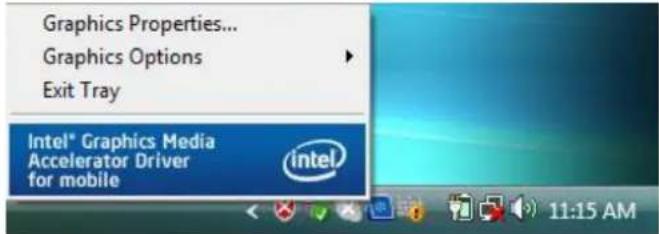
Click on the "Graphics Properties" to enter the "Intel® Graphics Media Accelerator Driver for Mobile" display window.
You can also click the touchpad or mouse right button and select the "Personalize" item.


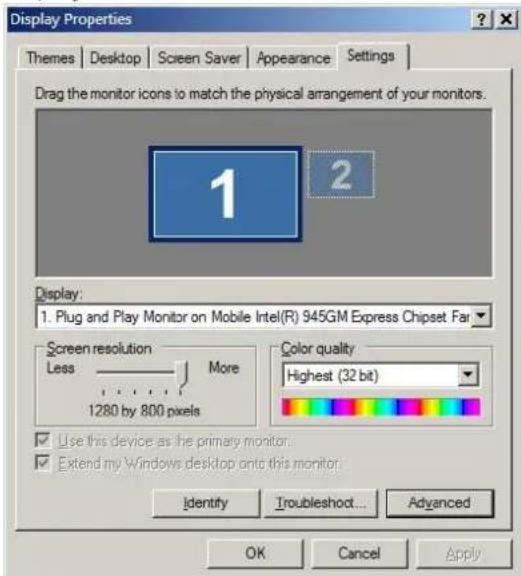
Select the "Display Settings" option to enter its window display. Click on the "Advanced Settings" tab to enter "Plug and Play Monitor on Mobile Intel® 945GM Express Chipset" window display.
Select the "Intel ® Graphics Media Accelerator Driver for Mobile" and click on the "Graphics Properties" tab.
Display Devices
This feature allows you to connect external display devices.
Display Settings
This feature allows you to adjust the color scheme, resolution, refresh rate for your display.

Color Correction
This feature allows you to adjust the color rate of your display.

Hot Keys
This feature allows you to set the corresponding hot keys in executing the program you frequently use.

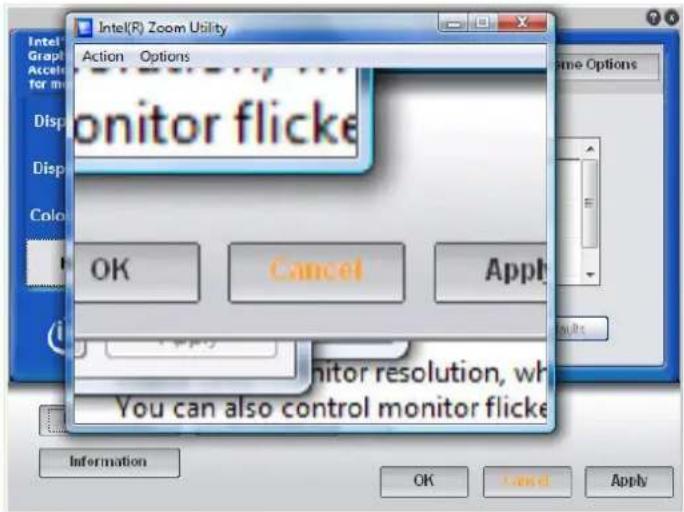
Launch Zoom
This features allows you to enlarge some parts that you would like to see for a clearer view.

natural_image
Abstract horizontal gradient bars in blue, red, green, and gray (no text or symbols)
Chapter 9
Troubleshooting
Your computer has been fully tested and complies with the system specifications before shipping. However, incorrect operations and/or mishandling may cause problems.
This chapter provides a reference for identifying and correcting common hardware and software problems that you may encounter.
When you encounter a problem, you should first try to go through the recommendations in this chapter. Instead of returning the computer and waiting for repair, you may easily solve the problems by considering the following scenarios and possible solutions. If the error continues, contact your reseller for service information.
Before taking further actions, consider the following suggestions:
- Check to see if the problem persists when all the external devices are removed.
- Check to see that the green light indicator on the AC adapter is lit.
- Check to see the power cord is properly plugged to the wall outlet and to the computer.
- Check to see the power indicator of the computer is on.
- Check to see if your keyboard is operational by pressing and holding any key.
- Check for any incorrect or loose cable connections. Make sure the latches on the connectors latch securely on to the receptor end.
-
Be sure you have not performed an incorrect setting on the hardware devices in the BIOS Setup utility. A faulty setting may cause the system to misbehave. If you are not sure of the changes you made, try to restore all the settings to factory defaults.
-
Be sure all the device drivers are installed properly. For example, without the audio driver properly installed, the speakers and microphone will not work.
- If external devices such as USB camera, scanner, printer do not function correctly when connected to the system, it is usually the device's own problem. Consult the device's manufacturer first.
- Some software programs, which have not gone through rigorous coding and testing, may cause problems during your routine use. Consult the software vendor for problem solving.
- Legacy peripheral are not plug-and-play capable. You need to restart the system with these devices powered up and connected first.
- Be sure to go to BIOS SETUP and load DEFAULT SETTING after BIOS re-flash.
- Be sure the Quick Key Lockout Switch on the bottom of the computer is not engaged; otherwise the quick keys will not work.
Audio Problems
No speaker output -
- Software volume control is turned down in Microsoft Sound System or is muted. Double-click the speaker icon on the lower right corner of the taskbar to see if the speaker has been muted or turned down all the way.
- Most audio problems are software-related. If your computer worked before, chances are software may have been set incorrectly.
- Go to [Start > Settings > Control Panel] and double-click the Sounds and Audio Devices icon. In the Audio page, make sure that the audio codec mentioned in the spec is the default playback device.
Sound cannot be recorded -
- You will need to plug-in an external microphone to the microphone connector to record sound.
- Double-click the speaker icon on the lower right corner of the taskbar to see if the microphone has been muted.
Click Options and select Properties.
Select Recording and click the OK button.
After Click OK button, the recording volume control panel will appear.
- Go to [Start > Settings > Control Panel] and double-click the Multimedia icon (or Sounds and Audio Devices icon). In the Volume or Audio page, make sure that the audio codec mentioned in the spec is the default recording device.
Hard Disk Problems
The hard disk drive does not work or is not recognizable
- If you had just performed a hard disk upgrade, make sure the hard drive connector is not loose and the hard disk drive is also correctly seated. Remove it and reinsert it firmly, and restart your PC. (Refer to Chapter 4 for details.)
- The new HDD may need to be partitioned and reformatted. O/S and drivers will need to be re-installed as well.
- Check the hard disk indicator LED. When you access a file, the LED lamp should light up momentarily.
- The new HDD may be defective or is not compatible.
- If your computer has been subjected to static electricity or physical shock, you may have damaged the disk drive.
The hard drive is making abnormal whining noises
- You should back up your files as soon as possible.
- Make sure the source of noise is indeed from the hard drive and not the fan or other devices.
The hard disk drive has reached its capacity
- Run Disk Cleanup utility in Windows. [Start > All Programs > Accessories > System Tools > Disk Cleanup] The system will prompt you for what to do.
- Archive files or programs that you had no longer used by moving them to an alternative storage medium (floppy disk, optical record-able disk, etc.) or uninstall programs that no longer use.
- Many browsers store files in the hard drive as a cache to speed up the performance. Check the program's Online Help for instructions on decreasing the cache size or on removing temporary Internet files.
- Empty the Recycle Bin to create more disk space. When you delete files, Windows saves them to the Recycle Bin.
The hard disk takes longer to read a file
- If you have been using the drive for a period, the files may be fragmented. Go to [Start > Programs > Accessories > System Tools > Disk Defragmenter] to perform a disk defragmentation. This operation may take a while.
- Interrupt requests or problems with other hardware devices may have occupied the CPU and therefore slows down the system performance.
The files are corrupted
- Run the Error-checking utility in Windows to check the HDD. Double-click My Computer. Right-click C: and select Properties. Click Check Now in Error-checking in Tools.
Optical Drive Problems
The optical drive does not work
- Try rebooting the system.
- The disk is damaged or files are not readable.
- After you have inserted a CD-ROM disk, it may take a moment before you can access its content.
The drive dose not read any disks
- The CD may not be properly seated in the tray. Make sure the disk is firmly seated onto the spindle.
- The disk is damaged or not readable.
The disk cannot be ejected
- Normally, it takes a few seconds to eject the disk.
- If the disk cannot be ejected, it may be mechanically jammed. Straighten out a paper clip and insert it to a tiny hole next to the eject button. This should reject the disk tray. If not, return the unit for repair. Do not forcefully pull on the disk tray.
The Combo or DVD RW drive (optional device) cannot record
- You need to purchase and install a burner utility program to record files to a blank media.
Display Problems
The display panel is blank when the system is turned on
- Make sure the computer is not in the Standby or Hibernate suspend modes. The display is turned off to conserve energy in these modes.
The screen is difficult to read -
- The display resolution should at least be set to at least 1024x768 for optimal viewing.
Go to [Start > Settings > Control Panel] and double-click the Display icon.
Under the Settings page, set screen resolution to at least 1024x800 and choose at least 256 colors.
The screen flickers -
- It is normal if the display flickers a few times during shutting down or powering up.
Keyboard and Mouse Problems
The built-in touch pad performs erratically -
- Make sure there is no excess perspiration or humidity on your hand when using the touch pad. Keep the surface of the touch pad clean and dry.
- Do not rest your palm or wrist on the surface of the touch pad while typing or using the touch pad.
The built-in keyboard accepts no input -
- If you are connecting an external keyboard to the system, the built-in keyboard may not work.
- Try restarting the system.
The characters on the screen repeat while I type.
- You may be holding the keys down too long while you're typing.
- Keep the keyboard clean. Dust and dirt under the keys could cause them to stick.
- Configure the keyboard to wait longer before the auto repeat feature starts.
To adjust this feature, Go to [Start > Settings > Control Panel], and double-click the Keyboard icon. A dialogue box shows up with the adjustable settings for the keyboard.
CMOS Battery Problem
A message “CMOS Checksum Failure” displays during the booting process or the time (clock) resets when booting
- Try to reboot the system.
- If the message “CMOS Checksum Failure” appears during the booting procedure even after rebooting, it may indicate failure of the CMOS battery. If so, you need to replace the battery. This battery normally lasts two to five years. The battery is of type CR2032 (3V). You may replace it by yourself. The battery is located under the System Device Cover on the bottom of the notebook. See Chapter 4 for more details.
Memory Problems
The POST does not show an increased memory capacity when you have already installed additional memory
- Certain brands of memory module may not be compatible with your system. You should ask your vendor for a list of compatible DIMM.
- The memory module may not be installed properly. Go back to Chapter 4 to review the details of this operation.
- The memory module may be defective.
The O/S issues an insufficient memory error message during operation
- This is often a software or Windows-related problem. A program is draining the memory resources.
- Close the application programs you're not using and restart the system.
- You need to install additional memory module. For instructions, go to Chapter 4 Upgrading Your Computer.
PC Card / PCMCIA Problems

Some system may not have the PC Card
PC Cards do not function-
- Make sure you have properly installed the driver for the card.
- Consult the card's manual or contact the vendor for troubleshooting.
The PC card cannot be recognized -
- Make sure the card is fully inserted; the outer end of the card should be even with the edge of the computer.
- Remove and insert the PC card again.
- Make sure there is no IRQ conflict with the card. See Windows on-line help for solving IRQ conflicts.
- Reboot the computer and see if the problem persists.
- The card may be defective. Try the card on another system, if possible.
Windows crashes or freezes when you remove the PC card-
- Make sure you have
Performance Problems
The computer becomes hot -
- In a 35 °C environment, the certain areas of the computer's back case are expected to reach 50 degrees.
• Make sure the air vents are not blocked. - If the fan does not seem to be working at high temperature (50 degrees Celsius and up), contact the service center.
- Certain programs that are processor-intensive may increase the computer temperature to a degree where the computer automatically slows down its CPU clock to protect itself from thermal damage.
The program appears stopped or runs very slowly -
- Press CTRL+ALT+DEL to see if an application is still responding.
-
Restart the computer.
-
This may be normal for Windows when it is processing other CPU-intensive programs in the background or when the system is accessing slow-speed devices such as floppy disk drive.
- You may be running too many applications. Try to close some applications or increase system memory for higher performance.
- The processor may have been overheated due to the system's inability to regulate its internal heat. Make sure the computer's ventilation grills are not blocked.
USB2.0 Problems
The USB device does not work -
- Check the settings in the Windows Control Panel.
- Make sure you have installed the necessary device drivers.
- Contact the device vendor for additional support.

Appendix A
Specification
Operating System
Support Windows XP Home Edition (32-bit)
Support Linux Fedora evaluation to be bootable
Support Windows Vista
Processor
Yonah Dual Core Processor, 2MB L2 cache
Yonah single Core Processor, 2MB L2 cache
Merom Processor (T5000 Serires), 667 MHz FSB, 2MB L2 Cache
Merom Processor (T7000 Serires), 667 MHz FSB, 4MB L2 Cache
Memory
DDR2 533/667
DDR2 RAM socket * 2
System DDR II SDRAM Up to 2GB total
Core Logic
Intel 945GM (Calistoga) + ICH7-M (82801GBM)
VGA
Intel 945GM
Audio codec
Realtek ALC883
New Card
Support new card type II, 54/34 mm
PCI-E /USB 2.0 interface
IEEE 1394/Card Reader
Support IEEE 1394 and 1394a with Open HCI Compliance
PCI V2.2 MAC/BIU supports
TV Encoder
Analog TV-out interface support, on-chip DAC
NTSC/PAL encoder standard formats support
Composite video with S-Video
Support for Macrovision 7.1 copy protection standard-a fully programmable timing capability
LAN Controller
Realtek RTL8100CL - Supports 10 and 100 Mb/sec. Full and half Duplex operation.
Modem
56K MDC Modem card with Azalia standard support
MDC 1.5 interface
Wireless LAN
Intel® PRO/Wireless 3945ABG - Mini-card type, USB-interface,PCI-E interface
IEEE 802.11b/g standard compliant
Keyboard
87/86 Keys K/B, KBD Dimension: 285 mm x 106.65mm
86 keys for US KB; 87 Keys for JP. UK, FR
Pointing Device
Elantek/Synaptics
LCD
14.1" WXGA, resolution 1280 x 800
Glare type panel
HDD
Support SATA 1.0 and 5400 RPM, 1 x 2.5" (9.5mm) HDD
40GB/60GB/80GB/100GB/120GB
Optical Device
DVD Dual, Double Layer
Combo drive
GBAS support (Bezel w/o printing)
Battery
4/6 Cells
AC-DC Adapter
Automatics Voltage adjustment between 100 and 240VAC 50/60Hz 65 Watts
Supports 2 pins adapter
Speaker
Build-in 2 speakers
Speaker: 1.5W and 4 ohm WWW
System BIOS
Support PnP, APM 1.2 & ACPI 2.0
Support external USB flash memory card boot up.
Power Management
"Smart Power II" Power Management
Proprietary Technology of Battery Life and System performance Extension
The technology is includes prolong battery life mode, Silent mode Silent mode: Noise frequency under 28dB
Measurements
Dimension: (W*L*H) 334mm x 244mm x 32.5 mm(front) \~ 38.5mm (back w/battery)
Weight: Less than 2.4kg w/ 6-cell battery
EMI Regulation
CCC, FCC Part 15b report, CE
Safety Regulation
CCC, CB, UL/CUL
RF Regulation
CCC, Approval from Subtel for Chile, FCC part 15C
Telecom Regulation
MII, Approval from Subtel for Chile, FCC PART 68


- Preface
- Limitation of Liability
- Notices
- NOTE....
- Notice:
- Table of Content
- CHAPTER 1: BEFORE YOU START....1
- CHAPTER 2: INTRODUCTION ....11
- CHAPTER 3: GETTING STARTED ....17
- CHAPTER 4: USING THE NOTEBOOK COMPUTER ....21
- Chapter I
- Before you Start
- Conventions of This Manual
- Safety Precautions
- selection.
- For U.S. and Canada:
- For Japan:
- For Other Countries:
- When using your telephone equipment, basic safety precautions should always be followed to reduce the risk of fire, electric shock and injury to persons. These precautions include the following:
- Class 1 Laser Product
- Appareil A Laser De Classe 1
- CAUTION...
- VORSICHT...
- Things you must remember before working on your computer
- Let your computer acclimate itself
- WARNING....
- Heat, Cold, Humidity, and Glare
- Suitable place to work
- Chapter 2
- Welcome to the Notebook PC
- Getting to Know Your Computer
- panel:
- LED Status Indicator
- Right View
- Left View
- Bottom View
- Chapter 3
- Getting Started
- Connecting to a Power Source
- Connecting the AC Adapter
- Turning On Your Notebook Computer
- Operating on Battery Power
- Installing and Removing the Battery Pack
- Charging the Battery Pack
- Chapter 4
- Using the Notebook Computer
- Adjusting the LCD Screen Display
- KEYS FUNCTIONS
- LCD Care
- External CRT Display
- The TouchPad
- TouchPad Precautions
- The DVD Dual
- Features of the DVD Dual
- Precautions for Handling CD Discs
- Loading a Disc
- Power Saving Modes
- The Battery Power System
- Removing the Battery Pack
- Preparing the Battery Pack for Use
- Automatic Battery Pack Charging Function
- Battery Status
- Battery Low Warning
- Small Battery for the Real Time Clock
- Resetting the System
- Adjusting the Brightness
- Using the Windows
- Help Windows
- Desktop
- Recycle Bin
- Start Button
- Taskbar
- Notification
- Control Panel
- Chapter 5
- Desktop Operation
- Audio
- The Multimedia Sound System
- Audio Volume Control
- Audio Software
- Sound Recording
- Playing Sound Files
- External Speakers and Microphone
- Connecting Peripheral Devices
- Chapter 6
- Internet Connection
- Using a modem for Connection to Internet (Optional)
- Using a wired LAN for Connection to Internet
- Chapter 7
- Running BIOS Setup
- Entering the BIOS Setup Screen
- Leaving the BIOS Setup Screen
- Modifying the BIOS Settings
- Main Setup
- Chapter 8
- Display Devices
- Display Settings
- Color Correction
- Hot Keys
- Launch Zoom
- Chapter 9
- Troubleshooting
- Audio Problems
- No speaker output -
- Sound cannot be recorded -
- Hard Disk Problems
- The hard disk drive does not work or is not recognizable
- The hard drive is making abnormal whining noises
- The hard disk drive has reached its capacity
- The hard disk takes longer to read a file
- The files are corrupted
- Optical Drive Problems
- The optical drive does not work
- The drive dose not read any disks
- The disk cannot be ejected
- The Combo or DVD RW drive (optional device) cannot record
- Display Problems
- The display panel is blank when the system is turned on
- The screen is difficult to read -
- The screen flickers -
- Keyboard and Mouse Problems
- The built-in touch pad performs erratically -
- The built-in keyboard accepts no input -
- The characters on the screen repeat while I type.
- CMOS Battery Problem
- A message “CMOS Checksum Failure” displays during the booting process or the time (clock) resets when booting
- Memory Problems
- The POST does not show an increased memory capacity when you have already installed additional memory
- The O/S issues an insufficient memory error message during operation
- PC Card / PCMCIA Problems
- PC Cards do not function-
- The PC card cannot be recognized -
- Windows crashes or freezes when you remove the PC card-
- Performance Problems
- The computer becomes hot -
- The program appears stopped or runs very slowly -
- USB2.0 Problems
- The USB device does not work -
- Appendix A
- Specification
- Operating System
- Processor
- Memory
- Core Logic
- VGA
- Audio codec
- New Card
- IEEE 1394/Card Reader
- TV Encoder
- LAN Controller
- Modem
- Wireless LAN
- Keyboard
- Pointing Device
- LCD
- HDD
- Optical Device
- Battery
- AC-DC Adapter
- Speaker
- System BIOS
- Power Management
- Measurements
- EMI Regulation
- Safety Regulation
- RF Regulation
- Telecom Regulation
Brand : ECS
Model : L41SA
Category : Laptop