HB-3001BYT - Microwaves LG - Free user manual and instructions
Find the device manual for free HB-3001BYT LG in PDF.

User questions about HB-3001BYT LG
0 question about this device. Answer the ones you know or ask your own.
Ask a new question about this device
Download the instructions for your Microwaves in PDF format for free! Find your manual HB-3001BYT - LG and take your electronic device back in hand. On this page are published all the documents necessary for the use of your device. HB-3001BYT by LG.
USER MANUAL HB-3001BYT LG
natural_image
Technical illustration of a microwave oven with lid open, showing internal components and control panel (no text or labels)natural_image
Simple line drawing of a kitchen machine with directional arrows indicating motion (no text or symbols)natural_image
Illustration of a kitchen appliance with a hand cleaning the top panel and three cabinets, no text or symbols present.natural_image
Illustration of a baby sitting on the floor next to a washing machine with warning symbols (no text or labels)natural_image
Simple line drawing of a box with a cross mark and cartoon eyes, emitting smoke (no text or symbols)natural_image
Line drawing of a coffee maker with a lid open, showing its open lid and base (no text or symbols)natural_image
Illustration of a hand washing a water dispenser with steam rising (no text or symbols)natural_image
Line drawing of a bucket being washed with a faucet, no text or symbols presentnatural_image
Cartoon illustration of a steaming machine emitting exhaust smoke, with hands waving and a plug inserted (no text or symbols)natural_image
Cartoon illustration of a toaster with a phone and crossed-out hand gesture (no text or symbols)natural_image
Line drawing of a hand washing a small appliance with hands and legs raised (no text or symbols)natural_image
Illustration of a knife and fork next to a cooking pot with hands (no text or symbols)natural_image
Line drawing of a coffee maker with open lid and side arm, showing steam rising from the cup (no text or symbols)natural_image
Line drawing of a hand washing a small object inside a square container (no text or symbols)natural_image
Line drawing of a kitchen appliance with a hand holding a bucket and lid open, showing internal components (no text or symbols)natural_image
Line drawing of a kitchen appliance with a hand placing food into a bowl (no text or symbols)natural_image
Illustration of hands using a tool to remove a textured substance from a tray (no text or symbols)ВНИМАНИЕ:
natural_image
Illustration of a hand using a pen to clean or spread food on a plate (no text or symbols)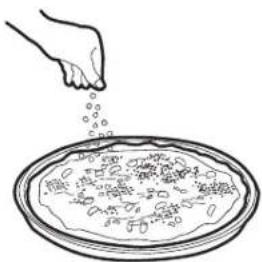
natural_image
Simple line drawing of a hand pouring liquid onto a plate with food items (no text or symbols)
natural_image
Line drawing of hands pressing a piece of bread on a tray (no text or symbols)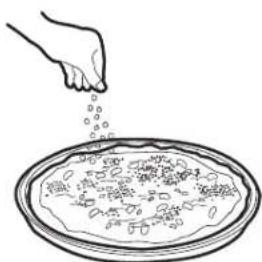
natural_image
Line drawing of a hand pouring granular material into a bowl (no text or symbols)
Багели Тесто
RU
natural_image
Illustration showing four steps of food preparation: mixing, pouring, boiling with a spoon, and pouring from a bowl (no text or symbols)natural_image
Simple line drawing of two hands holding a circular plate with a small cross symbol at the center (no text or symbols)
natural_image
Line drawing of two hands stretching a cylindrical object with floating spheres (no text or symbols)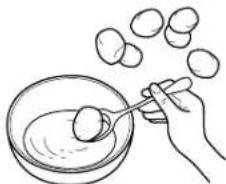
natural_image
Simple line drawing of a hand pouring liquid into a bowl with a spoon (no text or symbols)natural_image
Illustration showing four steps of food preparation: slicing rice, rolling dough, cutting with a knife, and boiling with rolled dough (no text or symbols)natural_image
Simple line drawing of a hand pressing down on a circular object, with no text or symbols present.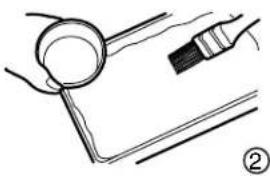
natural_image
Simple line drawing of a tool interacting with a magnifying glass (no text or symbols)
natural_image
Line drawing of two hands pressing down on a pile of round objects (no text or symbols)③

natural_image
Illustration of a hand pressing down on a circular object with two separate oval shapes nearby (no text or symbols)text_image
Technical diagram of a coffee maker with labeled parts and measurement scales for volume and cup.-10. Кришка
natural_image
Simple line drawing of a smiling radio machine with directional arrows indicating airflow or movement (no text or symbols)text_image
Illustration showing a hand holding a plug and a fuse with an electrical switch, accompanied by text indicating electrical hazard or resistance.natural_image
Illustration of a kitchen appliance with a hand cleaning the front panel and a tray, no text or symbols present.natural_image
Illustration of a child reacting to a large machine with warning symbols (no text or labels)natural_image
Cartoon illustration of a steaming machine with a cross symbol on its side (no text or symbols present)natural_image
Illustration of a hand using a small container to clean or wash the product (no text or symbols visible)natural_image
Illustration of a person using a water dispenser to clean or manage the surface, with a faucet and hand visible (no text or symbols)natural_image
Line drawing of a bucket being washed with a faucet, no text or symbols presentnatural_image
Cartoon illustration of a steamer with steam rising and falling, emitting exhaust smoke, next to a plug (no text or symbols)natural_image
Cartoon illustration of a steaming toaster with steam rising, next to a smartphone (no text or symbols)natural_image
Illustration of a knife and fork next to a bucket with hands, no text or symbols presentnatural_image
Line drawing of a microwave oven with a lid open, showing internal components and a handle (no text or symbols)natural_image
Line drawing of a hand washing a small container with a handle (no text or symbols)natural_image
Line drawing of a kitchen appliance with a hand holding a tool, showing internal components and a lid open (no text or symbols)natural_image
Illustration of a hand placing a food item into a microwave oven (no text or symbols)natural_image
Illustration of hands using a tool to remove or remove a sample from a tray (no text or symbols)УВАГА:
text_image
Technical diagram of a coffee maker with labeled parts and measurement scales for volume measurement.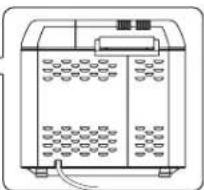
Керек-жарактар:
natural_image
Cartoon illustration of a steaming toaster with steam rising, next to a sun and a falling figure (no text or symbols)natural_image
Simple line drawing of a smiling radio machine with directional arrows indicating airflow or movement (no text or symbols)natural_image
Illustration of a kitchen appliance with a refrigerator and kitchenware on a cabinet (no text or symbols)natural_image
Illustration of a baby sitting on the floor next to a distressed refrigerator with warning symbols (no text or labels)natural_image
Cartoon illustration of a character with a cross mark inside a box, surrounded by smoke and small objects (no text or symbols)natural_image
Line drawing of a microwave oven with a lid open, showing the lid and interior (no text or symbols)natural_image
Illustration of a person washing a water dispenser with a faucet above (no text or symbols)natural_image
Line drawing of a bucket on a sink with a faucet above (no text or symbols)natural_image
Cartoon illustration of a steamer with steam rising and waving, connected to a plug (no text or symbols)natural_image
Illustration of a cartoon toaster with steam and smoke, next to a smartphone displaying a grid (no text or symbols)natural_image
Line drawing of a hand operating a washing machine with a lid open (no text or symbols)natural_image
Illustration of a fork and knife next to a bucket with hands, no text or symbols presentnatural_image
Line drawing of a microwave oven with a lid open, showing internal components and heat dissipation (no text or symbols)natural_image
Line drawing of a hand washing a small object inside a container (no text or symbols)natural_image
Line drawing of a kitchen appliance with a lid and side panel, showing a hand holding a tool above the lid (no text or symbols)natural_image
Line drawing of a kitchen appliance with a bowl containing granular material being placed into a tray (no text or symbols)natural_image
Illustration of hands using a tool to interact with a small object, no text or symbols presentECKEPTY:
Automatic Breadmaker
text_image
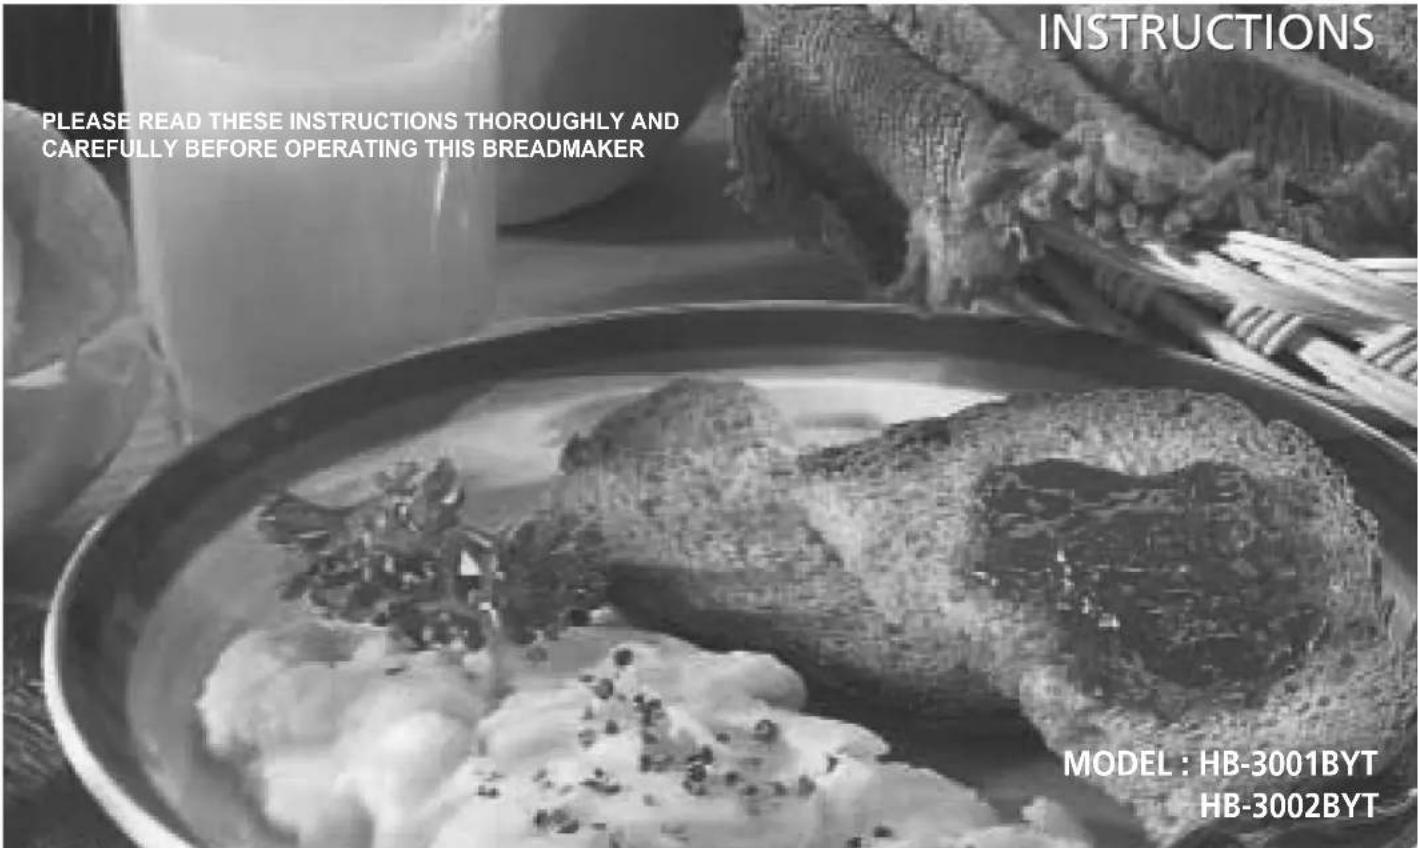
INSTRUCTIONS PLEASE READ THESE INSTRUCTIONS THOROUGHLY AND CAREFULLY BEFORE OPERATING THIS BREADMAKER MODEL : HB-3001BYT HB-3002BYTTABLE OF CONTENTS
IMPORTANT SAFEGUARDS.... 195
BEFORE YOUR FIRST USE 196
SPECIFICATIONS....197
BREAD MACHINE INTRODUCTION 198
- Parts 198
• Control Panel....199 - Program Specifications.... 200
CLEANING INSTRUCTIONS....202
INGREDIENTS....203
OPERATION 205
- Programming Bread.... 205
- Programming Cake....208
- Programming JAM 209
- Programming Dough....210
- Programming Yogurt....211
- Programming Butter 212
- Programming The Delay Timer (Bread or Dough) 213
- Baking Control (Bread) 214
BEFORE CALLING FOR SERVICE 215
- Questions and Answers.... 215
- Check List 216
EN
IMPORTANT SAFEGUARDS
When using electrical appliances, basic safety precautions should always be followed to reduce the risk of fire, electric shock and injury to persons, including the following:
- Read all instructions before using this appliance.
- If the supply cord is damaged, it must be replaced by the manufacturer or its service agent or similarly qualified person in order to avoid a hazard.
- To protect against electric shock do not immerse cord, plug, or appliance in water or other liquid (see instructions for cleaning).
- Do not touch hot surfaces. Always use oven mitts when handling the hot bread pan or bread.
- Close supervision is necessary when this appliance is used near children.
- This appliance is not for use by children. Keep out of reach of children.
- Unplug from outlet when not in use and before cleaning. Allow to cool before attaching or removing parts.
- Avoid touching moving parts. Do not remove the bread pan or insert hand into the bread pan during operation. Stop pad must be pressed if bread pan is to be removed before completion.
- Do not operate the appliance with a damaged cord or plug, or after the appliance malfunctions, or has been dropped or damaged in any manner. Return appliance to the nearest authorized service facility for examination, repair, electrical or mechanical adjustment.
- Do not use outdoors or while standing in damp area.
- Do not let cord hang over edge of table or counter or touch hot surfaces.
- Do not place on or near hot gas or electric burner or in a heated oven.
- To unplug with unit switched off, grip the plug and pull out from the wall outlet. Never pull on the cord.
- Do not use appliance for other than intended use.
- This product is intended for household use only.
- Do not clean with metal scouring pads. Pieces can break off metal pad and may touch electrical parts, creating a risk of electrical shock.
- Bread machine must be placed at least 10cm from walls and edge of the counter.
- Do not cover bread machine with anything which would prevent the steam escaping. This may cause warpage, discoloration, malfunction or even fire.
- This product may be dangerous to the environment, and the health, life and the property of the consumer during, and on expiration of its working life.
- Do not touch hot surfaces(Inside/Outside Body and Lid) during or after use. You may get a burn.
- When the product is first used (particularly when the heater is heated), the heater or other inner components may be heated to cause the burning smell or sound. There is no problem that you may feel comfortable and safe in using the product.
SAVE THESE INSTRUCTIONS
THIS PRODUCT FOR HOUSEHOLD USE ONLY.
CAUTION : A short power supply cord is provided to reduce the risk of personal injury resulting from becoming entangled in or tripping over a longer cord. Extension cords are available from local hardware stores and may be used if care is exercised in their use. If an extension cord is required, special care and caution is necessary. Also the cord must be: (1) marked with an electrical rating of 250 V, and at least 13 A., 3250 W., and (2) the cord must be arranged so that it will not drape over the countertop or tabletop where it can be pulled on by children or tripped over accidentally.
ELECTRIC POWER : If the electric circuit is overloaded with other appliances, your bread machine may not operate properly. The bread machine should be operated on a separate electrical circuit from other operating appliances.
Carefully unpack the bread machine and remove all packaging materials. To remove any dust that may have accumulated during packaging, Wipe the bread pan and kneading blade. Do not immerse. (See cleaning instruction on page 7.) Wipe the outside of the bread machine with a damp cloth. Do not use harsh or abrasive cleaners on any part of the bread machine.
Place the bread machine on a dry, stable surface away from burners and away from areas where cooking grease or water may splatter onto it. Plug the bread machine into a 230V\~50Hz outlet
IMPORTANT SAFETY TIPS
- Unplug unit and allow to cool. Remove any flour, bread crumbs or other materials from the inside of the inner case using a damp sponge, cloth or a small, portable vacuum cleaner.
- The bread machine will bake up to a 1.0 kg loaf of bread. Do not put a larger quantity of ingredients into the bread pan than recommended. If you do so, the bread may not mix or bake correctly and the bread machine may be damaged. the maximum amount of flour to be used is as follows:
BAKE settings – approximately 4 cups
Prepackaged bread mixes – approximately 4 cups
DOUGH setting – approximately 4 14 cups
- Handle the bread pan with care. Remove the bread pan by pulling straight up on the handle. Do not turn or shake the bread pan while taking it out. If the bread pan is damaged or bent, the temperature sensor will not work properly. Handle hot bread pan using pot holders or oven mitts.
SPECIFICATIONS
| Power supply | AC 230V / 50Hz | |
| Power Consumption | Heater | 560 W |
| Kneading Motor | 100 W | |
| Dimension (W × D × H) | 347 × 231 × 394 mm | |
| Weight | Approx. 8.0kg | |
| Timer | 13 hours digital timer | |
| Cord | APPROX. 3' 3.4"(1.0M) | |
| Thermal Fuse | Main Heater Protector | 291°F / 144°C |
| Kneading Motor Protector | 275°F / 135°C | |
BREAD MACHINE INTRODUCTION
Parts
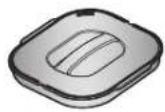
Butter lid
- Use this only when Butter menu is selected.
- Do not use this for any other purposes.
- Never boil this.
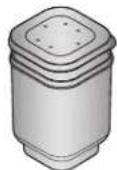
Yogurt fermentation container and lid
- Use these only when the Yogurt menu is selected.
- Do not use these for any other purposes.
- Never boil these.
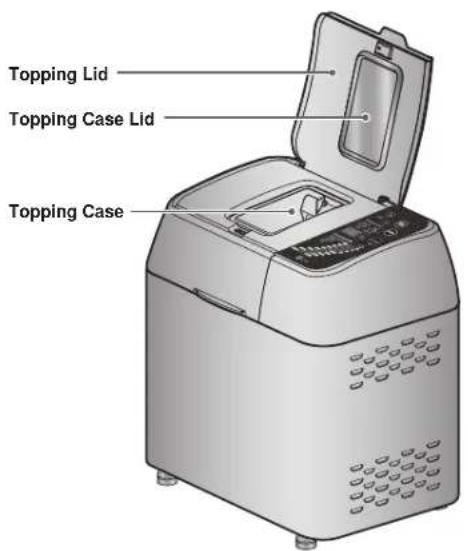
text_image
Topping Lid Topping Case Lid Topping Case
text_image
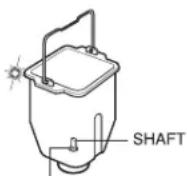
Bread Pan Handle Kneading Blade (Flat side down) Bread Pan Shaft (Rotates the kneading blade) Lid Air Exhaust (Air is vented through these outlets) Control Panel■ Control Panel
TIMER
Press timer pad to set the time delay. The time will advance in 10 minutes interval from 4:10 to 13:00. This timer can not be used for KEKC/AXEM(CAKE/JAM) program.
REMAINING TIME INDICATOR
This displays the remaining time for the program to be completed.
BREAD PROGRAM INDICATOR
When PROGRAM SELECT pad is pressed, BREAD PROGRAM INDICATOR will display 1,2,..9 or 10 to indicate the selected program. After IYCK(START) pad is pressed, the indicator will disappear.
BREAD PROGRAM INDICATOR
This LED displays the selected BREAD PROGRAM. 1. РУССКИЙ ПОВАР (RUSSIAN COOK) 2. ОСНОВНОЙ (BASIC BREAD) 3. СПЕЦИАЛЬНЫЙ (SPECIALTY BREAD) 4. ФРАНЦУЗСКИЙ (FRENCH BREAD) 5. БЫСТРЫЙ (RAPID BREAD) 6. КЕКС (CAKE) 7. ДЖЕМ (JAM) 8. ТЕСТО (DOUGH) 9. Йогурт(YOGURT) 10. Масло (BUTTER)
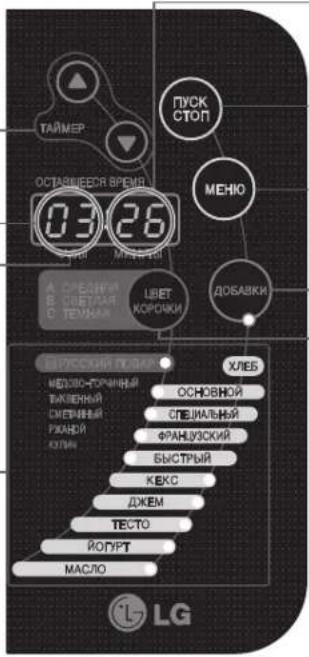
When BAKING CONTROL pad is pressed, BAKING CONTROL INDICATOR will display A,B, or C to indicate the selected baking control. After PYCK(START) pad is pressed, the indicator will disappear.
START
After setting the desired program, the baking control and timer (if needed), press this pad to start the program or timer count down.
CANCEL or STOP
Press this pad to cancel a program. If you make a mistake when setting the delay timer, program, or baking control, press CTON (CANCEL) pad and reenter the correct program.
BREAD PROGRAM SELECTOR
Press this pad to select BREAD PROGRAM.
TOPPING PROGRAM SELECTOR Press this pad to select Auto Topping.
BAKING CONTROL
Press this pad to select dark, medium or light crust.
NOTE : If you want to cancel the selected program, press the CTON (CANCEL) pad for more than 1 second at any time during the cycle.
■ Program Specifications.
| ProgramProcess | RussianCook | Basic Specialty French Rapid Cake Jam Dough Yogurt Butter | ||||||||
| 1Timer Set | 4:10-13:00 | 4:10-13:00 | 4:10-13:00 | 4:10-13:00 | 4:10-13:00 | - - 4:10 | -13:00 | - - | ||
| 2Timer Set | - | - | - | 20min | - | - | 10 min | - | 6~8:00 | - |
| 3Timer Set | 7 min | 7 min | 7 min | 13 min | 7 min | - | - | 6 min | - | - |
| 4Timer Set | 5 min | 5 min | 5 min | 50 min | 5 min | - | - | 5 min | - | - |
| 5Timer Set | 12 min | 12 min | 12 min | 12 min | 7 min | - | - | 12 min | - | 1:00 |
| 6Timer Set | 40 min | 40 min | 40 min | 20 min | 13 min | - | - | 40 min | - | - |
| 7Timer Set | 4 sec | 4 sec | 4 sec | 4 sec | 4 sec | - | - | 4 sec | - | - |
| 8Timer Set | 26 min | 26 min | 26 min | 15 min | - | - | - | - | - | - |
| 9Timer Set | 4 sec | 4 sec | 4 sec | 4 sec | - | - | - | - | - | - |
| 10Timer Set | 50 min | 50 min | 50 min | 40 min | 52 min | - | - | - | - | - |
| 11Timer Set | 50 min | 50 min | 50 min | 50 min | 35 min | 60 min | 60 min | - | - | - |
| 12Timer Set | 20 min | 20 min | 20 min | 20 min | - | 10 min | 10 min | - | - | - |
| 13Timer Set | 3 hours | 3 hours | 3 hours | 3 hours | 3 hours | 3 hours | - | - | - | - |
| 14Timer Set | End | End | End | End | End | End | End | End | End | End |
| TOTAL | 3:30 | 3:30 | 3:30 | 4:00 | 1:59 | 1:10 | 1:20 | 1:03 | 6~8:00 | 1:00 |
-Topping operation can be configured or cancelled by using 'topping' button in Russian Cook. When topping operation is configured, topping operation starts automatically with no separate signal 15 minutes after operation starts (9 minutes before 2nd kneading completion) and ingredients are inserted. When topping operation is not configured, beep sounds 8 times 15 minutes after operation starts (9 minutes before 2nd kneading) and at this time, top cover can be opened to insert additional ingredients. At this point, display shows [3:15].
Topping operation is automatically configured in specialty program and cannot be cancelled. When topping operation is configured, topping operation starts automatically with no separate signal 15 minutes after operation starts (9 minutes before 2nd kneading completion) and additional ingredients are inserted. At this point, display shows [3:15].
Topping operation can be configured or cancelled using 'topping' button in French program. When topping operation is configured, topping operation starts automatically with no separate signal 1 hour 26 minutes after operation starts (9 minutes before 2nd kneading completion) and ingredients are inserted. When topping operation is not configured, beep sounds 8 times 1 hour 26 minutes after operation starts (9 minutes before 2nd kneading completion) and at this time, top cover can be opened to insert additional ingredients. At this point, display shows [2:34].
Topping operation can be configured or cancelled using 'topping' button in Rapid Program. When topping operation is configured, topping operation starts automatically with no separate signal 14 minutes after operation starts (5 minutes before 2nd kneading completion) and additional ingredients are inserted. When topping operation is not configured, beep sounds 8 times 14 minutes after operation starts (5 minutes before 2nd kneading completion) and at this time, top cover can be opened to insert additional ingredients. At this point, display shows [1:45].
- The beeper sounds 4 times at the end of Baking process.
- The beeper sounds 8 times at the end of cooling process to indicate the bread is done.
- The beeper sounds 8 times at the end of Hold warm process.
- Jam cycle takes 1 hour and 20 minutes to complete. After preheating for 10 minutes, the fruits for Jam is heated with kneading for an hour. And then, the Jam will keep cool for 10 minutes with kneading.
CLEANING INSTRUCTIONS
CLEANING (Always unplug unit)
ANY SERVICING REQUIRING DISASSEMBLY, OTHER THAN THE CLEANING DESCRIBED BELOW, SHOULD BE PERFORMED BY AN AUTHORIZED SERVICE REPRESENTATIVE.
- Avoid using any cleaning agent other than dish detergent.
- Do not use steel wool or other abrasive materials.
- Do not wash any of the removable parts in the dishwasher.
- Do not immerse the bread pan in water. Wipe clean with a damp cloth, then dry thoroughly.
Otherwise, the kneading process will not operate or noise will be occur during kneading.
- Wipe the shaft with a soft cloth or sponge to prevent damage to the seal packing.
- Allow to dry before storing the pan inside the bread machine.
- It is not necessary to remove the kneading blade for cleaning. But if you wish to, it can be removed after each use.
- Wipe the exterior with a damp dishcloth after each use. Do not immerse in or splash with water.
- After using, cool and wipe out the oven interior with a damp dishcloth or plastic scouring pad.
- To remove the kneading blade, fill the pan with hot soapy water and allow it to soak for 20 minutes.
Wash it with a soft brush or cloth and dry thoroughly.
- Do not use metal utensils inside the machine.
They will damage the non-stick coating. If the bread sticks to the lid, use a plastic pancake turner to clean.
NOTE : The non-stick coating may change color over time. This is caused by moisture and steam and in no way affects performance.
SEAL PACKING

KNEADING BLADE
STORING
- Be sure bread machine is completely cooled before storing.
- All removable parts should be thoroughly cleaned and dried.
- Store bread machine with lid closed.
INGREDIENTS
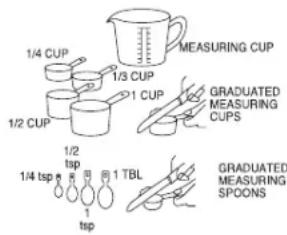
Measure accurately for successful bread machine bread loaves. Mismeasuring, even slightly, can make a big difference in your results. Measure each ingredient precisely before placing it into the bread pan.
- To measure liquids, use a clear glass or plastic liquid measuring cup. Read the measurement at eye level.
- To measure flour, spoon into a standard dry ingredient measuring cup and level with a straight edge. Do not sift flour or pack in measuring cup.
- Use standard measuring spoons and level with a straight edge.
■ Yeast : Active Dry Yeast or Bread Machine Yeast can be used in the LG Automatic Breadmaker. In Recipes of this Manual, Yeast means Instant Dry Yeast.
This can be purchased in small packets, jars, cans, or in bulk at health food store. Cake yeast cannot be used. because yeast can grind against itself and become very fine, it is packaged by weight and not by volume. (1/4 oz.) package of yeast contains approximately 2 1/4 level teaspoons of yeast. The activity of
yeast will deteriorate when it is exposed to oxygen, moisture, or warmth. Therefore, yeast needs to be stored airtight, refrigerated or frozen. Yeast is granular and comes to room temperature very quickly. Be sure to check the expiration date on the yeast since aged yeast usually performs poorly. Measure yeast accurately for best results and follow the quantities given in each individual recipe.
text_image
1/4 CUP 1/3 CUP MEASURING CUP 1/2 CUP 1 CUP GRADUATED MEASURING CUPS 1/2 tsp 1/4 tsp 1 tsp 1 TBL GRADUATED MEASURING SPOONS■ Flour: Bread Flour is Essential
All types of flour are affected by many factors, such as milling grades, moisture content, length of storage, and manufacturing processes. adjustments to the recipes may need to be made to compensate for climatic changes in different regions to ensure an excellent loaf.
Bread flour is a definite necessity. Milled from hard wheat, it has a higher protein content that makes it more durable than all-purpose flour. The protein, when mixed with liquid, becomes gluten. When kneaded, gluten becomes elastic and gives the breads better structured contrast, all-purpose flour, milled from a combination of soft and hard wheat, becomes elastic too easily for use in a bread machine and quickly loses its ability to stretch well. As a result, bread made from all-purpose flour will be small and dense. Several well known mills now market bread flour. It is labeled bread flour on the package and is available at grocery stores.
■ Sweeteners provide food for the yeast to work. Sweeteners, including sugar, honey and molasses, also add flavor and help the crust to brown. Sweeteners vary in flavor intensity and dissolving rate and may cause the dough to mix differently when substituted. Artificial sweeteners are not recommended for yeast baling because they do not feed the yeast like regular sweeteners do.
■ Salt helps control yeast growth to prevent overriding, which causes the bread to collapse. Salt also adds flavor to breads.
■ Fat such as shortening, margarine, butter or oil, adds tenderness and flavor to breads.
■ Liquids: Activate The Yeast And Bind The Dough
"Liquid" means all the wet ingredients used in the recipe. When yeast is used in a bread machine, the liquid temperature must be 80^ / 27^ . With this temperature, the yeast activates gradually to accommodate the program of the machine. When higher temperatures are used, not only does the yeast activate too quickly, but also the entire dough becomes too warm. The bread does not rise well if the temperature is too low.
When the machine is set on the delay timer, reduce the amount of liquid in most recipes by 1-2 teaspoons depending on the recipe and size or loaf. Eggs are also considered part of the total liquid amount. Eggs need to be at room temperature. If taken directly from the refrigerator, place in a bowl of warm water to take off the chill before using.
DO NOT USE EGGS OR ANY PERISHABLE FOODS WITH THE DELAYED SETTING.
■ Programming Russian Cook Basic, Specialty, French, and Rapid Bread
- Open the lid and remove the bread pan. Pull straight up, using the handle.
- Mount the kneading blade on the shaft.
NOTE: Polyoxymethylene copolymer identified in "Kneading-Blade" section may be safely used as an article or component of articles intended for food contact use in accordance with the "FDA" prescribed conditions.
CAUTION: If you use breadmaker without material, "Kneading-Blade" could be melt. Please, operate breadmaker with ingredients.
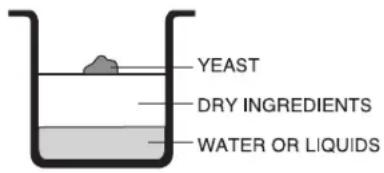
- Place all ingredients in the bread pan. Make sure not to omit any ingredients.
text_image
YEAST DRY INGREDIENTS WATER OR LIQUIDSNOTE: Particularly when using the timer, add the yeast on top of the flour and away from the liquid. This is critical for good results.
- Place the bread pan in the bread maker.
- Close the lid slowly and tightly using the handle. Plug in the breadmaker.
- Select the desired Program (Press the Menu pad to select BREAD PROGRAM) and Baking Control(light, medium, or dark crust). The program and baking control indicator should light up in the display window.
- Press the "START" pad.
Notice that the time left for the bread to be finished is displayed 3:30 and counts down(1:59 for Rapid Bread). For the French cycle, the time displayed will be 4:00 and the first 20 minutes will be pre-heat time to warm the ingredients and allow the flour time to absorb water.
NOTE: Topping operation can be configured or cancelled by using 'topping' button in Russian Cook. When topping operation is configured, topping operation starts automatically with no separate signal 15 minutes after operation starts (9 minutes before 2nd kneading completion) and ingredients are inserted. When topping operation is not configured, beep sounds 8 times 15 minutes after operation starts (9 minutes before 2nd kneading) and at this time, top cover can be opened to insert additional ingredients. At this point, display shows [3:15].
Topping operation is automatically configured in specialty program and cannot be cancelled. When topping operation is configured, topping operation starts automatically with no separate signal 15 minutes after operation starts (9 minutes before 2nd kneading completion) and additional ingredients are inserted. At this point, display shows [3:15].
Topping operation can be configured or cancelled using 'topping' button in French program. When topping operation is configured, topping operation starts automatically with no separate signal 1 hour 26 minutes after operation starts (9 minutes before 2nd kneading completion) and ingredients are inserted. When topping operation is not configured, beep sounds 8 times 1 hour 26 minutes after operation starts (9 minutes before 2nd kneading completion) and at this time, top cover can be opened to insert additional ingredients. At this point, display shows [2:34].
Topping operation can be configured or cancelled using 'topping' button in Rapid Program. When topping operation is configured, topping operation starts automatically with no separate signal 14 minutes after operation starts (5 minutes before 2nd kneading completion) and additional ingredients are inserted. When topping operation is not configured, beep sounds 8 times 14 minutes after operation starts (5 minutes before 2nd kneading completion) and at this time, top cover can be opened to insert additional ingredients. At this point, display shows [1:45].
CAUTION: Do not touch the breadmaker, because it is very hot during baking. Do not open the lid during the rise or bake cycles. Heat will escape and final result may be affected.
- The beeper will sound 8 times indicating the bread is done and cooled. After bread is done if you do not take the bread out of the breadmaker immediately, the bread is kept warm for 3 hours, [:H]is displayed. After 3 hours, [END]is displayed. The Rapid and Dough programs do not have the cool feature. The Dough and Jam program does not have the hold-warm feature.
NOTE: The beeper sounds 4 times when baking is complete. Cooling then begins. If you want to serve bread that has just been baked, press the Cancel pad and remove the bread pan. (Be sure to use oven mitts, because the pan is very hot.) Dissipate heat by placing a towel or other cloth under the bread before cutting. Turn the loaf on its side and cut with a serrated knife.
-
Press the Cancel pad and remove the bread pan using oven mitts.
-
Turn the Bread Pan several times to release the bread. Place the bread on a wire rack to cool and allow the steam to escape. Be sure to remove the kneading blade from the bread.
CAUTION: The bread pan, kneading blade, and bread will be very hot. Always unplug the breadmaker after each use.
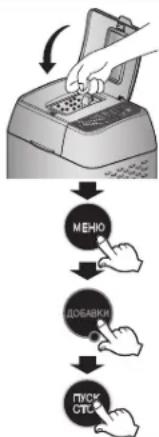
\* Topping Programming
flowchart
graph TD
    A["Receipt"] --> B["MEHIO"]
    B --> C["READIKI"]
    C --> D["PICK CTL"]
-
Prepare by inserting all ingredients in the oven except for ingredients for auto-topping.
-
Insert ingredients for auto-topping in topping case and close the topping case cover.
-
Select appropriate course among Russian Cook, Basic, French and Rapid Program by pressing menu button.
*Topping function is automatically selected when specialty program is selected.
-
Press topping button once to turn on the topping LED lamp.
-
Start the course by pressing the Start button.
-
Once specified time has arrived automatic topping operation starts and ingredients are inserted.
Russian Cook, Basic Program - 3:15 (9 minutes before 2nd kneading completion)
French Program - 2:34 (9 minutes before 2nd kneading completion)
Rapid Program - 1:45 (5 minutes before 2nd kneading completion)
- Selected menu is completed when remaining time has passed.
NOTE
● Ingredients possible for Auto Topping
- Dried fruits (raisins, dried kiwi, dried mango, etc) : Max 100g (Size:5\~8mm)
- Nuts (walnuts, peanuts, almonds, etc) : Max 90g (Size:5\~8mm)
- Others (Olives, Salami, vegetables, etc) : Max 100g (Size:5\~8mm)
* Ingredients for Auto Topping should have no moisture and stickiness.
● Ingredients not possible for Auto Topping
- Easily melting items such as chocolate, cheese, etc (It can melt and stick to topping case)
- Ingredients too large or hard (coating film inside the oven can come off.)
■ Programming Cake
The Delay Timer cannot be used for the cake program.
MAC | 1. This machine makes delicious CAKES. |
| 2. Prepare the cake mix according to the directions on the box if using a commercial cake mix. Otherwise, follow the recipe in this manual, If you use a cake mix, we recommend a 6-ounce package. You should put only half of the butter in the bread pan.If you put too much butter in the bread pan, the cake will be raw on the inside. | |
| 3. Select the Cake menu then press Start. The cake will be done in 1 hour and 10 minutes. | |
| 4. Frost if desired, or enjoy as is. | |
| 5. Remember, the cake will be smaller than a loaf of bread because cake does not contain yeast to make it rise. |

■ Programming Jam
The Delay Timer cannot be used for the jam program.
 | 1. This machine makes delicious JAM. |
| 2. Jam requires only 3 ingredients: berries, sugar and lemon juice.You may use strawberries, blueberries or other thin skinned berries.Sugar and lemon juice help to firm, flavor and preserve the color of the berries.Jam is heated and stirred during the program to produce a topping for your breads, waffles and ice cream. | |
| 3. Select the Jam menu, then press Start.The jam will be done in 1 hour and 20 minutes. | |
| NOTEDo not exceed the quantities shown on the COOKING GUIDE.Clean the bread pan surface immediately after making jam.Failure may cause damage to the non-stick coating by remaining jam.After cooling the cooked jam, place in jar or dish and store in refrigerator.The quality of homemade jam will very slightly, depending on the room temperature, size of main ingredients and the degree of freshness.To change the texture of the jam. add pectin ( 12 112 teaspoons.) | |
■ Programming Dough
 | 1. First choose a recipe from the Recipe Section and add all ingredients in the pan.Place pan into machine close the lid. |
| 2. Select the Dough menu | |
| 3. Press Start pad. The REMAINING TIME displays 1:03 and the breadmaker will start to knead. | |
| 4. After an hour and 3 minutes, the beeper will sound indicating it is time to remove the dough. | |
| 5. Follow your recipe direction for completing the dough. |

■ Programming Yogurt
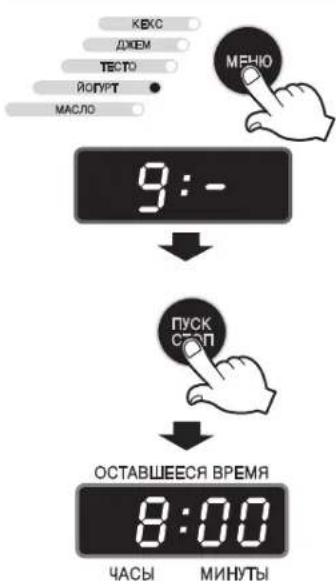 | 1. Take out Oven and remove Kneading Blade at the bottom of the inside.Warning) Do not operate any other funtions than Ferment function while Fermentation container is inserted.2. Place prepared ingredients in Fermentation container and close the lid.Refer to "Appendix:Cooking" for the detailed procedure to prepare ingredients.3. Add Fermentation container to Oven, add Oven to the product and close the lid.4. Insert Power plug in a wall inlet.5. Press the Yogurt Menu. |
| 6. Press the Set buttons to set Time as desired.Time Change, 6H -> 7H -> 8H7. Press the Start button and Fermentation will begin. Display panel will show remaining hours until completion.8. If the Fermentation process is completed, Press the Stop button and take out Yogurt. |
■ Programming Butter
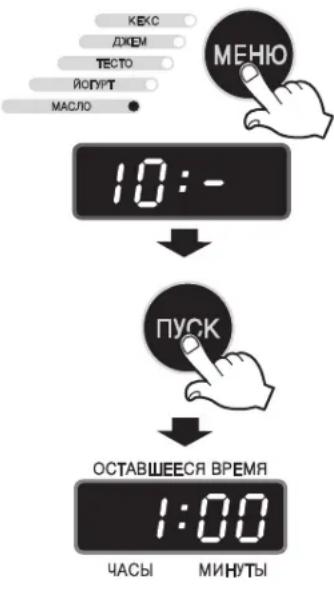 | 1. Remove Oven and insert Kneading Blade into the bottom of Oven. |
| 2. Place prepared ingredients in Oven and close the Butter lid.3. Add Oven to the product and close the lid. | |
| 4. Insert Power plug in a wall inlet.5. Press the Menu button and select the Butter menu. | |
| 6. Press the Start button. Display panel will show remaining 1 hour until completion.7. Buzzer will go off when the process is completed.Press the Stop button, remove Oven and serve yourself. |

■ Programming The Delay Timer (Bread or Dough)
| Set the program and crust colour. Before pressing Start, set the timer for however long you want to wait before the bread is done. (4:10 to 13 hours.) | ||
| EXAMPLE : It is 9:00 p.m. now. The bread is to be ready at 6:30 a.m. the next morning.Set the timer for 9:30, because there are 9 hours and 30 minutes between 9:00 p.m. and 6:30 a.m. | ||
TA | 1. When pressed, the time will advance in 10 minute increments. | NOTE : The bread machine will start when the timer reaches the time of the program selected. |
| 2. When constant pressure is applied to the pad, the time will advance quickly. | ||
| 3. Press the Start pad. The timer is set, and the colon blinks. After one minute, 9:29 is displayed, and the timer continues to count down in 1 minute increments. |  | |
■ Baking Control (Bread)
The Baking Control function is used to select the color of the crust. It can be baked medium, light or dark. It is not necessary to press the control when medium is desired.

The Baking Control function will advance as the pad is pressed.

POWER OUTAGE
If your bread machine loses power before the second rise, you can try starting the machine at the beginning of the cycle again. This may not always produce an acceptable loaf. If you are not sure when the outage occurred, remove the dough ball from the bread pan and place in an oven-safe baking container. Allow to double in size and place in a preheated 350^ oven for 30-45 minutes or until done.
The bread should sound hollow when tapped on the top of the loaf after done. If the bread has already begun to bake when the outage occurs, you must begin with new ingredients.
BEFORE CALLING FOR SERVICE
■ Questions and Answers
| Questions Answers | |
| 1 Why does the height and shape of bread differ in each loaf? | The height and shape of bread may differ depending on the ingredients, room temperature and length of the timer cycle. Also accurate measurement of ingredients is essential to make delicious bread. |
| 2 The bread has an unusual aroma. Why? | Stale ingredients may have been used or too much yeast may have been used. Always use fresh ingredients. Accurate measurements are essential to make delicious bread. |
| 3 The kneading blade comes out with the bread. | This can happen as the kneading blade is detachable. Use a non-metal utensil to remove it.Caution : The kneading blade will be hot. |
| 4 The bread has a floured corner. | Sometimes flour in the corner of the bread pan may not have been completely kneaded into the dough. Scrape it off with a knife. |
| 5 Why can the timer not be set for more than 13 hours? | Longer delay times could alter the baking results. |
| 6 Can ingredients be halved or doubled? | No. If there is too little in the bread pan, the kneading blade cannot knead well enough. If there is too much, bread swells out of the bread pan. |
| 7 Can fresh milk be used in place of dry milk? | Yes. Be sure to deduct the same measurement of water to equal liquid substitution. Fresh milk is not recommended when using the timer, because it may spoil while sitting in the bread pan. |
| 8 The bread does not rise well | In case temperature of the liquid used is too low, the bread may not rise well as the yeast does not leaven properly |
■ Check List
| OPERATIONAL ERRORSINGREDENT PROBLEMS | |||||||||||||||||||||||||||
| Temperature of water either too hot or too odd | Yeast Flour | Ingredients used other than prescribed | MEASUREMENT ERRORS | Kneading blade not installed property in pan | Water added after kneading flour | Program selection was wrong (Dough mode was chosen) | Top lid was open during operation | CANCEL pad was pressed after starting | Ingredients spilled on heating element | Oven area is too hot (display Hi). | Unplugged | Lease check the following:BAKING RESULTS: | |||||||||||||||
| Wrong type of yeast used | Old yeast used | Yeast toothed water before rinsing | Wrong type of flour used | No sugar or molasses | Flour | Yeast | Water | ||||||||||||||||||||
| Too much | Not enough | No yeast | Too much | Not enough | Too cold | Too much | Too much | Not enough | |||||||||||||||||||
| ○ | ○ | Breadmaker does not operate | |||||||||||||||||||||||||
| ○ | Smoke emitted from steam vent. Burning smell | ||||||||||||||||||||||||||
| ○ | Sides of bread collapse and bottom is damp | ||||||||||||||||||||||||||
| Bread rises too much | |||||||||||||||||||||||||||
| ○ | ○ | ○ | ○ | ○ | Collapsed after over-rising | ||||||||||||||||||||||
| ○ | ○ | ○ | ○ | ○ | ○ | ○ | ○ | ○ | ○ | Bread doesn,t rise enough | |||||||||||||||||
| ○ | Top of bread floured | Unleavened or not leavened enough | |||||||||||||||||||||||||
| ○ | ○ | ○ | Underbrowned | ||||||||||||||||||||||||
| ○ | ○ | Browned and floured sides, and raw | |||||||||||||||||||||||||
| ○ | Sides and bottom floured | ||||||||||||||||||||||||||
| ○ | ○ | ○ | Underbaked | ||||||||||||||||||||||||
| ○ | Slices unevenly and is sticky | ||||||||||||||||||||||||||

Printed in Korea