HP200 - Simulateur Oricom - Free user manual and instructions
Find the device manual for free HP200 Oricom in PDF.

| Product Type | Baby Monitor |
| Model | HP200 |
| Brand | Oricom |
| Display Type | 2.8-inch LCD |
| Video Resolution | 640 x 480 pixels |
| Night Vision | Yes, infrared LEDs |
| Wireless Range | Up to 300 m (outdoor, line of sight) |
| Audio | Two-way talk with noise reduction |
| Temperature Sensor | Yes, displayed on parent unit |
| Lullabies | 5 built-in lullabies |
| VOX Mode | Yes, automatic power saving |
| Power Source | AC adapter (included) or rechargeable battery |
| Battery Type | Lithium-ion rechargeable |
| Battery Life | Up to 10 hours (typical use) |
| Dimensions (Parent Unit) | 122 x 72 x 35 mm |
| Weight (Parent Unit) | 150 g |
| Frequency Band | DECT 1.9 GHz |
| Cleaning | Wipe with a soft dry cloth; do not use liquids |
| Safety | Use only the supplied power adapter; keep away from water |
| Spare Parts Availability | Power adapters and batteries sold separately |
Frequently Asked Questions - HP200 Oricom
User questions about HP200 Oricom
0 question about this device. Answer the ones you know or ask your own.
Ask a new question about this device
Download the instructions for your Simulateur in PDF format for free! Find your manual HP200 - Oricom and take your electronic device back in hand. On this page are published all the documents necessary for the use of your device. HP200 by Oricom.
USER MANUAL HP200 Oricom
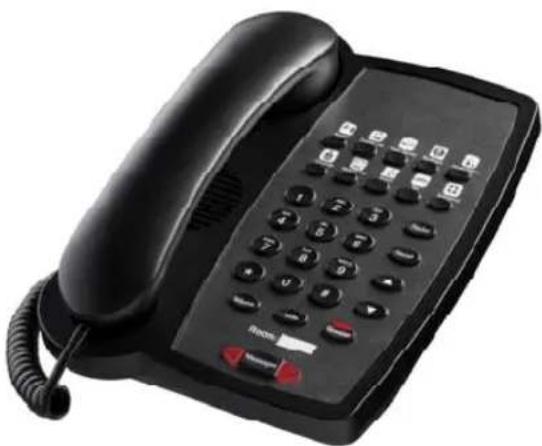
HP200 Corded Hotel Phone with Speakerphone
natural_image
Black office telephone with keypad and control buttons (no visible text or symbols)Keep this user guide for future reference
Installation Connection
- Connect one end of the curly cord to the handset, and the other end to the socket marked HANDSET on the left-hand side of the base.
- Connect the telephone line cord to the LINE IN socket on the telephone, and to a telephone network wall socket.
- Lift the handset and listen for the dial tone. Your telephone is now operational.
- Ensure the correct Recall time has been set for your system PBX or phone network
For Desk Use
Fit the desk support onto the base of the phone.
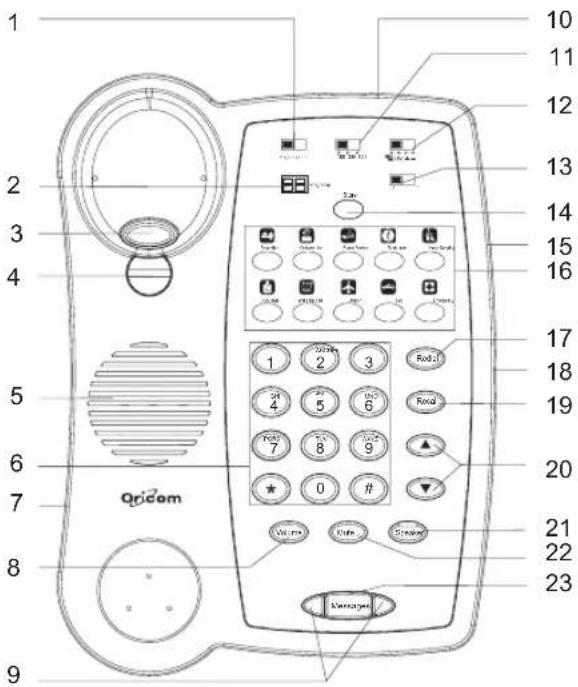
Location of controls
text_image
1 2 3 4 5 6 7 8 9 Qricom 10 11 12 13 14 15 16 17 18 19 20 21 22 23 S###g#e- Program/Store switch
- Programmer switch
- Hook switch
- Handset holder
- Speaker
- Keypad
- Handset cord jack
- Handset volume control button
- Message Waiting and Visual Ringer indicator
- Telephone line jack
-
Recall time 100/300/600 switch
-
Message Waiting switch
- Line 1/2 switch
- Store button
- Data port
- One touch memories
- Ringer volume Hi/Lo switch
- Redial button
- Recall button
- Speaker volume control
- Speaker button with LED
- Mute button
- Messages button
Wall mounting your phone:
For wall mounting installation, do not insert the desk support on the base.
- Revolve the handset catch 180^ to the wall mounting position using a small coin.
- Connect the telephone line cord to the LINE IN socket on the telephone, and to a telephone wall socket.
- Run the telephone cable inside the groove and ensure it is tight.
- Drill two holes vertically, one above the other, 83mm apart, and leave the screws protruding from the wall by 5mm.
- Align the base's keyhole slots with the screws and slide the phone downward to secure it.
- Lift the handset. Listen for the dial tone to ensure the telephone is working.
Using your phone
Making a call
- Lift the handset or press Speaker button the LED lights, then dial tone will be heard.
- Dial the required telephone number The number will be dialed.
- On completion of the call, hang up the handset or press the Speaker button again.
Answering a incoming call
- When an incoming call is received, the phone will ring,
- Pick up the handset or press the Speaker button to answer the call.
- On completing the call, hang up the handset or press the Speaker button again.
Redial
- Lift the handset or press Speaker button.
- Press Redial to dial the last number dialled.
Volume control
The handset earpiece volume may be increased or decreased during a call. Press the Volume button to increase or decrease the volume.
To adjust the speaker volume (hands free dialling/group listening) use the ▲/▼buttons for a comfortable levels.
Recall (Australia ONLY)
You can use the Recall button on your telephone when using your network operator's services such as call waiting etc. A subscription may apply for these services, contact your network operator for more information. If this is not working correctly check the country option of the phone menu and select Australia or New Zealand option. For Australia it should be set to 100ms and for New Zealand is 600ms.
Mute button
The handset and speaker volume can be muted during a call by pressing MUTE button. Release the MUTE button to reactivate the microphone.
Ringer volume control
The ringer volume can be adjusted using the Ring Volume switch located on the right-hand side of the telephone
Memory
This telephone has 10 One-Touch memories.
Storing One-Touch Memories
- Ensure the Program/Store switch is set to Store.
- Lift the handset or press Speaker button, dial tone will be heard (ignore any tone). Press Store button.
- Enter the telephone number to be stored (up to 32 digits). Press Store.
-
Select a memory position by pressing the corresponding memory button.
-
Replace the handset. If you need to insert a pause in the telephone number press Redial.
If you need to change a number, store the new number in the same location as the old one.
Dialling using One-Touch Memories
- Lift the handset or press Speaker button, dial tone will be heard.
- Press the required One-Touch memory button.
Messages button
You can also store a telephone number into this button like the one touch memory buttons:
- Ensure the Program/Store switch is set to Store.
- Pick up the handset or press the Speaker button, the dial tone will be heard. (ignore the dial tone) press Store button.
- Enter the telephone number to be stored (up to 32 digits). Press Store.
- Press the Messages button, now number have been stored.
- Replace the handset.
Dial the pre-programmed number
- Lift the handset. You will hear the dial tone.
- Press the MESSAGES button. A pre programmed number will be dialed automatically.
Line Switch
There is a line switch on the top of the unit allows you select the desired telephone line 1 or line 2 depends on your selection.
You may configure the phone using the switch located under the inlay on the base of the phone marked 1 2, so that the telephone (1) and the outer port (2) are connected in parallel.
Connection of additional equipment
Additional equipment such as modems can be connected to this telephone via the DATA PORT socket on the right side of the base. Two methods of operation can be selected by using the switch located on the top of the base (Please refer to "Location of controls" point 12):
- Allows for single line parallel operation. For example, a computer modem can be operated through the telephone but only one device can be operated at a time, either the modem or the telephone.
- Allows for two line operation where a computer modem can be connected via the telephone and both devices can be used at the same time. The network wall socket must have two lines connected.
Hearing aid compatible
This telephone is hearing aid compatible. Select the T mode on your hearing aid to enable this feature.
Programmer lock
The Program/Store switch (located under the underlay) allows access to the One-Touch memory programming. Store Manual programming allowed.
Program Programmer downloads allowed.
PBX Message Waiting
Most PBX systems use a function called Message Waiting. The telephone will indicate when a call was received by flashing the Massage Waiting lights next to the Messages button.
The MW switch is located on the top side of the telephone. The MW function operates differently depending on the PBX in question.
Please contact the PBX administrator for more information.
The following four alternatives are available: LED+, LED-, ringer indicator (☐) and high DC voltage (HV).
When the telephone is used in systems without a telephone exchange ( ) should be selected.
Programmer
A dedicated programmer (optional) can be connected to the Programmer socket located on the top side of the telephone, this allows easy programming of the 10 One-Touch memories and the number in Messages key.
The Program/Store switch (located on the top side of the telephone) must be set to Program.
General Information Warnings
- The telephone is designed for indoor use only. Do not install the telephone in areas where there is the risk of an explosion, excessive exposure to smoke, dust, vibrations, chemicals, moisture and heat.
- Do not install in damp locations such as a bathroom or laundry, do not expose the unit to direct sunlight.
- Do not use your telephone during an electrical thunderstorm as it is possible to get an electric shock. Refer to information contained in Telstra White pages directory.
- The earpiece of the handset may attract small metal objects such as staples and pins. Care should be taken when placing the handset near these items.
- This phone is designed for connection to a PSTN telephone line or analogue extension port of a PBX system. If you connect this device to a digital extension of a PBX, damage may result to the PBX.
Trouble Shooting
If you feel this product is not working correctly please consult the user guide and ensure that you are using the product in accordance with the instructions.
Remove all extra telephone equipment and connect only this telephone directly to the telephone socket.
If the fault is still present, connect another telephone (if available) to the telephone socket. The results will show you whether the fault lies with this unit or with the telephone line. If the product is not working correctly the fault is on the telephone line.
Please contact your network operator for assistance.
In the unlikely event of a fault please return the product to the dealer where you purchased it.
Cleaning and Care
The surface of the case can be cleaned with a dry, soft, lint-free cloth. Never use cleaning agents, particularly aggressive solvents.
Notes for operation in New Zealand
The grant of a Telepermit for any item of terminal equipment indicates only that Telecom has accepted that the item complies with the minimum conditions for connection to its network. It indicates no endorsement of the product by Telecom, nor does it provide any sort of warranty. Above all, it provides no assurance that any item will work correctly in all respects with another item of Telepermitted equipment of a different make or model, nor does it imply that any product is compatible with all of Telecom's network services. This device may be subject to ringing or bell tinkle when certain other devices are connected to the same line. If this occurs, the problem should not be referred to the Telecom Faults service. This equipment shall not be set to make automatic calls to the Telecom "111"
Emergency Service. This equipment may not provide for the effective hand-over of a call to another device connected to the same line. Telepermitted equipment only may be connected to the auxiliary telephone port. The auxiliary telephone port is not specifically designed for 3-wire connected equipment that may not respond to incoming ringing when attached to this port.
REN (RN for New Zealand)
The REN (Ringer Equivalence Number) or (RN) is of significance only if you wish to connect more than 1 telephone to your telephone line. A standard telephone line has a maximum REN capacity of 3 (RN of 5). It is possible to connect 3 (5) devices with a REN of 1 (RN of 1) with no degradation to the product's performance. Exceeding this limit may cause the volume of the ringer in any phone to decrease or not ring at all.
Australia
Oricom International Pty Ltd
Locked Bag 658, South Windsor, NSW 2756
Customer Support
Email: support@oricom.com.au
Web: www.oricom.com.au
Phone: (02) 4574 8888 Fax: (02) 4574 8898
New Zealand
Atlas Gentech (NZ) Limited
Private Bag 14927
Panmure, Auckland
Customer Support
Email: support@atlasgentech.co.nz
Web: www.atlasgentech.co.nz
Phone: 0900 50 025 (Toll Call) Fax: (09) 574 2722