Profile JGP989KCCC - Cooker GE - Free user manual and instructions
Find the device manual for free Profile JGP989KCCC GE in PDF.

User questions about Profile JGP989KCCC GE
0 question about this device. Answer the ones you know or ask your own.
Ask a new question about this device
Download the instructions for your Cooker in PDF format for free! Find your manual Profile JGP989KCCC - GE and take your electronic device back in hand. On this page are published all the documents necessary for the use of your device. Profile JGP989KCCC by GE.
USER MANUAL Profile JGP989KCCC GE
Safety Instructions . . . 2-7
Operating Instructions
Downdraft Vent System . .10
Features 8
Gas Surface Burners .....9
Using Your Cooktop ....10
Care and Cleaning
Burner Assemblies .....11
Burner Caps and Heads . .11
Burner Grates and
VentGrille....12
Control Knobs .....13
Glass Surface .....13, 14
Vent Filter .....12
Installation Instructions
Ductwork .....19-22, 27
Electrical
Connections . . . .23, 28, 29
Exhaust Blower Ratings .21
Final Assembly .....30
Installing
the Cooktop .....25-28
Installing the Gasket ....24
Power Supply .....23
Preparation .....17–19
Safety Precautions .....15
Unpacking
the Cooktop .....16, 24
Write the model and serial numbers here:
Model # ____
Serial #
Find these numbers on a label under the cooktop, on the side of the vent chamber.
Troubleshooting
Tips....31, 32
Consumer Support
Consumer Support .....36
Product
Registration .....33, 34
Warranty 35
Owner's Manual & Installation Instructions
JGP989

natural_image
Abstract decorative swirl design with no text or symbols49-80388-1 10-06 JR
IMPORTANT SAFETY INFORMATION. READ ALL INSTRUCTIONS BEFORE USING.
WARNING!
For your safety, the information in this manual must be followed to minimize the risk of fire or explosion, electric shock, or to prevent property damage, personal injury, or loss of life.
WARNING: If the information in this manual is not followed exactly, a fire or explosion may result causing property damage, personal injury or death.
— Do not store or use gasoline or other flammable vapors and liquids in the vicinity of this or any other appliance.
— WHAT TO DO IF YOU SMELL GAS
Do not try to light any appliance.
Do not touch any electrical switch; do not use any phone in your building.
Immediately call your gas supplier from a neighbor's phone. Follow the gas supplier's instructions.
If you cannot reach your gas supplier, call the fire department.
— Installation and service must be performed by a qualified installer, service agency or the gas supplier.

text_image
GAS-FIRED C UL US LISTED
IMPORTANT SAFETY NOTICE
The California Safe Drinking Water and Toxic Enforcement Act requires the Governor of California to publish a list of substances known to the state to cause cancer, birth defects or other reproductive harm, and requires businesses to warn customers of potential exposure to such substances.
Gas appliances can cause minor exposure to four of these substances, namely benzene, carbon monoxide, formaldehyde and soot, caused primarily by the incomplete combustion of natural gas or LP fuels. Properly adjusted burners, indicated by a bluish rather than a yellow flame, will minimize incomplete combustion. Exposure to these substances can be minimized by venting with an open window or using a ventilation fan or hood.

SAFETY PRECAUTIONS
Have the installer show you the location of the cooktop gas shut-off valve and how to shut it off if necessary.
■Have your cooktop installed and properly grounded by a qualified installer, in accordance with the Installation Instructions. Any adjustment and service should be performed only by qualified gas cooktop installers or service technicians.
Do not attempt to repair or replace any part of your cooktop unless it is specifically recommended in this manual. All other service should be referred to a qualified technician.
Locate the cooktop out of kitchen traffic path and out of drafty locations to prevent poor burner performance.
Plug your cooktop into a 120-volt grounded outlet only. Do not remove the round grounding prong from the plug. If in doubt about the grounding of the home electrical system, it is your personal responsibility and obligation to have an ungrounded outlet replaced with a properly grounded, three-prong outlet in accordance with the National Electrical Code. Do not use an extension cord with this appliance.
Let the burner grates and other surfaces cool before touching them or leaving them where children can reach them.
Be sure all packaging materials are removed from the cooktop before operating it to prevent fire or smoke damage should the packaging material ignite.
Be sure your cooktop is correctly adjusted by a qualified service technician or installer for the type of gas (natural or LP) which is to be used. Your cooktop can be converted for use with either type of gas. See the Installation Instructions in the LP Conversion Kit.
WARNING: These adjustments must be made by a qualified service technician in accordance with the manufacturer's instructions and all codes and requirements of the authority having jurisdiction. Failure to follow these instructions could result in serious injury or property damage. The qualified agency performing this work assumes responsibility for the conversion.
Do not leave children alone or unattended where a cooktop is hot or in operation. They could be seriously burned.
Do not allow anyone to climb, stand or hang on the cooktop.
Do not operate or clean your cooktop if the glass is broken or cracked. Cleaning solutions and spillovers could penetrate the broken cooktop and create a risk of electric shock. Call for service immediately if the cooktop glass breaks or cracks.
IMPORTANT SAFETY INFORMATION. READ ALL INSTRUCTIONS BEFORE USING.

SAFETY PRECAUTIONS
CAUTION:
children should not be stored in cabinets above a cooktop—children climbing on the cooktop to reach items could be seriously injured.
■Always keep wooden and plastic utensils and canned food a safe distance away from your cooktop.
■Always keep combustible wall coverings, curtains or drapes a safe distance from your cooktop.
Never wear loose-fitting or hanging garments while using the appliance. Be careful when reaching for items stored in cabinets over the cooktop. Flammable material could be ignited if brought in contact with flame or hot surfaces and may cause severe burns.
■ Teach children not to play with the controls or any other part of the cooktop.
⚠ WARNING: NEVER use this appliance as a space heater to heat or warm the room. Doing so may result in carbon monoxide poisoning and overheating of the oven.
■Always keep dish towels, dishcloths, pot holders and other linens a safe distance from your cooktop.
- Do not store flammable materials near a cooktop.
Do not store or use combustible materials, gasoline or other flammable vapors and liquids in the vicinity of this or any other appliance.
Do not let cooking grease or other flammable materials accumulate on or near the cooktop.
- Do not operate the burner without all burner parts in place.
Do not place hot cookware on the glass cooktop. This could cause glass to break.
- Do not clean the cooktop with flammable or volatile cleaning fluids.
- Do not clean the cooktop when the appliance is in use.
■ Avoid scratching the cooktop with sharp instruments, or with rings and other jewelry.
■Never use the cooktop as a cutting board.
Do not use water on grease fires. Never pick up a flaming pan. Turn the controls off. Smother a flaming pan on a surface burner by covering the pan completely with a well-fitting lid, cookie sheet or flat tray. Use a multi-purpose dry chemical or foam-type fire extinguisher.
Flaming grease outside a pan can be put out by covering it with baking soda or, if available, by using a multi-purpose dry chemical or foam-type fire extinguisher.
WARNING: To reduce the risk of fire, electrical shock, or injury to persons, observe the following:
A. Use this unit only in the manner intended by the manufacturer. If you have questions, contact the manufacturer.
B. Before servicing or cleaning the unit, switch power off at service panel.
C. When cutting or drilling into wall or ceiling do not damage electrical wiring and other hidden utilities.
D. Ducted fans must always be vented to the outdoors.
E. To reduce the risk of fire, use only metal ductwork.
F.Do not flame foods on the cooktop. If you do flame foods under the hood, turn the fan on.
WARNING: To reduce the risk of a cooktop grease fire:
A. Keep fan, filters and grease-laden surfaces clean.
B. Always turn vent ON when cooking at high heat.
C. Use high settings on cooktop only when necessary. Heat oil slowly on low to medium setting.
D. Don't leave the cooktop unattended when cooking.
E. Always use cookware and utensils appropriate for the type and amount of food being prepared.
CAUTION: For general ventilating use only. Do not use to exhaust hazardous or explosive materials and vapors.

GLASS COOKTOP SURFACE (on some models)
Use care when touching the glass cooktop surface. The glass surface of the cooktop will retain heat after the controls have been turned off.
Avoid scratching the glass cooktop surface. The glass surface can be scratched with items such as sharp instruments, rings or other jewelry and rivets on clothing.
Large scratches or impacts to glass cooktops can lead to broken or shattered glass.
Do not operate the cooktop if the glass is broken. Spillovers or cleaning solution may penetrate a broken cooktop and create a risk of electrical shock. Contact a qualified technician immediately should your glass cooktop surface become broken.
■Never use the glass cooktop surface as a cutting board.
Do not place or store items that can melt or catch fire on the glass cooktop surface, even when it is not being used.
Be careful when placing spoons or other stirring utensils on glass cooktop surface when it is in use. They may become hot and could cause burns.
Clean the cooktop surface with caution. If a wet sponge or cloth is used to wipe spills on a hot surface, be careful to avoid steam burns. Some cleaners can produce noxious fumes if applied to a hot surface.
NOTE: We recommend that you avoid wiping any surface areas until they have cooled and the indicator light has gone off. Sugar spills are the exception to this. Please see Cleaning the glass cooktop surface section.
When the cooktop is cool, use only CERAMA BRYTE® Ceramic Cooktop Cleaner and the CERAMA BRYTE® Cleaning Pad to clean the cooktop.
To avoid possible damage to the cooking surface, do not apply cleaning cream to the glass surface when it is hot.
■After cleaning, use a dry cloth or paper towel to remove all cleaning cream residue.
Read and follow all instructions and warnings on the cleaning cream labels.
IMPORTANT SAFETY INFORMATION. READ ALL INSTRUCTIONS BEFORE USING.

⚠ WARNING!
SURFACE BURNERS
Use proper pan size—avoid pans that are unstable or easily tipped. Select cookware having flat bottoms large enough to cover burner grates. To avoid spillovers, make sure cookware is large enough to contain the food properly. This will both save cleaning time and prevent hazardous accumulations of food, since heavy spattering or spillovers left on cooktop can ignite. Use pans with handles that can be easily grasped and remain cool.
■ Always use the LITE position when igniting the top burners and make sure the burners have ignited.
Never leave the surface burners unattended at high flame settings. Boilovers cause smoking and greasy spillovers that may catch on fire.
Use only dry pot holders—moist or damp pot holders on hot surfaces may result in burns from steam. Do not let pot holders come near open flames when lifting cookware. Do not use a towel or other bulky cloth in place of a pot holder. Such cloths can catch fire on a hot burner.
When using glass cookware, make sure it is designed for cooktop cooking.
To minimize the possibility of burns, ignition of flammable materials and spillage, turn cookware handles toward the side or center of the cooktop without extending over adjacent burners.
■ Always turn the surface burner controls off before removing cookware.
Carefully watch foods being fried at a high flame setting.
■Always heat fat slowly and watch as it heats.
Do not leave any items on the cooktop. The hot air from the vent may ignite flammable items and will increase pressure in closed containers, which may cause them to burst.
If a combination of oils or fats will be used in frying, stir together before heating or as fats melt slowly.
Do not use a wok on the cooking surface if the wok has a round metal ring that is placed over the burner grate to support the wok. This ring acts as a heat trap, which may damage the burner grate and burner head. Also, it may cause the burner to work improperly. This may cause a carbon monoxide level above that allowed by current standards, resulting in a health hazard.
■ Foods for frying should be as dry as possible. Frost on frozen foods or moisture on fresh foods can cause hot fat to bubble up and over the sides of the pan.
■ Use the least possible amount of fat for effective shallow or deep-fat frying. Filling the pan too full of fat can cause spillovers when food is added.
■ Use a deep fat thermometer whenever possible to prevent overheating fat beyond the smoking point.
■ Never try to move a pan of hot fat, especially a deep fat fryer. Wait until the fat is cool.
Do not flame foods on the cooktop. If you do flame foods under the hood, turn the fan on.

SURFACE BURNERS
Adjust the burner flame size so it does not extend beyond the edge of the cookware. Excessive flame is hazardous.
Do not leave plastic items on the cooktop—they may melt if left too close to the vent.
- Keep all plastics away from the surface burners.
If you smell gas, turn off the gas to the cooktop and call a qualified service technician. Never use an open flame to locate a leak.
To avoid the possibility of a burn, always be certain that the controls for all burners are at the off position and all grates are cool before attempting to remove them.
Never clean the cooktop surface when it is hot. Some cleaners produce noxious fumes and wet cloths could cause steam burns if used on a hot surface.
■ Never leave jars or cans of fat drippings on or near your cooktop.
Do not use aluminum foil under burner grates. Misuse could result in a fire hazard or damage to the cooktop.
Do not cover or block the area around the cooktop knobs. This area must be kept clear for proper ventilation and burner performance.
Clean only parts listed in this Owner's Manual.

COOK MEAT AND POULTRY THOROUGHLY...
Cook meat and poultry thoroughly—meat to at least an INTERNAL temperature of 160^ and poultry to at least an INTERNAL temperature of 180^ . Cooking to these temperatures usually protects against foodborne illness.

CONVERTING TO LP GAS (or converting back to natural gas from LP)
This cooktop leaves the factory set for use with natural gas.
If you want to convert to LP gas, the conversion must be performed by a qualified LP gas installer.
The conversion instructions, conversion sticker and LP orifices can be found attached to the cooktop next to the pressure regulator.
There is a second set of instructions included in the envelope containing the product wiring diagrams on the side of the cooktop. Keep these instructions and the orifices in case you want to convert back to natural gas.

READ AND FOLLOW THIS SAFETY INFORMATION CAREFULLY.
SAVE THESE INSTRUCTIONS
Features of your cooktop.
Throughout this manual, features and appearance may vary from your model.

text_image
Technical diagram of a multi-panel fan or vent system with numbered components and directional arrows indicating flow or assembly.| Feature Index on page | Explained |
| 1 Vent Grille 12 | |
| 2 Vent Filter (located under the vent grille) 12 | |
| 3 Simmer Spillproof Burner 9, 11 | |
| 4 Spillproof Burners 9, 11 | |
| 5 High Power Spillproof Burner 9, 11 | |
| 6 Vent Control 10 | |
| 7 Surface Burner Controls 9 | |
| 8 Glass Cooktop Surface 13, 14 | |
| 9 Cast-Iron Burner Grates 12 | |
| 10 Vent Grille Gasket 12, 13, 14 |
Using the gas surface burners. ge.com
Throughout this manual, features and appearance may vary from your model.

natural_image
Illustration of a hand pressing down on a mechanical component with a downward arrow (no text or symbols)Push the control knob down and turn it to the LITE position.
How to Light a Gas Surface Burner
Push the control knob down and turn it to the LITE position.
You will hear a little clicking noise—the sound of the electric spark igniting the burner.
Turn the knob to adjust the flame size. If the knob stays at LITE, it will continue to click.
When one burner is turned to LITE, all the burners spark. Do not attempt to disassemble or clean around any burner while another burner is on. An electric shock may result, which could cause you to knock over hot cookware.
Sealed Gas Burners
The smaller burner (right rear position) will give the best simmer results. It offers precise cooking performance for delicate foods, such as sauces or foods which need to cook over low heat for a long time. It can be turned down to a very low simmer setting.
The other burners are higher powered and will bring liquids to a boil quicker, especially with the use of a lid.

natural_image
Simple line drawing of a cooking pot with a crossed-out black X mark (no text or symbols)How to Select Flame Size
For safe handling of cookware, never let the flames extend up the sides of the cookware.
Watch the flame, not the knob, as you reduce heat. The flame size on a gas burner should match the cookware you are using.
Any flame larger than the bottom of the cookware is wasted and only serves to heat the handle.
In Case of Power Failure
In case of a power failure, you can light the gas surface burners on your cooktop with a match. Hold a lit match to the burner, then push in and turn the control knob to the LITE position. Use extreme caution when lighting burners this way.
Surface burners in use when an electrical power failure occurs will continue to operate normally.
IN CASE OF A POWER FAILURE, THE VENTILATION SYSTEM WILL NOT OPERATE.
Before Lighting a Gas Burner
■ Make sure all grates on the cooktop are in place before using any burner.
After Lighting a Gas Burner
Do not operate the burner for an extended period of time without cookware on the grate. The finish on the grate may chip without cookware to absorb the heat.
Be sure the burners and grates are cool before you place your hand, a pot holder, cleaning cloths or other materials on them.
Using your cooktop.

Use a flat-bottomed wok.
Wok This Way
We recommend that you use a flat-bottomed wok, available at your local retail store.
Only a flat-bottomed wok should be used. Do not use a flat-bottomed wok with a wok holder.
Do not use a flat-bottomed wok on a support ring. Placing the ring over the burner or grate may cause the burner to work improperly, resulting in carbon monoxide levels above allowable current standards. This could be dangerous to your health.
Cookware
Aluminum: Medium-weight cookware is recommended because it heats quickly and evenly. Most foods brown evenly in an aluminum skillet. Use saucepans with tight fitting lids when cooking with minimum amounts of water.
Enamelware: Under some conditions, the enamel of some cookware may melt. Follow cookware manufacturer's recommendations for cooking methods.
Glass: There are two types of glass cookware: those for oven use only and those for cooktop cooking (saucepans, coffee and tea pots). Glass conducts heat very slowly.
Cast Iron: If heated slowly, most skillets will give satisfactory results.
Heatproof Glass-Ceramic: Can be used for either surface or oven cooking. It conducts heat very slowly and cools very slowly. Check cookware manufacturer's directions to be sure it can be used on a gas cooktop.
Stainless Steel: This metal alone has poor heating properties and is usually combined with copper, aluminum or other metals for improved heat distribution. Combination metal skillets usually work satisfactorily if they are used with medium heat as the manufacturer recommends.

natural_image
Cross symbol crossed over a circular mechanical component (no text or labels)Stove Top Grills
Do not use stove top grills on your sealed gas burners. If you use the stove top grill on the sealed gas burner it will cause incomplete combustion and can
result in exposure to carbon monoxide levels above allowable current standards. This can be hazardous to your health.
Using the downdraft vent system.

text_image
OFF HI MED LOHow to Operate the Downdraft Vent System
The built-in vent system helps remove cooking vapors, odors and smoke from foods prepared on the cooktop.
Turn the vent fan speed control knob to HI, MED or LO, as needed.
Continuous use of the vent system while cooking helps keep the kitchen comfortable and less humid, reducing cooking odors and soiling moisture that normally creates a frequent need for cleaning.
The appearance of the burner flames may be affected when the vent fan is operating. At high fan speed setting, the flame may be drawn toward the vent opening, affecting cooking performance.
IN CASE OF A POWER FAILURE, THE VENTILATION SYSTEM WILL NOT OPERATE.
Care and cleaning of the cooktop. ge.com
Be sure electrical power is off and all surfaces are cool before cleaning any part of the cooktop.

text_image
Grate Burner cap Burner head Electrode Burner base▲ CAUTION: Do not operate the burner without all burner parts in place.
Sealed Burner Assemblies
Turn all controls OFF before removing the burner parts.
The burner grates, caps and burner heads can be lifted off, making them easy to clean.

text_image
ElectrodeWhen one burner is turned to LITE, all the burners spark. Do not attempt to disassemble or clean around any burner while another burner is on. An electric shock may result, which could cause you to knock over hot cookware.

natural_image
Technical line drawing of a mechanical component with a circular top and base, showing internal structure (no text or symbols)After cleaning, make sure the notch in the burner head is positioned toward the electrode. Rotate the burner head around the burner base until it is level and securely seated.
Burner Caps and Heads
NOTE: Before removing the burner caps and heads, remember their size and location. Replace them in the same location after cleaning. The burner heads and burner bases are labeled A, B and C to aid reassembly.
Burner Caps
Lift off when cool. Wash burner caps in hot, soapy water and rinse with clean water. You may scour with a plastic scouring pad to remove burned-on food particles.
Burner Heads
The slits in the burner heads of your cooktop must be kept clean at all times for an even, unhampered flame.
You should clean the surface burners routinely, especially after bad spillovers, which could clog these openings. Lift off when cool.
To remove burned-on food, soak the burner heads in a solution of mild liquid detergent and hot water for 20–30 minutes. For more stubborn stains, use a toothbrush.
After Cleaning
Before putting the burner caps and heads back, shake out excess water and then dry them thoroughly by setting in a warm oven for 30 minutes.
Replacement
The burner heads and burner bases are labeled A, B and C to aid reassembly.
Replace the burner heads on the bases matching the letters. Replace the caps on the heads. Make sure that the caps and heads are replaced in the correct location. There is one small (A), two medium (B) and one large (C) head and cap.

text_image
Medium Head and Cap B A B C Small Head and Cap A Front of Cooktop C Large Head and CapCare and cleaning of the cooktop.

natural_image
Technical line drawing of a mechanical component with multiple blades and a central hub (no text or symbols)Appearance may vary.
The grate legs have one brass foot and three rubber feet. To order replacement rubber grate feet, please call our toll-free number:
National
Parts Center ..... 800.626.2002
Rubber Grate Feet .. #WB02T10101
Burner Grates and Vent Grille
Lift off when cool. Grates and grille should be washed regularly and, of course, after spillovers. Wash them in hot, soapy water and rinse with clean water.
Discoloration on the grates may also be removed by using the provided cooktop cleaning cream. Apply a drop or two on a damp cloth and rub across the discolored area. Rinse and dry. After cleaning, replace the burner grates and make sure they are positioned securely over the burners.
To remove burned-on food, use a soap-filled scouring pad.
Although they are durable, the grates will gradually lose their shine, regardless of the best care you can give them. This is due to their continual exposure to high temperatures. You will notice this sooner with lighter color grates.
Do not operate a burner for an extended period of time without cookware on the burner grate. The finish on the grate may chip without cookware to absorb the heat.
Replacement
Before replacing the vent grille, make sure the grille gasket is properly installed around the downdraft vent opening, with the word "FRONT" toward the knobs. Replace the vent grille carefully over the gasket.
When replacing the grates, make sure they are positioned with their brass locator feet toward the center.

text_image
Grille Vent Grille Gasket Vent Filter Brass Locator FeetNOTE: Do not clean the grates, grille or grille gasket in a self-cleaning oven.
The grates, grille and grille gasket may be cleaned in a dishwasher.
To order replacement filters, please call our toll-free number:
National
Parts Center ..... 800.626.2002
Filter.....#WB02X10651
Vent Filter and Chamber
Remove the vent grille and vent grille gasket. The filter is held in place at an angle with a hold bump. Lift the filter up and out of the vent opening diagonally.
Clean the filter by swishing it in hot, soapy water. Rinse well and dry thoroughly.

text_image
Grille Vent Grille Gasket Vent Filter Vent ChamberRemove and replace the filter diagonally through the vent opening.
Do not operate the vent without the filter in place.

natural_image
Diagram of a 3D container with a shaded internal panel, no text or symbols presentWhen replacing the filter, make sure it rests, at an angle, on the supports in the vent opening.
To clean the vent chamber, use hot, soapy water. Do not use abrasive cleaners; they will damage the finish.
Replacement
Replace the filter after it is cleaned and dry. Replace the vent grille gasket by forming it around the vent opening and make sure the word "FRONT" is toward the knobs. Replace the grille.

text_image
Molded flat area FlatThe control knobs may be removed for easier cleaning.
Control Knobs
The control knobs may be removed for easier cleaning.
Make sure the knobs are in the OFF positions and pull them straight off the stems for cleaning.
The knobs can be cleaned in a dishwasher or they may also be washed with soap and water. Make sure the insides of the knobs are dry before replacing.
Replace the knobs in the OFF position to ensure proper placement.
Cleaning the glass cooktop.

text_image
CERAMA BRYTEClean your cooktop after each spill. Use CERAMA BRYTE® Ceramic Cooktop Cleaner.
Normal Daily Use Cleaning
ONLY use CERAMA BRYTE® Ceramic Cooktop Cleaner on the glass cooktop. Other creams may not be as effective.
To maintain and protect the surface of your glass cooktop, follow these steps:
Before using the cooktop for the first time, clean it with CERAMA BRYTE® Ceramic Cooktop Cleaner. This helps protect the top and makes clean-up easier.
2 Daily use of CERAMA BRYTE® Ceramic Cooktop Cleaner will help keep the cooktop looking new.
3 Remove the burner grates, vent grille and vent grille gasket.
4 Shake the cleaning cream well. Apply a few drops of CFRAMA BRYTE® Ceramic Cooktop Cleaner directly to the cooktop.
5 Use a paper towel or CERAMA BRYTE® Cleaning Pad for Ceramic Cooktops to clean the entire cooktop surface.
6 Use a dry cloth or paper towel to remove all cleaning residue. No need to rinse.
NOTE: It is very important that you DO NOT heat the cooktop until it has been cleaned thoroughly.

natural_image
Hand using a tool to clean or mark a circular object on a flat surface (no text or symbols visible)Use a CERAMA BRYTE® Cleaning Pad for Ceramic Cooktops or a Scotch-Brite® Multi-Purpose No Scratch blue scrub pad.
Burned-On Residue
WARNING: DAMAGE to your glass surface may occur if you use scrub pads other than the pad included with your cooktop.
1 Allow the cooktop to cool.
2 Remove the burner grates, vent grille and vent grille gasket. Spread a few drops of CERAMA BRYTE® Ceramic Cooktop Cleaner to the entire burned residue area.
3 Using the included CERAMA BRYTE® Cleaning Pad for Ceramic Cooktops, rub the residue area, applying pressure as needed.
4 If any residue remains, repeat the steps listed above as needed.
For additional protection, after all residue has been removed, polish the entire surface with CERAMA BRYTE® Ceramic Cooktop Cleaner and a paper towel.
Cleaning the glass cooktop.

natural_image
Hand using a brush to clean or store items on a stove (no text or symbols visible)The CERAMA BRYTE® Ceramic Cooktop Scraper and all recommended supplies are available through our Parts Center. See instructions under "To Order Parts" section below.
NOTE: Do not use a dull or nicked blade.
Heavy, Burned-On Residue
1 Allow the cooktop to cool.
2 Remove the burner grates, vent grille and vent grille gasket.
3 Use a single-edge razor blade scraper at approximately a 45^ angle against the glass surface and scrape the soil. It will be necessary to apply pressure to the razor scraper in order to remove the residue.
4 After scraping with the razor scraper, spread a few drops of CERAMA BRYTE® Ceramic Cooktop Cleaner to the entire burned residue area. Use the CERAMA BRYTE® Cleaning Pad to remove any remaining residue.
For additional protection, after all residue has been removed, polish the entire surface with CERAMA BRYTE® Ceramic Cooktop Cleaner and a paper towel.
Metal Marks and Scratches
Be careful not to slide pots and pans across your cooktop. It will leave metal markings on the cooktop surface.
These marks are removable using the CERAMA BRYTE® Ceramic Cooktop Cleaner with the CERAMA BRYTE® Cleaning Pad for Ceramic Cooktops.
WARNING: Carefully check the bottom of pans for roughness that would scratch the cooktop.
Glass surface—potential for permanent damage.
Our testing shows that if you are cooking high sugar mixtures such as jelly or fudge and have a spillover, it can cause permanent damage to the glass surface unless the spillover is immediately removed.
Damage from Sugary Spills and Melted Plastic
1 Turn off all surface burners and, with an oven mitt, remove hot pans and grates.
2 Wearing an oven mitt:
a. Use a single-edge razor blade scraper (CERAMA BRYTE® Ceramic Cooktop Scraper) to move the spill to a cool area on the cooktop.
b. Remove the spill with paper towels.
3 Any remaining spillover should be left until the surface of the cooktop has cooled.
4 Don't use the surface units again until all of the residue has been completely removed.
NOTE: If pitting or indentation in the glass surface has already occurred, the cooktop glass will have to be replaced. In this case, service will be necessary.
To Order Parts
To order CERAMA BRYTE® Ceramic Cooktop Cleaner and the cooktop scraper, please call our toll-free number:
National Parts Center 800.626.2002
CERAMA BRYTE® Ceramic Cooktop Cleaner . . . # WX10X300
CERAMA BRYTE® Ceramic Cooktop Scraper ..# WX10X0302 Kit ....../..# WB64X5027 (Kit includes cream and razor scraper)
CERAMA BRYTE® Cleaning Pads for Ceramic Cooktops ....#WX10X350
Installation Instructions
Gas Downdraft Cooktop
If you have questions, call 800.GE.CARES (800.432.2737) or visit our Website at: ge.com
IN THE COMMONWEALTH OF MASSACHUSETTS:
- This product must be installed by a licensed plumber or gas fitter.
- When using ball-type gas shut-off valves, they shall be the T-handle type.
- A flexible gas connector, when used, must not exceed 3 feet.
BEFORE YOU BEGIN
Read these instructions completely and carefully.
- IMPORTANT – Save these instructions for local inspector's use.
- IMPORTANT – Observe all governing codes and ordinances.
- Note to Installer – Be sure to leave these instructions with the Consumer.
- Note to Consumer – Keep these instructions for future reference.
- Unless very knowledgeable in the installation of this product, engage a professional installer.
- Proper installation is the responsibility of the installer.
- Product failure due to improper installation is not covered under the Warranty.
FOR YOUR SAFETY
If You Smell Gas:
- Open windows.
- Don't touch any electrical switches.
- Extinguish any open flame.
- Immediately call your gas supplier.
Do not store or use gasoline or other flammable vapors and liquids in the vicinity of this or any other appliance.

WARNING – Before beginning the installation, switch power off at the service panel and lock the service disconnecting means to prevent power from being switched on accidentally. When the service disconnecting means cannot be locked, securely fasten a prominent warning device, such as a tag, to the service panel.
IMPORTANT SAFETY INSTRUCTIONS
The cooktop has been design certified by CSA International. As with any appliance using gas and generating heat, there are certain safety precautions you should follow. You'll find these precautions in the Important Safety Information section in the front of this Owner's Manual. Read them carefully.
- Be sure your cooktop is installed properly by a qualified installer or service technician.
- The cooktop must be electrically grounded in accordance with local codes, or in their absence, with the National Electrical Code ANSI/NFPA No. 70 – Latest Edition.
- Installation of this cooktop must conform with local codes, or in the absence of local codes, with the National Fuel Gas Code ANSI Z223.1 – Latest Edition.
- Improper installation, adjustment, alteration, service or maintenance can cause injury or property damage. Refer to this manual. For assistance or additional information, consult a qualified installer, service agency, manufacturer (dealer) or the gas supplier.
- Disconnect electrical supply before servicing.
- Never reuse old flexible connectors. The use of old flexible connectors can cause gas leaks and personal injury. Always use NEW flexible connectors when installing a gas appliance.
- Make sure the wall coverings around the cooktop can withstand heat generated by the cooktop up to 200^ .
- Avoid placing cabinets above the cooktop.
- If cabinets are placed above the cooktop, allow a minimum clearance of 30" between the cooking surface and the bottom of unprotected cabinets.
- If cabinets are placed above the cooktop, use cabinets no more than 13"deep.
- If a 30" clearance between cooking surface and overhead combustible material or metal cabinets cannot be maintained, protect the underside of the cabinets above the cooktop with not less than 1/4" insulating millboard or gypsum board at least 3/16" thick covered with 28 gauge sheet steel or 0.020" thick copper.
- Clearance between the cooking surface and protected cabinets MUST NEVER BE LESS THAN 24." The vertical distance from the plane of the cooking surface to the bottom of adjacent overhead cabinets extending closer than 1"to the plane of the cooktop sides must not be less than 18."
UNPACKING YOUR COOKTOP
PARTS INCLUDED (PACKED BELOW THE COOKTOP)
- Blower assembly
- Blower plenum
• (4) Nuts (10-32 keps – nuts with lock washers attached)
• (2) Hold-down retainers and thumb screws
• (9) Sheet metal screws (8-18 x 3/8") - Foam gasket tape (9-ft. roll)
-
Vent grille
-
Vent filter
- Vent grille gasket
- Cleaning cream
- Scrub sponge or scraper (on some models)
- Burner grates
-
Burner heads (1 small (A), 2 medium (B), 1 large (C))
-
Burner caps (1 small, 2 medium, 1 large)
• Gas pressure regulator - Attached 120-volt grounded plug cord
- LP Conversion
- Reflective tape

Reflective Tape

Hold-Down
Retainers and
Screws

natural_image
Simple line drawing of a folded paper or sheet with vertical ridges (no text or symbols)Vent Grille
Burner Grate (2)

natural_image
3D diagram of a rectangular tray with four petal-like cutouts and a central hub (no text or symbols)
natural_image
Technical line drawing of a mechanical valve or pump component (no text or symbols)Regulator

Sheet Metal Screws (9) (8-18 x 3/8")

Scrub Sponge


Foam Gasket Tape Vent Grille Gasket

text_image
Safety warning symbol with crossed-out hand and prohibition sign, indicating no protection or disapprovalCAUTION: DO NOT LIFT FROM VENT OPENING
CAUTION: GLASS IS FRAGILE
DO NOT BUMP EDGE OF GLASS DURING INSTALLATION

text_image
DO NOT FROM OPE B B C ABurner Cap and Burner Head
Burner Cap and Burner Head

Blower Assembly and (4) Mounting Nuts (10-32 keps - nuts with lock washers attached)

Blower Plenum

Vent Filter
PREPARATION
TOOLS AND MATERIALS YOU WILL NEED
- Saw
- Duct tape
• Measuring tape or scale - Carpenter's square
- Adjustable wrench or socket set (7/16" socket and ratchet)
- Drill and drill bit
- 1/4"nut driver
- Sheet metal screws
- Pipe wrench
- Manual gas line shut-off valve
- Pipe joint sealant that resists action of LP gas
- Ductwork to suit the installation
For rigid connection:
- Shut-off valve
- Union
- Pipe fittings as required
For flexible connection where local codes permit:
- Flexible metal tubing (same 3/4" or 1/2" I.D. as gas supply line)
30"COOKTOP (DIMENSIONS FOR REFERENCE ONLY)
Unit shown fully assembled.

natural_image
Technical line drawing of a dual-panel electric fan or heat exchanger mounted on a base (no text or symbols)
text_image
21½" 22" 20½" 29½" 2½" 28¾"Unit must be vented to the outside!
CABINET PREPARATION
1 PREPARING FOR INSTALLATION Positioning the cooktop
The cooktop is designed to look best when centered in a cabinet at least 30"wide.
The exhaust vent beneath the cooktop must be located between wall studs or floor joists so that the ductwork may be installed properly.

text_image
13" max. depth of unprotected overhead cabinets 30" min. clearance from countertop to unprotected overhead surface 18" min. height from countertop to nearest cabinet on either side of the unit 5" min. clearance from cutout to side walls 1½" min.The downdraft system with blower, motor and ductwork will occupy the cabinet below the cooktop. Drawers cannot be installed below this cooktop.
Avoid placing cabinets above the cooktop unit, if possible, in order to reduce the hazards caused by reaching over heated surface units.
If the cabinetry is used above the cooktop, allow a minimum 30" clearance between the cooking surface and the bottom of the unprotected cabinet.
If the clearance between the cooktop and the cabinetry is less than 30", the cabinet bottom must be protected with a flame retardant millboard at least 1/4" thick, or gypsum board at least 3/16" thick, covered with 28 gauge sheet steel or 0.020" thick copper. Clearance between the cooktop and the protected cabinetry MUST NEVER BE LESS THAN 24".
EXCEPTION: Installation of a listed microwave oven or cooking appliance over the cooktop shall conform to the installation instructions packed with that appliance.
Working areas adjacent to the cooktop should have an 18" minimum clearance between the countertop and the bottom of the cabinet. If the clearance is less than 18", the adjacent cabinets should be at least 5" from the side edge of the cooktop.
② PREPARING THE BASE CABINET
This cooktop is designed to fit easily into a variety of cabinets. However, the combined installation of a downdraft vent and a cooktop require careful consideration.
Some cabinets may require modifications.
This installation requires a 24"min. deep cabinet base. The cabinet must be at least 30"wide.
Preparing a cabinet that is against a wall
In some cabinets, the sides may need to be scooped or cut down 5 ^3/4 "as shown, and the corner braces removed in order to accommodate the unit.
In 75 cm and 90 cm frameless European cabinets, the back panel may need to be cut down 5 ^3/4 "to accommodate the unit.
Preparing a peninsula or island-type cabinet
In a peninsula or island type cabinet, the sides may need to be scooped or cut down, and the corner braces removed in order to accommodate the unit.

text_image
5¾/4" Approx. for European cabinets Approx.CABINET PREPARATION CUTOUTS
③ PREPARING THE COUNTERTOP
The countertop must have a deep flat surface to accommodate the cooktop and the vent. Countertops with a rolled front edge and backsplash may not provide the flat surface area required.
Clearance between inside front of cabinet and rear of countertop cutout must be 20 ^5/8 "in order to accommodate cooktop depth.

text_image
2³/₈"Min. 20⁵/₈" 17/₈"Min.A 1/2"wide flat area is required around the edge of opening for support of the unit. The cooktop unit must be level and sit squarely into countertop opening.
Carefully cut countertop opening according to the dimensions shown in the illustration. Be sure that opening is cut squarely, with sides parallel to each other and rear exactly perpendicular to sides.

text_image
205/8" 25" 287/8" 17/8"Min.4 PREPARING FOR DUCTWORK
NOTE: Ductwork MUST be vented to outside. DO NOT vent into a wall, ceiling, crawlspace, attic or any concealed space.
Cut hole in cabinet wall or floor as appropriate for your installation. Make sure exhaust duct is located between wall studs or floor joists.
NOTE: When cutting or drilling into wall or ceiling, do not damage electrical wiring and other hidden utilities.

text_image
9½" 18¾" Rear Wall Venting
text_image
6½" 10½" Downward Venting⑤ BLOWER TO DUCTWORK ALIGNMENT
In general, the use of flexible ducting is discouraged because it can cause severely restricted airflow. However, if the blower outlet and the floor or wall duct location do NOT align well, then flexible METAL ducting can be used to adapt to an offset. Good alignment without use of flexible ducting is best.
NOTE:
- Do not exceed the maximum recommended offset of 6".
- Do not allow the flexible ducting to kink or collapse.
- Do stretch the flexible ducting as much as possible to eliminate as much of the corrugation as possible.

text_image
6"Max. Centerline to Centerline Offset Bottom Venting Back Venting (Requires 3¼"x 10A 3 14 " x 10" rectangle to 6" round transition duct is available at your local building supply store.
NOTE: Illustrations are for planning purposes only.
DUCTWORK CALCULATIONS
| Calculate Total Equivalent Ductwork Length | |||
| Duct Pieces Length* x Used = Length | Equivalent Number Equivalent | ||
| 6"round straight 1 ft. x ( ) † = ft. | |||
| 31⁄4"x 10" straight 1 ft. x ( ) † = ft. | |||
| 6", 90° elbow 15 ft. x ( ) = ft. | |||
| 6", 45° elbow 9 ft. x ( ) = ft. | |||
| 24"max. flexible metal offset adapter 34 ft. x ( ) = ft. | |||
| 31⁄4"x 10" 90° elbow 16 ft. x ( ) = ft. | |||
| 31⁄4"x 10" 45° elbow 5 ft. x ( ) = ft. | |||
| 31⁄4"x 10" 90° flat elbow 18 ft. x ( ) = ft. | |||
| 6"round to 31⁄4"x 10" transition 7 ft. x ( ) = ft. | |||
| Subtotal Column 1 = ft. | |||
| *Equivalent lengths of duct pieces are based on actual tests and reflect requirements for good venting performance with any downdraft cooktop.†Measure and list feet of straight duct used. Count and list the quantity of all other duct pieces for the "Number Used" of each type.IMPORTANT:For maximum efficiency, use the shortest and straightest duct run possible, with as few fittings as possible. For satisfactory performance, the duct run should not exceed 100 feet equivalent length.Venting performance is improved by using larger diameter duct. | |||
| Duct Pieces Length ^x | Equivalent Number Equivalent Used = Length | ||
| 6"round to 31⁄4"x 10" transition 90° elbow 20 ft. x( )= ft. | |||
| 31⁄4"x 10" to 6"round transition 5 ft. x( )= ft. | |||
| 31⁄4"x 10" to 6"round transition 90° elbow 12 ft. x( )= ft. | |||
| 6"round wall cap with damper | 21 ft. x( )= ft. | ||
| 31⁄4"x 10" wall cap with damper | 27 ft. x( )= ft. | ||
| 6"round roof cap | 20 ft. x( )= ft. | ||
| 6"round roof vent | 24 ft. x( )= ft. | ||
| Subtotal Column 2 = ft. | |||
| Subtotal Column 1 = ft. | |||
| TOTAL DUCTWORK = ft. | |||
| Should not exceed 100 feet. | |||
| DO NOT use flexible plastic ducting.Vent installation should not exceed 100 feet equivalent length. | |||
EXHAUST BLOWER RATINGS
EXHAUST BLOWER SAFETY WARNING
Sufficient air is needed for proper combustion and exhausting of gases through the flue (chimney) of other fuel burning equipment to prevent back drafting. Follow the heating equipment manufacturer's guidelines and safety standards such as those published by the National Fire Protection Association (NFPA), the American Society for Heating, Refrigeration and Air Conditioning Engineers (ASHRAE) and local code authorities.
NOTE: The exhaust blower output is approximately 400 CFM (cubic feet per minute) without ductwork. Each installation is different and ductwork affects blower output accordingly. Actual blower exhaust CFM can be approximated using the graph below.
Step 1: Calculate the "equivalent duct length" using the "DUCTWORK CALCULATIONS" table in these instructions for your installation.
Step 2: Find the approximate intersection point of the blower exhaust performance curve with the equivalent duct length to estimate the actual maximum blower output for your installation.
Examples: 50 equivalent feet of ductwork has approximately 320 CFM. 100 equivalent feet of ductwork has approximately 265 CFM.
Downdraft Cooktop Exhaust Blower CFM

line
| X | Air Flow (CFM) | | ---- | -------------- | | 0 | 400 | | 25 | 380 | | 50 | 360 | | 75 | 340 | | 100 | 320 | | 125 | 300 | | 150 | 280 | | 175 | 260 | | 200 | 240 | | 225 | 230 |6" Diameter Equivalent Duct Length
DUCTWORK INSTALLATION
(Note: For planning purposes only.)
6 INSTALLING THE DUCTWORK
Use galvanized or aluminum duct in 6" round or 3 ^1/4 " x 10" size, or a combination of both.
PVC duct should be used if installing under a poured concrete slab.
NOTE: Local building code must be followed in specifying approved type and schedule of ALL duct used.
Always use an appropriate roof or wall cap with damper. Laundry-type wall caps should NEVER be used.

natural_image
Technical line drawing of two mechanical assembly configurations (no text or symbols)Through Cabinet Toe Space Between Floor Joist
Downward Venting
Install ductwork, making male-female connections in the direction of airflow as shown. Secure all joints with sheet metal screws and duct tape to assure an airtight seal.

text_image
Air Flow Duct Tape Over Seam and Screw ScrewUse the shortest and straightest duct run possible. For satisfactory performance the duct run should not exceed 100 feet equivalent length. Refer to TABLE 1 of equivalent lengths. Use TABLE 1 to calculate the total equivalent length of the ductwork.
OPTIONAL INSTALLATION: REAR WALL VENTING
5"round duct may be used on SHORT DUCT runs of 3 feet or less, such as direct to outside wall venting.

natural_image
Technical line drawing of two mechanical assembly configurations (no text or symbols)Inside Wall to Roof Direct to Outside
Rear Wall Venting
To convert blower exhaust direction, remove four nuts behind the filter which hold blower and wire finger guard.
Rotate blower and reinstall to vent chamber, as shown above. Retighten nuts, but do not overtighten.
POWER SUPPLY LOCATIONS
GAS SUPPLY:
These cooktops are designed to operate on natural gas at 4" of water column pressure or on LP gas at 10" of water column pressure.
- These cooktops are shipped from the factory set for natural gas. If you decide to use this cooktop with LP gas, conversion adjustments must be made by a service technician or other qualified person.
- The pressure regulator must be connected in series with the manifold of the cooktop and must remain in series with the supply line regardless of type of gas being used.
For proper operation, the maximum inlet pressure to the regulator must be no more than 10" water column pressure for natural gas and 14" water column pressure for LP gas.
- When checking the regulator, the inlet pressure must be at least 1" greater than the regulator output setting. If the regulator is set for 4" of water column pressure, the inlet pressure must be at least 5". If the regulator is set for 10" of water column pressure, the inlet pressure must be at least 11". For ease of installation, and if local codes permit, the gas supply line into the cooktop should be 1/2" or 3/4" ID flexible metal appliance connector, three to five feet long.
NOTE: Purchase a new flexible line. DO NOT USE AN OLD PREVIOUSLY USED LINE.
- Make gas connection through rear wall, or on cabinet floor at rear, as illustrated.
ELECTRICAL SUPPLY:

text_image
29½" 2" Min 3" Min Electrical outlet 12" above cabinet floor (mount on side or back cabinet wall 2"min. from centerline) Gas pipe location 4"(to clear toe kick area)The built-in gas downdraft cooktop features pilotless electric ignition for energy savings and reliability. It operates on a 120-volt, 60-Hz power supply. A separate circuit, protected by a 15-amp time-delay fuse or circuit breaker, is required.
- A properly grounded 3-prong receptacle should be located within reach of cooktop's four foot power cord.
IMPORTANT: (Please read carefully.) FOR PERSONAL SAFETY, THIS APPLIANCE MUST BE PROPERLY GROUNDED.
The power cord of this appliance is equipped with a three-prong (grounding) plug which mates with a standard three-prong grounding wall receptacle to minimize the possibility of electric shock hazard from this appliance. The customer should have the wall receptacle and circuit checked by a qualified electrician to make sure the receptacle is properly grounded and has correct polarity.
Where a standard two-prong wall receptacle is encountered, it is the personal responsibility and obligation of the customer to have it replaced with a properly grounded three-prong wall receptacle.
Do Not, Under Any Circumstances, Cut Or Remove The Third (ground) Prong From The Power Cord.
Do not use an extension cord.
UNPACKING THE COOKTOP/INSTALLING THE GASKET
7 INSTALLING THE FOAM GASKET AND REFLECTIVE TAPE
⚠️ CAUTION: Potential risk of fire – reflective tape must be secured around countertop opening as shown.
Do not install the cooktop into the countertop without installing the foam gasket as shown. It protects the bottom edge of the glass from the countertop and seals the cooktop against spills.
Remove the cooktop along with its shipping pad from the shipping box. Remove the shipping block from the downdraft vent opening and place it under the shipping pad to provide level support.

natural_image
Technical line drawing of a mechanical component with no visible text or symbolsCenter vent shipping block – place under the shipping pad to provide level support
⚠️CAUTION: GLASS IS FRAGILE. DO NOT BUMP EDGE OF GLASS DURING INSTALLATION.
Locate the reflective tape and foam gasket tape included with your cooktop.


Smooth rough edges of the cutout. Install reflective tape to the opening, along the inside and 3/8" to 1/2" of the opening edge.

text_image
Place r 1/2" of reflective tapetop and vertical sidesPeel off the white backing to install the foam gasket tape on the bottom side of the cooktop glass as shown.
Foam Gasket Installation Notes:
- The foam gasket tape should be installed within 1/8" of the edge of the glass. Do not stretch or twist the foam gasket tape.
⚠️CAUTION: Failure to install foam gasket tape greatly increases the potential of breaking the cooktop glass when installing, especially in Corian® or granite countertops. - Use care not to stretch the foam gasket tape while it is installed or it will not stay in place.
- Do not place foam gasket tape over the metal flanges.
- Butt the foam gasket tape ends together at each corner without overlapping.
- Trim the foam gasket tape to length without stretching.
- Mitre cut outside corners of foam gasket tape slightly if necessary for appearance.

text_image
Underside of Glass Foam Gasket Tape 1/8" max. to Glass Edge- Do not scratch the glass while cutting the foam gasket tape.
INSTALLING THE COOKTOP
8 INSTALLING THE COOKTOP

text_image
Diagram showing a prohibition symbol over a device with dollar signs and circular components, likely indicating financial or cost-related restrictions.CAUTION:
DO NOT LIFT FROM VENT OPENING.
Lift the cooktop by the glass side edges as shown.
NOTE: Do not use the glass top vent opening to lift or move the cooktop into position.

natural_image
Line drawing of a hand pressing down on a metal plate with circular holes (no text or symbols)Lower the cooktop into the countertop opening, guiding it into position. Glass is fragile—do not allow it to drop onto the countertop. Support from the underside and lower slowly.
Carefully remove your fingers one corner at a time to lower the cooktop into position.
NOTE: Do not use Silicone RTV or caulk to bond cooktop glass to countertop.
9 CHECKING FOR FLATNESS
Inspect the cooktop glass for rocking or uneven gap on all four sides at the countertop surface. Do not attempt to force the glass to meet the countertop.

text_image
Check for uneven gapsINSTALLING THE COOKTOP
10 INSTALLING THE HOLD-DOWN RETAINERS
NOTE: Check for glass flatness in Step 9 before installing hold-down retainers.

text_image
Hold-down retainer Hold-down retainer Countertop Thumb screwSecure cooktop to the counter using the hold-down retainers and thumb screws shipped with the unit (one on each side).
11 INSTALLING THE BLOWER PLENUM TO THE COOKTOP
Slide the plenum, with the blower opening on the left, into the opening in the bottom of the cooktop. Push up on the plenum until the stops on the plenum contact the bottom of the cooktop, and snap the plenum into place. (You may have to move the plenum back and forth to work it into place.)

natural_image
Line drawing of a kitchen sink with a stove and air vent, showing an upward arrow (no text or symbols)Secure the plenum to the bottom of the cooktop, on each side, using the four (4) screws provided. Further secure the plenum to the cooktop, from the top side, using the two screws (2) provided.
12 INSTALLING THE BLOWER TO THE PLENUM
Orient the blower discharge opening to match the ductwork in Steps 5 and 6. Slide the four threaded studs on the side of the blower housing into the four holes on the side of the plenum.
NOTE: See Step 13 for installing the transition duct to the blower. It may be easier to install the transition duct to the blower before installing the blower to the plenum.

natural_image
Technical line drawing of a mechanical assembly with a motor and cable (no text or symbols)From the vent opening in the top of the cooktop, fasten the blower assembly securely to the plenum with four (4) nuts.

text_image
4 Nuts (7/16" socket required)INSTALLING THE COOKTOP
13 ATTACHING A BLOWER TRANSITION DUCT
Use a blower transition duct for all downward duct installations to connect to 6"round standard ductwork. This 3 ^1/4 " x 10" rectangle to 6"round transition duct is available at your local building supply store.

text_image
Screws Screw (on other side)Install the transition duct to the blower outlet. Secure all joints with duct tape to assure an airtight seal.
14 CONNECTING THE DUCTWORK
Connect the ductwork prepared in Steps 5 and 6 to the blower transition duct.
INSTALLING THE COOKTOP
15 INSTALL THE PRESSURE REGULATOR

text_image
Regulator Solid piping or flexible connector Union Solid piping or flexible connector Shut-off valve Pipe stub- Install the supplied pressure regulator in the gas line as close to the cooktop inlet as possible. Allowances for ventilation ducting may be necessary.
Make sure the regulator is installed in the right direction.
- Install a manual shut-off valve in the gas line in an easily accessible location.
NOTE: Instead of using solid piping to connect to pressure regulator, an approved flexible metal appliance connector may be used between the shut-off valve and the pressure regulator, if local codes permit.
Appropriate flare nuts and adapters are required at each end of the flexible connector.
TEST FOR LEAKS
WARNING: DO NOT USE A FLAME TO CHECK
FOR GAS LEAKS! Do not use the cooktop until all connections have been leak tested.
Perform leak test per the following instructions:
- Purchase a liquid leak detector or prepare a soap solution of one part water, one part liquid detergent.
- When all connections have been made, make sure all cooktop controls are turned to OFF and turn the gas supply valve to ON.
- Apply the liquid leak detector or the soap solution around all connections from the shut-off valve to the cooktop.
- A leak is identified by a flow of bubbles from the area of the leak.
- If a leak is detected, turn the gas supply off. Tighten the fitting. Turn the gas on and test again. If the leak persists, turn the gas supply off and contact your dealer for assistance. Do not attempt to operate the cooktop if a leak is present.
15 INSTALL THE PRESSURE REGULATOR (cont.)
IMPORTANT: Disconnect the cooktop and the individual shut-off valve from the gas supply piping system during any pressure testing of that system at test pressures greater than 1/2 psig. Isolate the cooktop from the gas supply piping system by closing the individual manual shut-off valve to the cooktop during any pressure testing of the gas supply piping system at test pressures equal to or less than 1/2 psig.
16 BLOWER ELECTRICAL CONNECTIONS
- Loosen the two screws and remove and discard the sheet metal connector cover on the cooktop bottom. Save the screws for reinstallation later.
- Connect the 5-pin plug on the blower assembly to the matching 5-pin receptacle on the bottom of the cooktop.

text_image
5-pin connectors- Fold all wires into the electrical enclosure. Secure the enclosure with the screws removed earlier, making sure that no wires are trapped.

text_image
5-pin connectors Electrical enclosure Flexible conduit- Plug the cooktop cord set into a suitable electrical outlet. See step 17.
ELECTRICAL CONNECTIONS
17 ELECTRICAL REQUIREMENTS
120-volt, 60-Hertz, properly grounded branch circuit protected by a 15-amp or 20-amp circuit breaker or time-delay fuse.
EXTENSION CORD CAUTIONS
Because of potential safety hazards associated with certain conditions, we strongly recommend against the use of an extension cord. However, if you still elect to use an extension cord, it is absolutely necessary that it be a UL-listed, 3-wire grounding-type appliance extension cord and that the current carrying rating of the cord in amperes be equivalent to, or greater than, the branch circuit rating.
GROUNDING
IMPORTANT — (Please read carefully.)
FOR PERSONAL SAFETY, THIS APPLIANCE MUST BE PROPERLY GROUNDED.
Preferred Method


Ensure proper ground exists before use
The power cord of this appliance is equipped with a three-prong (grounding) plug which mates with a standard three-prong grounding wall receptacle to minimize the possibility of electric shock hazard from this appliance.
The customer should have the wall receptacle and circuit checked by a qualified electrician to make sure the receptacle is properly grounded.
Where a standard two-prong wall receptacle is encountered, it is the personal responsibility and obligation of the customer to have it replaced with a properly grounded three-prong wall receptacle.
DO NOT, UNDER ANY CIRCUMSTANCES, CUT OR REMOVE THE THIRD (GROUND) PRONG FROM THE POWER CORD.
An adapter may be used only on a 15-amp circuit. Do not use an adapter on a 20-amp circuit. Where local codes permit, a TEMPORARY CONNECTION may be made to a properly grounded two-prong wall receptacle by the use of a UL-listed adapter, available at most hardware stores. The larger slot in the adapter must be aligned with the larger slot in the wall receptacle to provide proper polarity in the connection of the power cord.
Temporary Method
(Adapter plugs not permitted in Canada)
Align large prongs/slots

text_image
y Method ugs not permitted in ge prongs/slots Ensure proper ground and firm connection before useEnsure proper ground and firm connection before use
⚠️ CAUTION: Attaching the adapter ground terminal to the wall receptacle cover screw does not ground the appliance unless the cover screw is metal, not insulated, and the wall receptacle is grounded through the house wiring. The customer should have the circuit checked by a qualified electrician to make sure the receptacle is properly grounded.
When disconnecting the power cord from the adapter, always hold the adapter with one hand. If this is not done, the adapter ground terminal is very likely to break with repeated use. Should this happen, DO NOT USE the appliance until a proper ground has again been established.
FINAL ASSEMBLY
18 ASSEMBLE BURNERS, CHECK IGNITION
Assemble burner as shown.

text_image
Grate Curved side toward the center Burner cap Burner head Burner base ElectrodeCAUTION: Do not operate the burner without all burner parts in place.

text_image
Medium Head and Cap B A B C Small Head and Cap Front of Cooktop Medium Head and Cap B A c Large Head and CapPlace the burner heads on the burner bases matching the letters. Place the caps on the heads. Make sure that the heads and caps are placed on the correct size burner. The
burner heads and burner bases are labeled A, B and C to aid reassembly. There is one small (A), two medium (B) and one large (C) head and cap.

natural_image
Technical line drawing of a mechanical component with a circular base and cylindrical shaft (no text or symbols)Make sure the notch in the burner head is positioned toward the electrode. Rotate the burner head around the burner base until it is level and securely seated.
Place the grates over the burners.
Check for proper ignition:
- Push in one control knob and turn to LITE position.
- The igniter will spark and the burner will light; the igniter will cease sparking when the burner is lit.
- First test may require some time, while air is flushed out of the gas line.
- Turn knob to OFF.
- Repeat the procedure for each burner.
19 INSTALL DOWNDRAFT FILTER, VENT GASKET AND VENT GRILLE
Do not operate the vent without the filter in place.
- Place the filter diagonally through the vent opening.

text_image
Vent Filter Vent Chamber- Make sure it rests, at an angle, on the supports in the vent opening.

natural_image
Simple line drawing of a 3D rectangular prism with a mesh pattern on one face (no text or symbols)- Fit the vent grille gasket around the edge of the downdraft vent opening. Make sure the front of the gasket is installed toward the front of the cooktop.
- Carefully place the vent grille onto the gasket on the downdraft opening.

text_image
Grille Vent Grille GasketCHECK OPERATION OF DOWNDRAFT
- Turn the vent fan speed control to HI, MED and LO to make sure all speeds operate correctly.
Before you call for service... ge.com

Troubleshooting Tips
Save time and money! Review the chart on this page
first and you may not need to call for service.
| Problem Possible Causes What To Do | |||
| Water won't boil • Cover pan with a lid. | |||
| Turn the downdraft fanOFFuntil the water begins to boil. | |||
| Burners have yellow or yellow-tipped flames | The combustion quality of burner flames needs to be determined visually. | Use the illustrations below to determine if your burner flames are normal. If burner flames look likeA, call for service. Normal burner flames should look likeBorC, depending on the type of gas you use. With LP gas, some yellow tipping on outer cones is normal. | |
 | 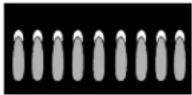  | ||
| A-Yellow flamesCall for service | B-Yellow tipson outer conesNormal for LP gas C-Soft blue flamesNormal for natural gas | ||
| Burner parts not replaced correctly. | See Care and cleaning of the cooktop section. | ||
| Burners do not light | Plug on cooktop is not completely inserted in the electrical outlet. | Make sure electrical plug is plugged into a live, properly grounded outlet. | |
| Gas supply not connected or turned on. | See the Installation Instructions section. | ||
| A fuse in your home may be blown or the circuit breaker tripped. | Replace the fuse or reset the circuit breaker. | ||
| Igniter orifice in burner body may be clogged. | Remove the obstruction. | ||
| Burner parts not replaced correctly. | See Burner Caps and Heads in theCare and cleaning of the cooktop section. | ||
| Hole in burner top behind the igniter may be clogged. | Use a small sewing needle to unplug. | ||
| Sparking sound persists after burner is turned off | Be sure the knob is in the OFF position. | Remove knob by pulling it straight off the stem and check the bottom of the knob for any buildup of soil. | |
| Occasional sparking sound | Changing blower speed. | This is a typical electrical switching noise.This is normal. | |
| Burner flames very large or yellow | Improper air to gas ratio. | If cooktop is connected to LP gas, contact the person who installed your cooktop or made the conversion. | |
| Burner parts not replaced correctly. | See Care and cleaning of the cooktop section. | ||
Before you call for service...

Troubleshooting Tips
Problem Possible Causes What To Do
| Control knobswill not turn and then turn. The knob can only be turned in a counterclockwise direction. When the knob is at any other position, it can be turned in either direction without being pushed in. | ||
| Fan does not work | The fan control knob is improperly set. | Turn knob in clockwise direction to turn fan on. |
| Cord improperly connected or power turned off. | Check connections. Turn on power at the fuse box. | |
| Poor venting | Clogged filter. | Clean filter per instructions. |
| House too airtight. | Open a window slightly to provide fresh air source. | |
| Wall cap obstructed. | Remove blockage from exterior wall cap. | |
| Wall cap damper door stuck. | Check exterior wall cap damper door for free movement or obstruction. | |
| Duct length exceeds recommended 100 equivalent foot maximum. | Reduce number of elbows to simplify duct run. | |
| Scratches (may appear as cracks) on cooktop glass surface | Incorrect cleaning methods being used. | Scratches are not removable. Tiny scratches will become less visible in time as a result of cleaning. |
| Cookware with rough bottoms being used or coarse particles (salt or sand) were between the cookware and the surface of the cooktop. | To avoid scratches, use the recommended cleaning procedures. Make sure bottoms of cookware are clean before use, and use cookware with smooth bottoms. | |
| Cookware has been slid across the cooktop surface. | ||
| Areas of discoloration on the cooktop | Food spillovers not cleaned before next use. | See the Cleaning the glass cooktop section. |
| Hot surface on a model with a light colored cooktop. | This is normal. The surface may appear discolored when it is hot. This is temporary and will disappear as the glass cools. | |
| Plastic melted to the surface | Hot cooktop came into contact with plastic placed on the hot cooktop. | See the Glass surface—potential for permanent damage section in the Cleaning the glass cooktop section. |
| Pitting (or indentation) of the cooktop | Hot sugar mixture spilled on the cooktop. | Call a qualified technician for replacement. |
GE Service Protection Plus™
GE, a name recognized worldwide for quality and dependability, offers you Service Protection Plus™—comprehensive protection on all your appliances—No Matter What Brand!
Benefits Include:
- Backed by GE
- All brands covered
• Unlimited service calls - All parts and labor costs included
• No out-of-pocket expenses
• No hidden deductibles
• One 800 number to call
We'll Cover Any Appliance. Anywhere. Anytime.\*
You will be completely satisfied with our service protection or you may request your money back on the remaining value of your contract. No questions asked. It's that simple.
Protect your refrigerator, dishwasher, washer and dryer, range, TV, VCR and much more—any brand! Plus there's no extra charge for emergency service and low monthly financing is available. Even icemaker coverage and food spoilage protection is offered. You can rest easy, knowing that all your valuable household products are protected against expensive repairs.
Place your confidence in GE and call us in the U.S. toll-free at 800.626.2224 for more information.
*All brands covered, up to 20 years old, in the continental U.S.

Cut here
Please place in envelope and mail to:
General Electric Company
Warranty Registration Department
P.O. Box 32150
Louisville, KY 40232-2150
Consumer Product Ownership Registration
Dear Customer:
Thank you for purchasing our product and thank you for placing your confidence in us.
We are proud to have you as a customer!
Follow these three steps to protect your new appliance investment:
1
Complete and mail your Consumer
Product Ownership
Registration today.
Have the peace of mind of knowing we can contact you in the unlikely event of a safety modification.
2
After mailing the registration below, store this document in a safe place. It contains information you will need should you require service. Our service number is 800.GE.CARES (800.432.2737).
3
Read your Owner's
Manual carefully.
It will help you
operate your new
appliance properly.
Model Number Serial Number

natural_image
Two identical horizontal lines with tick marks, no text or symbols presentImportant: If you did not get a registration card with your product, detach and return the form below to ensure that your product is registered, or register online at ge.com.

Consumer Product Ownership Registration

Model Number Serial Number

natural_image
Two identical horizontal lines with tick marks, no text or symbols present
text_image
Mr. □ Ms. □ Mrs. □ Miss □ First Name Last Name
text_image
Street Address
text_image
Apt. # E-mail Address* ____
text_image
City State Zip Code
text_image
Date Placed In Use Month Day Year Phone: Number
GE Consumer & Industrial
Appliances
General Electric Company
Louisville, KY 40225
ge.com
* Please provide your e-mail address to receive, via e-mail, discounts, special offers and other important communications from GE Appliances (GEA).
Check here if you do not want to receive communications from GEA's carefully selected partners.
FAILURE TO COMPLETE AND RETURN THIS CARD DOES NOT DIMINISH YOUR WARRANTY RIGHTS.
For information about GFA's privacy and data usage policy, go to ge.com and click on "Privacy Policy" or call 800.626.2224.
GE Gas Cooktop Warranty.

All warranty service provided by our Factory Service Centers, or an authorized Customer Care® technician. To schedule service, on-line, 24 hours a day, visit us at ge.com, or call 800.GE.CARES (800.432.2737). Please have serial number and model number available when calling for service.
Staple your receipt here. Proof of the original purchase date is needed to obtain service under the warranty.
For The Period Of: GE Will Replace:
| One YearFrom the date of the original purchase replace | Any part of the cooktop which fails due to a defect in materials or workmanship. During this limited one-year warranty, GE will also provide, free of charge, all labor and in-home service to the defective part. |
| Five YearsFrom the date of the original purchase the defective part. | A replacement glass cooktop if it should crack or discolor. During this limited additional four-year warranty, you will be responsible for any labor or in-home service to replace |
What GE Will Not Cover:
■ Service trips to your home to teach you how to use the product.
- Improper installation, delivery or maintenance.
Failure of the product if it is abused, misused, or used for other than the intended purpose or used commercially.
■ Damage to the glass cooktop caused by the use of cleaners other than the recommended cleaning creams and pads.
Damage to the glass cooktop caused by hardened spills of sugary materials or melted plastic that are not cleaned according to the directions in the Owner's Manual.
■ Replacement of house fuses or resetting of circuit breakers.
■ Damage to the product caused by accident, fire, floods or acts of God.
■Incidental or consequential damage caused by possible defects with this appliance.
■ Damage caused after delivery.
■ Product not accessible to provide required service.
EXCLUSION OF IMPLIED WARRANTIES—Your sole and exclusive remedy is product repair as provided in this Limited Warranty. Any implied warranties, including the implied warranties of merchantability or fitness for a particular purpose, are limited to one year or the shortest period allowed by law.
This warranty is extended to the original purchaser and any succeeding owner for products purchased for home use within the USA. If the product is located in an area where service by a GE Authorized Servicer is not available, you may be responsible for a trip charge or you may be required to bring the product to an Authorized GE Service Location for service. In Alaska, the warranty excludes the cost of shipping or service calls to your home.
Some states do not allow the exclusion or limitation of incidental or consequential damages. This warranty gives you specific legal rights, and you may also have other rights which vary from state to state. To know what your legal rights are, consult your local or state consumer affairs office or your state's Attorney General.

GE Appliances Website
ge.com
Have a question or need assistance with your appliance? Try the GE Appliances Website 24 hours a day, any day of the year! For greater convenience and faster service, you can now download Owner's Manuals, order parts or even schedule service on-line.

Schedule Service ge.com
Expert GE repair service is only one step away from your door. Get on-line and schedule your service at your convenience 24 hours any day of the year! Or call 800.GE.CARES (800.432.2737) during normal business hours.

Real Life Design Studio ge.com
GE supports the Universal Design concept—products, services and environments that can be used by people of all ages, sizes and capabilities. We recognize the need to design for a wide range of physical and mental abilities and impairments. For details of GE's Universal Design applications, including kitchen design ideas for people with disabilities, check out our Website today. For the hearing impaired, please call 800.TDD.GEAC (800.833.4322).

Extended Warranties ge.com
Purchase a GE extended warranty and learn about special discounts that are available while your warranty is still in effect. You can purchase it on-line anytime, or call 800.626.2224 during normal business hours. GE Consumer Home Services will still be there after your warranty expires.

Parts and Accessories ge.com
Individuals qualified to service their own appliances can have parts or accessories sent directly to their homes (VISÄ, MasterCard and Discover cards are accepted). Order on-line today, 24 hours every day or by phone at 800.626.2002 during normal business hours.
Instructions contained in this manual cover procedures to be performed by any user. Other servicing generally should be referred to qualified service personnel. Caution must be exercised, since improper servicing may cause unsafe operation.

Contact Us ge.com
If you are not satisfied with the service you receive from GE, contact us on our Website with all the details including your phone number, or write to: General Manager, Customer Relations GE Appliances, Appliance Park Louisville, KY 40225

Register Your Appliance ge.com
Register your new appliance on-line—at your convenience! Timely product registration will allow for enhanced communication and prompt service under the terms of your warranty, should the need arise. You may also mail in the pre-printed registration card included in the packing material.
de embaîle.
Louisville, KY 40225
GE Appliances, Appliance Park
General Manager, Customer Relations
Garantec: General Electric Company, Louisville, KY 40225
natural_image
Simple line drawing of a mechanical component with no text or symbolsnatural_image
Technical line drawing of a mechanical assembly with hoses and components (no text or symbols)natural_image
Line drawing of a refrigerator with a downward arrow indicating a drop or change (no text or symbols present)excto.
natural_image
Technical line drawing of a mechanical component with no visible text or symbolsapoyo de nivel.
natural_image
Technical line drawing of a mechanical assembly with no visible text or symbolsnatural_image
Technical line drawing of a mechanical assembly with no visible text or symbolsnatural_image
Pure technical line drawing of a mechanical assembly without any text, numbers, or symbolsuser NUMCA.
text_image
"%,9" "%,0Ltext_image
"8%1 "8%6text_image
178" Min. 287/8" 25" 205/8"lados.
text_image
17% Min. 20% 23% Min.text_image
283/4" 21/4" 297/8"
text_image
201/2" 22" - 217/8"
natural_image
Technical line drawing of a mechanical component with internal channels and a coiled cable (no text or symbols)locals to permittan:
natural_image
Hand holding a pen with a magnifying glass over a surface, no text or symbols visiblenatural_image
Simple line drawing of a hand holding an object over two circular shapes (no text or symbols)text_image
Area plan Area plan moldedanatural_image
Simple line drawing of a door with a mesh-patterned guard net (no text or symbols)natural_image
Pure geometric diagram of a symmetrical fan-like pattern with no text or symbols
natural_image
Simple line drawing of a mechanical component with no text or symbolstext_image
LO MED OFF HInatural_image
Symbolic illustration of a crossed-out ring with a cross mark, no text or labels presentnatural_image
Simple line drawing of a chimney with a cross symbol (no text or labels)natural_image
Illustration of a hand holding a small object with an upward arrow and striped pattern (no text or symbols)text_image
Technical diagram of a fan or vent system with numbered components and internal structure, likely for assembly or labeling.E. Siempire use sentences y intensities appropriations