
4710300 - Power Tools RYOBI - Free user manual and instructions
Find the device manual for free 4710300 RYOBI in PDF.
| Product Type | Miter Grip Clamp Kit (Table Saw Accessory) |
| Brand | RYOBI |
| Model | 4710300 |
| Use | Holding and clamping workpieces during miter cuts |
| Clamping Pressure | Up to 1/16 in (approx. 1.6 mm) of workpiece retraction toward the guide |
| Mechanism | Return spring to automatically release the jaw |
| Compatibility | Table saw miter gauge with 5/16 in T-slot |
| Kit Contents | Clamping jaw, rod, spacer, 5/16 in T-nut, 5/16-18 x 1 in knob, formed springs, #8-32 x 3/8 in screw, rubber pad |
| Required Tools | Adjustable wrench |
| Safety | Wear safety glasses with side shields; unplug the saw before assembly; read the operator's manual |
| Maintenance | Clean with a dry cloth; store in a dry place away from moisture |
| Warranty | 90 days from the date of purchase (accessories) |
| Replacement Parts | Available from authorized Ryobi service centers |
| Customer Service | 1-800-525-2579 (United States) or www.ryobotools.com |
Frequently Asked Questions - 4710300 RYOBI
User questions about 4710300 RYOBI
0 question about this device. Answer the ones you know or ask your own.
Ask a new question about this device
Download the instructions for your Power Tools in PDF format for free! Find your manual 4710300 - RYOBI and take your electronic device back in hand. On this page are published all the documents necessary for the use of your device. 4710300 by RYOBI.
USER MANUAL 4710300 RYOBI
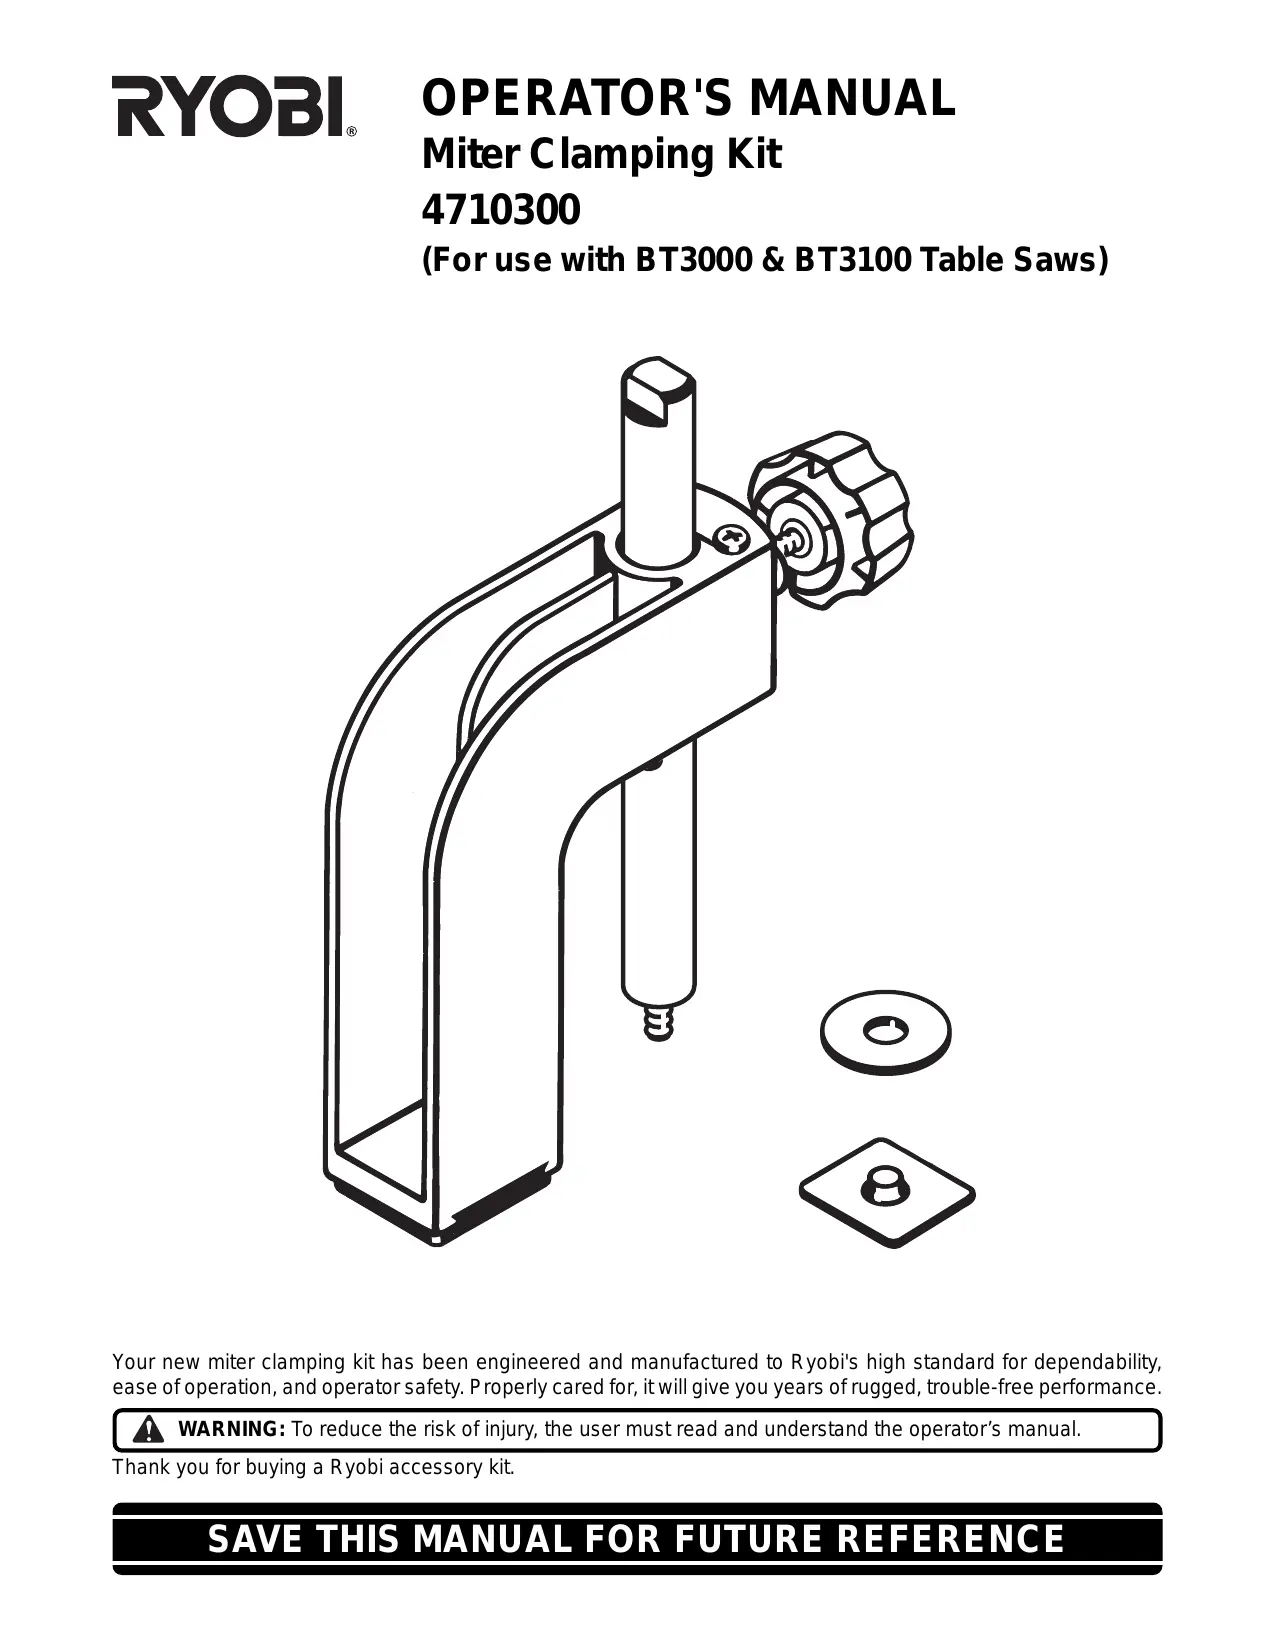
Your new miter clamping kit has been engineered and manufactured to Ryobi's high standard for dependability, ease of operation, and operator safety. Properly cared for, it will give you years of rugged, trouble-free performance.

WARNING: To reduce the risk of injury, the user must read and understand the operator's manual.
Thank you for buying a Ryobi accessory kit.
Safe operation of this accessory requires that you read and understand this operator's manual, the operator's manual for the table saw and all labels affixed to the tool.
READ ALL INSTRUCTIONS
■ KNOW YOUR ACCESSORY. Read the operator's manual carefully. Learn the product's applications and limitations as well as the specific potential hazards related to this product.
■ KEEP THE WORK AREA CLEAN. Cluttered work areas and work benches invite accidents. DO NOT leave tools or pieces of wood on the saw while operating.
■ ALWAYS WEAR SAFETY GLASSES WITH SIDE SHIELDS. Everyday eyeglasses have only impact-resistant lenses; they are NOT safety glasses.
DO NOT USE THIS PRODUCT WITH OTHER EQUIPMENT or for other purposes.
■ ALWAYS DISCONNECT THE SAW FROM THE POWER SUPPLY BEFORE ASSEMBLING THIS KIT. Make sure the switch is off when reconnecting the saw to a power supply.
BEFORE MAKING A CUT, BE SURE ALL ADJUSTMENTS ARE SECURE.
SAVE THESE INSTRUCTIONS. Refer to them frequently and use them to instruct other users. If you loan someone this product, also loan these instructions.
| The purpose of safety symbols is to attract your attention to possible dangers. The safety symbols, and the explanations with them, deserve your careful attention and understanding. The safety warnings do not by themselves eliminate any danger. The instructions or warnings they give are not substitutes for proper accident prevention measures. | |
| SYMBOL | MEANING |
| SAFETY ALERT SYMBOL: Indicates danger, warning or caution. May be used in conjunction with other symbols or pictographs. | |
| DANGER: Failure to obey a safety warning will result in serious injury to yourself or to others. Always follow the safety precautions to reduce the risk of fire, electric shock and personal injury. | |
| WARNING: Failure to obey a safety warning can result in serious injury to yourself or to others. Always follow the safety precautions to reduce the risk of fire, electric shock and personal injury. | |
| CAUTION: Failure to obey a safety warning may result in property damage or personal injury to yourself or to others. Always follow the safety precautions to reduce the risk of fire, electric shock and personal injury. | |
| NO HANDS: Failure to keep your hands away from the blade will result in serious personal injury. | |
| WET CONDITIONS ALERT: Do not expose to rain or use in damp locations. | |
| NOTE: | Advises you of information or instructions vital to the operation or maintenance of the equipment. |

The operation of any power tool can result in foreign objects being thrown into your eyes, which can result in severe eye damage. Before beginning tool operation, always wear safety goggles or safety glasses with side shields and a full face shield when needed. We recommend Wide Vision Safety Mask for use over eyeglasses or standard safety glasses with side shields. Always wear eye protection which is marked to comply with ANSI Z87.1.
UNPACKING
INFORMATION
Your miter clamping kit includes a miter clamp and the connecting hardware necessary to assemble and attach the miter clamp to the miter fence of your saw.
NOTE: This kit applies downward and inward pressure to the workpiece. The kit snugly pulls the workpiece against the miter fence up to a maximum of 1/16 in.
Remove the loose parts from the box. Make sure that all items listed in the loose parts list are included.
Inspect all parts carefully to make sure no breakage or damage occurred during shipping.
If any parts are damaged or missing, please call 1-800-525-2579 for assistance.

WARNING:
If any parts are missing do not assemble the kit until the missing parts are replaced. Failure to do so could result in serious personal injury.
LOOSE PARTS LIST
- Post
- Miter Clamp
- Knob Bolt #5/16-18 x 1 in.
- Spacer
- T-Nut 5/16 in.
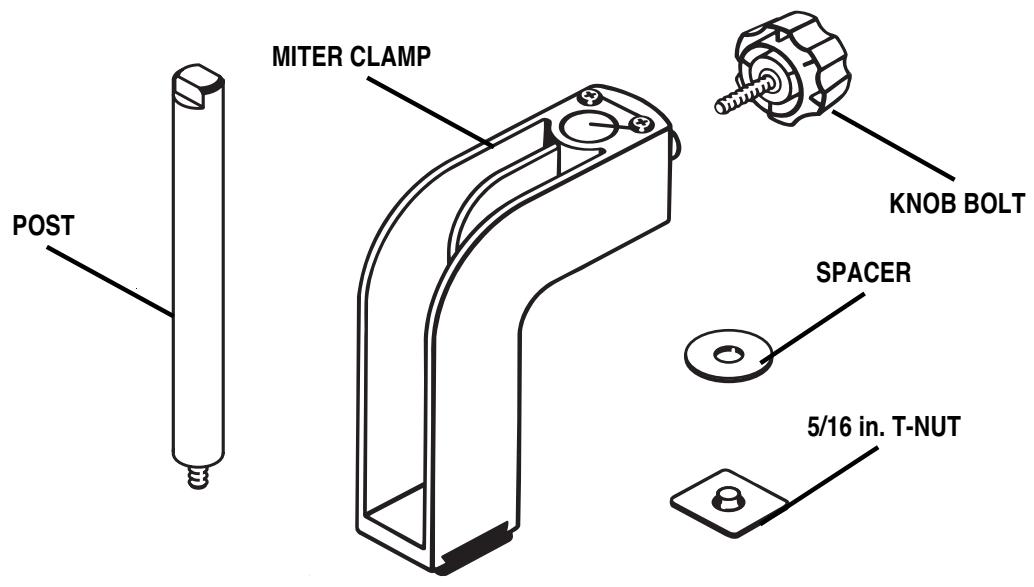
Fig. 1
TOOLS NEEDED
You need an adjustable wrench to assemble this accessory.


WARNING:
The table saw should never be connected to a power supply when you are assembling parts. Disconnecting the saw will prevent accidental starting that could cause serious personal injury.
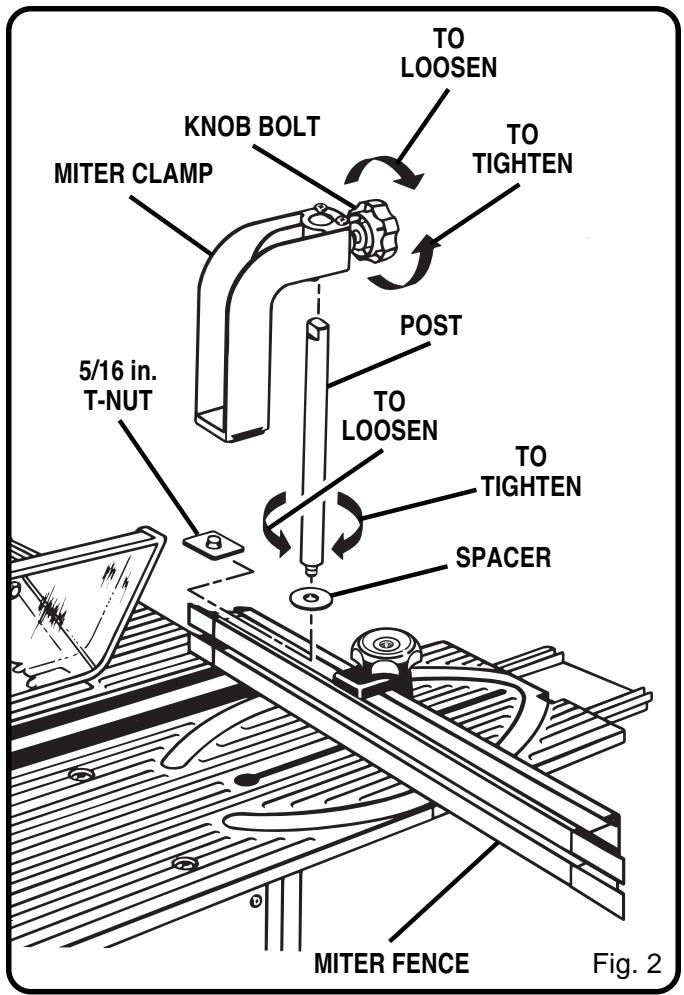
ASSEMBLING THE T-NUT
See Figure 3.
Slide the special 5/16 in. T-nut into the top channel of the miter fence as shown.
ASSEMBLING THE POST
See Figure 3.
Place the spacer provided on the threaded end of the post.
- Thread the post through the spacer into the 5/16 in. T-nut in the top channel of the miter fence.
Tighten the post securely with an adjustable wrench.
NOTE: The adjustable wrench will fit the flats on top of the post.
ASSEMBLING THE MITER CLAMP
See Figure 2.
NOTE: When the miter clamp is correctly positioned on the post, the clamp is spring loaded. Spring loading holds the miter clamp out of the way while workpieces are placed or removed.
- Loosen the knob bolt threaded into the back of the miter clamp. DO NOT TIGHTEN THE BOLT UNTIL THE WORKPIECE IS IN THE DESIRED POSITION AND YOU ARE READY TO SECURE THE MITER CLAMPER.
Orient the miter clamp as shown. - Slide and turn the miter clamp on the post to activate the spring. The miter clamp is now spring loaded against the post and will remain in position when you release it.
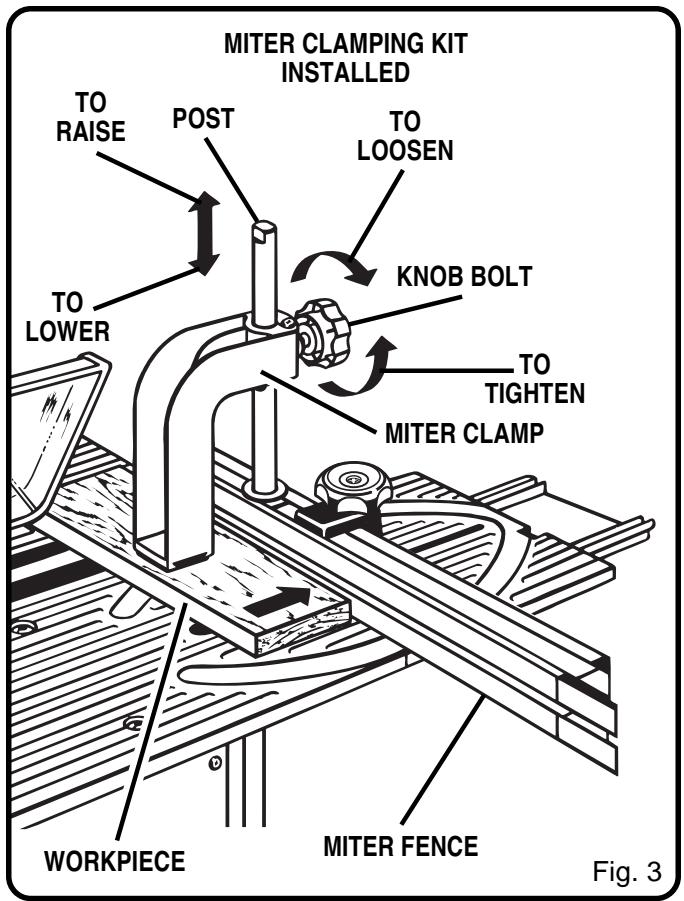
PREPARING FOR CUTTING
See Figure 3.
Place the workpiece in the desired position against the saw's miter fence.
Loosen the knob bolt.
■ Slide the miter clamp down against the workpiece as shown.
- Tighten the knob bolt securely. As the knob bolt tightens, pressure against the post causes the miter clamp to pull the workpiece inward against the miter fence and down toward the table. As noted above, the miter clamp pulls the workpiece inward up to 1/16 in.

WARNING
This clamping device provides assistance only; the operator must ensure control of the workpiece at all times. Failure to heed this warning could cause an accident resulting in serious personal injury.
NOTES
REPLACEMENT PARTS
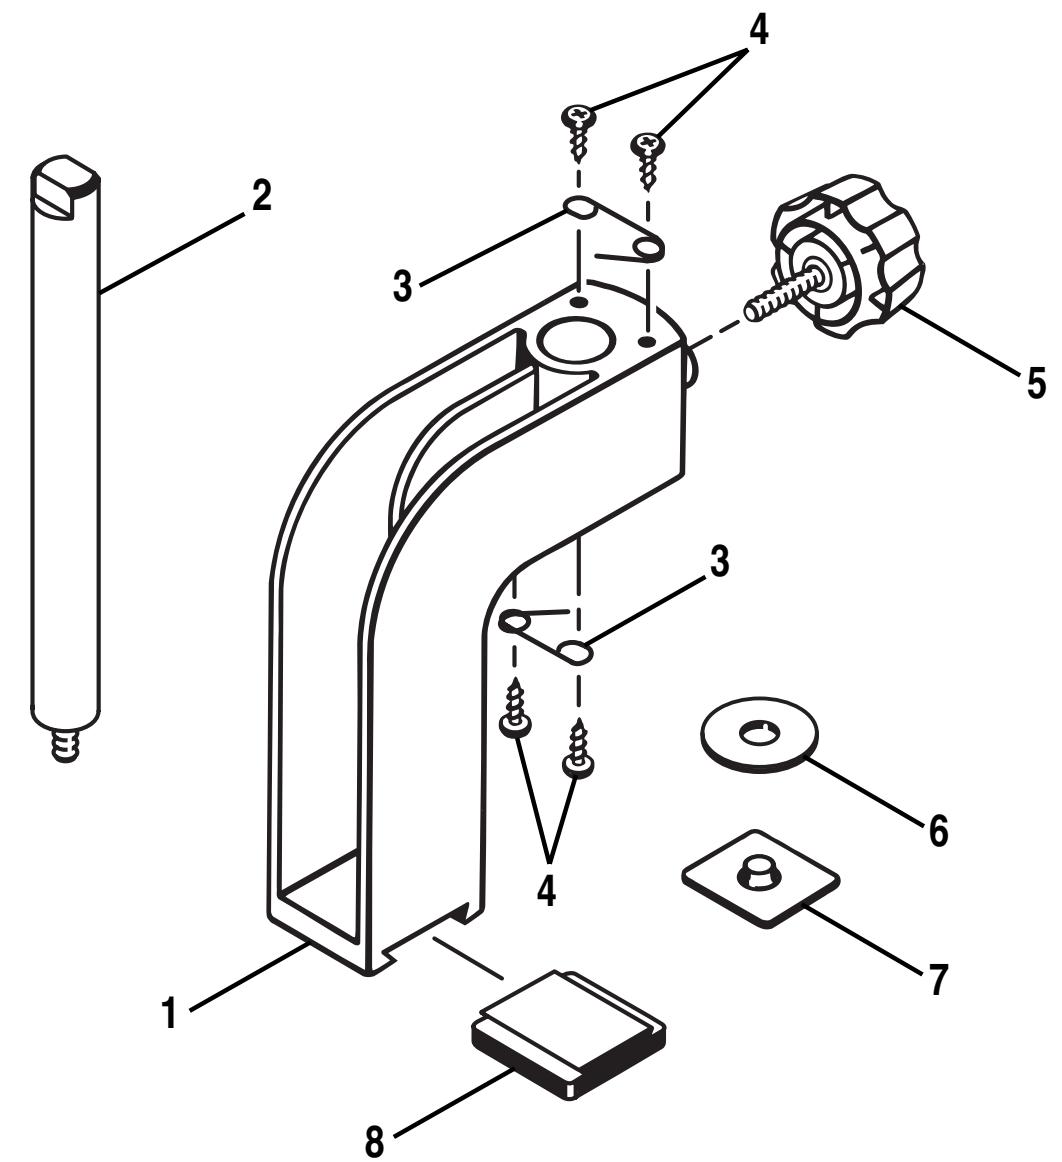
PARTS LIST
KEY NO. DESCRIPTION
QUANTITY
1 Miter Clamp 1
2 Post 1
3 Wire Formed Spring 2
4 Screw (#8-32 x 3/8 in. Phillips Pan Head Tapping) 4
5 Knob Bolt (#5/16-18 x 1 in.)
6 Spacer 1
7 5/16-18 T-Nut (Special) 1
8 Rubber Clamp Pad 1
Operator's Manual
WARRANTY
Ryobi warrants its accessories for a period of 90 days from the date of purchase. Batteries and chargers are warranted for a period of two years from the date of purchase.
PARTS AND SERVICE
For parts or service, contact your nearest Ryobi authorized service center. Be sure to provide all relevant information when you call or visit. For the location of the authorized service center nearest you, please call 1-800-525-2579 or visit us online at www.ryobotools.com. When ordering parts, always give the model number:
MODEL NUMBER
4710300