SCF20E20B - Hi-Fi System LG - Free user manual and instructions
Find the device manual for free SCF20E20B LG in PDF.

User questions about SCF20E20B LG
0 question about this device. Answer the ones you know or ask your own.
Ask a new question about this device
Download the instructions for your Hi-Fi System in PDF format for free! Find your manual SCF20E20B - LG and take your electronic device back in hand. On this page are published all the documents necessary for the use of your device. SCF20E20B by LG.
USER MANUAL SCF20E20B LG
Please read this manual carefully before operating your set. Retain it for future reference.
Record model number and serial number of the set. See the label attached on the back cover and quote this information to your dealer when you require service.
Model number : ____ Serial number : ____
P/NO : 3828VA0025A (MC41B, 210A/210J/230A TX)

natural_image
Completely blank or uniformly gray image with no visible content, text, or symbols.Installation
Power
This TV should be operated in the range of the voltage indicated on the label at the back of the set. Never apply DC power to the set.
Warning
To prevent fire or shock hazard, do not expose the TV to rain or moisture.
Location
Select an area where sunlight or bright artificial light will not shine directly on the screen. For the best results, view in subdued lighting. Care should be taken not to expose the TV to any unnecessary vibration, moisture, dust or heat. Also ensure that the TV is placed in a position to allow a free flow of air through the ventilation holes in the back cover of the set.
Service
Never remove the back cover of the TV as this can expose you to very high voltage and other hazards.
If the TV does not operate properly, unplug it and call your dealer.
Aerial
Connect the aerial to the 175Ω socket on the back of the TV.
If the picture quality is not satisfactory, we advise you to use an outdoor aerial.
Battery
The remote control unit is powered by two AA type batteries. Fully open the cover of the remote control unit so that the battery compartment can be seen. Ensure that the batteries are inserted with correct polarity.
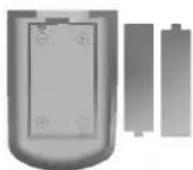

Note : To avoid damage from possible battery leakage, remove the batteries when you will not be using the remote control unit for a fairly long time.
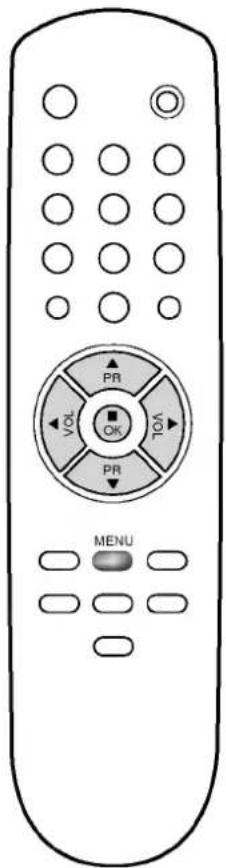
Location and function of the controls
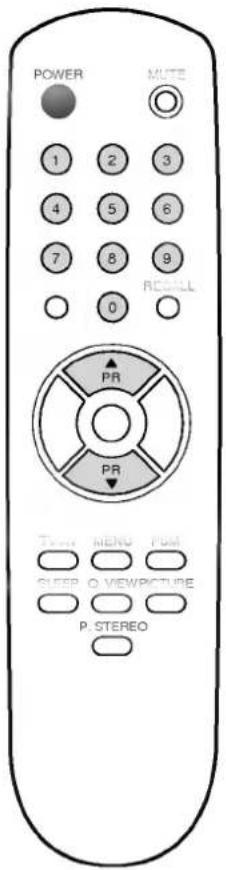
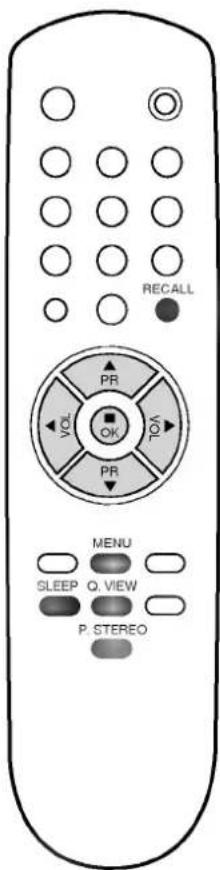
Remote Control Unit
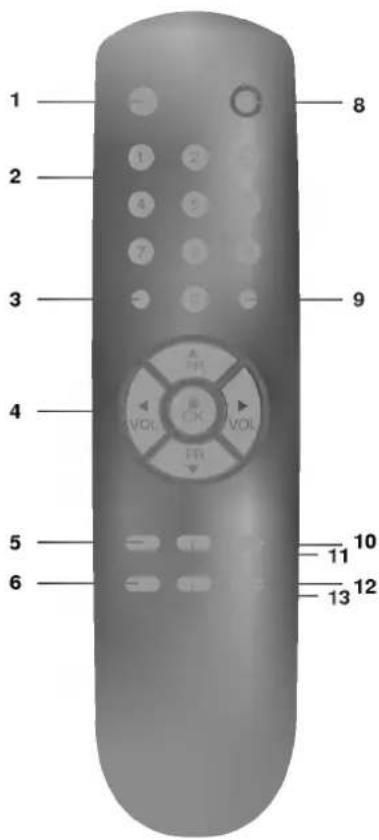
The TV is designed so that all of its functions can be controlled by the REMOTE CONTROL unit. Some functions can be also set with the controls on the FRONT PANEL of the TV.
Before attempting to operate your remote control unit, install the batteries.
1. POWER
To switch the TV to standby mode.
2. NUMBERS
To select program numbers.
3. UNIT
To set either one or double figure.
4. PROGRAM-MENU UP/DOWN
To select the next higher/lower program number or menu item.
VOLUME-MENU UP/DOWN
To control the level of the sound or change the setting of a menu item.
OK
Store the setting of menu items.
5. TV/AV
To select TV or audio/video mode.
6. SLEEP
To set the time the TV turned off automatically.
Location and function of the controls
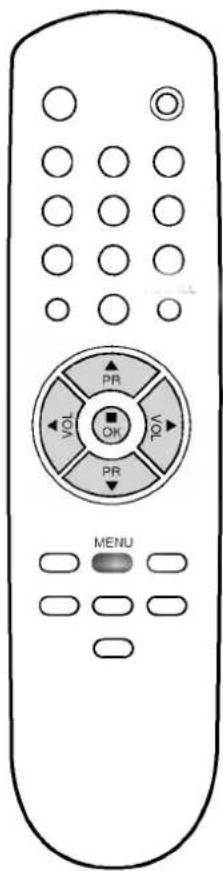
Remote Control Unit
Front Panel
Shown is a simplified representation of front panel.
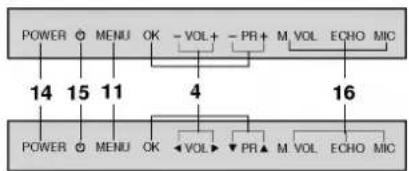
flowchart
graph TD
    A["POWER"] --> B["14"]
    C["MENU"] --> D["15"]
    E["OK"] --> F["11"]
    G["-VOL+"] --> H["4"]
    I["-PR+"] --> J["16"]
    K["M VOL"] --> L["POWER"]
    M["ECHO"] --> N["M VOLT"]
    O["MIC"] --> P["ECHO MIC"]
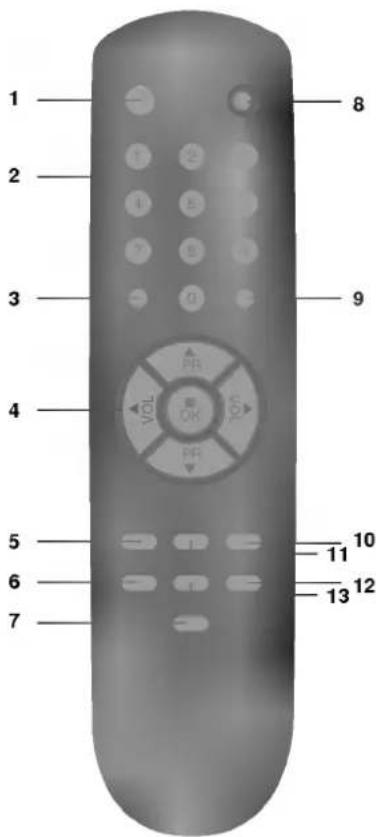
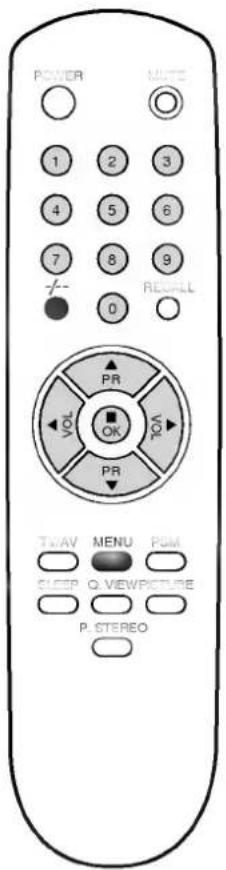
7. P. STEREO (OPTION)
To get a pseudo stereo sound effect.
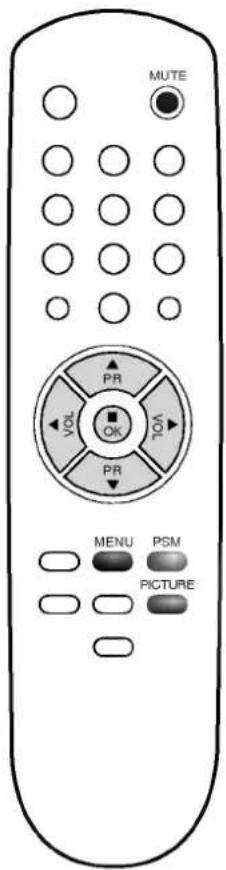
8. MUTE
To interrupt temporarily and restore the sound.
9. RECALL
To check the current time and channel.
10. PSM
To call up the picture level settings.
11. MENU
To select the menu pages.
12. PICTURE
To adjust the picture settings.
13. Q. VIEW
To display a channel shown right before quickly.
14. MAIN POWER (POWER/①)
To switch the TV on and off.
15. POWER/STANDBY INDICATOR
Lights when the TV is turned on or in standby mode.
16. OPTION : For the model with the karaoke function, use three controls below;
MICROPHONE VOLUME KNOB
To adjust the microphone volume level.
ECHO ON/OFF
To turn echo sound on or off.
MICROPHONE JACK
Operating the TV
Turning the main power on or off (standby mode)
- Press the main power button on the TV.
The power/standby indicator lights up in red and shows that the main power is turned on.
In this case, the TV is in standby mode. - Press the main power button once more to turn it off.
Turning on the TV from standby mode
- Press the POWER button on the remote control unit. or
- Press the ▲ / ▼ button.
- Press one of the number buttons(0 to 9) to select the desired program directly.
- When it comes up to the time, if you set ON TIME.
When the TV is turned on from standby mode, the preset selected program will appear.
Selecting standby mode
The TV can be put into standby mode in three ways:
- Press the POWER button on the remote control unit. or
- If you set OFF TIME, when it comes up to the time, the TV is put into standby mode. or
- In AUTO SLEEP ON, approximately 10 minutes after a TV station stops broadcasting('close-down') the TV switches automatically to standby mode.
On-Screen menus
The TV is equipped with a menu-based user guidance system for setting the on-screen display language and for storing the TV channels and for various other useful functions.
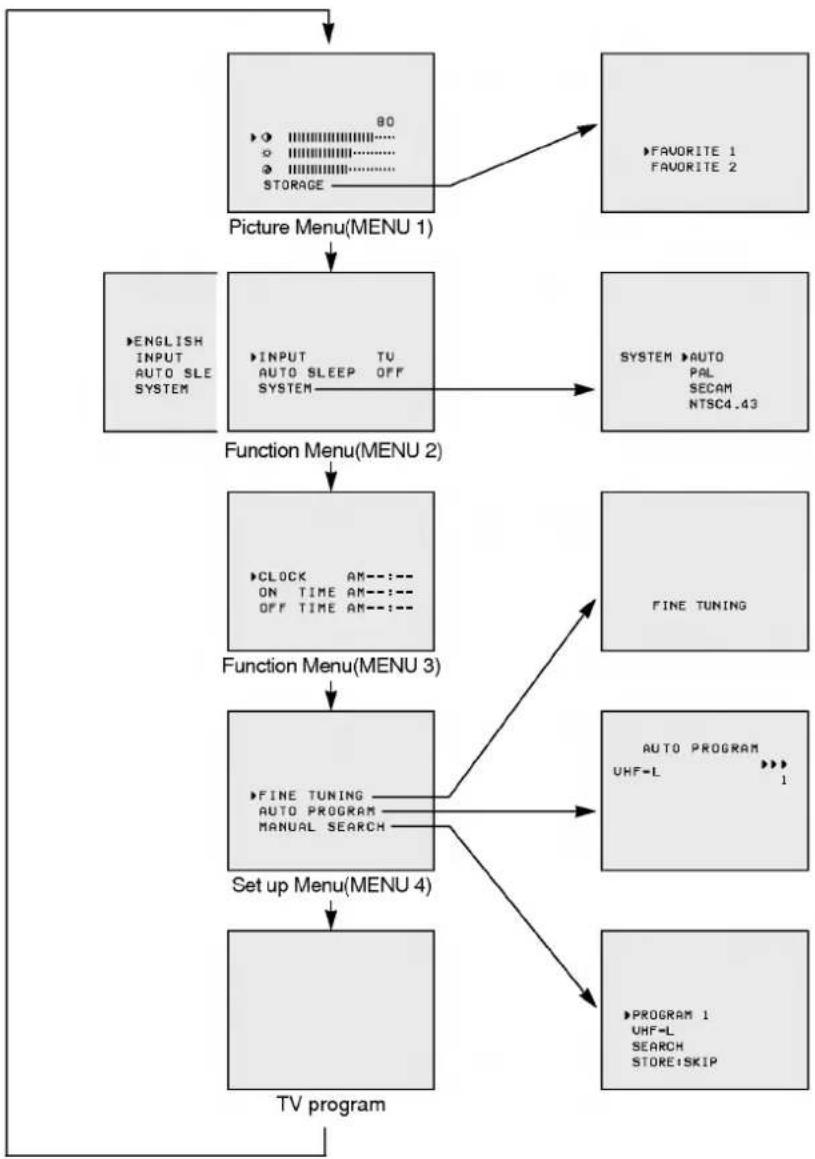
flowchart
graph TD
    A["80"] --> B["Picture Menu(MENU 1)"]
    B --> C["ENGLISH INPUT AUTO SLE SYSTEM"]
    C --> D["INPUT TV AUTO SLEEP OFF SYSTEM"]
    D --> E["FUNCTION MENU 2"]
    E --> F["CLOCK AM---: ON TIME AM---: OFF TIME AM---:"]
    F --> G["FINE TUNING"]
    G --> H["FINE TUNING AUTO PROGRAM MANUAL SEARCH"]
    H --> I["Set up Menu(MENU 4)"]
    I --> J["TV program"]
    K["FAVORITE 1 FAVORITE 2"] --> B
    L["SYSTEM AUTO PAL SECAM NTSC4.43"] --> E
    M["AUTO PROGRAM UHF-L 1"] --> H
    N["PROGRAM 1 UHF-L SEARCH STORE-SKIP"] --> J
Note : In certain models, the display TETRIS is displayed in MENU 2.
On-Screen menus
Calling up the menu
- Press the MENU button repeatedly to display the menu 1 to 4.
- Press the ▲ / ▼ button to select the item of a menu.
The selected item is magenta and the others are green. - Press the ◀ / ▶ button to change the setting of an item.
- Press the OK button to store the setting of item or display the sub-menu.
Note :
a. In AV mode, menu 4 is not displayed.
b. When the NTSC color system is received, 📋 appears in menu 1.
c. When you press the MENU button after a menu disappears, the last selected menu is displayed.
If no menu is selected, menu 1 is always displayed at first.
d. The displayed menu will automatically disappear from the screen if you don't press any button within 10 seconds.
Changing language on the screen (option)
If your set has two on-screen display languages, you can select between two languages. After having made a choice, the messages on the screen will appear in the respective languages. It is therefore recommended to make this choice at first.
-
In menu 2, press the ◀ / ▶ button to select the on-screen language.
-
Press the OK button or wait a minute.
Changing the input mode
1. To switch directly
Press the TV/AV button on the remote control unit.
TV/AV is a toggle button that turns the mode either TV or AV each time you press it.
2. To use the menu
In menu 2, press the ▲ / ▼ button to select INPUT.
Press the ◀ / ▶ button to select the desired input mode.
Changing the reception color system
Normally set the color system to AUTO.
If the reception color system is not correct - if the picture turns red or blue - change it.
- In menu 2, press the ▲ / ▼ button to select SYSTEM.
- Press the ◀ / ▶ button. The sub-menu will be displayed.
- Press the ▲ / ▼ button to select the correct color system.
Note :
a. In the models which can't receive the SECAM color system, the display SECAM does not appear.
b. NTSC 3.58 can only be displayed and selected for the NTSC color system.
a. In the models which can't receive the SECAM color system, the display SECAM does not appear. b. NTSC 3.58 can only be displayed and selected for the NTSC color system.
Setting up TV channels
Storing channels automatically
- In menu 4, press the ▲ / ▼ button until AUTO PROGRAM is selected.
- Press the OK button to begin auto programming.
The TV programs which can be received in the area where you live are stored in memory.
Once all TV programs have been stored in memory, the program number 1 will be displayed on the screen.
You can check if which channels are in memory by pressing the ▲ / ▼ button.
To stop autoprogramming, press the OK button.
Note :
If the undesired channel is stored or the stored channel is not clear, you can skip the program number. In the sub-menu of MANUAL SEARCH, select the desired program number and SKIP.
Manual search
We recommend that you use AUTO PROGRAM for tuning and storing the programs. However you also have an option for performing program tuning procedures with the manual search function.
- In menu 4, press the ▲ / ▼ button until MANUAL SEARCH is selected.
- Press the OK button to display the sub-menu.
- Press the ◀ / ▶ button to select the desired program number. You can select one of all program numbers(0 to 79).
- Press the ▲ / ▼ button to select the band selection item.
- Press the ◀ / ▶ button to select the proper band. (VHF-L, VHF-H, UHF)
- Press the ▲ / ▼ button to select SEARCH.
- Press the ▶ button. After searching a program, the sub-menu gets back.
- Press the ▲ / ▼ button to select STORE : SKIP.
- If you want to store it, press the ◀ button. The program number remains in green and STORE appears for a few seconds at its right side.
- If you don't want to store it, press the ▶ button. The program number is turned into cyan and SKIP appears.
- Press the OK button and the on-screen display will disappear.
Channel copy
You can copy the current viewing channel into a desired program number.
After performing manual search steps 1, 2, 3, 8 and 9, press the OK button. The current shown channel is copied into the selected program number.
Setting up TV channels
Fine tuning
The TV will be automatically tuned to the best picture sharpness.
Therefore normally you won't need to carry out fine tuning.
It may only be necessary to carry out fine tuning, if reception is poor.
- In menu 4, press the OK button. The sub-menu will appear.
- Press the ◀ / ▶ button to get the optimum sound and picture quality while the message FINE TUNING is displayed. Each time you press the ▶ button, the mark ▶▶▶ is blinking on the screen. Otherwise pressing the ◀ button shows ◀◀◀.
- Press the OK button to store the finetune.
The message STORED appears for a few seconds.
Note :
In this function, the stored program number is yellow.
Selecting TV channels
- Press the ▲ button for a higher program number and the ▼ button for a lower.
- Press one-(0 to 9) or two-(10 to 79) digit program number to select the desired TV channel directly. If necessary, press the -/-- button to set the program number of one or double figure at first.
Adjusting the picture and the volume
Adjusting the picture settings
- Press the PICTURE or the MENU button.
- Press the PICTURE or the ▲ / ▼ button to select the item you want to adjust. (● contrast, ⚙ brightness, Ⓑ color, ⌈️ tint)
- Press the ◀ button to decrease or the ♦" button to increase the level.
- Press the ▲ / ▼ button to select STORAGE.
- Press the ◀ / ▶ button. The sub-menu will be displayed.
- Press the ▲ / ▼ button to select either FAVORITE 1 or FAVORITE 2.
- Press the OK button to store the adjusted levels in FAVORITE 1 or FAVORITE 2 you select.
The message STORED will be displayed.
Note :
a. N (tint) can only be displayed and adjusted for the NTSC color system.
b. The FAVORITE 1 and FAVORITE 2 picture status have been initially adjusted for daytime and night-time respectively.
PSM(Picture Status Memory)
You can call up the picture status storing in FAVORITE 1 or FAVORITE 2.
- Press the PSM button until the desired message is displayed. Three messages are displayed as the following order.

- Press the OK button or wait a minute when the message you want to select is displayed on the screen.
Note :
The preset standard picture status have 80 percent for the amount contrast, 60 for the brightness, 50 for the color intensity and 50 for the tint. They cannot be changed.
Adjusting the volume
Press the ▶ button to increase or the ◀ button to decrease the volume level.
Temporarily interrupting the sound
- Press the MUTE button.
The message MUTE is displayed on the screen and the sound is temporarily interrupted. - Press the MUTE button again or the ◀ / ▶ button to get the sound back.
The message MUTE is removed from the screen.
Setting the time
Clock
This menu item is for keeping the current time and allowing operation of the on time and the off time functions.
The clock employs the 12-hour system(0:00 to 12:00).
- In menu 3, press the ◀ / ▶ button to select the hour position.
- Press the ▲ / ▼ button to set the hour.

- Press the ◀ / ▶ button to select the minute position.
- Press the ▲ / ▼ button to set the minute.

Press the OK button, and the on-screen display disappears.
On pressing the OK button, the clock begins to operate.
Note :
If the main power is interrupted, the clock stops.
When the main power is later restored, the clock will show AM....
Reset the clock to make available the on time and the off time functions.
On time and off time
These functions automatically turns the TV(power) on or off at the set time. You have to set the clock before you use these functions.
-
In menu 3, press the ▲ / ▼ button to select ON TIME or OFF TIME.
-
To set the on or the off time, repeat the above steps 1 to 4.
Note :
a. If both ON TIME and OFF TIME are set to the same time, OFF TIME has priority.
b. When the TV is turned on by the setting on time, if no button is pressed within 2 hours, the TV automatically switches to standby mode.
c. If the power is already on when the setting on time occurs, the preset selected program will appear.
d. OFF TIME cannot turn the main power off.
Also, ON TIME or OFF TIME only works when the main power is on. If the main power is turned off, you have to reset the clock, the on time and the off time.
Other functions
Auto sleep
When the TV station stops broadcasting('close-down'), the TV will switch itself automatically to standby mode approximately 10 minutes later in
AUTO SLEEP ON
- In menu 2, press the ▲ / ▼ button to select AUTO SLEEP.
- Press the ◀ / ▶ button to switch AUTO SLEEP OFF to ON.
- Press the OK button or wait a minute. The on-screen display disappears.
Recall
You can check the present turned-to channel and the current time by pressing the RECALL button.
Quick view
The channel shown right before can be displayed for quick on-screen viewing.
For example, if the channel 9 is displayed, when you want to see the channel 11 displaying right before again, press the Q.VIEW button. The channel 11 will be displayed.
Once more pressing the Q.VIEW button allows the channel 9 to be displayed.
Sleep timer
The TV can be automatically turned off approximately 120, 90, 60, 30, 20 or 10 minutes later.
Each time the SLEEP button is pressed, the message on the screen changes as follows:

flowchart
graph LR
    A["SLEEP"] --> B["SLEEP120"]
    B --> C["SLEEP90"]
    C --> D["SLEEP60"]
    D --> E["SLEEP10"]
    E --> F["SLEEP20"]
    F --> G["SLEEP30"]
For example, to turn off the TV after 60 minutes, press the SLEEP button until SLEEP60 is displayed on the screen.
To cancel the sleep timer, press the SLEEP button until SLEEP--- is displayed.
Note :
After the sleep timer is set, if you press the SLEEP button, the remaining time will be displayed.
Pseudo stereo (option)
In the models which have the pseudo stereo function, you can experience sound effect as stereo sound by pressing the P.STEREO button.
- Press the P.STEREO button.
The message P. STEREO ON will be displayed on the screen. - Press the button again to turn pseudo stereo off.
P.STEREO is a toggle button that turns P.STEREO either ON or OFF each time you press it.
Other functions
TETRIS game (option)
In the models which have the TETRIS game function, you can enjoy the TETRIS game with this set. To make a good score, try to pile up bricks neatly without empty spaces.
- In menu 2, press the ▲ / ▼ button to select TETRIS.
- Press the ◀ /▶ button. The TETRIS game mode appears.
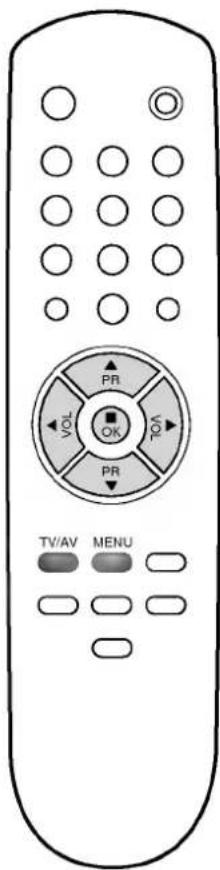
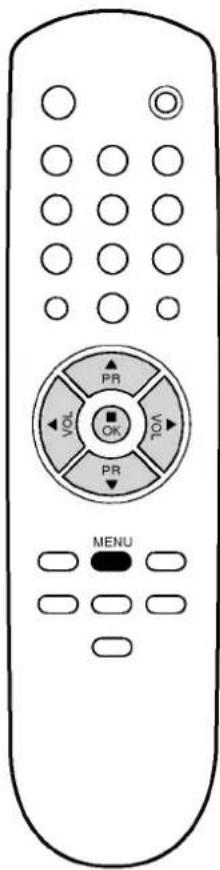
natural_image
Front view of a remote control with labeled buttons (PR, VOL, OK) and a 'MENU' button at the bottom (no text or symbols beyond basic labels)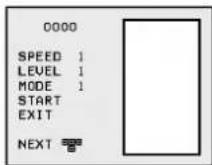
- Adjust SPEED (1 to 9), LEVEL (1 to 5) and select MODE 1 or 2 with the ▲ / ▼ and ◀ / ▶ button.
- Select START with the ▲ / ▼ button then press the OK button.
- Rotate bricks with the OK button for an appropriate arrangement, move them to left or right direction with the ◀ / ▶ button, and set them down straightly with the ▼ button when playing the game. The game score will automatically be recorded.
- When the game is finished, select EXIT with the ▲ / ▼ button if you want to exit the TETRIS game. If not, select START.
- Press the OK button.
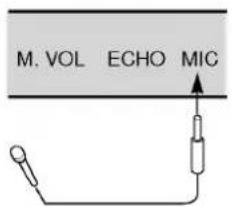
Karaoke (option)
If your set has the karaoke function, the TV can be used as a karaoke monitor by connecting an optional microphone and using a VCR or VDP etc.
- Connect a microphone equipped with a standard plug(ø6.3mm) to the
MIC jack on the front panel.
-
Switch the microphone on.
-
Turn the M.VOL knob to adjust the output level of the connected microphone.
Clockwise : Increase the volume
Counterclockwise : Decrease the volume
- As your preference, press the ECHO button to turn the echo effect function on or off.
ON (■): With echo effect
OFF (■): No echo effect
Note :
When a microphone connected to the TV is moved too close to the set, high-pitched feedback may be heard.
If this occurs, move the microphone further from the TV or decrease the microphone volume.
Connecting a VCR
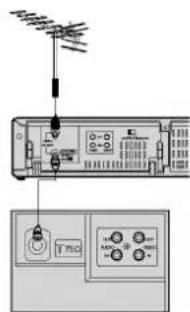
Connect a VCR as below. Here shown may be somewhat different from the back of your set.
Using the aerial socket
Connect the coaxial cable from the RF OUT socket of the VCR to the aerial socket on the back of the TV.
Connect the antenna lead-in cable to the RF IN socket of the VCR.
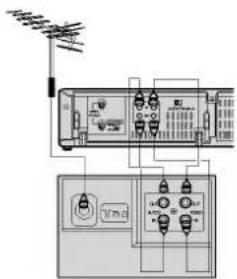
Using the phone jack - AV IN
For the superior quality of picture and sound during playback, this connection is recommended.
-
Connect the AV OUT terminal of the VCR to the AV IN terminal of the TV.
-
Press the TV/AV button so that the connected video message appears on the screen.
-
Set the VCR to the playback mode.
To return to the TV mode, press the TV/AV button.
A channel or program position number will be displayed on the screen.
Using the phone jack - AV OUT
With this connection, you can record a TV program to the video tape.
-
Connect the AV IN terminal of the VCR to the AV OUT terminal of the TV.
-
Set the VCR to the recording mode.
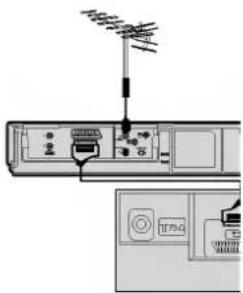
Using the euro-scart jack
If your TV has not phone jack but euro-scart jack,
- Connect it to the VCR equipped with the euro scart jack.
- Press the TV/AV button.
- Set the VCR to the playback mode.
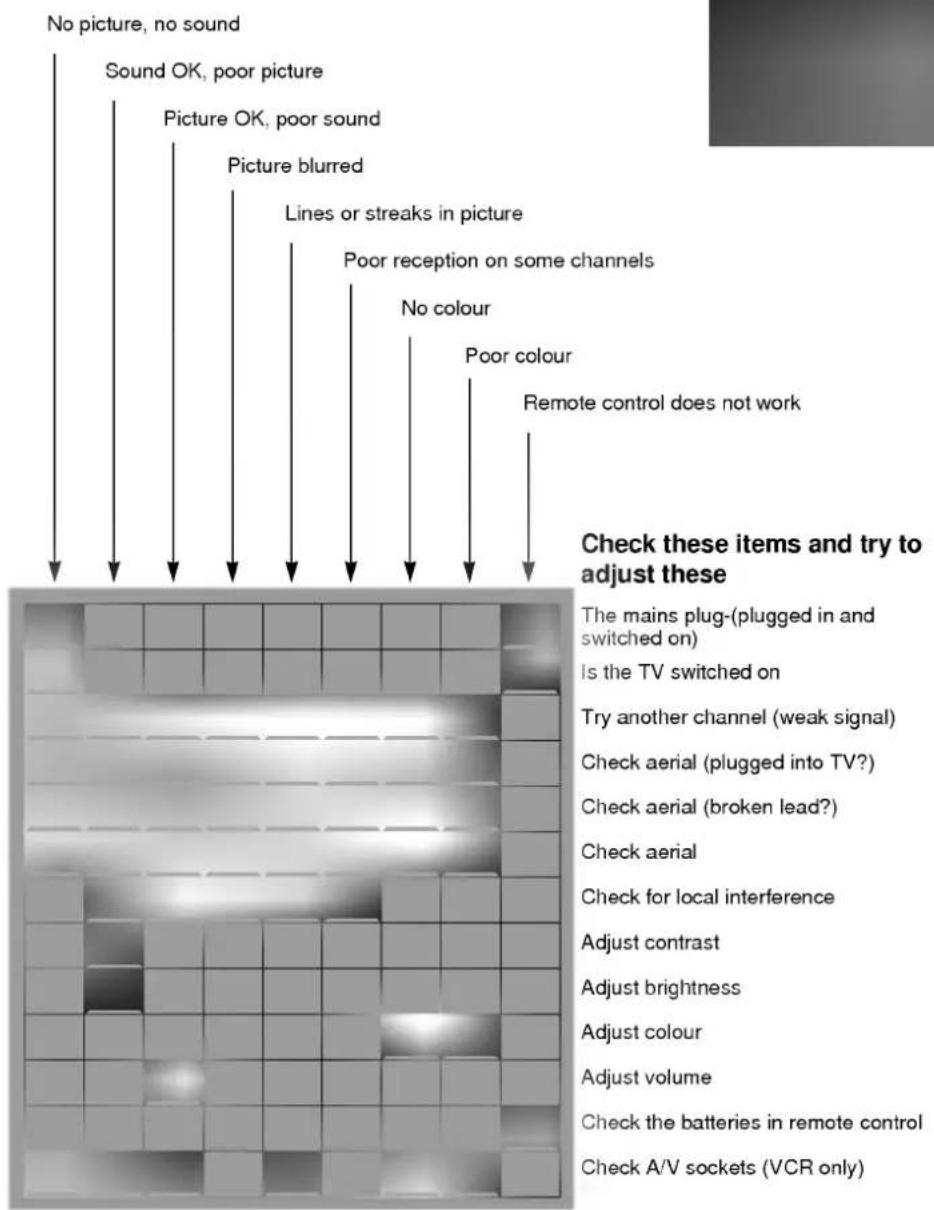
Check list for faults
Symptoms