ABC990M - Hi-Fi System LG - Free user manual and instructions
Find the device manual for free ABC990M LG in PDF.

User questions about ABC990M LG
0 question about this device. Answer the ones you know or ask your own.
Ask a new question about this device
Download the instructions for your Hi-Fi System in PDF format for free! Find your manual ABC990M - LG and take your electronic device back in hand. On this page are published all the documents necessary for the use of your device. ABC990M by LG.
USER MANUAL ABC990M LG
Before connecting, operating, or adjusting this product, please read this instruction booklet carefully and completely.
Precautions
Information
Note to CATV system
installer: This reminder is provided to call the CATV system installer's attention to Section 820-40 of the NEC which provides guidelines for proper grounding and, in particular, specifies that the cable ground shall be connected to the grounding system of the building, as close to the point of cable entry as practical.
WARNING : TO REDUCE THE RISK OF FIRE OR ELECTRIC SHOCK, DO NOT EXPOSE THIS APPLIANCE TO RAIN OR MOISTURE.

CAUTION
RISK OF ELECTRIC SHOCK DO NOT OPEN

CAUTION: TO REDUCE THE RISK OF ELECTRIC SHOCK, DO NOT REMOVE COVER (OR BACK); NO USER-SERVICEABLE PARTS INSIDE REFER SERVICING TO QUALIFIED SERVICE PERSONNEL

This lightning flash with arrowhead symbol within an equilateral triangle is intended to alert the user to the presence of uninsulated dangerous voltage within the product's enclosure that may be of sufficient magnitude to constitute a risk of electric shock to persons.

The exclamation point within an equilateral triangle is intended to alert the user to the presence of important operating and maintenance (servicing) instructions in the literature accompanying the product.
CAUTION : TO PREVENT ELECTRIC SHOCK, DO NOT USE THIS PLUG WITH AN EXTENSION CORD, RECEPTACLE OR OTHER OUTLET UNLESS THE PLUG CAN BE FULLY INSERTED WITHOUT EXPOSING ANY PARTS OF THE BLADES.
FCC WARNING: This equipment may generate or use radio frequency energy. Changes or modifications to this equipment may cause harmful interference unless the modifications are expressly approved in the instruction manual. The user could lose the authority to operate this equipment if an unauthorized change or modification is made.
REGULATORY INFORMATION
This equipment has been tested and found to comply with the limits for a Class B digital device, pursuant to Part 15 of the FCC Rules. These limits are designed to provide reasonable protection against harmful interference in a residential installation! This equipment generates, uses and can radiate radio frequency energy and, if not installed and used in accordance with the instructions, may cause harmful interference to radio communications.
However, there is no guarantee that interference will not occur in a particular installation. If this equipment does cause harmful interference to radio or television reception, which can be determined by turning the equipment off and on, the user is encouraged to try to correct the interference by one or more of the following measures:
• Recorient or relocate the receiving antenna.
- Increase the separation between the equipment and receiver.
- Connect the equipment into an outlet on a circuit different from that to which the receiver is connected.
- Consult the dealer or an experienced radio/TV technician for help.
This Class (B) digital apparatus meets all requirements of the Canadian Interference-Causing Equipment Regulations.
Main features of this VCR
- MTS Hi-Fi Stereo
• OPR (Optimum Picture Response) - Easy Graphic Menu
• Video Doctor (Advanced Self-Diagnosis)
• 181 Channel Frequency Synthesized Cable Compatible Tuner with Autochannel Programming and Multichannel Scan
• 1 Year/7 Event Timer with DAILY and WEEKLY Function
• Auto Power and Playback Functions
• ITR (Instant Timer Recording)
• Real-Time Tape Counter
• Visual Search, Logic Search, CM Skip
• Clean Still, Slow, Frame Advance
• Auto Tracking Function/Auto Head Cleaner
• On-screen Display of Function
• Trilingual On-screen Programming (English/Spanish/Portuguese)
Features/Contents 3
Safety Tips 4-5
Remote Control 6
Your VCR's Controls
(Front & Rear) 7
Connections 8-9
VCR to TV & Antenna to VCR .8
CATV to VCR .9
Display Window 10
On-screen Display (OSD) .....11
Setting the On-screen Display ....12
Setting the menu .....13
Language Select .....13
Function OSD On/Off .....13
Setting the Clock .....13
Tuning in TV Stations .....14
How to Play Back a Tape ....15-17
Normal Playback ....15
Special Playback ....16
The Others' Playback ....17
How to Record .....18-22
Normal Recording .....18
Instant Timer Recording .....19
Timer Recording .....20-21
Dubbing and Editing .....22
Hi-Fi Stereo System .....23-24
MTS Broadcast .....23
Audio Output Selection .....23
Broadcast type selection
for recording .....24
SAP Recording .....24
Real-Time Counter/
Counter Memory .....25
Other Functions .....26
Video Doctor 26
Operating Hints 26
ez (easy) Operation .....27
Troubleshooting .....28
Specifications .....29
The serial number is found on the back of this unit. This number is unique to this unit and not available to others.
You should record requested
information here and retain this
guide as a permanent record of your purchase.
Model No. ____
Serial No.
Important safeguards for you and your new product Your product has been manufactured and tested with your safety in mind. However, improper use can result in potential electrical shock or fire hazards. To avoid defeating the safeguards that have been built into your new product, please read and observe the following safety points when installing and using your new product, and save them for future reference. Observing the simple precautions discussed in this section of the operating guide can help you get many years of enjoyment and safe operation that are built into your new product.
1. Read Instructions
All the safety and operating instructions should be read before the product is operated.
2. Follow Instructions
All operating and use instructions should be followed.
3. Retain Instructions
The safety and operating instructions should be retained for future reference.
4. Heed Warnings
All warnings on the product and in the operating instructions should be adhered to.
5. Cleaning
Unplug this product from the wall outlet before cleaning. Do not use liquid cleaners or aerosol cleaners. Use a damp cloth for cleaning.
6. Water and Moisture
Do not use this product near water – for example, near a bath tub, wash bowl, kitchen sink, or laundry tub, in a wet basement, or near a swimming pool.
7. Accessories
Do not place this product on an unstable cart, stand, tripod, bracket, or table. The product may fall, causing serious injury to a child or adult, and serious damage to the product. Use only with a cart, stand, tripod, bracket, or table recommended by the
manufacturer, or sold with the product. Any mounting of the product should follow the manufacturer's instructions, and should use a mounting accessory recommended by the manufacturer.
8. Transporting Product
A product and cart combination should be moved with care. Quick stops, excessive force, and uneven surfaces may cause the product and cart combination to overturn.

PORTABLE CART
WARNING
9. Attachments
Do not use attachments not recommended by the product manufacturer as they may cause hazards.
10. Ventilation
Slots and openings in the cabinet are provided for ventilation and to ensure reliable operation of the product and to protect it from overheating, and these openings must not be blocked or covered. The openings should never be blocked by placing the product on a bed, sofa, rug, or other similar surface. This product should not be placed in a built-in installation such as a bookcase or rack unless proper ventilation is provided or the manufacturer's instructions have been adhered to.
11. Power Sources
This product should be operated only from the type of power source indicated on the marking label. If you are not sure of the type of power supply to your home, consult your product dealer or local power company. For products intended to operate from battery power, or other sources, refer to the operating instructions.
12. Line-Cord Polarization
This product is equipped with a polarized alternating-current line plug (a plug having one blade wider than the other). This plug will fit into the power outlet only one way. This is a safety feature. If you are unable to insert the plug fully into the outlet, try reversing the plug. If the plug should still fail to fit, contact your electrician to replace your obsolete outlet. Do not defeat the safety purpose of the polarized plug.
13. Power-Cord Protection
Power-supply cords should be routed so that they are not likely to be walked on or pinched by items placed upon or against them, paying particular attention to cords at plugs, convenience receptacles, and the point where they exit from the product.
-
Outdoor Antenna Grounding If an outside antenna or cable system is connected to the product, be sure the antenna or cable system is grounded so as to provide some protection against voltage surges and built-up static charges. Article 810 of the National Electrical Code (U.S.A), ANSI/NFPA 70 provides information with regard to proper grounding of the mast and supporting structure, grounding of the lead-in wire to an antenna discharge unit, size of grounding conductors, location of antenna-discharge unit, connection to grounding electrodes, and requirements for the grounding electrode. (See figure 1 on the right.)
-
Lightning For added protection for this product (receiver) during a lightning storm, or when it is left unattended and unused for long periods of time, unplug it from the wall outlet and disconnect the antenna or cable system. This will prevent damage to the product due to lightning and power-line surges.
-
Power Lines An outside antenna system should not be located in the vicinity of overhead power lines or other electric light or power circuits, or where it can fall into such power lines or circuits. When installing an outside antenna system, extreme care should be taken to keep from touching such power lines or circuits as contact with them might be fatal.
-
Overloading Do not overload wall outlets and extension cords as this can result in a risk of fire or electric shock.
-
Object and Liquid Entry Never push objects of any kind into this product through openings as they may touch dangerous voltage points or short-out parts that could result in a fire or electric shock. Never spill liquid of any kind on the product.
-
Servicing Do not attempt to service this product yourself as opening or removing covers may expose you to dangerous voltage or other hazards. Refer all servicing to qualified service personnel.
-
Damage Requiring Service Unplug this product from the wall outlet and refer servicing to qualified service personnel under the following conditions:
a. If the power-supply cord or plug is damaged.
b. If liquid has been spilled, or objects have fallen into the product.
c. If the product has been exposed to rain or water.
d. If the product does not operate normally by following the operating instructions. Adjust only those controls that are covered by the operating instructions as an improper adjustment of other controls may result in damage and will often require extensive work by a qualified technician to restore the product to its normal operation.
e. If the product has been dropped or the cabinet has been damaged.
-
If the product exhibits a distinct change in performance.
-
Replacement Parts When replacement parts are required, be sure the service technician has
used replacement parts specified by the manufacturer or have the same characteristics as the original part. Unauthorized substitutions may result in fire, electric shock, or other hazards.
22. Safety Check
Upon completion of any service or repairs to this product, ask the service technician to perform safety checks to determine that the product is in proper operating condition.
23. Wall or Ceiling Mounting
The product should be mounted to a wall or ceiling only as recommended by the manufacturer.
24. Heat
The product should be situated away from heat sources such as radiators, heat registers, stoves, or other products (including amplifiers) that produce heat.
Figure 1
EXAMPLE OF GROUNDING ACCORDING TO NATIONAL ELECTRICAL CODE INSTRUCTIONS
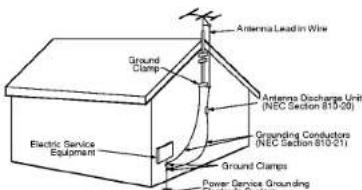
NEC - NATIONAL ELECTRICAL CODE

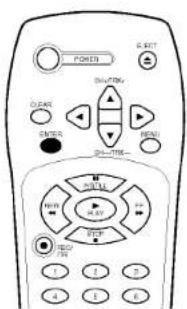
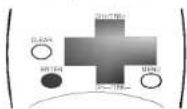
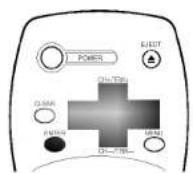
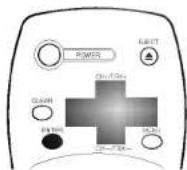
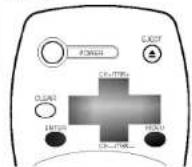
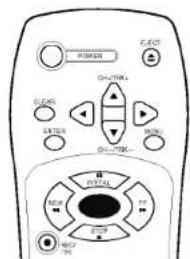
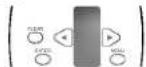
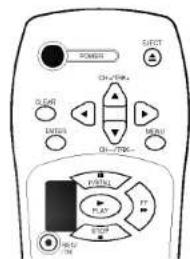
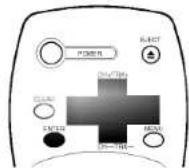
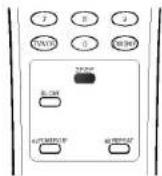
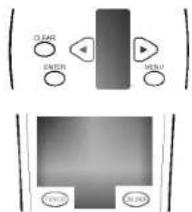
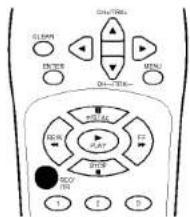
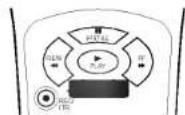
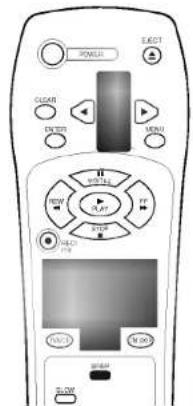
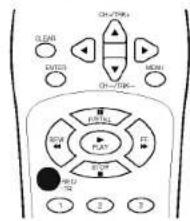
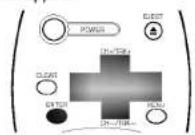
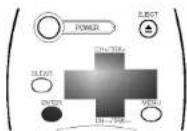
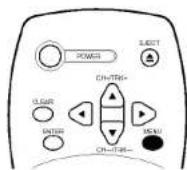
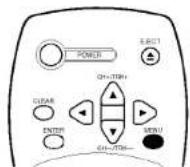
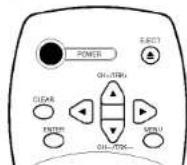
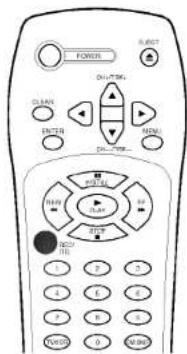
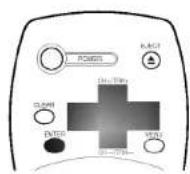
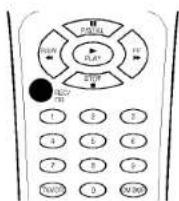
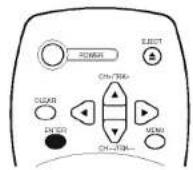
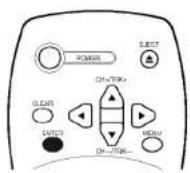
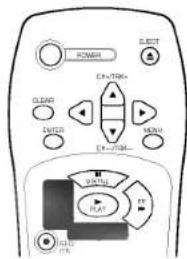
Remote Control
Location & Functions
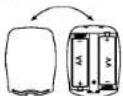
To install batteries:
Your remote control is powered by two AA type batteries.
- To insert them, push the tab backwards and lift off the cover of the remote control.
- Put the two batteries into the compartment making sure the + and - are correctly positioned.
- Replace the cover.
Your video recorder (VCR) is designed so that almost all of its features can be controlled from the Remote Control. Some features can also be controlled from the front panel of the video recorder. The maximum operating distance that you may control your video recorder is about 25 feet (7.5 meters). It must also be within an angle of 30 degrees either side of the remote sensor on the front of your video recorder. To avoid damage from possible battery leakage, remove the batteries if you do not plan to use the remote control for an extended period of time. Do not use batteries of differing age or type. Always discard batteries safely.
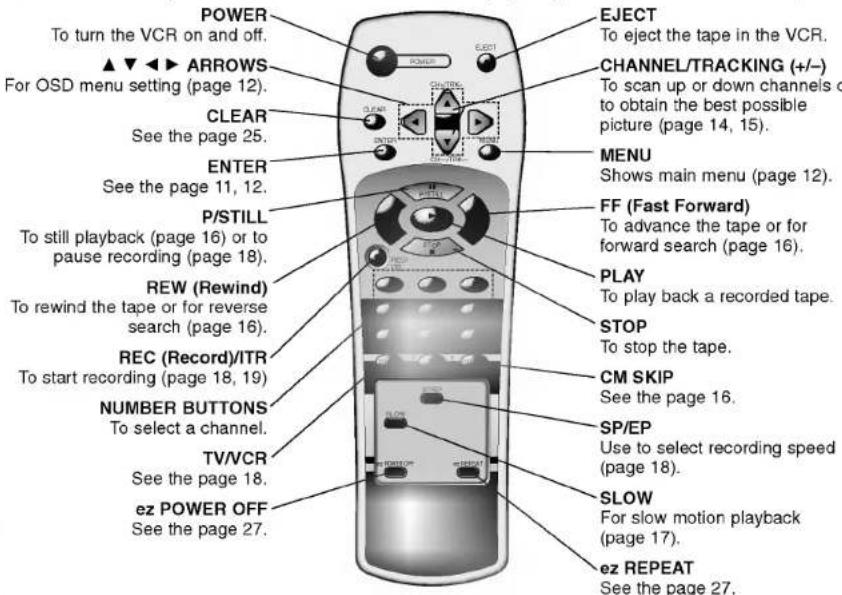
Each button on your VCR has the same function as it's corresponding button on the remote control.

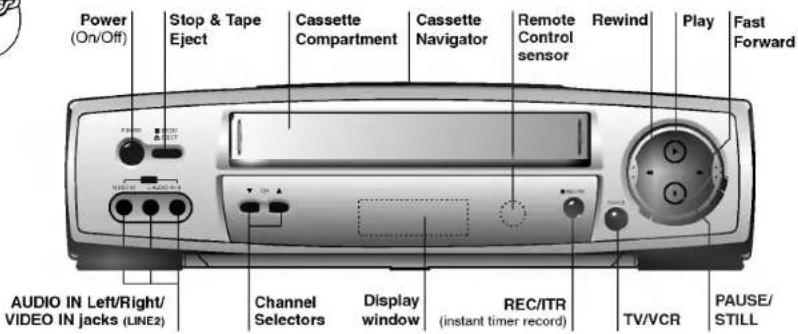
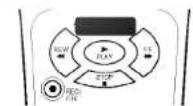
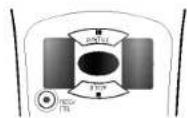
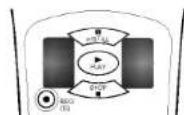
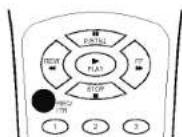
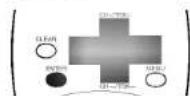
Controls
Your VCR's

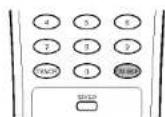
You can select LINE1
(from AUDIO/
/VIDEO IN jacks at
the rear) or LINE 2
(from AUDIO/VIDEO IN
jacks at the front) pressing
CH (+/-) continuously to
display "LINE1" or "LINE2"
on the TV screen.
You can also select
"LINE1" or "LINE2" by
pressing 0 button twice or
four times.
Connections
VCR to TV &
Antenna to VCR
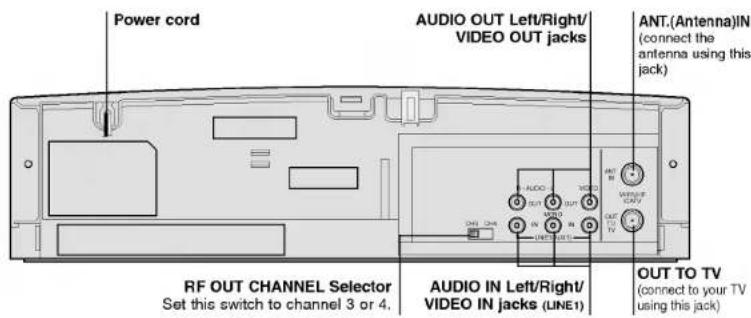
When a TV is connected with a coaxial cable only When the TV is connected to the OUT TO TV using a supplied coaxial cable only, set the channel selector at the rear to CH 3 or CH 4, not employed for broadcasts, and select the same channel on the TV.
When a TV is connected with an audio/video cable. When the TV is connected using an audio/video cable, turn the TV and VCR on, and select the video input mode on the TV.
The guidance given on the next two pages is the most common forms of connection. However please check with your manufacturers instruction books for specific information. Make sure all connections are made with both your VCR and additional appliance unplugged from the mains to avoid damaging your equipment. Connecting a VCR using a Audio/Video cable is one of the best ways to achieve optimum sound and picture quality from video-tape playback. If you own a stereo TV you will be able to enjoy stereo sound when playing a stereo video tape or stereo TV reception.

flowchart
graph TD
    A["TV set"] --> B["Cable/Antenna"]
    B --> C["R-AUDIO/L OUT"]
    B --> D["IN IN"]
    B --> E["To AUDIO/VIDEO IN"]
    E --> F["AUDIO/VIDEO Cable (Supplied)"]
    F --> G["75 ohm Coaxial Cable with Antenna Adapter (supplied)"]
    G --> H["2-1 Connect the supplied Coaxial Cable to OUT TO TV on the VCR and antenna connector on your TV."]
    H --> I["From AUDIO/VIDEO OUT"]
    I --> J["VCR's Back Panel"]
    J --> K["300/75 ohm Adaptor (Not supplied)"]
    K --> L["300 ohm Coaxial Cable"]
    L --> M["75 ohm Coaxial Cable"]
    M --> N["OR"]
    N --> O["VHF/UHF Antenna"]
    O --> P["1 Disconnect the coaxial cable (from antenna or cable company) from your TV and connect it to ANT.IN on the VCR."]
    P --> Q["300 ohm twin lead"]
    Q --> R["To OUT TO TV"]

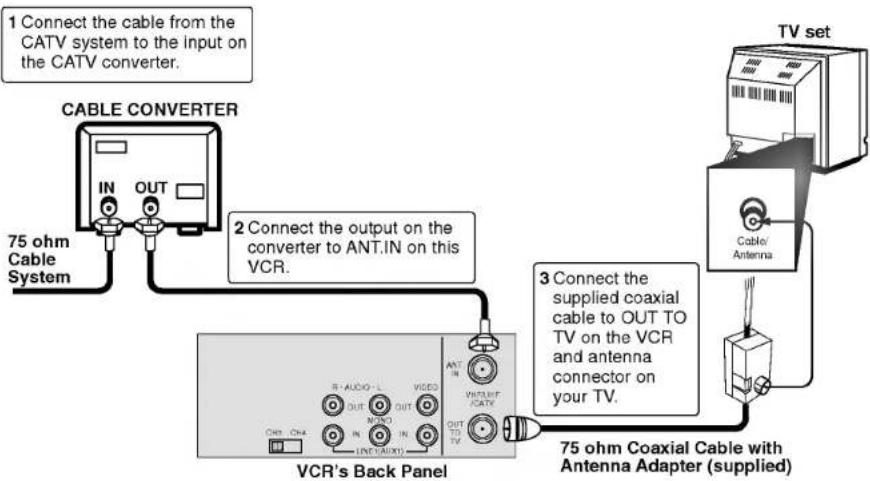
If your cable service supplies you with a cable converter box, you can use the basic connection shown below.
To view or record CATV channel
1 Set the TV channel to the video output channel as located on the back of the VCR (CH3 or CH4).
2 Set the VCR channel selector to the output channel of the cable converter box by pressing CH (+/-) or number buttons (0-9) of your VCR. (Example: CH3)
3 Select the channel to view at the Cable Converter Box.
flowchart
graph TD
    A["1 Connect the cable from the CATV system to the input on the CATV converter."] --> B["CABLE CONVERTER"]
    B --> C["75 ohm Cable System"]
    B --> D["2 Connect the output on the converter to ANT.IN on this VCR."]
    D --> E["VCR's Back Panel"]
    E --> F["3 Connect the supplied coaxial cable to OUT TO TV on the VCR and antenna connector on your TV."]
    F --> G["TV set"]
    G --> H["Cable/Antenna"]
    H --> I["75 ohm Coaxial Cable with Antenna Adapter (supplied)"]
CATV to VCR
Connections

With this connection, you CANNOT
record one program while
viewing another.
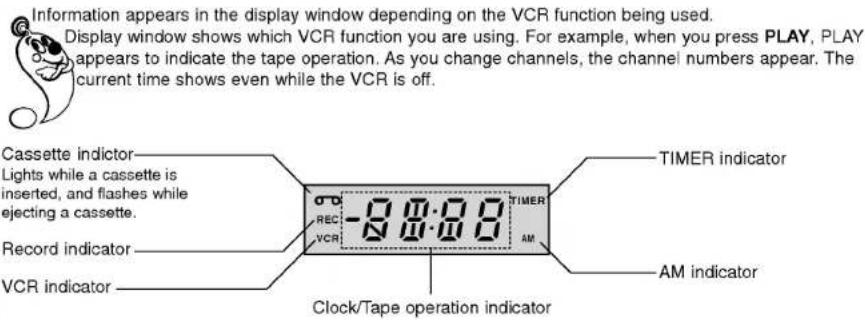
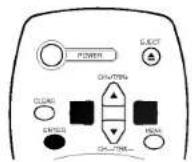
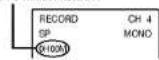
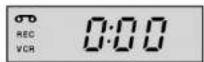
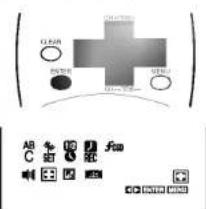
Front Panel Display shows which VCR function you are using. For example, when you press SP/EP, SP or EP appears to indicate the tape speed. As you change channels, the channel numbers appear. The current time shows even while the VCR is off.
HI — VCR is turned on.
BYE — VCR is turned off.
CUE — Tape is advancing rapidly in playback mode for visual search.
-CUE — Tape is reversing rapidly in playback mode for visual search.
FF (Fast Forward) — Tape is advancing rapidly.
L_(Line_) — Auxiliary channel is selected for viewing equipment connected to Audio/Video jacks on the VCR.
PLAY — Tape is playing at normal playback speed.
REW (Rewind) — Tape is rewinding rapidly.
SLW (Slow) — Tape is playing at slow-motion forward speed.
STL (Still) — Playback is halted on one frame.
STOP — Tape rewind or playback is stopped.
CH _ — VCR tuned to Channel _.
Some of these functions will be displayed every time the VCR is operated.

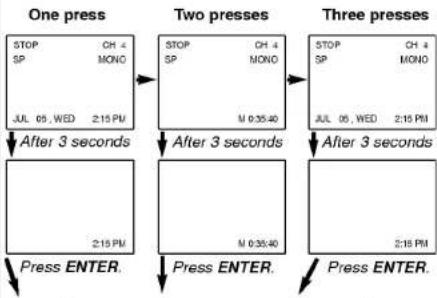
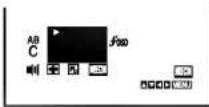
Each press of the ENTER changes the TV screen in the following sequence.
flowchart
graph TD
    A["One press"] --> B["Two presses"]
    B --> C["Three presses"]
    A --> D["Press ENTER."]
    B --> E["Press ENTER."]
    C --> F["Press ENTER."]
    D --> G["After 3 seconds"]
    E --> H["After 3 seconds"]
    F --> I["After 3 seconds"]
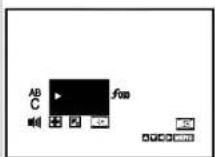
All indicator are turned off.
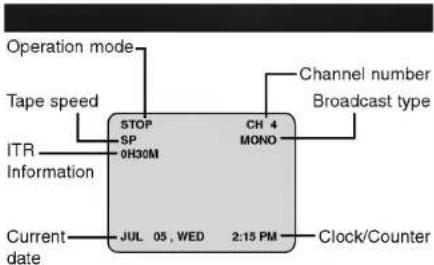
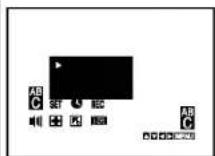
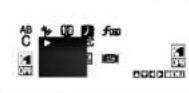
OSD
On-screen Display
The clock (or tape counter) only mode will continue until you press ENTER again.
The tape counter display does not appear when the tape is not inserted.
Setting the
On-screen Display
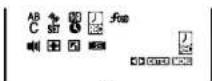
The SETUP, clock setting, and timer recordings are accessed conveniently with On-screen Menu Displays that lead you through each step. The following pages describe the On-screen selections to be set.
Blue Background on-screen Function: Shows blue background color on-screen while setting a menu. We recommend keeping blue background option ON when On-screen display flickers.

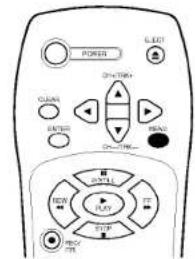
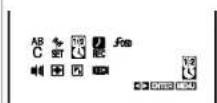
Press MENU.
The main menu appears.

You may only set OPR when playing a tape.

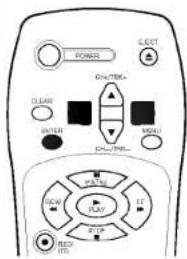
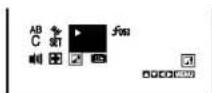
Select the desired menu with ◀ or ▶ and then press ENTER to see desired sub menu to be used.

To change the language setting for OSD (page 13).

Manual/Automatic tuning setting (page 14).

Date & clock setting (page 13)

Timer recording setting (page 20).

To display the operational mode of your VCR (page 13).

To improve the playback picture (page 17).

To select the channel for audio output (page 23).

To check a problem with your VCR (page 26).

To use blue background on-screen function (Details are on the right).

To select received Broadcast type. (page 24)

Press MENU to exit the menu.

Blue Background on-screen Function On/Off
Select the ☑ item on the main menu with ◀ or ▶ and then press ENTER.
Select a desired mode (ON or OFF) with ▲ or ▼ and then press ◀ or ▶.

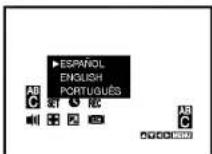
Language Selection: The on-screen programming of this VCR can display in either English, Spanish, or Portuguese.
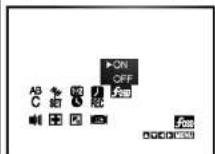
Function OSD On/Off: The on-screen display of this VCR can be turned on or off.
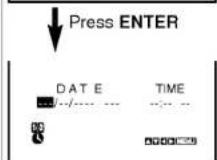
Setting the Clock: You must set the date and time for timer recordings.
1
Language Selection
Select the ^AB C item on the main menu with ◀ or ▶ and then press ENTER.
Select a desired language with ▲ or ▼ and then press ◀ or ▶.
2
Function OSD ON/OFF
Select the ☐ item on the main menu with ◀ or ▶ and then press ENTER.
Select a desired mode (ON or OFF) with ▲ or ▼ and then press ◀ or ▶.
3
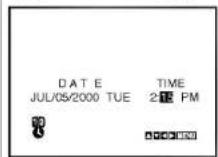
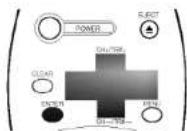
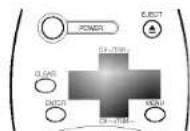
Setting the Clock
Select the ⚪ item on the main menu with ◀ or ▶ and then press ENTER.
Press the ▼ or ▲ to set MONTH first, then press ▶ to move to next option. And then set DAY, YEAR and TIME by using ▼, ▲, and ▶.
Press MENU to exit the menu.
Setting the Clock
Language Select Function OSD On/Off
Setting the Menu
Tuning in TV Stations
Automatically and Manually
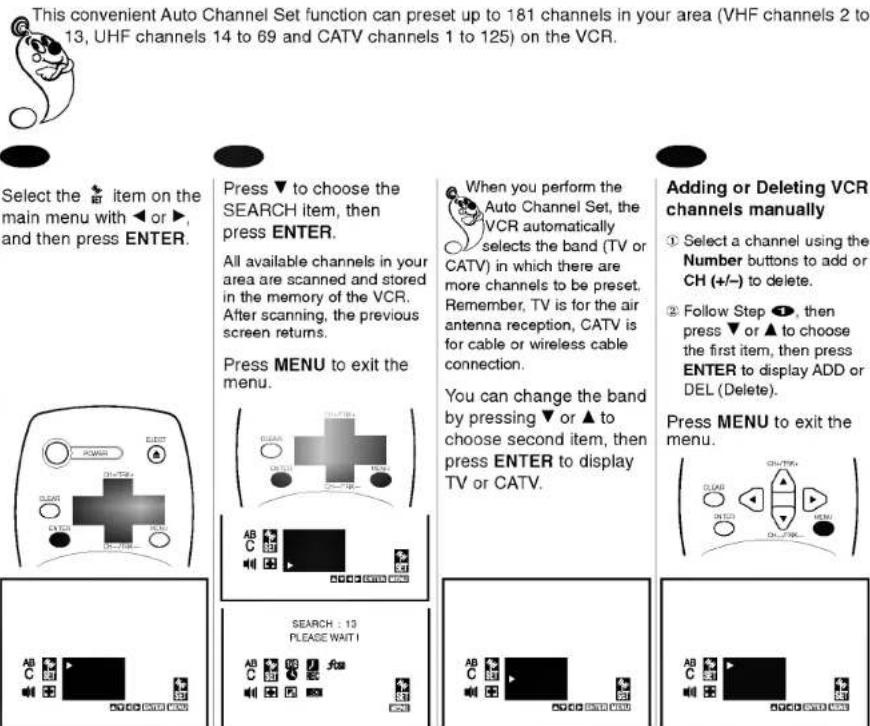
Select the ✝ item on the main menu with ◀ or ▶, and then press ENTER.
Press ▼ to choose the SEARCH item, then press ENTER.
All available channels in your area are scanned and stored in the memory of the VCR. After scanning, the previous screen returns.
Press MENU to exit the menu.
When you perform the Auto Channel Set, the VCR automatically selects the band (TV or CATV) in which there are more channels to be preset. Remember, TV is for the air antenna reception, CATV is for cable or wireless cable connection.
You can change the band by pressing ▼ or ▲ to choose second item, then press ENTER to display TV or CATV.
Adding or Deleting VCR channels manually
① Select a channel using the Number buttons to add or CH (+/-) to delete.
② Follow Step 1, then press ▼ or ▲ to choose the first item, then press ENTER to display ADD or DEL (Delete).
Press MENU to exit the menu.

Turn on the power of both the VCR and TV.
- Set the TV to the VCR Output Channel (CH 3 or 4) or video input.
- If a direct VIDEO/AUDIO connection is made between the VCR and the TV, set the TV's source selector to VIDEO.
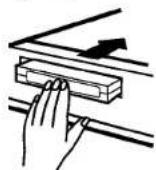
Insert the video cassette into your VCR.
The video cassette should have the window side facing up and the arrow facing away from you.
The power turns on automatically, if you load a video cassette which has had it's record protection tab removed (e.g rental movies from video hire shops) playback of the cassette will start automatically.
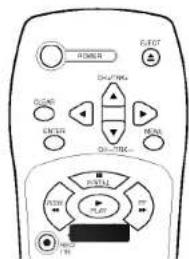
Press PLAY to start playback.
Press STOP to stop playback.
If the tape reaches the end before STOP is pressed, the VCR will automatically stop, rewind, eject, and it will turn itself off.
Adjusting the picture
Although the VCR adjusts the tracking automatically, you may need to adjust the tracking manually if the tape quality is too poor.
Auto tracking
While the VCR is adjusting the tracking automatically, "AUTO TRACKING" appears. It turns off after the adjustment is complete.
AUTO TRACKING
Manual tracking
If noise appears on the screen during playback, press either TRK (+/-) on the remote control until the noise on the screen is reduced.
(Normal)
Play back a tape
How to
If you do not wish to record on a tape (this can happen quite easily by accident!) remove the protection tab on the back edge of the video cassette.

It is possible to record on a video cassette with the record protection tab removed by covering the hole with self adhesive tape.

How to
Play back a tape
(Special)

Special effects
playback notes:
Horizontal lines
○V (noise bars) will appear on the TV screen. This is normal.
The audio is automatically muted during special effect modes, so there is no sound during search.
During the visual (or logic) search modes, a short period is needed to stabilize tape speed when re-entering the PLAY mode. Slight interference may be observed during this period.

Still Picture (& Frame Advance); You can watch a still picture during playback.
/visual search; This function lets you quickly and visually search for a desired tape section in either direction: forward (called CUE) and reverse (called REVIEW).
Logic search; You can watch a picture during fast-forward or rewind mode.
/CM (Commercial Message) Skip; This feature enables you during playback of a tape to skip a commercial break in a few seconds, then resume normal playback.

Still Picture (& Frame Advance) during Playback
Press P/STILL to pause a picture during playback.
Press and hold P/STILL to advance the tape frame by frame (slow mode).
If a still picture vibrates vertically, stabilize it by pressing TRK (+/-) on the remote control.
If a still picture lasts for more than 5 minutes, the VCR will automatically enter stop mode to protect the tape.
To continue normal playback, press PLAY.
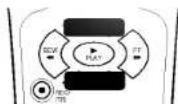
Visual search
Press the desired search buttons (FF or REW) during playback.
If forward and reverse searches lasts for more than 3 minutes, the VCR will automatically enter playback mode to protect the tape.
To continue normal playback, press PLAY.
Logic search
Press and hold the desired search button (FF or REW) during fast-forward or rewind mode.
Visual search (CUE/REVIEW) begins so you can check what is on the tape.
When released, Fast Forward or Rewinding resumes.
CM (Commercial Message) Skip:
Press CM SKIP during playback to skip commercials or other material.
Pressing 1, 2, 3, 4, 5 or 6 times skips 30, 60, 90, 120, 150 or 180 seconds, respectively.
CM SKIP skips a full 180 seconds of commercials in a few seconds, then resumes normal playback.

Auto power shut-off; This feature is especially helpful when you finish watching a tape.
Slow Motion Playback
Press SLOW during playback.
The tape will be played back at a speed 1/19 times slower than the normal speed.
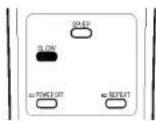
During slow playback, TRK (+/-) on the Remote Control can be used to minimize noise bands. When the slow mode continues for more than 3 minutes, the VCR will automatically change to p mode.
Auto power shut-off
During the REWIND mode, press POWER once.
The VCR will enter the Auto power shut-off mode.
The REW will flash.
After tape is rewound, VCR will turn off automatically.
OPR (Optimum Picture Response):
You may only set OPR when playing a tape.
Select the item on the main menu with ◀ or ▶ and then press ENTER.
Select a desired OPR mode (OFF, SOFT or HARD) with ▲ or ▼ and then press ◀ or ▶.
(Others)
Play back a tape
How to

select "OPR-SOFT" to make a picture more soft.
Select "OPR-HARD" to make a picture more sharp.
You may only set OPR when playing a tape.
How to record
Normal recording

watch another TV program while recording if the TV is
connected only with an coaxial cable, press TV/VCR after starting the recording so that VCR indicator in the display window disappears. Then select another channel on the TV.

Preparations
• Make sure that you have correctly installed your VCR as described earlier in this book.
• Turn on the power of both the VCR and TV.
- Set the TV to the VCR Output Channel (CH 3 or 4) or video input.
- Insert a video cassette with protection tab into your VCR.
Set the desired speed (SP or EP) by pressing SP/EP.
EP provides three times as much recording time as SP, although SP produces better picture and audio sounds.
Press CH (+/-) or Number buttons to select the channel to record.
If you want to record the program through the line input, press CH (+/-) continuously to display "LINE1" (from AUDIO/VIDEO IN jacks at the rear) or "LINE2" (from AUDIO/VIDEO IN jacks at the front) on the TV screen.
You can also select "LINE1" or "LINE2" by pressing 0 button twice or four times.
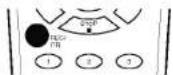
Press the REC/ITR once.
The RECORD and REC indicator appear on the TV screen and display window.
If a cassette with no prevention tab is loaded, the cassette will be ejected automatically. ("NO TAB CASSETTE" message appears)
To stop recording.
Press STOP.
To pause recording.
Press P/STILL
The PAUSE appear on the TV screen. Also REC indicator will flash during pause mode on the display window

To resume recording, press P/STILL again.

Make sure that you have correctly installed your VCR as described earlier in this book.
Turn on the power of both the VCR and TV.
- Set the TV to the VCR Output Channel (CH 3 or 4) or video input.
- Insert a video cassette with protection tab into your VCR.
Set the desired speed (SP or EP) and select the channel to record by following steps 1 to 2 as shown "Normal Recording" on the previous page.
Press REC/ITR twice.
The ITR information as illustrated, will appear on the TV screen and display window.
Recording will start.
ITR Information
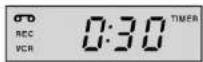
Within a few seconds, press REC/ITR repeatedly to set the recording duration.
0H00M (Regular recording) ↓ 0H30M → 1H00M → ... → 9H00M
Instant Timer Recording information appears on the TV screen and window display. (TIMER indicator appears also.)

To stop, pause, or turn off the power while recording
Press STOP, P/ STILL, or POWER.

To extend the recording duration while recording
Press REC/ITR, until the new duration you want appears.
Instant Timer Recording
How to record
When the recording time indicator in the display window counts down to
"0:00", recording stops and VCR turns off.
When the regular recording is resumed by pressing REC/ITR repeatedly to display "0H00M", Instant Timer Recording is canceled.
How to record
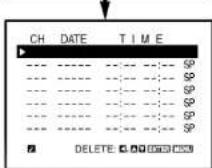
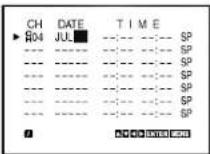
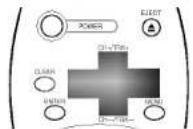
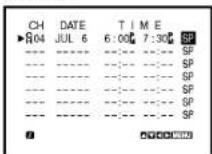
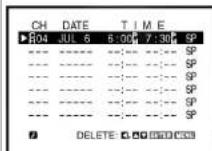
Timer Recording

Press ENTER to select date option
1\~31=One time recording DLY(Daily)=Same Mon\~Fri Weekly(SUN\~SAT)=Same time once a week
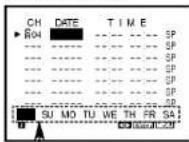
Date options
Press ◀ or ▶ to select a date option then press ENTER.

VCR can be programmed to record up to 7 programs within a period of 1 year. For unattended recording, the timer needs to know the channels to be recorded and the starting and ending times.
- Check that the VCR clock is set correctly. - Insert a video cassette with protection tab
- If you have connected the CATV using the CATV converter, set the CHANNEL to match the cable box output channel (usually CH3 or 4). Change the channel on the CATV converter instead of VCR.

Select the item on the main menu with ◀ or ▶, and then press ENTER.
If all programs have already been entered, FULLY PROGRAMMED message will appear.

Press ENTER to start setting the timer record event.
Press ▼ or ▲ to select channel number (or LINE1, LINE2) and then press ▶ to move to next option.
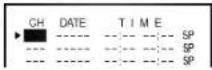
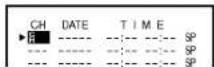

Press ▼ or ▲ to select month and then press ▶ to move to day item.
You can select date option by pressing ENTER (Details are on the left).
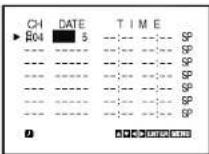

Press ▼ or ▲ to select day and then press ▶ to move to set time.

u have finished programming and you want to set the VCR to record the programs you have entered. A) MAKE SURE YOU HAVE INSERTED A TAPE INTO THE VCR. B) YOU MUST TURN OFF THE VCR BEFORE IT WILL RECORD ANY TIMER PROGRAMS. (TIMER indicator appears). The VCR is now set to record the preset programs.
5
Press ▼▲◀ to select and set each of the remaining items at right.
Remaining item to be set: START and STOP time Recording Speed (SP or EP)
To make corrections Repeatedly press ◀ to move the cursor to the left, or ▶ to move to the right to the incorrect entry and make the correction.
6
Press MENU, the program will be memorized at the VCR.
Additional programs may be entered by repeating steps ② to ⑤.
7
Press MENU to exit the menu again.
Press POWER off to set the timer.
TIMER indicator appears on the display window.
8
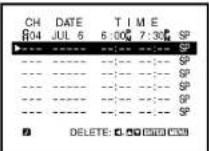
Checking (Erasing) the Timer recording
① Select the item on the main menu with or ▶, and then press ENTER.
② Press ▼ or ▲ to select a program you want to check or erase.
③ Press ◀ or ENTER to erase or modify the program.
Timer Recording
How to record

if the program preset time is past, the PAST TIME
PROGRAMMED message will appear on the TV screen. Correct the time.
If the incorrect data is entered, the PLEASE CORRECT THE DATA message will appear on the TV screen. Correct the data.
Make sure that the preset times of the timer recording events do not overlap. If that do, the earlier program will always be given priority.
How to record
Dubbing and Editing

IMPORTANT
COPYRIGHT
INFORMATION
programs and films are copyrighted. In certain circumstances, copyright law may apply to private in-home video taping of copyrighted materials.
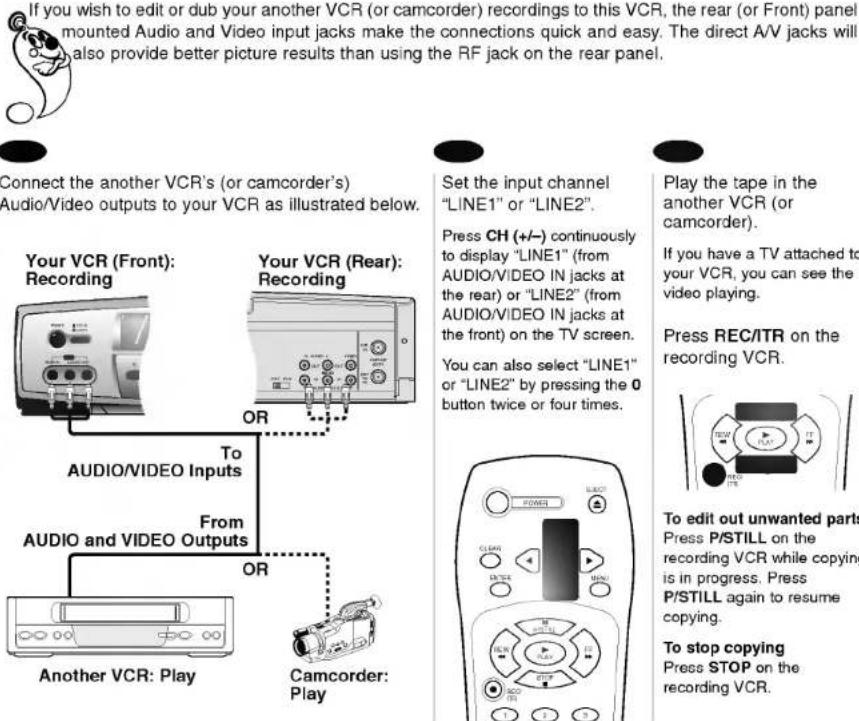
Connect the another VCR's (or camcorder's) Audio/Video outputs to your VCR as illustrated below.
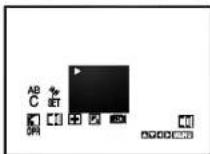
Set the input channel "LINE1" or "LINE2".
Press CH (+/-) continuously to display "LINE1" (from AUDIO/VIDEO IN jacks at the rear) or "LINE2" (from AUDIO/VIDEO IN jacks at the front) on the TV screen.
You can also select "LINE1" or "LINE2" by pressing the 0 button twice or four times.
Play the tape in the another VCR (or camcorder).
If you have a TV attached to your VCR, you can see the video playing.
Press REC/ITR on the recording VCR.
To edit out unwanted parts Press P/STILL on the recording VCR while copying is in progress. Press P/STILL again to resume copying.
To stop copying Press STOP on the recording VCR.

This VCR is equipped with the VHS Hi-Fi audio sound system for recording and playback. The information below gives a brief description of Hi-Fi audio and how to record and play a tape in the Hi-Fi audio mode.
To enjoy the Hi-Fi stereo system, you connect your VCR's AUDIO(L/R)/VIDEO OUT jacks to the AUDIO(L/R)/VIDEO INPUT jacks on back your TV (or another A/V system) using the A/V cable.
Receivable Broadcast types
The following are possible audio broadcast type and on screen displays.
Press ENTER to display the broadcast signal currently being received.
MTS Stereo and SAP broadcast
Multi-channel Television Sound Stereo (main language) and Secondary Audio Program (sub language) broadcasts are being received simultaneously. Select STEREO or SAP broadcast type mode.
MTS Stereo broadcast
Multi-channel Television Sound Stereo broadcast. Select STEREO. If a stereo broadcast is weak and the display flickers, you may want to select the MONO audio mode for better picture.
SAP broadcast
Secondary Audio Program (sub language) broadcast. Select SAP audio mode for the sub language.
MONO broadcast
Normal monaural sound broadcast.
| STOP | CH 4 |
| SP | STEREO/SAP |
| STOP | CH 4 |
| SP | STEREO |
| STOP | OH 4 |
| SP | SAP |
| STOP | CH 4 |
| SP | MOND |
Audio output selection
Select the ▶ item on the main menu with ◀ or ▶ and then press ENTER.
Select a desired audio output mode (STEREO, LEFT, RIGHT, or MONO) with ▲ or ▼ and then press ◀ or ▶.
STEREO- The left
channel sound (L) is heard from the left speaker and the right channel sound (R) is heard from the right speaker.
LEFT- The left channel sound (L) is heard from both speakers.
RIGHT- The right channel sound (R) is heard from both speakers.
MONO- The monaural sound is heard from both speakers (playback mode only).
If audio output selection is selected at STEREO position while playing a prerecorded SAP audio program, the main
language (Left) and the sub language (Right) will be heard simultaneously. For SAP BILINGUAL playback do not use
STEREO position. Select the RIGHT position.
Audio output selection
MTS Broadcast
Hi-Fi Stereo System
Hi-Fi Stereo System
Broadcast type selection for recording
SAP Recording

dcast type selection for recording: You can select the broadcast audio format (STEREO, SAP or MONO) to use when recording. We recommend using STEREO.
SAP (Secondary Audio Program; sub language) recording: Some stations transmit a Second Audio Program, which is used for a sub language or additional information. When the station broadcasts a Second Audio Program, follow the procedure below to record the SAP.

Broadcast type selection for recording
Select the ☒ item on the main menu with ◀ or ▶ and then press ENTER.
Select a desired Broadcast type mode (STEREO, SAP, or MONO) with ▲ or ▼ and then press ◀ or ▶.
Please refer to the "Receivable Broadcast types" section on the previous page.

Do a recording. Follow "Normal recording" section on the 18 page.

SAP (Second Audio Program) recording Select the ☑ item on the main menu with ◀ or ▶ and then press ENTER.
Select Broadcast type to SAP with ▲ or ▼ and then press ◀ or ▶.

Do a recording. Follow normal recording section on the 18 page.
Do the SAP (Second Audio Program) recording if only the SAP appears on the TV screen. Please refer to the "Receivable Broadcast types" section on the previous page.

Real-time counter: Shows length of tape run in hours, minutes, and seconds.
Counter memory: This is useful if there is a section of tape you want to view immediately after recording or if you want to return to the same point several times.
Real-time counter
Press the ENTER to select the real-time counter display.
Every press of the ENTER changes the TV screen as illustrated below.

1
Counter memory
Press the ENTER repeatedly to display the tape counter on the TV screen.

2
Press CLEAR at the point you want to locate later.
The tape counter on the TV screen resets to "M 0:00:00".


3
After playback or recording, press STOP, then REW.
The tape automatically stops when the tape counter returns to about "M 0:00:00".
Counter memory
Real-time counter

Counter memory does not work during fast-forward and Auto rewind.
When you insert a cassette, the tape counter is reset to "M 0:00:00".
The real-time counter does not operate when nothing is recorded on the tape.
The real-time counter does not work when the tape is not inserted.
Other functions
Video Doctor
Operating Hints
Video Doctor (Advanced Self-Diagnosis); This feature informs you that there is a problem with your VCR. These error messages will appear on the TV screen.

Video Doctor
Select the ✕ item on the main menu with ◀ or ▶, and then press ENTER.
Press ▲ or ▼ to select a item to check a problem.
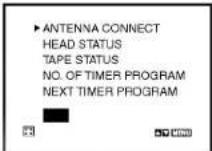
ANTENNA CONNECT- If PLEASE CHECK! appears, Connect the VCR to the antenna and TV correctly and securely.
HEAD STATUS- If "PLEASE CLEAN" appears, clean your video heads.
TAPE STATUS— Indicates whether the protection tab of the cassette inside VCR is removed or not.
(RECORDABLE, NOT RECORDABLE or NO TAPE IS LOADED)
NO. OF TIMER PROGRAM— Indicates how many timer recording are set.
NEXT TIMER PROGRAM— Indicates setting contents of the next timer recording.
Operating hints
- Auto play system; If you insert a cassette tape without a prevention tab into the VCR, the tape will begin playing automatically. When the tape is finished, it will rewind and be ejected, and it will turn itself off. Auto play function is not operated when VCR is in Timer Recording mode (The TIMER indicator is lighted.).
- In manual recording, Timer recording, Instant Timer Recording, playback, or fast forward modes, the VCR automatically starts rewinding the tape at the end of the tape. The cassette will stop at the beginning of the tape and be ejected, and the VCR will turn itself off.
• After you have finished using the VCR, rewind, eject, and remove the cassette. Place the cassette in its protective sleeve to protect it from dust. It is not necessary to rewind the cassette before removing it, but if you do, it will be ready to play or record the next time you use it.
- Be sure the VCR Channel Selector is on the correct channel you wish to record. The channel that is being recorded can always be checked by setting the television on the VCR channel (3 or 4) and pressing TV/VCR selector to turn the VCR indicator on.
- Do not attempt to hook up more than one television set to the VCR for either recording or playback.
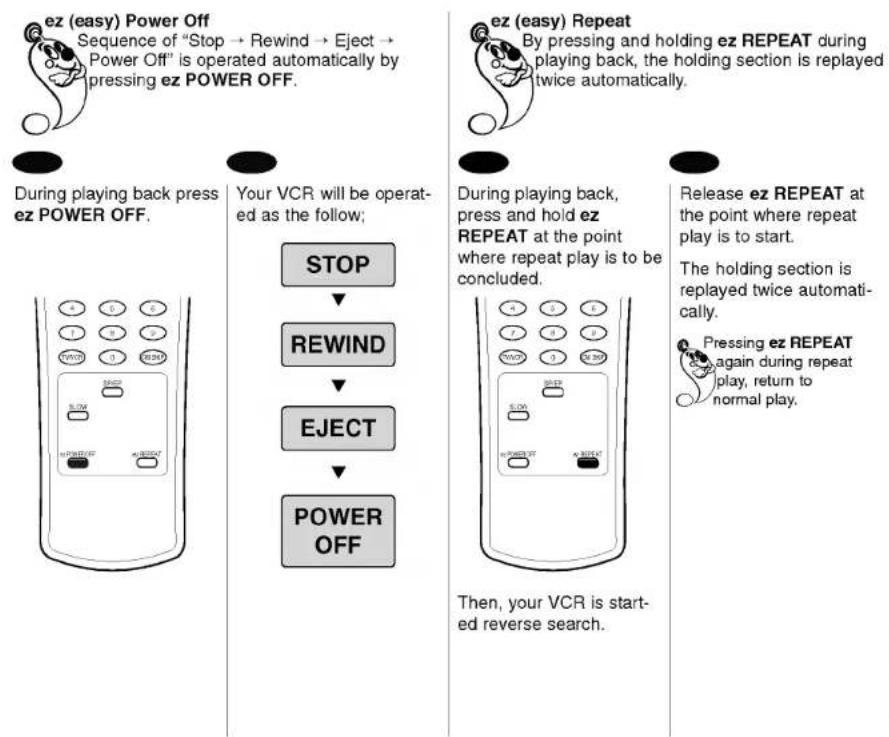
flowchart
graph TD
    A["ez (easy) Power Off\nSequence of "Stop → Rewind → Eject → Power Off" is operated automatically by pressing ez POWER OFF."] --> B["During playing back press ez POWER OFF."]
    B --> C["Your VCR will be operated as the follow; STOP"]
    C --> D["REWIND"]
    D --> E["EJECT"]
    E --> F["POWER OFF"]
    F --> G["When, your VCR is started reverse search."]
    H["ez (easy) Repeat\nBy pressing and holding ez REPEAT during playing back, the holding section is replayed twice automatically."] --> I["During playing back, press and hold ez REPEAT at the point where repeat play is to be concluded."]
    I --> J["Release ez REPEAT at the point where repeat play is to start. The holding section is replayed twice automatically. Pressing ez REPEAT again during repeat play, return to normal play."]
Troubleshooting
Check list
MOISTURE CONDENSATION If you pour a cold liquid into a glass, water vapor in the air will condense on the surface of the glass. This is moisture condensation. Moisture condensation on the head drum, one of the most crucial parts of the unit, will cause damage to the tape. When the VCR is exposed to a rapid temperature change from cold to warm some condensation will occur. Under this condition connect the power cord to the AC line, turn on the VCR and allow at least two hours for the VCR to dry out.
If the unit does not seem to operate properly, read the instructions again, then check the table below. Video Head Cleaning Whenever a video cassette is inserted into or ejected from your VCR the video head is automatically cleaned. This should mean that additional head cleaning should not be necessary. However dirt accumulating on the head after a long period of time can cause the playback picture to become blurred or broken up. High quality video cassette tapes will not normally deposit dirt onto the video head, but old or damaged tapes might.
Cassette cannot be inserted.
- Load cassette in direction indicated by arrow on cassette.
• A cassette is already in the VCR. - Check if display window is lit. If not, make sure power cord is plugged in.
- If the indicator flashes, press POWER again.
No picture appears on TV screen.
- Set the television to the same channel selected on the RF Channel Select Switch. (CH3 or CH4).
The playback picture is noisy.
- Make sure the TV is set to the video channel or video input.
- Adjust the tracking manually when the tape quality is poor.
- Although the unit cleans the video heads automatically, dirt may be accumulated after a long period of use. Clean the video heads with a commercially available video heads cleaning tape.
- Make sure all the connections with the VCR are made correctly and securely.
TV reception is noisy or there is no TV reception.
- Connect the VCR to the antenna and TV correctly and securely.
- Move the VCR away from the TV set.
No picture, but audio is clear.
• The heads may require cleaning.
The VCR will not go into the recording mode, even when REC/ITR is pressed.
- The cassette has had the erase prevention tab removed. Stick a piece of adhesive tape over the erase prevention tab hole or select a different cassette.
No picture appears on television screen during playback.
- Set the television to the VCR channel (3 or 4) depending upon the selected channel on the back of the VCR. - Try a different cassette tape.
The VCR cannot be remotely controlled or the remote control has short range.
- Weak or dead batteries.
- Do not block sensor.
--:-- appears on the display window.
- Reset time according to instructions. Power has been interrupted.
VCR does not start at preset record starting time.
- Setup recording time according to instructions. - Be sure the AM-PM display is correct.
The tape is ejected in the timer mode.
- The cassette has had the erase prevention tab removed. Stick a piece of adhesive tape over the erase prevention tab hole or select a different cassette.
indication flashes.
- Insert a cassette.
Designs and specifications are subject to change without notice.
Weight and dimensions shown are approximate.

GENERAL
| Head System | Four head helical scanazimuth system | Video Signal System | EIA Standard (525 lines, 60 fields)NTSC type color signal |
| Power Source | AC 100-240V, 50/60Hz | Input | 1.0 Vp-p 75 ohms unbalanced |
| Power Consumption | Approx. 22 Watts | Output | 1.0 Vp-p 75 ohms unbalanced |
| Dimensions (WxHxD) | 360 x 98 x 274 mm(14.2" x 3.9" x 10.8") | Signal to Noise Ratio | More than 43 dB (SP mode) |
| Operating Temperature | 5 °C~35 °C (41 °F~95 °F) | AUDIO | |
| Operating Humidity | Less than 80% RH | FM audio | |
| Timer | 12-hour display type with AM, PM | Frequency Range | 20Hz to 20kHz |
| Weight | Approx. 3.4 kg (7.5 lbs) | Dynamic Range | More than 83 dB |
| Tape Speed | 33.35 mm/sec (SP mode)16.67 mm/sec (LP mode)11.12 mm/sec (EP mode) | Channel Separation | More than 55 dB |
| Tape Width | 12.7 mm | Conventional audio | |
| Maximum Recording | 2 HOURS (T-120, SP mode) | Input | -6.0 dBm more than 47 kohms (LINE) |
| Time | 6 HOURS (T-120, EP mode)8 HOURS (T-160, EP mode) | Output | -6.0 dBm less than 1.5 kohms (LINE) |
| Rewind Time | About 60 seconds (T-120) | S/N Ratio | More than 43 dB (SP mode) |
| Frequency Range | 200 Hz to 10kHz (SP mode) | ||
| TUNER | Supplied Accessories | ||
| Antenna | 75 ohms (UHF), 75 ohms (VHF) | Coaxial Cable (1) | |
| VHF Output Signal | Channel 3 or 4 (Switchable) | Audio Cable (1) | |
| Channel Coverage | VHF; 2-13UHF; 14-69CATV; 4A, A-W, W+1-W+84, A-5-A-1 | Video Cable (1)Remote control (1) | |
P/NO:3834RM0040J
|
—
[Non-Text]
[Non-Text]
[Non-Text]
[Non-Text]
[Non-Text]
[Non-Text]
[Non-Text]
[Non-Text]
[Non-Text]
[Non-Text]
[Non-Text]
[Non-Text]
[Non-Text]
[Non-Text]
[Non-Text]
[Non-Text]
[Non-Text]
[Non-Text]
[Non-Text]
[Non-Text]
[Non-Text]
[Non-Text]
[Non-Text]
[Non-Text]
|
—
[Non-Text]
[Non-Text]
[Non-Text]
[Non-Text]
[Non-Text]
[Non-Text]
[Non-Text]
[Non-Text]
[Non-Text]
[Non-Text]
[Non-Text]
[Non-Text]
[Non-Text]
[Non-Text]
[Non-Text]
[Non-Text]
[Non-Text]
[Non-Text]
[Non-Text]
[Non-Text]
[Non-Text]
[Non-Text]
[Non-Text]
一
|
[Non-Text]
[Non-Text]
[Non-Text]
[Non-Text]
[Non-Text]
[Non-Text]
[Non-Text]
[Non-Text]
[Non-Text]
[Non-Text]
[Non-Text]
[Non-Text]
[Non-Text]
[Non-Text]
[Non-Text]
[Non-Text]
[Non-Text]
[Non-Text]
[Non-Text]
[Non-Text]
[Non-Text]
[Non-Text]
[Non-Text]
[Non-Text]
[Non-Text]
[Non-Text]
[Non-Text]
[Non-Text]
[Non-Text]
[Non-Text]
[Non-Text]
[Non-Text]
广力云智慧零售收银系统
|
-
[Non-Text]
[Non-Text]
[Non-Text]
[Non-Text]
[Non-Text]
[Non-Text]
[Non-Text]
[Non-Text]
[Non-Text]
[Non-Text]
[Non-Text]
[Non-Text]
[Non-Text]
[Non-Text]
[Non-Text]
[Non-Text]
[Non-Text]
[Non-Text]
[Non-Text]
[Non-Text]
[Non-Text]
[Non-Text]
[Non-Text]
|
The Ground Truth image displays a single, solid horizontal line. According to Rule 2 (UNDERSCORE & LINE RULES), this is a stylistic or background line, not a placeholder underscore. Therefore, the OCR result must ignore it and output nothing or only meaningful text. The provided OCR content is "____", which consists of four underscores. This is an incorrect interpretation of the line as a placeholder, violating the rule that stylistic lines must be ignored. The OCR has hallucinated underscores where none should exist based on the GT's visual context. Hence, the OCR result is inconsistent with the Ground Truth.
[Non-Text]
[Non-Text]
[Non-Text]
[Non-Text]
[Non-Text]
[Non-Text]
[Non-Text]
[Non-Text]
[Non-Text]
[Non-Text]
[Non-Text]
[Non-Text]
[Non-Text]
[Non-Text]
[Non-Text]
[Non-Text]
[Non-Text]
[Non-Text]
[Non-Text]
[Non-Text]