
PLUG-OUT SH-2 - Audio software ROLAND - Free user manual and instructions
Find the device manual for free PLUG-OUT SH-2 ROLAND in PDF.

| Product Type | Software synthesizer (PLUG-OUT) |
| Compatibility | Windows / macOS, VST / AU compatible |
| Supported Hardware | Roland SYSTEM-1, SYSTEM-1m, SYSTEM-8 |
| Sound Engine | Virtual analog synthesis (based on SH-2) |
| Number of Voices | Up to 4 voices (polyphonic) |
| Oscillators | 2 VCOs + sub oscillator + noise |
| Filter | Low-pass VCF with resonance |
| Modulation | LFO with multiple waveforms, envelope modulation |
| Effects | Reverb, Delay, Crusher (distortion) |
| Arpeggiator | Built-in arpeggiator with multiple types and steps |
| Memory | 64 patches per bank, unlimited banks (file-based) |
| MIDI Control | Supports MIDI input/output for hardware controllers |
| PLUG-OUT Function | Install into SYSTEM-1/SYSTEM-8 for standalone use |
| Sample Rate | 44.1 kHz, 48 kHz, 96 kHz (depending on DAW) |
| System Requirements | DAW supporting VST or AU; USB port for hardware connection |
| Documentation | Owner's manual (PDF) included |
| Warranty | Standard Roland software warranty |
Frequently Asked Questions - PLUG-OUT SH-2 ROLAND
User questions about PLUG-OUT SH-2 ROLAND
0 question about this device. Answer the ones you know or ask your own.
Ask a new question about this device
Download the instructions for your Audio software in PDF format for free! Find your manual PLUG-OUT SH-2 - ROLAND and take your electronic device back in hand. On this page are published all the documents necessary for the use of your device. PLUG-OUT SH-2 by ROLAND.
USER MANUAL PLUG-OUT SH-2 ROLAND
PLUG-OUT Software Synthesizer
Owner's Manual
Introduction
You must specify the MIDI Input/Output in the Setting window (p. 12) for the first time.
For details on the settings for the DAW software that you're using, refer to the DAW's help or manuals.
In this document, SYSTEM-1/SYSTEM-1m are described as "SYSTEM-1."
About this product
- In the interest of product improvement, the specifications and/or contents of this package are subject to change without prior notice.
- The explanations in this manual include illustrations that depict what should typically be shown by the display. Note, however, that your unit may incorporate a newer, enhanced version of the system (e.g., includes newer sounds), so what you actually see in the display may not always match what appears in the manual.
About Trademarks
• VST is a registered trademark of Steinberg Media Technologies GmbH.
- Roland, PLUG-OUT are either registered trademarks or trademarks of Roland Corporation in the United States and/or other countries.
- Company names and product names appearing in this document are registered trademarks or trademarks of their respective owners.

Screen Structure
![[PATCH] button Selects a patch memory. The Patch Select window opens. [SEND] button Sends the memory to the SYSTEM-1/SYSTEM-8. [GET] button Loads the memory (temporary) being edited in PLUG-OUT mode of the SYSTEM-1/ SYSTEM-8 into the SH-2. [PLUG-OUT] button Installs the SH-2 into the SYSTEM-1/SYSTEM-8. Level meter Displays output levels of the SH-2. [TUNE] knob Adjusts the overall pitch of the SH-2. p. 5 p. 8 p. 8 p. 8 Patch Memory name This area shows the name of the selected patch memory. Main window This area shows various knobs and sliders that you can use to edit the sound. [OPTION] button Here you can choose skins and use MIDI Control Mapping. These settings can be made separately for each instance of the SH-2. p. 12 p. 4 [SETTING] button Here you can edit the MIDI settings and the direction of mouse wheel scrolling (Only Mac). These settings are shared by all instances of the SH-2 that you are using. p. 12 [KEYBOARD] button Toggles the keyboard area between visible and hidden. [HELP] button Displays help. Keyboard area Click here to produce sound. When a MIDI message is received, the corresponding key responds.](/content/2026/06/1205607/images/9b7d2838cfffd4cb48ce8e8744d1ac7e6c398793f7fcbb70a73bc6c59eb0e163.jpg)
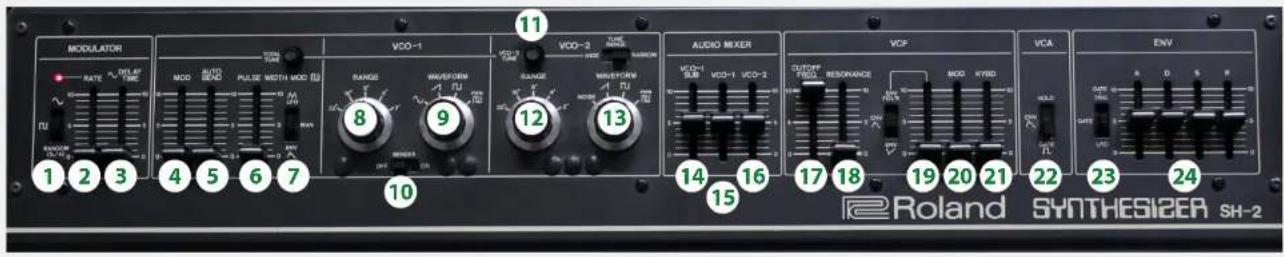
Main Window
MODULATOR
Here you can create cyclic change (modulation) in the sound by applying vibrato (pitch modulation) or wah (filter modulation).
| WAVE FORM | RANDOM (S/H) (Random wave) |
| (Square wave) | |
| (Saw wave) | |
| (Triangle wave) | |
| (Sine wave) | |
| RATE | Determines the speed of the modulation. |
| DELAY TIME | Specifies the time from the moment you play a note until the LFO reaches its maximum amplitude. |
VCO
Here you can specify the character and the pitch of the sound.
| MOD Modulates the pitch (vibrato). | |
| AUTO | Changes the pitch at the moment you play a note. |
| BEND | |
VCO-1/VCO-2
| WAVE FORM | (Saw wave) (Square wave) (Sine wave) *1 / NOISE *2 |
| RANGE Specifies the octave setting. | |
| PULSE WIDTH | When MOD is set to MAN, this adjusts the pulse width of the Square wave.When the setting is other than MAN,this adjusts the depth of the modulation produced by the LFO and envelope. |
| MOD | Selects the source that modulates the pulse width of the pulse wave.S.OSC: VCO-1 SUBA.ENV: VCA envelopeF.ENV: VCF envelopeAUTO BEND: AUTO BEND(VCO)LFO: ModulatorMAN: No modulation |
| BENDER *1 | Adjusts the amount of bend that is applied to VCO-1. |
| FINE TUNE *2 | Adjusts the pitch of VCO-2. |
| COARSE TUNE *2 | Adjusts the pitch of VCO-2 in semitone steps. |
*1 VCO-1 only/*2 VCO-2 only
VOLUME
Adjusts the overall volume of the 5H-2.
PORTAMENTO TIME
Adjusts the time over which the pitch change occurs.
BEND RANGE
Specifies the amount of pitch change that occurs when pitch bend messages are received.
TEMPO SYNC
Press this to make it light if you want to synchronize to the tempo of your host application (DAW).
Synchronization tempo range: 40–300
ARPEGGIO
Causes an arpeggio to be produced when you simply hold down a chord on the keyboard.
| ARPEGGIO | If this is lit, an arpeggio plays. |
| ARP TYPE | Selects the arpeggio variation. |
| ARP STEP | Selects the speed of the arpeggio. |

VCF
These settings determine the brightness and thickness of the sound. Here you can also specify the time-varying change (envelope) for the filter.
| CUTOFF FREQ | Specifies the cutoff frequency of the low-pass filter. |
| RESONANCE | Resonance boosts the sound in the region of the filter's cutoff frequency. |
| ENV | Specifies the direction and amount by which the envelope changes. |
| MOD | Uses a modulator to vary the cutoff frequency of the low pass filter. |
| KYBD | Allows the filter cutoff frequency to vary according to the key that you play. |
ENV TRIG (Common for VCF and VCA)
Specifies what triggers the envelope.
| LFO+GATE | The envelope is triggered when you newly press a key. And if you hold down a key, the envelope is triggered repeatedly at each cycle of the modulator.* The envelope is not triggered when you play legato. |
| GATE+TRIG | The envelope is triggered each time you press a key. |
| LFO | If you hold down a key, the envelope is triggered repeatedly at each cycle of the modulator. |
| GATE | The envelope is triggered when you newly press a key.* The envelope is not triggered when you play legato. |
AUDIO MIXER
Adjusts the volume of the VCO.
| VCO-1 SUB | Volume of the sound one octave below. |
| VCO-1 | Volume of VCO-1. |
| VCO-2 | Volume of VCO-2. |
EFFECTS
Here you can adjust the effects.
| REVERB | Adjusts the depth of the reverb. |
| DELAY | Adjusts the volume of delay sound. |
| TIMEdjusts | Ahe delay time. |
VCA
Here you can create time-varying change (envelope) for the volume.
| VCA MODE | HOLD: The note sounds at a fixed volume level.F.ENV: The note sounds according to the envelope specified by the VCF's A D S R settings.A.ENV: The note sounds according to the envelope specified by the VCA's A D S R settings.GATE: The sound has a fixed volume as long as you hold down the key. |
| CRUSHER | Modifies the tonal character by distorting the waveform. |
| TONE | Adjusts the brightness of the sound. |
| A D S R Specifies the envelope. | |
Memory and Bank
1. Click the [PATCH] button.
The Patch Select window opens.
![[NEW] button Creates a new empty bank. [DELETE] button Deletes the selected bank. [LOAD] button Imports a bank. [SAVE] button Exports a bank as a file. BANK PATCHES 01: BS the real BH-2 17: BS EH 2 Base 1 33: BS One Base 40 02: LD Alpha Lead 1 36: BS SH-2 Base 5 34: BS SH-2 Base 7 50 03: BS LPD Alpha Bz 39: BS Pulse Aa Bz 30: BS Organ Base 1 51 04: BY Towers 1 38: BS Organ Base 2 52 05: LD Dual Squares 1 37: BS Monster Base 53 06: BE Fat Base 36: BS Deep Outline 54 07: LD NY Lead 1 29: BS Ping Base 55 08: FX Space Zoo 24: BS Deep Air Base 56 09: BG Slow Base 1 28: BG Hour Base 40: BS Pay Base 57 10: BS SH-2 Base 1 41: BG CDN Base 58 11: BS SH-2 Base 2 42: BS Voxel Base 59 12: BG Slow Base 2 43: BS Chrd Rise 60 13: BG Cut Save Base 28: BS Large Base 61 14: BS SH-2 Base 3 45: BS Chl Base 62 15: BS NY Base 1 46: BS Deep Rise 63 16: BS Room Base 37: BS ICM Rise 64 The selected memory is shown in yellow. [SEND ALL] button Sends all (64) memories in the bank to the SYSTEM-1/ SYSTEM-8. [GET ALL] button Receives all (64) memories stored on the SYSTEM-1/ SYSTEM-8. NOTE All 64 memories are received into the currently selected bank, overwriting the previous contents of that bank. If you want to keep the state of the bank, create a new bank and receive the memories into the newly created bank (p. 6). [WRITE] button Saves an edited sound as a memory in the bank. [RENAME] button Renames the selected memory. [READ] button Loads a memory from a bank.](/content/2026/06/1205607/images/fcc416fa597a090623876b742dd9acce87865734c3e828d7ade6f17c1df23d34.jpg)
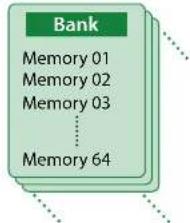
Bank
A set of 64 memories is called a "bank." By switching banks you can access a large number of memories.
A bank of memories can be saved as a file.
Changing to Other Bank
- Click the Bank field.
The bank list window opens.
- Click the bank that you want to recall.
By pressing the [▲][▼] buttons located at the right of the bank field, you can switch to the next or previous bank.
Exporting the Bank
Here's how to export a bank as a file.
- Click the [EXPORT] button.
The file name input window opens.
- Enter a file name and save.
The file is written.
Importing a Bank
- Click the [IMPORT] button.
The file selection window opens.
- Select a file and load it.
The bank is loaded.
Creating/Deleting a Bank
Creating a bank
Click the [NEW] button to create a new empty bank.
Deleting a bank
Here's how to delete the selected bank.
-
Select a bank as described in "Changing to Other Bank" (p. 5).
-
Click the [DELETE] button.
A confirmation screen appears.
- Click [OK] to delete the bank.
Renaming a Bank
- Select a bank as described in "Changing to Other Bank" (p. 5).
- At the left of the bank field, click ▶.
- Edit the name and press the [Return (Enter)] key.
Memory
The SH-2 manages 64 memories as one bank.
Loading a Memory
Here's how to load a memory from a bank. When you load a memory, its settings appear in the edit area and can be edited.
- Click the number of the memory that you want to load.
- Click the [LOAD] button. Or press the [Return (Enter)] key.
The memory is loaded.
* You can also load a memory by double-clicking a memory number.
Saving the Memory
Here's how to save an edited sound as a memory in the bank.
- Click the number of the memory in which you want to save the sound.
- Click the [SAVE] button.
The memory is saved in the bank.
Renaming the Memory
- Click the number of the memory that you want to rename.
- Click the [RENAME] button.
- Change the memory name. (Up to 16 letters)
Changing the Order of the Memories
Drag the memory number to change the order of memories.
Keyboard shortcuts
Keyboard shortcuts for the Patch Select window.
| Key Function | |
| Command (Ctrl) + B Changes bank | |
| Command (Ctrl) + I Imports bank | |
| Command (Ctrl) + E Exports bank | |
| Command (Ctrl) + N New memory | |
| Command (Ctrl) + O Loads memory | |
| Command (Ctrl) + S Saves memory | |
| Up/Down/Left/Right Selects memory | |
| Space Renames memory | |
| Command (Ctrl) + C Copies memory | |
| Command (Ctrl) + V Pastes memory | |
| Delete *1delete ☒ *2fn + delete *2 | Deletes memory |
| Return (Enter) Loads memory | |
| Command (Ctrl) + Z Undo | |
| Command (Ctrl) + Shift + Z Redo | |
| Command (Ctrl) + U Sends all memories to the SYSTEM-1 | |
| Esc Closes window | |
*1 Windows / *2 Mac
Playing with the SYSTEM-1
By connecting the SYSTEM-1 to your computer (Mac/Windows), you can use the SH-2 in conjunction with the SYSTEM-1.
Windows
The "SYSTEM-1 CTRL" shown as a MIDI port is the port used by the SH-2. Do not use this port from your DAW.
Plug-Out
What is a "Plug-out"?
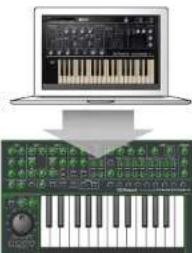
"Plug-out" is technology that allows a software synthesizer such as SH-2 to be installed and used in the SYSTEM-1.
- You can play the SH-2 on the SYSTEM-1 by itself, without using a computer.
- You can send the setting of selected bank to the SYSTEM-1.
- You can use the knobs and sliders of the SYSTEM-1 to edit the sound.
Plug-Out Procedure
-
Click the [PLUG-OUT] button.
A confirmation message appears. -
Click the [OK] button.
A progress bar appears, and plug-out processing begins. This takes approximately one minute.
* If another software synthesizer is already plugged-out on the SYSTEM-1, a confirmation message appears. Click the [OK] button to continue.
If an error message appears, check the following items.
• Is the MIDI port specified correctly? (p. 12)
• Is the SYSTEM-1 connected to your computer?
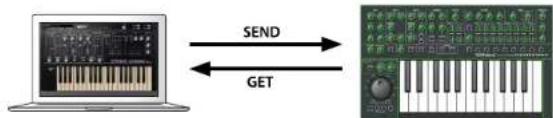
Send/Get Memories
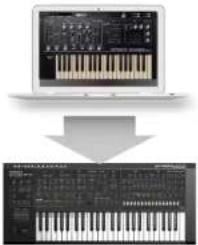
flowchart
graph LR
    A["Laptop with keyboard"] -->|SEND| B["Keyboard with keyboard"]
    B -->|GET| A
- Connect the SYSTEM-1 to your computer.
- Turn on the MODEL [PLUG-OUT] button of the SYSTEM-1. * In order to send or get a memory, you must first plug-out (p. 8).
Sending the Memory
You can send the current SH-2 memory to the SYSTEM-1 and play it on the SYSTEM-1. The sound is output from the SYSTEM-1's OUTPUT jacks.
- Click the [SEND] button of the SH-2.
The memory is transmitted.
Getting the Memory
If you've used the SYSTEM-1 to edit a memory of the plugged-out SH-2, here's how to load that memory into the SH-2.
- Click the [GET] button of the SH-2.
The memory is loaded.
If an error message appears, check the following items.
• Is the MIDI port specified correctly? (p. 12)
- Is the SYSTEM-1 connected to your computer?
- Is the SYSTEM-1's MODEL [PLUG-OUT] button turned on?
• Is the SH-2 plugged-out on the SYSTEM-1? (p. 8)
SH-2 Controller Map
SH-2 (Original hardware)
SYSTEM-1 (Hardware)
| Controls Lit Unit Blink Blink (Raptdly) | |||
| 22 GATE A ENV F.ENV HOLD | |||
| 23 GATE LFO GATE + TRIG LFO + GATE | |||
Playing with the SYSTEM-8
By connecting the SYSTEM-8 to your computer (Mac/Windows), you can use the SH-2 in conjunction with the SYSTEM-8.
Windows
The "SYSTEM-8 CTRL" shown as a MIDI port is the port used by the SH-2. Do not use this port from your DAW.
Plug-Out
What is a "Plug-out"?
"PLUG-OUT" is technology that allows a software synthesizer such as SH-2 to be installed and used in the SYSTEM-8.
- You can play the SH-2 on the SYSTEM-8 by itself, without using a computer.
- You can send the setting of selected bank to the SYSTEM-8.
- You can use the knobs and sliders of the SYSTEM-8 to edit the sound.
Plug-Out Procedure
- Click the [PLUG-OUT] button.
- Select the plug-out destination (PLUG-OUT1-PLUG-OUT3) that corresponds to the MODEL button of the SYSTEM-8.
A confirmation message appears.
- Click the [OK] button.
A progress bar appears, and plug-out processing begins. This takes approximately one minute.
* If the SH-2 is already plugged-out to one of the plug-out destinations (PLUG-OUT1-PLUG-OUT3), it cannot be additionally plugged-out.
* If another software synthesizer is already plugged-out on the SYSTEM-8, a confirmation message appears. Click the [OK] button to continue.
If an error message appears, check the following items.
- Is the MIDI port specified correctly? (p. 12)
• Is the SYSTEM-1 connected to your computer?
Send/Get Memories
You can send the current SH-101 memory to the SYSTEM-8 and play it on the SYSTEM-8. The sound is output from the SYSTEM-8's OUTPUT jacks. If you've used the SYSTEM-8 to edit a memory of the plugged-out SH-101, here's how to load that memory into the SH-101.

flowchart
graph LR
    A["Laptop with keyboard"] -->|SEND| B["Audio workstation"]
    B -->|GET| A
- Connect the SYSTEM-8 to your computer.
- Turn on the MODEL [PLUG-OUT1-3] button of the SYSTEM-8.
* In order to send or get a memory, you must first plug-out.
Sending the Memory
- Click the [SEND] button of the SH-2.
The memory is transmitted.
Getting the Memory
- Click the [GET] button of the SH-2.
The memory is loaded.
If an error message appears, check the following items.
• Is the MIDI port specified correctly? (p. 12)
• Is the SYSTEM-8 connected to your computer?
- Is the SYSTEM-8's MODEL [PLUG-OUT] button turned on?
- Is the SH-2 plugged-out on the SYSTEM-87 (p. 8)
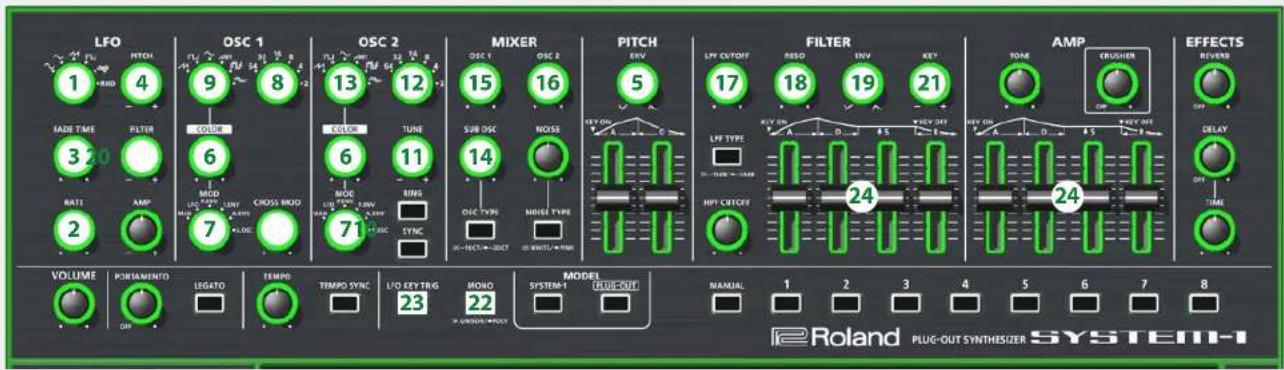
Correspondence table of SH-2 operations
| SH-2 SYSTEM-8 | |
| MODULATION | |
| RATE LFO RATE | |
| DELAY TIME LFO FADE TIME | |
| WAVEFORM LFO WAVE | |
| VCO | |
| MOD LFO PITCH | |
| AUTO BEND PITCH ENV | |
| VCO-1 | |
| RANGE OSC 1 OCTAVE (FEET) | |
| WAVEFORM OSC 1 WAVE | |
| PULSE WIDTH MOD OSC 1 COLOR | |
| MOD OSC 1 MOD | |
| BENDER OSC 1 CROSS MOD | |
| VCO-2 | |
| RANGE OSC 2 OCTAVE (FEET) | |
| WAVEFORM OSC 2 WAVE | |
| FINE TUNE | OSC 2 FINE TUNE |
| COURSE TUNE | OSC 2 COURSE TUNE |
| PULSE WIDTH | OSC 2 COLOR |
| MOD OSC 2 MOD | |
| AUDIO MIXER | |
| VCO-1 | MIXER OSC 1 |
| VCO-2 | MIXER OSC 2 |
| VCO-1 SUB | MIXER SUB OSC 3/SUB OSC |
| ENV | |
| ENV TRIG LFO KEY TRIG | |
| VCF | |
| CUTOFF FREQ | FILTER CUTOFF |
| RESONANCE | FILTER RESO |
| ENV | FILTER ENV |
| MOD | LFO FILTER |
| KYBD | FILTER KEY |
| A | FILTER A |
| D | FILTER D |
| S | FILTER S |
| R | FILTER R |
| VCA | |
| MODE | MONO |
| TONE | AMP TONE |
| CRUSHER | EFFECT DEPTH |
| A | AMP A |
| D | AMP D |
| S | AMP S |
| R | AMP R |
| EFFECTS | |
| REVERB | REVERB LEVEL |
| DELAY | DELAY LEVEL |
| DELAY TIME | DELAY TIME |
Settings
Option
-
Click the [OPTION] button.
-
Select items.
A √ is shown for the selected item.
| Item Explanation | |
| SH-2 Layout SYSTEM-1 Layout | Changes the layout of the controllers in the main window.SH-2 Layout: The controllers are laid out as they are on the SH-2 (original).SYSTEM-1 Layout: The controllers are laid out as they are on the SYSTEM-1. |
| Zoom Changes the size of the main window. | |
| Set MIDI Control Mapping for SYSTEM-1 | Check this item if you want to use the SYSTEM-1 as a control surface for the SH-2.Here you can make MIDI mapping settings for the buttons and sliders. |
| Authentication... Performs user authentication for the SH-2. | |
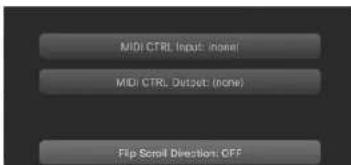
Setting
- Click the [SETTING] button. The Setting window opens.
* Flip Scroll Direction is only on Mac.
- Edit the parameters.
| Parameter Explanation | |
| MIDI CTRL Input | If you're using SYSTEM-1Choose "SYSTEM-1" (Mac OS) or "SYSTEM-1 CTRL" (Windows). |
| MIDI CTRL Output | If you're using SYSTEM-8Choose "SYSTEM-8 CTRL." |
| Flip Scroll Direction(Only on Mac) | Inverts the direction of rotation when using the mouse wheel to edit a value. |
- Click the [OK] button.
* Your changes are remembered.
* If multiple instances of the SH-2 are running, these settings apply to all instances.
Setting for the SYSTEM-1
When you want to play the SH-2's sound (plug-in) with your SYSTEM-1, set the SYSTEM-1 to the MIDI controller mode.
Once you set to MIDI controller mode, SYSTEM-1's internal sound can not be played, and the SYSTEM-1 can play the SH-2's sound only.
* These settings are not available in SYSTEM-1m.
- Turn the power on of the SYSTEM-1.
- While holding down the MODEL [SYSTEM-1] and [PLUG-OUT] buttons, use the SCATTER [TYPE] dial to set to MIDI controller mode.
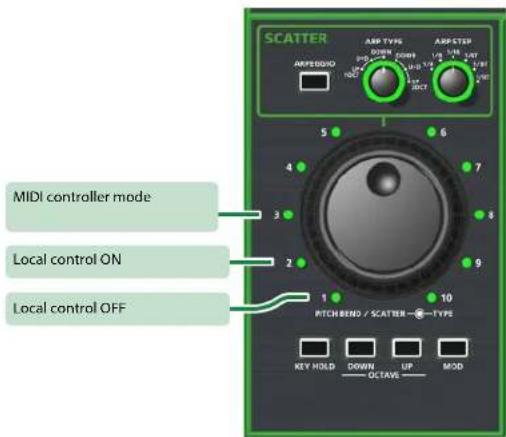
| Setting Explanation | |
| MIDI Controller Mode | Choose this if you're using the SYSTEM-1 as a MIDI controller.* Playing the keyboard will not produce the SYSTEM-1's internal sound.* The SYSTEM-1's internal sound is not produced even if the SYSTEM-1 receives MIDI. |
| Local Control ON Choose this when using the SYSTEM-1 on its own. (Default setting) | |
| Local Control OFF | Choose this when using the SYSTEM-1 In conjunction with your DAW.* If the SYSTEM-1 is used by itself with this setting, playing the keyboard will not produce sound. |
Setting for the SYSTEM-8
If you want to use the SYSTEM-8 to play the SH-2 (plug-in) in your DAW, set the SYSTEM-8's menu item "SYSTEM" → "SOUND" → "Local Sw" to "SURFACE."
The internal sound engine of the SYSTEM-8 no longer produces sound; only the SH-2 can produce sound.
For details, refer to SYSTEM-8 Reference Manual.
- Introduction
- About this product
- About Trademarks
- Screen Structure
- Main Window
- MODULATOR
- VCO
- VOLUME
- PORTAMENTO TIME
- BEND RANGE
- TEMPO SYNC
- ARPEGGIO
- VCF
- ENV TRIG (Common for VCF and VCA)
- AUDIO MIXER
- EFFECTS
- VCA
- Memory and Bank
- Click the [PATCH] button.
- Bank
- Changing to Other Bank
- Exporting the Bank
- Importing a Bank
- Creating/Deleting a Bank
- Creating a bank
- Deleting a bank
- Renaming a Bank
- Memory
- Loading a Memory
- Saving the Memory
- Renaming the Memory
- Changing the Order of the Memories
- Keyboard shortcuts
- Playing with the SYSTEM-1
- Windows
- Plug-Out
- What is a "Plug-out"?
- Plug-Out Procedure
- If an error message appears, check the following items.
- Send/Get Memories
- Sending the Memory
- Getting the Memory
- SH-2 Controller Map
- Playing with the SYSTEM-8
- Settings
- Option
- Setting
- Setting for the SYSTEM-1
- Setting for the SYSTEM-8
Brand : ROLAND
Model : PLUG-OUT SH-2
Category : Audio software