OMX-EDID-EM1 - Audio/Video Equipment Ocean Matrix - Free user manual and instructions
Find the device manual for free OMX-EDID-EM1 Ocean Matrix in PDF.

User questions about OMX-EDID-EM1 Ocean Matrix
0 question about this device. Answer the ones you know or ask your own.
Ask a new question about this device
Download the instructions for your Audio/Video Equipment in PDF format for free! Find your manual OMX-EDID-EM1 - Ocean Matrix and take your electronic device back in hand. On this page are published all the documents necessary for the use of your device. OMX-EDID-EM1 by Ocean Matrix.
USER MANUAL OMX-EDID-EM1 Ocean Matrix
The Ocean Matrix OMX-EDID-EM1 emulates EDID information to correct compatibility issues between a video source and a monitor. Designed for AV installation and equipment testing, the unit has an integrated learning function that allows EDID management through read, write, emulator, and bypass modes.
Features
• Supports 8 sets of default EDID
• Supports DVI source with a HDMI to DVI adaptor
• Supports CEC and EDID pass through
- Can be powered through the USB or HDMI input
Includes
Mini-USB to USB Type A Cable
| Specifications | |
| Video Bandwidth | 300Mbps/9 Gbps |
| Inputs | 1-HDMI, 1-USB Mini-B (power only) |
| Output | 1-HDMI |
| HDMI Cable Distance | 32.8 ft@1080P/12-bit, 16.4 ft@4Kx2K |
| HDMI Support | Resolutions up to 1080p@60 Hz and 4K×2K@24/25/30 Hz12-bit Deep ColorLPCM 7.1CH, Dolby TrueHD, Dolby Digital Plus and DTS-HD Master Audio (Sampling rates from 32 kHz to 192 kHz) |
| EDID Modes | Read: Reads the TV/display's EDID informationWrite: Overwrites the display's EDID informationEmulator: Allows the source device to read the selected EDID information from the unit's default or learned EDID memoryBypass: Allows the source device to read the EDID information from the display directly |
| Power Consumption | 2.5W |
| USB Power | 5V/500mA |
| Dimensions (LxWxH) | 2.8 x 2.8 x 0.9in / 71 x 71 x 23mm |
| Weight | 3.81 oz / 108g |
OMX-EDID-EM1 Features
Front Panel

text_image
1 2 3 4 Learned Select HDMI IN 5 6 7 8 Default1-8 LEDs: EDID Settings: Press 'Select' button to switch from one setting to the next.
Learned LED: Select Learned to save up to 8 unique HDMI EDID settings. Refer to “EDID Learning Procedure” for more information, page 5.
Default LED: Select Default to use the built-in default EDID settings, 1—8. Refer to “EDID Learning Procedure” for more information, page 5.
Select Button: Press for 3 seconds to switch between Learned and Default. The appropriate LED will illuminate to indicate mode selected.
HDMI IN: Connecticut HDMI source.

text_image
R&FAX HDMI EDID EMULATOR OMX-EDID-EM1OMX-EDID-EM1 Features
Rear Panel
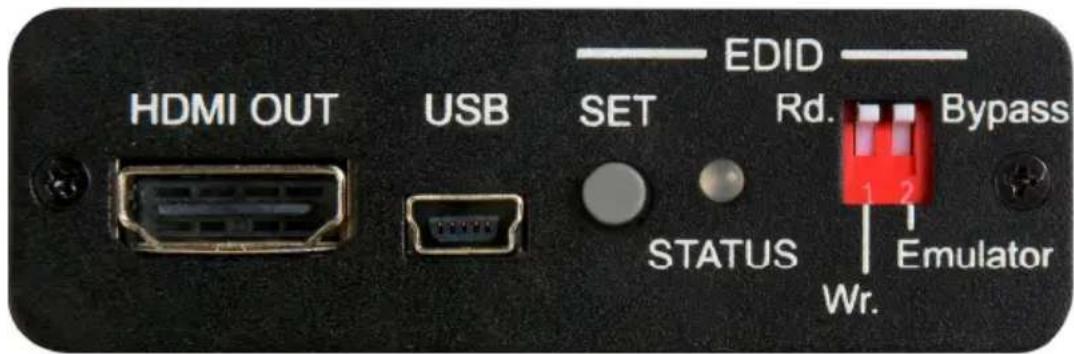
text_image
HDMI OUT USB SET EDID Rd. Bypass STATUS 1 2 Wr. EmulatorHDMI OUT: Connect to an HDMI display
USB: Connect the mini-USB to active USB device to power the system.
SET Button: Press to activate EDID Read/Write function.
STATUS LED: Indicates EDID Read/Write status.
EDID Switch: Selects Read/Write and Bypass/Emulator
- Rd (Read): sets the emulator mode to read (refer to page 5).
- Wr (Write): sets the emulator mode to write (refer to page 5).
- Emulator: set to Emulator position for video/audio source to read the unit's current set EDID (1-8). To change to another EDID, press Select button to switch among settings.
- Bypass: set to Bypass mode for the video/audio source to read the HDMI display's EDID settings directly.

text_image
OCEAN MAFAX HDMI EDID EMULATOR OMX-EDID-EM1 HDMI OUT USB SET EDID Kd Bypass STATUS W: EmulsionOMX-EDID-EM1 Operation
EDID Learning Procedure
To Read the EDID
- Connect a display to the HDMI output.
- Set the Emulator/Bypass 2 switch to Emulator first then set the Rd/Wr 1 switch to the Rd (Read) position.
- Press the Select button for 3 seconds to put the unit into Learned mode.
- Press the Select button repeatedly to cycle through to the required 1 to 8 EDID setting.
- Press the SET button for 3 seconds to write the EDID to the corresponding memory as indicated by the LED.
- When the STATUS LED illuminates in green, the EDID learning has been successful. If the STATUS LED is red, the learning failed.
To Write the EDID
- Connect a display to the HDMI output.
- Set the Emulator/Bypass 2 switch to Emulator first then set the Rd/Wr 1 switch to the Wr (Write) position.
- Press the Select button repeatedly to cycle through to the required Learned/Default 1 to 8 setting.
- Press the SET button for 3 seconds to overwrite the HDMI display EDID setting. The STATUS LED will blink during the writing process.
- When the STATUS LED illuminates in green, the EDID writing has been successful. If the STATUS LED is red, the writing has failed. If the STATUS LED did NOT blink and is red, then the display's EDID is not writable.
Warning: Once the writing is complete, the original EDID will be erased. We recommend you back up the original EDID settings by storing them in the unit prior to performing the overwrite.
OMX-EDID-EM1 Operation
Default EDID Settings
| LED No. | Video Audio | |
| 1 | DVI N/A | |
| 2 | 1080p@60Hz, 8-bit LPCM 2CH | |
| 3 | 1080p@60Hz, 12-bit Deep Color LPCM 2CH | |
| 4 | 3D or 1080p@60 Hz,12-bit Deep Color | LPCM 2CH |
| 5 | 4Kx2K@24/25/30 Hz LPCM 2CH | |
| 6 | 1080p@60Hz, 8-bit LPCM 5.1CH | |
| 7 | 3D or 1080p@60 Hz,12-bit Deep Color | Dolby TrueHD or DTS-HD Master Audio |
| 8 | 4Kx2K@24/25/30 Hz or 3D | Dolby TrueHD or DTS-HD Master Audio |
OMX-EDID-EM1 Connection Diagram
Diagram below shows power supplied through a USB port on the display. Power can also be supplied over HDMI by compatible devices.
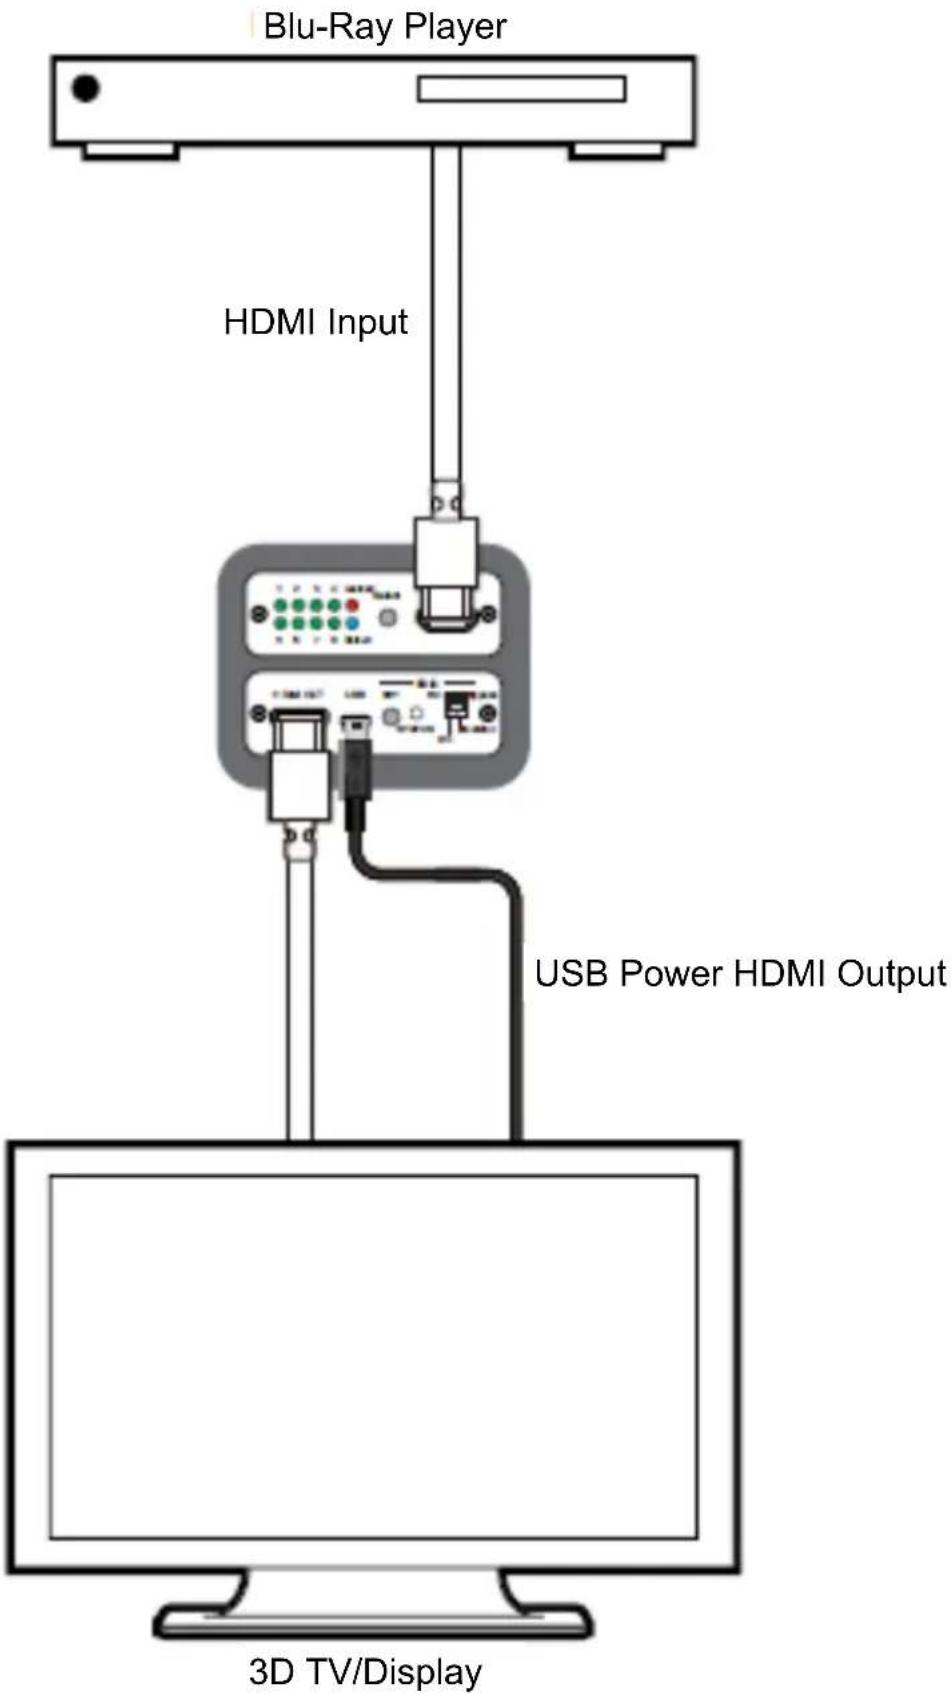
text_image
Blu-Ray Player HDMI Input USB Power HDMI Output 3D TV/Display
SAFETY PRECAUTIONS

- To prevent fire or shock hazard, do not expose this equipment to high humidity and/or dust. Do not use in an unprotected outdoor installation nor any area classified as overly damp or wet.
- The temperature for installation should be kept between 32^ F to 140^ F ( 0^ C to 60^ C). Avoid direct sunlight exposure or extreme changes of temperature over a short period of time.
- Do not disassemble the unit or place it on an unstable base.
- Do not drop the unit and avoid heavy impact.
- This unit should not be permanently installed unless proper ventilation is provided. Any enclosure openings must not be blocked or covered as they protect the unit from overheating.
- Before cleaning, turn off the power and unplug the unit from all connections. Use a damp cloth. Do not use liquid or aerosol cleaners.
- Do not overload outlets and extension cords as this may result in a risk of fire or electric shock.
- Enclosure entry is dangerous. Never push objects of any kind, including liquids, into this unit through openings as they may touch dangerous voltage points or short-out parts that could result in a fire or electric shock.
- Do not attempt to open or service this unit yourself as opening or removing covers may expose you to dangerous voltage and other hazards.
- There are no user-serviceable parts inside the unit. If the unit requires service contact your authorized dealer, or an authorized repair service company.