WKHLWP1101Q - Water heater WHIRLPOOL - Free user manual and instructions
Find the device manual for free WKHLWP1101Q WHIRLPOOL in PDF.

User questions about WKHLWP1101Q WHIRLPOOL
0 question about this device. Answer the ones you know or ask your own.
Ask a new question about this device
Download the instructions for your Water heater in PDF format for free! Find your manual WKHLWP1101Q - WHIRLPOOL and take your electronic device back in hand. On this page are published all the documents necessary for the use of your device. WKHLWP1101Q by WHIRLPOOL.
USER MANUAL WKHLWP1101Q WHIRLPOOL
Calentador de Agua de Paso Continuo Automatic Gas Water Heater
WKL71311Q - WKL71321Q WKL71312Q - WKL71322Q WKHLWP1101Q
Manual de Instrucciones Instruction Manual
Este manual contiene información útil, léalo detenidamente This manual contains useful information; please read them carefully.
Español
pg.
English
pag.
¡Felicitaciones!
Índice
Fig. 1a
WKL71311Q
WKL71321Q
WKL71312Q
WKL71322Q
WKHLWP1101Q
natural_image
Silhouette of a person running with one leg raised, no text or symbols presentnatural_image
Three circular kitchen rotary knobs with a central display unit, no text or symbols presentFig. 9
Whirlpool thank you for relying on our products and for purchasing our automatic gas water heater.
Please read this manual before installing and using the heater.
Keep it for future reference.
Table of Contents
Product identification 20
Safety warnings....21
Features & benefits....22
Components location....22
Technical specifications ....23
Installation 24
Recommendations 24
Installation guide 25
Assembly 25
Gas connection and piping 26
Battery installation 27
Exhaust duct 27
Exhaust duct basic requirements 28
Installation Tips 28
Product operation....28
Preparation before starting the heater 28
Water temperature control 28
Safety precautions 29
Maintenance....31
Troubleshooting....32
Accessories 33
Tips for environmental protection ....34
After-sales service 34
Product identifi cation
AUTOMATIC GAS WATER HEATER

| Model | WKL71311Q | WKL71312Q | WKL71321Q |
| Type | B 11BS | B 11BS | B 11BS |
| Category | II 2-3 | II 2-3 | II 2-3 |
| Gas type | Natural | Natural | GLP |
| Rated power | P = 38.2 MJ/h (10.6kW) | P =72.7 MJ/h (20.2kW) | P = 40.0 MJ/h (11.1kW) |
| Supply pressure (Colombia) ^1 | 2.0 kPa (20 mbar) | 2.0 kPa (20 mbar) | 2.9 kPa (29 mbar) |
| Supply pressure (Chile) ^2 | 1.76 kPa (18 mbar) | 1.76 kPa (18 mbar) | 2.75 kPa (28 mbar) |
| Nominal thermal consumption | Q = 12.1 kW | Q = 22.6 kW | Q = 12.4 kW |
| Minimum water pressure | 0.02 MPa (2.9 psi) | 0.02 MPa (2.9 psi) | 0.02 MPa (2.9 psi) |
| Maximum water pressure | 1 MPa (145 psi) | 1 MPa (145 psi) | 1 MPa (145 psi) |
| Nominal capacity | 6.0 L/min | 12.0 L/min | 6.0 L/min |
| Model | WKL71322Q | WKHLPWP1101Q |
| Type | B 11BS | B 11BS |
| Category | II 2-3 | II 2-3 |
| Gas type | GLP | GLP |
| Rated power | P = 71.3 MJ/h (19.8 kW) | P = 71.3 MJ/h (19.8 kW) |
| Supply pressure (Colombia) ^1 | 2.9 kPa (29 mbar) | 2.9 kPa (29 mbar) |
| Supply pressure (Chile) ^2 | 2.75 kPa (28 mbar) | 2.75 kPa (28 mbar) |
| Nominal thermal consumption | Q = 22.0 kW | Q = 22.0 kW |
| Minimum water pressure | 0.02 MPa (2.9 psi) | 0.02 MPa (2.9 psi) |
| Maximum water pressure | 1 MPa (145 psi) | 1 MPa (145 psi) |
| Nominal capacity | 12.0 L/min | 11.0 L/min |
| 1) According to Colombia Standard NTC 3531-2007 |
| 2) According to Chile Standard NCH 1938-2005 |
| Made for Whirlpool S.A. for Guangdong Vanward New Electric CO, LTD, in China |
Safety warnings
Your safety and the safety of others are very important.
We have provided many important safety messages in this manual and on your appliance. Always read and obey all safety messages.
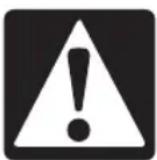
This is the safety alert symbol.
This symbol alerts you to potential hazards that can kill or hurt you and others.
All safety messages will follow the safety alert symbol and either the word “DANGER” or “WARNING”. These words mean:
! DANGER
You can be killed or seriously injured if you dont immediately follow instructions.
WARNING
You can be killed or seriously injured if you dont follow instructions.
All safety messages will tell you what the potential hazard is, tell you how to reduce the chance of injury, and tell you what can happen if the instructions are not followed.
WARNING
Carbon Monoxide Poisoning Hazard
The water heater must exhaust combustion gases outside.
The exhaust duct must be installed by qualified personnel in strict observance of the installation instructions.
Examples of qualified personnel: gas technicians, authorized personnel from the gas supplier company, authorized service personnel.
Failure to follow these instructions may result in death or carbon monoxide poisoning.
Special recommendations
During operation, gas combustion will consume a large amount of air and produce carbon monoxide (CO).
Carbon monoxide is a colorless, odorless gas and causes no irritation, so its presence is not easily detected. Inhaling this gas in large amounts can cause carbon monoxide poisoning and even death.
Users are asked to install and use the water heater according to this manual to prevent carbon monoxide poisoning. The manufacturer or its authorized distributors assume no responsibility for any damage resulting from installation and operations that do not comply with the provisions of this manual.
It should be paid special attention to the flame back combustion when the gas pressure is insufficient. This causes the carbon deposit on the burner to increase and affect the product normal operation. In such case, should the flame becomes yellow, the amount of carbon monoxide increases. Stop using the water heater and contact the Whirlpool Service Center. The water heater must be installed vertically.
Features & benefits
Automatic operation
- Just open the hot water faucet or shower and hot water will come out. When the faucet is closed, the flame will automatically go out.
- Independent control of water flow and gas flow makes it easy to adjust the water temperature.
Innovative design
- Compact and easy to install.
- Advanced energy-saving combustion technology ensuring efficient burning.
- Startup at low water pressure (0.02 MPa), fulfilling the need of users living in high buildings or that have low pressure.
Safety features
• Overheat: The appliance will automatically shut down when the appliance exceeds a predetermined temperature.
- Flame Failure: The appliance will automatically shut down if the burner flame is extinguished.
- Power Failure: The appliance will cut off the gas if it loses electrical power.
- Dry operation protection, this product will automatically turn off without water;
- Hot water temperature control: this product will not works if hot water temperature exceed 75 °C (167 °F).
Components location
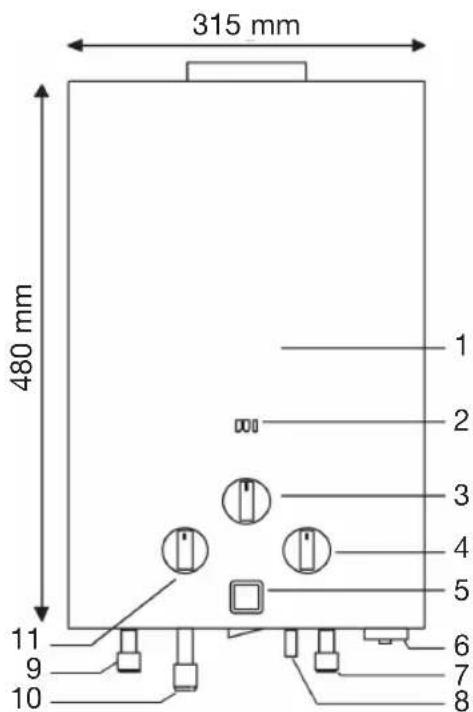
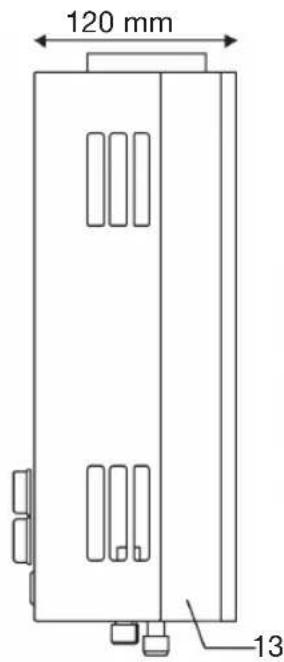
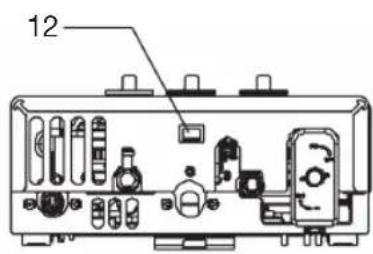
Fig. 1a
WKL71311Q
WKL71321Q
All images are for reference purposes only; check the product for correct appearance.
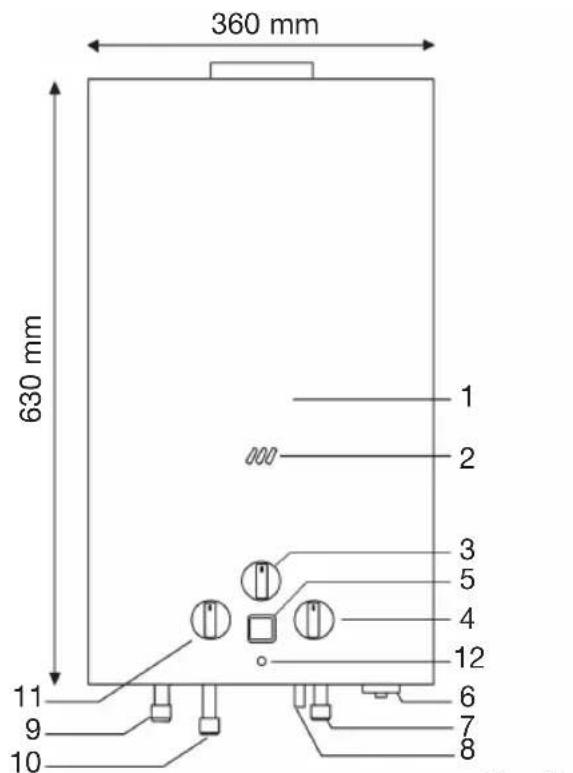
Fig. 1b

WKL71312Q
WKL71322Q
WKHLWP1101Q
Technical specifications
| Description | Automatic gas water heater | ||||
| Model | WKL71311Q | WKL71321Q | WKL71312Q | WKL71322Q | WKHLWP1101Q |
| Rated heat load | 12.1 kW | 12.4 kW | 22.6 kW | 22 kW | 22 kW |
| Water flow | 6.0 L/min | 6.0 L/min | 12.0 L/min | 12.0 L/min | 11.0 L/min |
| Type of gas | Natural | L.P.G. | Natural | L.P.G. | L.P.G. |
| Gas pressure | 1.76 kPa (1)2.0 kPa(2) | 2.75 kPa(1)2.9 kPa(2) | 1.76 kPa (1)2.0 kPa(2) | 2.75 kPa(1)2.9 kPa(2) | 2.75 kPa(1)2.9 kPa(2) |
| Water pressure | Minimum: 0.02 MPa (2.90 psi) - Maximum: 1 MPa (145 psi) | ||||
| Ignition | Water-controlled automatic ignition | ||||
| Power | 2 batteries (D 1.5 V) — — — | ||||
| Safety devices | Flame failure protection.Protection against excessive water pressure.Flame sensor valve: it shuts gas off if there is no flame.Sensor valve for water minimum pressure.Thermostat: it prevents water from exceeding 75 °C. | ||||
| Connections: Gas inlet G1/2" - Cold water inlet G1/2" - Hot water outlet G1/2" | |||||
| For gas pressure: 1) Standard for Chile — 2) Standard for Colombia | |||||
Installation
Recommendations
- Before installing, get in touch with the Authorized Service Center or a qualified technician to perform installation. Any improper gas installation will affect product safety and will endanger user's life.
- Do not install a water heater in the bedroom, attic, bathroom or in places where ventilation is poor. The installation environment must be well-ventilated and be bigger than 7 m ^2 .
If the product is installed in a poorly-ventilated environment, an exhaust fan must be used. Drill a vent hole and a fresh-air intake on the wall. The exhaust fan must be installed above the water heater, and the fresh-air intake must be below water heater (Fig. 2).
The vent hole must be to a ventilated outside environment. Table 1 shows the area the fresh-air intake must have according to the heating capacity of the heater.
The flame window must be at eye level (approximately 1.55 m – 1.65 m from the floor, Fig. 3). Keep product away from flammable materials (Fig. 4). Do not install any kind of wiring or electrical equipment above the water heater. No electronic equipment shall be placed at a distance smaller than 400 mm from the heater.
- Do not install product under strong windy area, where the wind may turn off the flame or cause incomplete combustion.
- Install the heater in an environment that is protected from rain; install a metal "roof" over the product so water does not run inside the heater. Make sure not to block gas outlets.

Fig. 2
| Heater power (kW) | Fresh-air intake area (mm2) |
| ≤ 12 | 100 |
| 12 ~ 16 | 130 |
| 16 ~ 20 | 160 |
| 20 ~ 26 | 200 |
Table 1
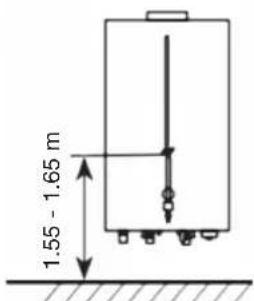
Fig. 3
Minimum distance from walls with flammable material.
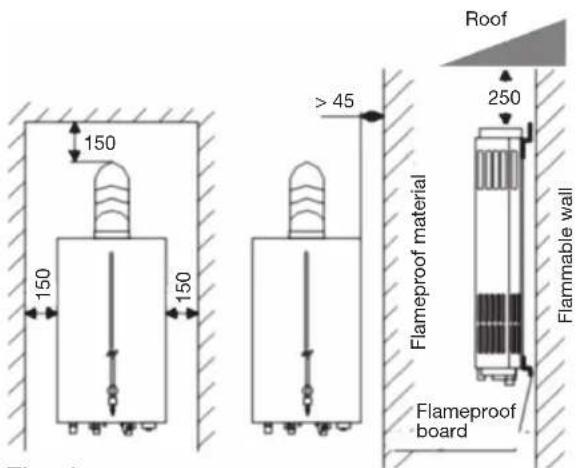
Fig. 4
(unit: mm)
The flameproof board must be at least 100 mm longer than the heater roof.
Installation guide
The gas supply pressure must be adjusted according to the type of fuel being used: L.P. Gas to 2.75 kPa to Chile and 2.9 kPa to Colombia and Natural Gas 1.76 kPa to Chile and 2.0 kPa to Colombia.
Important:
The distance between the point of use and the heater should not exceed 10 m.
Assembly
Important:
Make sure there are no spark or fire sources in the environment when installing the product.
Drill holes according to Fig. 5. Place expanding pin in the upper hole and plastic bushes in the lower holes. Fit the water heater in upper pin without tilting it and then fit screws into lower bushes and tighten them.
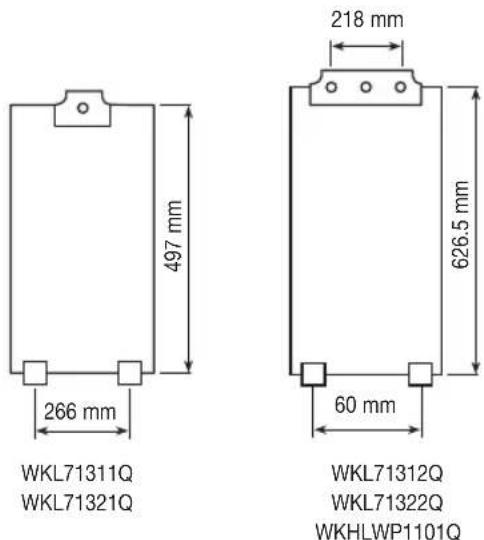
Fig. 5
WARNING
Carbon Monoxide poisoning Hazard
Install the heater strictly according to the requirement in the manual.
Do not connect a Natural Gas water heater with L.P gas.
Do not connect a L.P gas water heater with Natural Gas.
Do not install the water heater in bedroom, basement, bathroom, or other rooms under poor ventilation condition.
The heater must exhaust combustion gases to outdoors.
The exhaust duct must be installed by qualified personnel in strict observance of the installation instructions.
Examples of qualified personnel are: gas technicians, authorized personnel from the gas supplier company, authorized service personnel.
Failure to follow these instructions can result in death or carbon monoxide poisoning.monoxide poisoning.
WARNING
Explosion Hazard
Use a new certified gas supply line.
Install a gas shut off valve.
Failure to follow these instructions may result in death, explosion, or fire.
Gas connection and piping
For L.P. gas models, use a 1.2 m³/h pressure regulator.
Gas inlet valves:
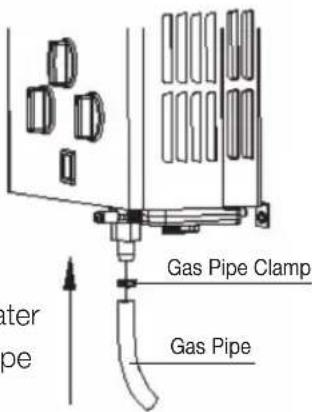
- For L.P. gas users: ensure the gas valve is fully closed, connect gas piping to pressure regulator through a 9.50 mm pipe. Connect piping as described in Fig. 6.
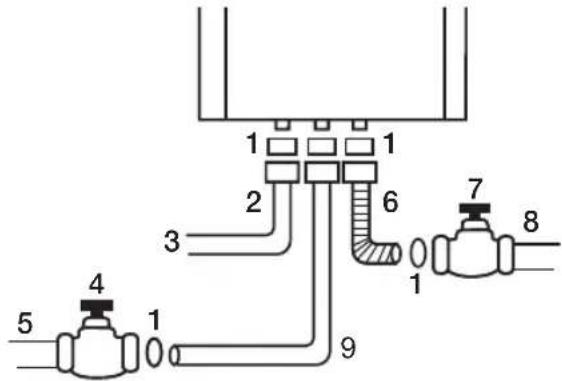
- Plastic Packing
- Rigid pipe
- Hot water outlet
- Gas valve
- Gas inlet
- Flexible pipe
- Water inlet valve
- Entry and cold water
- Flexible copper pipe

natural_image
Technical diagram of a mechanical assembly with an inset close-up showing a component detail (no text or symbols)- For Natural gas users: close main gas valve and connect as described in Fig. 6.
- After installation, open gas valve and check for leaks at connections with water and soap. Never check for gas leaks with fire.
For hydraulic connection, it is recommended to use copper pipes and to install a globe valve for cold water inlet.
Note: There is a filter at the water inlet; do not remove it to install. (Fig. 12).
Hot water outlet
First, remove the drain plug.
Connect as shown in Fig. 6. If you install a control valve or faucet, or a shower with a faucet at the hot water outlet, make sure their material and piping material is resistant to high temperatures.
Plastic or aluminum pipes can be damaged by heat. Replace drain plug.
! WARNING
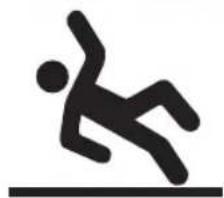
natural_image
Silhouette of a person running on a horizontal line (no text or symbols)Slipping Hazard.
After draining, dry the water on the floor to prevent slipping.
Failure to do so may result in death or injuries.
Battery installation
Use two 1.5 V type D batteries —— . Make sure to properly place negative and positive terminals of the batteries (Fig. 7). Batteries life is around 90 days, but may vary depending on usage and operation conditions.
To find the battery indicator, Fig. 1a and Fig. 1b.
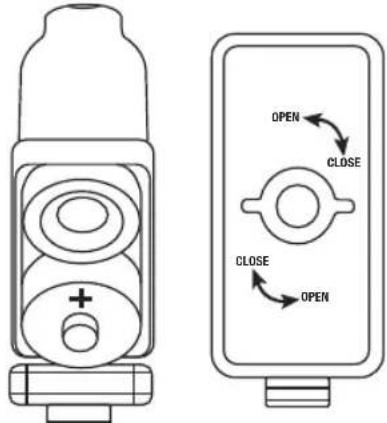
Fig. 7
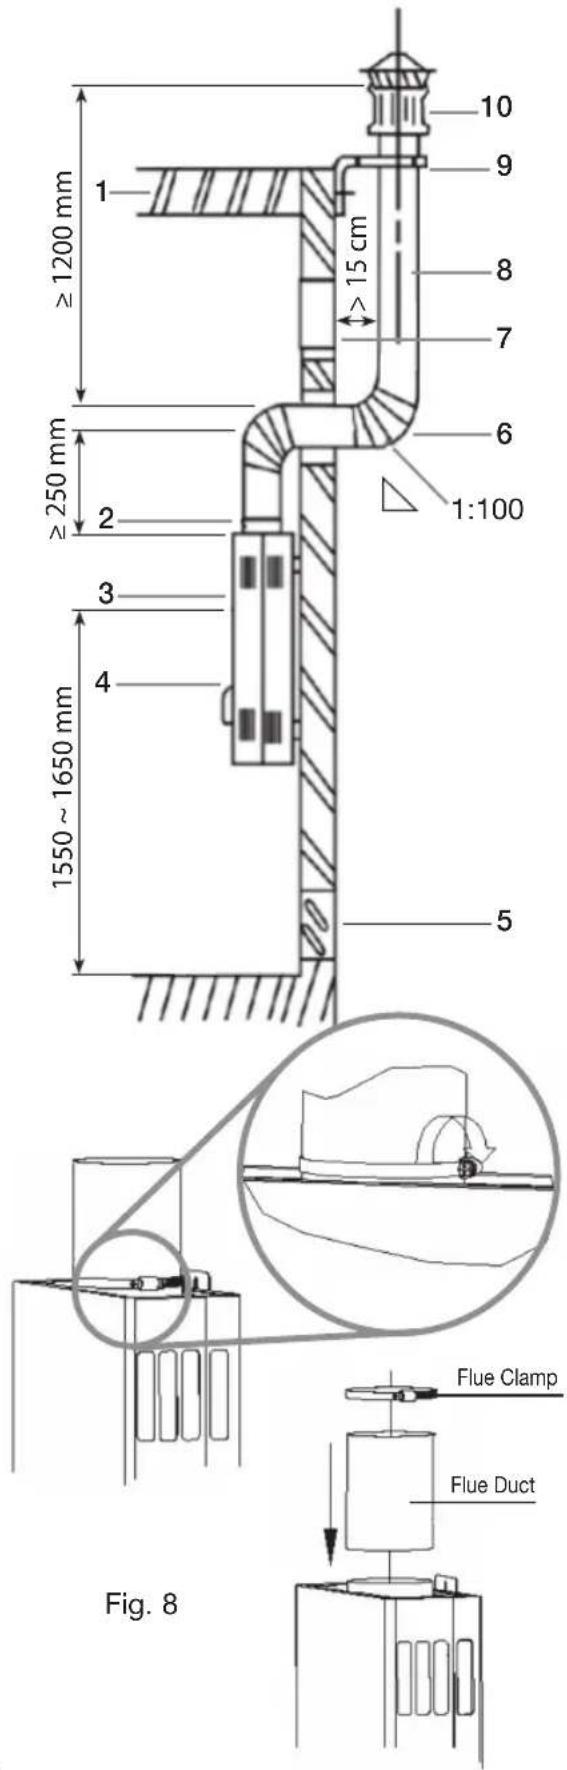
Exhaust duct
In poorly ventilated areas, it is recommended to install an exhaust duct so combustion gases are exhausted (Fig. 8).
- Roof
- Duct support
- Window height to check flame
- Whirlpool water heater
- Air inlet > 0.06 m² (25 × 25 cm)
- Drain hole - ø10 mm
- Exhaust fan
- Exhaust duct
- Duct support
- Protection cover
ENGLISH
Exhaust duct basic requirements
To install this product, make sure to comply with all local construction regulations.
- Duct inside diameter: 100 mm (1 service model) and 120 mm (2 services model).
- The main body of the duct must be made of corrosion-resistant material.
- The horizontal portion of the exhaust duct must have an inclination smaller than 1:100, and must have a 10mm hole at the bottom of the duct vertical portion, outside the room, to drain raindrops (Fig 8.)
- The exhaust duct outlet must be provided with a protection against wind (cap), which must not be clogged.
Installation tips
- Drill a hole on the wall according to duct dimensions as per Fig. 5.
- When the duct is installed, fill the gaps between the wall and the duct with nonflammable material.
Product operation
Preparation before starting the heater
- Be sure the gas used is the same as that on the data plate.
- Turn the exhaust fan on and open the fresh-air intake (if any).
- Open the gas inlet valve.
- Open the water valve (be sure water is running in the shower); the heater must automatically go on and make a "click" sound. A green light will turn on, indicating that the burner has been lit and hot water will flow. If water pressure is low, or if batteries are running out, the water heater will not work properly.
- After initial installation, or after replacing a gas cylinder, air may go into gas piping. It may take several attempts to purge the air out of the gas piping before the water heater turns on. In the event of a problem after normal operation, immediately close the water valve, wait 10 to 20 seconds and try to open it again to prevent incomplete or intermittent combustion from taking place (Fig.8).
Water temperature control
WARNING
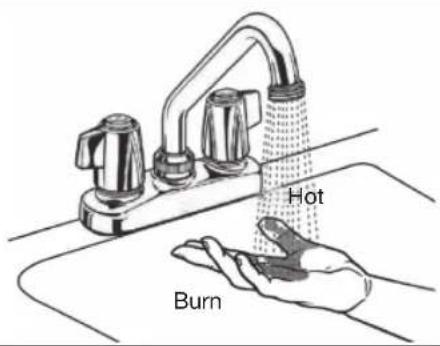
Risk of Burns
Water temperature over 50 °C can cause severe burns instantly or death from scalds.
Children, disabled and elderly are at highest risk of being scalded.
See instruction manual before setting temperature at water heater.
Feel water before bathing or showering.
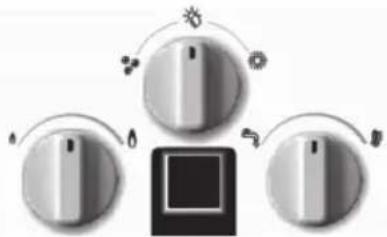
This water heater has three control knobs for you select desired hot water temperature.
- Winter/Spring. Autumn/Summer knob: This feature has 3 different burning power.
• Water temperature knob: Which control the water flow rate.
- Flame knob: Which control the gas flow rate, Fig. 9.
natural_image
Three circular kitchen ovens with arrows indicating rotation and a central square (no text or symbols)Fig. 9
Select different matrix of those three control knobs to get the desired setting. Always check the water temperature before entering a shower or bath.
• Always use the control knob to set a comfortable water temperature.
In hot summer days, set control knob to minimum. In cold winter days, set control knob to maximum to turn burner on at maximum power. For intermediary temperatures, set control knob to medium.
- Test water temperature with your hand before it gets in touch with your body to prevent burns.
- The automatic water heater is different from traditional heaters; the smaller the water flow, the hotter the water. If you need hotter water, close the hot water faucet a little. To get colder water, open the hot water faucet a little further. When you are using the heater, avoid opening the cold water faucet.
- To get the best temperature, gradually open and close the hot water faucet; be careful not to make sudden movements that may turn the heater off. If that happens, close the water faucet all way through and open it again after ten seconds. The heater will restart automatically.
Safety precautions
Gas leak prevention
- It is a good idea to install a gas detector.
- Check if the flame has extinguished after every shower; do not forget to close the gas valve.
- Always check all piping connections with soap and water. In the event of a gas leak, bubbles can be observed. In that case, shut off the gas supply and immediately ventilate the area. Do not turn on/off any electrical device in the environment to prevent explosion or fire.
- Use one type of fuel only (L.P. gas or Natural Gas); never mix them.
- Regularly check gas piping as it may deteriorate and/or crack after a long period of use.
- Replace piping if damaged. Under normal operation conditions, piping must be replaced every year.
- For L.P. gas users, if the heater flame is not stable, it could be due to a failure of the regulator connected to the gas tank outlet. In that case, immediately stop using the heater and contact Service Center.
- For natural gas users, if the heater flame is not stable, it could be due to unstable gas pressure. In this case, stop using the heater to prevent damage to the product and an accident. Contact the gas supplier.
Fire and accident prevention
- Ensure the heater flame has extinguished after use and before going to sleep.
- If you are out of water, close the main gas valve and the water inlet valve.
- Do not place flammable objects such as towels over the vent-hole or fresh-air intake.
- Do not leave flammable explosive or volatile materials in the vicinity of the water heater.
- For L.P. gas users, do not leave the gas cylinder tilted or upside down as the gas in the cylinder may flow to the heater and cause a fire.
Carbon monoxide poisoning prevention
- Gas combustion consumes large amounts of air, producing a poisonous gas (carbon monoxide). The heater, thus, must be installed in a well-ventilated place. Keep the exhaust fan working and the fresh air opening open.
- Due to the heater volume, if it is installed in a place that is not well-ventilated, install an exhaust duct to exhaust combustion gases to the outside, keeping the environment air clean.
- Natural gas users must pay attention to flame light back which takes place when pressure is insufficient. That causes carbon build up on the burner and affects normal use. When gas pressure is insufficient, the flame becomes yellow, and the amount of carbon monoxide increases. Stop using the heater and contact the gas supplier. The heater must be installed vertically.
Eye injury prevention
Keep your eyes at least 300 mm away from the flame window while turning on the heater. If you fail to turn it on, wait 10 to 20 seconds before trying again.
Freezing prevention
When room temperature is near or below 0 °C, drain the water inside the heater after every use; water can freeze and expand, damaging the heater.
See Maintenance section for the draining procedure.
Reducing water scale
After every use, with the gas valve closed, drain the hot water until you get only cold water.
Do not drink water from the heater
Residues are always present in the heater. The water coming from the heater must be used for general purpose only; do not drink it.
What to do in an abnormal condition?
- Immediately shut off the heater when abnormal wind conditions occur in the area where the heater is located.
- In case of abnormal combustion (example: flame light back, flame goes off, yellow tipping or black smoke etc.), odor, noise or other unusual conditions, keep calm and close the gas valve and then contact the gas supplier.
Burns prevention
During or immediately after a shower, do not touch anything other than the water heater control knobs, especially the flame check window from front cover.
The following conditions are normal:
- When water pressure is lower than 0.02 Mpa (2.90 psi), the heater may not turn on.
- The drain valve drips water when water pressure is too high to reduce the pressure and to protect the heater.
- When the heater supplies hot water to many points of use at the same time, the flow of hot water is reduced and the water may not be hot enough.
Maintenance
- Check gas piping regularly. In the event of any defect, contact the gas supplier.
- Regularly clean the filter located at the water inlet.
• Regularly check for water leaks. - When the flame goes from blue to yellow and you see a bit of black smoke, immediately get in touch with Service Center for help.
- If the water drain valve (with water filter) is covered with debris, the hot water may not run smoothly, or the unit may put out cold water. Check and clean the filter as explained below.
CAUTION:
To avoid burns, wait until the equipment cools down before draining the water. The appliance will remain hot after it is turned off.
- Take out the water connecting tube. (Fig. 10)
- Remove the filter then clean it with water. (Fig.11)
- Put back the filter and re-connect the water tube. (Fig. 12).
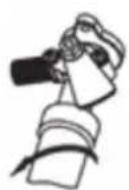
Fig. 10

Fig. 11
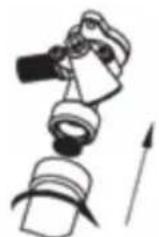
Fig. 12
- Wipe the outside surface with a wet cloth, and then dry the surface. Use a neutral detergent to clean any stains.
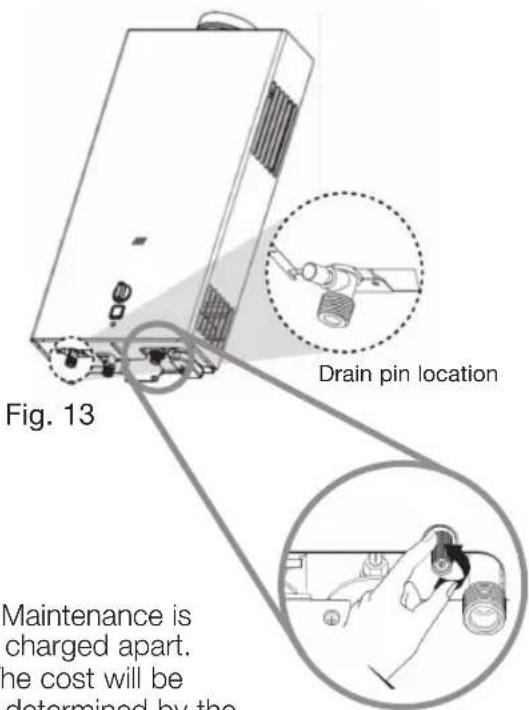
- During cold winter days, the water heater must be drained after every shower in the following way:
- Shut off water supply.
- Turn drain pin counterclockwise (Fig. 13).
- Allow water to drain completely.
- Tighten pin clockwise.
- It is recommended that you get in touch with Service Center every year to request maintenance services (*) A technician will check the heater to ensure optimum operation.
(*) Maintenance is charged apart.
The cost will be determined by the Authorized Service Centers.
Troubleshooting
| PROBLEMS | PROBABLE CAUSE | SOLUTIONS |
| Flame lift. | Half-open gas valve. | Open the main valve. |
| Gas pressure inadequate (low). | Contact your gas supplier, to check the gas pressure valve. | |
| Inadequate water supply. | Call the Whirlpool Service Centre to check the water pressure, then clean the filter | |
| Insufficient fresh air. | Open the fresh air vent sufficiently. | |
| Heat exchanger obstructed. | Contact Whirlpool Service Center. | |
| Water control unit failure. | Contact Whirlpool Service Center. | |
| No ignition after opening the water valve | Gas valve closed. | Open valve or replace the gas tank. |
| Air inside gas line. | Open and close the water inlet valve several times until it ignite. | |
| Cold water valve closed. | Open the main water valve. | |
| Freezing. | Use after thawing | |
| Inadequate water supply. | Call the Whirlpool Service Centre to check the water pressure, then clean the filter. | |
| Short energy. | Replace the batteries. | |
| Water control unit failure. | Contact Whirlpool Service Center. | |
| Loose ignition needle. | Contact Whirlpool Service Center. | |
| Intensely burns and flashes after opening the water valve | Half-open gas valve. | Open the main valve. |
| Gas pressure inadequate (high). | Contact your gas supplier, to check the gas pressure valve. | |
| Loose ignition needle. | Contact Whirlpool Service Center. | |
| Yellow Tipping | Gas pressure inadequate (high). | Contact your gas supplier, to check the gas pressure valve. |
| Burner clogged. | Contact Whirlpool Service Center. | |
| Heat exchanger obstructed. | Contact Whirlpool Service Center. | |
| Abnormal odor | Insufficient fresh air. | Open the fresh air vent sufficiently. |
| Burner clogged. | Contact Whirlpool Service Center. | |
| Heat exchanger obstructed. | Contact Whirlpool Service Center. |
ENGLISH
| PROBLEMS | PROBABLE CAUSE | SOLUTIONS |
| Snapping noise during ignition | Gas pressure inadequate (high). | Contact your gas supplier, to check the gas pressure valve. |
| Burner clogged. | Contact Whirlpool Service Center. | |
| Low water temperature under Highest temperature setting | Half-open gas valve. | Open the main valve. |
| Gas pressure inadequate (low). | ||
| Water Temperature Control erroneous. | Adjust the 3 control knob carefully. | |
| Water control unit failure. | Contact Whirlpool Service Center. | |
| Extremely hot temperature under Highest temperature setting | Gas pressure inadequate (high). | Contact your gas supplier, to check the gas pressure valve. |
| Water Temperature Control erroneous. | Adjust the 3 control knob carefully. | |
| Water control unit failure. | Contact Whirlpool Service Center. | |
| Continuous ignition after closing the water valve | Inadequate water supply. | Call the Whirlpool Service Centre to check the water pressure, then clean the filter. |
Accessories
| Models | WKL71311Q | WKL71312Q |
| WKL71321Q | WKL71322Q | |
| (1 service) | WKHLWP1101Q (2 service) | |
| Item | Quantity | Quantity |
| Water heater | 1 | 1 |
| Guarantee sheet | 1 | 1 |
| User care & guide | 1 | 1 |
| Metal clamp for exhaust fumes pipe | 1 | 1 |
| Metal clamp for gas pipe | 1 | 1 |
| Screws anchor | 2 | 2 |
| Mounting screws | 2 | 2 |
| Gas inlet connection (with rubber seal gasket) | 1 | 1 |
| Expansion bolts (M6) | 1 | 2 |
Tips for environmental protection
Packing
In new projects, Whirlpool S.A. materials used in its packaging received. Clable and easy separation, allowing the consumer places the waste plastic bags, polystyrene pieces and carton so conscious you, preferably allocating them to recyclers.
Product
This product was built with materials that can be recycled and / or reused. Therefore, when disposing of this product, seek specialized companies to disarm them properly.
Cull
When disposing of this product, at the end of its useful life, we require notice entirely local regulations in your area for the waste carried out in full compliance with existing regulations.
Should not dispose of the product together with general household waste. For more information contact the local
authority or the shop where you purchased the product. Prior to remove the old product cut the power cord to avoid accidents.
After-sales service
Before contacting After-sales Services:
- Try to solve the problem by checking the "Troubleshooting section".
If, after that, failure persists, get in touch with the nearest Authorized Service Center.
Please be ready to:
• Make a brief description of the problem.
- Say the exact type and model of product.
- Say the service number (the number that is after the word "Service" in the warranty leaflet).
- Provide your complete address and phone number.
If repairs are needed, get in touch with the Authorized Service Center mentioned in the warranty.
These basic rules ensure product quality and efficiency.

COD: W10804710
21/01/2016
REVISIÓN: 02