FileCruiser - NAS Promise Technology - Free user manual and instructions
Find the device manual for free FileCruiser Promise Technology in PDF.

User questions about FileCruiser Promise Technology
0 question about this device. Answer the ones you know or ask your own.
Ask a new question about this device
Download the instructions for your NAS in PDF format for free! Find your manual FileCruiser - Promise Technology and take your electronic device back in hand. On this page are published all the documents necessary for the use of your device. FileCruiser by Promise Technology.
USER MANUAL FileCruiser Promise Technology
LOGIN TO THE ADMINISTRATION PORTAL 1
Home 2
CAPACITY OVERVIEW 2
MENU FEATURES 3
OU SPACE/TEAM SPACE/PERSONAL SPACE USAGE 6
STATUS 6
Domain 7
USERS 9
ADD U_SER 9
EDIT ALL USERS 10
REMOTE WIPE USER ACCOUNTS 10
EXPORT USER LISTS 10
IMPORT USERS 11
IMPORT LDAP/AD USER ACCOUNTS 11
IMPORT TEAM 12
Device 13
DEVICE LIST 13
Log 14
CLUSTER EVENTS 14
LOG TABLE 15
ADMINISTRATION EVENTS 16
USER EVENTS 17
Configuration 18
GENERAL 18
CLUSTER MANAGE BUTTON 18
IDENTITY 20
ADD IDENTITY 20
AUTHENTICATION TYPE 20
ENDPOINT 22
BACKUP SERVER 22
EMAIL SERVER 23
ROLE PERMISSION 24
LICENSE 25
DOWNLOAD 26
POLICY 26
NETWORK 26
SYSTEM 27
SHUTDOWN/REBOOT CLUSTER 27
SHUTDOWN/REBOOT NODE 27
MACHINE STATUS LIST 28
CONFIG BACKUP 29
STANDALONE BACKUP/RESTORE 29
CLUSTER BACKUP/RESTORE 30
USER DATA BACKUP 31
BACKUP/RESTORE USER DATA 31
CREATE BACKUP SCHEDULE 32
SYSTEM UPGRADE 33
RESET SYSTEM 33
RESET CLUSTER 33
RESET NODE 33
MONITOR 34
CLUSTER OVERVIEW 34
NODE OVERVIEW 34
LOGIN TO THE ADMINISTRATION PORTAL
To login to the administration portal:
- Use a computer connected to the same subnet as the FileCruiser and type the system IP address into the address bar of a web browser followed by "/admin", the address should look like this: http://xxx.xxx.xxx.xxx/admin with the IP address in place of the xxx.xxx.xxx.xxx
The FileCruiser administration portal login menu appears.
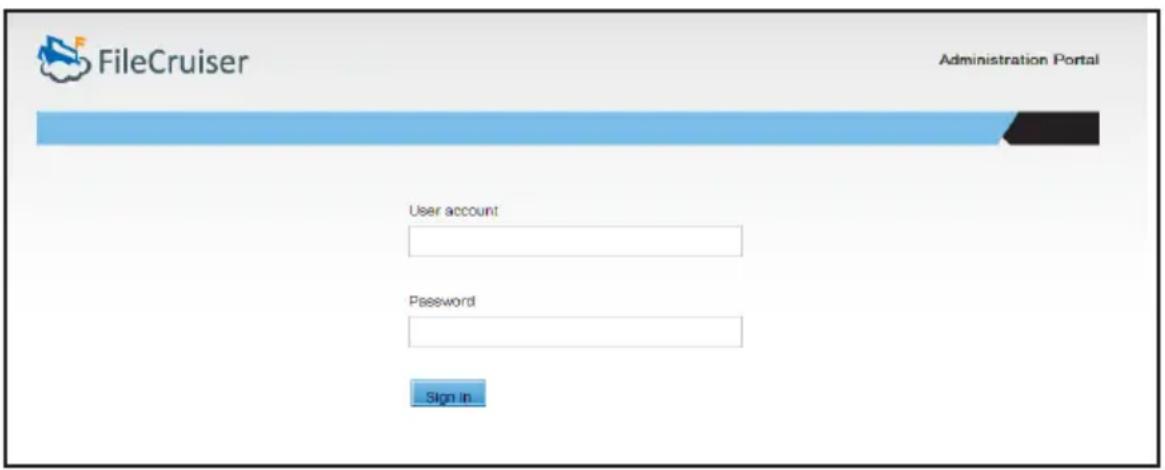
- Use the default user name, administrator, and default password, password, to login.
- Since the system has not yet been configured, the Setup Wizard menu appears. Use this menu to create basic settings, including importing the license. If you prefer to setup some of the items for FileCruiser using the regular menus, you can skip most steps. You must however use the Setup Wizard to configure Time Zone settings the first time setting up the system.
HOME
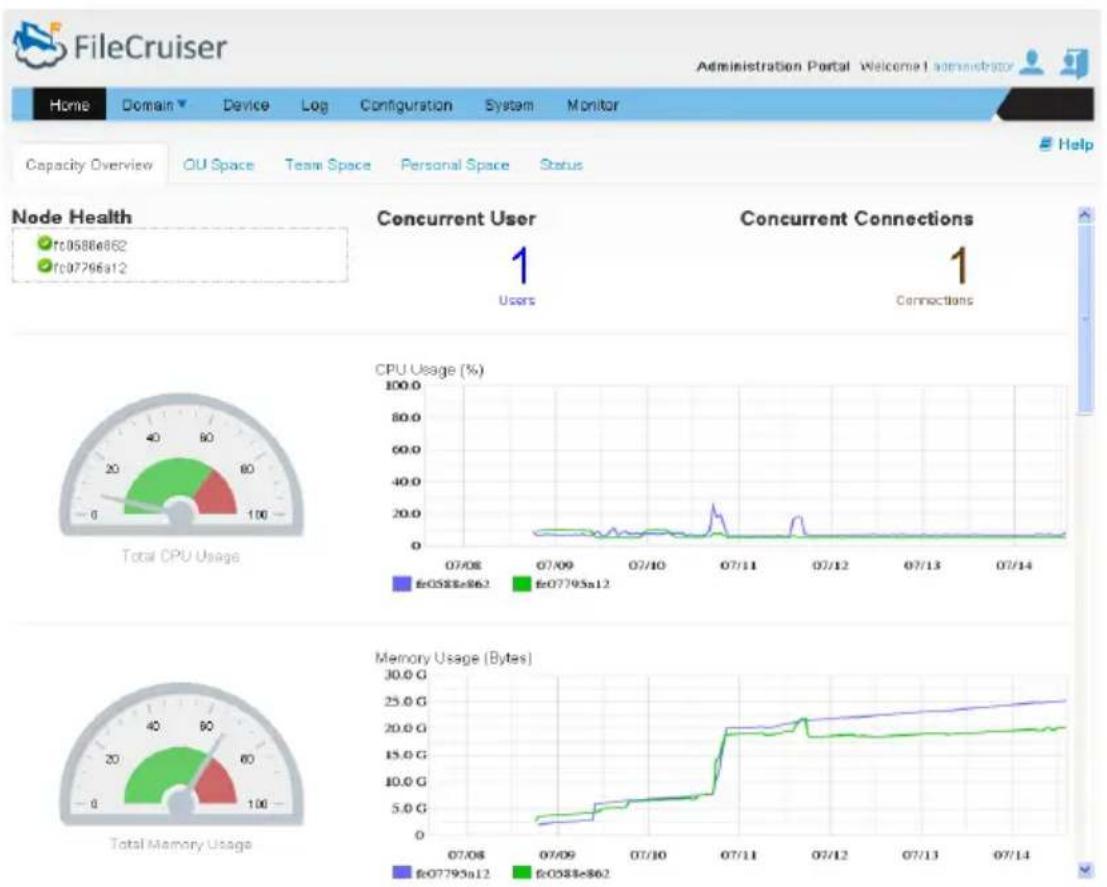
CAPACITY OVERVIEW
Capacity Overview is the topmost menu tab in the Home directory. Scroll down to view the various status displays including current and historical system-related information such as capacity and usage statistics. The information is presented using bar graphs, line graphs and simulated analog gauges.
Home - Capacity Overview menu
line
| Metric | Value | |--------|-------| | Total CPU Usage | 100.0 | | CPU Usage (%) | 100.0 | | Memory Usage (Bytes) | 30.0 G | | Time (approx) | 07/08 to 07/14 |MENU FEATURES
Menu Types
• Bar graphs: Overviews of System and Domain Capacity (in Gigabytes)
- Analog gauges: Located on the left side display CPU Usage, System Memory Usage, Physical Storage Usage and the number of Total Users.
- Line graphs: display CPU Usage and System Memory Usage over time; Physical Capacity percentage, OU, Domain, and User capacity for the previous seven days (in Bytes per second), Domains are color coded in the graph; Concurrent users and Concurrent connections for the previous seven days; and Upload and Download Traffic (in Bits per second), individual nodes are color coded in the graph.
Scroll down to view the following information.
- System Capacity/Used Overview (GB): A bar chart displays system allocated quota (in orange) and used quota (in blue).
- Domain Capacity/Used Overview (GB): A bar chart displays allocated quota (in orange) and used quota (in blue) by domain.
- Concurrent Users: The integer displayed at the top of the menu, this is the number of users connected to FileCruiser via the User Portal Windows Agent, Mac Agent and Android App in real time. Does not include users connected via Administration Portal.
- Concurrent Connections: The integer displayed at the top of the menu, this is the total number of connections to FileCruiser in real time, except for users connected through the Administrator Portal
Capacity Overview
| Feature Description | |
| Node Health Node status and node names in real time.Check mark: Machine is powered on and running.Cross mark: Machine is powered off.Question mark: Machine state is unknown. | |
| Concurrent User States | Total connection number of FileCruiser (User Portal, Windows Agent, Mac Agent and Android App) in real time.Users: The number of users using FileCruiser except Administration Portal in real time.Connections: The number of connections to FileCruiser in real time. |
| Current Upload and Download Traffic Does not include traffic on Administrator Portal. | Current upload and download traffic in real time.Upload Traffic: It shows current upload traffic bytes per second in blue.Download Traffic: It shows current download traffic bytes per second in brown. |
| CPU Usage Current and historical CPU usage information.Total CPU Usage: The semi-circle scale on left shows current CPU usage percent in real time.CPU Usage Chart: The chart on right shows historical CPU usage percent for past seven days by nodes. | |
| Memory Usage Current and historical memory usage information.Total Memory Usage: The semi-circle scale on left shows current memory usage percent in real time.Memory Usage Chart: The chart on right shows historical memory usage percent for past seven days by nodes. | |
| Capacity Usage Current and historical capacity usage information. | System Capacity/Used Overview (GB): The bar chart shows system allocated quota (in orange) and used quota (in blue).Domain Capacity/Used Overview (GB): The bar chart shows allocated quota (in orange) and used quota (in blue) by domain.To view different domain capacity/used overview:Select domain from the drop-down list below Domain Capacity/Used Overview (GB) title.Physical Capacity Used (%): The semi-circle scale on left shows current physical capacity used percent in real time.Physical Capacity Usage Chart (%): The chart on right shows historical capacity used percent for seven days.Domain Used Capacity (Bytes): The chart shows historical domain usage in bytes for seven days. Different color lines stand for different domains.OU Used Capacity (Bytes): The chart shows historical OU usage in bytes by domain for seven days. Different color lines stand for different domains.User Used Capacity (Bytes): The chart shows historical user usage in bytes by domain for seven days. Different color lines stand for different domains. |
| Concurrent Users/Connections | Total User: The semi-circle scale on left shows current number of online users. A machine node is supposed to support 1000 users.Concurrent Max Users: The chart on right shows historical ratios of online users to time (calculated in 30 minute segments) for seven days.Concurrent Max connections: The chart shows historical maximum number of connections on FileCruiser to time (calculated in 30 minute segments) for seven days. |
OU SPACE/TEAM SPACE/PERSONAL SPACE USAGE
These menus present a list of used quotas within the selected Domain at the OU, Team and Personal level. The list is ranked from the highest percentage used to the lowest. Information includes the OU/Team/User name, the set quota in Gigabytes, the amount of the quota used, and the percentage of the quota used.
Use the Domain pull-down menu to choose other Domains to display here.
STATUS
View general status information of FileCruiser, go to Home > Status to display the following information.
Software Update: Current software Version and Last Update Date
License: Numbers of users allowed and Expiration Date of license.
Backup: Last Backup Time Backup, Schedule for Remote Backup, and Backup Storage IP address.
Notification: Mail Server IP address and Administrator Notification Level
Settings: Session Time Out (in seconds) Endpoint, AD Server and LDAP Server IP addresses.
Download Links for:
- Windows Agent
- MacOS Agent
- iOS App
- Android App
DOMAIN
The Domain menus are used to manage Teams and Users and to create and manage Domains, including adding OUs to a Domain.
Click on Domain in the top menu directory, select User List, User Import or Team Import from the drop-down menu to view the menu. See the descriptions below.
To add a new Domain:
- Click on the Globe icon and select the Add Domain option. A new menu appears.
- In the Add Domain menu, type a Domain Name, Domain Quota (GB) and Authentication method (Local, LDAP or AD) to create the new Domain.
There are several actions initiated in the Domain Tree menu by right-clicking on a Domain, OU or Team in the list. These actions are listed below.
- Right-click on a Domain: Edit or Delete a Domain, Add or Search for an OU in the Domain, and Search for a Team in the Domain. The Search function is useful when there are several OUs or Teams in the Domain. To delete a Domain, first delete the OU in the Domain.
- Right-click on an OU: Add, Edit, Delete or Search for an OU, enable or disable all users in the User List, Add or Search for a Team. To delete an OU, first delete the Teams in the OU.
- Right-click on a Team: Edit a Team in the OU (change name or quota), Delete a Team, or Manage users in the Team (change role or remove from Team). See Users menu instructions below.
Note that to delete a Domain, OU, it is necessary to first delete the Users, or OUs in the Domain you intend to remove. They must be deleted in reverse hierarchical order.
Domain
| Feature Description | |
| User List The User List | menu is used for adding, managing and deleting Domains, OUs, Users and Teams, including quota management.The menu user interface presents the Domain Tree and User List. The Domain Tree used to create and manage Domains, including creating and managing OUs and Teams. The User List is used to create and manage users in an existing domain. See the descriptions below. |
| Domain Tree The Domain | ain Tree menu lists existing Domains and OUs in each Domain. Click on the + to expand the tree and list the nested OUs and Teams in the hierarchy. Click on a Domain or OU icon in the tree to view the Users in that Domain or OU. The Users list is used to add and manage users. Click on a Team icon to view the Members in that Team. The Members list is read only.To view the Domain Tree, click on the Domain directory and choose the User List option. The Domain Tree appears in the left part of the user interface. |
USERS
To view the Users list, click on the Domain directory and choose the User List option. The Users list is used for adding and managing users in Teams and OUs.
In the User List for a Domain, select individual user accounts or click the selection box on multiple accounts, then click on the pencil icon in the list to perform the following Password, Edit, Remote Wipe, Delete or Transfer Data.
- Password: Change the user password.
- Edit: Change user, email, or quota in a separate menu. The menu is the same used for Add User.
- Remote Wipe: Remote Wipe is used to remove data from the FileCruiser folder in a remote user device. See instructions below.
- Delete: Use this to remove one or selected multiple user accounts. If you want to remove all user accounts listed in the Domain, click the selection box next to Action to select all users and click the Delete button located in the top right of the user interface. Another menu appears listing the users that will be deleted. If you want to continue, click the Submit button.
- Transfer Data: Use this to transfer the content of a user folder to a new team, and assign another user to be team lead in the team.
Add User
To add a new user:
- Choose the Domain or OU the user will be added to in the Domain Tree menu, then click on the Add User icon.
- In the new menu, type in the following the User Account name and Alias Name.
- Choose the Domain and OU, if any.
- Enter a Password and Confirm Password.
- Enter an Email account for the user.
- Choose Enabled or Disabled for the user status.
- Enter a Quota for the user.
- If the user will be an administrator, choose the Yes option for Administrator, otherwise leave the default No option.
- Click the Submit button to create the new user. The user appears listed in the Users list.
EDIT ALL USERS
To enable or disable all users in a Domain, click on the users-pencil icon on the left of the Add User icon. Choose a Domain from the pull-down menu, and choose to Enable or Disable all users in that Domain.
REMOTE WIPE USER ACCOUNTS
An important security feature for administration of FileCruiser is the Remote Wipe capability. This will remove the contents of the FileCruiser folder from a remote device for a user. This occurs immediately if the user is logged in, or occurs as soon as the user logs in. Note that Remote Wipe does not remove the data from the server.
To Remote Wipe contents from a user client device:
- Click on the pencil icon for the user to be remotely wiped and choose the Remote Wipe option.
- Choose the device or devices associated with the user account from the list.
- Choose whether to Enable or Disable the account with the appropriate button.
EXPORT USER LISTS
To export a .csv file that lists user accounts or team members, select the Domain, OU or Team for which the user list will be created in the Domain Tree and click the Export button located in the upper right corner of the user interface. Notice that the pull-down menu next to the Export button lets you determine a maximum number of users to include in the list.
IMPORT USERS
To add users from a previously created list, or to import users from the AD/LDAP directory, click on the Domain directory and choose the User Import option.
Import user list
To import users from a previously exported list (see instructions below for exporting user lists):
- Choose the File Import option for the Type.
- Select the Domain in which the list will be added.
-
Click on the +Import button. A browsing menu appears.
-
Locate the .csv file in utf-8 format on your computer and click Open to load the user list and add it to the selected Domain.
IMPORT LDAP/AD USER ACCOUNTS
To import users from LDAP/AD (Note: This requires Microsoft AD or LDAP setup has previously been configured, see Administrator Guide or Quick Configuration Guide for details):
- Choose the Microsoft AD/LDAP option for the Type.
- An expandable Tree menu appears for the LDAP or AD Domain. Click to select user groups from this menu.
IMPORT TEAM
To import Teams to a Domain, a list of Teams or Team Members must have been previously created.
Follow these steps to import a team:
- Click on the Domain directory and choose the Team Import option.
- In the new menu, click the radio button to select the Team Import option.
- Notice the Note displayed in the bottom of the menu. Use this guide to prepare a .csv file with the team information.
- Choose the domain name from Domain drop-down list.
- Click on the +Import button and locate the .csv file for the team.
Follow these steps to import members:
- Click on the Domain directory and choose the Team Import option.
- In the new menu, click the radio button to select the Members Import option.
- Notice the Note displayed in the bottom of the menu. Use this guide to prepare a .csv file with the member information.
- Choose the domain name from Domain drop-down list.
- Click on the +Import button and locate the .csv file for the team members.
DEVICE
DEVICE LIST
The Device List presents information about user devices for each Domain. Choose the Domain to view from the pull-down menu. The information in the Device List includes the User Name, Agent used, Remote IP Address, Last Login Date and the Status (Enabled/Disabled) for the device. The Device List can be used to Disable or Delete a device.
To Disable or Delete and user device:
- Click the pencil icon for the device in the list
- Choose the Delete or Disable option. Disabling a device locks it out of FileCruiser. It can later be enabled.
To Search for a specific user device, enter the user name in the Search entry field and click the magnifying glass icon.
Log
Use the Log menus to search for and list events according to the criteria selected in the search menus. In addition, selected events or event lists can be exported to .csv file or deleted from the list.
Choose the menu tab for the type of events to search. The event types are Cluster Events, Administration Events and User Events.
CLUSTER EVENTS
Click on the Cluster Events menu tab to view the search and menu display options.
Search Options
Nodes: Nodes in cluster
Start Date: Search logs which happened after start date
End Date: Search logs which happened before end date
Service:
- Admin Portal: Search Administration Portal log
- User Portal: Search User Portal log
• Auth: Search login log - FileOp: Backend service fileop log
- Notify Service: Backend service notify function log
- Severity:
ERROR: Non-urgent failures, these should be relayed to developers or administrators
WARN: Warning messages
INFO: Normal operational messages
Message: Search log messages for keyword
Export Log Number: Choose the number of logs which you want to export
Export Button: Export logs to .csv file
Search Button: Search logs according the conditions and display in the table
Delete Button: Choose log entries in the table to remove
Log Table
This lists detailed information about the logs.
Nodes: Displays administrator choice "Nodes" information
Time: The log occurred at a time
Priority: Displays administrator "Priority" information
Message: Display log detail information
ADMINISTRATION EVENTS
Click on the Admin Events menu tab to view the search and menu display options.
Options
Start Date: Search logs which happened after start date
End Date: Search logs which happened before end date
Method:
• ALL: All Administration Portal action logs
- POST: Recording administrator add new setting, login, upload file...etc
- PUT: Recording administrator update settings on Administration Portal
- PATCH: Recording administrator update settings by condition on Administration Portal
- DELETE: Recording administrator delete settings on Administration Portal
Export Log Number: Choose the number of logs which you want to export
Export Button: Export logs to .csv file
Search Button: Search logs according the conditions and display in the table
Delete Button: Choose log entries in the table to remove
Log Table
This lists detailed information about the logs.
Method: Displays administrator chosen "Method"
User: Displays administrator name
Message: Displays administrator action
Update Time: Displays time of administrator action
USER EVENTS
Provide administrator to search Log about user actions on User Portal
Options
Start Date: Search logs which happened after start date
End Date: Search logs which happened before end date
User Name: Can choice the user action on User Portal
Display Order: Order log list by update time
- New>>Old: New to Old Sorting
- Old>>New: Old to New sorting
Export Log Number: Choose the number of logs to export.
Export Button: Export logs to .csv file
Search Button: Search logs according the conditions and display in the table
Log Table
This lists detailed information about the logs.
No: Reference index of log entries
Account/Domain: User account and Domain
Action: Action performed by the user
Path: Path of file
Folder: Confirm if the user is performing a folder action
Size: Size of file
Update: Log update time
CONFIGURATION
GENERAL
The General menu tab displays information about the cluster in a table format. This is also the menu used to access cluster management menus. Cluster management includes time and date settings, Administration and User Portal settings (enable/disable), administrator session timeout and server certificate management.
CLUSTER MANAGE BUTTON
Click the Cluster Manage button and choose the menu to display to change the settings listed here.
Session Timeout: This is the idle time allowed for a logged in administrator before being logged out.
Management Setting:
Time Zone: Set Region and City
Sync with NTP server: NTP server IP settings
Administration Portal(Http): Choose Enabled or Disabled
Administration Portal(Https): Choose Enabled or Disabled
User Portal(Http): Choose Enabled or Disabled
User Portal(Https): Choose Enabled or Disabled
Certificate:
Domain Certificate: Import domain validated certificate
Domain key: Import domain validated key for certificate
Intermediate CA Certificate: Import Intermediate CA Certificate
General system information displayed in the menu includes:
Time: Date and Time
Time Zone: City/Region setting
Session time-out: Current timeout setting
Nodes:: The number of nodes in the cluster
Certificate: Certificate setting status, if applicable
Master IP: IP address of Master node
General cluster information displayed in table format at the bottom of the menu includes:
Display general setting
Manage: Which node is managing the Administration Portal
Name: Node name
State: Current node status
Time Zone: City and Region setting
NTP: NTP server IP address
Admin HTTP: Administration portal http status
Admin HTTPS: Administration portal https status
User HTTP: Shows user portal http status
User HTTPS: Shows user portal https status
Certificate: Shows certificate status
Ack: Ignore the broken node
Retry: If the node connection is broken, click Retry button.
IDENTITY
The Identity menu is used for configuration of Microsoft AD and LDAP settings for Domains that have been created.
Add Identity
To create new identity settings for a Domain, click the icon with the + above the upper right corner of the Identity list. In the new menu, configure the following:
AUTHENTICATION TYPE
Click the radio button to choose the authentication type, LDAP or Microsoft AD, used for the Domain. The menu is slightly different for LDAP and AD, so the menu adjusts according to which is chosen.
For Microsoft AD
- Type in a Host Name, which is the URL or IP address of the Active Directory (AD) server.
- Type in the User Name and Password of an authorized user name for accessing the AD server.
- Choose the Domain Name used.
- Choose the Default User Status radio button for Enabled or Disabled. This is the status for any users that are created or a list of users is imported.
- Enter a value for the Default User Quota.
- Type in a value for the User Quota. This is the maximum amount of physical disk space allowed to be used by a generic FileCruiser user that is applied when users are created or is a list of users is imported. Keep in mind that quotas for users can also be configured separately for individual users when adding or editing user accounts.
- Click the Save button.
For LDAP
- Type in a Host Name, which is the URL or IP address of the LDAP server.
- Type in the User Name and Password of an authorized user name for accessing the LDAP server.
3.
ENDPOINT
Use the Endpoint configuration menu to create the URL for the User Portal. The User Portal is where all users of FileCruiser first go to login and use the system.
Likewise use the Endpoint menus to create the URLs for the Notification Server, File Operation and Monitor Server.
To create the Endpoint configuration:
- Type in the URL or IP address for the User Portal. For FileCruiser systems using LDAP or Microsoft AD, enter the Domain Name used in the Identity menu.
- You can test to see if the domain will work by clicking the Test button. Or click Save to apply the settings.
BACKUP SERVER
Set up a backup server to backup data via Secure File Transfer Protocol. To configure backup server settings:
- Enter the Backup server URL or IP address in the Host entry field.
- Enter the Username and Password for the Backup server.
- Enter the Port number used for the Backup server.
- Enter the Remote Directory name (Example: /tmp/floder/) for the location on the Backup server where the backup will be placed.
- Click on the Save button to save the Backup Server settings.
- Click the Test Settings button to verify that the server settings are working.
EMAIL SERVER
Set up mail server settings to receive notifications of events. To configure mail server settings:
- Enter the server URL or IP address in the Server entry field.
- Enter the Port number used to Email services.
-
Choose whether authentication is needed, if so, enter:
-
Connection Type (SSL or TLS)
- Authentication User Name the User Name for the Email account
-
Authentication Password for the Email account
-
Enter the Sender Name, Sender Address, and Log Level used for the Emails.
- Enter the Email address used for the notifications.
- Click on the Save button to save the Email settings.
- Click the Test Settings button to verify that the Email server settings are working.
ROLE PERMISSION
Use this menu to create user roles. You can choose what permissions are used for each role.
Create Role Permission
- Enter a Name for the role being created.
- Choose the capabilities allowed for users with the role from the Permission list. The permission are as follows:
• Write: Can fix data
- Share Outside: Can share data to other members in other Domains
- Trash: Can empty the trash
- Read: Can read data
- Share Inside: Can share data to members in the same Domain
- Delete: Can delete data (send to Trash)
- Manage: Can add team members
The table in this menu lists existing roles and the permissions assigned to the role.
• Action: Can Edit or Delete the role
- Name: Role name
- Permission: Display permissions associated with the role
LICENSE
Import the license key and check the status of the licenses used.
To import the license:
- Click on the Import License button, a new menu appears.
- Locate the MD5 key and user password needed to activate the FileCruiser license, and copy and paste the information into the entry fields in the new menu.
- Click on the +Import License File button.
Also in the License menu:
• Total licenses: Displays number of enabled license
- Licenses used: Displays number of used licenses
Active Status: Select license status to search
• All: List all of licenses
- Enable: List of enabled licenses
- Disable: List of disabled licenses
License Table
Show all of licenses detail information
- License Amount: Choose how many licenses to display
- Start Date: License start date
- Expiration Date: License expiration date
• Active Status: License status (Enabled/Disabled)
DOWNLOAD
Use this menu to setup the URL used for downloading the different client user agents including:
• Windows Agent download link
• MacOS Agent download link
- iOS Agent download link
• Andorid Agent download link
POLICY
- Use this to limit format types allowed and restrict file sizes allowed on the server. Click the Save button to enforce the restrictions specified.
- Restrict Size: Users cannot upload files larger than the specified limit.
- Restrict Format: Users cannot upload files of the formats specified.
NETWORK
To change the network settings to suit your network, go Configuration, click on a node in the cluster list, then choose the Network menu tab.
The Network configuration menu appears.
Each of the four ports can be configured with separate virtual IP addresses. To change basic IP settings for static IP or DHCP, click the pencil icon for the port you are going to change and choose the Edit option. In the new menu change the IP settings to suit your network.
The Network menu also contains links to menus for channel bonding, DNS setting, and default gateway setting.
Interface: Network interface (example: eth0, eth1...etc)
IP Address: Show IP address
Subnet Mask: Show subnet mask IP
MAC Address: Show the node MAC address
SYSTEM
General
The General System menu tab presents an overview of the system status of the server cluster and individual nodes. Use this to reboot or shutdown the cluster or a node in the cluster.
SHUTDOWN/REBOOT CLUSTER
To shutdown or reboot the server cluster:
- Click to select the cluster in the Cluster List
- Click on the Restart/Shutdown icon [ ] located on the right side of the menu, about the machine status table.
- Choose the Reboot or Shutdown radio button and click the Apply button.
SHUTDOWN/REBOOT NODE
To shutdown or reboot a node in the server cluster:
- Click to select the node in the Cluster List. The status for the selected node appears in the machine status table.
- Click on the Reboott/Shutdown icon [ ] located in the machine status table.
- Choose the Reboot or Shutdown radio button and click the Apply button.
MACHINE STATUS LIST
Basic information about the server cluster and individual nodes is listed in table format in the machine status list. Cluster and machine status information is read-only.
- Manage: The machine which the browser is accessing will be marked.
- Machine Status: Displays the online (green icon) or offline (red icon) status.
• State: Displays action state of the machine.
• Name: Hostname of the machine. - Uptime: Time since system booted up.
- Version: FileCruiser version of the machine. Notice that version and build date are also listed separately for each node in the Version menu tab.
- Action: Shutdown or reboot actions applied to the machine.
- Ignore: If shutdown fails, you can choose to ignore the failure.
- Retry: Choose to retry the shutdown.
CONFIG BACKUP
The Config Backup and Restore menu in the System directory is used to backup configuration settings to a back server. If you have not yet setup the backup server, go to Configurations > Backup Server first to enter IP settings for the backup device. When this is done, use this menu to backup or restore system configuration settings.
Follow the instructions below to initiate configuration settings backup or restoration for standalone or cluster systems.
STANDALONE BACKUP/RESTORE
To backup configuration settings to the backup server:
- Go to System > Config Backup
- Choose Configuration Backup in the pull-down menu.
- Click on the Backup button.
To restore configuration settings from the backup server:
- Go to System > Config Backup
- Choose Configuration Restore in the pull-down menu.
- Choose the Config file from the list to be used for restoration. Files are listed by the date the backup file was created.
- Click on the Restore button.
- After the configuration files are transferred, restart the system, login again and check the system configuration.
CLUSTER BACKUP/RESTORE
To backup cluster configuration settings to the backup server:
- Go to System > Config Backup
- Choose Configuration Backup in the pull-down menu.
- Click on the Backup button.
To restore configuration settings from the backup server:
- Go to System > Config Backup
- Choose Configuration Restore in the pull-down menu.
- Choose the Config file from the list to be used for restoration. Files are listed by the date the backup file was created.
- Click on the Restore button.
- After the configuration files are transferred, restart the system, login again and check the system configuration.
USER DATA BACKUP
Use this menu to create schedules for backing up user data to the backup server. If you have not yet setup the backup server, go to Configurations > Backup Server first to enter IP settings for the backup device. Backups can also be completed manually. After user data has been backed up, use this menu to restore from the backup server.
Information listed in the User Data Backup table includes:
- Location
- Directory
- Policy
- Schedule
- Status
- Result
BACKUP/RESTORE USER DATA
Click on the pencil icon under Action in the table and choose the appropriate option to perform the following functions:
- Run: Initiate a data backup manually.
- Restore: Restore user data. Choose the backup in a pop-up menu. Backups are listed by date.
• History: Display the history of previous manual and scheduled backups. - Edit: Use this to change the details for a backup schedule.
- Delete: Remove a backup schedule from the list.
CREATE BACKUP SCHEDULE
To create a schedule for regular user data backups to the backup device, click on the Create Backup icon [ ].
In the menu that appears, configure the following:
Location: The backup server location.
Directory: The absolute path of backup directory at the backup server.
User Name: The user to access the backup server. This user must have the access ability to the backup directory.
Password: The password of the given user.
Policy: Choose option.
• Full: A full backup job option.
- Incremental: The incremental backup applied to the previous full backup. If there is not a full backup done, the job will do a full backup job automatically.
Schedule:
- Manual: Trigger backup manually.
- Every hour interval: Do a scheduled job every 1, 2, 3, 4, 6, 8, or 12 hour interval.
• Daily: Do a scheduled job at a specified time every day.
• Weekly: Do a scheduled job at a specified time weekly.
SYSTEM UPGRADE
Use the System Upgrade to upgrade FileCruiser firmware for the FileCruiser VA2600. Get the latest firmware from the Promise website.
To upgrade FileCruiser firmware for the FileCruiser VA2600, click on the Upload File button, locate the upgrade package. Click the Upgrade button to proceed. When the upgrade is finished, the system reboots automatically.
RESET SYSTEM
The Reset System menu is used to reset configuration settings to default values. System reset can be done for a cluster or individual nodes.
RESET CLUSTER

WARNING!
Performing a system reset for an entire cluster or a standalone system will wipe out all user data in FileCruiser. If there is user data on FileCruiser make sure to fully backup user data and system configuration to a backup system.
To reset the entire cluster, click on the Reset All icon located in the right side of the menu. A dialog box appears asking if you want to reset the cluster. To reset the cluster, click the Apply button. All system configuration settings for the nodes in the cluster are returned to factory default values. The devices will be rebooted automatically.
RESET NODE
To reset a single node in a cluster, click on the Reset button for the individual node listed in the table. A dialog box appears asking if you want to reset the node. To reset the node, click the Apply button. All system configuration settings for the node are returned to factory default values. The device will be rebooted automatically.
MONITOR
Use this to monitor cluster health. Data is presented in line graphs for the specified time period The time period options are 1 week, 1 day, 3 hours or 30 minutes.
CLUSTER OVERVIEW
Use the pull-down menu under Cluster Overview to select the time period to display. The data displayed begins from the time period selected to the present.
The cluster data in Monitor includes:
• Total CPU Utilization: Line graph display of CPU utilization
- Load Avg: Line graph display of average loading
• Memory used: Line graph display of memory usage
NODE OVERVIEW
Use the pull-down menu under Node Overview to select the time period to display. The data displayed begins from the time period selected to the present.
The node data in Monitor includes:
• CPUs Utility: Line graph display CPU utilization color coded for each node
- Total CPU Utilization: Line graph display of total (cluster) CPU utilization
- Load Avg: Line graph display of CPU average loading
• Memory used: Line graph display of memory usage
• Total Rx: Line graph display of total volume of data received via network
• Total Tx: Line graph display of total volume of data transmitted via network