EonServ 7012 - NAS Infortrend - Free user manual and instructions
Find the device manual for free EonServ 7012 Infortrend in PDF.

User questions about EonServ 7012 Infortrend
0 question about this device. Answer the ones you know or ask your own.
Ask a new question about this device
Download the instructions for your NAS in PDF format for free! Find your manual EonServ 7012 - Infortrend and take your electronic device back in hand. On this page are published all the documents necessary for the use of your device. EonServ 7012 by Infortrend.
USER MANUAL EonServ 7012 Infortrend
Infortrend EonServ 7000 Series
User Guide
Copyright Notice
All rights reserved. This publication may not be reproduced, transmitted, transcribed, stored in a retrieval system, or translated into any language or computer language, in any form or by any means, electronic, mechanical, magnetic, optical, chemical, manual or otherwise, without the prior written consent of Infortrend Technology, Inc.
Disclaimer
Infortrend Technology makes no representations or warranties with respect to the contents hereof and specifically disclaims any implied warranties of merchantability or fitness for any particular purpose. Furthermore, Infortrend Technology reserves the right to revise this publication and to make changes from time to time in the content hereof without obligation to notify any person of such revisions or changes. Product specifications are also subject to change without prior notice.
Trademarks
Infortrend, the Infortrend logo, SANWatch, ESVA, EonStor, EonStor DS, EonNAS, EonServ and EonPath are registered trademarks of Infortrend Technology, Inc. Other names prefixed with "IFT" and "ES" are trademarks of Infortrend Technology, Inc.
- Windows is a registered trademark of Microsoft Corporation.
• Mac OS X is a registered trademark of Apple Computer, Inc.
• Linux is a trademark of Linus Torvalds.
All other names, brands, products or services are trademarks or registered trademarks of their respective owners.
Legal Information
All Infortrend products, including the product customers have purchased from Infortrend, shall be subject to the latest Standard Warranty Policy available on the Infortrend website: http://www.infortrend.com/global/Support/Warranty
Infortrend may from time to time modify, update or upgrade the software, firmware or any accompanying user documentation without any prior notice. Infortrend will provide access to these new software, firmware or documentation releases from certain download sections of our website or through our service partners. Customer shall be responsible for maintaining updated version of the software, firmware or other documentation by downloading or obtaining from Infortrend, and installing designated updated code, including but not limited to firmware, microcode, basic input/out system code, utility programs, device drivers, and diagnostics delivered with Infortrend product.
Before installing any software, applications or components provided by a third party, customer should ensure that they are compatible and interoperable with Infortrend product by checking in advance with Infortrend. Customer is solely responsible for ensuring the compatibility and interoperability of the third party's products with Infortrend product. Customer is further solely responsible for ensuring its systems, software, and data are adequately backed up as a precaution against possible failures, alternation, or loss.
For any questions of hardware/ software compatibility, and the update/ upgrade code, customer should contact Infortrend sales representative or technical support for assistance. To the extent permitted by applicable laws, Infortrend shall NOT be responsible for any interoperability or compatibility issues that may arise when (1) products, software, or options not certified and supported by Infortrend are used; (2) configurations not certified and supported by Infortrend are used; (3) parts intended for one system are installed in another system of different make or model.
Contact Information
Customer Support
Contact your system vendor or visit Infortrend's website
http://infortrend.com/global/About/Worldwide
for the contact information of support offices worldwide.
About This Guide
- This User Guide introduces EonServ 7000 series' basic hardware/software and recommended procedures to produce a sample for pilot/volume production.
- If you are already an EonServ 7000 series user, please refer to the hardware and/or software manuals that came with your system for full installation details.
-
For specific system information, you may also refer to the following documents:
-
EonServ 7000 Series Quick Installation Guide
- EonServ 7000 Series Hardware Manual
- SANWatch User Manual
Revision History
| Version | Date | Description |
| 1.0 | Mar. 2017 | Initial release |
| 1.1 | May 2017 | Remove the limit on the minimum number of drives |
Table of Contents
Copyright Notice ....ii
Legal Information ....iii
Contact Information iv
About This Guide ...... v
Revision History......v
Table of Contents ...... vi
- Introduction ...... 1
1.1 EonServ 7000 Series Overview ....1
1.2 EonServ 7000 Series Advantages .... 1
1.3 EonServ 7000 Series Technology 2
1.3.1 EonServ Hardware Architecture....2
1.3.2 Infortrend RAID Platform Virtualization (IRPV) 3
1.3.3 Intelligent Drive Recovery (IDR) for Better Data Integrity....3
1.3.4 Sustained IO Throughput....4
1.4 EonServ 7000 Series Hardware....4
1.4.1 Front Panel Components....4
1.4.2 Rear Panel Components....4
1.4.3 Controller Module Interfaces....5
- Initial Setup....6
2.1 Hardware Installation 6
2.2 Software Installation 6
2.2.1 Setting up BIOS....6
2.2.2 Installing Operating System 7
2.2.3 Installing Drivers for Your Operating System 7
2.2.4 Installing SANWatch 9
2.2.5 Installing Application Software 9
Appendix 10
Dimensions....10
Environment Requirement 10
Certifications 11
JBOD Expansion....12
Volume Production 13
1. Introduction
1.1 EonServ 7000 Series Overview
EonServ 7000 series is a storage server series that specializes in storage while providing data access, security, management and services over a shared network or the internet. Being an integral part of modern day storage technology and with its data storage capabilities, storage servers are a great option for data backup over network. With extensive customizability when it comes to installing dedicated operating systems, EonServ 7000 series can become specialized and yet remain flexible.
While tradition storage servers usually comprise of two systems, Infortrend EonServ 7000 series uses Infortrend RAID Platform Virtualization (IRPV) to combine the reliability of RAID storage and the powerful server processing abilities into a single hybrid device. This design saves space, lowers costs, is green to operate and requires minimum maintenance. In order to meet all your requirements, Infortrend EonServ 7000 series can be turned into the central point of access for all incoming and outgoing data by simply installing the desired operating system.
Infortrend EonServ 7000 series RAID functions can be managed through the SANWatch graphic user interface (GUI), which is installed on the guest OS (currently supporting Windows 10, Windows Server 2012 R2 64-bit, and CentOS 7). Once tested and approved, you may mass produce your EonServ 7000 series to supply in volume!
1.2 EonServ 7000 Series Advantages
Unlike most storage servers currently on the market, the EonServ 7000 series is a standalone hybrid system that offers the following benefits over traditional server storage systems:
- System hardware advantage: EonServ is a highly integrated industrial grade storage server. It features cable-less design and modular components for easy maintenance.
● Better data integrity with Infortrend Intelligent Drive Recovery: With the Infortrend RAID technology, users can rest assured that the safety of their stored data is protected from accidental and mechanical errors.
● Sustained performance guaranteed: Featuring patented read/write technology ensures sustained data throughput.
- Intuitive GUI: SANWatch is intuitive and easy to use, simplifying complicated setup processes to have the system up and running as soon as possible.
- Expandability: EonServ 7000 series has a built-in SAS expansion port for JBODs. Maximum hard drive expansion can reach 432 HDDs for 2U and 436 HDDs for 3U EonServ systems. Based on current 8TB hard drives, maximum capacity can reach up to 3488TB.
1.3 EonServ 7000 Series Technology
EonServ 7000 series is designed for optimal performance. Infortrend RAID Platform Virtualization technology allows a dedicated operating system and Infortrend RAID to co-exist, while the Intelligent Drive Recovery function constantly monitors every hard drive for bad blocks. If bad blocks are found, the processing algorithm will find other means to sustain I/O throughput.
1.3.1 EonServ Hardware Architecture
EonServ 7000 series is available in 2U and 3U form factors with various CPU configurations (Intel Xeon E5-2609 v4 and E5-2620 v4). The system supports a maximum of 1024GB DDR4 memory.

flowchart
graph TD
    A["SAS 12G expander"] --> B["SAS 12G I/O controller"]
    B --> C["SAS expansion conn x 1"]
    B --> D["10GbE LAN SFP+ conn x 2"]
    B --> E["PCIe x16 slot"]
    B --> F["PCIe x8 slot"]
    B --> G["PCIe x8 slot"]
    B --> H["PCIe x16 slot"]
    A --> I["CPU0"]
    I <--> J["CPU1"]
    J <--> K["DDR4x8"]
    K --> L["DDR4x8"]
    L --> M["PCH Wellsburg"]
    M --> N["System Drive x 2"]
    M --> O["USB 3.0 x 2"]
    M --> P["USB 2.0 x 2"]
    M --> Q["VGA conn"]
    M --> R["Mini-USB conn"]
    M --> S["GbE LAN x 4(I/O)"]
    M --> T["GbE LAN x1(Mgt)"]
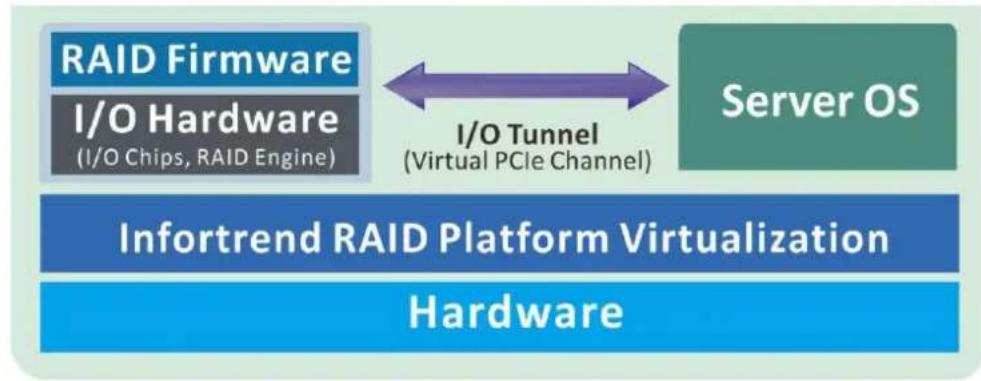
1.3.2 Infortrend RAID Platform Virtualization (IRPV)
Unlike most storage server vendors using add-on RAID card to integrate RAID and additional hardware to house the operating system (application), Infortrend's RAID Platform Virtualization is designed in-house to combine the two into one single system.
The IRPV technology allows for RAID and server to co-exist and operate side-by-side by means of an I/O tunnel (virtual PCIe channel). The utilization of virtualization technology optimizes both RAID and server components for maximum efficiency. Hardware wise, IRPV allows for total characteristic integration of two technologies into a single system. The end result is a cable-less design with easy to maintain modular components delivering optimum performance and compatibility.
flowchart
graph LR
    A["RAID Firmware\nI/O Hardware\n(I/O Chips, RAID Engine)"] <--> B["I/O Tunnel\n(Virtual PCIe Channel)"]
    C["Server OS"] --> B
    D["Infortrend RAID Platform Virtualization"] --> E["Hardware"]
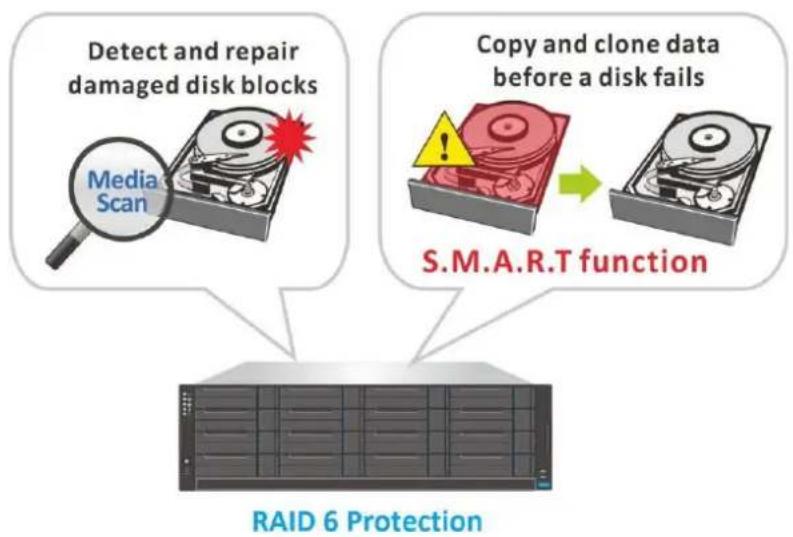
1.3.3 Intelligent Drive Recovery (IDR) for Better Data Integrity
To provide better data integrity, Infortrend EonServ 7000 series' hard drive error detection and countermeasure mechanism in a RAID6 configuration scans for damaged disk block(s) and attempts to repair it. If the damaged block is beyond repair, the Intelligent Drive Recovery (IDR) function takes over isolating the disk and copying and cloning its data to the spare disk which will replace the failing disk before it actually fails. This prevents complete failure of the RAID drive and avoids going through the rebuild process that would otherwise consume valuable resources.
flowchart
graph TD
    A["Detect and repair damaged disk blocks"] --> B["Media Scan"]
    C["Copy and clone data before a disk fails"] --> D["S.M.A.R.T function"]
    D --> E["RAID 6 Protection"]
1.3.4 Sustained IO Throughput
EonServ 7000 series' RAID6 disk fault tolerance ensures better performance and quicker response time when there's a hard drive read I/O delay by promptly recalculating the lagging stripe. If there is a drive I/O delay, for read, it pre-calculates the request and for write requests, it pre-writes to cache.
Altogether, Infortrend's patented technology offers users a better user experience with stronger data integrity, system stability and more responsive operations.
1.4 EonServ 7000 Series Hardware
EonServ 7000 series is available in 2U and 3U form factors with various CPU configurations (Intel Xeon E5-2609 v4 and E5-2620 v4). It has two system drive slots (2.5" SATA), 5 PCIe card expansion slots, compatibility with 2.5" SATA SSD, 2.5" SAS SSD, 2.5" 10K RPM SAS HDD, and 3.5" 7,200 RPM NL-SAS HDD, and can expand to up to 432HDDs (for 2U) and 436HDDs (for 3U) through the built-in SAS expansion that connects to JBODs.
1.4.1 Front Panel Components

text_image
① ② ③ ④ ⑤ ③- Drive trays (1): Each drive tray is hot-swappable and holds a 3.5-inch hard drive.
- LED Panel (2): The panel has Service / Power / Cooling Fan / Thermal / System LEDs.
- Handles (3): There are handles on both sides of the enclosure for users to pull / push the enclosure out and into the cabinet when the enclosure is installed on a slide rail rackmount system.
- Power Switch (4): The power switch turns on the system.
- Mute Button (5): The mute button is to mute an alarm when sound or to indicate to the administrator the system requires service.
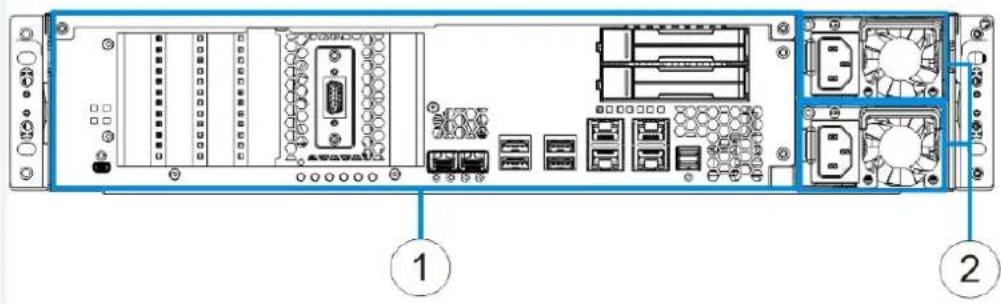
1.4.2 Rear Panel Components
The rear of the enclosure consists of major modular components. There are dual redundant power supply units on both sides of the controller module. There are LEDs for users to monitor each component status and the modular design allows for easy extracting of components for maintenance.
text_image
Diagram of a server rack with labeled components, showing front and rear views with numbered annotations.Controller (1)
The controller module represents the server component of the system that contains a main circuit board with various output and connections at the rear.
Power supply unit (2)
The hot-swappable PSUs provide power to the system.
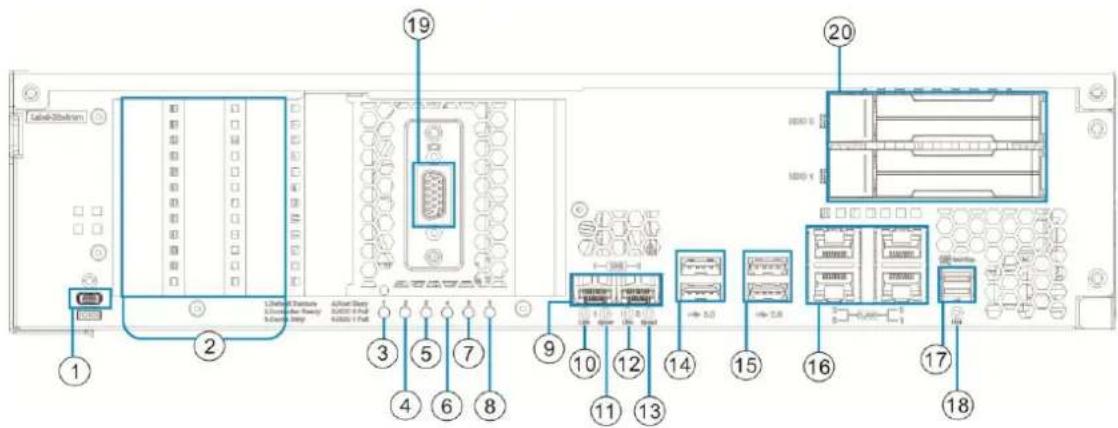
1.4.3 Controller Module Interfaces
The controller module is situated next to the two power supply units at the rear of the system. It has a vast array of connection interfaces (input and output) to compliment user application needs. It is recommended that users familiarize themselves with these interfaces.
text_image
LabelButton 1 2 3 4 5 6 7 8 9 10 11 12 13 14 15 16 17 18 19 20 3000 x 3000 x 3000 x 3000 x 3000 x 3000 x 3000 x 3000 x 3000 x 3000 x 3000 x 3000 x 3000 x 3000 x 3000 x 3000 x 3000 x 30C 1.5 1.5 1.5 1.5 1.5 1.5 1.5 1.5 1.5 1.5 1.5 1.5 1.5 1.5 1.5 1.5 1.5 1.5 1.5 1.5 1.5 1.5 1.5 1.5 1.5 1.6 1.6 1.6 1.6 1.6 1.6 1.6 1.6 1.6 1.6 1.6 1.6 1.6 1.6 1.6 1.6 1.6 1.6 1.6 1.6 1.6 1.6 1.6 1.6 1.6 1.7 1.7 1.7 1.7 1.7 1.7 1.7 1.7 1.7 1.7 1.7 1.7 1.7 1.7 1.7 1.7 1.7 1.7 1.7 1.7 1.8| 1 | Service port | 11 | 10 GbE(SFP+) port 1 Speed LED |
| 2 | PCI-E expansion slot | 12 | 10 GbE(SFP+) port 0 Link LED |
| 3 | Default Restore LED | 13 | 10 GbE(SFP+) port 0 Speed LED |
| 4 | Controller status LED | 14 | USB 3.0 port |
| 5 | Cache Dirty LED | 15 | USB 2.0 port |
| 6 | Host Busy LED | 16 | 1 GbE(RJ-45) ports |
| 7 | HDD 0 Fail LED | 17 | SAS-12G wide port |
| 8 | HDD 1 Fail LED | 18 | SAS-12G wide port Link LED |
| 9 | 10 GbE(SFP+) ports | 19 | D-Sub VGA port |
| 10 | 10 GbE(SFP+) port 1 Link LED | 20 | HDD |
2. Initial Setup
For the initial setup, EonServ requires at least basic hardware and software installations before it can be deployed for specific application purposes and volume production. If you are a current EonServ 7000 series user, please refer to the Hardware and Software Installation Manuals that came with your system for the complete setup process.
Hardware Installation
Please install the following hard drives for your EonServ 7000 series:
- At least one system drive
- At least 4 data drives
*Refer to Hardware Installation Manual for full details.
Software Installation
To set up EonServ 7000 series software components, please follow the steps below:
- Set up the boot device order in BIOS (see section 2.2.1)
- Install the desired operating system (see section 2.2.2)
- Install drivers for your operating system (see section 2.2.3)
- Install SANWatch management software (see section 2.2.4)
- Install the desired application software (see section 2.2.5)
Volume Production
Once the system has been trial tested then it is ready for volume production.
- Pilot production (see Volume Production in Appendix section)
- Mass volume production (see Volume Production in Appendix section)
2.1 Hardware Installation
The system requires the installation of at least one system drive. For detail installation procedures, please refer to the hardware manual on the CD that came with the system for details.
2.2 Software Installation
The software installation procedure includes setting up the BIOS (for OS installation), OS installation, OS driver installation, SANWatch installation and application software installation. If you are a current EonServ 7000 series user, you can find the supported operating system drivers on the CD that came with your system.
2.2.1 Setting up BIOS
Before you can install an operating system on your system, you must setup the BIOS to boot from the desired device. To do this, please follow the instructions below. Please also refer to the document EonServ OS Driver Installation Guide for more details.
- Press F2 to access the motherboard BIOS when powering up the system.
- Go to 'Boot' tab and select the desired boot device as Boot Option #1.
- Save and exit the BIOS.
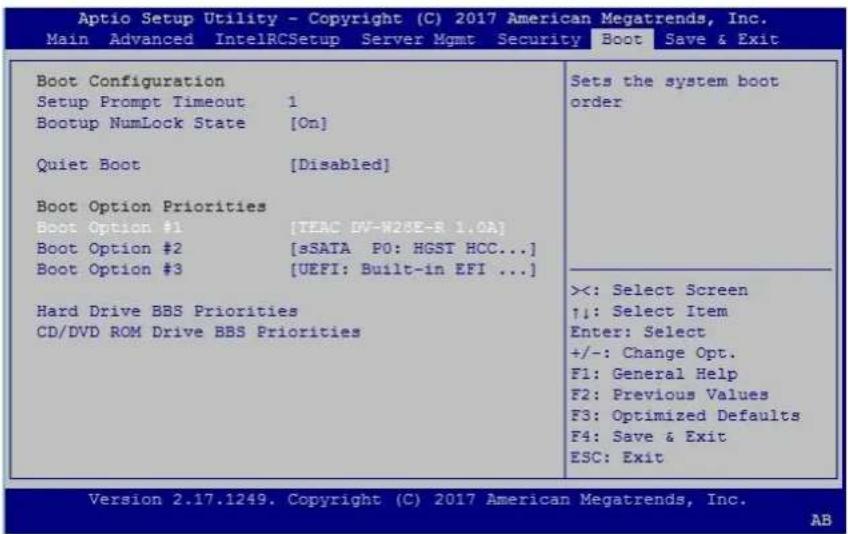
text_image
Aptio Setup Utility - Copyright (C) 2017 American Megatrends, Inc. Main Advanced IntelRCSetup Server Mgmt Security Boot Save & Exit Boot Configuration Setup Prompt Timeout 1 Bootup NumLock State [On] Quiet Boot [Disabled] Boot Option Priorities Boot Option #1 [TEAC DV-W28E-R 1.0A] Boot Option #2 [sSATA P0: HGST HCC...] Boot Option #3 [UEFI: Built-in EFI ...] Hard Drive BBS Priorities CD/DVD ROM Drive BBS Priorities Sets the system boot order ><: Select Screen ↑: Select Item Enter: Select +/-: Change Opt. F1: General Help F2: Previous Values F3: Optimized Defaults F4: Save & Exit ESC: Exit Version 2.17.1249. Copyright (C) 2017 American Megatrends, Inc. AB2.2.2 Installing Operating System
EonServ 7000 series drivers support ONLY the following operating systems:
- Windows 10
● Windows Server 2012 R2 64-bit - CentOS 7.2
Follow the installation procedure for your operating system as described in your operating system's installation guides.

NOTE
Upon system reboot, enter the BIOS again, go to 'Boot' tab and make sure the installed system drive is the first device to boot.
2.2.3 Installing Drivers for Your Operating System
Once the OS has been installed, you may install the driver for the OS.
Installing Drivers for Windows Server 2012 R2
Open Computer management → device manager. Find "!" devices.

text_image
Device Manager File Action View Help WIN-LO26B0BSHI Audio inputs and outputs Computer Disk drives Display adapters DVD/CD-ROM drives Human Interface Devices IDE ATA/ATAPI controllers Keyboards Mice and other pointing devices Monitors Network adapters Other devices SCSI Controller SM Bus Controller Ports (COM & LPT) Print queues Processors Sound, video and game controllers Storage controllers System devices Universal Serial Bus controllersInstall driver for the following devices:
- SM Bus Controller: Intel C220 chipset driver [SetupChipset.exe]
- SCSI controller: Infortrend RAID communication driver [ift_raid.sys]
Installing Drivers for Linux CentOS
- Linux CentOS System Driver Installation
Use the software update feature of your Linux operating system to install the latest drivers.
Note: If the software update feature fails, check EonServ's Internet connection and try again.
- Linux CentOS RAID Driver Installation
On the installation disc of EonServ, search for the following files and navigate to the folder which contains them:
• vscsihba.ko
- ift_driver_install.sh
Execute the following command, where the "i" option represents "install": sudo sh ift_driver_install.sh i
2.2.4 Installing SANWatch
SANWatch is the proprietary software suite that enables you to easily configure and manage Infortrend storage systems. SANWatch can be accessed through a web browser as long as both the computer and the subsystems are online. You are no longer required to install complex desktop application to your local computer: everything is always available over the network.
SANWatch Installation & Setup
For Windows
From the installation CD, open SANWatch.exe, and from the navigation menu that appears, choose SANWatch GUI Software Installation, and then select Windows Platform under SANWatch Management Tool. Then, follow the installation steps to complete the process.

SANWatch® GUI Software Installation
- SANWatch® Management Tool - Windows Platform
- Linux Platform (run linux.sh) - Solaris Platform (run unix.sh)
For Linux CentOS
Locate the "SANWatch" folder on the installation CD and copy it to your computer.
Open the command line utility of your OS (such as Terminal for Linux), and log into the command line shell as root.
Locate the "SANWatch" folder copied to your computer, and then browse its contents to make sure the "linux.sh" script is in the folder.
[root@localhost ~]# cd <computer_path>/SANWatch/
[root@localhost <computer_path>/SANWatch]# ls -l
...
-rw-r--r--. 1 root root 4279 Jun 23 19:55 linux.sh
...
-rw-r--r--. 1 root root 2037 Jun 23 19:55 unix.sh
Make "linux.sh" executable, and then execute it.
[root@localhost <computer_path>/SANWatch]# chmod +x linux.sh
[root@localhost <computer_path>/SANWatch]# ./linux.sh
Then, follow the installation steps to complete the process.
2.2.5 Installing Application Software
Once you have the system drive, data drive, OS, OS driver and management software installed, you may begin to install the application software relevant for your storage server applications.
Appendix
Dimensions
2U series
| Dimensions | With chassis ears & protrusions |
| Height | 88.00mm |
| Width | 447.40mm |
| Length | 650mm |
3U series
| Dimensions | With chassis ears & protrusions |
| Height | 130.00mm |
| Width | 447.40mm |
| Length | 650mm |
Environment Requirement
| Humidity | 5 to 95% (non condensing – operating and non-operating) |
| Temperature | Operating: 0^ to 40^ Non-operating: -40^ to 60^ |
| Altitude | Operating: Sea level to 12,000ftPackaged: Sea level to 40,000ft |
| Shock (Half-sine) | Operating: 5G, half-sine, 11ms pulse widthNon-operating: 15G, half-sine, 11ms pulse width |
| Vibration | (Random)Operating: 5 to 500Hz, 0.25Grms, X/Y/Z, 30minNon-operating: 5 to 500Hz, 1.0Grms, X/Y/Z, 30min(Sine)Operating: 5 to 500Hz, 0.2Grms, X/Y/Z Sine, 1hr/sweepNon-operating: 5 to 500Hz, 1.0Grms, X/Y/Z Sine,1hr/sweep |
| Acoustic Noise | 65dBA boundary, 60dBA normal |
Certifications
| Safety | UL 60950-1, 2nd EditionBSMI CNS 14336-1: 99 年版CB IEC 60950-1:2005 (Second Edition) + Am 1:2009 + Am 2:2013EAC TP TC 004/2011, TP TC 020/2011 |
| EMC | CE EN 55032:2012 +AC:2013 / EN61000-3-2:2014 / EN 61000-3-3: 2013 / EN 55024:2010+A1:2015BSMI (CNS 13438)FCC (FCC Part 15,subpart B ) |
| Environment | IEC 60068-2MIL-STD-810E/883EISTAASTM-D3332IPC-TM-650 |
| Others | ISO7779/3744RoHSMicrosoft WHQL-Windows Server 2003 |
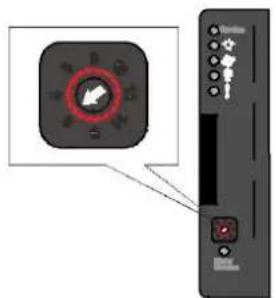
JBOD Expansion
Setting JBOD IDs
Use a small flat blade screwdriver to set the JBOD enclosure ID(s). A different ID number must be allocated for each JBOD.
text_image
Diagram showing a device control panel with a highlighted circular button and directional arrows, likely indicating a system or interface.Making Connections
1. Cabling rules:
Host system (HBA) to JBOD: SFF-8644/SFF-8644 cable
JBOD to JBOD: SFF-8644/SFF-8644 cable
2. Connection rules:
- Connect EV7000 from the OUT port to JBOD IN port.
- JBODs can connect only from one OUT to the IN port of another JBOD (Daisy Chain).
- JBOD OUT to JBOD OUT or JBOD IN to JBOD IN connection is not allowed.
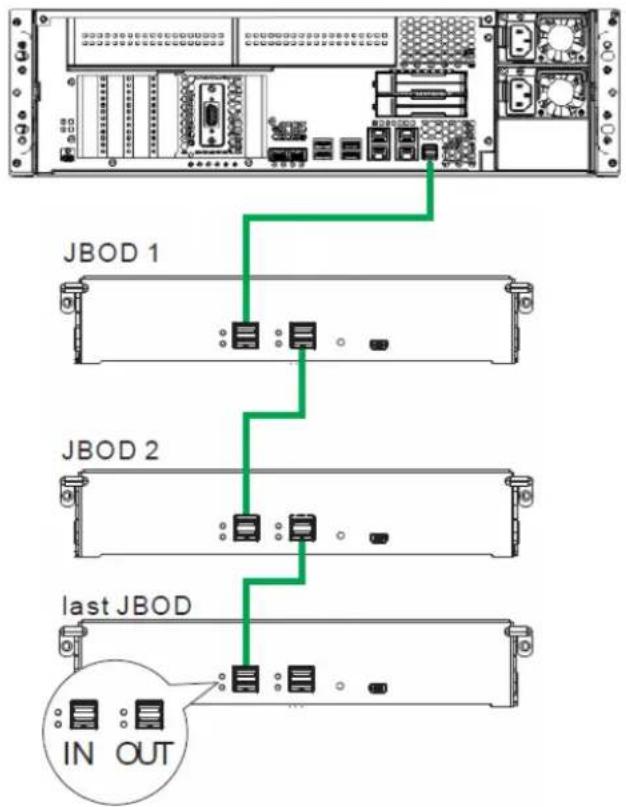
text_image
JBOD 1 JBOD 2 last JBOD IN OUTVolume Production
When you have completed the basic hardware and software setup, and have your specific application software installed. Then you are ready to test the system with designated task(s) and in desired environment(s). Once the system has been tested and approved, you may then consider replication in volume for distribution.
Create Source Image File
You can create a replica of the system drive so it can be quickly applied to EonServ systems to suit your needs.
Clone System Drive
For small volume replication, you may use image creation software for small volume pilot runs. Once the pilot run has been approved, it is ready for mass volume replication. For mass production, you may use hard drive duplicators to mass produce the OS system drive.
OS Software Registration (if any)
Please do remember to register or purchase volume licensing for your OS!