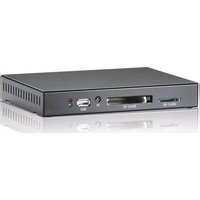
PA200 - Media player Geovision - Free user manual and instructions
Find the device manual for free PA200 Geovision in PDF.


| Product Type | Digital Media Player |
| Brand | Geovision |
| Model | PA200 |
| Dimensions (W x H x D) | 182.5 x 29 x 141.5 mm (7.19 x 1.14 x 5.58 in) |
| Net Weight | 615 g (1.36 lb) |
| Power Supply | AC/DC adapter 12V 3.0A 36W (included) |
| Power Consumption | 36 W max |
| Storage Media Support | USB 2.0 (backward compatible), SD Card (Class 6), CF Card Type I/II |
| Video Output | HD (up to 720p), VGA (up to 720p), A/V (CVBS + Stereo Audio, 480p) |
| Video Resolution | 480p, 720p |
| Audio Output | Stereo audio via A/V cable, HDMI audio, VGA audio (line out) |
| Supported Video Formats | MPEG, AVI (with subtitle support), others (multimedia support) |
| Supported Audio Formats | MP3, WMA, etc. (multimedia support) |
| Supported Photo Formats | JPEG, PNG |
| TV Standard | NTSC / PAL |
| Remote Control | IR remote control included |
| External Control | RJ45-style port for external buttons (play, stop, pause, power) |
| Firmware Upgrade | Via USB, SD, or CF card (automatic detection) |
| Subtitle Support | External .srt files for AVI videos |
| Operating Temperature | 0 °C to 40 °C (32 °F to 104 °F) |
| Storage Temperature | 0 °C to 60 °C (32 °F to 140 °F) |
| Operating Humidity | 20% to 80% |
| Storage Humidity | 5% to 90% |
| Warranty | 1 year from purchase |
| Maintenance & Cleaning | Use a soft, dry cloth. Do not use liquid cleaners. Keep away from water. |
| Safety | Do not use near water. Avoid electrical short circuits. Use only supplied adapter. |
| Spare Parts & Repairability | No user-serviceable parts. Modifications void warranty. Repairs only by manufacturer. |
Frequently Asked Questions - PA200 Geovision
User questions about PA200 Geovision
0 question about this device. Answer the ones you know or ask your own.
Ask a new question about this device
Download the instructions for your Media player in PDF format for free! Find your manual PA200 - Geovision and take your electronic device back in hand. On this page are published all the documents necessary for the use of your device. PA200 by Geovision.
USER MANUAL PA200 Geovision
natural_image
Front view of a black USB and CD card device with ports labeled (USB, IR, CF CARD, SD CARD) and no visible text beyond labels.WARRANTY
The products are warranted against defects in workmanship and material for a period of one (1) year from the date of purchase provided no modifications are made to it and it is operated under normal conditions and in compliance with the instruction manual.
The warranty does not apply to:
- Product that has been installed incorrectly, this specifically includes but is not limited to cases where electrical short circuit is caused.
- Product that has been altered or repaired except by the manufacturer (or with the manufacturer's consent).
· Product that has subjected to misuse, accidents, abuse, negligence or unusual stress whether physical or electrical.
· Ordinary wear and tear.
Except for the above express warranties, the manufacturer disclaims all warranties on products furnished hereunder, including all implied warranties of merchantability and fitness for a particular application or purpose. The stated express warranties are in lieu of all obligations or liabilities on the part of the manufacturer for damages, including but not limited to special, indirect consequential damages arising out of or in connection with the use of or performance of the products.
CAUTION
Whilst care has been taken to provide as much detail as possible for use of this product it cannot be relied upon as an exhaustive source of information. This product is for use by suitably qualified persons who understand the nature of the work they are doing and are able to take suitable precautions and design and produce a product that is safe and meets regulatory requirements.
SAFETY INSTRUCTION
Do not use this product near water, for example, near a bathtub, wash bowl, kitchen sink, laundry tub, in a wet basement or near a swimming pool.
LIMITATION OF LIABILITY
The manufacturer's liability for damages to customer or others resulting from the use of any product supplied
hereunder shall in no event exceed the purchase price of said product.
TRADEMARKS
The following are trademarks of iDi Signage Inc.:
· iDi Signage Inc.
- SQP Series
CompactFlash is a registered trademark of SanDisk Corporation.
Other brands and products are trademarks of their respective holder/s.
CONTACT DETAILS
ASIA: iDi SInnage Inc.
9F., No. 250, Sec 1, Neihu Road.
Neihu Dist., Taipei City 114, R.O.C.
Taiwan, R.O.C.
Specifications subject to change without notice
Contents
Chapter 1 Introduction ...... 2
1.1 Features....2
1.2 Packing List....2
1.3 Overview....3
1.3.1 Front View 3
1.3.2 Back View....4
1.3.3 External Control....5
1.4 The IR Remote Control....6
Chapter 2 Getting Started....8
Chapter 3 System Setup....9
3.1 The Main Page of the Setup Menu 9
3.2 Setting the Display Effects 10
3.3 Setting the System Preferences 12
3.4 Upgrading the Hardware Firmware....13
Chapter 4 Playing the Media Files....14
4.1 Adding Subtitles to the Video Files .... 14
Specifications 15
Chapter 1 Introduction
PA 200 is a digital media player, which is designed to play the digital audio and video contents on TVs, computer monitors, or any compatible display devices. The device is built-in a USB port, a SD card slot and a CF card slot for connection to storage devices used for storing the media files. It also provides various output methods, including HD, A/V and VGA connection, making it flexible to play the audio and digital contents on various entertainment devices.
1.1 Features
• Multimedia support
• Video resolution of 480p, 720p (VGA and HD).
• Video Output of A/V (CVBS + Stereo Audio), HD and VGA
- SD card support
- CF card support
• USB storage device support
- IR remote control
1.2 Packing List
- PA 200 device × 1
- AC/DC adapter × 1 (12 V, 3.0 A, 36 W)
- IR remote control × 1
- A/V Cable × 1
1.3 Overview
This section identifies the components of the PA 200.
1.3.1 Front View
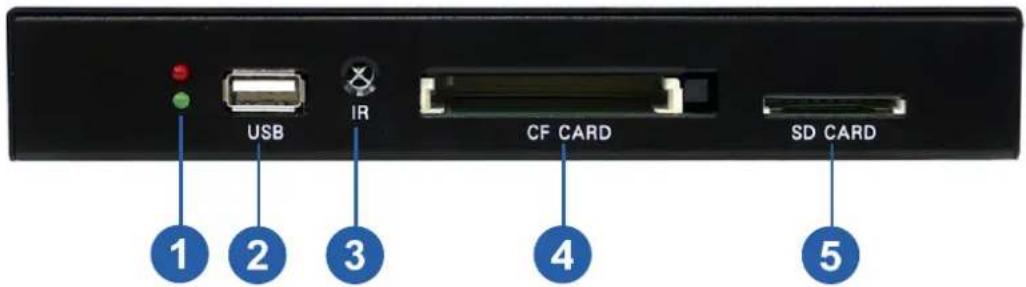
Figure 1-1
| No. | Name Function | |
| 1 | LED Indicators | The green LED is on, indicating the power is supplied.The red LED is on, indicating the USB port, the CF card, or the SD card slot is used. |
| 2 | USB Connect the USB storage device. | |
| 3 | IR | Built-in IR receiver to receive the IR signals from the IR remote control. |
| 4 | CF Card Connect the CF memory card. | |
| 5 | SD Card Connect the SD card. | |
1 Introduction
1.3.2 Back View
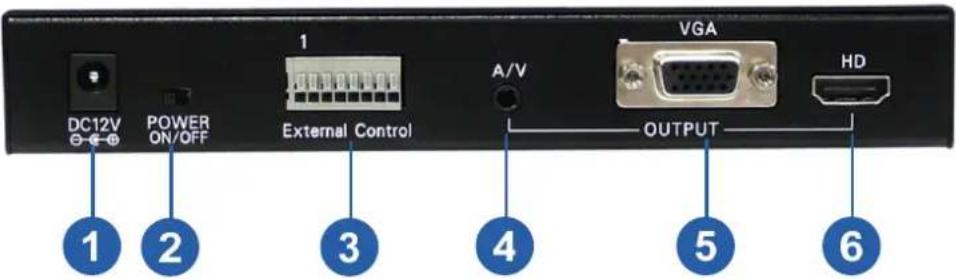
Figure 1-2
| No. | Name Function | |
| 1 | DC 12V Connect the supplied power adaptor. | |
| 2 | Power ON/OFF Switch on the power. | |
| 3 | External Control | Connect to the external control devices. See 1.3.3 External Control. |
| 4 | A/V | A/V interface for transmitting digital data with video resolution of 480p. |
| 5 | VGA | VGA interface for transmitting digital data with video resolution up to 720p. |
| 6 | HD | HD interface for transmitting digital data with video resolution up to 720p. |
1.3.3 External Control
With the built-in the External Control ports (No. 3, Figure 1-2), you can connect the PA 200 to external control devices, such as control buttons, if necessary. It is required to use the wire AWG 28\~20 for connection. The pin functions are as the followings:
| Pin Number Function | |
| 1+2 | Power |
| 3+4 | Play |
| 5+6 | Stop |
| 7+8 | Pause |
The figure below illustrates how to use the External Control ports to connect to the external control devices:

Figure 1-3
1.4 The IR Remote Control
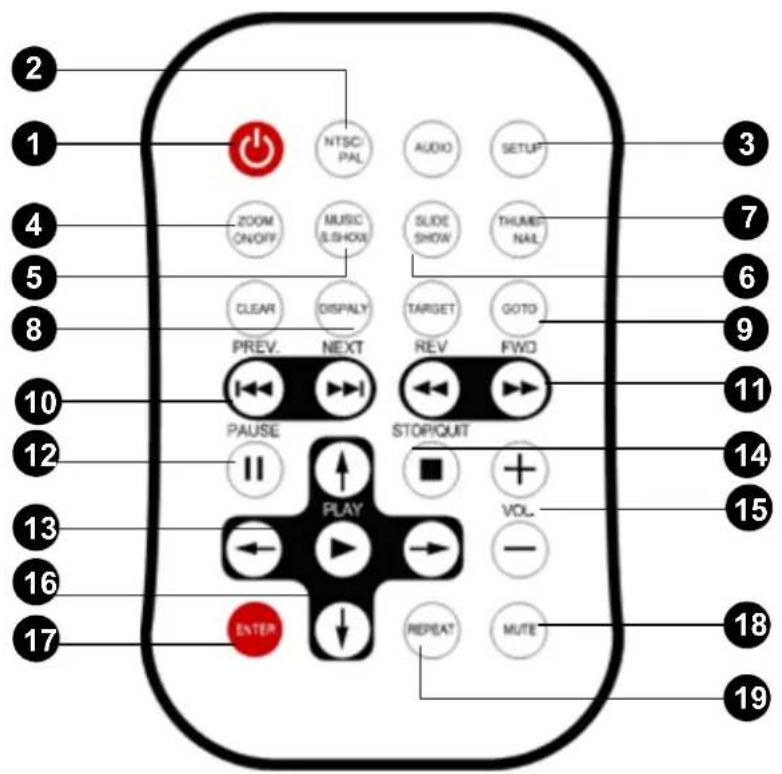
Figure 1-4
| No. | Name Function | |
| 1 | Standby | Turn into the Standby mode. In the standby mode, the screen turns off to save the power consumption. Press the button again to return to the ON mode. |
| 2 | NTSC/ PAL | Press NTSC/ PAL, NEXT and then MUTE to restore the default resolution of 480p, when no storage device is connected. |
| 3 | SETUP Enter the setup Menu. | |
| 4 | ZOOM ON/OFF Zoom in the image. | |
| 5 | MUSIC S.SHOW | Display the images and the audio files in the state of the thumbnail display. |
| 6 | SLIDESHOW Display 14 types of the display transition effects. | |
| 7 | THUMBNAIL Display the scaled-down images. | |
| 8 | DISPLAY Display the information of the playing media file. | |
| 9 | GOTO Enter the File List. | |
| 10 | PREV./ NEXT Move to the previous or the next page. | |
| 11 | REV/ FWD Reverse or forward the playback. | |
| 12 | PAUSE Pause the playback. | |
| 13 | PLAY Play the media files. | |
| 14 | $TOP/ QUIT Stop playing the media files. | |
| 15 | VOLUME CONTROL Increase or decrease the volume. | |
| 16 | MENU CONTROL Move up, down, right and left in the setup menu. | |
| 17 | ENTER Select an item from the setup menu. | |
| 18 | MUTE Mute the volume. | |
| 19 | REPEAT Set the repeat mode. There are repeat All, One and Off for options. | |
Chapter 2 Getting Started
This section describes the basic connections to get the PA 200 working with a display device, such as a TV or a computer monitor.
- Connect the PA 200 to the display device, using one of the three video output interfaces (No. 4, 5 or 6, Figure 1-2).
A. To view videos with resolution up to 720p, connect to the display device built-in a VGA or HD interface.
B. To view videos with resolution of 480p, connect to the display device built-in an A/V interface.

flowchart
graph TD
    A["External Device"] -->|USB| B["USB Port"]
    A -->|USB| C["USB Port"]
    A -->|USB| D["USB Port"]
    B --> E["Computer 480P"]
    C --> F["Computer 720P"]
    D --> G["Computer 720P"]
Figure 2-1
- Plug the supplied power adapter into the DC socket (No. 1, Figure 1-2).
- Switch the power to the ON marking position to turn on the PA 200 (No. 2, Figure 1-2).
Chapter 3 System Setup
Before playing the media files, such as images, music and videos, with the PA 200, you can customize the system settings from the setup menu. To select items from the setup menu, use the MENU CONTROL buttons (No. 16, Figure 1-4) and the Enter button (no. 17. Figure 1-4) on the IR remote control.
3.1 The Main Page of the Setup Menu
- Turn on the PA 200 and the connected display device. The default initial screen appears.
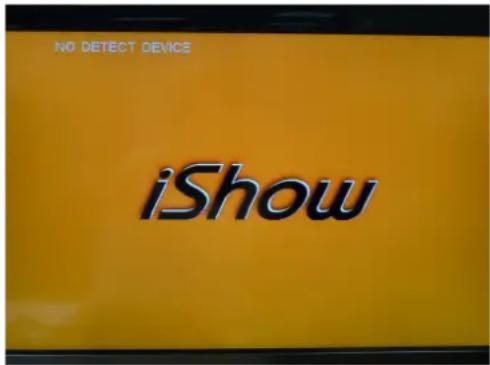
Figure 3-1
- Press the SETUP button on the IR remote control (No. 3, Figure 1-4) to enter the main page of the setup menu. The numbers (e.g. 461S-V100_100702) at the page bottom indicate the firmware version of PA 200.

Figure 3-2
■ PHOTO SETUP: Select this option to set the display effects.
■ RREFERENCES: Select this option to set the system preferences.
■ EXIT SETUP: Select this option to exit the setup menu.
3 System Setup
3.2 Setting the Display Effects
In this section, you can select the display effects of the image files on the connected display device.
- Select the PHOTO SETUP option (Figure 3-2). This menu appears.

Figure 3-3
■ DIGEST STYLE: Specify the display of the thumbnail window.
- 2 × 2 MATRIX: Display four thumbnails (2 × 2) in a set in the thumbnail window. When you press the THUMBNAIL button on the IR remote control (No. 7, Figure 1-4), the thumbnail window looks similar as shown below. Use the MENU CONTROL buttons (No. 16, Figure 1-4) to view more thumbnails.

Figure 3-4
- 3 × 3 MATRIX: Display six thumbnails (3 × 3) in a set in the thumbnail window. When you press the THUMBNAIL button on the IR remote control (No. 7, Figure 1-4), the thumbnail window looks similar as shown below. Use the MENU CONTROL buttons (No. 16, Figure 1-4) to view more thumbnails.
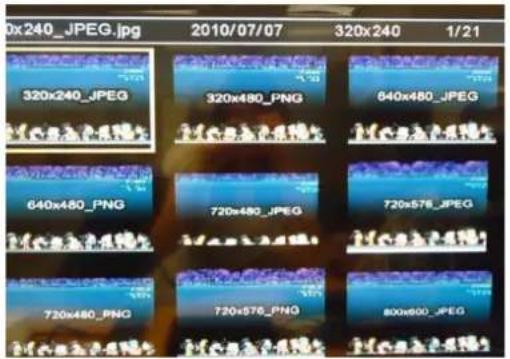
Figure 3-5
■ SLIDESHOW MODE: Select to play the images manually or automatically.
- MANUAL: Play the images manually by pressing the NEXT button on the IR remote control (No. 10, Figure 1-4) to move to the next page.
- AUTO: Play the images automatically by setting the interval time of each slideshow page.
■ INTERVAL TIME: Select the interval time of each image from 1, 3, 5, 10, seconds.
■ TRANSITION MODE: Select the transition mode from the following 13 options: FULL SCREEN, TOP->BOTTOM, T/B → CENTER, CENTER → T/B, BLIND: T → B, LEFT → RIGHT, RIGHT → LEFT, L/R → CENTER, CENTER → L/R, IMPLODE, BLIND: L → R, CROSS FADE, and RANDOM.
■ MAIN PAGE: Return to the main page.
Note: If you select MANUAL for the slideshow mode, you don't need to set the INTERVAL TIME and the TRANSITION MODE.
3 System Setup
3.3 Setting the System Preferences
In this section, you can set the system preferences, such as TV standard or video resolution, for the connected display device.
- Select the PREFERENCES option (Figure 3-2). This menu appears.

Figure 3-6
■ TV DISPLAY: Select NORMAL/ PS for the monitor of 4:3 aspect ratio or select WIDE/ HDTV (16:9) for the HD or the widescreen monitor of 16:9 aspect ratio.
■ TV TYPE: Select NTSC or PAL for the TV standard in your region.
■ RESOLUTION: Select the video resolution from 480P and 720P. The resolution you select still depend on your display device's capacity.
■ AUTO START: Select to automatically play the media files in the order of the file name sorting when a storage device is connected.
- ALL: Play all the media files.
- PHOTO+MUSIC: Play the image files with the audio files.
- PHOTO+VIDEO: Play the image files and the video files.
■ OSD MESSAGE: Display the file information, including the file name, image resolution, the time duration, created date, and the storage device. If you enable this function, the file information will appear on the playing media file when you press the DISPLAY button (No. 9, Figure 1-4) on the IR remote control.
■ SETUP VALUES: Select to restore the default settings.
■ MAIN PAGE: Return to the main page.
3.4 Upgrading the Hardware Firmware
We will periodically release the updated firmware on the website. You can also find the updated firmware, if available, from the Software CD. To upgrade the hardware firmware, follow the steps below.
- Store the updated firmware file to a USB storage device, a CF card or a SD card.
- Connect the USB storage device or the memory card to the PA 200. The firmware upgrade runs automatically, and the PA 200 restarts after the firmware upgrade is complete.
Chapter 4 Playing the Media Files
After you connect the PA 200 with the display device and finish all the settings, you can start to play the media files on the connected display device with PA 200.
- Store the media files to a USB storage device, a CF card or a SD card. The media files should be compatible with PA 200's specifications. To know the media formats PA 200 supports, see Specifications.
- Connect the storage device or the memory card to the PA 200. The first media file in the order of the file name sorting appears on the screen.
Note: Since the media files play in the order of the file name sorting, you can arrange the files to play in the desired order by naming files.
4.1 Adding Subtitles to the Video Files
You can add subtitles to the video files (.avi) when playing the files with PA 200. To add subtitles, follow the steps below.
- Open a new document file in Microsoft's Notepad or WordPad software.
- Enter the serial number of the subtitle in the first sentence (e.g. 1, 2, 3...etc).
- Enter the subtitle's start time and end time, including the hour, minute and second, in the second sentence. For example, if you want the subtitle to display from the 9^th second to the 17^th second of the video, enter 00:00:09, 000 00:00:17, 000.
- Enter the content of the subtitle in the third sentence. The content can include English characters (both the capital and small letters) and numbers. When you finish the steps above, the document looks similar as the following example.
1
00:00:09, 000→00:00:17, 000
iDi Sinage Inc.
-
To add another subtitle, follow the step 2, 3, and 4. Ensure to leave a line space between two sets of the subtitles.
-
After you finish adding the subtitles, save the document with the same file name as that of the video file, but modify the filename extension to .srt.
- Store the .srt file with other media files in the storage device or the memory card. The subtitles will appear on the screen when the video file is playing.
Note: At step 3, you can also leave a word space to replace the symbol → between the start time and the end time of the subtitle.
Specifications
| Model PA 200 | ||||
| VideoFormat | Multimedia | |||
| Audio Format Multimedia Support | ||||
| Photo Format PNG / JPEG | ||||
| Audio Output | HD VGA A/V | |||
| ○ | X ○ | |||
| Video Output | 480p | ○ ○ ○ | ||
| 720p | ○ ○ | X | ||
| TV Standard NTSC / PAL | ||||
| CF Card Type 1 / 2 | ||||
| SD Card Class 6 | ||||
| USB USB 2.0 Backward Compatible | ||||
| IR Remote Control Yes | ||||
| Storage Temperature | 0 °C ~ 60 °C (32 °F ~ 140 °F) | |||
| Storage Humidity | 5 % ~ 90 % | |||
| Operating Temperature | 0 °C ~ 40 °C (32 °F ~ 104 °F) | |||
| Operating Humidity | 20 % ~ 80 % | |||
| Dimension (W x H x D) | 182.5 × 29 × 141.5 mm (7.19 × 1.14 × 5.58 in ) | |||
| Net Weight | 615 g (1.36 lb) | |||

- WARRANTY
- CAUTION
- SAFETY INSTRUCTION
- LIMITATION OF LIABILITY
- TRADEMARKS
- CONTACT DETAILS
- Contents
- Chapter 1 Introduction ...... 2
- Chapter 2 Getting Started....8
- Chapter 3 System Setup....9
- Chapter 4 Playing the Media Files....14
- Specifications 15
- Chapter 1 Introduction
- Features
- Packing List
- Overview
- Front View
- Introduction
- Back View
- External Control
- The IR Remote Control
- Chapter 2 Getting Started
- Chapter 3 System Setup
- The Main Page of the Setup Menu
- System Setup
- Setting the Display Effects
- Setting the System Preferences
- Upgrading the Hardware Firmware
- Chapter 4 Playing the Media Files
- Adding Subtitles to the Video Files
Brand : Geovision
Model : PA200
Category : Media player