KeyMander 2 Mobile - Gaming accessory ATEN - Free user manual and instructions
Find the device manual for free KeyMander 2 Mobile ATEN in PDF.

User questions about KeyMander 2 Mobile ATEN
0 question about this device. Answer the ones you know or ask your own.
Ask a new question about this device
Download the instructions for your Gaming accessory in PDF format for free! Find your manual KeyMander 2 Mobile - ATEN and take your electronic device back in hand. On this page are published all the documents necessary for the use of your device. KeyMander 2 Mobile by ATEN.
USER MANUAL KeyMander 2 Mobile ATEN
natural_image
Abstract geometric logo with green lightning bolt inside a gray circle (no text or symbols)KALIBER GAMING™
KeyMander™ 2 Mobile
KeyMander 2 Mobile Keyboard/Mouse Adapter For iPhone/iPad & Apple TV
User Manual
This User Manual is provided to help you get the most from your system. It covers all aspects of installation, configuration and operation. An overview of the information found in the manual is provided below.
Chapter 1, Introduction, introduces you to the KeyMander 2 Mobile. Its purpose, features, benefits, and requirements are presented, and its front and back panel components are described.
Chapter 2, Setup, describes how to set up your KeyMander 2 Mobile. The necessary steps for configuring the mouse settings and hardware setup are provided.
Chapter 3, Basic Operation, describes how to use the keyboard, mouse, and PS/Xbox game controller with your KeyMander 2 Mobile.
Chapter 4, Using the K2 Mobile app, explains how to use the KeyMander 2 Mobile App with your KeyMander 2 Mobile, as well as how to create and edit game profiles.
Chapter 5, Firmware Upgrade, explains how to download the firmware upgrade utility and install updates on the KeyMander 2 Mobile.
Chapter 6, Troubleshooting, explains how to solve common issues with the KeyMander 2 Mobile.
The Appendix, provides helpful tips, specifications, and other technical information regarding the KeyMander 2 Mobile.
© 2021 IOGEAR. All rights reserved. “KG Kaliber Gaming”, “IOGEAR” and “Keymander” are registered and other trademarks of, and the Keymander 2 Mobile is a product of, Aten Technology, Inc. “PS4” is a registered trademarks of Sony Interactive Entertainment Inc. “Sony” is a registered trademark of Sony Corporation. “Microsoft” and “Xbox” are registered trademark of Microsoft Corporation. All other trademarks are the property of their respective owners. References to compatible products, such as those produced by Apple, Microsoft, Sony, Google, Bluetooth and USB, are not intended to suggest any endorsement or sponsorship by or affiliation with those product manufacturers. Tested to comply with FCC and CE standards.”
Manual Date: 2-6-2021
Manual Revision: v1.0
Package Contents
1 x 1 GE1337M KeyMander 2 Mobile
1 x 1 Micro USB Cable
1 x 1 Quick Start Guide*
Check to make sure that all the components are present and that nothing got damaged in shipping. If you encounter a problem, contact your dealer.
Read this manual thoroughly and follow the installation and operation procedures carefully to prevent any damage to the unit, and/or any of the devices connected to it.
* Features may have been added to the KeyMander 2 Mobile since this manual was published. Please visit our website to download the most up-to-date version.
Table of Contents
Chapter 1 Introducon.... 1
Overview ....1
Features....2
Requirements ....3
Game Console / Controller ....3
Keyboard and Mouse....3
Audio Support....3
Operang Systems ....3
Components ....4
GE1337M Front View....4
GE1337M Rear View ....4
GE1337M Side View....5
Chapter 2 Setup 7
Connecng Hardware....7
Hardware Installaon and Setup for Gaming Mode ....7
Setup for Oce Mode ....11
Chapter 3 Basic Operaon .... 15
Overview 15
Controller to Keyboard Buon Layout....15
Chapter 4 Using the K2 Mobile app .... 18
Overview ....18
Installing the K2 Mobile app ....18
Opening the K2 Mobile app ....19
Signing Up an Account ....19
Connecng the K2 Mobile app....22
Device Tab 24
Device Sengs....26
Firmware Upgrade ....27
Reset Device....30
Gaming Mode Setup Tutorial....31
Oce Mode Setup Tutorial....32
Connecon....33
Changing Game Prole....34
Eding Game Prole 35
Game Center Tab....36
Library Tab....37
Account 38
Changing Username ....40
Changing Password ....41
Backing Up and Restoring Game Proles....42
Downloading a Profile from Game Center 45
Adding a Game Prole 48
Eding, Deleng and Sharing a Prole....51
Uploading & Customizing Controls for a Prole....55
Uploading a Prole....55
Customizing Controls for a Prole 56
Sensitivity....57
General Mode 58
General Mode Advanced Sengs....59
Aim Mode (Aim-Down-Sight)....71
Walk Mode....73
Weapon Mode ....74
Mapping....75
Macro Mode....87
Chapter 5 Firmware Upgrade ....91
The Firmware Upgrade Utility 91
Before You Begin....91
Starng the Upgrade....91
Upgrade Succeeded 94
Upgrade Failed 94
Firmware Upgrade Recovery 95
Chapter 6 Troubleshoong 96
Troubleshoong 96
LED Indicator Behavior 97
Appendix 98
Understanding Mouse Performance 98
Sensitivity Sengs 98
Maximum Turn Speed (In-Game)....99
Turn Speed Sengs (K2 Mobile app).... 101
Deadzone Sengs (K2 Mobile app and In-Game) 101
Resoluon (Mouse Hardware/Soware and K2 Mobile app)...... 101
Technical Support.... 103
Internaonal 103
North America....103
Safety Instrucons.... 104
General.... 104
Specicaons.... 106
Limited Warranty 107
[This page intenonally le blank.]
Overview
The KeyMander 2 Mobile Keyboard/Mouse Adapter for Mobile Devices offers gamers the ability to use a keyboard and mouse on a compatible iPhone, iPad or Apple TV device with the latest Apple Arcade games, Google® Stadia™ games, and App Store apps. Play popular mobile titles like first person shooters (FPS) like Call of Duty®: Mobile, Doom® II, Fortnite™ or Minecraft™, Roblox™ and others with your keyboard and mouse. Dominate the leaderboards with increased accuracy, speed, functionality over traditional touch controls. The KeyMander 2 Mobile has an easy to use app that allows you to customize all game controller buttons for use with a keyboard and mouse. Advanced features allow you to custom map keys, create macros, set turbo buttons, and adjust the mouse sensitivity. Quick macro setup allows you to program up to 8 button press combinations and set it to a single key, so one press executes multiple commands.
The KeyMander 2 Mobile app also allows you to download preconfigured game profiles, as well as create, edit and share your own profiles, then back them up to our cloud storage service.
With the KeyMander 2 Mobile you can create an unlimited number of keyboard and mouse configuration profiles - each suited for specific game play. Profiles can be switched and configured during game play for quick access. The KeyMander 2 Mobile gives gamers the ability to customize and fine tune all controls for the expert advantage with every game.
The KeyMander 2 Mobile allows you to:
Use a keyboard & mouse in place of your controller on Xbox Series X/S, Xbox One, Xbox 360, PS4, PS3 & Nintendo Switch game systems
- Use a keyboard and mouse in place of your fingers or controller on iPad/iPhone/Apple TV
◆ Use a keyboard & mouse with apps for email, messaging, drawing, etc.
- Play FPS (First Person Shooter) and TPS (Third Person Shooter) games like Fortnite and Call of Duty Mobile with increased speed and accuracy
- Simultaneously use a keyboard, mouse, and controller
- Connect your iOS smartphone using the K2 Mobile App to provide custom key mapping, mouse sensitivity & more
- Download game profiles from the Game Center in the K2 Mobile app or create custom profiles for specific games & scenarios
◆ Make on-the-fly adjustments while live gaming - Enable traction control to improve accuracy when turning onto targets behind you
- Create Macro commands which perform up to 8 controller commands with a single key press
- Use Turbo Mode to make semi-auto guns operate as full-auto guns in compatible games
Share game profiles with friends and backup your profile library to our free cloud storage - Receive OTA (over-the-air) firmware upgrades for easier and faster product updates
Features
Gamepad Emulation transforms keyboard and mouse signals into game controller signals for keyboard and mouse use on an iPhone, iPad or Apple TV.
- Easy gamepad to keyboard key mapping and advanced configuration via KeyMander 2 Mobile app
- Macro editor allows for detailed configuration and command sequence control of controller buttons
- Macros can combine up to 8 controller commands into a single key
- Turbo Mode can turn semi-auto weapons into full-auto weapons
◆ Supports iOS Remote Play with PS4 and Xbox One
Hot Swap between the controller and keyboard/mouse instantly
K2 Mobile iOS app provides configuration for custom key mapping, mouse sensitivity, macro functions and more
- Download and share game profiles from the K2 Mobile App for KeyMander 2 Mobile
◆ Supports over 1000+ mobile and cloud based games from Apple Arcade and Google Stadia
Note: The KeyMander 2 Mobile does not support use with PS1, PS2, or the original Xbox consoles.
Requirements
Game Console / Controller
- Sony PlayStation brand PS4 Dualshock V2 wireless controller connected via included micro USB cable
- Microsoft brand Xbox One wireless controller w/Bluetooth (Model 1708) connected via included micro USB cable
- iOS 13+ device with Bluetooth 4.0+ supporting Bluetooth Low Energy (BLE)
Keyboard and Mouse
◆ 1 USB Keyboard and Mouse
Audio Support
- Audio is not supported on the gamepad controller. Connect a headset or Bluetooth audio device directly to the iPhone, iPad or TV (in the case of the Apple TV).
Operating Systems
Supported operating systems for the K2 Mobile app, are shown in the table, below:
| Software Platform | Version |
| Android | Version 7 and up |
| iOS | Version 10 and up |
Components
GE1337M Front View
| No. | Component | Description |
| 1 | LED Indicator | The LED indicator provides system alerts and feedback for different operating modes. |
text_image
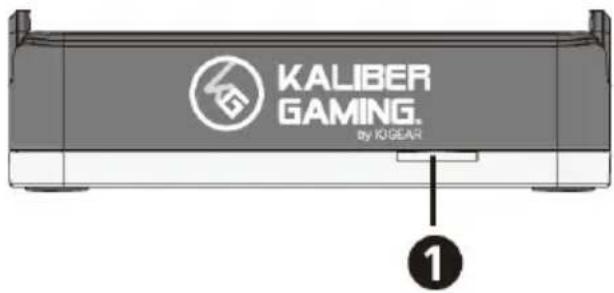
KALIBER GAMING. by KIGEAR ①GE1337M Rear View
| No. | Component | Description |
| 1 | Keyboard USB Port | Plug a USB keyboard into this port. |
| 2 | Mouse USB Port | Plug a USB mouse into this port. |
| 3 | Power Port | This USB connector provides power to the unit.KeyMander 2 Mobile will not function without the power cable connected to a USB power supply (minimum 2A output) such as a charger for a tablet or smartphone. |

text_image
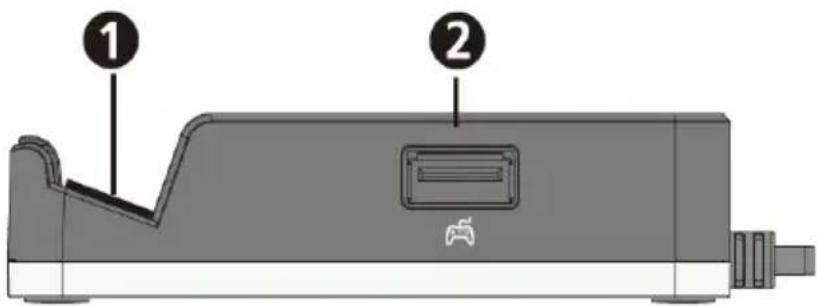
Diagram of a device rear panel with labeled ports and buttons, showing front, back, and side views.GE1337M Side View
| No. | Component | Description |
| 1 | Mobile Device Stand | Insert the polycarbonate device back support into the base with the rubber pad placed to the top. The stand will support iPhone and iPad while in use. |
| 2 | Gamepad Port | Plug the PS4 Dualshock V2 or Xbox One Model 1708 game controller into this port.. |
text_image
Diagram of a device casing with labeled parts, showing two numbered components and a game controller icon.[This page intenonally le blank.]
Connecting Hardware
Hardware Installation and Setup for Gaming Mode
To setup the KeyMander 2 Mobile with your device, follow the steps below.
- Connect your wired controller to the Gamepad Port using the supplied Micro USB Cable.

natural_image
Diagram of a gaming device with a game controller above it, showing no text or symbols on the device itself.- Connect your USB keyboard and mouse to the Keyboard Port and the Mouse Port.
Note: If you are using a wireless keyboard / mouse set, plug the receiver into the Keyboard Port.

natural_image
Diagram of a computer setup with two binders and a mouse, no text or symbols present- To activate the GE1337M, connect the Power Connector to a 5V2A DC power supply.

natural_image
Diagram of a device with a battery and plug, connected to a lightning bolt (no text or symbols)- Pair up the GE1337M with your iOS device.
a. Tap Settings on your iOS device.
b. Select Bluetooth and make sure it is turned on.
c. Find the name of your wireless controller under Other Devices.
- Xbox Wireless Controller
• PS4 DUALSHOCK 4 Wireless Controller
d. Tap the name to connect the wireless controller with your iOS device that you will use for gaming.
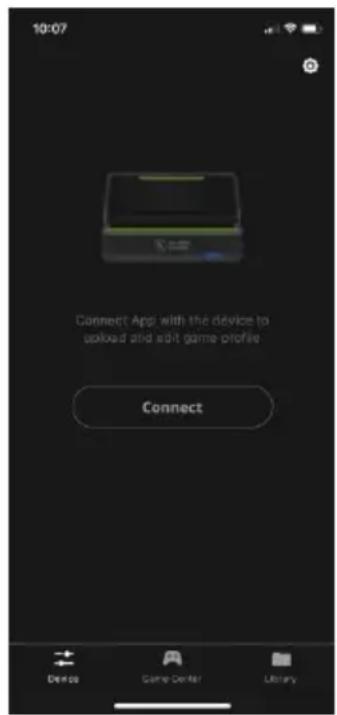
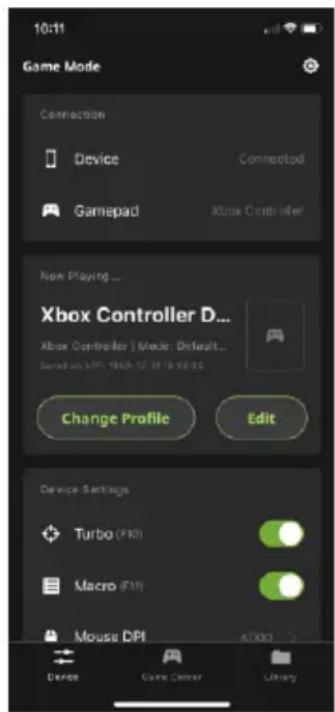
- Download and install KeyMander 2 Mobile App for configuration. Press Alt+F2 to pair the GE1337M with your K2 Mobile App. Press the Connect button on the Device tab in the K2 Mobile App (Image 1). Next, select GE1337M under DEVICES (Image 2). When the Device Tab shows the current profile and device settings it is ready to configure the port connections (Image 3).
Note: If you are using iPhone / iPad with iOS version 13 or above, please make sure to enable the Bluetooth Permission for this app.
text_image
10:07 Connect Appl with the device to upload and edit game profile Connect Device Game Center LibraryImage 1

text_image
10:08 Close Connect Device Turn on Bluetooth Press Alt+F2 to search device IOGEAR GE1337M ConnectImage 2
text_image
10:11 Game Mode Connection Device Connected Gamepad Xbox Controller Non Playing... Xbox Controller D... Xbox Controller | Mode: Default... Sorted on AWD 1960-10 31:18:00:00 Change Profile Edit Device Settings Turbo (F10) Macro (F11) Mouse DPI Device Game Center LibraryImage 3
Note: If you are using iPhone / iPad with iOS version 13 or above, please make sure to enable the Bluetooth Permission for this app. If you are using an Android phone / tablet, please make sure to enable the GPS function before you begin to use the KeyMander 2 Mobile
App. The KeyMander 2 Mobile App may be used on Android devices for configuration of the unit, but the unit is not compatible with Android devices for Game Mode and Office Mode use.
- Create a user account to manage your game profiles. For more information, see Error! Reference source not found.
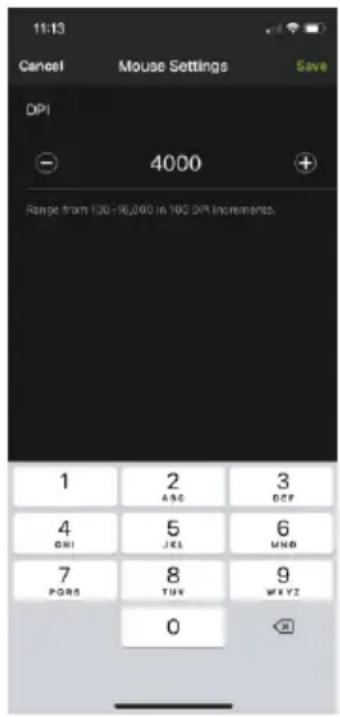
- The default Mouse DPI setting in the K2 Mobile App is 4000 and you need to set the mouse to match or choose an alternate setting. On the Device tab, scroll down and tap Mouse DPI (Image 4) then on the Mouse Settings page (Image 5) enter the DPI setting of your mouse. While our recommended settings of 3500-4000 DPI work fine for most games, we do encourage you to test other DPI settings. You may find that higher settings like 8000 DPI or more may work better for you with some games, depending upon things like aim-assist built, etc.

text_image
11:14 New Playings... Default PS4 PS4 | Mode: Default Mode 1 Send on APP 2019-07-23 10:30:43 Change Profile Edit Device Settings Microphone (F8) Set Holiday Turbo (F10) Macro (F15) Gamepad Vibration (F12) Mouse DPI 4000 > Device Demo Center LibraryImage 4
text_image
11:13 Cancel Mouse Settings Save DPI 4000 Range from 100-16,200 in 100 DPI increments. 1 2 3 ABC DEF 4 5 6 GHI JKL UNB 7 8 9 PORT TUX WAYZ 0Image 5
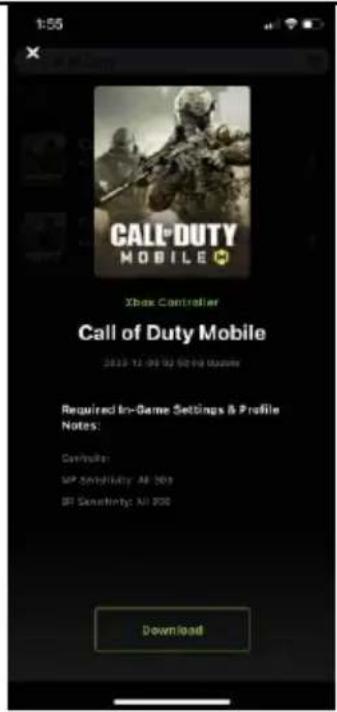
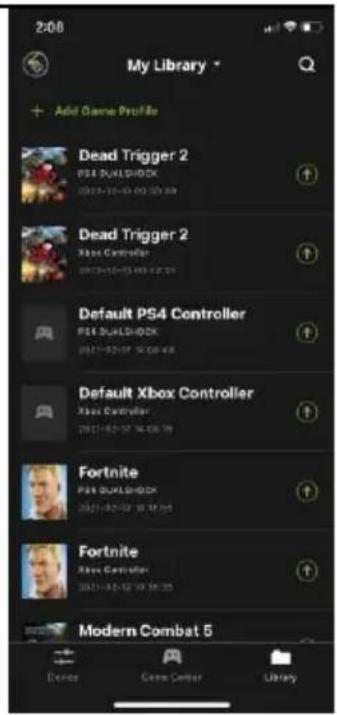
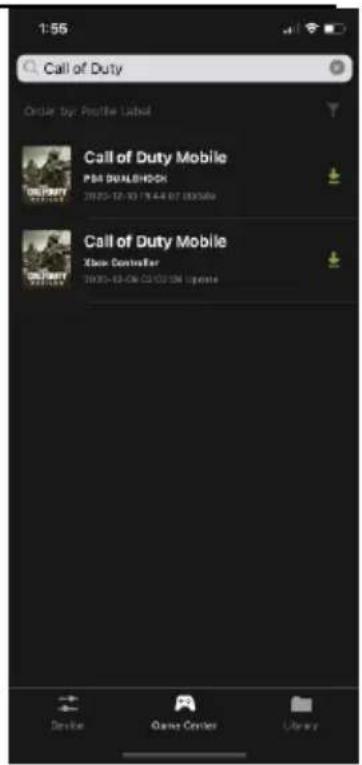
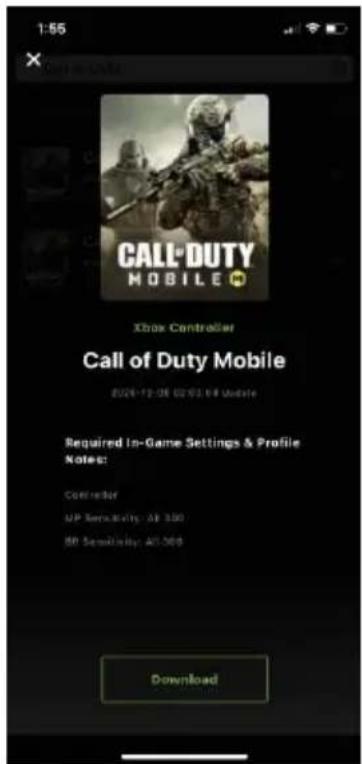
- Open the Game Center tab on the K2 Mobile app and use the search function to find your game (Image 6). Select the version for your controller by tapping on the game's cover art image. If there are any special in-game settings required, they are shown above the download button (Image 7). Press the download button. Open the Library tab and scroll to the profile you just downloaded, then press the up arrow to load the profile. If there is no profile available for your game, select Default PS4 Controller or Default Xbox Controller profile (Image 8) and press the up arrow to load the profile.
GE1337M KeyMander 2 Mobile User Manual

text_image
1:55 Call of Duty Order by Profile Label Call of Duty Mobile PRE CUALMOCK 2020.12-19 16:43:32 Update Call of Duty Mobile New Commander 2020.12-26 07:55:28 Update Device Game Center LibraryImage 6
text_image
1:55 X CALL DUTY MOBILE Xbox Controller Call of Duty Mobile 2020-12-06 10:00 PM Required In-Game Settings & Profile Notes: Controller SP Sensitivity: All 300 SP Sensitivity: All 800 DownloadImage 7
text_image
2:08 My Library * Add Game Profile Dead Trigger 2 PS4 DUALSHOCK 2021-10-03 10:00:59 Dead Trigger 2 Xbox Controller 2021-10-03 10:00:59 Default PS4 Controller PS4 DUALSHOCK 2021-10-03 10:00:59 Default Xbox Controller Xbox Controller 2021-10-03 10:00:59 Fortnite PS4 DUALSHOCK 2021-10-03 10:00:59 Fortnite Xbox Controller 2021-10-03 10:00:59 Modern Combat 5 games Center LibraryImage 8
- Once you have the profile loaded, open the settings menu inside the game and make the changes shown on the profile in Game Center (Image 7). NOTE: if using the default Xbox One profile you need to change the game's aim and look settings to maximum, then adjust mouse sensitivity and key bindings as desired.
Setup for Office Mode
After completing setup for Gaming Mode, you can setup Office Mode functionality to use the keyboard and mouse within various apps on your device. To setup the KeyMander 2 Mobile for Office Mode, follow the steps below.
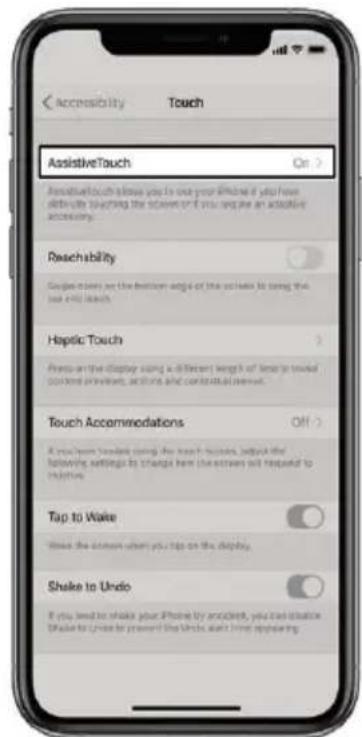
- From your iOS device, go to Settings > Accessibility then select Touch.

text_image
Settings Personal Hotspot Off > Notifications Sounds & Haptics Do Not Disturb Screen Time General Control Center Display & Brightness Accessibility Wallpaper Siri & Search Face ID & Passcode Emergency SOS Exposure Notifications Battery Privacy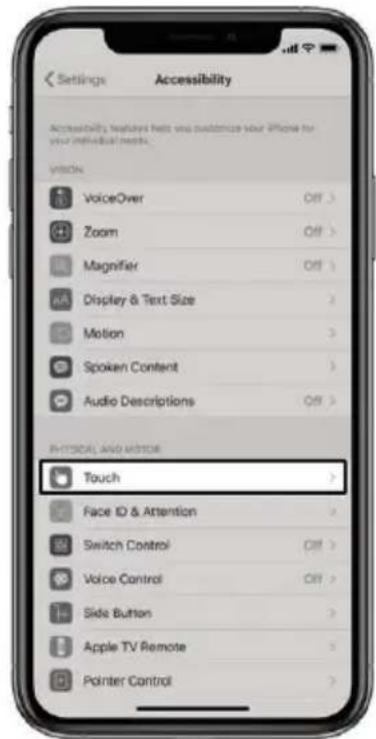
text_image
Settings Accessibility Accessibility features helps you customize your iPhone for your individual health. View: VoiceOver Zoom Magnifier Display & Text Size Motion Spoken Content Audio Descriptions PHYSICAL AND MOTOR Touch Face ID & Attention Switch Control Voice Control Slide Button Apple TV Remote Pointer Control- Go to AssistiveTouch.
text_image
Accessibility Touch AssistiveTouch On > PassiveTouch allows you to one your iPhone if you have difficulty touching the screen or if you use an assistive accessory. Reachability Guide down are the version edge of this screen to bring the size and length. Haptic Touch Press on the display using a different length of lock to travel comfort or comfort, pictures and contextual elements. Touch Accommodations Off > If you learn from the device using the touch success, adjust the following settings by changing how the screen will respond to instructions. Tap to Wake I wish the screen when you stop on the display. Shake to Undo If you need to shake your iPhone by ordered, you can choose Shake to Undo to prevent the links and then appearing.- Enable AssistiveTouch and scroll down to Device.

text_image
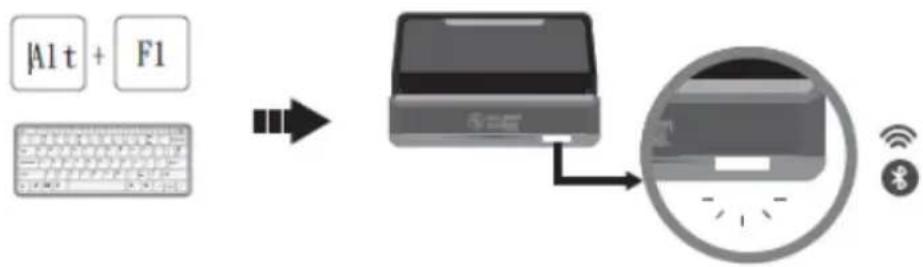
AssistiveTouch AssistiveTouch allows you to link your attention if you have difficulty touching the scope or if you deviate on adaptive scrutiny. Customize Top Level Menu CUSTOM ACTIONS Single-Tap Open Metal > Double-Tap None > Long Press None > Custom actions allow you to interact directly with the AssistiveTouch tool without passing the menu. CUSTOM FEATURES Create New Gesture ... Custom gestures allow your position to secure gestures that can be activated from Custom in the menu. Idle Opacity 40% > POWER DEVICES Devices >- Press hotkey Alt+F1 to switch between Gaming Mode and Office Mode, the LED lights solid white.
flowchart
graph LR
    A["Alt+F1"] --> B["Device"]
    C["Windows"] --> B
    D["Bluetooth Signal"] --> E["Access Icon"]
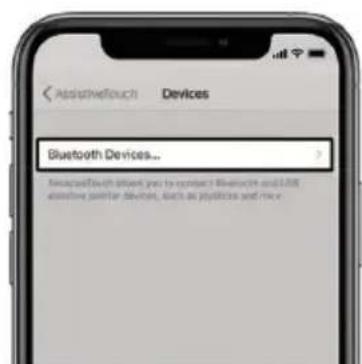
- Go to Bluetooth Devices.
text_image
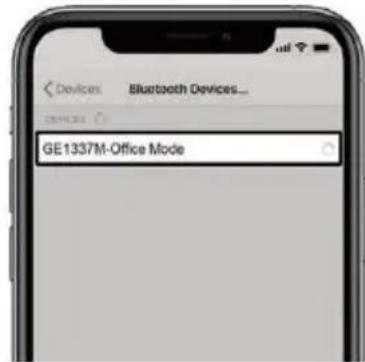
Bluetooth Devices... MicrosoftBluetooth offers you to contact Bluetooth and 1.0K absolute similar devices, such as playcards and mice- Search and tap GE1337M Office Mode to connect.
text_image
GE1337M-Office Mode- A circle-like mouse pointer appears on your iOS device, and you are now in the Office Mode.
Note: If your wireless controller was previously paired with the GE1337M, and you are having trouble pairing your wireless controller again. Please the website below for more information: https://support.apple.com/en-us/HT204091
[This page intenonally le blank.]
Overview
This chapter explains how to use a keyboard and mouse for gameplay and app control. It also instructs how to configure basic modes from the keyboard. For information on mapping, profiles and advanced settings, see Error! Reference source not found..
Controller to Keyboard Button Layout
This section explains how to use the keyboard and mouse during game play. Once the hardware is connected, the keyboard, mouse and controller will work on the game console. The mouse is used for up/down and right/left movements, emulating the controller's right stick as seen in the image below left. The controller buttons and directional pads are mapped to the keyboard as seen below right.

text_image
Xbox One PS4 Right Mouse click Left Mouse click LT RT L R Right Mouse click L1/ (L2) Left Mouse click R1/ (R2) L R Players Movement Mouse Movement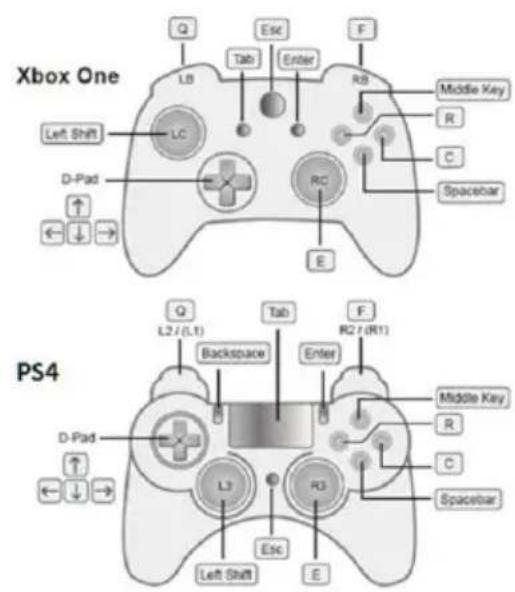
text_image
Xbox One Left Shift D-Pad ← ↓ → LC Esc Tab Enter RC E Middle Key R C Spacebar E PS4 Q L2 / (L1) Backspace Tab Enter F R2 / (R1) Middle Key R C Spacebar Left Shift Esc EHotkey Funcons
The function keys on the keyboard enable mode switching, profile switching and adjusting mouse sensitivity without using the K2 Mobile app. The table below explains each function key and provides a page with information on how it's used.
| Hotkey | Function | Description |
| [F10] | Turbo Mode | Toggles Turbo Mode on and off. The default setting is off. See Turbo Mode, for details on Turbo settings. |
| [F11] | Macro Mode | Turns Macro Mode on and off. When on, Macro keys will execute macro commands. The default setting is off. See Macro for details on setting macros. |
| Left Shift | Sprint Mode | During gameplay, to move a character in a running pace, use the keyboard combination. Left Shift+ [Key] |
| Left Control | Walk Mode | During gameplay, to move a character at slow walking pace, use the keyboard combination. Left Ctrl + [Key] |
| Alt + [F1] | Mode Switch | Switches between Gaming Mode and Office Mode. |
| Alt + [F2] | K2 Mobile App Connect | Broadcasts Bluetooth connection for K2 Mobile App connection from iPhone. |
| Alt + [F3] | Controller Connect | Broadcasts Bluetooth connection for game controller. |
| Alt + [F4] | Bluetooth Disconnect | Disconnects the Bluetooth connection with your devices |
| Alt + [F5] | Hotkey Edit Mode | Enters or leaves the Hotkey Edit Mode allowing mouse sensitivity adjustments without using the K2 Mobile app. For more information, see Hotkey Edit Mode Table below. |
| Alt + [F11] | Firmware Upgrade | Enters factory Firmware Upgrade Mode. |
| Alt + [F12] | Factory Reset | Performs a factory reset. |
Hotkey Edit Mode
The Hotkey Edit Mode allows you to conveniently adjust the mouse sensitivity in General Mode or ADS Mode without using the K2 Mobile app.
| Mode | Hotkey | Function |
| General Mode | [↑] | Increases (+5) the X and Y value for mouse sensitivity. |
| [↓] | Decreases (-5) the X and Y value for mouse sensitivity. | |
| [X] + [↑] | Increases (+5) the X value for mouse sensitivity. | |
| [X] + [↓] | Decreases (-5) the X value for mouse sensitivity. | |
| [Y] + [↑] | Increases (+5) the Y value for mouse sensitivity. | |
| [Y] + [↓] | Decreases (-5) the Y value for mouse sensitivity. | |
| ADS Mode | [→] | Increases (+5) the X and Y value for mouse sensitivity. |
| [←] | Decreases (-5) the X and Y value for mouse sensitivity. | |
| [X] + [→] | Increases (+5) the X value for mouse sensitivity. | |
| [X] + [←] | Decreases (-5) the X value for mouse sensitivity. | |
| [Y] + [→] | Increases (+5) the Y value for mouse sensitivity. | |
| [Y] + [←] | Decreases (-5) the Y value for mouse sensitivity. |
Reset Funcon
If your KeyMander 2 Mobile fails an update, has connection problems with your mobile device, or exhibits any other type of non-standard operation you can perform a System Reset which may resolve the issue. There are two ways to reset the KeyMander 2 Mobile as described below.
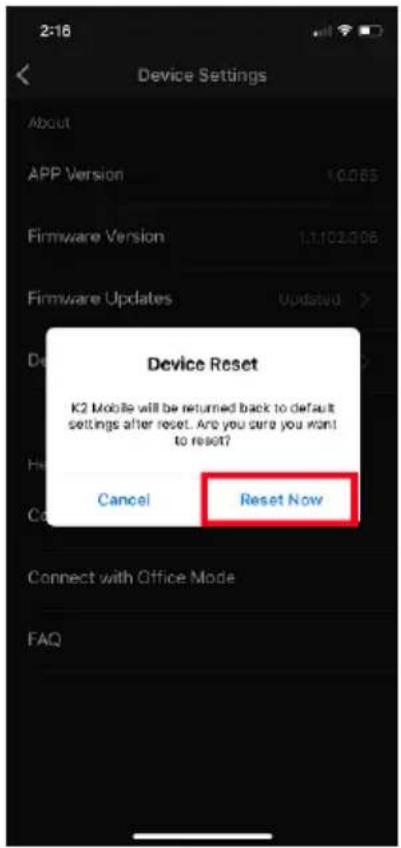
Method 1: To perform a reset using the K2 Mobile app, go to the Device tab and tap the settings icon in the upper right hand corner. On the Device Settings screen tap Reset Device and a warning message appears. Tap Reset Now to perform the factory reset.

text_image
Device Reset K2 Mobile will be returned back to default settings after reset. Are you sure you want to reset? Cancel Reset NowMethod 2: Press the Alt + F12 to perform a factory reset.
Overview
The K2 Mobile app allows you to configure the keyboard and mouse settings for game console use. This chapter explains how to use the app in four sections:
- Installing & Opening
- Signing Up
- Connecting
◆ Software Overview
◆ Groups, Profiles and Upload - Customizing Controls
Installing the K2 Mobile app
- Install the K2 Mobile app on a mobile device.
a) From the mobile device, tap the App Store 📋 icon.
b) In the search box, type “KeyMander 2 Mobile Game Dock App”.
c) Tap KeyMander 2 Mobile Game Dock App and install the app.
- From the mobile device, tap the K2 Mobile icon
- Follow the on-screen instructions.
Opening the K2 Mobile app
To connect the KeyMander 2 Mobile with your mobile devices:
-
Connect the KeyMander 2 Mobile to a game console.
-
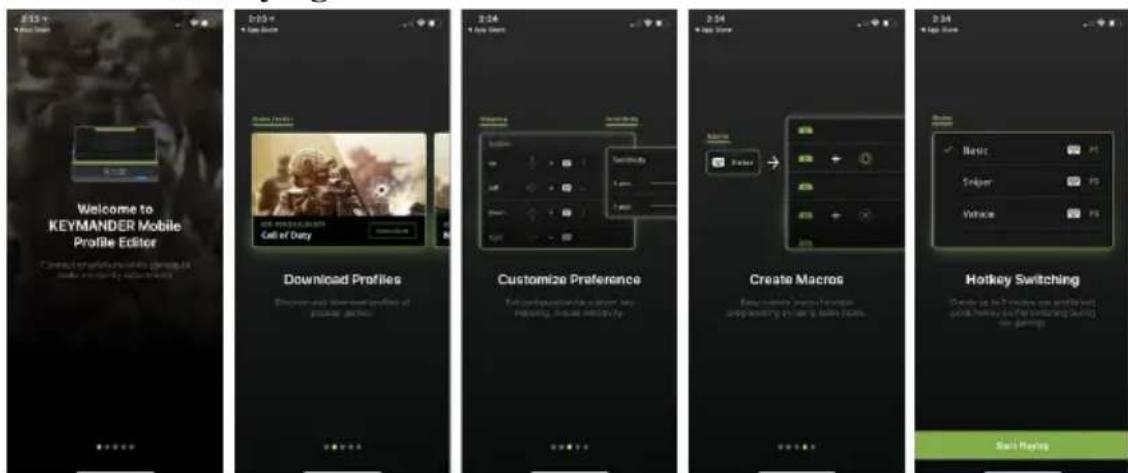
Open the K2 Mobile app. A welcome page appears, slide the screen and click Start Playing.
text_image
Welcome to KEYMANDER Mobile Profile Editor Download Profiles Customize Preference Create Macros Hotkey Switching Start RunningSigning Up an Account
- When you first started using the K2 Mobile app, you will be asked to sign up for an account. Click Sign Up.

text_image
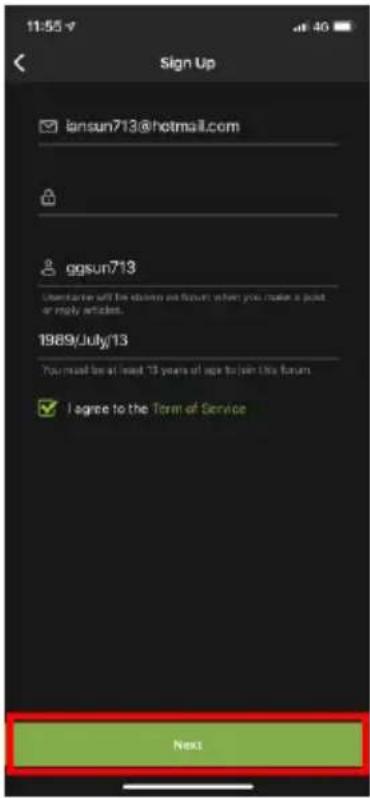
11:64 Skip Hello, Gamer! Sign up to download and sync free game profiles between all your smartphone devices. Sign Up Already have an account? Sign In- Fill in the required fields, check the I agree to the Term of Service, and click Next.
text_image
11:55 v Sign Up iansun713@hotmail.com ggsun713 User to be able to access email format when you make a point or reply articles. 1989/July/13 You must be at least 13 years of age to join this forum I agree to the Term of Service Next- Follow the instructions to verify your email.

text_image
11:56 Confirm E-mail Next Check your email and follow the instructions to verify your account. However, received the E-mail? Send the E-mail- Click Start Playing when the email verification is complete.

text_image
11:57 Congrats, Register Successful! Now, You can download free game profile from GAME CENTER. Start Playing Reminder Viewing Game Center, downloading, sharing, and syncing game profiles may increase your Internet data usage and addition charge may increase.- The K2 Mobile app opens as shown.

text_image
1:57 My Library + Add Game Profile Fortnite PS4 DUALSHOCK 2021-02-12 19:18:36 Fortnite Kiox Controller 2021-02-12 19:18:36 Call of Duty Mobile Kiox Controller 2021-02-12 19:18:36 Dead Trigger 2 PS4 DUALSHOCK 2020-12-10 00:00:39 Dead Trigger 2 Kiox Controller 2020-12-10 00:00:39 Shadowgun Legends Kiox Controller 2020-12-10 00:00:39 Device Game Center LibraryConnecting the K2 Mobile app
- To connect the K2 Mobile app with your mobile device, tap Connect on the device page.

text_image
10:07 Connect App with the device to upload and edit game profile Connect Device Game Desk Clears- Press Alt + F2 to broadcast the Bluetooth signal to connect to your K2 Mobile app. Select GE1337M under Devices, then wait for the device to connect.
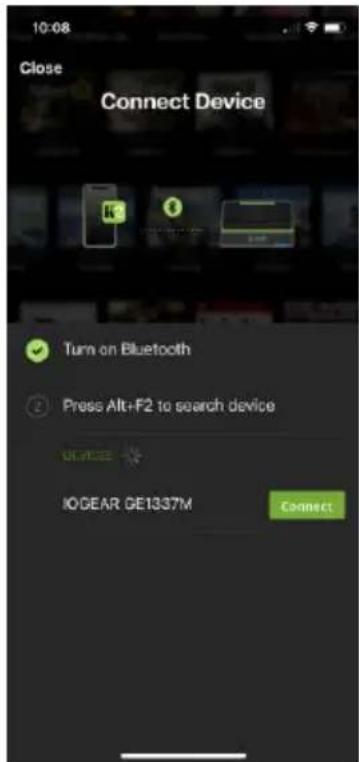
text_image
10:08 Close Connect Device Turn on Bluetooth Press Alt+F2 to search device IOGEAR GE1337M Connect- If there is a profile that does not belong to your library, tap Add to My Library to add the profile or tap Ignore, start playing to continue.

text_image
11:18 Sync Profile Profile Apex Legends on KEYMANDER 2 doesn't belong to your library. Add it to edit. Add to My Library Ignore, start playing- Now your mobile device is connected and the Device screen is displayed. Tap Disconnect to disconnect your mobile device from the K2 Mobile app. Closing the K2 Mobile app or powering off the KeyMander 2 Mobile will also disconnect it from the K2 Mobile app.

text_image
10:11 Game Mode Connection Device Connected Gamepad Xbox Controller Now Playing... Xbox Controller D... Xbox Controller | Mode: Default... Change Profile Edit Device Settings Turbo (F10) Macro (F11) Mouse DPI 2009 Device Game Center LibraryDevice Tab
This section allows you to quickly enable or disable microphone, turbo mode, macro mode, and gamepad vibration. Adjust the aim/look and mouse sensitivity for your game play, and also to perform a firmware upgrade, or reset the device. The app version, and firmware version information are also available under Device page.
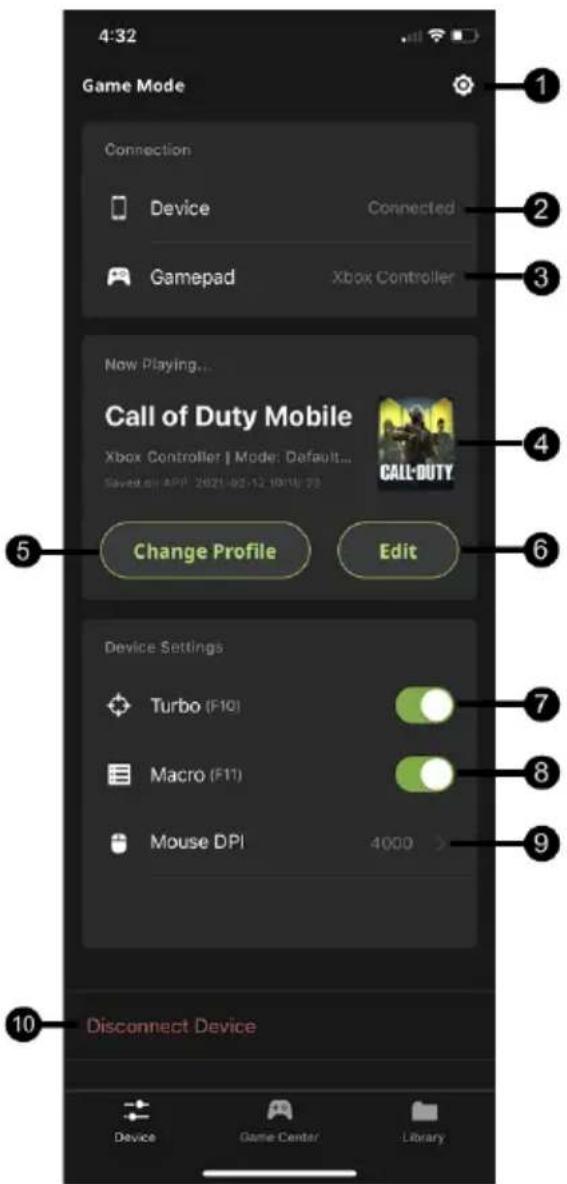
text_image
4:32 Game Mode Connection Device Connected Gamepad Xbox Controller Now Playing... Call of Duty Mobile Xbox Controller | Mode: Default... Saved off APP 2021-02-12 10:10:23 Change Profile Edit Device Settings Turbo (F10) Macro (F11) Mouse DPI 4000 Disconnect Device Device Game Center Library| # | Name | Description |
| 1 | Device Settings | Allows you to do a factory device reset, check and update firmware version. For more information, see Device Settings. |
| 2 | Device Connection | Shows whether or not your mobile device with the K2 Mobile app is connected to your GE1337M. |
Chapter 4. Using the K2 Mobile App
| 3 | Gamepad Connection | Shows whether or not your gaming controller is connected to your iPhone, iPad or Apple TV. |
| 4 | Game Profile picture | Displays your current game profile picture. |
| 5 | Change Profile | Tap to change your current game profile. |
| 6 | Edit | Tap to edit your current game profile. |
| 7 | Turbo | Toggles Turbo Mode on and off. When Turbo mode is on buttons with Turbo settings will work. See Turbo. |
| 8 | Macro | Turns Macro Mode on and off. When on, Macro keys will execute macro commands. See Macro. |
| 9 | Mouse DPI | This allows you to match the K2 Mobile app sensitivity to the programmed DPI setting of the mouse for proper operation. |
| 10 | Disconnect Device | To disconnect your mobile device from the KeyMander 2 Mobile, tap Disconnect Device. |
Device Settings
Tap to view the current app and firmware version, perform a firmware upgrade or a factory device reset.

text_image
11:05 Device Settings About APP Version 1.0.063 Firmware Version 1.1.102.00C Firmware Updates Updated > Device Reset > Help Connect with Gaming Mode Connect with Office Mode FAQ| # | Name | Description |
| 1 | App Version | Shows the current app version. |
| 2 | Firmware Version | Shows the current firmware version. |
| 3 | Firmware Updates | Shows if there is a firmware update available. To update the firmware through your mobile device, tap Firmware Updates. |
| 4 | Reset Device | To reset the device, tap Reset Device. For proper steps, see Reset Device. |
| 5 | Connect with Gaming Mode | Tutorial showing GE1337M connection for gaming. |
| 6 | Connect with Office Mode | Tutorial showing GE1337M connection with non-gaming apps. |
| 7 | FAQ | Shows all the FAQ and setup tips for the KeyMander 2 Mobile. |
Firmware Upgrade
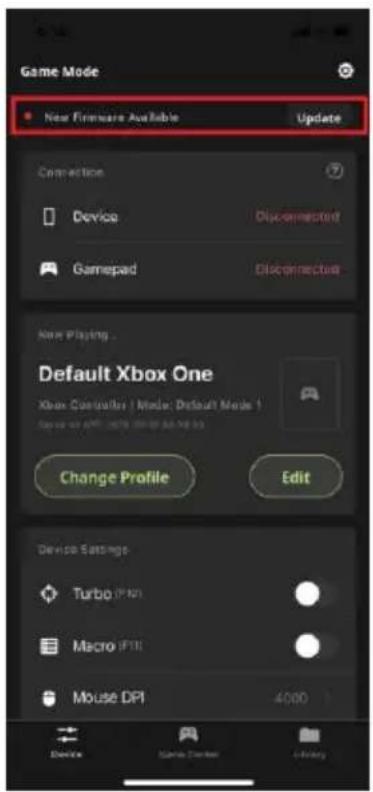
To perform a firmware upgrade, follow the steps below.
- Tap Update beside • New Firmware Available if shown on the Device tab (Image 1) or tap the settings icon and select Update Now (Image 2). If your firmware version is up to date, the firmware update notification will not be displayed.
text_image
Game Mode New Firmware Available Update Connection Device Disconnected Gamepad Disconnected New Playing... Default Xbox One Xbox Controller | Model: Default Mode 1 Change Profile Edit Device Settings Turbo (F10) Macro (F11) Mouse DPI 4000Image 1

text_image
Device Settings About APP Version 11.102 Firmware Version 13,486.000 Firmware Updates Update Note > Device Reset > Help Feature FAQImage 2
Note: The Firmware Update notification will only show when there is a newer version firmware available for upgrade, or your firmware version is earlier than the most recent version.
2. Click Update.

text_image
Latest Version 1.2.112 Release Date: 2020-08-14 02:29:13 **Reduced low spread mouse (after ** *Allow Macro keys and other function keys simultaneously *Added support - right stick controllers -Central Dragon Joystops (PS4) -Razor Pantheria EVO (PS4) -HOR Real Arcade Pro.M HApouse (PS4/PS3/PC) -HOR Real Arcade Pro.M KAI (PS4) *Added support for Xbox ONE Controller Model 1697 *Added support for Ducky One 2 keyboard *Fixed a bug causing mouse side buttons and mouse wheel button to not register when moving some price Update- The K2 Mobile app gives you the option to Update Now over the air with your mobile device, or to Update via PC. Select Update Now and it will take 5-10 minutes to complete depending upon your wireless data connection.

text_image
Firmware Updates Update may take 1-10 minutes. Are you sure you want to update now? Update Now Update via PC Cancel Update- The KeyMander 2 Mobile will begin upgrading. Press Close when complete. The unit will reboot and reconnect itself after the firmware upgrade is complete.
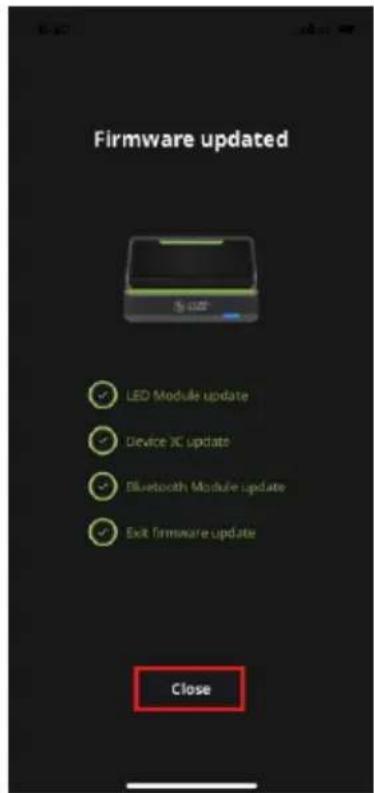
text_image
Firmware updated LED Module update Device XC update Bluetooth Module update Exit Firmware update CloseReset Device
To perform a reset using the K2 Mobile app, go to the Device tab and tap the settings icon in the upper right hand corner of the screen. On the Device Settings screen tap Reset Device and a warning message appears. Tap Reset Now to perform the factory reset.
text_image
Device Settings About APP Version 10.065 Firmware Version 1.1.102.9.06 Firmware Updates Updated > Device Reset K2 Mobile will be returned back to default settings after reset. Are you sure you want to reset? Cancel Reset Now Connect with Office Mode FAQGaming Mode Setup Tutorial
The first time you connect the KeyMander 2 Mobile the Gaming Mode Tutorial will be displayed on screen. Tap Start Tutorial, then swipe through the screens. Tap Close when done.

flowchart
graph TD
    A["Connect with Gaming Mode"] --> B["Start Tutorial"]
    B --> C["Gamepad"]
    C --> D["Keyboard & Mouse"]
    D --> E["Power"]
    E --> F["Go to iOS Settings"]
    F --> G["Pier-up this 68153.7fd"]
    G --> H["Start Gaming Mode!"]
Office Mode Setup Tutorial
To run the gaming mode tutorial, tap Connect with Gaming Mode and tap Start Tutorial. Slide the screen to browse through the tutorial, and then tap Close.

text_image
Connect with Office Mode Office Mode allows you to control or key-in messages using keyboard and mouse. Start Tutorial
flowchart
graph LR
    A["Step 1: Enable Office Mode"] --> B["Step 2: Switch Mode"]
    B --> C["Step 3: Go to iOS Settings"]
    C --> D["Start Office Mode!"]
Connection
Shows the connection between the KeyMander 2 Mobile App and the device, and gamepad.
text_image
Game Mode Connection Device Gamedad DSM DUALSHOCK New Playing... PS4 DUALSHOCK De... PS4 DUALSHOCK / Mod. Default Mod... Change Profile Edit Device Settings Turbo (PTO) Macro (PTU) Mouse DPI 4000 Device Game Console LibraryConnecng with the Device
To connect your device with the KeyMander 2 Mobile App, tap and follow the on-screen instructions.

text_image
Please follow the steps below to connect your device with KEYMANDER MOBILE 1. Connect the gamepad to the Gamepad USB Port 2. Press Alt+F2 to broadcast Bluetooth connection for gamepad 3. Go to Settings > Bluetooth 4. Connect with "DUALSHOCK 4 Wireless Controller" or "Xbox Wireless Controller" Cancel Go to SettingsChanging Game Profile
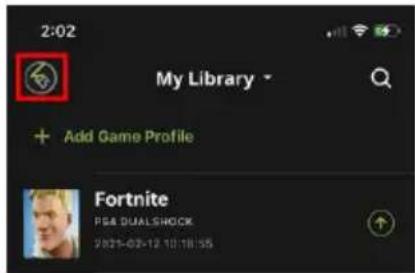
Tap Change on the Device tab to open your profile library (Image 1). Scroll through your library or press the search icon 📄 find a game profile,
then tap upload (Image 2) and replace your current game profile. The uploaded profile will be displayed on the Device tab (Image 3).

text_image
4:32 Game Mode Connection Device Connected Gamepad Xbox Controller Now Playing... Default None | Mode: Default Saved on API: 1989-12-16 10:00:36 Change Profile Edit Device Settings Turbo (F10) Macro (F11) Mouse DPI Device Game Center LibraryImage 1

text_image
2:02 My Library Add Game Profile Fortnite P64 DUALSHOOK 2021-05-12 16:18:55 Fortnite Xbox Controller 2021-05-12 16:18:55 Modern Combat 5 Xbox Controller 2021-10-02 21:25:30 Modern Combat Versus Xbox Controller 2021-10-03 02:06:32 Shadowgun Legends P64 DUALSHOOK 2021-05-18 16:18:59 Shadowgun Legends Xbox Controller 2021-10-18 16:18:59 Shadowgun War Games Game Center LibraryImage 2

text_image
Game Mode Connection Device Connected Gamepad Xbox Controller Now Playing... Fortnite Xbox Controller / Mode: Default... Saved on April 2021-02-12 TO 10:34 Change Profile Edit Device Settings Turbo (F10) Macro (F11) Mouse DPI 4000 > Device Game Center LibraryImage 3
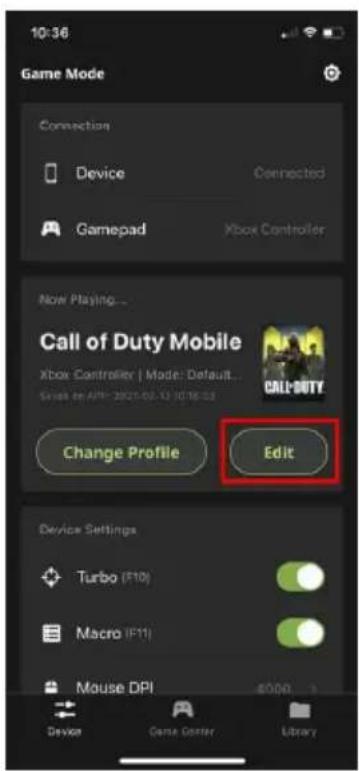
Editing Game Profile
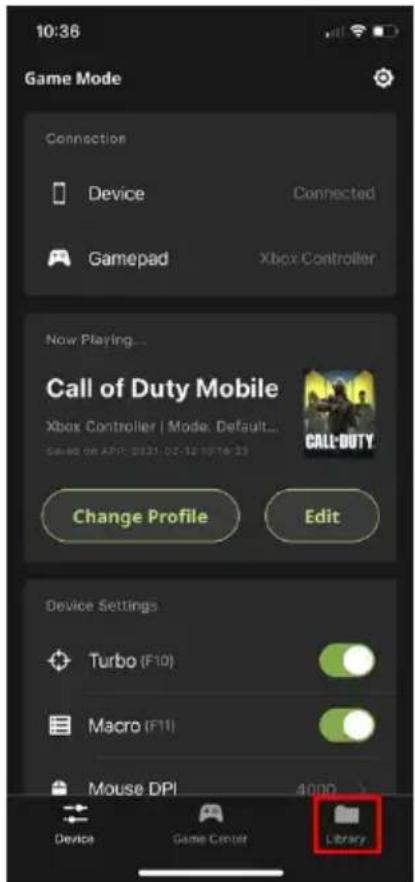
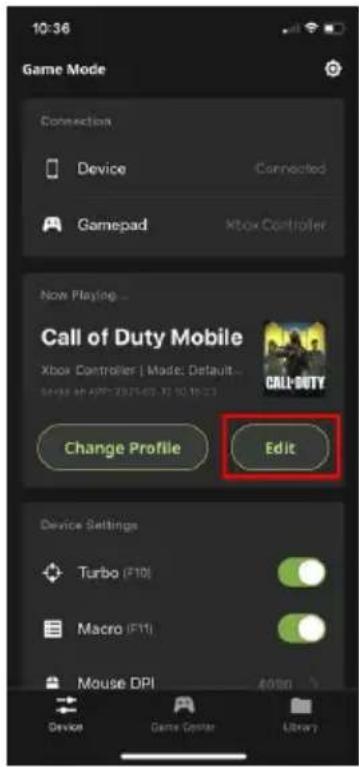
Tap Edit to make changes to your current game profile (Image 1). The profile opens to the begin making configuration changes (Image 2). For more information, see
Customizing Controls for a Profile.
text_image
10:36 Game Mode Connection Device Connected Gamepad Xbox Controller Now Playing... Call of Duty Mobile Xbox Controller j Mode: Default... Change Profile Edit Device Settings Turbo (F10) Macro (F11) Mouse DPI 4/00 Device Dance Center LibraryImage 1
text_image
2:10 Call of Duty Mobile Xbox Controller - Last Update: 2021-02-18 14:10:29 Mode Default Mode 1 Sensitivity Mapping Macro General Sensitivity X axis 80 Y axis 80 Activate Turn Assist When activating Turn Assist, you could move forward a direction without pulling mouse. Launch Key → Not Set Trigger Toggle >Image 2
Game Center Tab
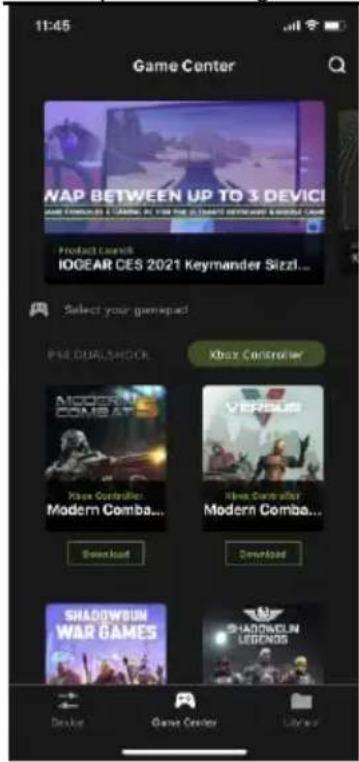
The Game Center tab allows you to browse and download available games for a selected game console.
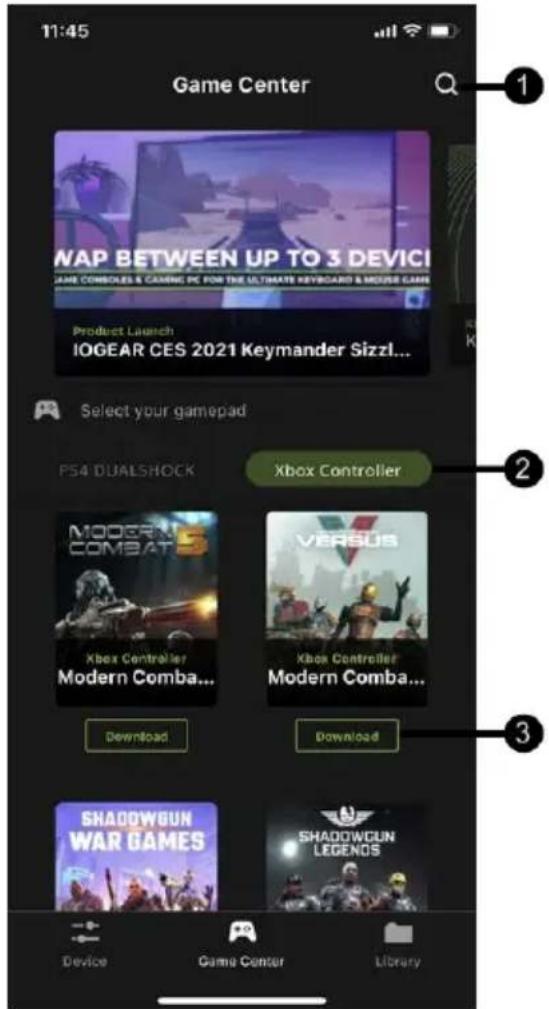
text_image
11:45 Game Center WAP BETWEEN UP TO 3 DEVICI GAME COMBOLES & GAMING PC FOR THE ULTIMATE KEYBOARD & MOUSE GAME Product Launch IOGEAR CES 2021 Keymander Sizzl... Select your gamepad PS4 DUALSHOCK Xbox Controller MODERN COMBATERS Xbox Controller Modern Comba... VERSUS Xbox Controller Modern Comba... Download Download SHADOWGUN WAR GAMES SHADOWGUN LEGENOS Device Game Center Library| # | Name | Description |
| 1 |  | Tap  to search the available game you wish to download by entering the game name. to search the available game you wish to download by entering the game name. |
| 2 |  / / | Tap  ist of available games for the selected game controller between Xbox One and PS4. ist of available games for the selected game controller between Xbox One and PS4. |
| 3 |  | Tap  the game to your Library. the game to your Library. |
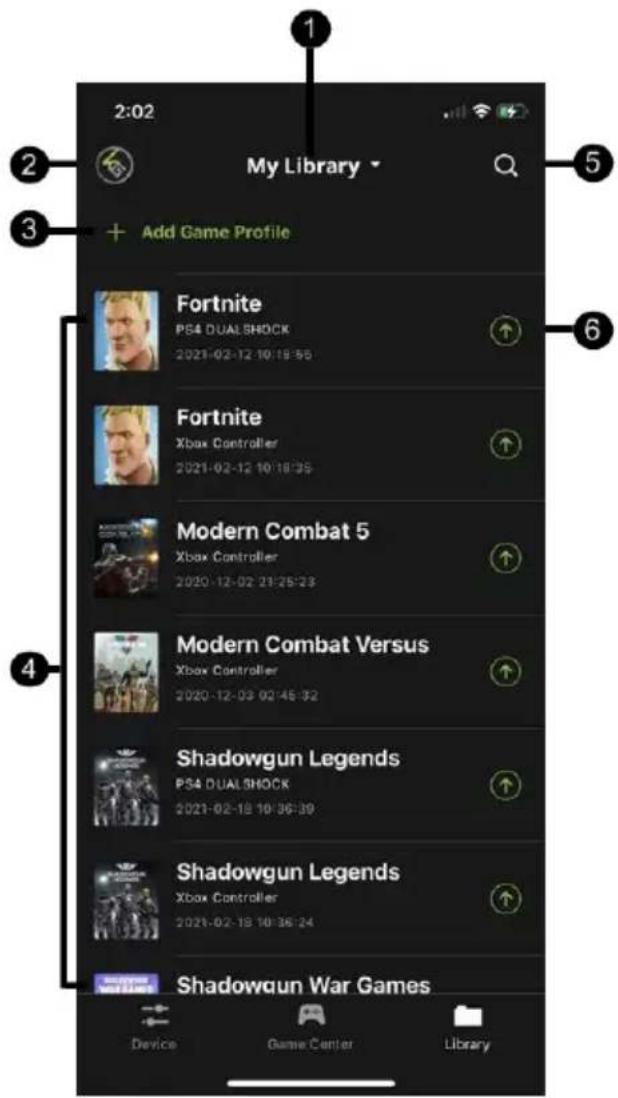
Library Tab
A profile is a keyboard/mouse configuration that is created and saved for a particular game console. You must sync a profile before start playing. Default profiles are created in advanced, you can modify or delete them, or create your own.
text_image
My Library Add Game Profile Fortnite PS4 DUAL SHOCK 2021-02-12 10:18:55 Fortnite Xbox Controller 2021-02-12 10:18:35 Modern Combat 5 Xbox Controller 2020-12-02 23:25:23 Modern Combat Versus Xbox Controller 2020-12-03 02:46:32 Shadowgun Legends PS4 DUAL SHOCK 2021-02-18 10:36:39 Shadowgun Legends Xbox Controller 2021-02-18 10:36:24 Shadowgun War Games Device Game Center LibraryThis is the main page of the K2 Mobile app. The table below provides a brief description of each section and the page to find more information.
| # | Name | Description |
| 1 | My Library | Tap to reset the game profile order.◆ Update Time (Latest - Oldest)◆ Profile Label (A - Z) |
Chapter 4. Using the K2 Mobile App
| 2 | Account | Allows you to view and modify your account information such as username and password. Backing up, and restoring your profiles and updates to prevent system crash. For more information, see Account. |
| 3 | + Add Game Profile | Tap to create a game profile. For more information, see Downloading a Profile from Game Center. |
| 4 | Available Game Profiles | Slide a game profile to the left to share, edit, or delete.For more information on share, see Editing, Deleting and Sharing a Profile.For more information on mapping, see Mapping.For more information on macro, see Macro |
| 5 |  | Tap to search the available game profile you wish to upload by entering the game profile name. |
| 6 |  | Tap to upload the game profile you wish to use for the KeyMander 2 Mobile. For more information, see Uploading a Profile. |
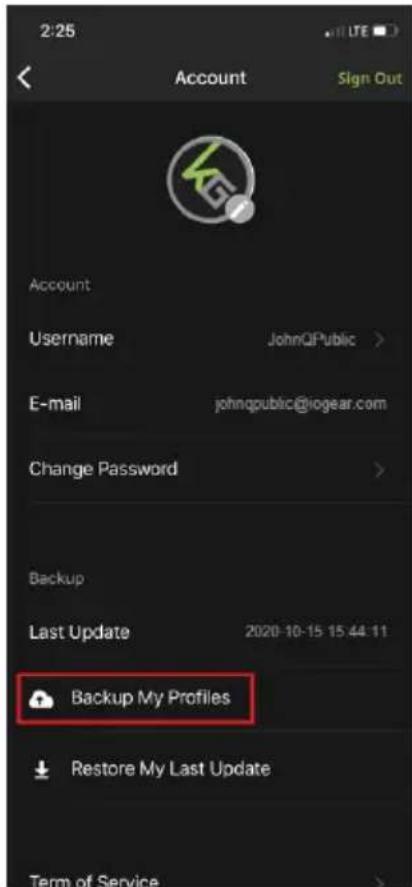
Account
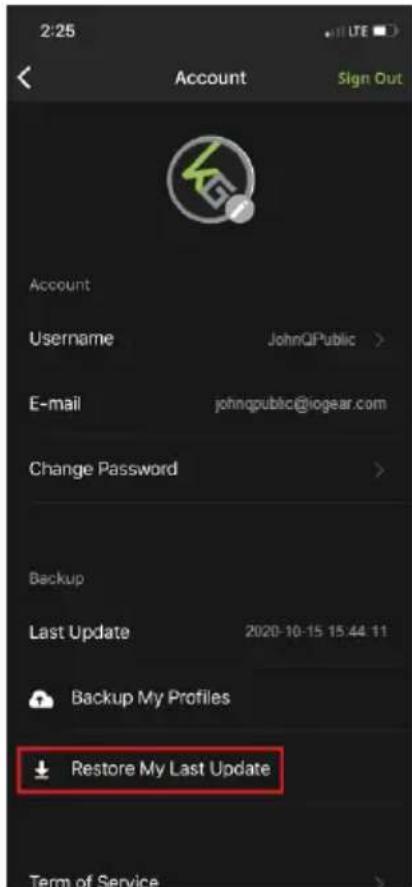
The account page allows you to view and modify your account information such as username and password. With the built-in access to the cloud based storage, allows you to backup and restore your game profiles as needed.

text_image
2:02 My Library + Add Game Profile Fortnite PS4 DUALSHOCK 2021-02-12 10:18:55 Fortnite Xbox Controller 2021-02-12 10:18:35
text_image
2:25 Account Sign Out Account Username JohnQPublic > E-mail johnqpublic@iogear.com Change Password > Backup Last Update 2020-10-15 15:44:11 Backup My Profiles Restore My Last Update Term of Service > Privacy Policy >| # | Name | Description |
| 1 | Sign Out | Tap to sign out from the K2 Mobile app. You are required to sign in again to access all the features. |
| 2 | Username | Tap to modify the username that is going to be displayed on the forum post. To modify the username, see Changing Username. |
| 3 | Shows the e-mail address. |
Chapter 4. Using the K2 Mobile App
| 4 | Change Password | Tap to modify the login password for the K2 Mobile app. To modify the password, see Changing Password. |
| 5 | Last Update | Shows when the last update took place. |
| 6 | Backup My Profiles | Tap to backup your profiles in the K2 Mobile app. See Backing Up and Restoring Game Profiles. |
| 7 | Restore My Last Update | Tap to restore your last update that took place. See Backing Up and Restoring Game Profiles. |
| 8 | Term of Service | Shows the term of services. |
| 9 | Privacy Policy | Tap to get directed to the privacy policy information page. |
Changing Username
To change the username, tap Username from the account page. Modify the current username and tap Save.

text_image
Change Username ggsun2144 Username will be displayed on forum post SaveChanging Password
To change the password, tap Change Password from the account page. Enter the password twice and tap Reset.

text_image
Change Password ResetBacking Up and Restoring Game Profiles
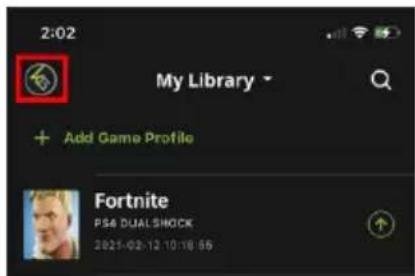
The K2 Mobile app has built-in access to cloud based storage for all your game profiles, and allows you to backup and restore your profiles as needed.
To Backup your game profiles:
- Press the Library tab at the bottom of the K2 Mobile app screen.

text_image
10:36 Game Mode Connection Device Connected Gamepad Xbox Controller New Playing... Call of Duty Mobile Xbox Controller | Mode: Default... Saved on April 2021-02-12 10:16:23 Change Profile Edit Device Settings Turbo (F10) Macro (F11) Mouse DPI 4000 Device Game Center Library- Press your account icon in the upper left hand corner of the app screen.
text_image
2:02 My Library + Add Game Profile Fortnite PS4 DUALSHOCK 2021-02-12 10:18:55- Press the Backup My Profiles icon.
text_image
2:25 Account Sign Out Account Username JohnQPublic > E-mail johnqpublic@iogear.com Change Password > Backup Last Update 2020-10-15 15:44:11 Backup My Profiles Restore My Last Update Term of ServiceNote: The Backup function takes a “snapshot” of all profiles on your device and backs up those profiles, while also deleting anything from your previous backup that is not currently shown in your device library. If you share your library between multiple devices, you should always start a new gaming session by restoring your previous backup before making changes (downloading, sharing or modifying profiles). Always remember to backup your profiles after making any profile changes you wish to keep. If you make changes to your profiles and do not wish to keep them, you can perform a Restore which will overwrite your current profiles with those from your most recent backup.
To Restore your game profiles:
- Press the Library tab at the bottom of the K2 Mobile app screen.
text_image
10:36 Game Mode Connection Device Connected Gamepad Xbox Controller Now Playing... Call of Duty Mobile Xbox Controller | Mode: Default... Sales on April 2021 02-12 10:16:23 Change Profile Edit Device Settings Turbo (F10) Macro (F11) Mouse DPI 4000 Device Game Center Library- Press your account icon in the upper left hand corner of the app screen.
text_image
2:02 My Library + Add Game Profile Fortnite PSB DUALSHOCK 2021-02-12 10:18:55- Press the Restore My Last Update icon.
text_image
2:25 Account Sign Out Account Username JohnQPublic > E-mail johnqpublic@iogear.com Change Password > Backup Last Update 2020-10-15 15:44:11 Backup My Profiles Restore My Last Update Term of ServiceNote: The Restore function adds any profiles missing from your device since your last Backup, and overwrites any current profiles on your device with the version from your last Backup. If you added new profiles since your last Restore, they will be unaffected. The Restore function also makes it easy to keep your profiles current across multiple devices if you start each session with a Restore.
Downloading a Profile from Game Center
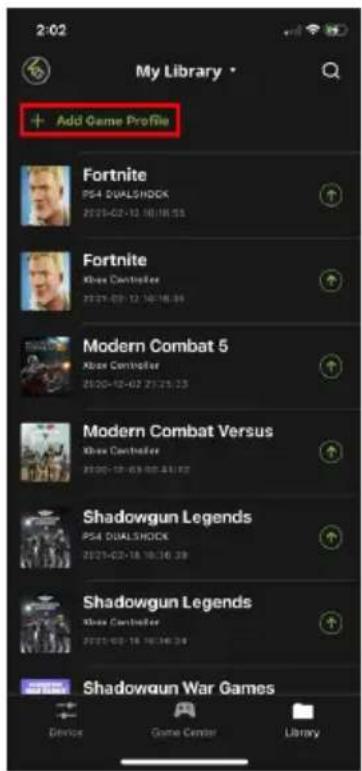
You can add a game profile to your library by downloading one from the Game Center tab in the K2 Mobile app, or using the Add Game Profile function in the Library tab to add a shared profile or create a new profile.
To download a profile from Game Center:
- Open the Game Center tab on the K2 Mobile app and scroll down to the game you want to download (Image 1) or use the search function by tapping the search icon in the upper right corner of the screen (Image 2), then entering the name of the game into the search bar (Image 3).
Chapter 4. Using the K2 Mobile App
text_image
11:45 Game Center WAP BETWEEN UP TO 3 DEVICES MOBA COMBOOLO - LAMGALI & LAMGALI Product Launch IOGEAR CES 2021 Keymander Sizzli... Select your gameplay PML DURLSHOCK Xbox Controller MODERN COMBA... VERSUS Xbox Controller Modern Comba... Download Download SHADOWRUN WAR GAMES SHADOWRUN LEGENDS Device Game Center LibraryImage 1

text_image
11:45 Game Center NAP BETWEEN UP TO 3 DEVICI Game Center's Game PC is the most popular video games. The Game Center is selected by the Home Game Froodost Launch IOGEAR CES 2021 Keymander Sizzl... Select your gamepad! PS4 DUALSHOCK Xbox Controller MODERN COMBATERS Xbox Controller Modern Comba... VERSUS Xbox Controller Modern Comba... Download Download SHADOWSUN WAR GAMES SHADOWCLIN LEGENDS Devikin Game Center LibraryImage 2
text_image
1:55 Call of Duty Order by: Poplite Label Call of Duty Mobile P84 DUALBHODH 2025-12-30 17:44:07 2025/06/09 Call of Duty Mobile Xbox Controller 2025-12-30 02:12:18 Update Device Game Center LibraryImage 3
- Select the profile by tapping on the game's cover art image. The required in-game settings are shown above the download button (Image 4). You must enter them into the game settings menu before beginning game play.
text_image
1:55 X CALL-DUTY MOBILE Xbox Controller Call of Duty Mobile 2026-12-08 02:03:54 Update Required In-Game Settings & Profile Notes: Controller MP Sensitivity: AP 3.00 SB Sensitivity: AP 0.00 DownloadImage 4
- Press the download button to save the profile into your library.
- Open the Library tab and scroll to the profile you downloaded, then press the up arrow to load the profile (Image 5). If there is no profile available for your game, select the default profile for your controller (Image 6).

text_image
2:02 My Library * + Add Game Profile Fortnite P64 DUALSHOCK 2021-03-12 10:18:51 Fortnite Xbox Controller 2021-03-12 10:18:35 Modern Combat 5 Xbox Controller 2020-12-02 27:28:29 Modern Combat Versus Xbox Controller 2020-12-03 02:43:52 Shadowgun Legends P64 DUALSHOCK 2021-03-18 10:34:39 Shadowgun Legends Xbox Controller 2021-03-15 10:34:24 Shadowgun War Games Device Game Camera LibraryImage 5

text_image
2:08 My Library Add Game Profile Dead Trigger 2 PS4 QUALBROCK 2020-12-10 00:46:19 Dead Trigger 2 Xbox Controller 2020-12-10 00:42:51 Default PS4 Controller PS4 QUALBROCK 2021-03-17 14:58:19 Default Xbox Controller Xbox Controller 2021-02-17 14:58:19 Fortnite PS4 QUALBROCK 2021-03-12 10:18:55 Fortnite Xbox Controller 2021-03-12 10:18:55 Modern Combat 5 Device Game Corner LibraryImage 6
- Once the profile is loaded, open the settings menu inside the game and make the changes shown on the profile in Game Center (Image 4).
Note: If using a default controller profile you need to change the game's aim and look settings to maximum, then adjust mouse sensitivity, DPI and key bindings as desired.
Adding a Game Profile
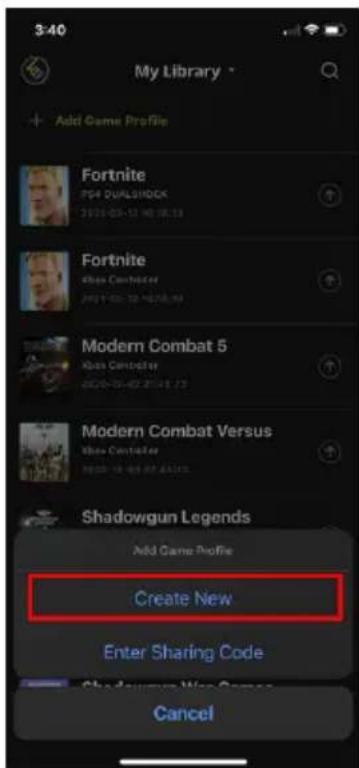
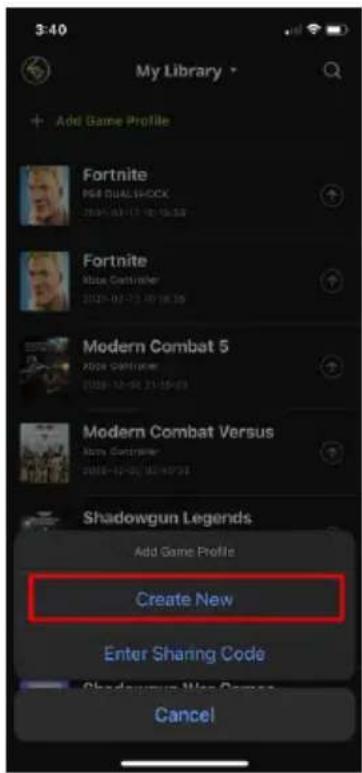
If there is no profile available for your game in Game Center you can create your own profile or enter a sharing code.
To create a game profile:
- Tap Add Game Profile (Image 1) and select Create New (Image 2). If Enter Sharing Code is selected, you can enter the sharing code to add a game profile. See Sharing a Profile.
text_image
2:02 My Library • + Add Game Profile Fortnite PS4 DUALSHOCK 2021-02-12 16:18:55 Fortnite Knee CounterRex 2021-03-12 16:18:54 Modern Combat 5 Knee CounterRex 2020-12-07 21:25:23 Modern Combat Versus Knee CounterRex 2020-12-07 21:25:23 Shadowgun Legends PS4 DUALSHOCK 2021-02-18 16:16:39 Shadowgun Legends Knee CounterRex 2021-03-18 16:16:34 Shadowgun War Games Device Game Center LibraryImage 1
text_image
3:40 My Library * + Add Game Profile Fortnite PS4 DUALSHOCK 2019-03-12 16:18:18 Fortnite Shoe Commander 2019-03-12 16:18:18 Modern Combat 5 Shoe Commander 2019-03-12 16:18:18 Modern Combat Versus Shoe Commander 2019-03-12 16:18:18 Shadowgun Legends Add Game Profile Create New Enter Sharing Code Shadowgun War Games CancelImage 2
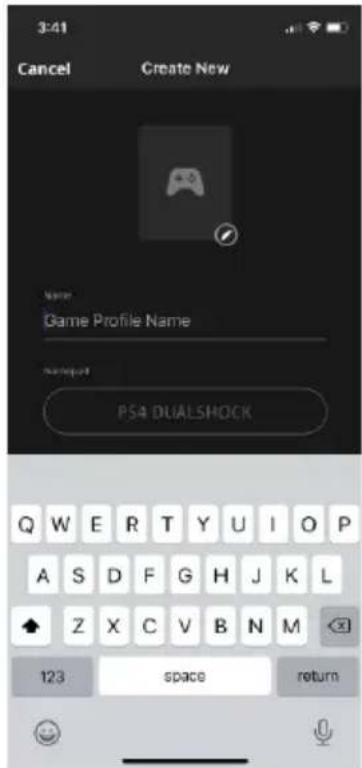
- Select a controller type (Image 4) and enter a profile name (Image 5).
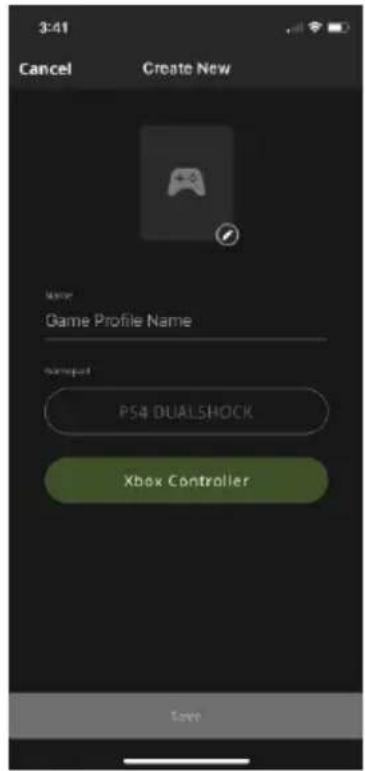
text_image
3:41 Cancel Create New Name: Game Profile Name Donepad: PS4 DUALSHOCK Xbox Controller SaveImage 3
text_image
3:41 Cancel Create New Name Game Profile Name setup PS4 DUALSHOCK Q W E R T Y U I O P A S D F G H J K L Z X C V B N M 123 space returnImage 4
- If you want to add a profile image, press the image edit button (Image 5) then accept permission to access your photos (Image 6).
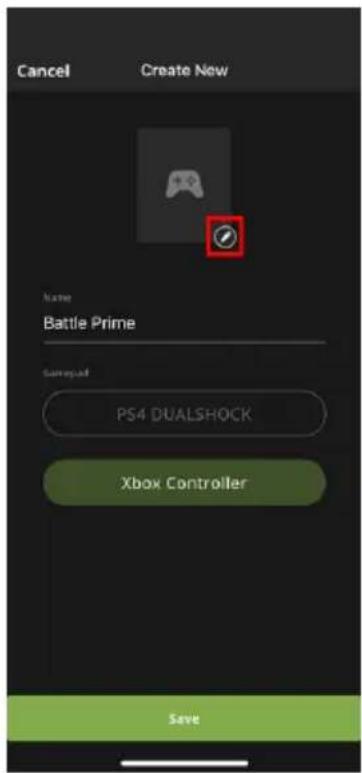
text_image
Cancel Create New Name Battle Prime Command PS4 DUALSHOCK Xbox Controller SaveImage 5

text_image
"K2 Mobile" Would Like to Access Your Photos This allows "KEYMANDER 2" to use your photos to save as game profile cover or avatar image. Select Photos... Allow Access to All Photos Don't AllowImage 6
- Select a photo and press Save (Image 7).
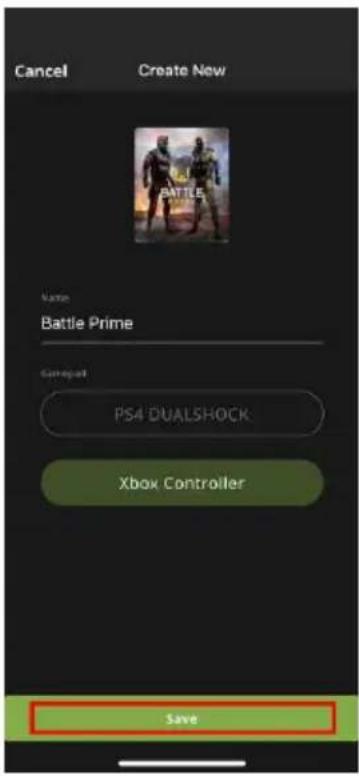
text_image
Cancel Create New BATTLE Name Battle Prime Gamepart PS4 DUALSHOCK Xbox Controller SaveImage 7
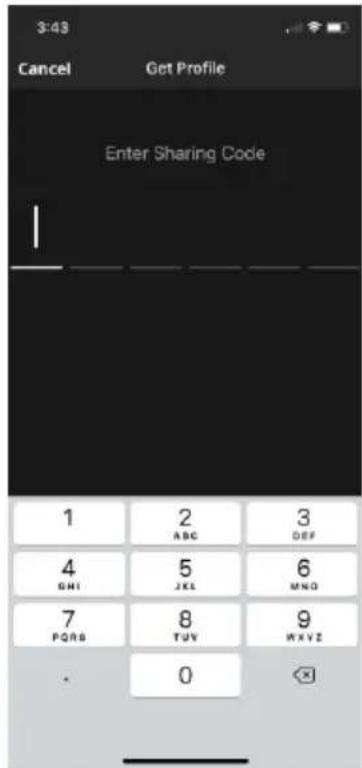
To add a profile using a sharing code:
- Tap Add Game Profile and select Entering Sharing Code.
text_image
3:40 My Library + Add Game Profile Fortnite PSB DUAL-5-0CK 2019-07-17 10:16:38 Fortnite Mouse Controller 2020-02-13 10:16:38 Modern Combat 5 Mouse Controller 2020-12-26 21:16:38 Modern Combat Versus Mouse Controller 2020-12-26 10:16:38 Shadowgun Legends Add Game Profile Create New Enter Sharing Code Shadowgun War Games Cancel- Enter the sharing code.
text_image
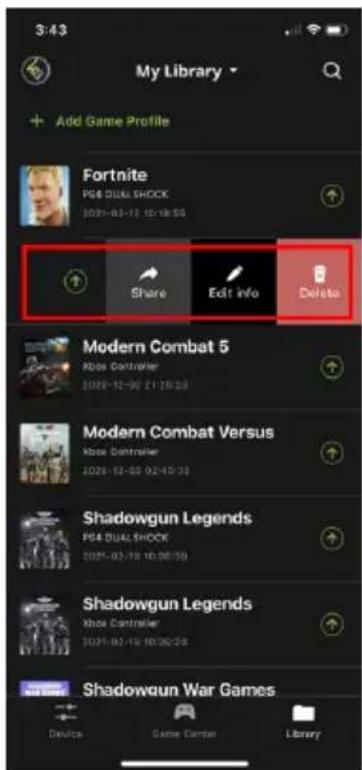
3:43 Cancel Get Profile Enter Sharing Code 1 2 3 ABC DEF 4 5 6 GHI JEL MNO 7 8 9 PQRS TUV MXYZ . 0Editing, Deleting and Sharing a Profile
To edit, delete, or share a profile, simply swipe left on the profile.
text_image
3:43 My Library Add Game Profile Fortnite PG8 DUAL SHOCK 2021-02-13 10:18:55 Share Edit info Delete Modern Combat 5 Nose Controller 2021-12-30 21:26:23 Modern Combat Versus Nose Controller 2021-12-30 02:43:31 Shadowgun Legends PG4 DUAL SHOCK 2021-02-18 10:38:59 Shadowgun Legends Nose Controller 2021-02-18 10:30:24 Shadowgun War Games Device Game Center LibraryEding a Prole
You can edit a profile's functions only from the Device tab (Image 1) but you can edit a profile's name, format or image from the Library tab. To edit a profile's functions, see Customizing Controls for a Profile. To edit a profile's name, format, or image from the Library tab, swipe the selected profile to the left and tap Edit Info (Image 2). Click Save when you have finished modifying.
text_image
10:56 Game Mode Connection Device Connected Gamepad Xbox Controller Now Playing... Call of Duty Mobile Xbox Controller | Mode: Default... Change Profile Edit Device Settings Turbo (F10) Macro (F11) Mouse DPI 8000.1 Devion Game Center LibraryImage 1

text_image
3:43 My Library Add Game Profile Fortnite PS4 DUALSHOCK 2021-03-12 16:18:35 Share Edit Info Delete Modern Combat 5 Alex Controller 2020-12-07 21:25:13 Modern Combat Versus Alex Controller 2020-12-07 02:48:32 Shadowgun Legends PS4 DUALSHOCK 2021-02-15 16:36:18 Shadowgun Legends Shore Controller 2021-02-16 16:34:34 Shadowgun War Games Device Game Center LibraryImage 2
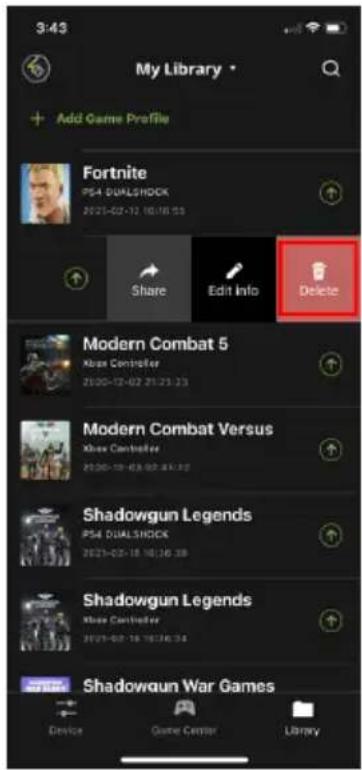
Deleng a Prole
To delete a selected profile, slide the selected profile to the left and tap Delete (Image 1). A warning message appears (Image 2), click Delete.
text_image
3:43 My Library • Add Game Profile Fortnite PS4 DUALSHOCK 2021-02-12 10:18:15 Share Edit Info Delete Modern Combat 5 Mouse Controller 21/05-12-02 21:25:23 Modern Combat Versus Mouse Controller 20/05-12-03 02:07:17 Shadowgun Legends PS4 DUALSHOCK 2021-02-18 10:16:39 Shadowgun Legends Mouse Controller 20/05-07-16 10:16:34 Shadowgun War Games Device Game Center LibraryImage 1

text_image
11:25 My Library - Add Game Profile Battlefield 4 PSA 7/01-07-28 19:34:30 Battlefield Hardline Korea One 6/01-08-28 19:37:30 Delete Battlefield Hardline This is an irreversible action. Are you sure you want to delete this profile? Cancel Delete Borderlands 3 Sore One 2000-06-03 12:49:30 Borderlands 3 Pia 4/01-08-28 15:52:47 Call of Juarez: GunsIngrImage 2
Sharing a Prole
To share a particular profile to another mobile device, slide the selected profile to the left and tap Share (Image 1). A sharing code that is unique to this profile will be generated (Image 2), and you can then share with friends.

text_image
3:43 My Library Add Game Profile Fortnite PS4 DUALSHOCK 2021-02-12 10:18:05 Share Edit Info Delete Modern Combat 5 Mouse Controller 2020-12-02 21:15:19 Modern Combat Versus Mouse Controller 2020-12-02 21:15:19 Shadowgun Legends PS4 DUALSHOCK 2021-02-18 10:16:39 Shadowgun Legends Mouse Controller 2021-02-18 10:16:39 Shadowgun War Games Device Game Center LibraryImage 1

text_image
Share Profile Jules Cormin For Fortnite Share this code 661713 How to add profile to Library? 1. Open H2 Mobile APP and open Library Page 2. Click "Add Game Profile" 3. Better Sharing Code within 90 daysImage 2
Note: The Share Code is available for 48 hours.
Uploading & Customizing Controls for a Profile
This section explains how to configure the keyboard/mouse settings for a selected profile. It is required to upload a profile before you can modify and settings and controls.
Uploading a Profile
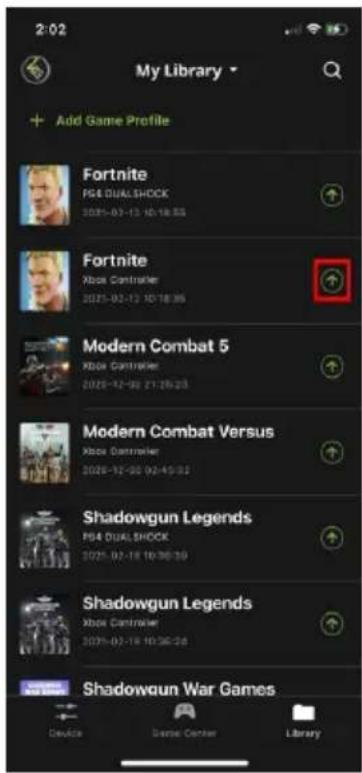
To upload a profile, tap Change Profile from the Device tab (Image 1) and tap the icon beside the profile you wish to upload (Image 2), then wait for the synchronization to complete (Image 3).

text_image
10:36 Game Mode Connection Device Connected Gamepad Xbox Controller Now Playing... Call of Duty Mobile Xbox Controller / Made: Default... Start on April 2021-02-12 10:00:23 Change Profile Edit Device Settings Turbo (F10) Macro (F11) Mouse DPI 4000 Device Game Center LibraryImage 1
text_image
2:02 My Library Add Game Profile Fortnite PS4 DUALSHOCK 2025-02-13 10:18:55 Fortnite Xbox Controller 2025-02-13 10:18:56 Modern Combat 5 Xbox Controller 2025-12-02 21:26:23 Modern Combat Versus Xbox Controller 2025-12-03 02:45:32 Shadowgun Legends PS4 DUALSHOCK 2025-02-18 10:36:39 Shadowgun Legends Xbox Controller 2025-02-19 10:36:38 Shadowgun War Games Device Darsai Center LibraryImage 2

text_image
2:03 My Library + Add Game Profile Fortnite PS4 CHASLSHOCK 2007-03-12 16:18:54 Fortnite Stock Commander 2007-03-12 16:18:54 Modern Combat 5 Show Commander 2007-13-16 29:09:23 Modern Combat Versus Show Commander 2007-13-16 03:45:32 Shadowgun Legends PS4 CHASLSHOCK 2007-13-16 19:38:49 Shadowgun Legends Fortnite is now uploaded to K2 Mobile Library Dorman Center LibraryImage 3
Customizing Controls for a Profile
To customize the profile settings, tap Edit on the Device Tab.
text_image
10:36 Game Mode Connection Device Connected Gamepad Xbox Controller Now Playing... Call of Duty Mobile Xbox Controller | Mode: Default... CALL- Duty Change Profile Edit Device Settings Turbo (F10) Macro (F11) Mouse DPI Addn Device Game Center LibraryThere are three fields that you can customize, Sensitivity, Mapping, and Macro. Each field is explained in the following pages.
text_image
Call of Duty Mobile Mode Default Mode 1 Sensitivity Mapping Macro General X axis 60 Y axis 60 Activate Turn Assist When activating Turn Axial, you could move forward a direction without pulling mouse. Launch Key → Not Set Trigger Toggle >Sensitivity
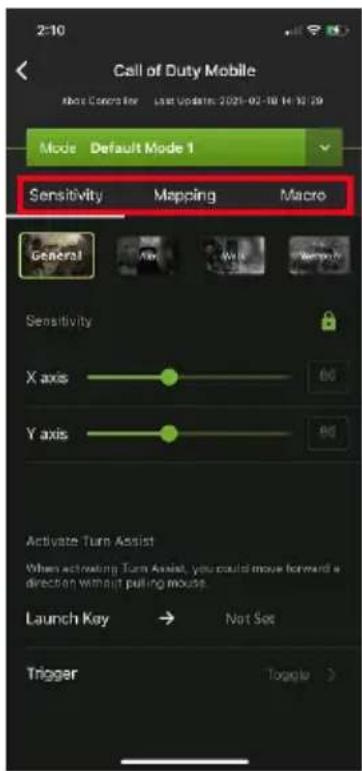
The sensitivity page accesses configuration for most mouse sensitivity settings through the General Mode, Aim (Aim-Down-Sight) Mode, Walk Mode, and Weapon Mode tabs. From the configuration page, tap Sensitivity.
- General Mode: the normal view the character has when looking or moving around in the game.
- Aim (Aim-Down-Sight) Mode: the view the character has when zooming-in to look through a scope.
♦ Walk Mode: allows setting a slower, quieter movement pace. - Weapon Mode: allows access to special functions such as swapping L/R sticks and turn assist.
text_image
2:10 Call of Duty Mobile Mode Control Key Last Update 2021-02-18 14:30:29 Mode Default Mode 1 Sensitivity Mapping Macro General Sensitivity X axis 80 Y axis 80 Activate Turn Assist When activating Turn Assist, you could move forward a direction without pulling mouse. Launch Key → Not Set Trigger Toggle >General Mode
These settings configure how the mouse movements respond when not aiming-down-sight (ADS). To access to the General Mode, tap on General.
text_image
Call of Duty Mobile Mode Default Mode 1 Sensitivity Mapping Macro General Sensitivity X axis 80 Y axis 80 Activate Turn Assist When activating Turn Assist, you could move forward a direction without pulling mouse. Launch Key → Not Set Trigger Toggle >| Name | Details |
| Sensitivity | Sets the sensitivity for mouse movement. A higher number feels more responsive, while a lower number feels more controlled.◆ Use X to set the sensitivity of right and left movements◆ Use Y to set the sensitivity of up and down movements |
Lock | The lock icon is used to bind the X and Y settings so that moving either one will move both settings. Click the icon to unlock the settings and set each to different values. |
| Turn AssistLaunch Key | Sets the key to active Turn Assist, which allows the view to continue moving the current direction by holding a key. Useful for making long slow turns with tank turrets, etc. |
| Turn Assist Trigger | Sets the Turn Assist Launch key to function as a toggle (on/off) or hold key. |
| Advanced Settings | Allows access to configure advanced settings such as Invert Mouse Movement, Turn Speed, Mouse Traction Control, Curve, Mouse Curve Shape, and Deadzone. |
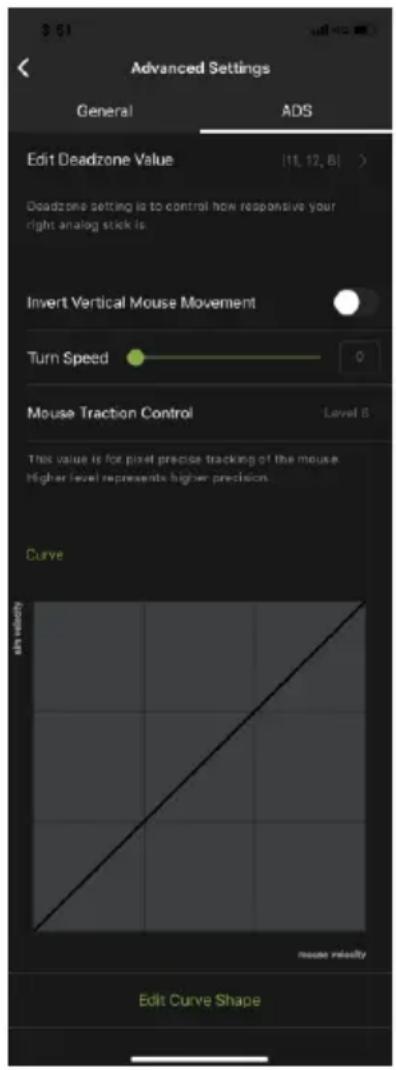
General Mode Advanced Settings

text_image
Advanced Settings General ADS Edit Deadzone Value [11, 12, 8] Deadzone setting is to control how responsive your right analog stick is. Invert Vertical Mouse Movement Turn Speed 0 Mouse Traction Control Level 4 This value is for pixel precise tracking of the mouse. higher level represents higher precision. Curve noise velocity noise velocity Edit Curve Shape| Name | Details |
| Edit Deadzone Value | Adjusts the amount of movement input required before the game registers an actual movement in-game. |
| Invert Vertical Mouse Movement | Toggles to reverse the up/down movements of the mouse, so that pushing the mouse forward causes a downward movement and pulling the mouse back causes an upward movement. |
| Turn Speed | Adjusts the turn speed of on-screen movements. For more information, see Turn Speed. |
| Mouse Traction Control | Caps the amount of aiming inclination or declination permitted when making long turns with the mouse. For more information, see Mouse Traction Control. |
Deadzone Sengs
The Deadzone Settings lets you adjust the size of the controller's Deadzone. Tap Edit Deadzone Value to edit, and below screen appears.
text_image
1:24 Discard Edit Deadzone Save Type Auto X axis 12 Y axis 12 XY value 8 Preview Setting TipsThe Deadzone is a small area around the controller's movement stick (usually the right stick) that does not respond to movements. Movement only occurs when the Right Stick moves outside the Deadzone. Deadzones are built into games so old controllers with worn sticks will not cause on-screen movement when the control is sitting still.
Right Stick Deadzone
text_image
Right Stick Control Deadzone (no movement) Movement
text_image
Right Stick Control No Deadzone MovementDepending upon the amount of Deadzone built into the game, this may case a delay in mouse response or decreased mouse performance when playing games with KeyMander 2 Mobile. Properly adjusting the Deadzone removes any delay to the mouse and delivers significantly sharper and smoother movements for much more accurate results, especially when aiming-down-sight in FPS games. For this reason adjustment of the Deadzone is strongly recommended
With the deadzone properly adjusted, small movements translate to accurate shots.

text_image
10mm 10mmWithout adjustment small movements may not be recognized, causing missed shots.

text_image
10mm 10mmSeng the Deadzone
Use the K2 Mobile app to adjust the Deadzone settings for the mouse so that the aim/look view begins moving slowly on its own in the direction of the adjustment – up, right, or diagonally up. You will need to make a change then observe the effect of the change until the player in the game starts to move slowly in the direction of the adjustment. It is important that you stop adjusting at the point where the player begins to move in the game – this is where the Deadzone is set perfectly. That means for example, if setting the X axis to 16 causes the aim/look view to begin slowly moving to the right, the correct X axis deadzone setting is 16.
Note: It is important to remember that the Deadzone setting can change if the in-game sensitivity setting is changed, so make sure to set the Deadzone AFTER setting the in-game sensitivity to maximum!
To set the Deadzone:
-
Start a first-person shooter (FPS) game and open the Deadzone Settings.
-
Select the Zone Type. If you do not know the zone type, select Auto.
Note: If Auto is selected, you can also adjust the XY (diagonal) value.
text_image
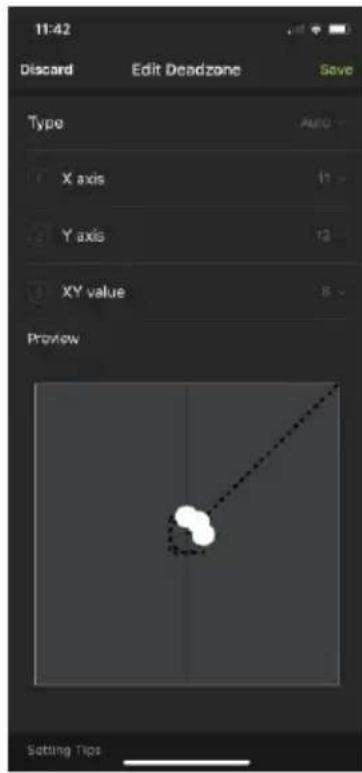
11:42 Discard Edit Deadzone Save Type AUTO X axis 11 Y axis 12 XY value 8 Preview Setting Tips- To adjust the X, Y, and XY values, tap on them to display the adjustment bars.

text_image
3-18 Discard Edit Deadzone Save Type Auto X axis 9 Y axis 10 XY value 2 Preview- Adjust the dots by increasing or decreasing the X, Y, and XY values, the dots re-adjust accordingly. While watching the game until the player in the game starts to move slowly in the direction of the adjustment.
Note: It's important that you stop adjusting the graph at the point (mouse click) where the player begins to move in the game – this is where the Deadzone is set perfectly. If you go past the point, simply decrease the value until the player stops moving and adjust again.

text_image
4.10 Discard Edit Deadzone Save X axis - + Y axis - + XY value - + Preview Setting Fox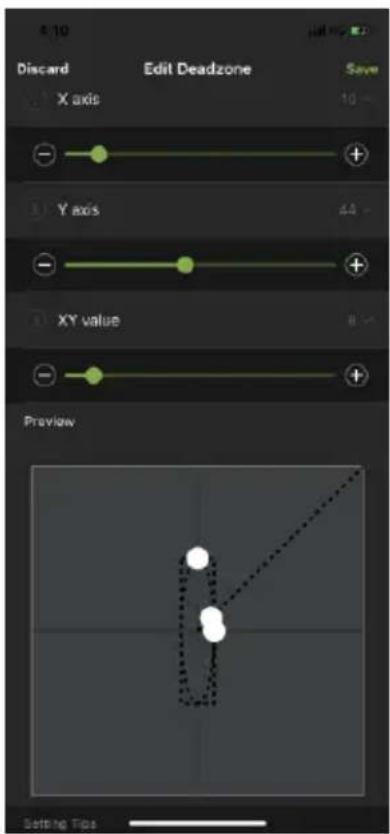
text_image
4.10 Discard Edit Deadzone Save X axis + - Y axis 64 - XY value 8 - Preview Setting Tips
text_image
4-11 Discard Edit Deadzone Save Y axis 10 XY value 69 Preview Setting TimeNote: It is very important that you set each direction's Deadzone (X-axis, Y-axis and Diagonal) when using the Auto Zone Type.
-
Click Save to save the Deadzone settings to the current profile.
-
Test the mouse within the first-person shooter game. Movements will be smooth, stable and accurate. You'll also notice that shooting becomes more steady and reliable than with the game controller.
If any mouse movements are shaky or jumpy repeat the steps to set the Deadzone. With the Deadzone set correctly the mouse performance should be excellent.
Turn Speed
The Turn Speed adjusts the amount of acceleration that the KeyMander 2 Mobile adds when moving your mouse. A setting of 0 on the slider is equal to zero acceleration added by KeyMander 2 Mobile. Settings of 1-50 add progressively greater amounts of aim acceleration to compensate for games with a slow Look mechanic.
When tuning your profiles, it is always best to start at 0 and begin making adjustment only when needed. For best accuracy remember to tune your Sensitivity (see Sensitivity) first, then fine tune the Turn Speed slider as needed for your style of play. Here's a quick visual of how increasing Turn Speed slider setting works:
| Slow Swipe 3 inches | Fast Swipe 3 inches |
| ON-SCREEN CURSOR MOVES 400 PIXELS | ON-SCREEN CURSOR MOVES 1200 PIXELS |
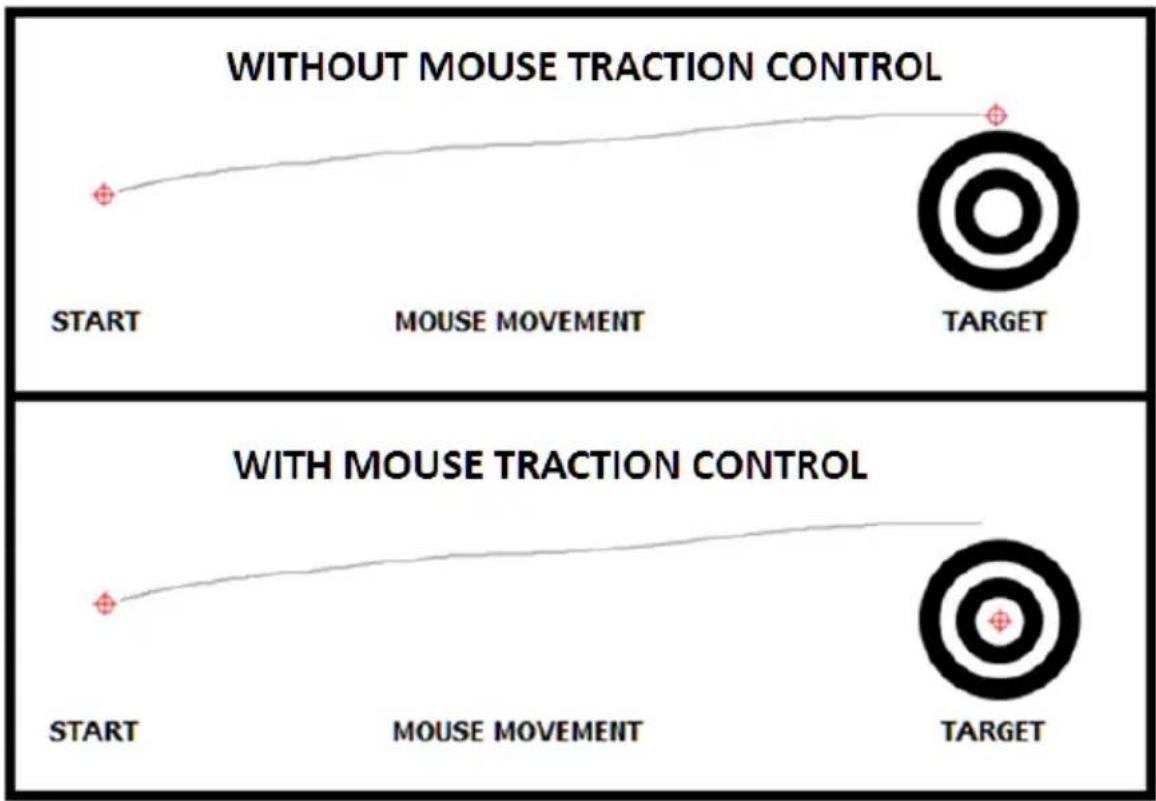
Mouse Tracon Control
The Mouse Traction Control setting adjusts the amount of vertical correction applied when moving the mouse horizontally. This is to help keep the general mode view level when making fast, long turns.
This feature is designed to see an enemy behind you when spinning 180 degrees, a slightly angled mouse swipe does not cause you to be aiming above their head or below their feet.
The cost of this ability can be a loss of precision when making diagonal movements or small movements when aiming-down-sight for sniping. A setting of Level 7 is equal to maximum vertical correction applied by the KeyMander 2 Mobile, and higher settings add decreasing amounts of correction down to level 1 where zero correction is applied.
Depending on the game, most users will see improved performance accuracy in long turns with the default setting, and advanced users will still see some benefits between levels 2-3. High level users that want no correction should select level 1.
text_image
WITHOUT MOUSE TRACTION CONTROL START MOUSE MOVEMENT TARGET WITH MOUSE TRACTION CONTROL START MOUSE MOVEMENT TARGETCurve Seng
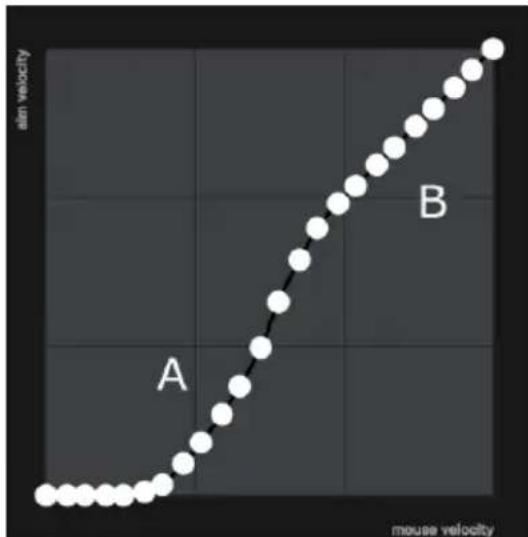
The Curve Setting is for adjusting the relationship of Mouse Velocity (physical mouse speed) to Aim Velocity (on-screen speed). Scroll down the General Advanced page, and tap Edit Curve Shape.
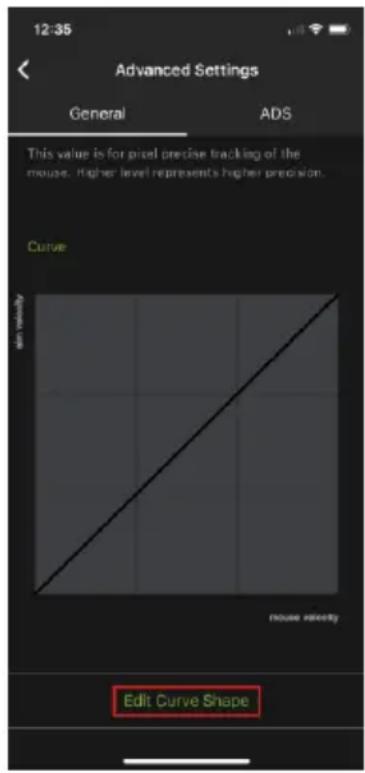
text_image
12:35 Advanced Settings General ADS This value is for pixel precise tracking of the mouse. Higher level represents higher precision. Curve Edit Curve ShapeThe Edit Curve Shape page appears. Curve settings are used to fine tune how physical mouse movements respond on-screen (in the game). The default curve has a 1:1 ratio: Physical mouse speed equals on-screen speed. Adjustments can limit movements, stretch movements and increase or decrease progressive movements.

text_image
12:31 Discard Edit Curve Shape Save mouse velocity mouse velocity| Function | Description |
| Discard | Tap Discard to remove the adjusted curve. |
| Save | Tap Save to save the adjusted curve. |
| Curve Type | Click a curve type to use a predefined curve for mouse movements. You can change the shape of a curve type at the points provided. Select a curve type to use as a template and adjust the curve to suit your needs. |
Custom | Use custom to make fine adjustments to the curve. When selected 24 points appear allowing you to adjust the shape of the curve. Click and drag the points up or down to make adjustments. You can select a Curve Type and then click Custom to adjust it as you wish.Examples are provided in Adjusting the Curve. |
| Aim Velocity | Aim Velocity refers to the speed of on-screen movements. |
| Mouse Velocity | Mouse Velocity refers to the speed of physical mouse movements. |
Curve
The Curve is the relationship of Mouse Velocity (physical mouse speed) to Aim Velocity (on-screen speed). When the physical mouse and on-screen speed are the same, the curve looks like this:

line
| atm velocity | mouse velocity | | ------------ | ------------- | | 0.5 | 0.2 |Mouse Velocity increases from left to right. Aim Velocity increases from bottom to top. As you adjust the curve up and down, the relationship of physical mouse speed to on-screen speed changes. The two sections represent different movements:

text_image
skin velocity A mouse velocity BA: Close Aiming Movements B: Long Turning Movements
Pulling the Curve up makes the on-screen movements faster and pulling the Curve down restricts the speed – of A or B as the mouse is moved.
Adjusng the Curve
Adjusting the curve allows you to fine tune turn acceleration, deceleration, high and low speeds with limits, and boost velocity. Use the graph points to adjust the curve to suit your needs. Use the examples below to understand how adjusting (A) Aiming and (B) Turning affect movements in the game:
(A) Low Aim Speed / (B) High Turn Speed

line
| mouse velocity | aim velocity | | -------------- | ------------ | | 0 | 0 | | 1 | 1 | | 2 | 2 | | 3 | 3 | | 4 | 4 | | 5 | 5 | | 6 | 6 | | 7 | 7 | | 8 | 8 | | 9 | 9 | | 10 | 10 | | 11 | 11 | | 12 | 12 | | 13 | 13 | | 14 | 14 | | 15 | 15 | | 16 | 16 | | 17 | 17 | | 18 | 18 | | 19 | 19 | | 20 | 20 | | 21 | 21 | | 22 | 22 | | 23 | 23 | | 24 | 24 | | 25 | 25 | | 26 | 26 | | 27 | 27 | | 28 | 28 | | 29 | 29 | | 30 | 30 | | 31 | 31 | | 32 | 32 | | 33 | 33 | | 34 | 34 | | 35 | 35 | | 36 | 36 | | 37 | 37 | | 38 | 38 | | 39 | 39 | | 40 | 40 | | 41 | 41 | | 42 | 42 | | 43 | 43 | | 44 | 44 | | 45 | 45 | | 46 | 46 | | 47 | 47 | | 48 | 48 | | 49 | 49 | | 50 | 50 | | 51 | 51 | | 52 | 52 | | 53 | 53 | | 54 | 54 | | 55 | 55 | | 56 | 56 | | 57 | 57 | | 58 | 58 | | 59 | 59 | | 60 | 60 | | 61 | 61 | | 62 | 62 | | 63 | 63 | | 64 | 64 | | 65 | 65 | | 66 | 66 | | 67 | 67 | | 68 | 68 | | 69 | 69 | | 70 | 70 | | 71 | 71 | | 72 | 72 | | 73 | 73 | | 74 | 74 | | 75 | 75 | | 76 | 76 | | 77 | 77 | | 78 | 78 | | 79 | 79 | | 80 | 80 | | 81 | 81 | | 82 | 82 | | 83 | 83 | | 84 | 84 | | 85 | 85 | | 86 | 86 | | 87 | 87 | | 88 | 88 | | 89 | 89 | | 90 | 90 | | 91 | 91 | | 92 | 92 | | 93 | 93 | | 94 | 94 | | 95 | 95 | | 96 | 96 | | 97 | 97 | | 98 | 98 | | 99 | 99 | | >100 | >10 |(A) Increasing Thrust for Aiming / (B) Prevent High Turn Speed

line
| Phase | Mouse Velocity | |-------|----------------| | A | Low | | | Medium | | | High | | | Very High | | B | High | | | Very High |(A) Normal Aim Speed / (B) Increasing Thrust for Turning

line
| mouse velocity | aim velocity | | -------------- | ------------ | | 0 | 0 | | 1 | 1 | | 2 | 2 | | 3 | 3 | | 4 | 4 | | 5 | 5 | | 6 | 6 | | 7 | 7 | | 8 | 8 | | 9 | 9 | | 10 | 10 | | 11 | 11 | | 12 | 12 | | 13 | 13 | | 14 | 14 | | 15 | 15 | | 16 | 16 | | 17 | 17 | | 18 | 18 | | 19 | 19 | | 20 | 20 | | 21 | 21 | | 22 | 22 | | 23 | 23 | | 24 | 24 | | 25 | 25 | | 26 | 26 | | 27 | 27 | | 28 | 28 | | 29 | 29 | | 30 | 30 | | 31 | 31 | | 32 | 32 | | 33 | 33 | | 34 | 34 | | 35 | 35 | | 36 | 36 | | 37 | 37 | | 38 | 38 | | 39 | 39 | | 40 | 40 | | 41 | 41 | | 42 | 42 | | 43 | 43 | | 44 | 44 | | 45 | 45 | | 46 | 46 | | 47 | 47 | | 48 | 48 | | 49 | 49 | | 50 | 50 | | 51 | 51 | | 52 | 52 | | 53 | 53 | | 54 | 54 | | 55 | 55 | | 56 | 56 | | 57 | 57 | | 58 | 58 | | 59 | 59 | | 60 | 60 | | 61 | 61 | | 62 | 62 | | 63 | 63 | | 64 | 64 | | 65 | 65 | | 66 | 66 | | 67 | 67 | | 68 | 68 | | 69 | 69 | | 70 | 70 | | 71 | 71 | | 72 | 72 | | 73 | 73 | | 74 | 74 | | 75 | 75 | | 76 | 76 | | 77 | 77 | | 78 | 78 | | 79 | 79 | | 80 | 80 | | 81 | 81 | | 82 | 82 | | 83 | 83 | | 84 | 84 | | 85 | 85 | | 86 | 86 | | 87 | 87 | | 88 | 88 | | 89 | 89 | | 90 | 90 | | 91 | 91 | | 92 | 92 | | 93 | 93 | | 94 | 94 | | 95 | 95 | | 96 | 96 | | 97 | 97 | | 98 | 98 | | 99 | 99 | | B | B |(A) Normal Aim Speed / (B) Low Turn Speed

(A) Decrease Aim Speed / (B) Normal Turn Speed
line
| mouse velocity | air velocity | | -------------- | ------------ | | 0 | 0 | | 1 | 0.5 | | 2 | 1 | | 3 | 1.5 | | 4 | 2 | | 5 | 2.5 | | 6 | 3 | | 7 | 3.5 | | 8 | 4 | | 9 | 4.5 | | 10 | 5 | | 11 | 5.5 | | 12 | 6 | | 13 | 6.5 | | 14 | 7 | | 15 | 7.5 | | 16 | 8 | | 17 | 8.5 | | 18 | 9 | | 19 | 9.5 | | 20 | 10 | | 21 | 10.5 | | 22 | 11 | | 23 | 11.5 | | 24 | 12 | | 25 | 12.5 | | 26 | 13 | | 27 | 13.5 | | 28 | 14 | | 29 | 14.5 | | 30 | 15 | | 31 | 15.5 | | 32 | 16 | | 33 | 16.5 | | 34 | 17 | | 35 | 17.5 | | 36 | 18 | | 37 | 18.5 | | 38 | 19 | | 39 | 19.5 | | 40 | 20 | | 41 | 20.5 | | 42 | 21 | | 43 | 21.5 | | 44 | 22 | | 45 | 22.5 | | 46 | 23 | | 47 | 23.5 | | 48 | 24 | | 49 | 24.5 | | 50 | 25 | | 51 | 25.5 | | 52 | 26 | | 53 | 26.5 | | 54 | 27 | | 55 | 27.5 | | 56 | 28 | | 57 | 28.5 | | 58 | 29 | | 59 | 29.5 | | 60 | 30 | | 61 | 30.5 | | 62 | 31 | | 63 | 31.5 | | 64 | 32 | | 65 | 32.5 | | 66 | 33 | | 67 | 33.5 | | 68 | 34 | | 69 | 34.5 | | 70 | 35 | | 71 | 35.5 | | 72 | 36 | | 73 | 36.5 | | 74 | 37 | | 75 | 37.5 | | 76 | 38 | | 77 | 38.5 | | 78 | 39 | | 79 | 39.5 | | 80 | 40 | | 81 | 40.5 | | 82 | 41 | | 83 | 41.5 | | 84 | 42 | | 85 | 42.5 | | 86 | 43 | | 87 | 43.5 | | 88 | 44 | | 89 | 44.5 | | 90 | 45 | | 91 | 45.5 | | 92 | 46 | | 93 | 46.5 | | 94 | 47 | | 95 | 47.5 | | 96 | 48 | | 97 | 48.5 | | 98 | 49 | | 99 | 49.5 | | 100 | 50 |Aim Mode (Aim-Down-Sight)
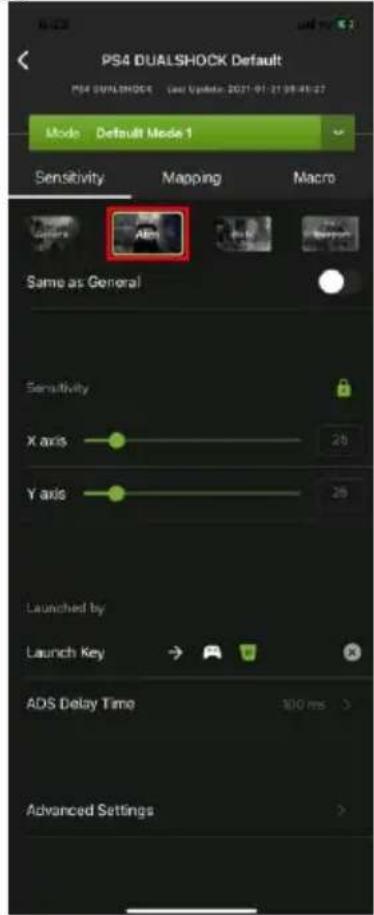
To access to the aim mode (Aim-Down-Sight), tap on Aim. The Aim Mode (Aim-Down-Sight) page appears.
text_image
PS4 DUALSHOCK Default PS4 DUALSHOCK User Update: 2021-01-21 08:46:27 Mode Default Mode 1 Sensitivity Mapping Macro Same as General Aim Sensitivity X axis 25 Y axis 25 Launched by Launch Key ADS Delay Time 300 ms Advanced Settings| Name | Details |
| Same as General | Uncheck this box to configure the ADS Mode settings. Checking this box sets the ADS Mode to use the same settings as the Aim Look Mode. |
| Sensitivity | The Aim Look sensitivity bar sets how quick or slow mouse movements respond. The higher the number the more loose the movements will feel and the lower the number the more tight the movements will feel.◆ Use X to set the sensitivity of right and left movements◆ Use Y to set the sensitivity of up and down movements |
Lock | The lock icon is used to fix the X and Y settings so that both stay the same. Click the icon to unlock the settings and set each to different values. |
| Launch Key | Use the drop-down menu to select the controller button that is used to zoom-in to an ADS view. |
Chapter 4. Using the K2 Mobile App
| ADS Delay time | Sets the delay for switching between General and ADS view. |
| Advanced Settings | Allows you to configure advanced settings such as Invert Vertical Mouse Movement, Turn Speed, Mouse Traction Control, Curve, Edit Curve Shape, and Edit Deadzone. |
Aim Mode Advanced Sengs
text_image
Advanced Settings General ADS Edit Deadzone Value [11, 12, 8] Deadzone setting is to control how responsive your right analog stick is. Invert Vertical Mouse Movement Turn Speed 0 Mouse Traction Control Level 5 This value is for pixel precise tracking of the mouse higher level represents higher precision. Curve mouse velocity Edit Curve ShapeUse these settings to set how the mouse movements respond when the character has zoomed in, such as through a scope. Please refer to the General Mode settings to configure the Aim Mode advanced settings.
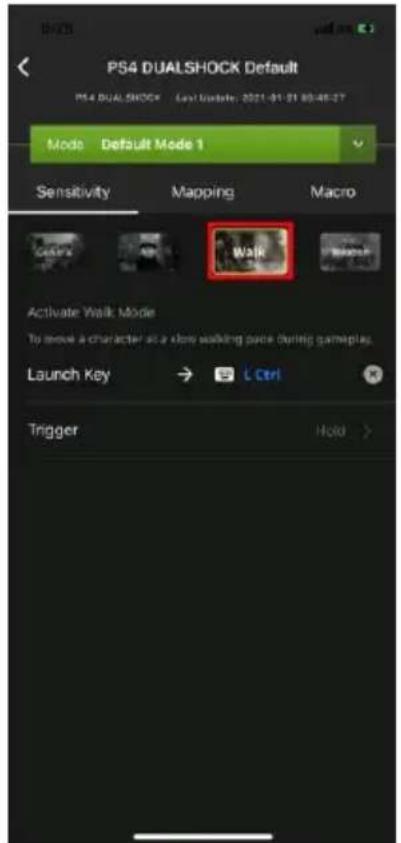
Walk Mode
To access to the Walk Mode, tap the Walk tab. Use these settings to enable walk mode during game play.
text_image
PS4 DUALSHOCK Default PS4 DUAL SHOCK Last Update: 2021-01-01 09:48:27 Mode Default Mode 1 Sensitivity Mapping Macro Walk Activate Walk Mode To move a character at a slow walking pace during gameplay. Launch Key → L Ctrl Trigger Hold >| Name | Details |
| Launch Key | Tap to configure a controller button that is used to launch the walk mode. |
| Trigger | Tap to select the trigger method between toggle or hold. |
Weapon Mode
To access to the Weapon Mode, tap on Weapon. Use these settings to enable weapon mode during game play.
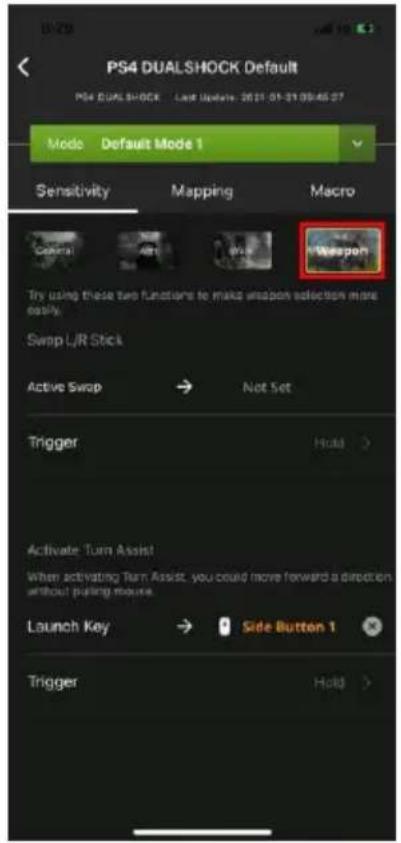
text_image
PS4 DUALSHOCK Default PS4 DUALSHOCK Last Update: 2021-01-21 09:46:27 Mode Default Mode 1 Sensitivity Mapping Macro Trigger Alert WAF Weapon Try using these two functions to make weapon selection more easily Swap L/R Stick Active Swap → Not Set Trigger Hold > Activate Turn Assist When activating Turn Assist, you could move forward a direction without pulling mouse. Launch Key → Side Button 1 Trigger Hold >| Name | Details |
| Active Swap | Tap to configure a controller button that is used to launch the active swap. |
| Trigger | Tap to select the trigger method between toggle or hold. |
| Launch Key | Tap to configure a controller button that is used to launch the active turn assist. |
| Trigger | Tap to select the trigger method between toggle or hold. |
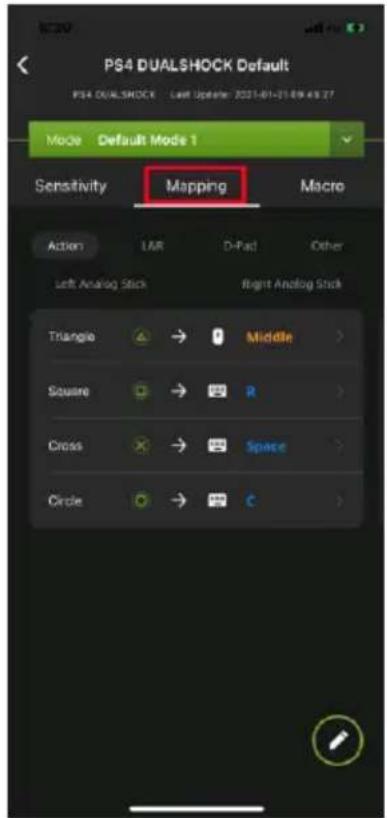
Mapping
The Mapping page is for mapping the controller buttons to the keyboard and mouse. From the configuration page, tap Mapping.
text_image
PS4 DUALSHOCK Default PS4 DUALSHOCK Left Update: 2021-01-21 09:43:27 Mode Default Mode 1 Sensitivity Mapping Macro Action LAR D-Pac Other Left Analog Stick Right Analog Stick Triangle → Middle > Square → R > Cross → Space > Circle → C >There are five mapping fields, Actions, L&R, D-Pad, Other, Left Analog Stick, and Right Analog Stick.
Acon

text_image
PS4 DUALSHOCK Default PS4 DUALSHOCK Last Update: 2021-01-21 09:45:27 Mode Default Mode 1 Sensitivity Mapping Macro Action L&R D-Pac Other Left Analog Stack Right Analog Stack Triangle → Middle > Square → Cross → Space Circle → CL&R

text_image
PS4 DUALSHOCK Default PS4 DUALSHOCK Last Update: 2021-01-27 09:48:27 Mode Default Mode 1 Sensitivity Mapping Macro Actions L&R D-Pad Other Left Analog Stick Right Analog Stick L1 → Q L2 → Right R1 → F R2 → LeftD-Pad
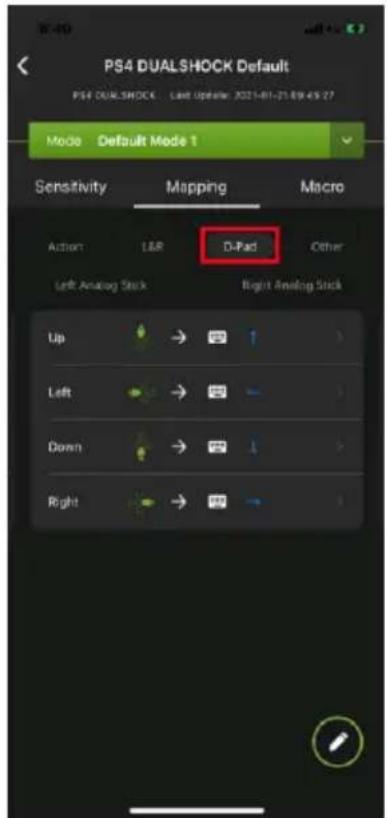
text_image
PS4 DUALSHOCK Default PS4 DUALSHOCK Last Update: 2021-01-21 09:45:27 Mode Default Mode 1 Sensitivity Mapping Macro Action L&R Other Left Analog Stick Right Analog Stick Up → ↑ Left → ← Down → ↓ Right → ↑Other
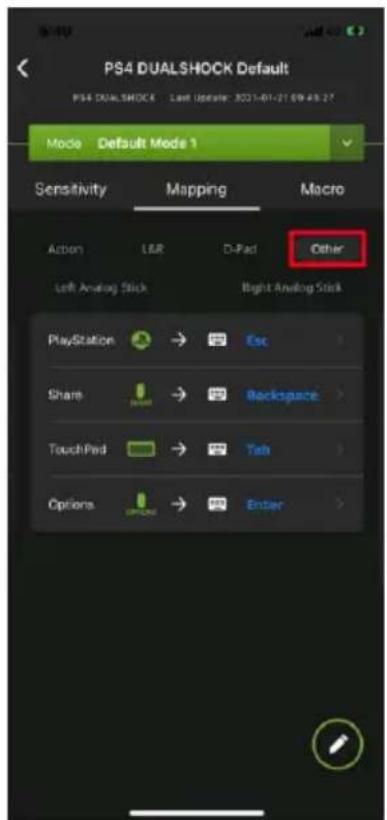
text_image
PS4 DUALSHOCK Default PS4 DUALSHOCK Last Update: 2021-01-27 09:45:27 Mode Default Mode 1 Sensitivity Mapping Macro Action L&R D-Pad Other Left Analog Stick Right Analog Stick PlayStation → Esc Share → Backspace > TouchPad → Tab > Options → Enter >Le Analog Sck

text_image
PS4 DUALSHOCK Default PS4 DUALSHOCK Last Update: 2021-01-21 09:45:27 Mode Default Mode 1 Sensitivity Mapping Macro Action L&R D-Pad Other Left Analog Stick Right Analog Stick Up → W Left → A Down → S Right → D L3 → Shift >Right Analog Sck

text_image
PS4 DUALSHOCK Default PS4 DUALSHOCK Last Update: 2021-01-21 09:48:27 Mode Default Mode 1 Sensitivity Mapping Macro Action L&R D-Pad Other Left Analog Stick Right Analog Stick Up → Not Set Left → Not Set Down → Not Set Right → Not Set RS → 167Conguring Key Mappings
Each controller button can be mapped to a keyboard, mouse or joystick. For default button mappings, see Controller to Keyboard Button Layout.
To map a controller button, follow the steps below.
- From the mapping page, tap on the button you wish to map.

text_image
PS4 DUALSHOCK Default PS4 DUALSHOCK Last Update: 2021-01-21 09:46:27 Mode Default Mode 1 Sensitivity Mapping Macro Action L&I D-Pad Other Left Analog Stick Right Analog Stick Up → ↑ Left → ↓ Down → ↓ Right → → ↓- From the configuration page, tap Primary Key to enable the listening mode. You may now map the selected button to a keyboard, mouse, or joystick.
Note: For extra mappings, Option Key 1 and Option Key 2 are available.

text_image
Discard Up Save Map Key Primary Key → ↑ Option Key 1 → Not Set Option Key 2 → Next Set Turbo Turbo ModeKeyboard: Press a key on the keyboard to map a controller button to it.
Mouse: Click a mouse button to map the controller button to it.
Joystick: Press a button to map the controller button to it.
- (Optional) Option Key 1 & 2
- (Optional) Turbo Mode, see Turbo Mode.
- Tap Save.
Quick Pairing
Quick paring allows you to map a controller button in two steps. Simply press the controller button, and then press a key on a keyboard, mouse, or joystick. For default button mappings, see Controller to Keyboard Button Layout.
To map a controller button, follow the steps below.
- From the Mapping page, Tap edit button page.

to enter the configuration

text_image
PS4 DUALSHOCK Default PS4 DUALSHOCK Last Update: 2021-01-21 09:16:27 Mode Default Mode 1 Sensitivity Mapping Macro Action L&R D-Psd Other Left Analog Stick Right Analog Stick Up → ↑ Left → ↓ Drown → ↓ Right → ↓- Press the up button on your controller to enter the listening mode. You may now map the selected button to a keyboard, mouse, or joystick.
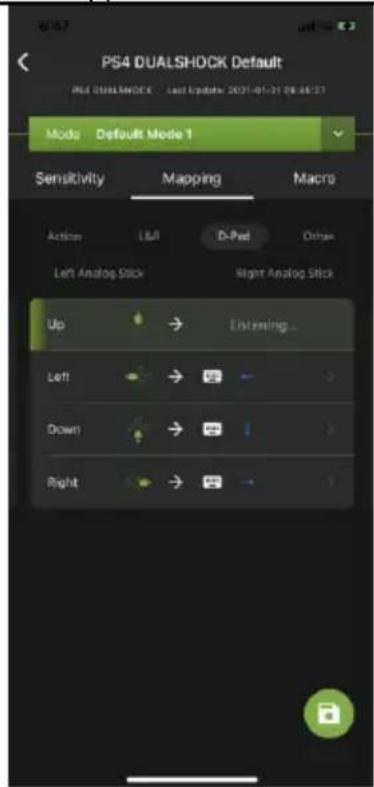
text_image
PS4 DUALSHOCK Default PS4 DUALSHOCK - Last Update: 2021-01-31 08:46:27 Mode Default Mode 1 Sensitivity Mapping Macro Actions LMI D-Psd Other Left Analog Stick Right Analog Stick Up → Listening... Left → > Drown → > Right → ?Keyboard: Press a key on the keyboard to map the controller button to a key.
Mouse: Click a mouse button to map the controller button to.
Joystick: Press a button to map the controller button to.
- Tap the save button to save the mappings.
Turbo Mode
The Turbo function allows repeat rapid fire of a button from the keyboard and mouse. You can enable or disable turbo for any controller button* and set the level (0.1\~1 second) of intensity. Turbo Mode must be on for turbo buttons to work see
Device Settings.
To setup turbo function on a button, follow the steps below.
- From the mapping page, tap on the button you wish to set turbo.

text_image
PS4 DUALSHOCK Default PS4 DUALSHOCK Last Version: 2021-01-31 06:58:27 Mode Default Mode 1 Sensitivity Mapping Macro Action L&R D-Pad Other Left Analog Stick Right Analog Stick Up → ↑ Left → ↓ Drown → ↓ Right → ↓- From the configuration page, tap to enable Turbo Mode.
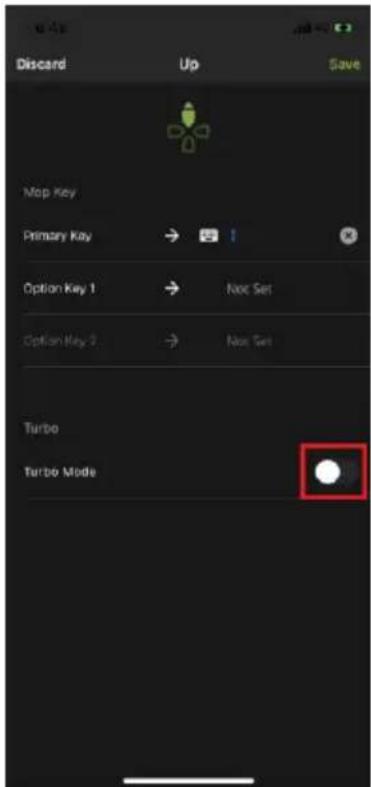
text_image
Discard Up Save Map Key Primary Key → Option Key 1 → Option Key 2 → Turbo Turbo Mode- Tap Speed to set the button timing from 0.1\~1 second.
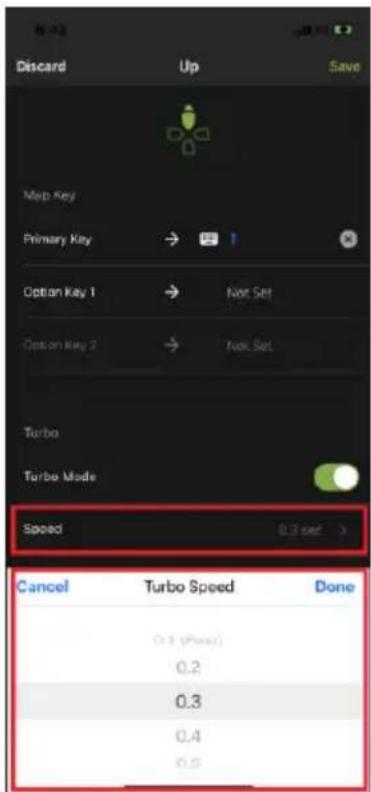
text_image
Discard Up Save Map Key Primary Key → Option Key 1 → Not Set Option Key 2 → Not Set Turbo Turbo Mode Speed 0.3 sec > Cancel Turbo Speed Done 0.1 (Speed) 0.2 0.3 0.4 0.54. Tap Save when finished.
Note: Turbo settings only work on the keyboard and mouse. Turbo settings will not work from the game controller.
Macro Mode
Macros activate multiple controller buttons into a single key or mouse click. For example you can set “X+O” or “R3+L3+R2” to execute by pressing the [Y] key on the keyboard. You can create up to 8 custom macros and each macro can have up to 8 controller buttons.

text_image
PS4 DUALSHOCK Default PS4 DUALSHOCK Last Update: 2015-01-27 08:48:27 Mode Default Mode 1 Sensitivity Mapping Macro + Create Macros Create Your Macro Macro can help to response to any situation in the gameMacro Mode [F11] must be turned on for Macros to work.
To create a macro, follow the steps below.
- From the Macro page, tap + Create Macros .
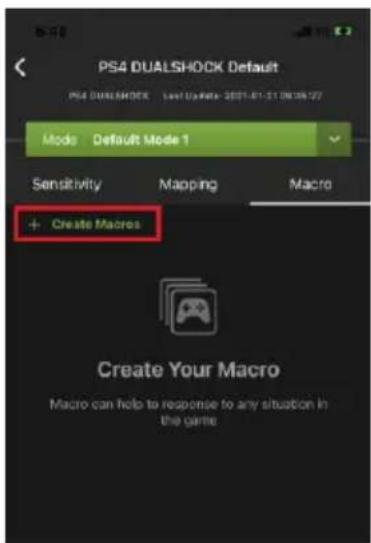
text_image
PS4 DUALSHOCK Default PS4 DUALSHOCK Model: Default Mode 1 Mode Sensitivity Mapping Macro + Create Macros Create Your Macro Macro can help to response to any situation in the game- The Recording Marco page opens. You may now start to program your Macro by pressing the buttons on the controller.

text_image
Recording Macro... Press "Stop Record" when you I'm not recording. Stop Recording- Tap Stop Recording when you have finished entering the macro. You are directed to a page to set launch key and macro label.

text_image
R-AS Discard Set Macro Info Launch Key → Not Set Macro Label Macro Key 2 Save- Tap Launch Key to map a button on the keyboard, mouse or joystick that will be used to execute the macro.
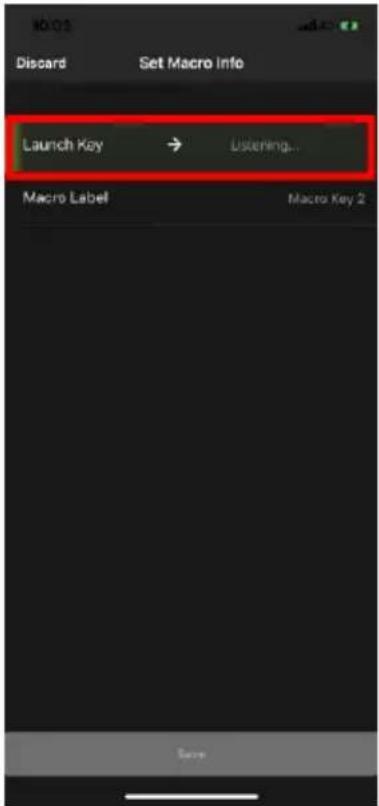
text_image
Launch Key → Listening... Macro Label Macro Key 2- Tap Macro Label to set a name for the macro to be listed in the Marco page.
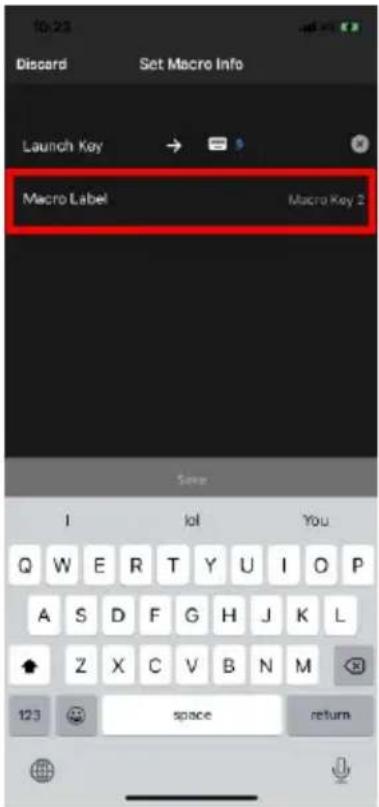
text_image
10:23 Discard Set Macro Info Launch Key Macro Label Macro Key 2 I lol You Q W E R T Y U I O P A S D F G H J K L Z X C V B N M 123 space return- Click Save. The macro appears in the Macro page.
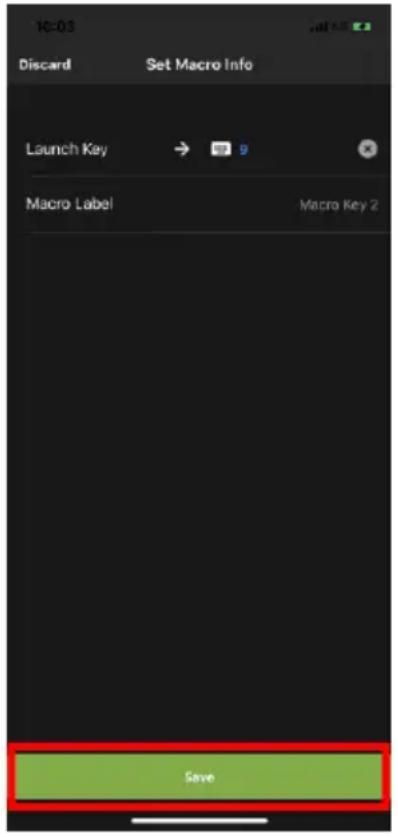
text_image
10:03 Discard Set Macro Info Launch Key Macro Label Macro Key 2 Save- Enable Macro Mode by pressing [F11] from the keyboard connected to the GE1337M KeyMander 2 Mobile.
- Press the Macro Key set in step 4 to run the macro.
The Firmware Upgrade Utility
The KeyMander 2 Mobile supports both OTA (over-the-air) and PC connection updates. Under most circumstances firmware updates will be performed using standard OTA update function found in the K2 Mobile app. There may be times however, when you wish to load a specific firmware version that is not hosted on the OTA update server (beta firmware), so the Firmware Update by PC method is explained below.
As new firmware versions become available firmware upgrade packages are posted on the IOGEAR website. The Windows-based Firmware Upgrade Utility (FWUpgrade.exe) provides a smooth automated process for upgrading the KeyMander 2 Mobile's firmware when needed. Check the web site regularly to find the latest firmware packages and information relating to them.
Before You Begin
To prepare for the firmware upgrade, do the following:
- Download the firmware .exe update file at https://www.iogear.com/support/dm/driver/GE1337M.
- Follow the instructions to download the firmware upgrade.
- Unzip the firmware upgrade package and connect the computer to the GE1337M KeyMander 2 Mobile.
Starting the Upgrade
- Plug the KeyMander 2 Mobile to the computer which you have downloaded the firmware from.
- Press and hold [Alt] + [F11].
- Wait for the LED Indicator to start flashing in white. The KeyMander 2 Mobile is now in the Firmware Upgrade Mode.
- Double click the firmware upgrade (*.exe) file, or right click and select Open. This will start the Firmware Upgrade Utility, and a window appears. Read the License Agreement, select I Agree, and then click Next.
Double click the firmware upgrade (*.exe) file, or right click and select Open. This will start the Firmware Upgrade Utility, and a window appears. Read the License Agreement, select I Agree, and then click Next.
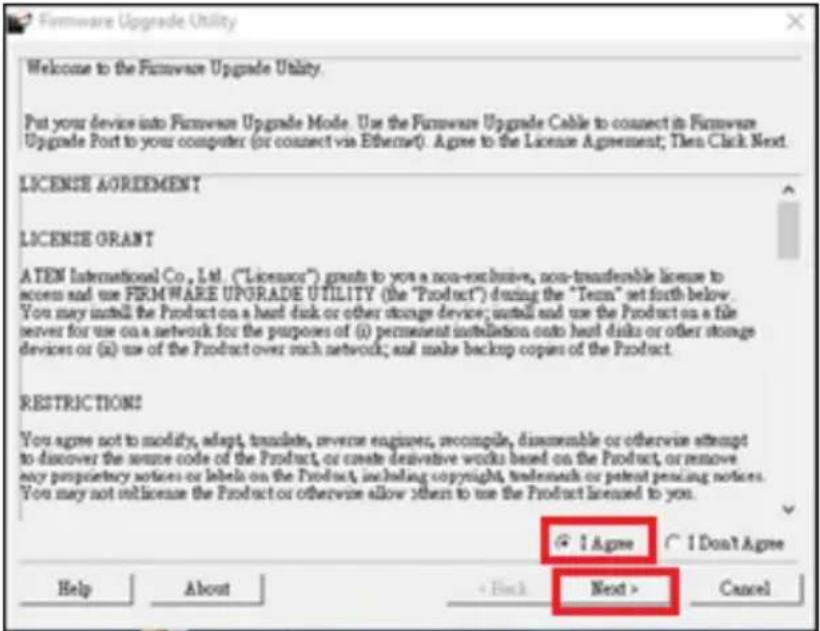
text_image
Firmware Upgrade Utility Welcome to the Firmware Upgrade Utility. Put your device into Firmware Upgrade Mode. Use the Firmware Upgrade Cable to connect in Firmware Upgrade Port to your computer (or connect via Ethernet). Agree to the License Agreement; Then Click Next. LICENSE AGREEMENT LICENSE GRANT A TEN International Co., Ltd. ("Licensor") grants to you a non-exclusive, non-transferable license to access and use FIRMWARE UPGRADE UTILITY (the "Product") during the "Term" set forth below. You may install the Product on a heat disk or other storage device; install and use the Product on a file server for use on a network for the purposes of (i) permanent installation onto heat disks or other storage devices or (ii) use of the Product over much network; and make backup copies of the Product. RESTRICTIONS You agree not to modify, adapt, translate, reverse engineer, recompile, disassemble or otherwise attempt to discover the source code of the Product, or create derivative works based on the Product, or remove any proprietary notices or labels on the Product, including copyright, trademark or patent pricing notices. You may not license the Product or otherwise allow them to use the Product licensed to you. I Agree I Don't Agree Help About Back Next > Cancel- The Firmware Utility main screen appears and lists the device that can be upgraded in the Device List panel..
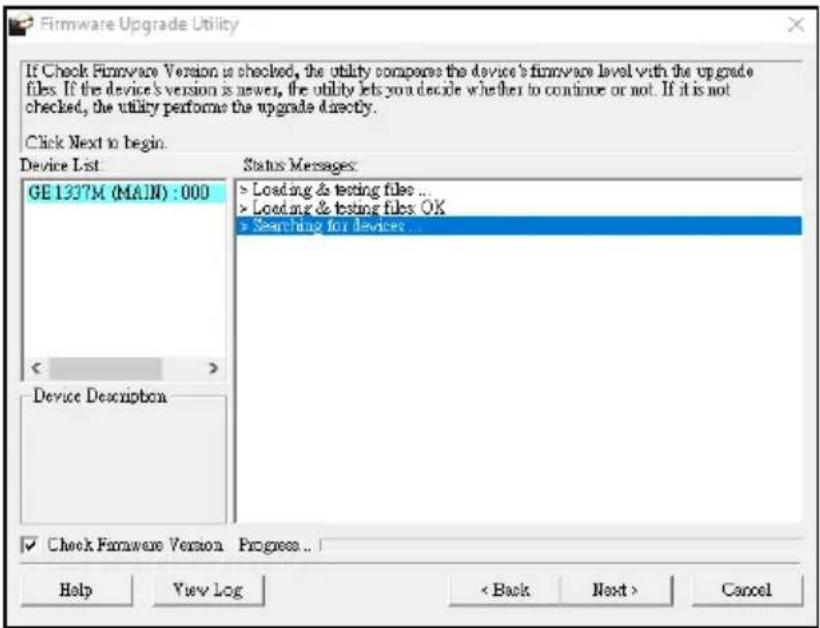
text_image
Firmware Upgrade Utility If Check Firmware Version is checked, the utility compares the device's firmware level with the upgrade files. If the device's version is newer, the utility lets you decide whether to continue or not. If it is not checked, the utility performs the upgrade directly. Click Next to begin. Device List GE 1337M (MAIN) : 000 < > Device Description Status Messages: > Loading & testing files ... > Loading & testing files OK > Searching for devices... ✓ Check Firmware Version Progress... Help View Log < Back Next > Cancel8. Click Next to perform the upgrade.

text_image
Firmware Upgrade Utility If Check Firmware Version is checked, the utility compares the device's firmware level with the upgrade file. If the device's version is never, the utility lets you decide whether to continue or not. If it is not checked, the utility performs the upgrade directly. Click Next to begin. Device List: GE 1337M (MAIN) : 000 < > Device Description Status Messages > Loading & testing files ... > Loading & testing files: OK > Search log for devices ... ✓ Check Firmware Version Progress... Help View Log < Back Next > Cancel- If you enabled Check Firmware Version, the Utility compares the device's firmware level with that of the upgrade files. If the device's version is higher than the upgrade version, it brings up a dialog box informing you of the situation and gives you the option to continue the upgrade:

text_image
Warning The firmware (Ver 1.1.102) is not newer than current firmware (Ver 1.1.103) in device GE1337M (MAIN) : 000 Continue the upgrade? (Yes/No) Yes NoIf you didn't enable Check Firmware Version, the Utility installs the upgrade files without checking whether they are a higher level, or not.
As the Upgrade proceeds status messages appear in the Status Messages panel, and the progress toward completion is shown on the Progress bar.
Upgrade Succeeded
After the upgrade has completed, a screen appears to inform you that the procedure was successful:
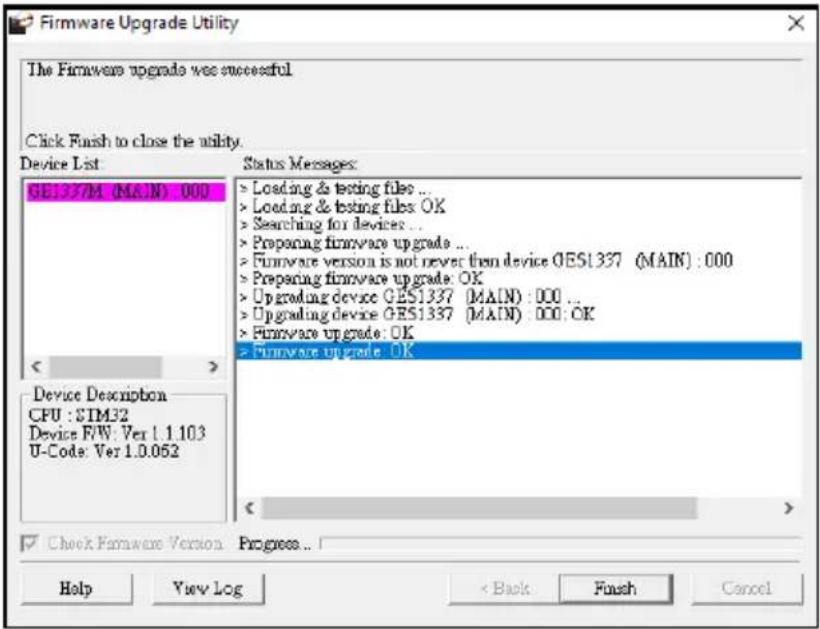
text_image
Firmware Upgrade Utility The Firmware upgrade was successful Click Finish to close the utility. Device List GE137/M (MAIN) 000 Status Messages: > Loading & testing files ... > Loading & testing files OK > Searching for devices ... > Preparing firmware upgrade ... > Firmware version is not never then device OES1337 (MAIN) : 000 > Preparing firmware upgrade: OK > Upgrading device OES1337 (MAIN) : 000 ... > Upgrading device OES1337 (MAIN) : 000: OK > Firmware upgrade: OK > Firmware upgrade: OK Device Description CPU : STM32 Device F/W: Ver 1.1.103 U-Code: Ver 1.0.052 Check Firmware Version Progress... Help View Log < Back Finish CancelClick Finish to close the Firmware Upgrade Utility.
Upgrade Failed
If the upgrade failed to complete successfully the Upgrade Failed screen appears:
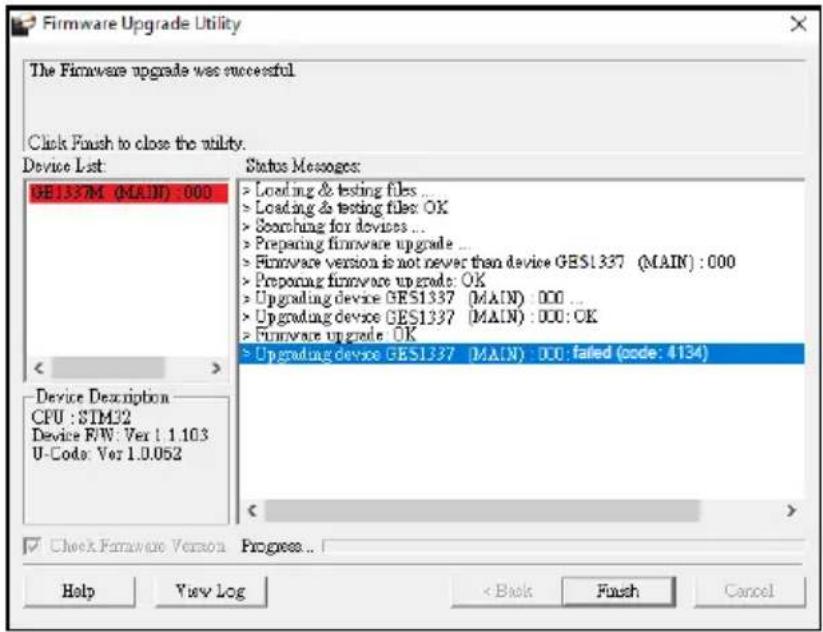
text_image
Firmware Upgrade Utility The Firmware upgrade was successful Click Flush to close the utility. Device List: GE1337M (MAIN) : 000 Status Messages: > Loading & testing files ... > Loading & testing files: OK > Searching for devices ... > Preparing firmware upgrade ... > Firmware version is not never than device GES1337 (MAIN) : 000 > Preparing firmware upgrade: OK > Upgrading device GES1337 (MAIN) : 000 ... > Upgrading device GES1337 (MAIN) : 000: OK > Firmware upgrade: OK > Upgrading device GES1337 (MAIN) : 000: failed (code: 4134) Device Description CPU : STM32 Device F/W: Ver 1.1.103 U-Code: Ver 1.0.052 < > ✓ Check Firmware Version Progress... Help View Log < Back Finish CancelClick Cancel to close the Firmware Upgrade Utility. See the next section, Firmware Upgrade Recovery, for how to proceed.
Firmware Upgrade Recovery
There are three conditions that call for firmware upgrade recovery:
- When the unit’s firmware becomes corrupted and you are unable to operate it.
- When a firmware upgrade procedure is interrupted or the KeyMander 2 Mobile is unplugged during upgrade.
- When a firmware upgrade procedure fails.
To perform a firmware upgrade recovery, do the following:
- Unplug the KeyMander 2 Mobile from the computer.
- Plug the KeyMander 2 Mobile into to the computer.
- Press and hold [Alt] + [F11].
- Upgrade the firmware as explained in Starting the Upgrade.
Troubleshooting
The following is a list of common issues and how to solve them.
Micro USB Cable Problems
In the event your system is not working with the supplied micro USB cable during initial setup, you can use your own micro USB charge and sync cable for testing. If the system works normally after performing this test, replace the micro USB cable. If the system is still not working after performing this test, the cable is not the source of the problem. If you are using a PS4 Dualshock 4 V2 controller, fully charge it and reconnect to KeyMander 2 Mobile.
LED Indicator Behavior
| Color | Indication | Status |
| Green | Lights Solid | The KeyMander 2 Mobile is in Game Mode. |
| Green | Blinks | The KeyMander 2 Mobile is broadcasting Bluetooth connection for Game Mode. |
| Blue | Blinks | The KeyMander 2 Mobile is broadcasting Bluetooth connection for K2 Mobile App. |
| White | Lights Solid | The KeyMander 2 Mobile is in Office Mode |
| White | Blinks | The KeyMander 2 Mobile is broadcasting Bluetooth connection for Office Mode. |
| Purple | Blinks | The KeyMander 2 Mobile is in Hotkey Edit Mode. |
| Red | Blinks | No controller is detected under Game Mode. |
Understanding Mouse Performance
To help better answer some of the common questions about mouse performance, here's some basics about several things that determine how the mouse responds in-game: Sensitivity Setting, Maximum Turn Speed, Turn Speed Setting, Deadzone Setting and Resolution.
The biggest reason to love KeyMander 2 Mobile can quickly become a frustration if the mouse isn't setup properly, so here is some information that may help you to better dial in your mouse settings. The KeyMander 2 Mobile is designed to provide a keyboard and mouse gaming experience on a mobile device, however there are a couple significant differences between playing with a keyboard and mouse versus a controller or touch controls.
Understanding differences in maximum turn speed and learning how to work with mouse sensitivity and acceleration are the keys to playing at the highest level with KeyMander 2 Mobile. Getting to that level requires some also time spent learning how your mouse settings translate into the game, and also understanding the limitations of console games.
Sensitivity Settings
Properly setting mouse sensitivity is the biggest factor in getting good mouse performance with your KeyMander 2 Mobile, and there is more to it other than adjusting the sensitivity sliders in the K2 Mobile app. There are actually three other steps required before adjusting the sliders, and forgetting them will lead to poor mouse performance.
The first and most commonly overlooked step in properly setting up the mouse is actually making sure the aim/look sensitivity is maxed out in the game's settings menu, so you have the full sensitivity range to work within.
Next, you need to input the mouse's DPI resolution setting into the K2 Mobile app Device tab for a smoother and more accurate adjustment range.
Third, most gaming mice have a DPI button with multiple settings so make sure the mouse is set to the highest DPI step when connected to KeyMander 2 Mobile. Only after those steps are complete do you begin making changes to the mouse sensitivity sliders. Just like in PC gaming, bumping the sensitivity too high will cause you to reach a point where movement can become jittery and difficult to use accurately for precision shots, so reaching a balance is important.
In the PC world this equates to the balance between low DPI and high DPI settings, where lower DPI is far more accurate for making small, precise movements (like needed for headshots) at the cost of having to move your hand a foot or more to turn a 360° rotation. In the older days of first-person-shooters, gamers playing titles like Counter Strike on standard definition monitors might have mouse resolutions set as low as 100 or 200 dpi, so they can snap off a headshot (without a scope) like it's nothing. That type of play is a far cry from the common Rambo-esque, hard-charging free-for-all styles we see now in Call of Duty multiplayer matches, so just like in PC gaming, finding your own balance point is the key. If you run around in CoD with a shotgun and never aim-down-sight, having a highly boosted sensitivity may be fine for you, but if you later decide to pick up a sniper rifle you probably aren't going to be happy with that setting. To get a better feel for how to best set your mouse sensitivity, start at a point where you think the sensitivity is way too low, and move your mouse back and forth. Get a feel for the ability to find your aim point accurately, then boost your speed until you can get the accuracy you want, at a comfortable enough speed to stay within the game's maximum turn speed or at least not far beyond it. Remember each game is different, and the difference can be huge when comparing a game like Call of Duty that has a high max turn speed, versus a game like Resident Evil 7 where you can use a watch to time how long it takes to spin around. By the way, several games actually have different horizontal and vertical look sensitivities that usually go unnoticed with analog sticks, but much more noticeable with a mouse. If vertical movement feels different than horizontal movement and you want to adjust it, you can unlock the horizontal and vertical mouse sensitivity sliders in the K2App and adjust as needed.
Maximum Turn Speed (In-Game)
The biggest difference between playing on a PC versus playing on a console with KeyMander 2 Mobile is the turn speed limitation built into console games. Because console games are built for joysticks, every game has a maximum turn speed equal to having the analog thumb stick pushed all the way to the farthest position. This is the turn speed limit of the game set by the game developers and it basically caps the speed at which you can turn (look) in a given direction, no matter how fast you move the thumb stick (or mouse as in our case).
You can test this with your controller by pushing the right thumb stick all the way left or right, and the speed at which your view rotates is the maximum turn speed for that game. This limit can vary widely from game to game as games like the Call of Duty franchise for example have a much higher turn speed limit that the Destiny franchise which can feel like the mouse is slow to
respond if you do not adjust your settings and style of play a bit. The turn speed limit can even vary within a game depending on factors such as weapon choice, whether or not you're in a vehicle, location in the game (especially in campaign modes), etc. Games can also have different horizontal and vertical turn speed limits, although vertical limits are normally less of an issue.
It is important to understand the game's maximum turn speed and the effect it has on mouse performance, since a mouse can deliver faster average and peak movement speeds than a thumb stick allows. When you exceed the game's maximum turn speed (moving the mouse faster than the game allows), the mouse will feel sluggish or "laggy" as your on-screen aim/look view moves less than expected. An easy way to see this is to move your mouse at a fairly slow rate noticing how far you rotate, then move extremely fast and compare. If your K2 Mobile app profile is set up with very high aim/look sensitivity, you probably noticed that by moving slowly you rotated 360 degrees or more with a short swipe, but by moving very fast you rotated only a short distance. That poor movement you just experienced is NOT mouse lag, but rather the game's turn speed limit.
The easiest way to understand what is happening is to equate the maximum turning speed to distance turned (rotated) in a period of time. For example, let's say with the aim/look thumb stick fully engaged it takes our game one full second to perform a 360° rotation, that would make our game's maximum turning speed equal to one rotation per second. Now to illustrate how that pertains to our mouse, let's say that with our current K2 Mobile app profile moving the mouse four inches in one second performs a full rotation; it would mean our max turn speed with the mouse is 4 inches per second. Now here is where the turn speed limit begins to show up with a mouse: if we move 8 inches in one second (double the limit in our example), the extra movement above the maximum turn speed is not registered and it's as if you moved for only half the distance or half the time (equal to a half rotation for our example). Following the same formula if we move it 16 inches (four times the limit), your on-screen aim/look view moves only a quarter of the time/distance (equal to a quarter rotation for our example), and so on. Simply put, once you hit maximum turn speed, the faster you move the mouse, the slower you go. Unlike on a PC, using a mouse in an environment designed for a joystick also requires getting used to playing within the game's turn speed limitation, but it's a small trade-off for being able to play console games with a mouse and keyboard and it's easy to set up your K2 Mobile app profiles to work within this limitation.
Turn Speed Settings (K2 Mobile app)
One way to overcome the turn speed limitations built into some games is through the use of the K2 Mobile app's Turn Speed setting, which progressively adds acceleration to boost your aim/look speed the faster you move. Slower movements stay slow and precise, but quick movements ramp up the turn speed to make spinning around much easier in games with lower turn speed limitations. Acceleration is usually avoided by most PC gamers since noticeable turn speed limitations are rare in PC games, however some console game designers understand that acceleration can be beneficial at times, and have begun adding the option in some games. The K2 Mobile app also has programmable mouse response curves to add similar functionality to games without these adjustments. When setting up your game profiles, remember to treat acceleration like salt at the dinner table; it's there if you need it, but if it's already good you probably shouldn't add anything or you could end up making it worse.
Deadzone Settings (K2 Mobile app and In-Game)
If you are having problems with getting a smooth response from the mouse, especially when moving diagonally, take a look at the Deadzone setting. The Deadzone's primary function is to overcome the area of the controller where joystick movement does not register in-game and allow instant response from the mouse, but when improperly adjusted it also influences mouse movement in a negative way. Having the deadzone set too low will cause choppy mouse response as initial mouse movements or very tiny mouse movements are suppressed. Having too large a deadzone will cause a floaty or accelerated feeling (pixel skipping), and can also cause a rough, “stair-step-like” movement in some games that reduces accuracy when moving the mouse diagonally. Some games also include a deadzone setting in the Options Menu, so be sure to check it and set accordingly for best performance. It is important to achieve the right balance, so if it feels choppy increase your deadzone setting and if the diagonal movement feels poor, lower the deadzone setting in the K2 Mobile app, in the game menu or both.
Resolution (Mouse Hardware/Software and K2 Mobile app)
The conventional wisdom for setting mouse resolution with the KeyMander 2 Mobile is normally to set the mouse to its maximum resolution and set the K2 Mobile app DPI setting to match it. This will provide the maximum amount of adjustment range with fine adjustment steps in between. While this normally works great with most games, there will be times when a lower dpi setting is actually advantageous. Games with built-in Aim Assist such as the Call of Duty titles, will benefit from having a lower dpi setting which allows 102
the aim assist to better “pull” you onto the target’s hit box. Having a higher dpi setting sends more data at a faster rate to the aim assist processing and causes what amounts to an overload situation, where the aim assist function is decreased or defeated altogether.
In games with aim assist it is important to test different resolution (DPI) settings so you can maximize the benefit (or remove it) for your style of play. For example, Call of Duty Mobile works very well with mouse resolutions between 3500-5000dpi for those that like the slightly magnetic feel of aim assist. If you prefer to snipe headshots, set the dpi higher at 6-16K to help breakout of the aim assist bubble as it will tend to "pull" you down when trying to snap quick headshots. Just make sure to match your K2 Mobile app DPI setting to your mouse DPI or your sensitivity will be way off.
As a final note, one of the things that can complicate getting proper mouse performance with high-end gaming mice is the manufacturer's custom mouse driver software, which often needs to be correctly configured on a PC so it doesn't default to some unknown/less effective setting. Mice from companies like Corsair, Logitech, etc. have downloadable drivers for setup, and usually store these settings in the mouse memory as configuration profiles. If you have one of these mice that stores profiles internally (especially Logitech mice as their software is a bit tricky), it is important to make sure you set the mouse to maximum resolution in their software first, and program it to default to that setting so the mouse is actually running at the full resolution offered. Because these settings have to be programmed using a PC, it will it will make your life much easier if you remember do this first before connecting the mouse to your KeyMander 2 Mobile. After setting up your mouse, make sure to set the mouse resolution in the K2 Mobile app to match your mouse setting. Having a 10,000+ DPI mouse is great, but if you forget to change the default setting in the K2 Mobile app (default is 4000 DPI) you won't getting the full benefit of all that resolution.
Technical Support
International
- For online technical support – including troubleshooting, documentation, and software updates: http://eservice.IOGEAR.com
- For telephone support, See Telephone Support below.
North America
| Email Support | support@IOGEAR.com | |
| Online Technical Support | Troubleshooting Documentation Software Updates | http://www.IOGEAR.com/support |
| Telephone Support | 866-9-IOGEAR (866-946-4327) x4862 | |
| Live Online Chat | www.iogear.com/keymanderchat | |
| KeyMander Forum | www.keymander2.com | |
When you contact us, please have the following information ready beforehand:
◆ Product model number, serial number, and date of purchase.
- Your computer configuration, including operating system, revision level, expansion cards, and software.
◆ Any error messages displayed at the time the error occurred.
- The sequence of operations that led up to the error.
◆ Any other information you feel may be helpful.
You can quickly find answers to most questions on our product support pages and in our KeyMander Forum (link listed above) where you can also access setup videos, contests and more.
Safety Instructions
General
- This product is for indoor use only.
- Read all of these instructions. Save them for future reference.
◆ Follow all warnings and instructions marked on the device. - Do not place the device on any unstable surface (cart, stand, table, etc.). If the device falls, serious damage will result.
♦ Do not use the device near water.
Do not place the device near, or over, radiators or heat registers. - The device cabinet is provided with slots and openings to allow for adequate ventilation. To ensure reliable operation, and to protect against overheating, these openings must never be blocked or covered.
- The device should never be placed on a soft surface (bed, sofa, rug, etc.) as this will block its ventilation openings. Likewise, the device should not be placed in a built-in enclosure unless adequate ventilation has been provided.
- Never spill liquid of any kind on the device.
- Unplug the device from the power before cleaning. Do not use liquid or aerosol cleaners. Use a damp cloth for cleaning.
- The device should be operated from the type of power source indicated on the marking label. If you are not sure of the type of power available, consult your dealer or local power company.
- To prevent damage to your installation it is important that all devices are properly grounded.
Do not allow anything to rest on the power cord or cables. Route the power cord and cables so that they cannot be stepped on or tripped over. - Position system cables and power cables carefully; be sure that nothing rests on any cables.
- Do not attempt to service the device yourself. Refer all servicing to qualified service personnel.
- If the following conditions occur, unplug the device and bring it to qualified service personnel for repair.
-
The power cord or plug has become damaged or frayed.
♦ Liquid has been spilled into the device. -
The device has been exposed to rain or water.
- The device has been dropped, or the cabinet has been damaged.
- The device exhibits a distinct change in performance, indicating a need for service.
- The device does not operate normally when the operating instructions are followed.
- Only adjust those controls that are covered in the operating instructions. Improper adjustment of other controls may result in damage that will require extensive work by a qualified technician to repair.
Specifications
| Function | KeyMander 2 Mobile | ||
| Connectors | Side | Downstream | 1 x 1m USB2.0 Full Speed Type B Female Port |
| Rear | Device Inputs | 2 x USB2.0 Full Speed Type A Female Ports | |
| External Power | 1 x 1 m USB2.0 Full Speed Type A Male (Black) | ||
| Wireless Connection | Bluetooth V4.2 (with BLE) | ||
| Port Switching | Hotkey | ||
| LED | Power / Notification | 3, RGB | |
| Firmware Upgrade | USB and Bluetooth | ||
| Emulation | Keyboard | USB, Emulation | |
| Mouse | USB, Emulation | ||
| Gamepad | USB, Bypass | ||
| Power Consumption | DC 5V: 0.96W | ||
| Environment | Operating Temp. | 0-40°C | |
| Storage Temp. | -20-60°C | ||
| Humidity | 0-80% RH, Non-condensing | ||
| Physical Properties | Housing | Plastic | |
| Weight | 0.12 kg | ||
| Dimensions (L x W x H) | 7.80 x 9.20 x 6.60 cm(3.1 x 3.6 x 2.6 in) | ||
| MTBF | 25°C | 40,000 hours | |
| 55°C | 40,000 hours | ||
Limited Warranty
IOGEAR warrants this product against defects in material and workmanship for a Warranty Period of two [2] years (warranty period may vary in certain regions/countries) commencing on the date of original purchase. Cables and accessories are not covered by the Standard Warranty. If a product proves to be defective within the warranty period, please contact IOGEAR's support department for information on how to have your product repaired or replaced. IOGEAR will not issue a monetary refund for the product nor will IOGEAR repair or replace any products sold by unauthorized resellers.
When returning the product, you must ship the product in its original packaging or in packaging that provides an equivalent degree of protection for the product during shipment. Place your proof of purchase inside the packaging and clearly print the RMA number on the outside of the package. IOGEAR's support department will provide you with the RMA number, but you will be responsible for the costs associated with shipping the product to IOGEAR. Return requests that do not contain a proof of purchase, such as a store receipt, will not be processed.
Removal or alteration of the factory-supplied serial number invalidates this warranty.
This warranty does NOT cover cosmetic damage. This warranty does NOT cover damage due to: acts of God; accident; misuse; abuse; neglect; modification; improper operation; improper maintenance; lack of maintenance; connection to improper equipment; or repairs conducted by a party other than IOGEAR. This warranty does NOT cover products sold AS IS or WITH FAULTS.
This warranty is only valid in the country in which the product was purchased. The return of a defective product will be handled by agents in the country in which the product was purchased.
EXCEPT FOR THE WARRANTIES SPECIFICALLY EXPRESSED IN THIS AGREEMENT, IOGEAR DISCLAIMS ALL OTHER WARRANTIES, WHETHER EXPRESS OR IMPLIED, INCLUDING IMPLIED WARRANTIES OF MERCHANTABILITY OR FITNESS FOR A PARTICULAR PURPOSE, WITH THE EXCEPTION OF THOSE WARRANTIES WHICH ARE IMPLIED BY AND/OR INCAPABLE OF EXCLUSION, RESTRICTION OR MODIFICATION BY AN APPLICABLE LAW. THE TERM OF ANY IMPLIED WARRANTIES THAT CANNOT BE DISCLAIMED ARE LIMITED TO THE TERM OF THIS WARRANTY AGREEMENT. IOGEAR'S MAXIMUM LIABILITY IS LIMITED TO THE PURCHASE PRICE YOU PAID FOR
THIS PRODUCT PLUS ANY INTEREST ALLOWED BY LAW IF AN APPLICABLE LAW REQUIRES THE PAYMENT OF INTEREST. IOGEAR SHALL NOT BE LIABLE FOR PROPERTY DAMAGE, PERSONAL INJURY, LOSS OF USE, INTERRUPTION OF BUSINESS, LOST PROFITS, LOST DATA OR OTHER CONSEQUENTIAL, PUNITIVE OR SPECIAL DAMAGES, HOWEVER CAUSED AND HOWEVER ALLEGED, WITH THE EXCEPTION OF THOSE DAMAGES WHICH AN APPLICABLE LAW RENDERS INCAPABLE OF LIMITATION, EXCLUSION OR RESTRICTION. SOME STATES DO NOT ALLOW LIMITATIONS ON HOW LONG AN IMPLIED WARRANTY LASTS AND/OR DO NOT ALLOW THE EXCLUSION OR LIMITATION OF INCIDENTAL OR CONSEQUENTIAL DAMAGES, SO THE ABOVE LIMITATIONS MAY NOT APPLY TO YOU. THIS WARRANTY GIVES YOU SPECIFIC LEGAL RIGHTS, AND YOU MAY ALSO HAVE OTHER RIGHTS WHICH VARY FROM STATE TO STATE.
For technical questions regarding your IOGEAR product, please visit our Technical Information Library (TIL) at //www.iogear.com/support.
To learn more about our warranty policies, please visit our website: http://www.IOGEAR.com/global/en/legal/policies/warranty-policy