
PJ106D - Video projector VIEWSONIC - Free user manual and instructions
Find the device manual for free PJ106D VIEWSONIC in PDF.


| Product Type | LED video projector |
| Dimensions (W x D x H) | 121 x 99 x 47.5 mm |
| Weight | Approx. 0.45 kg (1 lb) |
| Power Supply | AC adapter: 100-240 V AC, 50/60 Hz; DC input: 15 V, 2.0 A |
| Optional Battery | Lithium-ion rechargeable, 11.1 V, 4300 mAh |
| Display Technology | Single 0.5" DLP panel |
| Native Resolution | 800 x 600 pixels (SVGA) |
| Color Depth | 16.7 million colors |
| Light Source | RGB LED lamps |
| Projection Lens | Fixed zoom, manual focus; F2.0 |
| Projection Distance | 40 cm to 200 cm (typical) |
| Image Size | 12" to 60" diagonal (typical) |
| PC Compatibility | VGA (640x480), SVGA (800x600), XGA (1024x768), SXGA (1280x1024) |
| Video Compatibility | NTSC, PAL, SECAM; HDTV 480i, 480p, 720p, 1080i |
| I/O Connectors | DC IN, composite video (RCA), S-Video, VGA (D-SUB15), audio in, audio out (earphone), SD card slot |
| Keystone Correction | Vertical (remote or menu) |
| Remote Control | Infrared with full function: power, source, keystone, volume, blank, auto, aspect ratio, mute |
| SD Card Playback | JPEG still images and MPEG1/AVI/MOV video files |
| Lamp Life (LED) | Up to 20,000 hours (typical) |
| Warranty | 3 years parts and labor (North America), 1 year on lamp |
| Cleaning Instructions | Use soft cloth; lens with lens tissue and cleaner; avoid benzine/thinner |
Frequently Asked Questions - PJ106D VIEWSONIC
User questions about PJ106D VIEWSONIC
0 question about this device. Answer the ones you know or ask your own.
Ask a new question about this device
Download the instructions for your Video projector in PDF format for free! Find your manual PJ106D - VIEWSONIC and take your electronic device back in hand. On this page are published all the documents necessary for the use of your device. PJ106D by VIEWSONIC.
USER MANUAL PJ106D VIEWSONIC
This device complies with part 15 of the FCC Rules. Operation is subject to the following two conditions: (1) The device may not cause harmful interference, and (2) this device must accept any interference received, including interference that may cause undesired operation.
This equipment has been tested and found to comply with the limits for a Class B digital device, pursuant to part 15 of the FCC Rules. These limits are designed to provide reasonable protection against harmful interference in a residential installation. This equipment generates, uses, and can radiate radio frequency energy, and if not installed and used in accordance with the instructions, may cause harmful interference to radio communications. However, there is no guarantee that interference will not occur in a particular installation. If this equipment does cause harmful interference to radio or television reception, which can be determined by turning the equipment off and on, the user is encouraged to try to correct the interference by one or more of the following measures:
- Reorient or relocate the receiving antenna.
- Increase the separation between the equipment and receiver.
- Connect the equipment into an outlet on a circuit different from that to which the receiver is connected.
- Consult the dealer or an experienced radio/TV technician for help.
FCC Warning
To assure continued FCC compliance, the user must use grounded power supply cord and the cables which are included with the equipment or specified. Also, any unauthorized changes or modifications not expressly approved by the party responsible for compliance could void the user's authority to operate this device.
For Canada
For European Countries
CE Conformity

The device complies with the requirements of the EEC directive 89/336/EEC as amended by 92/31/EEC and 93/68/EEC Art.5 with regard to "Electromagnetic compaty", and 73/23/EEC as amended by 93/68/EEC Art.13 with regard to "Safety."
User Information for all Countries
Notice: Use the cables which are included with the unit or specified.
Copyright Information
Copyright © ViewSonic® Corporation, 2005. All rights reserved.
Macintosh and Power Macintosh are registered trademarks of Apple Computer, Inc.
Microsoft, Windows, Windows NT, and the Windows logo are registered trademarks of Microsoft Corporation in the United States and other countries.
ViewSonic, the three birds' logo, OnView, ViewMatch, and ViewMeter are registered trademarks of ViewSonic Corporation.
VESA is a registered trademark of the Video Electronics Standards Association. DPMS and DDC are trademarks of VESA.
PS/2, VGA and XGA are registered trademarks of International Business Machines Corporation.
Disclaimer:ViewSonic Corporation shall not be liable for technical or editorial errors or omissions contained herein; nor for incidental or consequential damages resulting from furnishing this material, or the performance or use of this product.
In the interest of continuing product improvement, ViewSonic Corporation reserves the right to change product specifications without notice. Information in this document may change without notice.
No part of this document may be copied, reproduced, or transmitted by any means, for any purpose without prior written permission from ViewSonic Corporation.
Product Registration
To meet your future needs, and to receive any additional product information as it becomes available, please register your product on the Internet at: www.viewsonic.com. The ViewSonic Wizard CD-ROM also provides an opportunity for you to print the registration form, which you may mail or fax to ViewSonic.
For Your Records
Product Name: PJ106D
ViewSonic LED Projector
Model Number: VS11244
Document Number: PJ106D-1_UG_ENG Rev. 1A 11-30-05
Serial Number:
Purchase Date:

The lamp in this product contains mercury.
Please dispose of in accordance with local, state or federal laws.
Contents
Important safeguards 2
Overview....7
Power....8
Remote control (optional accessory) 10
Installation 13
Basic connections....15
Preparation....17
Basic operation....19
Menu operation....22
Using an SD Card....25
Troubleshooting 28
Maintenance 32
Indicators 33
Specifications 35
Important safeguards
Please read all these instructions regarding your projector and retain them for future reference. Follow all warnings and instructions marked on the projector.
- Read instructions
All the safety and operating instructions should be read before the appliance is operated.
- Retain instructions
The safety and operating instructions should be retained for future reference.
- Warnings
All warnings on the appliance and in the operating instructions should be adhered to.
- Instructions
All operating instructions must be followed.
- Cleaning
Unplug this projector both from the wall outlet and battery before cleaning it. Do not use liquid aerosol cleaners. Use a damp soft cloth for cleaning.
- Attachments and equipment
Never add any attachments and/or equipment without the approval of the manufacturer as such additions may result in the risk of fire, electric shock or other personal injury.
- Water and moisture
Do not use this projector near water or in contact with water.
- Accessories
Do not place this projector on an unstable cart, stand, tripod, bracket or table. Use only with a cart, stand, tripod bracket, or table recommended by the manufacturer or sold with

the projector. Any mounting of the appliance should follow the manufacturer's instructions and should use a mounting accessory recommended by the manufacturer.
An appliance and cart combination should be moved with care. Quick stops, excessive force and uneven surfaces may cause the appliance and cart combination to overturn.
9. Ventilation
Slots and openings in the cabinet are provided for ventilation, ensuring reliable operation of the projector and to protect it from overheating. Do not block these openings or allow them to be blocked by placing the projector on a bed, sofa, rug, or bookcase.
Ensure that there is adequate ventilation and that the manufacturer's instructions have been adhered to.
10. Power sources
This projector should be operated only from the type of power source indicated on the marking label. If you are not sure of the type of power, please consult your appliance dealer or local power company.
11. Power-cord protection
Power-supply cords should be routed so that they are not likely to be walked on or pinched by items placed upon or against them. Pay particular attention to cords at plugs, convenience receptacles, and points where they exit from the appliance. Do not put the power cord under a carpet.
12. Overloading
Do not overload wall outlets and extension cords as this can result in a fire or electric shock.
13. Objects and liquids
Never push objects of any kind through openings of this projector as they may touch dangerous voltage points or short-out parts that could result in a fire or electric shock. Never spill liquid of any kind on the projector, adaptor or battery.
14. Servicing
Do not attempt to service this projector yourself. Refer all servicing to qualified service personnel.
15. Damage requiring service
Unplug this projector from the wall outlet and refer servicing to qualified service personnel under the following conditions:
(a) If the power-supply cord or plug is damaged.
(b) If the adaptor or the battery is damaged.
(c) If liquid has been spilled, or objects have fallen into the projector, adaptor or battery.
(d) If the projector does not operate normally after you follow the operating instructions.
Adjust only those controls that are covered by the operating instructions. An improper adjustment of other controls may result in damage and may often require extensive work by a qualified technician to restore the projector to its normal operation.
(e) If the projector has been exposed to rain or water.
(f) If the projector has been dropped or the cabinet has been damaged.
(g) If the projector exhibits a distinct change in performance- this indicates a need for service.
16. Replacement parts
When replacement parts are required, be sure that the service technician has used replacement parts specified by the manufacturer or parts having the same characteristics as the original part. Unauthorized substitutions may result in fire, electric shock or other hazards.
17. Safety check
Upon completion of any service or repair to this projector, ask the service technician to perform safety checks determining that the projector is in a safe operating condition.
-
Keep appropriate method when recharge the battery.
-
The projector is a precision instrument. Please pay attention on static electricity.
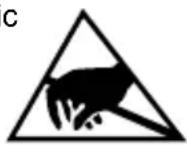
WARNING:
Unplug the power cord or remove the battery immediately if there is something wrong with your projector.
Do not operate if smoke, strange noise or odor comes out of your projector, adaptor or battery. It may cause fire or electric shock. In this case, unplug immediately and contact your dealer.
Never remove the cabinet.
This projector contains high voltage circuitry. An inadvertent contact may result in an electric shock. Except as specifically explained in User Manual, do not attempt to service this product by yourself. Please contact your dealer when you want to fix, adjust, or inspect the projector.
Do not modify the projector.
It can lead to fire or electric shock.
Do not keep using the damaged projector.
If the projector is dropped and the cabinet is damaged, unplug the projector and contact your dealer for inspection.
It may lead to fire if you keep using the damaged projector.
Do not face the projection lens to the sun.
It can lead to fire.
Use correct voltage.
If you use incorrect voltage, it can lead to fire.
Only use the provided AC adaptor.
Do not place the projector on uneven surface.
Place the projector on a level and stable surface only.
Do not look into the lens when the projector is operating.
It may hurt your eyes. Never let children look into the lens when the projector is on.
Do not unplug the power cord or remove the battery during operation.
It can lead to lamp breakage, fire, electric shock or other trouble. Wait for the fan to stop before unplugging the power cord or remove the battery.
Do not touch the air outlet grilles and bottom plate.
Do not touch them or put other equipment close to the air outlet grilles because they become hot during operation.
The heated air outlet grilles and bottom plate may cause injury or damage to other equipment. Also, do not put the projector on a desk that is easily affected by heat.
Do not look into the air outlet grilles when projector is operating.
Heat, dust, etc. may blow out of them and hurt your eyes.
Do not block the air inlet and outlet grilles.
If they are blocked, heat may be generated inside the projector, causing deterioration in the projector quality and fire.
- Don't put upwards. It may block the exhausted holes.
- Don't drop.
- Don't project to person's eyes.

Overview

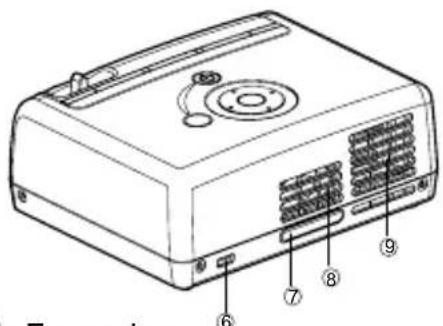
① Focus ring
② Control panel
③ Terminal board
④ Air outlet grille
⑤ Lens
⑥ Kensington lock
⑦ Remote control sensor (Rear side only)
⑧ Speaker
⑨ Air inlet grille
ViewSonic PJ106D 7
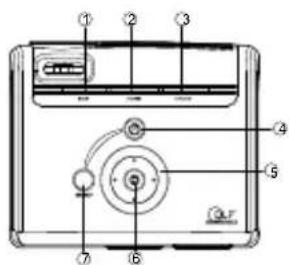
Control panel
① LAMP indicator
② POWER indicator
③ CHARGE indicator
④ POWER button
⑤ Four directional buttons
⑥ OK button
⑦ MENU button
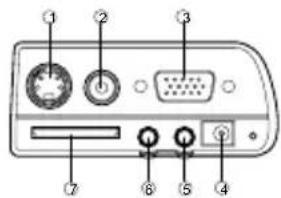
Terminal board
① S-VIDEO terminal
② VIDEO terminal
③ VGA IN terminal
④ Power jack
⑤ AUDIO IN terminal
⑥ AUDIO OUT(Earphone)terminal
⑦ SD Card slot
Bottom side
① Battery latch

natural_image
Technical line drawing of a rectangular electronic device with mounting holes and internal components (no text or symbols)Power
Using the provided AC adapter or an optional Lithium-ion rechargeable battery.
Warning:
The projector must be used with the provided AC adapter. Damage caused by the use of an incorrect adapter is not covered under the warranty.
Using the AC adapter
-
Insert the plug from the AC adapter into the DC IN terminal.
-
Insert the appropriate end of the power cord into the AC adapter.
-
Insert the plug on the power cord into a wall outlet. The POWER indicator lights red when using the AC adapter.
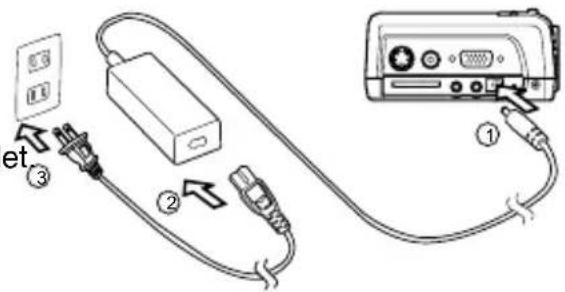
Using the optional battery
The projector must be used with specified Lithium-ion rechargeable battery. Charge the battery before using the projector for the first time use. Using the projector for charging the battery. You may also use the projector when charging the battery.
For battery charging
Warning:
When you use the battery, please observe the safety precautions.
-
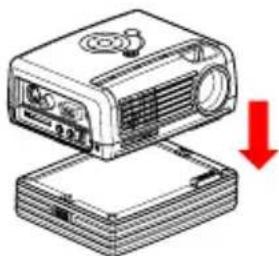
Move the battery latch to the open side.
-
Position the projector on the battery.

natural_image
Illustration of a projector placed on a base with a red downward arrow indicating compression (no text or symbols present)- Match the battery carefully until it fits in place.

natural_image
Line drawing of a projector with ventilation slots and a circular vent (no text or symbols)
- Insert the plug from the AC adapter into the DC IN terminal.
- Insert the appropriate end of the power cord into the AC adapter.
- Insert the plug on the power cord into a wall outlet.
■ The CHARGE indicator lights red when charging is started and turns off when charging is completed.
■ We recommended that you full charge the battery all the time.
■ When the projector is off, the charger works as a fast charging mode. It takes approximately 5 hours to complete charging.
■ When the projector is on, the charger works as a slow charging mode. It takes approximately 7 hours to complete charging.
For battery removal
Slide the battery lock switches on the two sides to remove the battery from the projector.
| CHARGE (Red) CONDITION | |
| On Charging battery | |
| Off Battery full | |

natural_image
Illustration of a projector with a slide being handled, showing front and side views (no text or symbols)Remote control
1 POWER button
② Four directional buttons
③ Menu button
4 Enter button
⑤ Keystone ▲/▼ buttons
⑥ Volume ▲/▼ buttons
⑦ Source button
⑧ Mute button
⑨ Blank button
10 4:3/16:9 button
11 Auto button
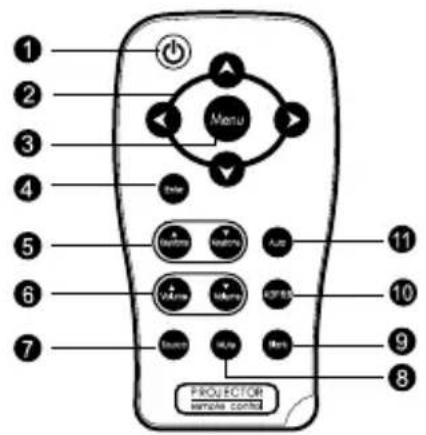
For the first time use:
Remove the transparent insulation tape by pulling it before use.
For battery change:
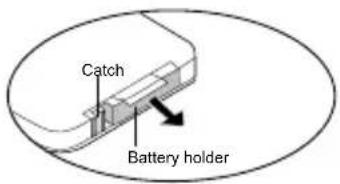
- Push the catch to the right and remove the battery holder.

-
Remove the old Lithium coin cell and install new one. Ensure that the side with the mark “+” is up.
-
Push the battery holder back into the remote control until you feel a click.
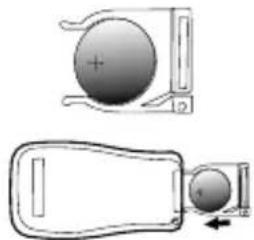
natural_image
Technical line drawing of a mechanical component with two views (top: circular hole, bottom: elongated handle), no text or symbols present.Operating Range
The infrared signal operates by line-of-sight up to a distance of approximately 9.8 (3 m) and within a 30-degree angle of the remote sensor. The projector will not function if there are objects between the remote control and the remote sensor on the projector or if strong light falls on the remote sensor. A weak battery will also prevent the projector from operating.
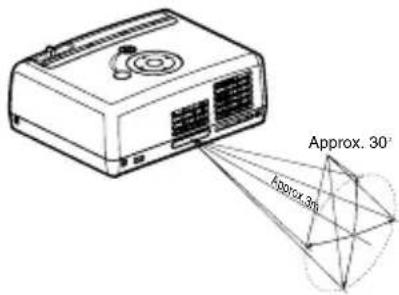
This sample may be slightly different from actual range.
Remote Control Precautions
■ Handle the remote control carefully.
■ Do not use the remote control if it got wet. Remove the battery immediately. Make sure the remote control and battery are dry before use.
■ Avoid excessive heat and humidity.
■ Do not place the battery upside down.
- Keep the coin cell battery out of reach of children so as not to allow them to swallow the cell battery.
ViewSonic PJ106D 11
CAUTION:
■ Danger of explosion if battery is incorrectly replaced.
■ Replace only with the same or equivalent type recommended by the manufacturer.
■ Dispose of used batteries according to your local regulations.
■ Do not recharge, disassemble or dispose of the battery in fire.
Installation
Layout of the projector
Image size varies depending on the distance between the screen and the projector.
Front projection
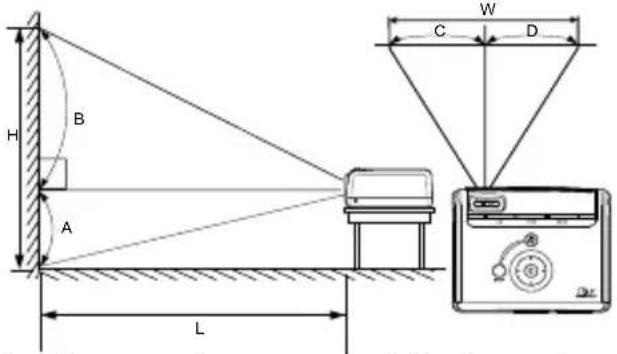
L : Between the screen and the front edge of the projector
A: Height of the projected image under the horizontal line
Optical offset:
B:A ≈27:13
C:D ≈41:59
| Screen diagonal size Distance (L) | |||
| inch cm inch | cm | ||
| 12 30.5 15.4 | 40 | ||
| 20 50.8 26.0 | 66 | ||
| 30 76.2 39.0 | 99 | ||
| 40 101.6 53.0 | 135 | ||
| 50 127.0 66.1 | 167 | ||
| 60 152.4 78.9 | 200 | ||
■ The above figures are approximate and may be slightly different from the actual measurements.
ViewSonic PJ106D 13
Caution:
■ Do not place the projector on a carpet or any flammable materials. It may cause damage or fire.
■ Place the projector at least 10 cm (or 4 inches) away from the wall to prevent the air inlet grille and the air outlet grilles that emit hot air from being blocked.
■ Do not use the projector in the following locations and manners, which may cause fire or electric shock.
a. In a dusty or humid place.
b. In a sideways or upside-down position.
c. Near a heater.
d. In an oily, smoky, or damp place such as a kitchen.
e. In direct sunlight.
f. Where the temperature rises high, such as in a closed car.
g. Where the temperature is lower than +41°F (or +5°C) or higher than +95°F (or +35°C).
Important:
■ Do not apply force to the lens, because the lens may be damaged.
Basic connections
This projector can be connected with various devices such as a VCR, video camera, videodisc player, or personal computer that have analog RGB output connectors.
Important:
■ Make sure that the connected device is turned off before starting connection.
- Plug in the AC adapter of the projector and the connected devices firmly. When unplugging, hold and pull the plug. Do not pull the cord.
■ When the projector and the connected devices are located too close to each other, the projected image may be affected by their interference.
- See the owner's guide of each device for details about its connections.
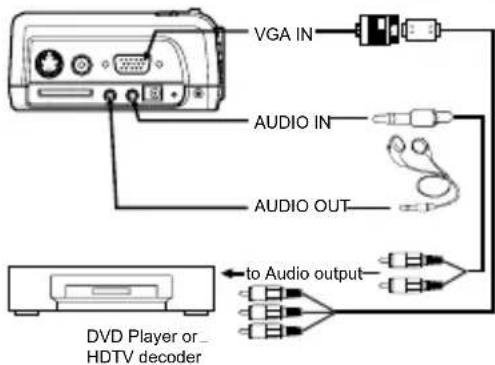
Projector + AV device
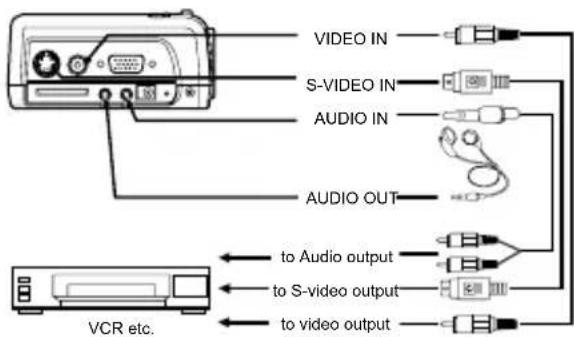
Projector + DVD player or HDTV
Some DVD players have an output connector for 3-line fitting (Y, C ^B , C ^R ). When connecting such DVD player with this projector, use the VGA IN terminal.
ViewSonic PJ106D 15
Important:
The terminal's names Y, P ^B , and PR are given as examples of when a HDTV decoder is connected.
The terminal's names vary depending on the connected devices.
■ Image may not be projected correctly with some DVD players.
Projector + Computer
For computer with D-SUB

Important:
■ When you use a longer RGB cable instead of the common length cable, the image may not be projected correctly.
■ Some computers require additional connectors or analog RGB output adapters to be connected with this projector. Contact your dealer for further information.
For Macintosh
■ If your Macintosh has no video port, a monitor output adapter is required. Contact your dealer for further information.
■ Some Macintoshes require a MAC adapter for the RGB cable for connection with this projector. Contact your dealer for further information.
ViewSonic PJ106D 16
Preparation
Preparation for projection
-
Attach the provided AC adapter to the projector.
-
Plug the AC adapter in the wall outlet.
■The POWER indicator lights red when using the AC adapter.
Warning:
■ Do not look into the lens directly when the projector is on.
■ Use 100-240 V AC 50/60 Hz to prevent fire or electric shock.
- Do not place any objects on the AC adapter and power cord or do not place the projector near heat sources to prevent damage to the power cord. If either the AC adapter or power cord should be damaged, contact your dealer for replacement because it may cause fire or electric shock.
■ Do not modify or alter the AC adapter. If the AC adapter is modified or altered, it may cause fire or electric shock.
Caution:
- Plug in the power cord firmly. When unplugging, hold and pull the power plug, not the power cord.
■ Do not plug in or out the power cord with your hand wet. It may cause electric shock.
Important:
■ Install the screen on a flat wall at 90 degrees to the floor.
■ Images may not be projected in a shape of a regular rectangle or with its aspect ratio 4:3, depending on the installation conditions of the projector and the screen.
■ To correct vertical keystone distortion:
On the optional remote control: press the Keystone ▲/▼ buttons.
On the control panel: adjust Keystone in the Image menu.
In the following cases:


Press the Keystone ▲. Press the Keystone ▼.
Important:
- When the keystone adjustment is carried out, the adjustment value is indicated. Note that this value doesn't mean a projection angle.
■ The allowable range of the adjustment value in the keystone adjustment varies depending on the installation conditions.
■ When the keystone adjustment takes effect, the resolution decreases. In addition, stripes may appear or straight lines may bend in images with complicated patterns. They are not due to product malfunctions.
■ Noise may appear on the screen during the keystone adjustment because of the type of the video signal being projected and the setting values of the keystone adjustment. In such cases, set the keystone adjustment values in the range where the image is displayed without noise.
■ When the keystone adjustment is carried out, the image may not be displayed correctly because of the type of input signal.
Basic operation
On the control panel

Power-on
-
Turn on the device connected to the projector first.
-
Plug the AC adapter in both the projector and the wall outlet.
■ The POWER indicator lights up.
■ The CHARGE indicator lights up when the projector connects with a not fully charged battery.
■ The projector charges a not fully charged battery all the time.
■ The projector stops charging battery when battery is fullled.
- Press the POWER button either on the control panel or the remote control.
■ The LAMP indicator lights up and the POWER indicator goes off.
■ The message "Searching for source" appears on the screen.
■ The lamp occasionally fails to light up. Turn off the projector, wait for one minute and then turn on it again.
■ After the POWER button is pressed, the image may flicker before the lamp becomes stable. This is not a product malfunction.
| Condition\Indicator | LAMP(Green) | POWER(Red) |
| Stand-by. | Off On | |
| When the lamp is on. | On Off |
Important:
■ Images may not be projected with good quality in an extremely hot or cold environment. (This is not a product malfunction.)
-
Adjust the focus by turning the focus ring.
-
Choose your desired external input source using the COMPUTER / VIDEO buttons.
■ The projector automatically selects the appropriate signal format. The selected signal format is displayed on the screen.
- Adjust the image size by changing the distance between the projector and the screen.
■ If necessary, adjust the focus ring again.
Caution:
■ The air outlet fan rotates faster as the temperature around the projector rises.
Power-off
Use the following procedure to turn off the projector. Do not turn off the projector by unplugging the power cord while the lamp is on. Unplugging while the lamp is on degrades the lamp's performance and causes failure in the projector.
- Press the POWER button either on the control panel or on the remote control.
■ The message "POWER OFF? PRESS POWER AGAIN" appears on the screen.
■ To cancel, press any button except the POWER button.
- Press the POWER button either on the control panel or on the remote control within 10 seconds again.
■ Both the lamp and the LAMP indicator will go out.
■ The POWER indicator lights up.
- Unplug the power cord.
■ The CHARGE indicator will go out if a not fully charged battery is connected with the projector.
■ The POWER indicator goes out.
Important:
In case the system has frozen or hung up for whatever reason and the system has stopped responding, you may shut off the system by holding down the POWER button either on the control panel or on the remote control for 5 seconds.
On the remote control
Keystone ▲/▼ button
Press the Keystone ▲ or Keystone▼ to adjust image distortion caused by tilting the projector.
Important:
■ Keystone adjustment will not change the shape of the menus, the start-up screen, and the background (with no signal input).
Volume ▲/▼ button
Press the Volume ▲ to increase the volume, press the Volume ▼ to reduce the volume.
Source button
If multiple sources are connected with to the projector simultaneously, press the Source button The projector will detect your source.
Important:
■ The image may not be projected or auto adjustment setting may not be performed correctly for input signals other than those supported by the projector.
Mute button
The sound is temporarily cut off when the Mute button is pressed. To cancel mute, press it again.
Blank button
The screen is temporarily cut off when the Blank button is pressed. To cancel blanking, press the Blank button again.
4:3/16:9 button
Toggle the 4:3/16:9 button to change the aspect ratio.
Auto button
If source is a computer, press the Auto button to adjust frequency and phase.
Menu operation
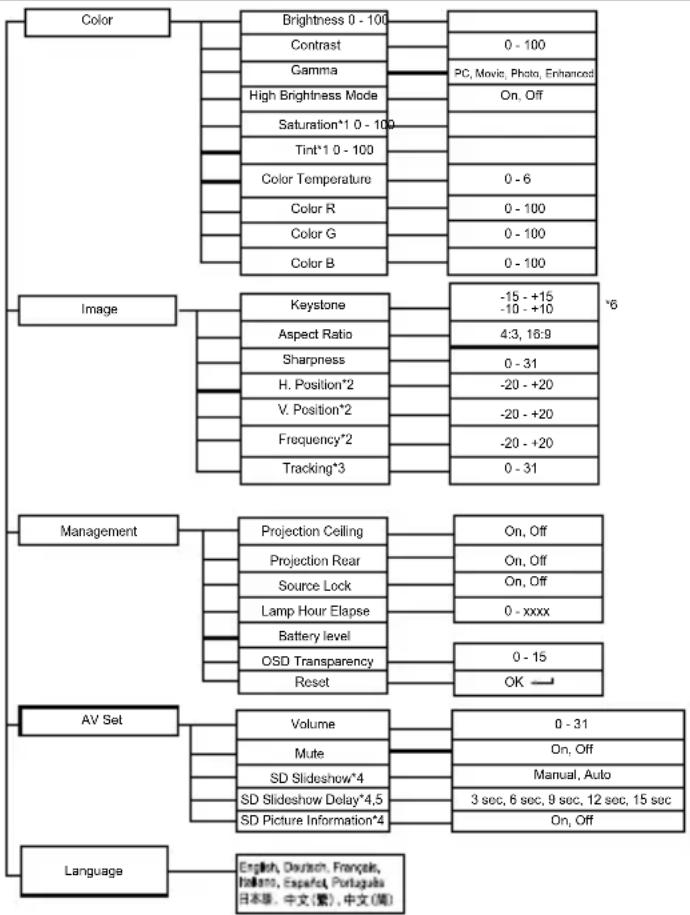
flowchart
graph TD
    A["Color"] --> B["Brightness 0 - 100"]
    A --> C["Contrast"]
    A --> D["Gamma"]
    A --> E["High Brightness Mode"]
    A --> F["Saturation*1 0 - 100"]
    A --> G["Tint*1 0 - 100"]
    A --> H["Color Temperature"]
    A --> I["Color R"]
    A --> J["Color G"]
    A --> K["Color B"]

    L["Image"] --> M["Keystone"]
    L --> N["Aspect Ratio"]
    L --> O["Sharpness"]
    L --> P["H. Position*2"]
    L --> Q["V. Position*2"]
    L --> R["Frequency*2"]
    L --> S["Tracking*3"]

    T["Management"] --> U["Projection Ceiling"]
    T --> V["Projection Rear"]
    T --> W["Source Lock"]
    T --> X["Lamp Hour Elapse"]
    T --> Y["Battery level"]
    T --> Z["OSD Transparency"]
    T --> AA["Reset"]

    AB["AV Set"] --> AC["Volume"]
    AB --> AD["Mute"]
    AB --> AE["SD Slideshow*4"]
    AB --> AF["SD Slideshow Delay*4,5"]
    AB --> AG["SD Picture Information*4"]

    AH["Language"] --> AI["English, Deutson, Français, Italiano, Español, Portuguila 日本级,中文(繁),中文(简)"]

    style A fill:#f9f,stroke:#333
    style L fill:#f9f,stroke:#333
    style T fill:#f9f,stroke:#333
    style AB fill:#f9f,stroke:#333
*1: Not active when connecting with VGA signal and SD card mode.
*2: Active when connecting with VGA, Component_P and HD source.
*3: Active when connecting with VGA source only.
*4: Only available for SD card mode.
*5: SD Slideshow Delay will be active when SD Slideshow sets to Auto.
*6: Range -15 - +15 for 4:3 aspect ratio; -10 - +10 for 16:9 aspect ratio.
ViewSonic PJ106D 22
1 Color
Brightness ......Use to adjust the image brightness. The image becomes brighter as the value increases.
Contrast ......Use to adjust the image contrast. The contrast becomes higher as the value increases.
Gamma ......Use to select Gamma mode.
• PC: For computer or notebook.
- Movie: Common video mode.
• Photo: Computer photo mode.
- Enhanced: For enhanced Gamma mode.
High Brightness Mode Select On for high brightness mode.
Saturation ....Use to adjust a video image from black and white to fully saturated color.
Tint ....Use to adjust the color balance of the image.
Color Temperature ....Use to adjust the color temperature.
Color R ....Use to adjust the red color.
Color G ....Use to adjust the green color.
Color B Use to adjust the blue color.
2. Image
Keystone ....Use to adjust the image distortion caused by tilting projection.
Aspect Ratio ......Use to choose aspect ratio.
Sharpness ....Use to adjust the image sharpness. The image becomes sharp as the value increases.
H. Position .....Use to adjust the horizontal position of the image.
V. Position .....Use to adjust the vertical position of the image.
Frequency ....Use to change the display data frequency to match the frequency of your computer's graphic card.
Tracking ....Use to eliminate image noise such as wide stripes.
3. Management
Projection Ceiling ...... Use to reverse the image horizontally.
Project Rear .... Use to reverse the image vertically.
Source Lock .... Use to lock the current source.
Lamp Hour Elapse ...... Displays the LED lamp's elapsed operating time (in hour).
Battery level ...... Displays the remaining battery level.
OSD Transparency ....Use to adjust OSD's transparency.
Reset ...... Press control panel's OK button or remote control's Enter button and then choose "Yes" to turn the display parameters to the factory default settings.
4. AV Set
Volume ...... Use to adjust the volume.
Mute Use to mute the sound.
SD Slideshow .... Use to select slideshow display mode.
- Manual: for playback once.
• Auto: for continuous playback.
SD Slideshow Delay ...... Use to adjust the slideshow display interval.
SD Picture Information .... Use to display picture information.
- Language Use to select the language used in the menu. [English, Deutsch, Français, Italiano Español, Português, 日本語, 中文(繁) 中文(简)
Using an SD Card
You can playback image and video files stored in an SD card.
| Video | MPEG1 (I-Frame only) | Supported file type: *.mpg | ||||
| Supported audio format: MPEG1 AUDIO LAYER I and MPEG1 AUDIO LAYER II (8Bit OUT) | ||||||
| Supported audio sampling rate: 8k,11.025k,12k,16k,22k,24k,32k,48k Hz (Note: 44.1KHz is not supported) | ||||||
| Supported brand name | Supported model name | |||||
| Premier DC-4381 | DC-5381 DC-5384 DC | -4365 | ||||
| AVI (MJPG only) | Supported file type: *.avi | |||||
| Supported audio format: PCM mono ( 8Bit OUT ) | ||||||
| Supported audio sampling rate: 8k,11.025k,12k,16k,22k,24k,32k,48k Hz (Note: 44.1KHz is not supported) | ||||||
| Supported brand name | Supported model name | |||||
| Canon PowerShot | S45 PowerShot S50 | PowerShot A40 | PowerShot G3 | |||
| Casio Exilim EX$ | 2 QVR4 | |||||
| Fuji Film FinePix | A303 FinePixF601 Fine | PixF602Zom | ||||
| Konica Digital Revio KD-400Z | ||||||
| Kyocera Finecam | S4 | |||||
| Minolta | DiMAGE 7Hi | |||||
| Pentax | Optio 330GS | |||||
| Ricoh Caplio RR1 | RDC-7 | |||||
| Samsung Digimax | 350SE | |||||
| QuickTime (MJPG only) | Supported file type: *.mov | |||||
| Supported audio format: UnCompressed ( 8Bit OUT ) | ||||||
| Supported audio sampling rate: 8k,11.025k,12k,16k,22k,24k,32k,48kHz (Note: 44.1KHz is not supported) | ||||||
| Supported brand name | Supported model name | |||||
| Epson PhotoPC | 3000Z | |||||
| Nikon Coolpix4500 | CoolPix500 | CoolPix5700 | ||||
| Olympus | C4040 | C5050 | C-730 Ultra Zoom | D-520 | ||
| PanasonicLecia | Lumix DMC-LC5 | |||||
| Still Image | JPEG | Supported file type: *.jpg (up to 16M pixels) | ||||
| Supported brand name | Supported model name | |||||
| Canon PowerShot | G1 PowerShot A40 | |||||
| Casio QV-2800UX | ||||||
| Fuji Film FinePix F | 401 | |||||
| Kodak DC210 DC2 | 40 DC4800 | |||||
| Minolta DiMAGE 5 | S304 | |||||
| Nikon 950 | ||||||
| Olympus C700 C9 | 20Z 5050 | |||||
| PanoasonicLeica | Digilux 1 Lumix DMC- | LC5 | ||||
| Pentax | 330 RS | Optio 330 | ||||
| Sanyo AZ1 | ||||||
| Sony | CD Mavica CyberShot | |||||
| Note:1. The accessing time varies depending on the file size. | ||||||
| Memory Card | SD | Supported brand name | Supported capacity | |||
| Hagiwara | 32M ~ 1G | |||||
| SanDisk | 64M ~ 1G | |||||
| Toshiba | 64M ~ 1G | |||||
| Panasonic | 32M ~ 1G | |||||
| Note:1. NTFS format is not supported when formatting the SD Card.2. Do not remove the SD Card while accessing or playing back the files because it may damage the data. | ||||||
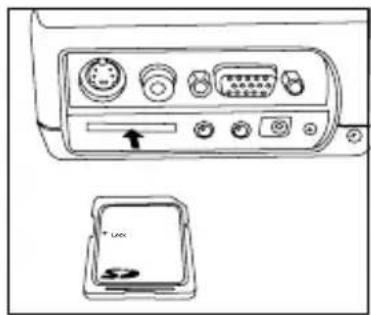
Inserting/Removing an SD Card
- Insert the SD card in the correct orientation shown.
- To removing an SD card, press lightly on the edge of the SD card and it will eject.
natural_image
Line drawing of a computer interface panel with ports and buttons, plus a separate icon showing a USB drive (no text or symbols present)Playing Back Files in SD Card
- Insert an SD card stored image and video files into the SD card slot.
- Select SD Card as input source.
■ Thumbnail display will appear on the screen.
- You may press remote control's Source button to change thumbnail display mode if still images and video clips saved in an SD card.
■ The still image thumbnail will display first and then automatically followed by video clip thumbnail.
- Use four directional buttons to select the desired image/video clip, and press remote control's Enter button or control panel's OK button to playback.
- Pressing remote control's Enter button or control panel's OK button again will stop, pause or exit from playback.
- Press remote control's Source button again to exit SD Card mode.
Troubleshooting
The following offers solutions to some of the common problems you may encounter. We suggest that you consult this chart before contacting your dealer.
Images aren't projected on the screen.
| Problem Cause and solution | ||||
| Power isn't turned on. | ● Check the states of the indicators. | |||
| LAMP(Red) | POWER(Red) | Charge(Red) Solution | on | |
| Off Off Off | Connect the power | cord | ● to the projector.● Plug the power cord into a wall outlet. | |
| Images aren't projected on the screen. | ● Cancel blanking by pressing the Blank button.● On rare occasion, the lamp fails to light up. In such cases, try to light the lamp again.● Check that the cable connected to the external device isn't broken.● When an extension cord is being used, replace it with the supplied cable and check whether images are projected correctly. | |||
| Images suddenly disappear. | ● The air inlet or outlet grille may be blocked.→ Remove the objects blocking the air inlet or outlet grille and carry out the following.1. Wait for the air inlet or outlet fan to stop (or wait for the LAMP indicator to go out.)2. Unplug the power cord from the wall outlet.3. Wait about 1 minute.4. Plug the power cord into the wall outlet.5. Press the POWER button.● Check that the battery or power cord connected with the projector correctly. | |||
| “Searching for source” is displayed. | Turn on the power of the connected device, or check whether there is something wrong with the connected device.Check the external device outputs signals. (Check this especially when the external device is a notebook computer.)Check that the cable connected to the external device isn’t defective.Check that the projector is connected to the external device using the correct terminals.Check that the connected device is correctly selected as the input source.When an extension cord is being used, replace it with the supplied cable and check whether images are projected correctly. | |||
Images aren't projected correctly.
| Problem Cause and solution | |
| Projected images are shaking. Projected images are displaced. | ● Check that the cable connected to the external device isn’t intermittent. ● Connect the cable’s plug with the external device’s connector firmly. ● Some computers output out-of-spec signals on rare occasion. Adjust the Image menu. |
| Projected images are distorted. | ● Adjust the projector and the screen so that they are perpendicular to each other. |
| Projected images are dark. | ● Adjust Brightness in the Color menu. |
| Projected images are blurred. | ● Adjust the focus. ● Clean the lens. ● Adjust Brightness and Contrast in the Color menu. ● Adjust the projector and the screen so that they are perpendicular to each other. |
| White dots are seen on projected images. Black dots are seen onprojected images. | ● This symptom is normal for a DLP projector and is not a malfunction. (A very small number of pixels may stay lit or out, but such symptom is not a malfunction. Pixels of 99.99% or more are effective.) |
| Rainbow blurprojected images. | ● This is due to color breaking noise that occurs in a DLP system and is not a malfunction. |
| Fine streak pattern appears in projected images. | ● It occurs because of interference with the screen and isn't a product malfunction. Change the screen or readjust the focus of the projector. |
| Projected images appear wavy and distorted. | ● Connect the cable's plug with the external device's connector firmly. ● Keep the projector away from equipment generating interfering radio waves. ● When the keystone adjustment is carried out, the image may not be displayed correctly because of the type of input signal. This isn't a product malfunction. In this case, readjust the keystone so that the amount of keystone correction is as small as possible. |
| Tint in projected images is incorrect. | ● Check that the cable connected to the external device isn't broken. |
| Only the motion areas in the images supplied from the computer aren't displayed. | ● This is caused by the computer being used. Contact the manufacturer of your computer. |
| Projected images are obscured. | ● Match the output resolution of your computer with the resolution of the projector. For the method to change the output resolution of the computer, contact the manufacturer of your computer. ● Some images and texts appear obscured during the keystone adjustment. In such cases, use the projector without applying the keystone adjustment. |
Others
| Problem Cause and solution | |
| Hot air is emitted from the air outlet grilles. | ● This air comes out as a result of cooling the inside of the projector. This isn't a product malfunction. |
| The menu can't be used. | ● The microcomputers inside the projector may be wrongly operating because of noise.● Press the POWER button twice to turn off the lamp and unplug the power cord from the wall outlet. Wait about 1 minute, plug the power cord in, and try again |
| The remote control doesn't function easily at all. | ● Check that the battery is loaded in the remote control or the battery isn't weak.● Check that the remote control sensor isn't exposed to direct sunlight or fluorescent light.● Use the remote control within its operation range. |
| displays on the upper-right of the screen. | ● Low battery power. Charge the battery. You may press the MENU button to cancel the icon display. |
| displays on the center of the screen. | ● No battery power. Charge the battery. You may press the MENU button to cancel the icon display. |
Maintenance
Caution:
Be sure to turn off the lamp and unplug the power cord from the wall outlet before you perform any maintenance on the projector.
Cleaning of the projector and the ventilation slots
Use a soft cloth to clean the projector and the ventilation grilles. When the grilles become dirty, wipe them with a soft cloth dampened with diluted mild detergent, and then wipe them with a dry cloth.
To protect the surface of the projector from fading or deteriorating:
■ Do not spray insecticide on or inside the projector.
■ Do not use benzine or thinner to clean it.
■ Do not let rubber or plastic materials contact with projector.
Cleaning of the lens
Use a standard lens-cleaning brush or a piece of lens tissue dampened with lens cleaning fluid. The lens surface is fragile. Use only recommended, nonabrasive lens-cleaning materials. Do not touch the lens with your fingers.
Indicators
This projector has three indicators, each of which shows the operation condition of the projector.
The following offer solutions to possible problems. If these problem persist, turn the projector off and consult your appliance dealer.

Normal condition (AC Adaptor only)
| LAMP(Green) POWER (Red) CHARGE (Red) CONDITION | |||
| ON OFF OFF System ON | |||
| OFF ON OFF System standby | |||
Normal condition ( AC Adaptor + Battery)
| LAMP(Green) | POWER (Red) | CHARGE (Red) CONDITION | |
| ON OFF | ON | System ON | +Battery charging |
| ON OFF | OFF | System ON + Battery full | |
| OFF ON | ON System standby+Battery | charging | |
| OFF ON | OFF | System standby+Battery full | |
Normal condition (Battery only)
| LAMP (Green) POWER (Red) CHARGE (Red) CONDITION | |||
| ON OFF OFF System ON | |||
| OFF ON OFF System standby | |||
| OFF Flashing x 10 OFF | Low Battery (System turned off) | ||
Abnormal condition
| LAMP (Green) POWER (Red) CHARGE (Red) | CONDITION | ||
| OFF Off x 1 (Flashing) - System Failure | |||
| OFF Off x 3 (Flashing) - Fan abnormal | |||
| OFF Off x 4 (Flashing) - Over temperature | |||
| Flashing x 1 | OFF | - System Failure | |
| Flashing x 2 | OFF | - System Failure | |
| Flashing x 3 | OFF | - System Failure | |
| ON OFF | - System | Failure | |
Specifications
| Type LED projector | ||
| Rated input 15V, 2.0A | ||
| Display technology Single 0.5" DLP panel | ||
| Native resolution 800 x 600 pixels | ||
| Colors 16.7 million | ||
| Projection lens Fixed zoom with focus adjustment; F2.0 | ||
| Light source RGB LED lamps | ||
| Projection range | Typical image size: 12" - 60"Typical distance: 40cm - 200cm | |
| Performance range | Typical image size: 15" - 50"Typical distance: 48cm - 167cm | |
| PC compatibility | VGA (Expand)SVGA (Real)XGA (Compress)SXGA (Compress) | 640 x 480800 x 6001024 x 7681280 x 1024 |
| Video compatibility | NTSC-M, 4.43; PAL60; PAL- M, N; SECAM;HDTV 480i, 480p, 720p, 1080i from analog RGB connector | |
| I/O Connectors | DC IN jack; Yellow RCA jack for composite video input; S-Video; D-SUB15 female for analog VGA input; AUDIO IN ; AUDIO OUT; SD CARD slot | |
| Outside dimensions 121 x 99 x 47.5mm (W x D x H) | ||
| Weight Approx. 1 lb (0.45kg) | ||
| AC adapter input 100-240V AC 50/60 Hz | ||
| Length of power cord | 72.8 inch + 72.8 inch (1.85m + 1.85m) | |
| Temperature, humidity(performance guaranteed) | +41°F (+5°C) - +95°F (+35°C), maximum 85% | |
● The specifications and outside appearance of the projector are subject to change without prior notice.
Dimensional drawings (unit : mm)
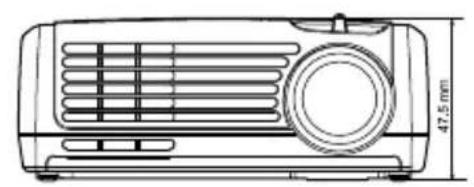
natural_image
Technical line drawing of a projector with ventilation grilles and a circular vent, shown with a 45.5 mm height dimension (no text or symbols beyond the dimension label)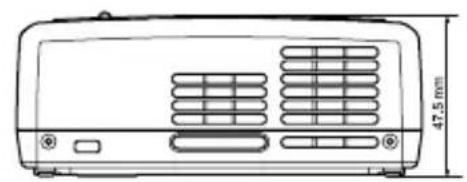
natural_image
Technical line drawing of a front-mounted electronic device with ventilation grilles and a 47.5 mm height dimension (no text or symbols on the device itself)

natural_image
Technical line drawing of a rectangular electronic enclosure with mounting holes and a central internal component, labeled with dimensions (90.0 mm width, 121.0 mm height)What's included in the box
■ 1 Soft Bag
■ 1 CD Wizard (with User's Manual)
■ 1 Quick Start Guide
■ 1 Composite Video Cable
■ 1 AC Adaptor
■ 1 Power Cord (US/EU/UK/AU/CN/TW)*
■ 1 Remote Control
* It depends on different countries or areas, only 1 cord is included.
Optional accessories
■ 1 Lithium-ion Rechargeable Battery
* Output: Normal DC 11.1V 4300 mAh
Specification of RGB signals in each computermode of the projector
| Signal mode R | Resolution (H x V) Horizontal frequency (kHz) Vertical frequency (Hz) | |
| VGA 60 640 | x 350 31.47 59.94 | |
| VGA 85 | 640 x 350 37.86 85.08 | |
| VGA mode3 | 640 x 480 31.47 59.94 | |
| MAC | 640 x 480 35 66.7 | |
| VGA VESA 72 | 640 x 480 37.86 72.80 | |
| VGA VESA 75 | 640 x 480 37.50 75.00 | |
| VGA VESA 85 | 640 x 480 43.27 85.01 | |
| VGA VESA 85 | 720 x 400 37.93 85.04 | |
| SVGA VESA 56 | 800 x 600 35.16 56.00 | |
| SVGA VESA 60 | 800 x 600 37.88 60.00 | |
| SVGA VESA 72 | 800 x 600 48.08 72.00 | |
| SVGA VESA 75 | 800 x 600 46.88 75.00 | |
| SVGA VESA 85 | 800 x 600 53.67 85.06 | |
| MAC 16 | 832 x 624 49.72 74.55 | |
| MAC 19 | 1024 x 768 60.24 75.02 | |
| XGA VESA 60 | 1024 x 768 48.36 60.00 | |
| XGA VESA 70 | 1024 x 768 56.48 70.00 | |
| XGA VESA 75 | 1024 x 768 60.02 75.03 | |
| XGA VESA 85 | 1024 x 768 68.68 85.00 | |
| SXGA 1280 | x 1024 64 | 60 |
| SXGA 1280 | x 1024 80 | 75 |
Specification of HDTV signals
| Signal mode | Resolution (H x V) | Horizontal frequency (kHz) | Vertical frequency (Hz) |
| 480i 720 x | 480 15.80 60.00 | ||
| 480p 720 x | 480 31.50 60.00 | ||
| 576i 720 x | 576 15.60 50.00 | ||
| 576p 720 x | 576 31.30 50.00 | ||
| 720p 60 1280 x | 720 45.00 60.00 | ||
| 720p 50 1280 x | 720 37.50 50.00 | ||
| 1080i 60 1920 x | 1080 33.80 60.00 | ||
| 1080i 50 1920 x | 1080 28.10 50.00 |
Important:
- Some computers aren’t compatible with the projector.
■ The projector's maximum resolution is 800 x 600 pixels. It may not display images of higher resolutions than 800 x 600 correctly.
■ Images with SYNC on G (Green) signal may jitter.
■ Images with SYNC on G (Green) signal may be tinged with green.
If the resolution and frequency of your computer aren't shown on the table, find the compatible resolution and frequency by changing the resolution of your computer.
Customer Support
For technical support or product service, see the table below or contact your reseller.
Note : You will need the product serial number.
| Country/Region Web Site | T=TelephoneF=Fax | ||
| United States | www.viewsonic.com/support/ | T=(800) 688 6688F=(909) 468 1202 | service.us@viewsonic.com |
| Canada | www.viewsonic.com/support | T=(866) 463 4775 | service.ca@viewsonic.com |
| United Kingdom | www.viewsoniceurope.com/uk | T=0207 949 0307 | service.eu@viewsoniceurope.com |
| Europe, Middle East,Baltic countries, andNorth Africa | www.viewsoniceurope.com | Contact your reseller | service.eu@viewsoniceurope.com |
| Australia and New Zealand | www.viewsonic.com.au/support/ | AUS=1800 880 818NZ=0800 008 822 | service@au.viewsonic.com |
| Singapore/Malaysia/Thailand | www.viewsonic.com.sg/support/ | T=(65) 6273 4018F=(65) 6273 1566 | service@sg.viewsonic.com |
| South Africa/Other countries | www.viewsonic.com | T=+886 2 2246-3456F=+886 2 2249-1751 | service@sd.viewsonic.com |
| Hong Kong | www.hk.viewsonic.com/support/ | T=+852 3102 2900 | service@hk.viewsonic.com |
| Macau | www.hk.viewsonic.com/support/ | T=+853 700 303 | service@hk.viewsonic.com |
| Korea www.viewsonic.com | T=080 333 2131 | service@kr.viewsonic.com |
Limited Warranty
ViewSonic® Projector
What the warranty covers:
ViewSonic warrants its products to be free from defects in material and workmanship during the warranty period. If a product proves to be defective in material or workmanship during the warranty period,
ViewSonic will at its sole option repair or replace the product with a like product. Replacement product or parts may include remanufactured or refurbished parts or components.
How long the warranty is effective:
North and South America: Three (3) years warranty for all parts excluding the lamp, three (3) years for labor, and one (1) year for the original lamp from the date of the first consumer purchase. Europe except Poland: Three (3) years warranty for all parts excluding the lamp, three (3) years for labor, and ninety (90) days for the original lamp from the date of the first consumer purchase. Poland: Two (2) years warranty for all parts excluding the lamp, two (2) years for labor, and ninety (90) days for the original lamp from the date of the first consumer purchase. Other regions or countries: Please check with your local dealer or local ViewSonic office for the warranty information.
Lamp warranty subject to terms and conditions, verification and approval. Applies to manufacturer's installed lamp only. All accessory lamps purchased separately are warranted for 90 days.
Who the warranty protects:
This warranty is valid only for the first consumer purchaser.
What the warranty does not cover:
-
Any product on which the serial number has been defaced, modified or removed.
-
Damage, deterioration or malfunction resulting from:
a. Accident, misuse, neglect, fire, water, lightning, or other acts of nature, unauthorized product modification, or failure to follow instructions supplied with the product.
b. Repair or attempted repair by anyone not authorized by ViewSonic.
c. Any damage of the product due to shipment.
d. Removal or installation of the product.
e. Causes external to the product, such as electric power fluctuations or failure.
f. Use of supplies or parts not meeting ViewSonic's specifications.
g. Normal wear and tear.
h. Any other cause which does not relate to a product defect.
-
Any product exhibiting a condition commonly known as "image built-in" which results when a static image is displayed on the product for an extended period of time.
-
Removal, installation, and set-up service charges.
How to get service:
- For information about receiving service under warranty, contact ViewSonic Customer Support. You will need to provide your product's serial number.
- To obtain warranted service, you will be required to provide (a) the original dated sales slip, (b) your name, (c) your address, (d) a description of the problem, and (e) the serial number of the product.
- Take or ship the product freight prepaid in the original container to an authorized ViewSonic service center or ViewSonic.
- For additional information or the name of the nearest ViewSonic service center, contact ViewSonic.
Limitation of implied warranties:
There are no warranties, express or implied, which extend beyond the description contained herein including the implied warranty of merchantability and fitness for a particular purpose.
Exclusion of damages:
ViewSonic's liability is limited to the cost of repair or replacement of the product. ViewSonic shall not be liable for:
- Damage to other property caused by any defects in the product, damaged based upon inconvenience, loss of use of the product, loss of time, loss of profits, loss of business opportunity, loss of goodwill, interference with business relationships, or other commercial loss, even if advised of the possibility of such damages.
- Any other damages, whether incidental, consequential or otherwise.
- Any claim against the customer by other party.
Effect of state law:
This warranty gives you specific legal rights, and you may also have other rights which vary from state to state. Some states do not allow limitations on implied warranties and/or do not allow the exclusion of incidental or consequential damages, so the above limitations and exclusions may not apply to you.
Sales outside the U.S.A. and Canada:
For warranty information and service on ViewSonic products sold outside of the U.S.A. and Canada, contact ViewSonic or your local ViewSonic dealer.
Warranty Projectors Rev. 1d 1 of 1
4.3: Projector Warranty Release Date: 03-31-05

bar
| Category | Value | |---|---| | Category 1 | 100 | | Category 2 | 100 | | Category 3 | 100 | | Category 4 | 100 | | Category 5 | 100 | | Category 6 | 100 | | Category 7 | 100 | | Category 8 | 100 | | Category 9 | 100 | | Category 10 | 100 |
ViewSonic

- FCC Warning
- For Canada
- For European Countries
- CE Conformity
- User Information for all Countries
- Copyright Information
- Product Registration
- For Your Records
- Contents
- Important safeguards
- Ventilation
- Power sources
- Power-cord protection
- Overloading
- Objects and liquids
- Servicing
- Damage requiring service
- Replacement parts
- Safety check
- WARNING:
- Never remove the cabinet.
- Do not modify the projector.
- Do not keep using the damaged projector.
- Do not face the projection lens to the sun.
- Use correct voltage.
- Overview
- Control panel
- Terminal board
- Bottom side
- Power
- Using the AC adapter
- Using the optional battery
- For battery charging
- For battery removal
- Remote control
- For the first time use:
- For battery change:
- Operating Range
- Remote Control Precautions
- CAUTION:
- Installation
- Layout of the projector
- Front projection
- Important:
- Basic connections
- Projector + AV device
- Projector + DVD player or HDTV
- Projector + Computer
- For Macintosh
- Preparation
- Preparation for projection
- In the following cases:
- Basic operation
- On the control panel
- Power-on
- Power-off
- On the remote control
- Keystone ▲/▼ button
- Volume ▲/▼ button
- Source button
- Mute button
- Blank button
- 4:3/16:9 button
- Auto button
- Menu operation
- Color
- Image
- Management
- AV Set
- Using an SD Card
- Inserting/Removing an SD Card
- Playing Back Files in SD Card
- Troubleshooting
- Images aren't projected on the screen.
- Maintenance
- Cleaning of the projector and the ventilation slots
- To protect the surface of the projector from fading or deteriorating:
- Cleaning of the lens
- Indicators
- Normal condition (AC Adaptor only)
- Normal condition ( AC Adaptor + Battery)
- Normal condition (Battery only)
- Abnormal condition
- Dimensional drawings (unit : mm)
- What's included in the box
- Optional accessories
- Specification of HDTV signals
- Customer Support
- Limited Warranty
- ViewSonic® Projector
- What the warranty covers:
- How long the warranty is effective:
- Who the warranty protects:
- What the warranty does not cover:
- How to get service:
- Limitation of implied warranties:
- Exclusion of damages:
- Effect of state law:
- Sales outside the U.S.A. and Canada:
Brand : VIEWSONIC
Model : PJ106D
Category : Video projector