
PJD6551W - Video projector VIEWSONIC - Free user manual and instructions
Find the device manual for free PJD6551W VIEWSONIC in PDF.


| Product Type | Video projector |
| Brand | ViewSonic |
| Model | PJD6551W |
| Display Technology | DLP |
| Native Resolution | WXGA (1280 x 800) |
| Brightness | 3000 ANSI lumens |
| Contrast Ratio | 15000:1 |
| Lamp Life (Normal/Eco) | 4000 / 6000 hours |
| Dimensions (W x D x H) | 294 x 220 x 80 mm |
| Weight | 2.4 kg |
| Power Consumption | 260 W (typical) |
| Inputs | HDMI, VGA, Composite, S-Video, Audio |
| Outputs | VGA out, Audio out |
| Lens Zoom | 1.2x manual |
| Keystone Correction | Vertical ±40° |
| Noise Level | 32 dB (Eco mode) |
| Built-in Speaker | 2W monaural |
| Air Filter | Removable and cleanable |
| Lamp Replacement | User-accessible, lamp door on side |
| Warranty | 3 years (limited) |
Frequently Asked Questions - PJD6551W VIEWSONIC
User questions about PJD6551W VIEWSONIC
0 question about this device. Answer the ones you know or ask your own.
Ask a new question about this device
Download the instructions for your Video projector in PDF format for free! Find your manual PJD6551W - VIEWSONIC and take your electronic device back in hand. On this page are published all the documents necessary for the use of your device. PJD6551W by VIEWSONIC.
USER MANUAL PJD6551W VIEWSONIC
IMPORTANT: Please read this User Guide to obtain important information on installing and using your product in a safe manner, as well as registering your product for future service. Warranty information contained in this User Guide will describe your limited coverage from ViewSonic Corporation, which is also found on our web site at http://www.viewsonic.com in English, or in specific languages using the Regional selection box in the upper right corner of our website. "Antes de operar su equipo lea cu idadosamente las instrucciones en este manual"
Model No. VS16443/VS15913/VS16444/VS16445/VS16483
Compliance Information
FCC Statement
This device complies with part 15 of FCC Rules. Operation is subject to the following two conditions: (1) this device may not cause harmful interference, and (2) this device must accept any interference received, including interference that may cause undesired operation.
This equipment has been tested and found to comply with the limits for a Class B digital device, pursuant to part 15 of the FCC Rules. These limits are designed to provide reasonable protection against harmful interference in a residential installation. This equipment generates, uses, and can radiate radio frequency energy, and if not installed and used in accordance with the instructions, may cause harmful interference to radio communications. However, there is no guarantee that interference will not occur in a particular installation. If this equipment does cause harmful interference to radio or television reception, which can be determined by turning the equipment off and on, the user is encouraged to try to correct the interference by one or more of the following measures:
- Reorient or relocate the receiving antenna.
- Increase the separation between the equipment and receiver.
- Connect the equipment into an outlet on a circuit different from that to which the receiver is connected.
- Consult the dealer or an experienced radio/TV technician for help.
Warning: You are cautioned that changes or modifications not expressly approved by the party responsible for compliance could void your authority to operate the equipment.
For Canada
CAN ICES-3 (B)/NMB-3(B)
CE Conformity for European Countries

The device complies with the EMC Directive 2014/30/EU and Low Voltage Directive 2014/35/EU.
Following information is only for EU-member states:
The mark is in compliance with the Waste Electrical and Electronic Equipment Directive 2012/19/EU (WEEE).
The mark indicates the requirement NOT to dispose the equipment including any spent or discarded batteries or accumulators as unsorted municipal waste, but use the return and collection systems available.
If the batteries, accumulators and button cells included with this equipment, display the chemical symbol Hg, Cd, or Pb, then it means that the battery has a heavy metal content of more than 0.0005% Mercury or more than, 0.002% Cadmium, or more than 0.004% Lead.


Important Safety Instructions
- Read these instructions.
- Keep these instructions.
- Heed all warnings.
- Follow all instructions.
- Do not use this unit near water.
-
Clean with a soft, dry cloth.
-
Do not block any ventilation openings. Install the unit in accordance with the manufacturer's instructions.
-
Do not install near any heat sources such as radiators, heat registers, stoves, or other devices (including amplifiers) that produce heat.
-
Do not defeat the safety purpose of the polarized or grounding-type plug. A polarized plug has two blades with one wider than the other. A grounding type plug has two blades and a third grounding prong. The wide blade and the third prong are provided for your safety. If the provided plug does not fit into your outlet, consult an electrician for replacement of the obsolete outlet.
-
Protect the power cord from being walked on or pinched particularly at plugs. Convenience receptacles and the point where they exit from the unit. Be sure that the power outlet is located near the unit so that it is easily accessible.
-
Only use attachments/accessories specified by the manufacturer.
-
Use only with the cart, stand, tripod, bracket, or table specified by the manufacturer, or sold with the unit. When a cart is used, use caution when moving the cart/unit combination to avoid injury from tipping over.

- Unplug this unit when unused for long periods of time.
- Refer all servicing to qualified service personnel. Servicing is required when the unit has been damaged in any way, such as: if the power-supply cord or plug is damaged, if liquid is spilled onto or objects fall into the unit, if the unit is exposed to rain or moisture, or if the unit does not operate normally or has been dropped.
Declaration of RoHS2 Compliance
This product has been designed and manufactured in compliance with Directive 2011/65/EU of the European Parliament and the Council on restriction of the use of certain hazardous substances in electrical and electronic equipment (RoHS2 Directive) and is deemed to comply with the maximum concentration values issued by the European Technical Adaptation Committee (TAC) as shown below:
| Substance | Proposed Maximum Concentration | Actual Concentration |
| Lead (Pb) 0.1% < 0.1% | ||
| Mercury (Hg) 0.1% < 0.1% | ||
| Cadmium (Cd) 0.01% < 0.01% | ||
| Hexavalent Chromium ( Cr^6+ ) 0.1% < 0.1% | ||
| Polybrominated biphenyls (PBB) 0.1% < 0.1% | ||
| Polybrominated diphenyl ethers (PBDE) 0.1% | < 0.1% |
Certain components of products as stated above are exempted under the Annex III of the RoHS2 Directives as noted below:
Examples of exempted components are:
- Mercury in cold cathode fluorescent lamps and external electrode fluorescent lamps (CCFL and EEFL) for special purposes not exceeding (per lamp):
(1) Short length ( ≤ 500 mm): maximum 3.5 mg per lamp.
(2) Medium length (>500 mm and ≤ 1,500 mm): maximum 5 mg per lamp.
(3) Long length (>1,500 mm): maximum 13 mg per lamp.
-
Lead in glass of cathode ray tubes.
-
Lead in glass of fluorescent tubes not exceeding 0.2% by weight.
-
Lead as an alloying element in aluminium containing up to 0.4% lead by weight.
-
Copper alloy containing up to 4% lead by weight.
-
Lead in high melting temperature type solders (i.e. lead-based alloys containing 85% by weight or more lead).
-
Electrical and electronic components containing lead in a glass or ceramic other than dielectric ceramic in capacitors, e.g. piezoelectronic devices, or in a glass or ceramic matrix compound.
Copyright Information
Copyright © ViewSonic® Corporation, 2016. All rights reserved.
Macintosh and Power Macintosh are registered trademarks of Apple Inc.
Microsoft, Windows, Windows NT, and the Windows logo are registered trademarks of Microsoft Corporation in the United States and other countries.
ViewSonic, the three birds logo, OnView, ViewMatch, and ViewMeter are registered trademarks of ViewSonic Corporation.
VESA is a registered trademark of the Video Electronics Standards Association.
DPMS and DDC are trademarks of VESA.
PS/2, VGA and XGA are registered trademarks of International Business Machines Corporation.
Disclaimer: ViewSonic Corporation shall not be liable for technical or editorial errors or omissions contained herein; nor for incidental or consequential damages resulting from furnishing this material, or the performance or use of this product.
In the interest of continuing product improvement, ViewSonic Corporation reserves the right to change product specifications without notice. Information in this document may change without notice.
No part of this document may be copied, reproduced, or transmitted by any means, for any purpose without prior written permission from ViewSonic Corporation.
Product Registration
To fulfill possible future product needs, and to receive additional product information as it becomes available, please visit your region section on ViewSonic's website to register your product online.
The ViewSonic CD also provides an opportunity for you to print the product registration form. Upon completion, please mail or fax to a respective ViewSonic office. To find your registration form, use the directory “:\CD\Registration”.
Registering your product will best prepare you for future customer service needs. Please print this user guide and fill the information in the “For Your Records” section. For additional information, please see the “Customer Support” section in this guide.
For Your Records
Product Name: PJD6252L/PJD6551W/PJD7326/PJD7526W/PJD7720HD
ViewSonic DLP Projector
Model Number: VS16443/VS15913/VS16444/VS16445/VS16483
Document Number: PJD6252L/PJD6551W/PJD7326/PJD7526W/PJD7720HD
UG_ENG Rev. 1B 05-04-16
Serial Number:
Purchase Date:
Product disposal at end of product life
The lamp in this product contains mercury which can be dangerous to you and the environment. Please use care and dispose of in accordance with local, state or federal laws.
ViewSonic respects the environment and is committed to working and living green.
Thank you for being part of Smarter, Greener Computing. Please visit ViewSonic website to learn more.
USA & Canada: http://www.viewsonic.com/company/green/recycle-program/
Europe: http://www.viewsoniceurope.com/uk/support/recycling-information/
Taiwan: http://recycle.epa.gov.tw/recycle/index2.aspx
Important safety instructions ......2
Introduction......4
Projector features 4
Shipping contents...... 5
Projector exterior view...... 6
Controls and functions ...... 7
Positioning your projector......12
Choosing a location.... 12
Projection dimensions.... 13
Connection ......16
Connecting a computer or monitor .... 17
Connecting Video source devices ..... 18
Playing sound through the projector .. 20
Using the cable management cover (for selected models).... 21
Operation ......22
Starting up the projector.... 22
Using the menus.... 23
Utilizing the password function ...... 24
Switching input signal.... 26
Adjusting the projected image 27
Magnifying and searching for details. 29
Selecting the aspect ratio 30
Optimizing the image.... 31
Setting the presentation timer ...... 35
Hiding the image.... 36
Locking control keys.... 36
Creating your own startup screen...... 36
Operating in a high altitude environment 37
Using the CEC function.... 37
Using the 3D functions.... 38
Controlling the projector through a LAN environment (for selected models) .... 39
Using the projector in standby mode. 46
Adjusting the sound 46
Shutting down the projector 48
Menu operation.... 49
Maintenance ....59
Care of the projector 59
Using the dust filter (optional accessory) 59
Lamp information.... 61
Troubleshooting ......64
Specifications ......65
Projector specifications.... 65
Dimensions 67
Ceiling mount installation 67
Tripod mount installation 67
Timing chart 68
Copyright information...72
Appendix......73
IR control table 73
RS232 command table.... 74
Your projector is designed and tested to meet the latest standards for safety of information technology equipment. However, to ensure safe use of this product, it is important that you follow the instructions mentioned in this manual and marked on the product.
Safety Instructions
- Please read this manual before you operate your projector. Save it for future reference.
- Do not look straight at the projector lens during operation. The intense light beam may damage your eyes.
- Refer servicing to qualified service personnel.
- Always open the lens shutter or remove the lens cap when the projector lamp is on.
- In some countries, the line voltage is NOT stable. This projector is designed to operate safely within a mains voltage between 100 to 240 volts AC, but could fail if power cuts or surges of ±10 volts occur. In areas where the mains voltage may fluctuate or cut out, it is recommended that you connect your projector through a power stabilizer, surge protector or uninterruptible power supply (UPS).
- Do not block the projection lens with any objects when the projector is under operation as this could cause the objects to become heated and deformed or even cause a fire. To temporarily turn off the lamp, press BLANK on the projector or remote control.
- The lamp becomes extremely hot during operation. Allow the projector to cool for approximately 45 minutes prior to removing the lamp assembly for replacement.
- Do not operate lamps beyond the rated lamp life. Excessive operation of lamps beyond the rated life could cause them to break on rare occasions.
- Never replace the lamp assembly or any electronic components unless the projector is unplugged.
- Do not place this product on an unstable cart, stand, or table. The product may fall, sustaining serious damage.
- Do not attempt to disassemble this projector. There are dangerous high voltages inside which may cause death if you should come into contact with live parts. The only user serviceable part is the lamp which has its own removable cover.
Under no circumstances should you ever undo or remove any other covers. Refer servicing only to suitably qualified professional service personnel. - Do not place this projector in any of the following environments.
- Space that is poorly ventilated or confined. Allow at least 50 cm clearance from walls and free flow of air around the projector.
- Locations where temperatures may become excessively high, such as the inside of a car with all windows rolled up.
- Locations where excessive humidity, dust, or cigarette smoke may contaminate optical components, shortening the projector's life span and darkening the picture.
- Locations near fire alarms
- Locations with an ambient temperature above 40^ C / 104^ F
-
Locations where the altitudes are higher than 3000 m (10000 feet).
-
Do not block the ventilation holes. If the ventilation holes are seriously obstructed, overheating inside the projector may result in a fire.
-
Do not place this projector on a blanket, bedding or any other soft surface.
- Do not cover this projector with a cloth or any other item.
-
Do not place inflammables near the projector.
-
Always place the projector on a level, horizontal surface during operation.
- Do not use if tilted at an angle of more than 10 degrees left to right, nor at angle of more than 15 degrees front to back. Using the projector when it is not fully horizontal may cause a malfunction of, or damage to, the lamp.
- Do not stand the projector on end vertically. Doing so may cause the projector to fall over, causing injury or resulting in damage to the projector.
- Do not step on the projector or place any objects upon it. Besides probable physical damage to the projector, doing so may result in accidents and possible injury.
- Do not place liquids near or on the projector. Liquids spilled into the projector may cause it to fail. If the projector does become wet, disconnect it from the power supply's wall socket and call your local service center to have the projector serviced.
- This product is capable of displaying inverted pictures for ceiling mount installation.

Use only qualified ceiling mount kit for mounting the projector and ensure it is securely installed.
- When the projector is under operation, you may sense some heated air and odor from its ventilation grill. It is a normal phenomenon and not a product defect.
- Do not use the Security bar for transporting or installation. It should be used with a commercially available theft prevention cable.
Safety instructions for ceiling mounting of the projector
We want you to have a pleasant experience using your projector, so we need to bring this safety matter to your attention to prevent damage to person and property.
If you intend to mount your projector on the ceiling, we strongly recommend that you use a proper fitting projector ceiling mount kit and that you ensure it is securely and safely installed.
If you use an inappropriate projector ceiling mount kit, there is a safety risk that the projector may fall from the ceiling due to an improper attachment through the use of the wrong gauge or length screws.
You can purchase a projector ceiling mount kit from the place you purchased your projector. We recommend that you also purchase a separate security cable and attach it securely to both the anti-theft lock slot on the projector and the base of the ceiling mount bracket. This will perform the secondary role of restraining the projector should its attachment to the mounting bracket become loose.
Projector features
The projector integrates high-performance optical engine projection and a user-friendly design to deliver high reliability and ease of use.
The projector offers the following features.
- Dynamic mode adjusting the power consumption of the lamp according to the brightness of the image being projected
- Power saving function decreasing the power consumption of the lamp by up to 70% when no input signal can be detected for a set period of time.
- Presentation timer for better control of time during presentations
• LAN Settings allowing management of projector status from a remote computer (for selected models)
• Supports 3D display
• Color Management allowing color adjustments to your liking - Less than 0.5W power consumption when power saving mode is turned on
- Screen Color correction allowing projection on surfaces of several predefined colors
- Quick auto search speeding up the signal detecting process
• Color modes providing choices for different projection purposes - Selectable quick power off function
• One-key auto-adjustment to display the best picture quality - Digital keystone correction and 4 corner adjustment (for selected models) to correct distorted images
- Adjustable color management control for data/video display
- Ability to display 1.07 billion colors
- Multi-language On-Screen Display (OSD) menus
- Switchable normal and economic modes to reduce the power consumption
- Component HDTV compatibility (YP bPr)
- HDMI CEC (Consumer Electronics Control) function allows synchronized power ON/OFF operation between the projector and a CEC-compatible DVD player device connected to the HDMI input of the projector
The apparent brightness of the projected image will vary depending on the ambient lighting conditions, selected input signal contrast/brightness settings, and is directly proportional to projection distance.
The lamp brightness will decline over time and may vary within the lamp manufacturers specifications. This is normal and expected behavior.
Shipping contents
Carefully unpack and verify that you have all of the items shown below. If any of these items are missing, please contact your place of purchase.
Standard accessories

The supplied accessories will be suitable for your region, and may differ from those illustrated.
natural_image
Line drawing of a projector with internal components (no text or symbols)
natural_image
Line drawing of a single cord with two terminal plugs (no text or symbols)Projector Power Cord

natural_image
Line drawing of a cable with two connectors (no text or symbols)

Multi-language User
Manual CD
Quick Start Guide
VGA Cable (for selected models)

Remote Control & Batteries

natural_image
Line drawing of a mechanical bracket or frame structure (no text or symbols)Cable management cover (for selected models)
Optional accessories
- Replacement lamp (RLC-092 for PJD6252L. RLC-093 for PJD6551W. RLC-104 for PJD7326. RLC-105 for PJD7526W. RLC-100 for PJD7720HD.)
- Soft carry case
- VGA-Component adapter
- Dust filter
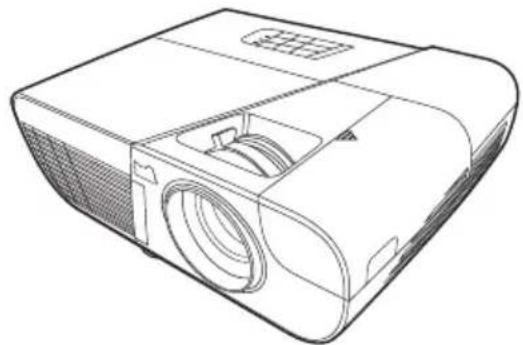
Projector exterior view
Front/upper side

Rear/lower side
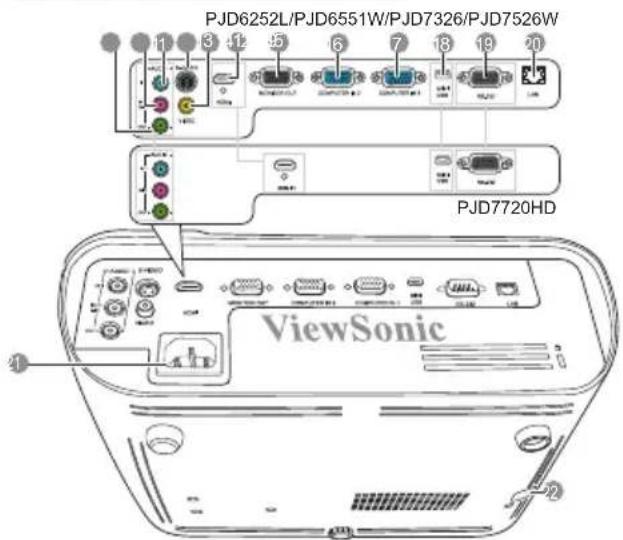
-
External control panel (See "Projector" on page 7 for details.)
-
Lamp cover
-
Vent (heated air exhaust)
-
Front IR remote sensor
-
Adjuster foot
-
Focus and Zoom rings
-
HDMI/MHL port
-
Projection lens
-
Audio signal output socket
-
Audio signal input socket 2/ Microphone
-
Audio signal input socket 1
-
S-Video input socket
-
Video input socket
-
HDMI port
-
RGB signal output socket
-
RGB (PC)/Component video (YPbPr/YCbCr) signal input socket-2
-
RGB (PC)/Component video (YPbPr/YCbCr) signal input socket-1
-
Mini USB port
-
RS-232 control port
-
RJ45 LAN input port
-
AC power cord inlet
-
Security bar for anti-theft lock slot

Warning
• THIS APPARATUS MUST BE EARTHED.
- When installing the unit, incorporate a readily accessible disconnect device in the fixed wiring, or connect the power plug to an easily accessible socket-outlet near the unit. If a fault should occur during operation of the unit, operate the disconnect device to switch the power supply off, or disconnect the power plug.
Controls and functions Projector
PJD7326/PJD7526W PJD6252L/PJD6551W/PJD7720HD

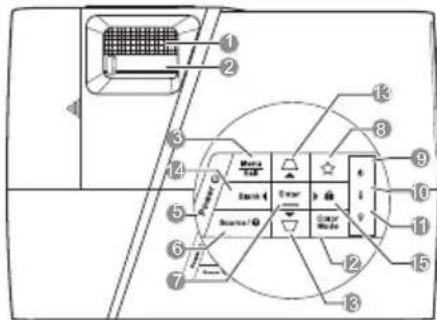
1. Focus ring
Adjusts the focus of the projected image.
2. Zoom ring
Adjusts the size of the projected image.
3. Menu
Turns on the On-Screen Display (OSD) menu.
Exit
Goes back to previous OSD menu, exits and saves menu settings.
4. / / / (Keystone keys)
Manually corrects distorted images resulting from an angled projection.
◀ Left/▶ Right/ ▲ Up/ ▼ Down
Selects the desired menu items and makes adjustments.
5. Power
Toggles the projector between standby mode and Power ON.
6. Source
Displays the source selection bar.
(Help)
Displays the HELP menu by a long press for 3 seconds.
7. Enter
Enacts the selected On-Screen Display (OSD) menu item.
□
Displays the Corner Adj. page. (PJD7326/PJD7526W only)
8. (MyButton)
Allows user to define a short cut key on this button, and the function item is selected in OSD menu.
9. (Power indicator light)
Lights up or flashes when the projector is under operation.
10. (Temperature indicator light)
Lights up red if the projector's temperature becomes too high.
11. (Lamp indicator light)
Indicates the status of the lamp. Lights up or flashes when the lamp has developed a problem.
12. Color Mode
Selects an available picture setup mode.
13. / (Keystone keys)
Manually corrects distorted images resulting from an angled projection.
14. Left
Selects the desired menu items and makes adjustments.
Blank
Hides the screen picture.
15. Right
Selects the desired menu items and makes adjustments.

(Panel Key Lock)
Activates panel key lock. To unlock the panel keys, long press for 3 seconds on 🔒
Remote control
PJD7326/PJD7526W
PJD6252L/PJD6551W

PJD7720HD
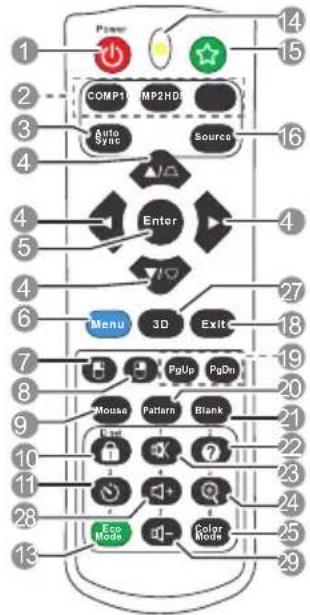

To use the remote mouse control keys (Page Up, Page Down, and see "Using the remote mouse control" on page 10 for details.
1. Power
Toggles the projector between standby mode and Power ON.
2. Source selection keys
• COMP1/COMP2
Selects D-Sub / Comp. 1 or D-Sub / Comp. 2 source for display.
• HDMI
Selects HDMI source for display.
3. Auto Sync
Automatically determines the best picture timings for the displayed image.
4. / / / (Keystone keys)
(PJD7326/PJD7526W)
☐ / (Keystone keys) (PJD6252L/PJD6551W/PJD7720HD)
Manually corrects distorted images resulting from an angled projection.
◀ Left/ ▶ Right/ ▲ Up/ ▼ Down
Selects the desired menu items and makes adjustments.
5. Enter
Enacts the selected On-Screen Display (OSD) menu item.

Displays the Corner Adj. page. (PJD7326/PJD7526W only)
6. Menu
Turns on the On-Screen Display (OSD) menu.
7. (Left mouse button)
Performs the same function as the left mouse button when the mouse mode is activated.

Only available when a PC input signal is selected.
8. (Right mouse button)
Performs the same function as the right mouse button when the mouse mode is activated.

Only available when a PC input signal is selected.
9. Mouse
Switches between the normal and mouse modes.
PgUp, PgDn, ☐: active after pressing Mouse. An icon appears on the screen to indicate the activation of the mouse mode.

Only available when a PC input signal is selected.
10. (Panel Key Lock)
Activates panel key lock. To unlock the panel keys, press 🔒
11. (Presentation Timer)
Displays the presentation timer settings menu.
12. (Volume)
Displays the volume adjustment bar.
13. Eco Mode
Selects a lamp mode.
14. LED indicator
15. (My Button)
Allows user to define a short cut key on the remote control, and the function item is selected in OSD menu.
16. Source
Displays the source selection bar.
17. Laser
Emits visible laser pointer light for presentation purposes.
18. Exit
Goes back to previous OSD menu, exits and saves menu settings.
19. PgUp (Page Up)/PgDn (Page Down)
Operates your display software program (on a connected PC) which responds to page up/down commands (like Microsoft PowerPoint) when the mouse mode is activated.

Only available when a PC input signal is selected.
20. Pattern
Displays embedded test pattern.
21. Blank
Hides the screen picture.
22. (Help)
Displays the HELP menu.
23. (Mute)
Toggles the projector audio between on and off.
24. (Zoom)
Displays the zoom bar that magnifies or reduces the projected picture size.
25. Color Mode
Selects an available picture setup mode.
26. Audio Mode
Selects an audio mode.
27.3D
Displays the 3D settings menu.
28. (Volume Up)
Increases the volume level.
29. (Volume Down)
Decreases the volume level.
Operating the LASER pointer
The Laser Pointer is a presentation aid for professionals. It emits colored light when you press it. The laser beam is visible. It is necessary to press and hold Laser for continuous output.

Do not look into the laser light window or shine the laser light beam on yourself or others. See the warning messages on the back of the remote control prior to using it.
The laser pointer is not a toy. Parents should be mindful of the dangers of laser energy and keep this remote control out of the reach of children.
Remote control code
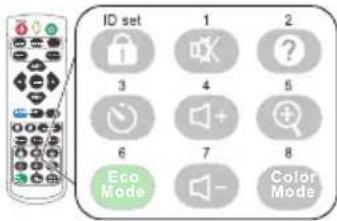
The projector can be assigned to 8 different remote control codes, 1 to 8. When several adjacent projectors are in operation at the same time, switching the remote control codes
can prevent interference from other remote controls. Set the remote control code for the projector first before changing that for the remote control.
To switch the code for the projector, select from among 1 to 8 in the SYSTEM SETTING: ADVANCED > Remote Control Code menu.
To switch the code for the remote control, press ID set and the number button corresponding to the remote control code set in the projector OSD together for 5 seconds or more. The initial code is set to 1. When the code is switched to 8, the remote control can control every projector.

If different codes are set on the projector and remote control, there will be no response from the remote control. When that happens, a message will display to remind you to switch the code for the remote control.

PJD7326/PJD7526W
PJD6252L/PJD6551W

PJD7720HD
Using the remote mouse control
The capability of operating your computer with the remote control gives you more flexibility when delivering presentations.
-
Connect the projector to your PC or notebook with a USB cable prior to using the remote control in place of your computer's mouse. See "Connecting a computer" on page 17 for details.
-
Set the input signal to D-Sub / Comp. 1 or D-Sub / Comp. 2.
-
Press Mouse on the remote control to switch from the normal mode to the mouse mode. An icon appears on the screen to indicate the activation of the mouse mode.
-
Perform the desired mouse controls on your remote control.
• To move the cursor on the screen, press //▲. ▲ ▼ ▶
- To left-click, press .
- To right-click, press .
- To operate your display software program (on a connected PC) which responds to page up/down commands (like Microsoft PowerPoint), press PgUp/PgDn.
- To return to the normal mode, press Mouse again or other keys except for the mouse related multi-function keys.
Remote control effective range
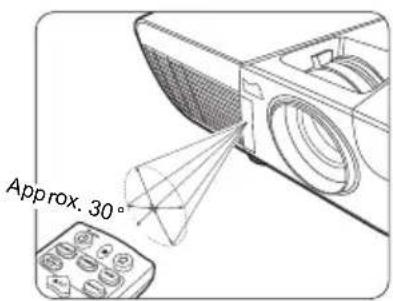
The Infra-Red (IR) remote control is located on the front of the projector. The remote control must be held at an angle within 30 degrees perpendicular to the projector's IR remote control sensor to function correctly. The distance between the remote control and the sensor should not exceed 8 meters (\~26 feet).
Make sure that there are no obstacles between the remote control and the IR sensor on the projector that might obstruct the infra-red beam.
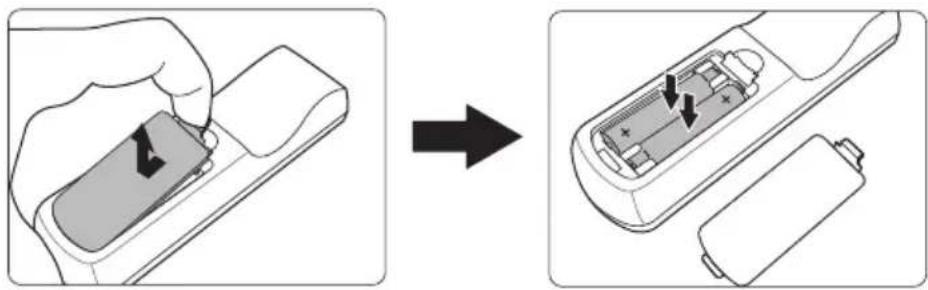
Replacing the remote control batteries
-
To open the battery cover, turn the remote control over to view its back, press on the finger grip on the cover and pull it up in the direction of the arrow as illustrated.
-
Remove any existing batteries (if necessary) and install two AAA batteries observing the battery polarities as indicated in the base of the battery compartment. Positive (+) goes to positive and negative (-) goes to negative.
-
Refit the cover by aligning it with the base and pushing it back down into position. Stop when it clicks into place.
natural_image
Diagram showing battery charging process: adding a component to a battery inside a motor casing (no text or symbols)
WARNING
- Avoid leaving the remote control and batteries in an excessive heat or humid environment like the kitchen, bathroom, sauna, sunroom or in a closed car.
- Replace only with the same or equivalent type recommended by the battery manufacturer.
- Dispose of the used batteries according to the manufacturer's instructions and local environment regulations for your region.
- Never throw the batteries into a fire. There may be danger of an explosion.
- If the batteries are drained or if you will not be using the remote control for an extended period of time, remove the batteries to avoid damage to the remote control from possible battery leakage.
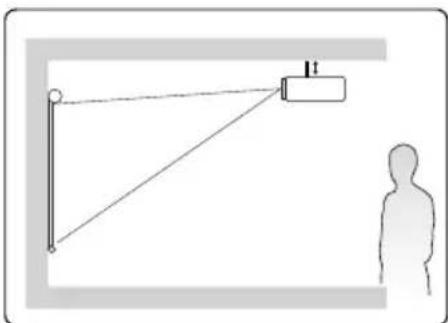
Choosing a location
Your room layout or personal preference will dictate which installation location you select. Take into consideration the size and position of your screen, the location of a suitable power outlet, as well as the location and distance between the projector and the rest of your equipment.
Your projector is designed to be installed in one of the following 4 possible installation locations:
1. Front Table
Select this location with the projector placed near the floor in front of the screen. This is the most common way to position the projector for quick setup and portability.

natural_image
Simple line drawing of a person standing near a desk with a pointer and connecting lines, no text or symbols present.2. Front Ceiling
Select this location with the projector suspended upside-down from the ceiling in front of the screen.
Purchase the projector ceiling mount kit from your dealer to mount your projector on the ceiling.
natural_image
Simple line drawing of a person silhouette facing a vertical pole with a rectangular object labeled '1t' (no text or symbols beyond the label)Set Front Ceiling in the SYSTEM SETTING: BASIC > Projector Position menu after you turn the projector on.
3. Rear Ceiling
Select this location with the projector suspended upside-down from the ceiling behind the screen.
Note that a special rear projection screen and the projector ceiling mounting kit are required for this installation location.

natural_image
Simple line drawing of a person standing next to a hanging object with a numbered label (no text or symbols on the object itself)Set Rear Ceiling in the SYSTEM SETTING: BASIC > Projector Position menu after you turn the projector on.
4. Rear Table
Select this location with the projector placed near the floor behind the screen.
Note that a special rear projection screen is required.

natural_image
Simple line drawing of a person observing a screen and a pole, with no text or symbols present.Set Rear Table in the SYSTEM SETTING: BASIC > Projector Position menu after you turn the projector on.
Projection dimensions

The "screen" mentioned below refers to the projection screen usually consisting of a screen surface and a support structure.
PJD6252L/PJD7326
• 4:3 image on a 4:3 screen
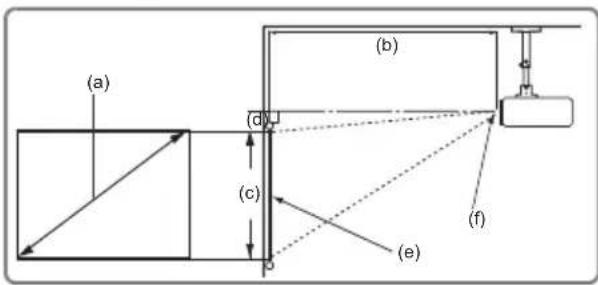
(e): Screen
(f): Center of lens
| (a) Screen Size[inch (cm)] | 4:3 image on a 4:3 Screen 4:3 image on a 16:10 Screen | ||||||||||
| (b) Projection distance [m (inch)] | (c) Image height[cm (inch)] | (d) Vertical offset[cm (inch)] | (b) Projection distance [m (inch)] | (c) Image height[cm (inch)] | (d) Vertical offset[cm (inch)] | ||||||
| min. max. | min. max. | ||||||||||
| 50 (127) 2 | .0 (78) 2.2 | (86) 76 (30) | 7.6 (3.0) | 1.8 (69) 1.9 | (76) 67 (26) | 6.7 | (2.6) | ||||
| 60 (152) 2 | .4 (94) 2.6 | (103) 91 (36) | 9.1 (3.6) | 2.1 (83) 2.3 | (91) 81 (32) | 8.1 (3.2) | |||||
| 70 (178) | 2.8 (110) | 3.1 (120) | 107 (42) | 10.7 (4.2) | 2.5 (97) | 2.7 | (106) | 94 (37) | 9.4 (3.7) | ||
| 80 (203) | 3.2 (125) | 3.5 (138) | 122 (48) | 12.2 (4.8) | 2.8 (111) | 3.1 | (122) | 108 (42) | 10.8 (4.2) | ||
| 90 (229) | 3.6 (141) | 3.9 (155) | 137 (54) | 13.7 (5.4) | 3.2 (124) | 3.5 | (137) | 121 (48) | 12.1 (4.8) | ||
| 100 (254) | 4.0 (156) | 4.4 (172) | 152 (60) | 15.2 (6.0) | 3.5 (138) | 3.9 | (152) | 135 (53) | 13.5 (5.3) | ||
| 120 (305) | 4.8 (188) | 5.2 (207) | 183 (72) | 18.3 (7.2) | 4.2 (166) | 4.6 | (182) | 162 (64) | 16.2 (6.4) | ||
| 150 (381) | 6.0 (235) | 6.6 (258) | 229 (90) | 22.9 (9.0) | 5.3 (207) | 5.8 | (228) | 202 (79) | 20.2 (7.9) | ||
| 180 (457) | 7.2 (282) | 7.9 (310) | 274 (108) | 27.4 (10.8) | 6.3 (249) | 7.0 | (274) | 242 (95) | 24.2 (9.5) | ||
PJD6551W/PJD7526W
• 16:10 image on a 16:10 screen
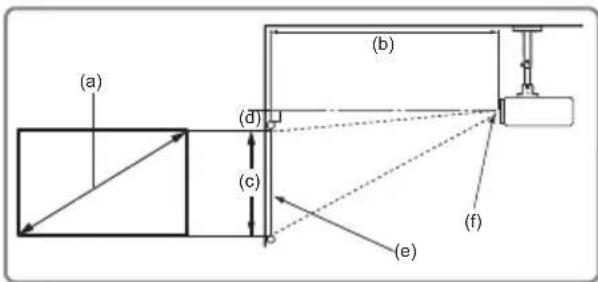
(e): Screen
(f): Center of lens
| (a) Screen Size[inch (cm)] | 16:10 image on a 16:10 Screen 16:10 | image on a 4:3 Screen | ||||||
| (b) Projection distance [m (inch)] | (c) Image height[cm (inch)] | (d) Vertical offset[cm (inch)] | (b) Projection distance [m (inch)] | (c) Image height[cm (inch)] | (d) Vertical offset[cm (inch)] | |||
| min. max. | min. max. | |||||||
| 60 (152) 2 | .0 (79) 2.2 | (87) 81 (32) | 0.0 (0.0) 1 | 9 (74) 2.1 | (82) 76 (30) | 0.0 (0.0) | ||
| 70 (178) 2 | .3 (92) 2.6 | (101) 94 (37) | 0.0 (0.0) | 2.2 (87) 2.4 | (95) 89 (35) | 0.0 (0.0) | ||
| 80 (203) | 2.7 (105) | 2.9 (115) | 108 (42) | 0.0 (0.0) | 2.5 (99) | 2.8 (109) | 102 (40) | 0.0 (0.0) |
| 90 (229) | 3.0 (118) | 3.3 (130) | 121 (48) | 0.0 (0.0) | 2.8 (111) | 3.1 (123) | 114 (45) | 0.0 (0.0) |
| 100 (254) | 3.3 (131) | 3.7 (144) | 135 (53) | 0.0 (0.0) | 3.1 (124) | 3.5 (136) | 127 (50) | 0.0 (0.0) |
| 120 (305) | 4.0 (157) | 4.4 (173) | 162 (64) | 0.0 (0.0) | 3.8 (149) | 4.2 (163) | 152 (60) | 0.0 (0.0) |
| 150 (381) | 5.0 (197) | 5.5 (217) | 202 (79) | 0.0 (0.0) | 4.7 (186) | 5.2 (204) | 191 (75) | 0.0 (0.0) |
| 180 (457) | 6.0 (236) | 6.6 (260) | 242 (95) | 0.0 (0.0) | 5.7 (223) | 6.2 (245) | 229 (90) | 0.0 (0.0) |
PJD7720HD
• 16:9 image on a 16:9 screen
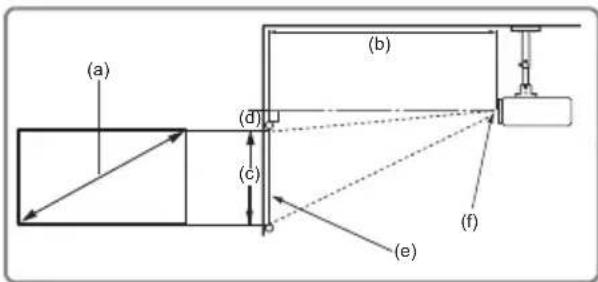
(e): Screen
(f): Center of lens
| (a) Screen Size[inch (cm)] | 16:9 image on a 16:9 Screen 16:9 image on a 4:3 Screen | ||||||||
| (b) Projection distance [m (inch)] | (c) Image height[cm (inch)] | (d) Vertical offset[cm (inch)] | (b) Projection distance [m (inch)] | (c) Image height[cm (inch)] | (d) Vertical offset[cm (inch)] | ||||
| min. max. | x. min. max. | ||||||||
| 50 (127) | 1.6 (64) | 1.8 (71) | 62 (25) | 5 (2.0) | 1.5 (59) | 1.6 (65) | 57 (23) | 4.6 (1.8) | |
| 60 (152) | 2.0 (77) | 2.2 (85) | 75 (29) | 6 (2.4) | 1.8 (71) | 2.0 (78) | 69 (27) | 5.5 (2.2) | |
| 70 (178) | 2.3 (90) | 2.5 (99) | 87 (34) | 7 (2.7) | 2.1 (83) | 2.3 (91) | 80 (32) | 6.4 (2.5) | |
| 80 (203) | 2.6 (103) | 2.9 (113) | 100 (39) | 8 (3.1) | 2.4 (94) | 2.6 (104) | 91 (36) | 7.3 (2.9) | |
| 90 (229) | 2.9 (116) | 3.2 (127) | 112 (44) | 9 (3.5) | 2.7 (106) | 3.0 (117) | 103 (41) | 8.2 (3.2) | |
| 100 (254) | 3.3 (128) | 3.6 (141) | 125 (49) | 10 (3.9) | 3.0 (118) | 3.3 (130) | 114 (45) | 9.1 (3.6) | |
| 110 (279) | 3.6 (141) | 3.9 (155) | 137 (54) | 11 (4.3) | 3.3 (130) | 3.6 (143) | 126 (50) | 10.1 (4.0) | |
| 120 (305) | 3.9 (154) | 4.3 (170) | 149 (59) | 12 (4.7) | 3.6 (142) | 4.0 (156) | 137 (54) | 11.0 (4.3) | |
| 130 (330) | 4.2 (167) | 4.7 (184) | 162 (64) | 13 (5.1) | 3.9 (153) | 4.3 (169) | 149 (59) | 11.9 (4.7) | |
| 140 (356) | 4.6 (180) | 5.0 (198) | 174 (69) | 14 (5.5) | 4.2 165 | 4.6 (182) | 160 (63) | 12.8 (5.0) | |
| 150 (381) | 4.9 (193) | 5.4 (212) | 187 (74) | 15 (5.9) | 4.5 (177) | 4.9 (195) | 171 (68) | 13.7 (5.4) | |

There is 3% tolerance among these numbers due to optical component variations. It is recommended that if you intend to permanently install the projector, you should physically test the projection size and distance using the actual projector in situ before you permanently install it, so as to make allowance for this projector's optical characteristics. This will help you determine the exact mounting position so that it best suits your installation location.
When connecting a signal source to the projector, be sure to:
- Turn all equipment off before making any connections.
- Use the correct signal cables for each source.
- Ensure the cables are firmly inserted.

In the connections shown below, some cables may not be included with the projector (see "Shipping contents" on page 5). They are commercially available from electronics stores.
The connection illustrations below are for reference only. The rear connecting jacks available on the projector vary with each projector model.
For detailed connection methods, see pages 17-20.

Connecting a computer or monitor
Connecting a computer
- Take the supplied VGA cable and connect one end to the D-Sub output socket of the computer.
- Connect the other end of the VGA cable to the COMPUTER IN 1 or COMPUTER IN 2 signal input socket on the projector.
- If you wish to use the remote mouse control function, take a USB cable and connect the larger end to the USB port of the computer, and smaller end to the MINI USB socket on the projector. See "Using the remote mouse control" on page 10 for details.

Many notebooks do not turn on their external video ports when connected to a projector. Usually a key combo like FN + F3 or CRT/LCD key turns the external display on/off. Locate a function key labeled CRT/LCD or a function key with a monitor symbol on the notebook. Press FN and the labeled function key simultaneously. Refer to your notebook's documentation to find your notebook's key combination.
Connecting a monitor
If you want to view your presentation close-up on a monitor as well as on the screen, you can connect the MONITOR OUT signal output socket on the projector to an external monitor with a VGA cable following the instructions below:
- Connect the projector to a computer as described in "Connecting a computer" on page 17.
- Take a suitable VGA cable (only one supplied) and connect one end of the cable to the D-Sub input socket of the video monitor.
Or if your monitor is equipped with a DVI input socket, take a VGA to DVI-A cable and connect the DVI end of the cable to the DVI input socket of the video monitor. - Connect the other end of the cable to the MONITOR OUT socket on the projector.

The MONITOR OUT output only works when COMPUTER IN 1 connection is made to the projector.

To use this connection method when the projector is in standby mode, turn on the Active VGA Out function under the SOURCE > Standby Settings menu.
Connecting Video source devices
You can connect your projector to various Video source devices that provide any one of the following output sockets:
• HDMI
- Component Video
• S - V i d e o
• Video (composite)
You need only connect the projector to a Video source device using just one of the above connecting methods, however each provides a different level of video quality. The method you choose will most likely depend upon the availability of matching terminals on both the projector and the Video source device as described below:
Best video quality
The best available video connection method is HDMI. If your source device is equipped with an HDMI socket, you can enjoy uncompressed digital video quality.
See "Connecting an HDMI device" on page 19 for how to connect the projector to an HDMI source device and other details.
If no HDMI source is available, the next best video signal is Component video (not to be confused with composite video). Digital TV tuner and DVD players output Component video natively, so if available on your devices, this should be your connection method of choice in preference to (composite) video.
See "Connecting a Component Video source device" on page 19 for how to connect the projector to a component video device.
Better video quality
The S-Video method provides a better quality analog video than standard composite Video. If you have both composite Video and S-Video output terminals on your Video source device, you should elect to use the S-Video option.
See "Connecting an S-Video source device" on page 20 for how to connect the projector to an S-Video device.
Least video quality
Composite Video is an analog video and will result in a perfectly acceptable, but less than optimal result from your projector, being the least video quality of the available methods described here.
See "Connecting a composite Video source device" on page 20 for how to connect the projector to a composite Video device.
Connecting audio
The projector has built-in mono speaker(s) which is designed to provide basic audio functionality accompanying data presentations for business purposes only. It is not designed for, nor intended for stereo audio reproduction use as might be expected in home theater or home cinema applications. Any stereo audio input (if provided), is mixed into a common mono audio output through the projector speaker.
If you wish, you can make use of the projector (mixed mono) speaker in your presentations, and also connect separate amplified speakers to the Audio Out socket of the projector. The audio output is a mixed mono signal and controlled by the projector Volume and Mute settings.
If you have a separate sound system, you will most likely want to connect the audio output of your Video source device to that sound system, instead of to the mono audio projector.
Connecting an HDMI device
You should use an HDMI cable when making connection between the projector and HDMI devices.
- Take an HDMI cable and connect one end to the HDMI output port of the video device.
- Connect the other end of the cable to the HDMI input port on the projector.

In the unlikely event that you connect the projector to a DVD player via the projector's HDMI input and the projected picture displays wrong colors, please change the color space to YUV. See "Changing HDMI input settings" on page 26 for details.

The projector is only capable of playing mixed mono audio, even if a stereo audio input is connected. See "Connecting audio" on page 18 for details.
Connecting a Component Video source device
Examine your Video source device to determine if it has a set of unused Component Video output sockets available:
- If so, you can continue with this procedure.
- If not, you will need to reassess which method you can use to connect to the device.
- Take a VGA (D-Sub)-Component adaptor cable and connect the end with 3 RCA type connectors to the Component Video output sockets of the Video source device. Match the color of the plugs to the color of the sockets; green to green, blue to blue, and red to red.
- Connect the other end of the VGA (D-Sub)-Component adaptor cable (with a D-Sub type connector) to the COMPUTER IN 1 or COMPUTER IN 2 socket on the projector.

The projector is only capable of playing mixed mono audio, even if a stereo audio input is connected. See "Connecting audio" on page 18 for details.

If the selected video image is not displayed after the projector is turned on and the correct video source has been selected, check that the Video source device is turned on and operating correctly. Also check that the signal cables have been connected correctly.

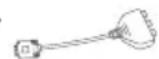
VGA-Component adapter (ViewSonic P/N: CB-00008906)
Connecting an S-Video source device
Examine your Video source device to determine if it has an unused S-Video output socket available:
- If so, you can continue with this procedure.
-
If not, you will need to reassess which method you can use to connect to the device.
-
Take an S-Video cable and connect one end to the S-Video output socket of the Video source device.
-
Connect the other end of the S-Video cable to the S-VIDEO socket on the projector.
The projector is only capable of playing mixed mono audio, even if a stereo audio input is connected. See "Connecting audio" on page 18 for details.
If the selected video image is not displayed after the projector is turned on and the correct video source has been selected, check that the Video source device is turned on and operating correctly. Also check that the signal cables have been connected correctly.
If you have already made a Component Video connection between the projector and this S-Video source device using Component Video connections, you need not connect to this device using an S-Video connection as this makes an unnecessary second connection of poorer picture quality. See "Connecting Video source devices" on page 18 for details.
Connecting a composite Video source device
Examine your Video source device to determine if it has a set of unused composite Video output sockets available:
- If so, you can continue with this procedure.
-
If not, you will need to reassess which method you can use to connect to the device.
-
Take a Video cable and connect one end to the composite Video output socket of the Video source device.
-
Connect the other end of the Video cable to the VIDEO socket on the projector.
The projector is only capable of playing mixed mono audio, even if a stereo audio input is connected. See "Connecting audio" on page 18 for details.
If the selected video image is not displayed after the projector is turned on and the correct video source has been selected, check that the Video source device is turned on and operating correctly. Also check that the signal cables have been connected correctly.
You need only connect to this device using a composite Video connection if Component Video and S-Video inputs are unavailable for use. See "Connecting Video source devices" on page 18 for details.
Playing sound through the projector
You can make use of the projector (mixed mono) speaker in your presentations, and also connect separate amplified speakers to the AUDIO OUT socket of the projector.
If you have a separate sound system, you will most likely want to connect the audio output of your Video source device to that sound system, instead of to the mono audio projector.
You can also use a microphone to output the sound through the projector speaker when the SYSTEM SETTING: ADVANCED > Audio Settings > Audio In 2 menu is set to Microphone. See "Adjusting the Audio In 2 setting (for selected models)" on page 47 for details.
Once connected, the audio can be controlled by the projector On-Screen Display (OSD) menus. See "Adjusting the sound" on page 46 for details.
About the microphone input
- If you wish to use a microphone, connect a 3.5 mini jack cable microphone to the projector.
- You can use a wireless microphone as long as a wireless module is attached to the projector's microphone input jack and it works well with the associated devices. To ensure a quality use of the wireless microphone, it is recommended that your microphone conforms to the specifications listed in the table below.
| Signal | Parameter | Min | Type | Max | |
| Microphone | Transducer Principle Dynamic | ||||
| Impedance 300 1K ohm | |||||
| Frequency response 600 | 16k Hz | ||||
- There are two ways to adjust microphone volumes.
- Directly set microphone volume levels in the SYSTEM SETTING: ADVANCED > Audio Settings > Microphone Volume menu.
- Set projector volume levels in the SYSTEM SETTING: ADVANCED > Audio Settings > Audio Settings > Audio Volume menu, or press 📄 (Volume) on the remote control. (The projector volume setting will affect the microphone volume.)
- If the microphone is not working, check the volume setting and cable connection.
- You might get feedback noise from the microphone when you are too close to the speaker of the projector. Move the microphone away from the speaker of the projector. The greater volume you require, the greater distance you need to be away from the speaker to prevent the noise.
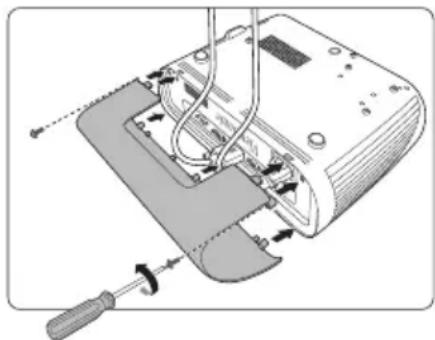
Using the cable management cover (for selected models)
This cable management cover helps you to conceal and organize the cables connected to the back of the projector. It is especially useful when the projector is ceiling-mounted or wall-mounted.
- Make sure that all the cables are properly connected to the projector.
- Attach the cable management cover to the back of the projector.
- Tighten the screws that secure the cable management cover.
natural_image
Mechanical assembly diagram showing a device with wires and tools, no visible text or symbolsStarting up the projector
-
Plug the power cord into the projector and into a wall socket. Turn on the wall socket switch (where fitted).
-
(If available) Remove the lens cap.
-
Press Power to start the projector. As soon as the lamp lights up, a "Power On Ring Tone" will be heard. The Power indicator light stays blue when the projector is on.

natural_image
Diagram showing connection between a power plug and an audio jack (no text or symbols present)(If necessary) Rotate the focus ring to adjust the image clearness.
If the projector is still hot from previous activity, it will run the cooling fan for approximately 60 seconds before energizing the lamp.
To maintain the lamp life, once you turn the projector on, wait at least 5 minutes before turning it off.
To turn off the ring tone, see "Turning off the Power On/Off Ring Tone" on page 47 for details.
-
If the projector is activated for the first time, select your OSD language following the on-screen instructions.
-
Switch all of the connected equipment on.
-
The projector will start to search for input signals. The current input signal being scanned appears in the upper left corner of the screen. If the projector doesn't detect a valid signal, the message 'No Signal' will continue to be displayed until an input signal is found.
You can also press Source to select your desired input signal. See "Switching input signal" on page 26 for details.
If the frequency/resolution of the input signal exceeds the projector's operating range, you will see the message 'Out of Range' displayed on a blank screen. Please change to an input signal which is compatible with the projector's resolution or set the input signal to a lower setting. See "Timing chart" on page 68 for details.
Using the menus
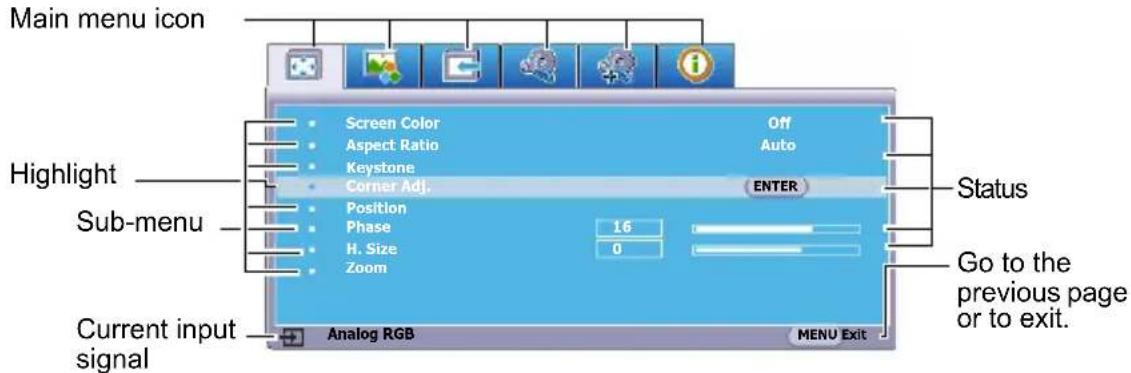
The projector is equipped with On-Screen Display (OSD) menus for making various adjustments and settings.

The OSD screenshots below are for reference only, and may differ from the actual design.
Below is the overview of the OSD menu.
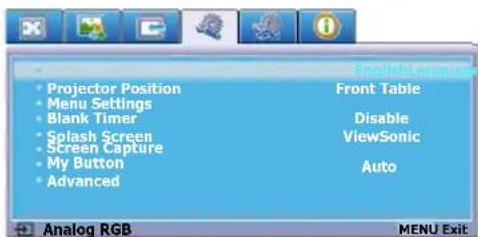
To use the OSD menus, please select your language first.
- Press Menu to turn the OSD menu on.

- Press ▼ to highlight Language and press ◀to▶ select a preferred language.
- Use ◀/▶ to highlight the SYSTEM SETTING: BASIC menu.
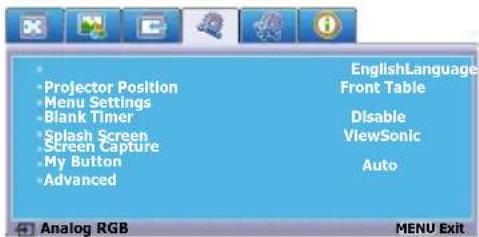
- Press Exit twice* to leave and save the settings.
*The first press leads you back to the main menu and the second press closes the OSD menu.

Utilizing the password function
For security purposes and to help prevent unauthorized use, the projector includes an option for setting up password security. The password can be set through the On-Screen Display (OSD) menu. For details of the OSD menu operation, please refer to "Using the menus" on page 23.

You will be inconvenienced if you enable the password function yet forget the password somehow. Do make a note of your password, and keep the note in a safe place for later recall.
Setting a password

Once a password has been set and the power on lock is enabled, the projector cannot be used unless the correct password is entered every time the projector is started.
- Open the OSD menu and go to the SYSTEM SETTING: ADVANCED > Advanced > Security Settings menu.
- Press Enter and the Security Settings page is displayed.
- Highlight Power On Lock and select On by pressing ◀/▶.
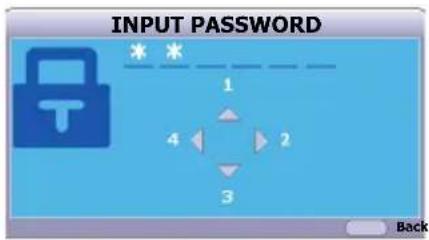
- As pictured to the right, the four arrow keys
(◀, ) respectively represent 4 digits (1,
2, 3, 4). According to the password you desire to set, press the arrow keys to enter six digits for the password.
- Confirm the new password by re-entering the new password.
Once the password is set, the OSD menu returns to the Security Settings page.
- To leave the OSD menu, press Exit.
If you forget the password
If the password function is activated, you will be asked to enter the six-digit password every time you turn on the projector. If you enter the wrong password, the password error message as pictured to the right is displayed lasting for 5 seconds, and the message
'INPUT PASSWORD' follows. You can retry by

entering another six-digit password, or if you did not record the password in this user manual, and you absolutely do not remember it, you can use the password recall procedure. See "Entering the password recall procedure" on page 25 for details.
If you enter an incorrect password 5 times in succession, the projector will automatically shut down in a short time.
Entering the password recall procedure
- Press and hold Auto Sync on the remote control for 3 seconds. The projector will display a coded number on the screen.
- Write down the number and turn off your projector.
- Seek help from the local service center to decode the number. You may be required to provide proof of purchase documentation to verify that you are an authorized user of the projector.


The "XXX" shown in the above screenshot are numbers that vary depending on different projector models.
Changing the password
- Open the OSD menu and go to the SYSTEM SETTING: ADVANCED > Advanced > Security Settings > Change Password menu.
- Press Enter. The message 'INPUT CURRENT PASSWORD' is displayed.
-
Enter the old password.
-
If the password is correct, another message 'INPUT NEW PASSWORD' is displayed.
-
If the password is incorrect, the password error message is displayed lasting for 5 seconds, and the message 'INPUT CURRENT PASSWORD' is displayed for your retry. You can press Exit to cancel or try another password.
-
Enter a new password.
-
Confirm the new password by re-entering the new password.
- You have successfully assigned a new password to the projector. Remember to enter the new password next time the projector is started.
- To leave the OSD menu, press Exit.

The digits being input will be displayed as asterisks on-screen. Do make a note of your password, and then keep the note in a safe place for later recall.
Disabling the password function
- Open the OSD menu and go to the SYSTEM SETTING: ADVANCED > Advanced > Security Settings > Power On Lock menu.
- Press ◀/▶ to select Off.
-
The message 'INPUT PASSWORD' is displayed. Enter the current password.
-
If the password is correct, the OSD menu returns to the Security Settings page with 'Off' shown in the row of Power On Lock. You will not have to enter the password next time you turn on the projector.
- If the password is incorrect, the password error message is displayed lasting for 5 seconds, and the message 'INPUT PASSWORD' is displayed for your retry. You can press Exit to cancel or try another password.

Though the password function is disabled, you need to keep the old password in hand should you ever need to re-activate the password function by entering the old password.
Switching input signal
The projector can be connected to multiple devices at the same time. However, it can only display one full screen at a time.
Be sure the Quick Auto Search function in the SOURCE menu is On if you want the projector to automatically search for the signals.
You can also manually select the desired signal by pressing one of the source selection keys on the remote control, or cycle through the available input signals.
- Press Source. A source selection bar is displayed.
- Press / until your desired signal is selected and press Enter. Once detected, the selected source information will be displayed on the screen for seconds. If there are multiple devices connected to the projector, repeat steps 1-2 to search for another signal.

Please see "Projector specifications" on page 65 for the native display resolution of this projector. For best display picture results, you should select and use an input signal which outputs at this resolution. Any other resolutions will be scaled by the projector depending upon the 'aspect ratio' setting, which may cause some image distortion or loss of picture clarity. See "Selecting the aspect ratio" on page 30 for details.
Changing HDMI input settings
In the unlikely event that you connect the projector to a device (like a DVD or Blu-ray player) via the projector's HDMI input and the projected picture displays wrong colors, please change the color space to an appropriate one that fits the color space setting of the output device.
PJD6252L/PJD6551W/PJD7326/PJD7526W
| D-Sub / Comp. 1 | |
| D-Sub / Comp. 2 | |
| HDMI | |
| HDMI / MHL | |
| Video | |
| S-Video |
PJD7720HD

To do this:
- Open the OSD menu and go to the PICTURE > HDMI Settings menu.
- Press Enter.
-
Highlight HDMI Format and press ◀/▶ to select a suitable color space according to the color space setting of the output device connected.
-
RGB: Sets the color space as RGB.
-
YUV: Sets the color space as YUV.
• Auto: Sets the projector to detect the color space setting of the input signal automatically. -
Highlight HDMI Range and press ◀/▶ to select a suitable HDMI color range according to the color range setting of the output device connected.
- Enhanced: Sets the HDMI color range as 0 - 255.
• Normal: Sets the HDMI color range as 15 - 235.
• Auto: Sets the projector to detect the HDMI range of the input signal automatically.
This function is only available when the HDMI input port is in use.
Refer to the documentation of the device for information on the color space and HDMI range settings.
Adjusting the projected image
Adjusting the projection angle
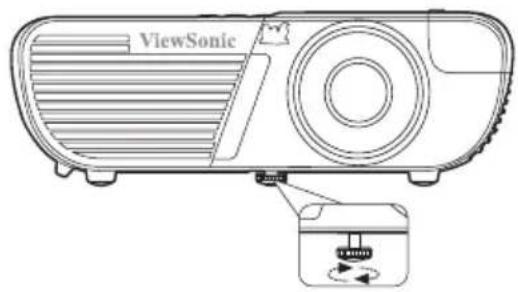
The projector is equipped with an adjuster foot. It changes the image height and vertical projection angle. Screw the adjuster foot to fine tune the angle until the image is positioned where you want it.
If the projector is not placed on a flat surface or the screen and the projector are not perpendicular to each other, the projected image becomes trapezoidal. To correct this situation, see "Correcting keystone" on page 28 for details.
Do not look into the lens while the lamp is on. The strong light from the lamp may cause damage to your eyes.
Auto-adjusting the image
In some cases, you may need to optimize the picture quality. To do this, press Auto Sync on the remote control. Within 5 seconds, the built-in Intelligent Auto Adjustment function will re-adjust the values of Frequency and Clock to provide the best picture quality.
The current source information will be displayed in the upper left corner of the screen for 3 seconds.
The screen will be blank while auto adjustment is functioning.
This function is only available when PC D-Sub input signal (analog RGB) is selected.
Fine-tuning the image clarity
-
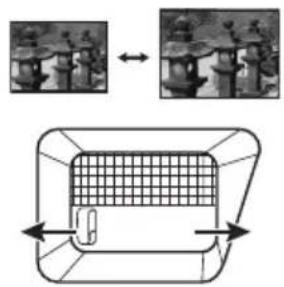
Adjust the projected image to the size that you need using the zoom ring.
-
If necessary, sharpen the image by rotating the focus ring.
flowchart
graph TD
    A["Input Image 1"] <--> B["Input Image 2"]
    C["Grid Box"] --> D["Processing Container"]
    style C fill:#f9f,stroke:#333

natural_image
Diagram showing a device with grid pattern and directional arrows, alongside two grayscale images of mechanical components (no text or symbols)Correcting keystone
Keystoning refers to the situation where the projected image becomes a trapezoid due to angled projection.
To correct this, besides adjusting the height of the projector, you will need to manually correct it following one of these steps.
• Using the remote control
- Press / □ ▽ ▶ to display the Keystone correction page.
- Press to correct keystoning at the top of the image. Press to correct keystoning at the bottom of the image. Press to correct keystoning at the right side of the image. Press to correct keystoning at the left side of the image.
• Using the OSD menu
For PJD6252L/PJD6551W/PJD7720HD:


- Open the OSD menu and go to the DISPLAY > Keystone menu.
- Press Enter. The Keystone correction page is displayed.
- Press to correct keystoning at the top of the image or press to correct keystoning at the bottom of the image.
For PJD7326/PJD7526W:
- Open the OSD menu and go to the DISPLAY > Keystone menu.
- Press Enter. The Keystone correction page is displayed.
- Highlight Vertical and press □ to correct keystoning at the top of the image or press □ to correct keystoning at the bottom of the image.
- You can also highlight Horizontal and press ▶ to correct keystoning at the right side of the image. Press ▶ to correct keystoning at the left side of the image.
Adjusting 4 corners (PJD7326/PJD7526W)
You can manually adjusts the shape and size of an image that is unevenly rectangular on all sides.
- To display the Corner Adj. page, you can do one of the followings:
i. Press Enter.
ii. Open the OSD menu and go to the DISPLAY > Corner Adj. menu and press Enter. The Corner Adj. page is displayed.
-
Press // /◀ to select the corner you wish to adjust and press Enter.
-
Press / to select an adjustment method that suits your need and press Enter.
- As indicated on the screen (/ for a 5-degree angle adjustment and / for ▼ ▶ a 90-degree angle adjustment), press ▼ ▶ ▼ / ▶o adjust its shape and size. You can press Menu or Exit to go back to a previous step. A long press for 2 seconds on Enter will reset the settings on the corner that you chose.

Adjusting keystone will reset the Corner Adj. settings.

After the Corner Adj. settings have been modified, some aspect ratios or timings are not available. When that happens, reset the settings on all 4 corners.
The following messages will appear:


![Corner Adj. Press [Menu/Exit] to save or exit. Hold [Enter] for 2 sec. to reset. [Corner Adj.] will be reset if adjust [Keystone].](/content/2026/05/1082444/images/089bce9718d4f611be907e80475fb10b60291fb814299cce21f77ff2d0e25313.jpg)

A long press for 2 seconds on Enter when this page displays will reset the settings on all 4 corners.
![Indicates the corner that you selected. Corner Adj. 45° 90° Press [Enter] after selection. Press [Menu/Exit] to return. Hold [Enter] for 2 sec. to reset.](/content/2026/05/1082444/images/0f363f92f1b93516705a947bfdb504c010188fba8246bb95b156f954e4f1d558.jpg)
Magnifying and searching for details
If you need to find the details on the projected picture, magnify the picture. Use the direction arrow keys for navigating the picture.
• Using the remote control
- Press on the remote control to display the Zoom bar.
- Press repeatedly to magnify the picture to a desired size.
-
To navigate the picture, press Enter to switch to the paning mode and press the directional arrows (◀, ▲) to navigate the picture.
-
To reduce size of the picture, press Enter to switch back to the zoom in/out functionality, and press ▼peatedly until it is restored to the original size. You can also press Auto Sync on the remote control to restore the picture to its original size.
• Using the OSD menu
- Open the OSD menu and go to the DISPLAY > Zoom menu.
- Press Enter. The Zoom bar is displayed.
- Repeat steps 2-4 in the section of Using the remote control above.

This adjustable range may vary depending on different aspect ratios.

The picture can only be navigated after it is magnified. You can further magnify the picture while searching for details.
Selecting the aspect ratio
The 'aspect ratio' is the ratio of the image width to the image height. Most analog TV and computers are in 4:3 ratio, and digital TV and DVDs are usually in 16:9 ratio.
With the advent of digital signal processing, digital display devices like this projector can dynamically stretch and scale the image output to a different aspect than that of the image input signal.
To change the projected image ratio (no matter what aspect the source is):
- Open the OSD menu and go to the DISPLAY > Aspect Ratio menu.
- Press ◀/▶ to select an aspect ratio to suit the format of the video signal and your display requirements.
About the aspect ratio

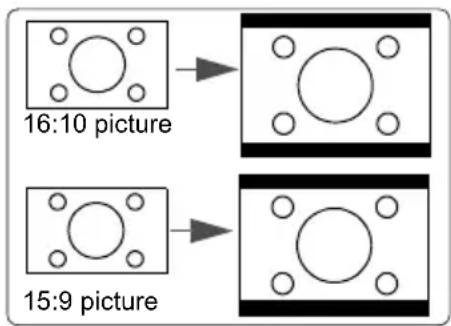
In the pictures below, the black portions are inactive areas and the white portions are active areas. OSD menus can be displayed on those unused black areas.
- Auto: Scales an image proportionally to fit the projector's native resolution in its horizontal width. This is suitable for the incoming image which is neither in 4:3 nor 16:9 and you want to make most use of the screen without altering the image's aspect ratio.
- 4:3: Scales an image so that it is displayed in the center of the screen with a 4:3 aspect ratio. This is most suitable for 4:3 images like computer monitors, standard definition TV and 4:3 aspect DVD movies, as it displays them without aspect alteration.
- 16:9 (PJD6252L/PJD7326/PJD7720HD): Scales an image so that it is displayed in the center of the screen with a 16:9 aspect ratio. This is most suitable for images which are already in a 16:9 aspect, like high definition TV, as it displays them without aspect alteration.


-
16:10 (PJD6551W/PJD7526W): Scales an image so that it is displayed in the center of the screen with a 16:10 aspect ratio. This is most suitable for images which are already in a 16:10 aspect, as it displays them without aspect alteration.
-
Panorama (PJD6551W/PJD7526W/PJD7720HD): Scales a 4:3 image vertically and horizontally in a non-linear manner so that it fills the screen.
-
2.35:1: Scales an image so that it is displayed in the center of the screen with a 2.35:1 aspect ratio without aspect alteration.
-
Anamorphic (PJD6551W/PJD7526W/PJD7720HD): Scales a 2.35:1 aspect image so that it fills the screen.


Optimizing the image
Selecting a picture mode
The projector is preset with several predefined picture modes so that you can choose one to suit your operating environment and input signal picture type.
To select an operation mode that suits your need, you can follow one of the following steps.
- Press Color Mode repeatedly until your desired mode is selected.
- Go to the PICTURE > Color Mode menu and press ◀/▶ to select a desired mode.
Picture modes for different types of signals
The picture modes available for different types of signals are listed below.
- Brightest mode: Maximizes the brightness of the projected image. This mode is suitable for environments where extra-high brightness is required, such as using the projector in well lit rooms.
-
Dynamic mode: Is designed for presentations under daylight environment to match PC and notebook coloring. In addition, the projector will optimize the image quality using the dynamic PC function in accordance with the projected contents.
-
Standard mode: Is designed for presentations under daylight environment to match PC and notebook coloring.
- ViewMatch sRGB mode: Switches between high brightness performance and accurate color performance.
- Movie mode: Is appropriate for playing colorful movies, video clips from digital cameras or DVs through the PC input for best viewing in a blackened (little light) environment.
- DICO M SIM mode (PJD7326/PJD7526W): Recommended for DICOM format files in simulation mode.
DICOM SIM mode is only for training or reference. It not used for actual diagnosis.
DICOM represents for the Digital Imaging and Communications in Medicine. This is a standard created by the American College of Radiology and the National Electrical Manufacturers Association. This standard specifies the method of digital image data to be transferred from one system to another.
Selectable lamp modes may vary depending on the Color Mode selected.
Using Screen Color
In the situation where you are projecting onto a colored surface such as a painted wall which may not be white, the Screen Color feature can help correct the projected picture's colors to prevent possible color difference between the source and projected pictures.
To use this function, go to the DISPLAY > Screen Color menu and press ◀/▶ to select a color which is closest to the color of the projection surface. There are several precalibrated colors to choose from: Whiteboard, Greenboard, and Blackboard. The effects of these settings may vary depending on different models.
This function is only available when a PC or HDMI input signal is selected.
Fine-tuning the image quality in user modes
According to the detected signal type, there are some user-definable functions available. You can make adjustments to these functions based on your needs.
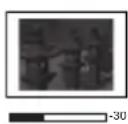
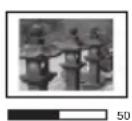
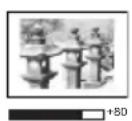
Adjusting Brightness
Go to the PICTURE > Brightness menu and press ◀/▶.
The higher the value, the brighter the image. And the lower the setting, the darker the image. Adjust this control so the black areas of the image appear just as black and that detail in the dark areas is visible.
Adjusting Contrast
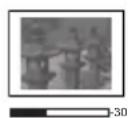
Go to the PICTURE > Contrast menu and press ◀/▶.
The higher the value, the greater the contrast. Use this to set the peak white level after you have previously adjusted the Brightness setting to suit your selected input and viewing environment.
Adjusting Color
Go to the PICTURE > Advanced > Color menu and press ◀/▶.
Lower setting produces less saturated colors. If the setting is too high, colors on the image will be overpowering, which makes the image unrealistic.

This function is only available when the input signal is S-Video, Video, YPbPr (digital) or YCbCr (digital).
Adjusting Tint
Go to the PICTURE > Advanced > Tint menu and press ◀/▶.
The higher the value, the more reddish the picture becomes. The lower the value, the more greenish the picture becomes.

This function is only available when the input signal is S-Video, Video, YPbPr (digital) or YCbCr (digital).
Adjusting Sharpness
Go to the PICTURE > Advanced > Sharpness menu and press ◀/▶.
The higher the value, the sharper the picture becomes. The lower the value, the softer the picture becomes.

This function is only available when the input signal is S-Video, Video, YPbPr (digital) or YCbCr (digital).
Adjusting Brilliant Color
Go to the PICTURE > Advanced > Brilliant Color menu and press ◀/▶.
This feature utilizes a new color-processing algorithm and system level enhancements to enable higher brightness while providing truer, more vibrant colors in the projected picture. It enables a greater than 50% brightness increase in mid-tone images, which are common in video and natural scenes, so the projector reproduces images in realistic and true colors. If you prefer images with that quality, select a level that suits your need. If you don't need it, select Off.
Reducing image noise
Go to the PICTURE > Advanced > Noise Reduction menu and press ◀/▶.
This function reduces electrical image noise caused by different media players. The higher the setting, the less the noise.

This function is only available when a PC, Video or S-Video input signal is selected.
Selecting a gamma setting
Go to the PICTURE > Advanced > Gamma menu and select a preferred setting by pressing ◀ ▶
Gamma refers to the relationship between input source and picture brightness.
Selecting a Color Temperature
Go to the PICTURE > Color Temp. menu and press ◀/▶.
The options available for color temperature settings vary according to the signal type selected.
- Cool: With the highest color temperature, Cool makes the image appear the most bluish white than other settings.
- Neutral: Makes images appear bluish white.
- Normal: Maintains normal colorings for white.
- Warm: Makes images appear reddish white.
Setting a preferred color temperature
-
Go to the PICTURE > Color Temp. menu.
-
Press ◀/▶ to select Cool, Neutral, Normal or Warm and press Enter.
-
Press ▲/▼ to highlight the item you want to change and adjust the values by pressing ◀▶.
-
Red Gain/Green Gain/Blue Gain: Adjusts the contrast levels of Red, Green, and Blue.
- Red Offset/Green Offset/Blue Offset: Adjusts the brightness levels of Red, Green, and Blue.

This function is only available when a PC input signal is selected.
Color Management
Only in permanent installations with controlled lighting levels such as boardrooms, lecture theaters, or home theaters, should color management be considered. Color management provides fine color control adjustment to allow for more accurate color reproduction, should you require it.
If you have purchased a test disc which contains various color test patterns and can be used to test the color presentation on monitors, TVs, projectors, etc., you can project any image from the disc on the screen and enter the Color Management menu to make adjustments.
To adjust the settings:
- Open the OSD menu and go to the PICTURE > Advanced > Color Management menu.
- Press Enter and the Color Management page is displayed.
- Highlight Primary Color and press ◀/▶ to select a color from among Red, Yellow, Green, Cyan, Blue, or Magenta.
- Press ▼ to highlight Hue and press ◀/▶ to select its range. Increase in the range will include colors consisted of more proportions of its two adjacent colors.
Please refer to the illustration to the right for how the colors relate to each other.
For example, if you select Red and set its range at 0, only pure red in the projected picture will be selected. Increasing its range will include red close to yellow and red close to magenta.
- Press to Highlight Saturation and adjust its values to your preference by pressing ▶. Every adjustment made will reflect to the image immediately.
For example, if you select Red and set its value at 0, only the saturation of pure red will be affected.

other
| Category | Count | |---|---| | RED | 1 | | GREEN | 1 | | BLUE | 1 | | MAGENTA | 1 | | Yellow | 1 | | Cyan | 1 |
Saturation is the amount of that color in a video picture. Lower settings produce less saturated colors; a setting of "0" removes that color from the image entirely. If the saturation is too high, that color will be overpowering and unrealistic.
- Press ▼ to highlight Gain and adjust its values to your preference by pressing ◀/▶. The contrast level of the primary color you select will be affected. Every adjustment made will reflect to the image immediately.
- Repeat steps 3 to 6 for other color adjustments.
-
Make sure you have made all of the desired adjustments.
-
Press Exit to exit and save the settings.
Setting the presentation timer
Presentation timer can indicate the presentation time on the screen to help you achieve better time management when giving presentations. Follow these steps to utilize this function:
• Using the remote control
- Press on the remote control and press repeatedly or / to select a Timer Period.
- Press Enter or wait for 3 seconds to activate the timer.
- To display the Presentation Timer page, select Advanced.
• Using the OSD menu
- Go to the SYSTEM SETTING: BASIC > Advanced > Presentation Timer menu.
- Press Enter to display the Presentation Timer page.
- Highlight Timer Period and decide the time period by pressing ◀/▶. The length of time can be set from 1 to 5 minutes in 1-minute increments and 5 to 240 minutes in 5-minute increments.
If the timer is already on, the timer will restart whenever the Timer Period is reset.
- Press ▼ to highlight Timer Display and choose if you want the timer to show up on the screen by pressing ◀ ▶
| Selection Description | |
| Always | Displays the timer on screen throughout the presentation time. |
| 1 min/2 min/3 min | Displays the timer on screen in the last 1/2/3 minute(s). |
| Never Hides the timer | throughout the presentation time. |
- Press ▼ to highlight Timer Position and set the timer position by pressing ◀/▶.
Top-Left Bottom-Left Top-Right Bottom-Right
- Press ▼ to highlight Timer Counting Direction and select your desired counting direction by pressing ◀ ▶
| Selection Description | |
| Count Up Increases from 0 to the preset time. | |
| Count Down Decreases from the preset time to 0. |
- Press ▼ to highlight Sound Reminder and decide if you want to activate sound reminder by pressing ◀/▶. If you select On, a double beep sound will be heard at the last 30 seconds of counting down/up, and a triple beep sound will be produced when the timer is up.
- To activate the presentation timer, press ▼ and press ◀/▶ to highlight Start Counting and press Enter.
- A confirmation message displays. Highlight Yes and press Enter to confirm. You will see the message “Timer is On” displaying on the screen. The timer starts counting when the timer is on.
To cancel the timer, perform the following steps:
-
Press on the remote control or go to the SYSTEM SETTING: BASIC > Advanced > Presentation Timer menu.
-
Highlight Off. Press Enter. A confirmation message displays.
-
Highlight Yes and press Enter to confirm. You will see the message "Timer is Off" displaying on the screen.
Hiding the image
In order to draw the audience's full attention to the presenter, you can press BLANK to hide the screen image. Press any key on the projector or remote control to restore the image. The word 'BLANK' appears at the lower right corner of the screen while the image is hidden.
You can set the blank time in the SYSTEM SETTING: BASIC > Blank Timer menu to let the projector return the image automatically after a period of time when there is no action taken on the blank screen.

Once Blank is pressed, the projector enters Eco mode automatically.

CAUTION
Do not block the projection lens from projecting as this could cause the blocking object to become heated and deformed or even cause a fire.
Locking control keys
With the control keys on the projector locked, you can prevent your projector settings from being changed accidentally (by children, for example). When the Panel Key Lock is on, no control keys on the projector will operate except ⏻Power.
- Press 🔒 (Panel Key Lock), or go to the SYSTEM SETTING: ADVANCED > Advanced > Panel Key Lock menu
- Press ◀ /▶ to select On.
- A confirmation message is displayed. Select Yes to confirm.
To release panel key lock, press and hold 📄 on the projector for 3 seconds.
You can also use the remote control to enter the SYSTEM SETTING: ADVANCED > Advanced > Panel Key Lock menu and press ◀/▶ to select Off.

Keys on the remote control are still functional when panel key lock is enabled.

If you press Power to turn off the projector without disabling panel key lock, the projector will still be in locked status the next time it is turned on.
Creating your own startup screen
In addition to selecting the projector preset startup screen from among Black, Blue, or ViewSonic screen, you can make your own startup screen that is a picture projected from your computer or video source.
To create your own startup screen:
- Project the picture you want to use as your startup screen from either a computer or video source.
- Open the OSD menu and go to the SYSTEM SETTING: BASIC > Screen Capture menu.
-
Press Enter.
-
A confirmation message displays. Press Enter again.
- The message 'Screen Capturing...' displays while the projector is processing the picture. Please wait.
- If the action is successful, you see the message 'Captured Succeeded' on the screen. The captured picture is saved as Screen Capture and have been set as your current startup screen.
In the unlikely event that the capturing action fails, change your target picture. When the resolution of the input signal is higher than the projector's native display resolution (See "Projector specifications" on page 65 for details.), the capture action may fail. When it happens, please set the resolution of the input signal under native resolution and try again.
Operating in a high altitude environment
We recommend you use the High Altitude Mode when your environment is between 1500 m–3000 m above sea level, and temperature is between 5^ C– 25^ C.

CAUTION
Do not use the High Altitude Mode if your altitude is between 0 m and 1500 m and temperature is between 5°C and 35°C. The projector will be over cooled, if you turn the mode on under such a condition.
To activate the High Altitude Mode:
- Open the OSD menu and go to the SYSTEM SETTING: ADVANCED > High Altitude Mode menu.
- Press ◀/▶ to select On. A confirmation message is displayed.
- Highlight Yes and press Enter.
Operation under "High Altitude Mode" may cause a
higher decibel operating noise level because of increased fan speed necessary to improve overall system cooling and performance.

If you use this projector under other extreme conditions excluding the above, it may display auto shut-down symptoms, which is designed to protect your projector from over-heating. In cases like this, you should switch to High Altitude Mode to solve these symptoms. However, this is not to state that this projector can operate under any and all harsh or extreme conditions.
Using the CEC function
This projector supports CEC (Consumer Electronics Control) function for synchronized power on/off operation via HDMI connection. That is, if a device that also supports CEC function is connected to the HDMI input of the projector, when the projector's power is turned off, the power of the connected device will also be turned off automatically. When the power of the connected device is turned on, the projector's power will be turned on automatically.
To turn on the CEC function:
- Open the OSD menu and go to the SOURCE > Auto Power On > CEC menu.
- Press ◀/▶ to select Enable.

In order for the CEC function to work properly, make sure that the device is correctly connected to the HDMI input of the projector via an HDMI cable, and its CEC function is turned on.

Depending on the connected device, the CEC function may not work.
Using the 3D functions
This projector features 3D function which enables you to enjoy 3D movies, videos, and sporting events in a more realistic way by presenting the depth of the images. You need to wear a pair of 3D glasses to view 3D images.
If the 3D signal is input from an HDMI 1.4a compatible device, the projector detects the signal for 3D Sync information and once detected, it projects images in 3D format automatically. In other cases, you may need to manually select a 3D Sync format for the projector to project 3D images correctly.
To select a 3D Sync format:
- Press 3D on the remote control to access the 3D Settings menu or go to the SOURCE > 3D Settings menu.
- Press Enter. The 3D Settings page is displayed.
- Highlight 3D Sync and press Enter.
- Press ▼ to select a 3D Sync setting and then press Enter to confirm.

When the 3D Sync function is on:
- The brightness level of the projected image will decrease.
• The Color Mode cannot be adjusted. - The Zoom function can only magnify the pictures to limited sizes.
If you discover the inversion of the 3D image depth, set the 3D Sync Invert function to "Invert" to correct the problem.
Controlling the projector through a LAN environment (for selected models)
The projector supports Crestron ^® software. With correct settings for the LAN Control Settings menu, you can manage the projector from a computer using a web browser when the computer and the projector are properly connected to the same local area network.
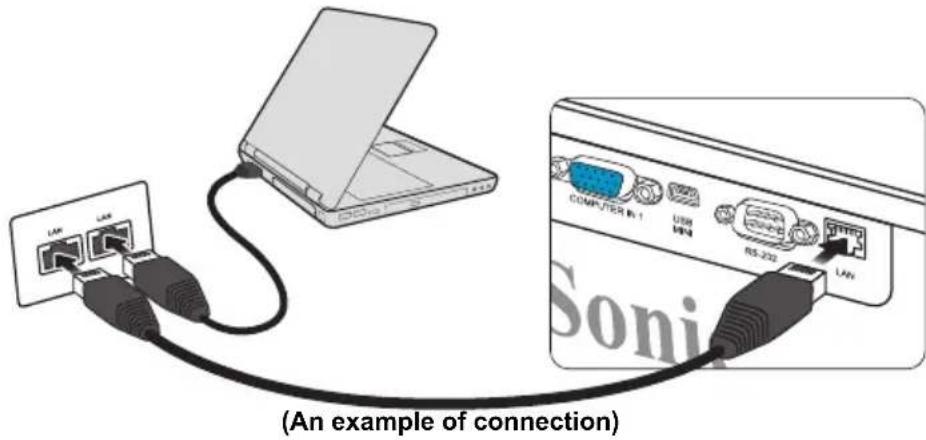
Configuring the LAN Control Settings
If you are in a DHCP environment:
-
Take a RJ45 cable and connect one end to the RJ45 LAN input jack of the projector and the other end to the RJ45 port.
-
Open the OSD menu and go to the SOURCE > LAN Control Settings menu.
-
Press Enter. The LAN Control Settings page is displayed.
-
Highlight LAN Control Settings and press ◀/▶ to select DHCP ON.
-
Press ▼ to highlight Apply and press Enter.
-
Please wait for around 15 - 20 seconds, and then re-enter the LAN Control Settings page. The Projector IP Address, Subnet Mask, Default Gateway, and DNS Server settings will be displayed. Note down the IP address displayed in the Projector IP Address row.

If the Projector IP Address still does not appear, contact your network administrator.

If the RJ45 cables are not properly connected, the Projector IP Address, Subnet Mask, Default Gateway, and DNS Server settings will display 0.0.0.0. Make sure the cables are properly connected and perform the procedures above again.

If you need to connect to the projector in its standby mode, set LAN Control to On in the SOURCE > Standby Settings menu.
If you are in a non-DHCP environment:
-
Repeat steps 1-3 above.
-
Highlight LAN Control Settings and press ◀/▶ to select Static IP.
-
Contact your ITS administrator for information on the Projector IP Address, Subnet Mask, Default Gateway, and DNS Server settings.
-
Press ▼ to select the item you want to modify and press Enter.
-
Press ◀/▶ to move the cursor and the press ▲/▼ to enter the value.
-
To save the settings, press Enter. If you do not want to save the settings, press Exit.
-
Press ▼ to highlight Apply and press Enter.
If the RJ45 cables are not properly connected, the Projector IP Address, Subnet Mask, Default Gateway, and DNS Server settings will display 0.0.0.0. Make sure the cables are properly connected and perform the procedures above again.
If you wish to connect to the projector in its standby mode, be sure you have selected Static IP and obtained the Projector IP Address, Subnet Mask, Default Gateway, and DNS Server information when the projector is on.
Controlling the projector through a web browser
Once you have the correct IP address for the projector and the projector is on or in standby mode, you can use any computer that is on the same local area network to control the projector.
If you are using Microsoft Internet Explorer, make sure it is version 7.0 or higher.
The screen shots in this manual are for reference only, and may differ from the actual design.
- Enter the address of the projector in the address bar of your browser and press Enter.

- The main page of the Network Control appears.
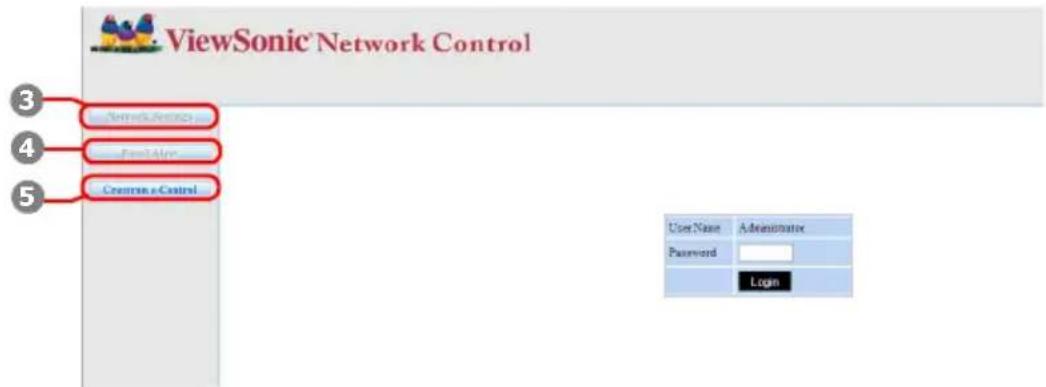
Accessing to Network Settings or Email Alert page requires Administrator password. The default password is "0000".
- This page allows you to make adjustments to the AMX and SNMP settings. In the AMX device discover row, when ON is selected, the projector can be detected by controllers of AMX connected to the same network. For the Details of AMX Device Discovery, visit the AMX web site at http://www.amx.com/.

- If your projector is connected to a network which supports Simple Mail Transfer Protocol (SMTP), you can configure it to alert you via email on significant events.

- The Crestron (e-Control) page displays the Crestron e-Control user interface. See "About Crestron e-Control®" on page 43 for details.
Please pay attention to the limitation of input length (including space and other punctuation keys) in the list blow:
| Category Item Input Length | Maximum Number of Characters | ||
| Network Settings | Network | DHCP/Manual (N/A) | |
| IP Address XXX.XXX.XXX.XXX | |||
| Subnet Mask XXX.XXX.XXX.XXX | |||
| Gateway XXX.XXX.XXX.XXX | |||
| DNS Server XXX.XXX.XXX.XXX | |||
| AMX device discovery (N/A) | |||
| Password | Administrator (N/A) | ||
| New Password 4 | |||
| Confirm Password 4 | |||
| SNMP | SysLocation 22 | ||
| SysName 22 | |||
| SysContact 22 | |||
| Email Alert | Email Setting | To40 | |
| Cc | 40 | ||
| Subject | 40 | ||
| From | 40 | ||
| SMTP Setting | Server | 30 | |
| User Name | 21 | ||
| Password 14 | |||
| Alert Condition | Fan Error | (N/A) | |
| Lamp Error | (N/A) | ||
| Over Temperature | (N/A) | ||
| Lamp Time Alert | (N/A) | ||
| Submit | (N/A) | ||
| Issue Test Mail | (N/A) | ||

/ > < \$ % + \ ' " are prohibited.
About Crestron e-Control®
- The Crestron e-Control ^® page provides a variety of virtual keys to control the projector or adjust the projected pictures.

i. These buttons function the same as the ones on the OSD menus or remote control.
See "2. PICTURE menu" on page 54 and "Projector" on page 7 for details.
ii. To switch between input signals, click on your desired signal.

The Menu button can also be used to go back to previous OSD menus, exit and save menu settings.

The source list varies according to the connectors available on the projector.

When you use the projector control panel or remote control to change the OSD menu settings, it may take a while for the web browser to synchronize these changes with the projector.
- The tools page allows you to manage the projector, configure the LAN control settings and secure access of remote network operation on this projector.

i. This section is only used with the Crestron Control System. Please contact Creston or refer to its user manual for setup information.
ii. You can name the projector, keep track of its location and the person in charge of it.
iii. You can adjust the LAN Control Settings.
iv. Once set, access to the remote network operation on this projector has been password-protected.
v. Once set, access to the tools page has been password-protected.

To prevent errors, only input the English alphabet and digits on the tools page.

After making the adjustments, press the Send button and the data will be saved for the projector.
vi. Press Exit to go back to the remote network operation page.
Please pay attention to the limitation of input length (including space and other punctuation keys) in the list blow:
| Category Item Input Length | Maximum Number of Characters | |
| Crestron Control | IP Address 16 | |
| IP ID 4 | ||
| Port 5 | ||
| Projector | Projector Name 32 | |
| Location 32 | ||
| Assigned To 32 | ||
| Network Configuration | DHCP (Enabled) (N/A) | |
| IP Address 16 | ||
| Subnet Mask | 16 | |
| Default Gateway | 16 | |
| DNS Server | 16 | |
| User Password | Enabled | (N/A) |
| New Password | 26 | |
| Confirm | 26 | |
| Admin Password | Enabled | (N/A) |
| New Password | 26 | |
| Confirm | 26 |
- The info page displays the information and status of this projector.

- After pressing the button “Contact IT Help”, the HELP DESK window will appear in the upper right corner of the screen. You will be able to deliver messages to RoomView™ software administrators/users who connect to the same local area network.
For more information, visit http://www.crestron.com & www.crestron.com/getroomview.
\*\*Crestron RoomView
On the “Edit Room” page, enter the IP Address (or hostname) as shown on the projector’s on-screen display (OSD) menu, and “02” for IPID, “41794” for the reserved Crestron control port.

About Crestron RoomView™ setting and command method, please access below website to get RoomView™ User Guide and more information:
http://www.crestron.com/products/roomview_connected_embedded_projectors_devices/resources.asp
PJLink™, SNMP, AMX and Xpanel formats supported
This projector is PJLink™, SNMP V.1, AMX or Xpanel V1.10 compliant. For details, please follow its user guide or website respectively to control and manage projectors.
Using the projector in standby mode
Some of the projector functions are available in standby mode (plugged in but not turned on). To use these functions, be sure you have turned on the corresponding menus under SOURCE > Standby Settings, and the cable connections are correctly made. For the connection methods, see the Connection chapter.
Active VGA Out (for selected models)
Selecting On outputs a VGA signal when the COMPUTER IN 1 and COMPUTER OUT sockets are correctly connected to devices. The projector outputs the signal received only from COMPUTER IN 1.
Active Audio Out
Selecting On outputs an audio signal when the AUDIO IN 1 socket is correctly connected to a proper device.
LAN Control (for selected models)
Selecting On allows the projector to provide the network function when it is in standby mode. See "Controlling the projector through a LAN environment (for selected models)" on page 39 for details.
Adjusting the sound
The sound adjustments made as below will have an effect on the projector speaker. Be sure you have made a correct connection to the projector audio input/output jacks. See "Connection" on page 15 for more details.
Adjusting the audio mode
- Open the OSD menu and go to the SYSTEM SETTING: ADVANCED > Audio Settings > Audio Mode menu.
- Press / to select a preferred audio mode.
If available, you can press Audio Mode on the remote control to select a preferred audio mode.
Muting the sound
- Open the OSD menu and go to the SYSTEM SETTING: ADVANCED > Audio Settings > Mute menu.
- Press ◀/▶ to select On.
If available, you can press on the remote control to toggle the projector audio between on and off.
Adjusting the sound level
- Open the OSD menu and go to the SYSTEM SETTING: ADVANCED > Audio Settings > Audio Volume menu.
- Press / to select a desired sound level.
If available, you can press 📄/+/− on the remote control to adjust the projector's sound level.
Adjusting the Audio In 2 setting (for selected models)
- Open the OSD menu and go to the SYSTEM SETTING: ADVANCED > Audio Settings > Audio In 2 menu.
- Press ◀/▶ to decide the audio input source for the AUDIO IN 2/MIC port. This will affect the connection method for different devices, and where the sound is from.
- When Audio is selected:
| Device | COMPUTER IN 1 COMPUTER IN 2 Video/S-Video | ||
| Audio input port | AUDIO IN 1 AUDIO IN 2 AUDIO IN 2 | ||
| The projector can play the sound from... | AUDIO IN 1 AUDIO IN 2 AUDIO IN 2 | ||
| Audio output port | AUDIO OUT AUDIO OUT AUDIO OUT | ||

The selected input signal determines which sound will be played by the projector speaker, and which sound will be output from the projector when AUDIO OUT is connected. For instance, if you select a D-Sub / Comp. 1 source, the projector can play the sound received from AUDIO IN 1.
- When Microphone is selected:
| Device | COMPUTER IN 1 COM | PUTER IN 2 Video/S-Video | video |
| Audio input port | AUDIO IN 1 AUDIO IN 1 | AUDIO IN 1 | |
| The projector can play the sound from... | • AUDIO IN 1• MIC | • AUDIO IN 1• MIC | • AUDIO IN 1• MIC |
| Audio output port | AUDIO OUT AUDIO OUT | AUDIO OUT |
Adjusting the microphone sound level
- Open the OSD menu and go to the SYSTEM SETTING: ADVANCED > Audio Settings > Microphone Volume menu.
- Press / to select a desired sound level.

This function is only available when the SYSTEM SETTING: ADVANCED > Audio Settings > Audio In 2 menu is set to Microphone.
Turning off the Power On/Off Ring Tone
- Open the OSD menu and go to the SYSTEM SETTING: ADVANCED > Audio Settings > Power On/Off Ring Tone menu.
- Press ◀/▶ to select Off.

The only way to change Power On/Off Ring Tone is setting On or Off here. Setting the sound mute or changing the sound level will not affect the Power On/Off Ring Tone.
Shutting down the projector
-
Press Power and a confirmation message is displayed prompting you. If you don't respond in a few seconds, the message will disappear.
-
Press Power a second time.
-
Once the cooling process finishes, a "Power Off Ring Tone" will be heard. Disconnect the power cord from the wall socket if the projector will not be used in an extended period of time.

natural_image
Diagram showing a cable being inserted into an electronic device, with no visible text or symbols
To turn off the ring tone, see "Turning off the Power On/Off Ring Tone" on page 47 for details.

CAUTION
- To protect the lamp, the projector will not respond to any commands during the cooling process.
- To shorten the cooling time, you can also activate the Quick Power Off function. See "Quick Power Off" on page 55 for details.
- Do not unplug the power cord before the projector shutdown sequence is complete.
Menu operation
Menu system
Please note that the on-screen display (OSD) menus vary according to the signal type selected.
The menu items are available when the projector detects at least one valid signal. If there is no equipment connected to the projector or no signal detected, limited menu items are accessible.
| Main menu | Sub-menu Options | |
| 1. DISPLAY | Screen Color Off/Blackboard/Greenboard/Whiteboard | |
| Aspect Ratio | Auto/4:3/16:9 (PJD6252L/PJD7326/PJD7720HD)/16:10 (PJD6551W/PJD7526W)/Panorama (PJD6551W/PJD7526W/PJD7720HD)/2.35:1/Anamorphic (PJD6551W/PJD7526W/PJD7720HD) | |
| Keystone | ||
| Corner Adj. (PJD7326/PJD7526W) | ||
| Position (PJD6252L/PJD6551W/PJD7326/PJD7526W) | ||
| Phase (PJD6252L/PJD6551W/PJD7326/PJD7526W) | ||
| H. Size (PJD6252L/PJD6551W/PJD7326/PJD7526W) | ||
| Zoom | ||
| 2. PICTURE | Color Mode | Brightest/Dynamic/Standard/ViewMatch sRGB/Movie/DICOM SIM (PJD7326/PJD7526W) |
| Brightness | ||
| Contrast | ||
| Color Temp. | Warm Red Gain/Green Gain/Normal Blue Gain/Red Offset/Neutral Green Offset/Blue Offset Cool | |
| OverScan Off/1/2/3/4/5 | ||
| HDMI Settings | HDMI Format Auto/RGB/YUV | |
| HDMI Range Auto/Enhanced/Normal | ||
| Advanced | Color | |
| Tint | ||
| Sharpness | ||
| Gamma 1/2/3/4/5/6/7/8 | ||
| Brilliant Color Off/1/2/3/4/5/6/7/8/9/10 | ||
| Noise Reduction | ||
| Color Management Primary Color | ||
| Reset Color Settings Reset/Cancel | ||
| Main menu | Sub-menu Options | ||
| 3. SOURCE | Quick Auto Search Off/On | ||
| 3D Settings | 3D Sync | Auto/Off/Frame Sequential/Frame Packing/Top-Bottom/ Side-by-Side | |
| 3D Sync Invert Disable/Invert | |||
| Standby Settings | Active VGA Out(PJD6252L/PJD6551W/ PJD7326/PJD7526W) | ||
| Active Audio Out Off/On | |||
| LAN Control(PJD6252L/PJD6551W/ PJD7326/PJD7526W) | |||
| Auto Power On | Computer (PJD6252L/PJD6551W/PJD7326/ PJD7526W) | Disable/Enable | |
| CEC Disable/Enable | |||
| Direct Power On Off/On | |||
| Smart Energy | Auto Power Off Disable/10 min/20 min/30 min | ||
| Sleep Timer | Disable/30 min/1 hr /2 hr/3 hr/4 hr/8 hr/12 hr | ||
| Power Saving Enable/Disable | |||
| Smart Restart Disable/Enable | |||
| Quick Power Off Disable/Enable | |||
| Lamp SPA Mode (PJD7326/PJD7526W) | Disable/Enable | ||
| LAN Control Settings(PJD6252L/ PJD6551W/ PJD7326/ PJD7526W) | LAN Control Settings DHCP ON/Static IP | ||
| Projector IP Address | |||
| Subnet Mask | |||
| Default Gateway | |||
| DNS Server | |||
| Apply | |||
| 4. SYSTEM SETTING: BASIC | Language | Multi-language OSD selection | |
| Projector Position | Front Table/Rear Table/Rear Ceiling/Front Ceiling | ||
| Menu Settings | Menu Display Time | 5 sec/10 sec/15 sec/20 sec/25 sec/30 sec | |
| Menu Position | Center/Top-Left/Top-Right/Bottom-Left/Bottom-Right | ||
| Blank Timer | Disable/5 min/10 min/15 min/20 min/25 min/30 min | ||
| Splash Screen | Black/Blue/ViewSonic/Screen Capture/Off | ||
| Screen Capture | |||
| Main menu Sub-menu Options | |||
| 4. SYSTEM SETTING: BASIC | My Button | Auto (PJD6252L/PJD6551W/PJD7326/PJD7526W)/Projection (Projector Position)/Menu Position/Color Temp./Brightness/Contrast/3D Settings/Screen Color/SplashScreen/Message/Quick Auto Search/CEC/DCR/Closed Caption (PJD6252L/PJD6551W/PJD7326/PJD7526W)/Power Saving/Freeze/INFORMATION/Aspect Ratio | |
| Advanced | Pattern | Off/Test Card/Note Pad /World Map/Stave/Trellis Chart | |
| Message On/Off | |||
| Presentation Timer | Timer Period | ||
| Timer Display | |||
| Timer Position | |||
| Timer Counting Direction | |||
| Sound Reminder | |||
| Start Counting/Off | |||
| 5. SYSTEM SETTING: ADVANCED | High Altitude Mode On/Off | ||
| DCR On/Off | |||
| Audio Settings | Audio Mode | Standard/Speech/Entertainment | |
| Mute On/Off | |||
| Audio Volume | |||
| Audio In 2 (PJD6252L/PJD6551W/PJD7326/PJD7526W) | Audio/Microphone | ||
| Microphone Volume | |||
| Power On/Off Ring Tone | On/Off | ||
| Closed Caption (PJD6252L/PJD6551W/PJD7326/PJD7526W) | Closed Caption Enable On/Off | ||
| Caption Version CC1/CC2/CC3/CC4 | |||
| 5. SYSTEM SETTING: ADVANCED | Lamp Settings | Lamp Mode | Normal/Eco/Dynamic/ SuperEco |
| Reset Lamp Hours | |||
| Lamp Hours | |||
| Filter Settings | Filter Mode On/Off | ||
| Reset Filter Hours | |||
| Filter Hours | |||
| Remote Control Code 1/2/3/4/5/6/7/8 | |||
| Advanced | Security Settings | Change Password | |
| Power On Lock | |||
| Panel Key Lock Off/On | |||
| Reset Settings Reset/Cancel | |||
| 6. INFORMATION | Current System Status | • Source• Color Mode• Resolution• Color System• IP Address (PJD6252L/PJD6551W/ PJD7326/PJD7526W)• MAC Address (PJD6252L/PJD6551W/ PJD7326/PJD7526W)• Firmware Version | |
Description of each menu
| Function Description | Option | |
| 1. DISPLAY menu | Screen Color | See "Using Screen Color" on page 32 for details. |
| Aspect Ratio | See "Selecting the aspect ratio" on page 30 for details. | |
| Keystone | See "Correcting keystone" on page 28 for details. | |
| Corner Adj.(PJD7326/PJD7526W) | See "Adjusting 4 corners (PJD7326/PJD7526W)" on page 29 for details. | |
| Position(PJD6252L/PJD6551W/PJD7326/PJD7526W) | Displays the position adjustment page. To move the projected image, use the directional arrow keys. The values shown on the lower position of the page change with every key press you made until they reach their maximum or minimum.This function is only available when a PC input signal is selected.The adjustment range may vary under different timings. | |
| Phase(PJD6252L/PJD6551W/PJD7326/PJD7526W) | Adjusts the clock phase to reduce image distortion. This function is only available when a PC input signal is selected. This function is only available when a PC input signal is selected. | |
| H. Size(PJD6252L/PJD6551W/PJD7326/PJD7526W) | Adjusts the horizontal width of the image.This function is only available when a PC input signal is selected. | |
| Zoom | See "Magnifying and searching for details" on page 29 for details. | |
| 2. PICTURE menu | Color Mode | See "Selecting a picture mode" on page 31 for details. |
| Brightness | See "Adjusting Brightness" on page 32 for details. | |
| Contrast | See "Adjusting Contrast" on page 32 for details. | |
| Color Temp. | See "Selecting a Color Temperature" on page 33 and "Setting a preferred color temperature" on page 33 for details. | |
| OverScan | Adjusts the overscan rate from 0% to 5%.This function is only available when a Composite Video, S-Video or HDMI input signal is selected. | |
| HDMI Settings | See "Changing HDMI input settings" on page 26 for details. | |
| Function Description | ||
| 2. PICTURE menu | Advanced | ColorSee "Adjusting Color" on page 32 for details.TintSee "Adjusting Tint" on page 33 for details.SharpnessSee "Adjusting Sharpness" on page 33 for details.GammaSee "Selecting a gamma setting" on page 33 for details.Brilliant ColorSee "Adjusting Brilliant Color" on page 33 for details.Noise ReductionSee "Reducing image noise" on page 33 for details.Color ManagementSee "Color Management" on page 34 for details. |
| Reset Color Settings | Returns all color settings to the factory preset values. | |
| 3. SOURCE menu | Quick Auto Search | See "Switching input signal" on page 26 for details. |
| 3D Settings | See "Using the 3D functions" on page 38 for details. | |
| Standby Settings | See "Using the projector in standby mode" on page 46 for details. | |
| Auto Power On | Computer (PJD6252L/PJD6551W/PJD7326/PJD7526W)Selecting Enable allows the projector to turn on automatically once the VGA signal is fed through the VGA cable.CECSee "Using the CEC function" on page 37 for details.Direct Power OnSelecting On allows the projector to turn on automatically once the power is fed through the power cord. | |
| Function Description | Auto Power OffSee "Setting Auto Power Off" on page 61 for details.Sleep TimerSee "Setting Sleep Timer" on page 61 for details.Power SavingSee "Setting Power Saving" on page 61 for details. | |
| 3. SOURCE menu | Smart Energy | Selecting Enable enables you to restart the projector immediately within 120 seconds after turning it off. After 120 seconds, if the projector is not turned on again, it will directly enter the standby mode.It takes some time to initiate this function. Make sure the projector has been turned on for more than 4 minutes. If the projector is resumed by using the Smart Restart feature, this function can be executed immediately.When Enable is selected, the Quick Power Off function will be automatically set to “Enable”. |
| Smart Restart | ||
| Quick Power Off | Selecting Enable enables the function and the projector will not enter the cooling process after being shut down. Selecting Disable disables the function and the projector will enter normal cooling process after being shut down.If you attempt to restart the projector right after it's been turned off, it may not be turned on successfully and will rerun its cooling procedure.When Disable is selected, the Smart Restart function will be automatically turned off. | |
| Lamp SPA Mode (PJD7326/PJD7526W) | Selecting Enable sets the projector's cooling time after being shut down to 180 seconds. If Disable is selected, the cooling procedure will depend on the Smart Restart and Quick Power Off settings.When Enable is selected, the Smart Restart and Quick Power Off functions will be automatically turned off. | |
| LAN Control Settings (PJD6252L/PJD6551W/PJD7326/PJD7526W) | See "Controlling the projector through a LAN environment (for selected models)" on page 39 for details. | |
| Function Description | Tion | |
| 4. SYSTEM SETTING: BASIC menu | Language | Sets the language for the On-Screen Display (OSD) menus.See "Using the menus" on page 23 for details. |
| Projector Position | See "Choosing a location" on page 12 for details. | |
| Menu Settings | Menu Display TimeSets the length of time the OSD will remain active after your last key press. The range is from 5 to 30 seconds in 5-second increments.Menu PositionSets the On-Screen Display (OSD) menu position. | |
| Blank Timer | See "Hiding the image" on page 36 for details. | |
| Splash Screen | Allows you to select which logo screen will be displayed during projector start-up. | |
| Screen Capture | See "Creating your own startup screen" on page 36 for details. | |
| My Button Sets a hotkey on remote control. | ||
| Advanced | PatternThe projector can display several test patterns. It helps you adjust the image size and focus and check that the projected image is free from distortion.MessageSelecting On displays the current information on the screen when the projector is detecting or searching for a signal.Presentation TimerSee "Setting the presentation timer" on page 35 for details. | |
| Function Description | ||
| 5. SYSTEM SETTING: ADVANCED menu | High Altitude Mode | A mode for operation in high altitude areas. See "Operating in a high altitude environment" on page 37 for details. |
| DCR | Enables or disables the DCR (Dynamic Contrast Ratio) function. Selecting On enables the function and the projector will automatically switch the lamp mode between normal and economic modes according to the input image detected.This function is only available when a PC input signal is selected.After enabling DCR, frequent lamp mode switching may shorten lamp life and noise level will vary during operation. | |
| Audio Settings | See "Adjusting the sound" on page 46 for details. | |
| Closed Caption (PJD6252L/PJD6551W/PJD7326/PJD7526W) | Closed Caption EnableActivates the function by selecting On when the selected input signal carries closed captions.• Captions: An on-screen display of the dialogue, narration, and sound effects of TV programs and videos that are closed captioned (usually marked as "CC" in TV listings).This function is only available when a Composite video or S-Video input signal is selected and its system format is NTSC.Caption VersionSelects a preferred closed captioning mode. To view captions, select CC1, CC2, CC3, or CC4 (CC1 displays captions in the primary language in your area). | |
| Lamp Settings | Lamp ModeSee "Setting Lamp Mode as Eco" on page 61 for details.Reset Lamp HoursResets the lamp timer after new lamp is installed. For changing the lamp, please contact qualified service personnel.Lamp HoursSee "Getting to know the lamp hour" on page 61 for details on how the total lamp hour is calculated. | |
| Filter Settings | See "Using the dust filter (optional accessory)" on page 59 for details. | |
| Function Description | ||
| 5. SYSTEM SETTING: ADVANCED menu | Remote Control Code | See "Remote control code" on page 9 for details. |
| Advanced | Security SettingsSee "Utilizing the password function" on page 24 for details.Panel Key LockSee "Locking control keys" on page 36 for details. | |
| Reset Settings | Returns all settings to the factory preset values.The following settings will still remain: Keystone, OverScan, Language, Projector Position, High Altitude Mode, Security Settings, Remote Control Code, 3D Sync. | |
| 6. INFORMATION menu | Current System Status | SourceShows the current signal source.Color ModeShows the selected mode in the PICTURE menu.ResolutionShows the native resolution of the input signal.Color SystemShows input system format.IP Address (PJD6252L/PJD6551W/PJD7326/PJD7526W)Shows the IP address of your projector.MAC Address (PJD6252L/PJD6551W/PJD7326/PJD7526W)Shows the MAC Address of your projector.MAC Address stands for Media Access Control Address, which is a physical layer address used to uniquely identify a network node.Firmware VersionShows the current firmware version. |
Care of the projector
You need to keep the lens and/or filter (optional accessory) clean on a regular basis.
Never remove any parts of the projector. Contact your dealer when any part of the projector needs replacing.
Cleaning the lens
Clean the lens whenever you notice dirt or dust on the surface.
- Use a canister of compressed air to remove dust.
- If there is dirt or smears, use lens-cleaning paper or moisten a soft cloth with lens cleaner and gently wipe the lens surface.

CAUTION
Never rub the lens with abrasive materials.
Cleaning the projector case
Before you clean the case, turn the projector off using the proper shutdown procedure as described in "Shutting down the projector" on page 48 and unplug the power cord.
- To remove dirt or dust, wipe the case with a soft, lint-free cloth.
- To remove stubborn dirt or stains, moisten a soft cloth with water and a neutral pH detergent. Then wipe the case.

CAUTION
Never use wax, alcohol, benzene, thinner or other chemical detergents. These can damage the case.
Storing the projector
If you need to store the projector for an extended time, please follow the instructions below:
- Make sure the temperature and humidity of the storage area are within the recommended range for the projector. Please refer to "Specifications" on page 65 or consult your dealer about the range.
- Retract the adjuster foot.
- Remove the battery from the remote control.
- Pack the projector in its original packing or equivalent.
Transporting the projector
It is recommended that you ship the projector with its original packing or equivalent.
Using the dust filter (optional accessory)

CAUTION
- It is recommended to clean the dust filter every 100 hours after the dust filter is installed.
- Be sure to turn off the projector and unplug it from power source before installing or detaching the filter.
- If your projector is ceiling-mounted or is not easily accessible, pay special attention to your personal safety when replacing the dust filter.
Installing the dust filter
-
Be sure to turn off the projector and unplug it from power source.
-
As the arrows shown to the right, fit the filter by aligning and inserting it into the projector slots. Make sure it clicks into place.

natural_image
Diagram of a projector with an inset showing the internal structure (no text or symbols present)For first time installation:
-
Open the OSD menu and go to the SYSTEM SETTING: ADVANCED > Filter Settings menu.
-
Press Enter and the Filter Settings page is displayed.
-
Highlight Filter Mode and press ◀/▶ to select On. The filter timer starts counting and the projector will remind you to clean the filter when the filter is in use for over 100 hours.

Set Filter Mode to On only when using the projector after the dust filer (optional accessory) is properly attached. Failing to do so will result in a shorter lamp life.
Obtaining the filter hour information
-
Open the OSD menu and go to the SYSTEM SETTING: ADVANCED > Filter Settings menu.
-
Press Enter. The Filter Settings page is displayed.
-
You will see the Filter Hours information on the menu.
Cleaning the dust filter
-
Be sure to turn off the projector and unplug it from power source.
-
Press the latches on the dust filter and remove the filter from the projector.
-
Use a small vacuum cleaner or a soft brush to sweep the dust on the filter away.
-
Re-install the dust filter.

flowchart
graph LR
    A["Initial Air Condition"] --> B["Add Air Condition"]
    B --> C["Close Air Condition"]
    C --> D["Check Air Condition"]
    D --> E["Final Air Condition"]
Resetting the filter timer
-
Open the OSD menu and go to the SYSTEM SETTING: ADVANCED > Filter Settings menu.
-
Press Enter and the Filter Settings page is displayed.
-
Highlight Reset Filter Hours and press Enter. A warning message is displayed asking if you want to reset the filter timer.
-
Highlight Reset and press Enter. The lamp time will be reset to '0'.

CAUTION
Remember to set Filter Mode to Off in the SYSTEM SETTING: ADVANCED > Filter Settings menu when using the projector with the dust filter removed. Setting Filter Mode to Off does not reset the filter timer. The timer will continue counting the next time you fit the filter back on and set Filter Mode to On.
Lamp information
Getting to know the lamp hour
When the projector is in operation, the duration (in hours) of lamp usage is automatically calculated by the built-in timer.
To obtain the lamp hour information:
- Open the OSD menu and go to the SYSTEM SETTING: ADVANCED > Lamp Settings menu.
- Press Enter and the Lamp Settings page is displayed.
- You will see the Lamp Hours information on the menu.
- To leave the menu, press Exit.
Extending lamp life
The projection lamp is a consumable item. To keep the lamp life as long as possible, you can do the following settings via the OSD menu.
Setting Lamp Mode as Eco
Using Eco mode reduces system noise and power consumption by 20%. If the Eco mode is selected, the light output will be reduced and result in darker projected pictures.
Setting the projector in Eco mode also extends the lamp operation life. To set Eco mode, go to the SYSTEM SETTING: ADVANCED > Lamp Settings > Lamp Mode menu and press ◀/▶ to select Eco.
Setting Auto Power Off
This function allows the projector to turn off automatically after a set period of time once no input source is detected to prevent unnecessary waste of lamp life.
- Open the OSD menu and go to the SOURCE > Smart Energy menu.
- Press Enter and the Smart Energy page is displayed.
- Highlight Auto Power Off and press ◀/▶.
- If the preset time lengths are not suitable for your need, select Disable. The projector will not automatically shut down in a certain time period.
Setting Sleep Timer
This function allows the projector to turn off automatically after a set period of time to prevent unnecessary waste of lamp life.
- Open the OSD menu and go to the SOURCE > Smart Energy menu.
- Press Enter and the Smart Energy page is displayed.
- Highlight Sleep Timer and press /. ◀ ▶
- If the preset time lengths are not suitable for your presentation, select Disable. The projector will not automatically shut down in a certain time period.
Setting Power Saving
The projector lowers the power consumption if no input source is detected after 5 minutes to prevent unnecessary waste of lamp life. You can further decide if you would like the projector to turn off automatically after a set period of time.
- Open the OSD menu and go to the SOURCE > Smart Energy menu.
-
Press Enter and the Smart Energy page is displayed.
-
Highlight Power Saving and press ◀/▶.
- When Enable is selected, the projector lamp will be changed to Eco mode after no signal is detected for 5 minutes.
The lamp power will be changed to SuperEco mode after no signal is detected for 20 minutes.


Timing of replacing the lamp
Please install a new lamp or consult your dealer when the Lamp indicator light lights up. An old lamp may cause a malfunction in the projector and in some instances the lamp may explode.
CAUTION
The Lamp indicator light and Temperature indicator light will light up if the lamp becomes too hot. Turn the power off and let the projector cool for 45 minutes. If the Lamp indicator light or Temperature indicator light still lights up after turning the power back on, please contact your dealer. See "Indicators" on page 63 for details.
Replacing the lamp
Turn the power off and disconnect the projector from the power outlet. Please contact qualified service personnel for changing the lamp.
Type number:
• PJD6252L: RLC-092
• PJD6551W: RLC-093
• PJD7326: RLC-104
• PJD7526W: RLC-105
• PJD7720HD: RLC-100
Indicators
| Light Status & Description | |||
| Power events | |||
| Blue Flashing | Off Off | Stand-by mode | |
| Blue Off | Off | Powering up | |
| Blue Off | Off | Normal operation | |
| Blue Flashing | Off Off | Normal power-down cooling (3 sec) | |
| Red Off | Off | Downloading | |
| Blue Blue | Blue | Burn in off | |
| Lamp events | |||
| Blue Flashing | Off Red | First Lamp-Lit error cooling (60 sec) | |
| Off Off | Red | Lamp error in normal operation (30 sec) | |
| Blue Off | Red | CW start fail (30 sec) | |
| Thermal events | |||
| Off Red | Off | Fan 1 error (the actual fan speed is ± 25% outside the desired speed.) | |
| Off Red | Red | Fan 2 error (the actual fan speed is ± 25% outside the desired speed.) | |
| Off Red | Blue | Fan 3 error (the actual fan speed is ± 25% outside the desired speed.) | |
| Off Red | Purple | Fan 4 error (the actual fan speed is ± 25% outside the desired speed.) | |
| Red Red | Red | Thermal sensor 1 open error (the remote diode has an open-circuit condition.) | |
| Red Red | Blue | Thermal sensor 2 open error (the remote diode has an open-circuit condition.) | |
| Blue Red | Red | Thermal sensor 1 short error (the remote diode has an short-circuit condition.) | |
| Off Red | Blue | Thermal sensor 2 short error (the remote diode has an short-circuit condition.) | |
| Purple Red | Red | Temperature 1 error (over limited temperature) | |
| Purple Red | Blue | Temperature 2 error (over limited temperature) | |
| Off Blue | Red | Fan IC #1 I2C connection error | |
⑦ The projector does not turn on.
| Cause Remedy | |
| There is no power from the power cord. | Plug the power cord into the AC inlet on the projector, and plug the power cord into the power outlet. If the power outlet has a switch, make sure that it is switched on. |
| Attempting to turn the projector on again during the cooling process. | Wait until the cooling down process has completed. |
⑦ No picture
| Cause Remedy | |
| The video source is not turned on or connected correctly. | Turn the video source on and check that the signal cable is connected correctly. |
| The projector is not correctly connected to the input signal device. | Check the connection. |
| The input signal has not been correctly selected. | Select the correct input signal with the Source key on the projector or remote control. |
⑦ Blurred image
| Cause Remedy | |
| The projection lens is not correctly focused. | Adjust the focus of the lens using the focus ring. |
| The projector and the screen are not aligned properly. | Adjust the projection angle and direction as well as the height of the projector if necessary. |
⑦ Remote control does not work
| Cause Remedy | |
| The battery is out of power. Replace the battery with a new one. | |
| There is an obstacle between the remote control and the projector. | Remove the obstacle. |
| You are too far away from the projector. Stand within 8 meters (26 feet) from the projector. | |
| The remote control code on the projector and that on the remote control are not consistent. | Adjust the remote control code. |
Projector specifications

- All specifications are subject to change without notice.
- Not all models can be purchased in your region.
| General | |
| Product name DLP Projector | |
| Optical | |
| Resolution PJD6252L/PJD7326:1024 x 768 XGAPJD6551W/PJD7526W:1280 x 800 WXGAPJD7720HD:1920 x 1080 1080p | |
| Display system 1-CHIP DMD | |
| Lamp PJD6252L/PJD6551W:190 W lampPJD7326/PJD7526W:240 W lampPJD7720HD:210 W lamp | |
| Electrical | |
| Power supply AC100–240V, 50–60 Hz (Automatic) | |
| Power consumption PJD6252L/PJD6551W:295 W (Max); < 0.5 W (Standby)PJD7326/PJD7526W:365 W (Max); < 0.5 W (Standby)PJD7720HD:330 W (Max); < 0.5 W (Standby) | |
| Mechanical | |
| Weight 2.5 Kg (5.51 lbs) | |
| Input terminal | |
| Computer input | |
| RGB input | D-Sub 15-pin (female) x 2 (PJD6252L/PJD6551W/PJD7326/PJD7526W) |
| Video signal input | |
| S-VIDEO | Mini DIN 4-pin port x 1 (PJD6252L/PJD6551W/PJD7326/PJD7526W) |
| VIDEO | RCA jack x 1 (PJD6252L/PJD6551W/PJD7326/PJD7526W) |
| SD/HDTV signal inputAnalog –Digital – | D-Sub <--> Component RCA jack x 3 (through RGB input)(PJD6252L/PJD6551W/PJD7326/PJD7526W) |
| HDMI V1.4a x 1 | |
| Audio signal input Audio | in jack x 1Audio in jack/Microphone in x 1 (PJD6252L/PJD6551W/PJD7326/PJD7526W)Microphone in x 1 (PJD7720HD) |
| HDMI/MHL input x 1 | |
| Output terminal | |
| RGB output | D-Sub 15-pin (female) x 1 (PJD6252L/PJD6551W/PJD7326/PJD7526W) |
| Audio signal output Audio | jack x 1 |
| Speaker 10 watt x 1 | |
| Control terminal | |
| RS-232 serial control 9 pin x 1 | |
| LAN | RJ45 x 1 (PJD6252L/PJD6551W/PJD7326/PJD7526W) |
| USB serial control Type mini B | |
| IR receiver x 1 (Front) | |
| Environmental Requirements | |
| Operating temperature 0°C–40°C at sea level | |
| Operating relative humidity | 10%–90% (without condensation) |
| Operating altitude • 0–1499 m at 5°C–35°C• 1500–3000 m at 5°C–25°C (withHigh Altitude Mode on) | |
Dimensions
315.24 mm (W) × 97.7 mm (H) × 227.93 mm (D) (Excluding extrusions)

Ceiling mount installation
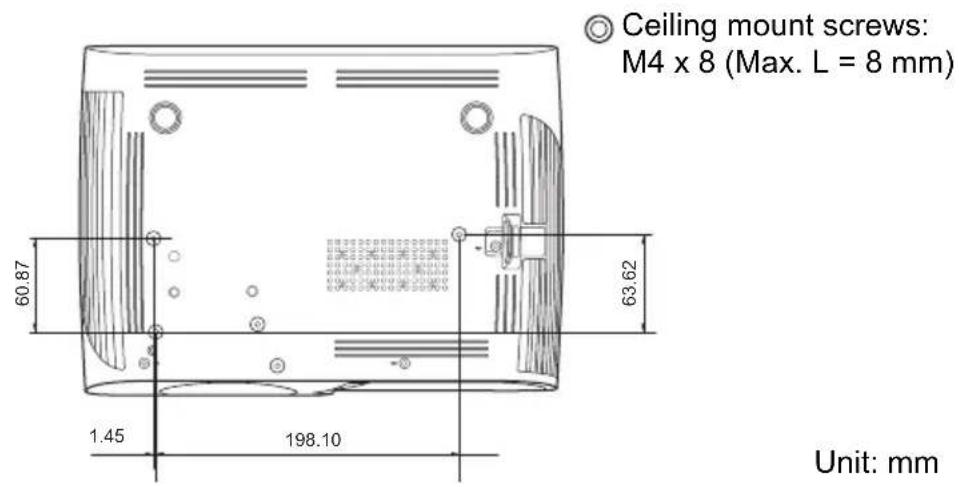
Tripod mount installation
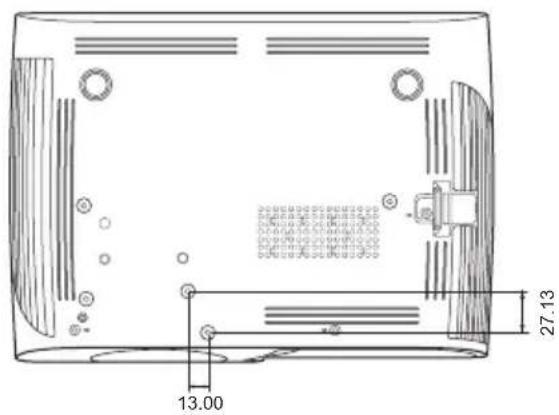
Unit: mm
Unit: mm
Timing chart
| Analog RGB | |||
| Signal Resolution (dots) Aspect Ratio Refresh Rate (Hz) | |||
| VGA 640 x 480 4:3 60/72/75/85 | |||
| SVGA 800 x 600 4:3 60/72/75/85 | |||
| XGA | 1024 x 768 4:3 60/70/75/85 | ||
| 1152 x 864 4:3 75 | |||
| WXGA | 1280 x 768 15:9 60 | ||
| 1280 x 800 16:10 60/75/85 | |||
| 1360 x 768 16:9 60 | |||
| Quad-VGA | 1280 x 960 4:3 60/85 | ||
| SXGA | 1280 x 1024 5:4 60 | ||
| SXGA+ | 1400 x 1050 4:3 60 | ||
| WXGA+ 1440 x 900 16:10 60 | |||
| UXGA | 1600 x 1200 4:3 60 | ||
| WSXGA+ | 1680 x 1050 16:10 60 | 60 | |
| HD | 1280 x 720 16:9 60 | ||
| MAC 13" | 640 x 480 4:3 67 | ||
| MAC 16" | 832 x 624 4:3 75 | ||
| MAC 19" | 1024 x 768 4:3 75 | ||
| MAC 21" | 1152 x 870 4:3 75 | ||
| HDTV (1080p) | 1920 x 1080 16:9 60 | ||
| HDMI | |||
| Signal Resolution (dots) Aspect Ratio Refresh Rate (Hz) | |||
| VGA 640 x 480 | 4:3 60 | ||
| SVGA 800 x 600 | 4:3 60 | ||
| XGA 1024 x 768 | 4:3 60 | ||
| WXGA | 1280 x 768 15:9 60 | ||
| 1280 x 800 16:10 60 | |||
| 1360 x 768 16:9 60 | |||
| Quad-VGA 1280 x | 960 4:3 60 | ||
| SXGA 1280 x 1024 | 5:4 60 | ||
| SXGA+ 1400 x | 1050 4:3 60 | ||
| WXGA+ 1440 x | 900 16:10 60 | ||
| WSXGA+ 1680 x | 1050 16:10 60 | ||
| HDTV (1080p) | 1920 x 1080 16:9 | 50 / 60 | |
| HDTV (1080i) | 1920 x 1080 16:9 | 50 / 60 | |
| HDTV (720p) | 1280 x 720 16:9 | 50 / 60 | |
| SDTV (480p) | 720 x 480 | 4:3 / 16:9 | 60 |
| SDTV (576p) | 720 x 576 | 4:3 / 16:9 | 50 |
| SDTV (480i) 720 x | 480 | 4:3 / 16:9 | 60 |
| SDTV (576i) 720 x | 576 | 4:3 / 16:9 | 50 |
| 3D (HDMI signal included) | |||
| Signal Resolution (dots) Aspect Ratio Refresh Rate (Hz) | |||
| SVGA 800 x 600 4:3 60* / 120** | |||
| XGA 1024 x 768 4:3 60* / 120** | |||
| HD 1280 x 720 16:9 60* / 120** | |||
| WXGA 1280 x 800 16:9 60* / 120** | |||
| for Video Signal | |||
| Signal Resolution (dots) Aspect Ratio Refresh Rate (Hz) | |||
| SDTV (480i)*** 720 x 480 4:3 / 16:9 60 | |||
| * 60Hz signals are supported for Side-by-Side, Top-Bottom, and Frame Sequential formats. ** 120 Hz signals are supported for Frame Sequential format only. *** Video signal (SDTV 480i) is supported for Frame Sequential format only. | |||
| HDMI 3D | |||
| In Frame packing format | |||
| Signal | Resolution (dots) Aspect Ratio Refresh Rate (Hz) | ||
| 1080p | 1920 x 1080 | 16:9 23.98/24 | |
| 720p 1280 x 720 | 16:9 50/59.94/60 | ||
| In Side by side format | |||
| Signal | Resolution (dots) Aspect Ratio Refresh Rate (Hz) | ||
| 1080i 1920 x 1080 | 16:9 50/59.94/60 | ||
| In Top and Bottom format | |||
| Signal | Resolution (dots) Aspect Ratio Refresh Rate (Hz) | ||
| 1080p | 1920 x 1080 | 16:9 23.98/24 | |
| 720p 1280 x 720 | 16:9 50/59.94/60 | ||
| Component video | |||
| Signal Resolution (dots) Aspect Ratio Refresh Rate (Hz) | |||
| HDTV (1080p) 1920 | x 1080 16:9 50 / 60 | ||
| HDTV (1080i) 1920 | x 1080 16:9 50 / 60 | ||
| HDTV (720p) 1280 | x 720 16:9 50 / 60 | ||
| SDTV (480p) 720 x | 480 4:3 / 16:9 60 | ||
| SDTV (576p) 720 x | 576 4:3 / 16:9 50 | ||
| SDTV (480i) 720 x | 480 4:3 / 16:9 60 | ||
| SDTV (576i) 720 x | 576 4:3 / 16:9 50 | ||
| Composite video | ||
| Signal Aspect Ratio | Refresh Rate (Hz) | |
| NTSC | 4:3 | 60 |
| PAL | 4:3 | 50 |
| PAL60 | 4:3 | 60 |
| SECAM | 4:3 | 50 |
Copyright
Copyright 2016. All rights reserved. No part of this publication may be reproduced, transmitted, transcribed, stored in a retrieval system or translated into any language or computer language, in any form or by any means, electronic, mechanical, magnetic, optical, chemical, manual or otherwise, without the prior written permission of ViewSonic Corporation.
Disclaimer
ViewSonic Corporation makes no representations or warranties, either expressed or implied, with respect to the contents hereof and specifically disclaims any warranties, merchantability or fitness for any particular purpose. Further, ViewSonic Corporation reserves the right to revise this publication and to make changes from time to time in the contents hereof without obligation to notify any person of such revision or changes.
*DLP and Digital Micromirror Device (DMD) are trademarks of Texas Instruments. Others are copyrights of their respective companies or organizations.
IR control table
| Key Format Byte1 Byte2 Byte3 Byte4 | |||||
| PgDn NEC X3 F4 05 FA | |||||
| PgUp NEC X3 F4 06 F9 | |||||
| Blank NEC X3 F4 07 F8 | |||||
| Auto sync NEC X3 F4 08 F7 | |||||
| Up | NEC | X3 | F4 | 0B | |
| Down | NEC | X3 | F4 | 0C | |
| L e | f | t | N | E | |
| Right | NEC | X3 | F4 | 0F | |
| Color Mode NEC X3 F4 10 EF | |||||
| Mute NEC X3 F4 14 EB | |||||
| Enter NEC X3 F4 15 EA | |||||
| Power ON NEC X3 F4 17 E8 | |||||
| Presentation Timer NEC X3 F4 27 D8 | |||||
| Exit NEC X3 F4 28 D7 | |||||
| D. ECO(Eco mode) | N | E | C | X 3 | F |
| Menu NEC X3 F4 30 CF | |||||
| Mouse | NEC X3 F4 31 CE | ||||
| Mouse Left | NEC X3 F4 36 C9 | ||||
| Mouse Right | NEC X3 F4 37 C8 | ||||
| S o | u | r | c | e | N |
| Pattern | NEC X3 F4 55 AA | ||||
| My button | NEC X3 F4 56 A9 | ||||
| HDMI NEC X3 F4 58 A7 | |||||
| Volume+ | NEC X3 F4 82 7D | ||||
| Volume- | NEC X3 F4 83 7C | ||||
| Magnify + | NEC X3 F4 18 e7 | ||||
| Magnify - | NEC X3 F4 19 e6 | ||||
| VGA1 | NEC X3 F4 41 be | ||||
| VGA2 | NEC X3 F4 45 ba | ||||
C
4
E
Address code
| Code 1 83F4 | |
| Code 2 93F4 | |
| Code 3 A3F4 | |
| Code 4 B3F4 | |
| Code 5 C3F4 | |
| Code 6 D3F4 | |
| Code 7 E3F4 | |
| Code 8 F3F4 |
RS232 command table
| Pin Description Pin Description |  | |||
| 1 | N | C | 2 | |
| 3 | T | X | 4 | |
| 5 | G | N | D | |
| 7 | R | T | S | |
| 9 | NC | |||
| RS-232 protocol | |
| Baud Rate 115200 bps (default) | |
| Data Length | 8 bit |
| Parity Check | None |
| Stop Bit | 1 bit |
| Flow Control | None |
C C
| Function Status Action cmd | |||
| Power | Write | Turn on 0x06 | 0x14 0x00 0x04 0x00 0x34 0x11 0x00 0x00 0x5D |
| Turn off 0x06 | 0x14 0x00 0x04 0x00 0x34 0x11 0x01 0x00 0x5E | ||
| Read | Power status(on/off) | 0x07 0x14 0x00 0x05 0x00 0x34 0x00 0x00 0x11 0x00 0x5E | |
| Reset all settings | Execute 0x06 0x14 | 0x00 0x04 0x00 0x34 0x11 0x02 0x00 0x5F | |
| Reset Color Settings | Execute 0x06 0x14 | 0x00 0x04 0x00 0x34 0x11 0x2A 0x00 0x87 | |
| Splash Screen | Write | Splash Screen Black | 0x06 0x14 0x00 0x04 0x00 0x34 0x11 0x0A 0x00 0x67 |
| Splash Screen Blue | 0x06 0x14 0x00 0x04 0x00 0x34 0x11 0x0A 0x01 0x68 | ||
| Splash Screen ViewSonic | 0x06 0x14 0x00 0x04 0x00 0x34 0x11 0x0A 0x02 0x69 | ||
| Splash Screen Screen Capture | 0x06 0x14 0x00 0x04 0x00 0x34 0x11 0x0A 0x03 0x6A | ||
| Splash Screen Off | 0x06 0x14 0x00 0x04 0x00 0x34 0x11 0x0A 0x04 0x6B | ||
| Read | Splash Screen status | 0x07 0x14 0x00 0x05 0x00 0x34 0x00 0x00 0x11 0x0A 0x68 | |
| Quick Power Off | Write | Quick Power Off Off | 0x06 0x14 0x00 0x04 0x00 0x34 0x11 0x0B 0x00 0x68 |
| Quick Power Off On | 0x06 0x14 0x00 0x04 0x00 0x34 0x11 0x0B 0x01 0x69 | ||
| Read | Quick Power Off status | 0x07 0x14 0x00 0x05 0x00 0x34 0x00 0x00 0x11 0x0B 0x69 | |
| High Altitude Mode | Write | High Altitude Mode Off | 0x06 0x14 0x00 0x04 0x00 0x34 0x11 0x0C 0x00 0x69 |
| High Altitude Mode On | 0x06 0x14 0x00 0x04 0x00 0x34 0x11 0x0C 0x01 0x6A | ||
| Read | High Altitude Mode status | 0x07 0x14 0x00 0x05 0x00 0x34 0x00 0x00 0x11 0x0C 0x6A | |
| Lamp Mode | Write | Normal 0x06 | 0x14 0x00 0x04 0x00 0x34 0x11 0x10 0x00 0x6D |
| Eco 0x06 0x | 14 0x00 0x04 0x00 0x34 0x11 0x10 0x01 0x6E | ||
| Dynamic 0x06 | 0x14 0x00 0x04 0x00 0x34 0x11 0x10 0x02 0x6F | ||
| SuperEco 0x06 | 0x14 0x00 0x04 0x00 0x34 0x11 0x10 0x03 0x70 | ||
| Read | Lamp Mode status | 0x07 0x14 0x00 0x05 0x00 0x34 0x00 0x00 0x11 0x10 0x6E | |
| Message | Write | Message Off 0x06 0x14 0x00 0x04 0x00 0x34 0x11 0x27 0x00 0x84 | |
| Message On 0x06 0x14 0x00 0x04 0x00 0x34 0x11 0x27 0x01 0x85 | |||
| Read | Message status0x07 0x14 0x00 0x05 0x00 0x34 0x00 0x00 0x11 0x27 0x85 | ||
| Projector Position | Write | Front Table 0x06 0x14 0x00 0x04 0x00 0x34 0x12 0x00 0x00 0x5E | |
| Rear Table 0x06 0x14 0x00 0x04 0x00 0x34 0x12 0x00 0x01 0x5F | |||
| Rear Ceiling 0x06 0x14 0x00 0x04 0x00 0x34 0x12 0x00 0x02 0x60 | |||
| Front Ceiling 0x06 0x14 0x00 0x04 0x00 0x34 0x12 0x00 0x03 0x61 | |||
| Read | projector position status0x07 0x14 0x00 0x05 0x00 0x34 0x00 0x00 0x12 0x00 0x5F | ||
| 3D Sync | Write | OFF 0x06 0x14 0x00 0x04 0x00 0x34 0x12 0x20 0x00 0x7E | |
| Auto 0x06 0x14 0x00 0x04 0x00 0x34 0x12 0x20 0x01 0x7F | |||
| Frame Sequential0x06 0x14 0x00 0x04 0x00 0x34 0x12 0x20 0x02 0x80 | |||
| Frame Packing0x06 0x14 0x00 0x04 0x00 0x34 0x12 0x20 0x03 0x81 | |||
| Top-Bottom 0x06 0x14 0x00 0x04 0x00 0x34 0x12 0x20 0x04 0x82 | |||
| Side-by-Side 0x06 0x14 0x00 0x04 0x00 0x34 0x12 0x20 0x05 0x83 | |||
| Read | 3D Sync Status0x07 0x14 0x00 0x05 0x00 0x34 0x00 0x00 0x12 0x20 0x7F | ||
| 3D Sync Invert | Write | Off 0x06 0x14 0x00 0x04 0x00 0x34 0x12 0x21 0x00 0x7F | |
| On 0x06 0x14 0x00 0x04 0x00 0x34 0x12 0x21 0x01 0x80 | |||
| Read | 3D Sync Invert Status0x07 0x14 0x00 0x05 0x00 0x34 0x00 0x00 0x12 0x21 0x80 | ||
| Contrast | Write | Contrast decrease0x06 0x14 0x00 0x04 0x00 0x34 0x12 0x02 0x00 0x60 | |
| Contrast increase0x06 0x14 0x00 0x04 0x00 0x34 0x12 0x02 0x01 0x61 | |||
| Read Contrast ratio 0x07 0x14 0x00 0x05 0x00 0x34 0x00 0x00 0x12 0x02 0x61 | |||
| Brightness | Write | Brightness decrease0x06 0x14 0x00 0x04 0x00 0x34 0x12 0x03 0x00 0x61 | |
| Brightness increase0x06 0x14 0x00 0x04 0x00 0x34 0x12 0x03 0x01 0x62 | |||
| Read Brightness 0x07 0x14 0x00 0x05 0x00 0x34 0x00 0x00 0x12 0x03 0x62 | |||
| Aspect ratio | Write | Aspect ratio Auto | 0x06 0x14 0x00 0x04 0x00 0x34 0x12 0x04 0x00 0x62 |
| Aspect ratio 4:3 | 0x06 0x14 0x00 0x04 0x00 0x34 0x12 0x04 0x02 0x64 | ||
| Aspect ratio 16:9 | 0x06 0x14 0x00 0x04 0x00 0x34 0x12 0x04 0x03 0x65 | ||
| Aspect ratio 16:10 | 0x06 0x14 0x00 0x04 0x00 0x34 0x12 0x04 0x04 0x66 | ||
| Aspect ratio Anamorphic | 0x06 0x14 0x00 0x04 0x00 0x34 0x12 0x04 0x05 0x67 | ||
| Aspect ratio Wide | 0x06 0x14 0x00 0x04 0x00 0x34 0x12 0x04 0x06 0x68 | ||
| Aspect ratio 2.35:1 | 0x06 0x14 0x00 0x04 0x00 0x34 0x12 0x04 0x07 0x69 | ||
| Aspect ratio Panorama | 0x06 0x14 0x00 0x04 0x00 0x34 0x12 0x04 0x08 0x6A | ||
| Read As | pect ratio 0x07 0x14 | 0x00 0x05 0x00 0x34 0x00 0x00 0x12 0x04 0x63 | |
| Auto Adjust | Execute 0x06 0x14 | 0x00 0x04 0x00 0x34 0x12 0x05 0x00 0x63 | |
| Horizontal position | Write | Horizontal position shift right | 0x06 0x14 0x00 0x04 0x00 0x34 0x12 0x06 0x01 0x65 |
| Horizontal position shift left | 0x06 0x14 0x00 0x04 0x00 0x34 0x12 0x06 0x00 0x64 | ||
| Read | Horizontal position | 0x07 0x14 0x00 0x05 0x00 0x34 0x00 0x00 0x12 0x06 0x65 | |
| Vertical position | Write | Vertical position shift up | 0x06 0x14 0x00 0x04 0x00 0x34 0x12 0x07 0x00 0x65 |
| Vertical position shift down | 0x06 0x14 0x00 0x04 0x00 0x34 0x12 0x07 0x01 0x66 | ||
| Read | read Vertical position | 0x07 0x14 0x00 0x05 0x00 0x34 0x00 0x00 0x12 0x07 0x66 | |
| Color temperature | Write | color temperature Warm | 0x06 0x14 0x00 0x04 0x00 0x34 0x12 0x08 0x00 0x66 |
| color temperature Normal | 0x06 0x14 0x00 0x04 0x00 0x34 0x12 0x08 0x01 0x67 | ||
| color temperature Neutral | 0x06 0x14 0x00 0x04 0x00 0x34 0x12 0x08 0x02 0x68 | ||
| color temperature Cool | 0x06 0x14 0x00 0x04 0x00 0x34 0x12 0x08 0x03 0x69 | ||
| Read | color temperature status | 0x07 0x14 0x00 0x05 0x00 0x34 0x00 0x00 0x12 0x08 0x67 | |
| Blank | Write | Blank on 0x06 | 0x14 0x00 0x04 0x00 0x34 0x12 0x09 0x01 0x68 |
| Blank off 0x06 | 0x14 0x00 0x04 0x00 0x34 0x12 0x09 0x00 0x67 | ||
| Read Blank status 0x07 0x14 0x00 0x05 0x00 0x34 0x00 0x00 0x12 0x09 0x68 | |||
| Keystone-Vertical | Write | Decrease 0x06 | 0x14 0x00 0x04 0x00 0x34 0x12 0x0A 0x00 0x68 |
| Increase 0x06 | 0x14 0x00 0x04 0x00 0x34 0x12 0x0A 0x01 0x69 | ||
| Read | Keystone status | 0x07 0x14 0x00 0x05 0x00 0x34 0x00 0x00 0x12 0x0A 0x69 | |
| Keystone-Horizontal | Write | Decrease 0x06 | 0x14 0x00 0x04 0x00 0x34 0x11 0x31 0x00 0x8E |
| Increase 0x06 | 0x14 0x00 0x04 0x00 0x34 0x11 0x31 0x01 0x8F | ||
| Read | Keystone status | 0x07 0x14 0x00 0x05 0x00 0x34 0x00 0x00 0x11 0x31 0x8F | |
| Color mode | Write | Brightest 0x06 | 0x14 0x00 0x04 0x00 0x34 0x12 0x0B 0x00 0x69 |
| Movie 0x06 | 0x14 0x00 0x04 0x00 0x34 0x12 0x0B 0x01 0x6A | ||
| Standard 0x06 | 0x14 0x00 0x04 0x00 0x34 0x12 0x0B 0x04 0x6D | ||
| ViewMatch sRGB | 0x06 0x14 0x00 0x04 0x00 0x34 0x12 0x0B 0x05 0x6E | ||
| Dynamic 0x06 | 0x14 0x00 0x04 0x00 0x34 0x12 0x0B 0x08 0x71 | ||
| DICOM SIM 0x06 | 0x14 0x00 0x04 0x00 0x34 0x12 0x0B 0x0a 0x73 | ||
| Read | Preset mode status | 0x07 0x14 0x00 0x05 0x00 0x34 0x00 0x00 0x12 0x0B 0x6A | |
| Primary Color | Write | Primary color R | 0x06 0x14 0x00 0x04 0x00 0x34 0x12 0x10 0x00 0x6E |
| Primary color G | 0x06 0x14 0x00 0x04 0x00 0x34 0x12 0x10 0x01 0x6F | ||
| Primary color B | 0x06 0x14 0x00 0x04 0x00 0x34 0x12 0x10 0x02 0x70 | ||
| Primary color C | 0x06 0x14 0x00 0x04 0x00 0x34 0x12 0x10 0x03 0x71 | ||
| Primary color M | 0x06 0x14 0x00 0x04 0x00 0x34 0x12 0x10 0x04 0x72 | ||
| Primary color Y | 0x06 0x14 0x00 0x04 0x00 0x34 0x12 0x10 0x05 0x73 | ||
| Read | Primary color status | 0x07 0x14 0x00 0x05 0x00 0x34 0x00 0x00 0x12 0x10 0x6F | |
| Hue | Write | Hue decrease 0x06 0x14 0x00 0x04 0x00 0x34 0x12 0x11 0x00 0x6F | |
| Hue increase 0x06 0x14 0x00 0x04 0x00 0x34 0x12 0x11 0x01 0x70 | |||
| Read Hue | 0x07 0x14 0x00 | 0x05 0x00 0x34 0x00 0x00 0x12 0x11 0x70 | |
| Saturation | Write | Saturation decrease | 0x06 0x14 0x00 0x04 0x00 0x34 0x12 0x12 0x00 0x70 |
| Saturation increase | 0x06 0x14 0x00 0x04 0x00 0x34 0x12 0x12 0x01 0x71 | ||
| Read Saturation | 0x07 0x14 | 0x00 0x05 0x00 0x34 0x00 0x00 0x12 0x12 0x71 | |
| Gain | Write | Gain decrease 0x06 0x14 0x00 0x04 0x00 0x34 0x12 0x13 0x00 0x71 | |
| Gain increase 0x06 0x14 0x00 0x04 0x00 0x34 0x12 0x13 0x01 0x72 | |||
| Read Gain | 0x07 0x14 0x00 | 0x05 0x00 0x34 0x00 0x00 0x12 0x13 0x72 | |
| Freeze | Write | Freeze on 0x06 | 0x14 0x00 0x04 0x00 0x34 0x13 0x00 0x01 0x60 |
| Freeze off 0x06 | 0x14 0x00 0x04 0x00 0x34 0x13 0x00 0x00 0x5F | ||
| Read Freeze | Freeze status 0x07 | 0x14 0x00 0x05 0x00 0x34 0x00 0x00 0x13 0x00 0x60 | |
| Source input | Write | Input source VGA | 0x06 0x14 0x00 0x04 0x00 0x34 0x13 0x01 0x00 0x60 |
| Input source VGA2 | 0x06 0x14 0x00 0x04 0x00 0x34 0x13 0x01 0x08 0x68 | ||
| Input source HDMI | 0x06 0x14 0x00 0x04 0x00 0x34 0x13 0x01 0x03 0x63 | ||
| Input source HDMI/MHL | 0x06 0x14 0x00 0x04 0x00 0x34 0x13 0x01 0x07 0x67 | ||
| Input source Composite | 0x06 0x14 0x00 0x04 0x00 0x34 0x13 0x01 0x05 0x65 | ||
| Input source SVIDEO | 0x06 0x14 0x00 0x04 0x00 0x34 0x13 0x01 0x06 0x66 | ||
| Read Source 0x07 0x14 0x00 0x05 0x00 0x34 0x00 0x00 0x13 0x01 0x61 | |||
| Quick Auto Search | Write | Quick Auto Search on | 0x06 0x14 0x00 0x04 0x00 0x34 0x13 0x02 0x01 0x62 |
| Quick Auto Search off | 0x06 0x14 0x00 0x04 0x00 0x34 0x13 0x02 0x00 0x61 | ||
| Read | Quick Auto Search status | 0x07 0x14 0x00 0x05 0x00 0x34 0x00 0x00 0x13 0x02 0x62 | |
| Mute | Write | Mute on 0x06 | 0x14 0x00 0x04 0x00 0x34 0x14 0x00 0x01 0x61 |
| Mute off 0x06 | 0x14 0x00 0x04 0x00 0x34 0x14 0x00 0x00 0x60 | ||
| Read Mute status 0x07 0x14 0x00 0x05 0x00 0x34 0x00 0x00 0x14 0x00 0x61 | |||
| Volume | Write | Increase Volume | 0x06 0x14 0x00 0x04 0x00 0x34 0x14 0x01 0x00 0x61 |
| Decrease Volume | 0x06 0x14 0x00 0x04 0x00 0x34 0x14 0x02 0x00 0x62 | ||
| Read Volume 0x07 0x14 0x00 0x05 0x00 0x34 0x00 0x00 0x14 0x03 0x64 | |||
| Language | Write | ENGLISH | 0x06 0x14 0x00 0x04 0x00 0x34 0x15 0x00 0x00 0x61 |
| FRANÇAIS | 0x06 0x14 0x00 0x04 0x00 0x34 0x15 0x00 0x01 0x62 | ||
| DEUTSCH | 0x06 0x14 0x00 0x04 0x00 0x34 0x15 0x00 0x02 0x63 | ||
| ITALIANO | 0x06 0x14 0x00 0x04 0x00 0x34 0x15 0x00 0x03 0x64 | ||
| ESPAÑOL | 0x06 0x14 0x00 0x04 0x00 0x34 0x15 0x00 0x04 0x65 | ||
| PYCCKIЙ | 0x06 0x14 0x00 0x04 0x00 0x34 0x15 0x00 0x05 0x66 | ||
| 繁體中文 | 0x06 0x14 0x00 0x04 0x00 0x34 0x15 0x00 0x06 0x67 | ||
| 简体中文 | 0x06 0x14 0x00 0x04 0x00 0x34 0x15 0x00 0x07 0x68 | ||
| 日本語 | 0x06 0x14 0x00 0x04 0x00 0x34 0x15 0x00 0x08 0x69 | ||
| 한국어 | 0x06 0x14 0x00 0x04 0x00 0x34 0x15 0x00 0x09 0x6A | ||
| Svenska | 0x06 0x14 0x00 0x04 0x00 0x34 0x15 0x00 0x0a 0x6B | ||
| Nederlands | 0x06 0x14 0x00 0x04 0x00 0x34 0x15 0x00 0x0b 0x6C | ||
| Türkçe | 0x06 0x14 0x00 0x04 0x00 0x34 0x15 0x00 0x0c 0x6D | ||
| Čeština | 0x06 0x14 0x00 0x04 0x00 0x34 0x15 0x00 0x0d 0x6E | ||
| Português | 0x06 0x14 0x00 0x04 0x00 0x34 0x15 0x00 0x0e 0x6F | ||
| Tulsquin | 0x06 0x14 0x00 0x04 0x00 0x34 0x15 0x00 0x0f 0x70 | ||
| Polski | 0x06 0x14 0x00 0x04 0x00 0x34 0x15 0x00 0x10 0x71 | ||
| Suomi | 0x06 0x14 0x00 0x04 0x00 0x34 0x15 0x00 0x11 0x72 | ||
| العربية | 0x06 0x14 0x00 0x04 0x00 0x34 0x15 0x00 0x12 0x73 | ||
| Indonesian | 0x06 0x14 0x00 0x04 0x00 0x34 0x15 0x00 0x13 0x74 | ||
| हिन्दी | 0x06 0x14 0x00 0x04 0x00 0x34 0x15 0x00 0x14 0x75 | ||
| Read Language 0x07 0x14 | 0x00 0x05 0x00 0x34 0x00 0x00 0x15 0x00 0x62 | ||
| Lamp Time | Write | Reset Lamp usage hour | 0x06 0x14 0x00 0x04 0x00 0x34 0x15 0x01 0x00 0x62 |
| Read | Lamp usage hour | 0x07 0x14 0x00 0x05 0x00 0x34 0x00 0x00 0x15 0x01 0x63 | |
| HDMI Format | Write | RGB 0x06 0x14 0x00 0x04 0x00 0x34 0x11 0x28 0x00 0x85 | |
| YUV 0x06 0x14 0x00 0x04 0x00 0x34 0x11 0x28 0x01 0x86 | |||
| Auto 0x06 0x14 0x00 0x04 0x00 0x34 0x11 0x28 0x02 0x87 | |||
| Read | HDMI Format status 0x07 0x14 0x00 0x05 0x00 0x34 0x00 0x00 0x11 0x28 0x86 | ||
| HDMI Range | Write | Enhanced 0x06 0x14 0x00 0x04 0x00 0x34 0x11 0x29 0x00 0x86 | |
| Normal 0x06 0x14 0x00 0x04 0x00 0x34 0x11 0x29 0x01 0x87 | |||
| Auto 0x06 0x14 0x00 0x04 0x00 0x34 0x11 0x29 0x02 0x88 | |||
| Read | HDMI Range status 0x07 0x14 0x00 0x05 0x00 0x34 0x00 0x00 0x11 0x29 0x87 | ||
| CEC | Write | Off 0x06 0x14 0x00 0x04 0x00 0x34 0x11 0x2B 0x00 0x88 | |
| On 0x06 0x14 0x00 0x04 0x00 0x34 0x11 0x2B 0x01 0x89 | |||
| Read CEC status 0x07 0x14 0x00 0x05 0x00 0x34 0x00 0x00 0x11 0x2B 0x89 | |||
| Error status | Read | Read error status 0x07 0x14 0x00 0x05 0x00 0x34 0x00 0x00 0x0C 0x0D 0x66 | |
| Brilliant Color | Write | Brilliant Color 0 0x06 0x14 0x00 0x04 0x00 0x34 0x12 0x0F 0x00 0x6D | |
| Brilliant Color 1 0x06 0x14 0x00 0x04 0x00 0x34 0x12 0x0F 0x01 0x6E | |||
| Brilliant Color 2 0x06 0x14 0x00 0x04 0x00 0x34 0x12 0x0F 0x02 0x6F | |||
| Brilliant Color 3 0x06 0x14 0x00 0x04 0x00 0x34 0x12 0x0F 0x03 0x70 | |||
| Brilliant Color 4 0x06 0x14 0x00 0x04 0x00 0x34 0x12 0x0F 0x04 0x71 | |||
| Brilliant Color 5 0x06 0x14 0x00 0x04 0x00 0x34 0x12 0x0F 0x05 0x72 | |||
| Brilliant Color 6 0x06 0x14 0x00 0x04 0x00 0x34 0x12 0x0F 0x06 0x73 | |||
| Brilliant Color 7 0x06 0x14 0x00 0x04 0x00 0x34 0x12 0x0F 0x07 0x74 | |||
| Brilliant Color 8 0x06 0x14 0x00 0x04 0x00 0x34 0x12 0x0F 0x08 0x75 | |||
| Brilliant Color 9 0x06 0x14 0x00 0x04 0x00 0x34 0x12 0x0F 0x09 0x76 | |||
| Brilliant Color 10 0x06 0x14 0x00 0x04 0x00 0x34 0x12 0x0F 0x0A 0x77 | |||
| Read | Brilliant Color status 0x07 0x14 0x00 0x05 0x00 0x34 0x00 0x00 0x12 0x0F 0x6E | ||
| Remote Control code | Write | code 1 0x06 | 0x14 0x00 0x04 0x00 0x34 0x0C 0x48 0x00 0xA0 |
| code 2 0x06 | 0x14 0x00 0x04 0x00 0x34 0x0C 0x48 0x01 0xA1 | ||
| code 3 0x06 | 0x14 0x00 0x04 0x00 0x34 0x0C 0x48 0x02 0xA2 | ||
| code 4 0x06 | 0x14 0x00 0x04 0x00 0x34 0x0C 0x48 0x03 0xA3 | ||
| code 5 0x06 | 0x14 0x00 0x04 0x00 0x34 0x0C 0x48 0x04 0xA4 | ||
| code 6 0x06 | 0x14 0x00 0x04 0x00 0x34 0x0C 0x48 0x05 0xA5 | ||
| code 7 0x06 | 0x14 0x00 0x04 0x00 0x34 0x0C 0x48 0x06 0xA6 | ||
| code 8 0x06 | 0x14 0x00 0x04 0x00 0x34 0x0C 0x48 0x07 0xA7 | ||
| Read | Remote Control code status | 0x07 0x14 0x00 0x05 0x00 0x34 0x00 0x00 0x0C 0x048 0xA1 | |
| Screen Color | Write | Screen color Off | 0x06 0x14 0x00 0x04 0x00 0x34 0x11 0x32 0x00 0x8F |
| Blackboard 0x06 | 0x14 0x00 0x04 0x00 0x34 0x11 0x32 0x01 0x90 | ||
| Greenboard 0x06 | 0x14 0x00 0x04 0x00 0x34 0x11 0x32 0x02 0x91 | ||
| Whiteboard 0x06 | 0x14 0x00 0x04 0x00 0x34 0x11 0x32 0x03 0x92 | ||
| Read | Screen Color status | 0x07 0x14 0x00 0x05 0x00 0x34 0x00 0x00 0x11 0x32 0x90 | |
| Over Scan | Write | Overscan Off 0x06 | 0x14 0x00 0x04 0x00 0x34 0x11 0x33 0x00 0x90 |
| Overscan 1 0x06 | 0x14 0x00 0x04 0x00 0x34 0x11 0x33 0x01 0x91 | ||
| Overscan 2 0x06 | 0x14 0x00 0x04 0x00 0x34 0x11 0x33 0x02 0x92 | ||
| Overscan 3 0x06 | 0x14 0x00 0x04 0x00 0x34 0x11 0x33 0x03 0x93 | ||
| Overscan 4 0x06 | 0x14 0x00 0x04 0x00 0x34 0x11 0x33 0x04 0x94 | ||
| Overscan 5 0x06 | 0x14 0x00 0x04 0x00 0x34 0x11 0x33 0x05 0x95 | ||
| Read | Overscan status | 0x07 0x14 0x00 0x05 0x00 0x34 0x00 0x00 0x11 0x33 0x91 | |
| Remote Key | Write | Menu 0x02 0x14 0x00 0x04 0x00 0x34 0x02 0x04 0x0F 0x61 | |
| Exit 0x02 0x14 0x00 0x04 0x00 0x34 0x02 0x04 0x13 0x65 | |||
| Up 0x02 0x14 0x00 0x04 0x00 0x34 0x02 0x04 0x0B 0x5D | |||
| Down 0x02 0x14 0x00 0x04 0x00 0x34 0x02 0x04 0x0C 0x5E | |||
| Left 0x02 0x14 0x00 0x04 0x00 0x34 0x02 0x04 0x0D 0x5F | |||
| Right 0x02 0x14 0x00 0x04 0x00 0x34 0x02 0x04 0x0E 0x60 | |||
| Source 0x02 0x14 0x00 0x04 0x00 0x34 0x02 0x04 0x04 0x56 | |||
| Enter 0x02 0x14 0x00 0x04 0x00 0x34 0x02 0x04 0x15 0x67 | |||
| Auto 0x02 0x14 0x00 0x04 0x00 0x34 0x02 0x04 0x08 0x5A | |||
| My Button 0x02 0x14 0x00 0x04 0x00 0x34 0x02 0x04 0x11 0x63 | |||
Customer Support
For technical support or product service, see the table below or contact your reseller.
Note : You will need the product serial number.
| Country/Region Website | T= TelephoneC = CHAT ONLINE | ||
| AustraliaNew Zealand | www.viewsonic.com.au | AUS= 1800 880 818NZ= 0800 008 822 | service@au.viewsonic.com |
| Canada www.viewsonic.com | T (Toll-Free)= 1-866-463-4775T (Toll)= 1-424-233-2533 | service.ca@viewsonic.com | |
| Europe www.viewsoniceurope.com www.viewsoniceurope.com/uk/support/call-desk/ | |||
| Hong Kong www.hk.viewsonic.com T= 852 3102 | 2900 service@hk.viewsonic.com | ||
| India www.in.viewsonic.com T= 1800 419 0959 service@in.viewsonic.com | |||
| Korea ap.viewsonic.com/kr/ T= 080 333 2131 service@kr.viewsonic.com | |||
| Latin America(Argentina) | www.viewsonic.com/la/ | C= http://www.viewsonic.com/la/soporte/servicio-tecnico | soporte@viewsonic.com |
| Latin America(Chile) | www.viewsonic.com/la/ | C= http://www.viewsonic.com/la/soporte/servicio-tecnico | soporte@viewsonic.com |
| Latin America(Columbia) | www.viewsonic.com/la/ | C= http://www.viewsonic.com/la/soporte/servicio-tecnico | soporte@viewsonic.com |
| Latin America(Mexico) | www.viewsonic.com/la/ | C= http://www.viewsonic.com/la/soporte/servicio-tecnico | soporte@viewsonic.com |
| Nexus Hightech Solutions, Cincinnati #40 Desp. 1 Col. De los Deportes Mexico D.F.Tel: 55) 6547-6454 55)6547-6484Other places please refer to http://www.viewsonic.com/la/soporte/servicio-tecnico#mexico | |||
| Latin America(Peru) | www.viewsonic.com/la/ | C= http://www.viewsonic.com/la/soporte/servicio-tecnico | soporte@viewsonic.com |
| Macau www.hk.viewsonic.com T= 853 2870 0303 service@hk.viewsonic.com | |||
| Middle East | ap.viewsonic.com/me/ | Contact your reseller | service@ap.viewsonic.com |
| Puerto Rico &Virgin Islands | www.viewsonic.com | T= 1-800-688-6688 (English)C= http://www.viewsonic.com/la/soporte/servicio-tecnico | service.us@viewsonic.comsoporte@viewsonic.com |
| Singapore/Malaysia/Thailand | www.ap.viewsonic.com | T= 65 6461 6044 service@sg.viewsonic.com | |
| South Africa | ap.viewsonic.com/za/ | Contact your reseller | service@ap.viewsonic.com |
| United States | www.viewsonic.com | T (Toll-Free)= 1-800-688-6688T (Toll)= 1-424-233-2530 | service.us@viewsonic.com |
Manual
natural_image
Illustration of two people in speech bubbles, one gesturing with a question mark above the other (no text or symbols present)¿Necesitas ayuda?
- For information about receiving service under warranty, contact ViewSonic Customer Support (please refer to "Customer Support" page). You will need to provide your product's serial number.
- To obtain warranted service, you will be required to provide (a) the original dated sales slip, (b) your name, (c) your address, (d) a description of the problem, and (e) the serial number of the product.
- Take or ship the product freight prepaid in the original container to an authorized ViewSonic service center or ViewSonic.
- For additional information or the name of the nearest ViewSonic service center, contact ViewSonic.
Limitation of implied warranties:
There are no warranties, express or implied, which extend beyond the description contained herein including the implied warranty of merchantability and fitness for a particular purpose.
Exclusion of damages:
ViewSonic's liability is limited to the cost of repair or replacement of the product. ViewSonic shall not be liable for:
- Damage to other property caused by any defects in the product, damages based upon inconvenience, loss of use of the product, loss of time, loss of profits, loss of business opportunity, loss of goodwill, interference with business relationships, or other commercial loss, even if advised of the possibility of such damages.
- Any other damages, whether incidental, consequential or otherwise.
- Any claim against the customer by any other party.
Effect of local law:
This warranty gives you specific legal rights, and you may also have other rights which vary from local authority. Some local governances do not allow limitations on implied warranties and/or do not allow the exclusion of incidental or consequential damages, so the above limitations and exclusions may not apply to you.
Sales outside the U.S.A. and Canada:
For warranty information and service on ViewSonic products sold outside of the U.S.A. and Canada, contact ViewSonic or your local ViewSonic dealer. The warranty period for this product in mainland China (Hong Kong, Macao and Taiwan Excluded) is subject to the terms and conditions of the Maintenance Guarantee Card.
For users in Europe and Russia, full details of warranty provided can be found in www.viewsoniceurope.com under Support/Warranty Information.
Projector Warranty Term Template In UG
VSC_TEMP_2005
Mexico Limited Warranty
ViewSonic ^® Projector
What the warranty covers:
ViewSonic warrants its products to be free from defects in material and workmanship, under normal use, during the warranty period. If a product proves to be defective in material or workmanship during the warranty period, ViewSonic will, at its sole option, repair or replace the product with a like product. Replacement product or parts may include remanufactured or refurbished parts or components & accessories.
How long the warranty is effective:
ViewSonic's standard warranty period is one (1) year for any product model in any country, unless a longer warranty period is specified and provided by ViewSonic. Please refer to the ViewSonic website in your country to check the local terms and model variants, and see if the product model in your country is eligible for a longer warranty period.
Who the warranty protects:
This warranty is valid only for the first consumer purchaser.
What the warranty does not cover:
- Any product on which the serial number has been defaced, modified or removed.
- Damage, deterioration or malfunction resulting from:
a. Accident, misuse, neglect, fire, water, lightning, or other acts of nature, unauthorized product modification, unauthorized attempted repair, or failure to follow instructions supplied with the product.
b. Any damage of the product due to shipment.
c. Causes external to the product, such as electrical power fluctuations or failure.
d. Use of supplies or parts not meeting ViewSonic's specifications.
e. Normal wear and tear.
f. Any other cause which does not relate to a product defect.
- Any product exhibiting a condition commonly known as "image burn-in" which results when a static image is displayed on the product for an extended period of time.
- Removal, installation, insurance, and set-up service charges.
How to get service:
For information about receiving service under warranty, contact ViewSonic Customer Support (Please refer to the attached Customer Support page). You will need to provide your product's serial number, so please record the product information in the space provided below on your purchase for your future use. Please retain your receipt of proof of purchase to support your warranty claim.
For Your Records
Product Name: ____ Model Number: ____
Document Number: Serial Number:
Purchase Date: ____ Extended Warranty Purchase? ____(Y/N)
If so, what date does warranty expire?
- To obtain warranty service, you will be required to provide (a) the original dated sales slip, (b) your name, (c) your address, (d) a description of the problem, and (e) the serial number of the product.
- Take or ship the product in the original container packaging to an authorized ViewSonic service center.
- Round trip transportation costs for in-warranty products will be paid by ViewSonic.
Limitation of implied warranties:
There are no warranties, express or implied, which extend beyond the description contained herein including the implied warranty of merchantability and fitness for a particular purpose.
Exclusion of damages:
ViewSonic's liability is limited to the cost of repair or replacement of the product. ViewSonic shall not be liable for:
- Damage to other property caused by any defects in the product, damages based upon inconvenience, loss of use of the product, loss of time, loss of profits, loss of business opportunity, loss of goodwill, interference with business relationships, or other commercial loss, even if advised of the possibility of such damages.
- Any other damages, whether incidental, consequential or otherwise.
- Any claim against the customer by any other party.
- Repair or attempted repair by anyone not authorized by ViewSonic.
| Contact Information for Sales & Authorized Service (Centro Autorizado de Servicio) within Mexico: | |
| Name, address, of manufacturer and importers:México, Av. de la Palma #8 Piso 2 Despacho 203, Corporativo Interpalmas,Col. San Fernando Huixquilucan, Estado de MéxicoTel: (55) 3605-1099 http://www.viewsonic.com/la/soporte/index.htm | |
| NÚMERO GRATIS DE ASISTENCIA TÉCNICA PARA TODO MÉXICO: 001.866.823.2004 | |
| Hermosillo:Distribuciones y Servicios Computacionales SA de CV.Calle Juarez 284 local 2Col. Bugambilas C.P: 83140Tel: 01-66-22-14-9005E-Mail: disc2@hmo.megared.net.mx | Villahermosa:Compumantenimietnos Garantizados, S.A. de C.V.AV. GREGORIO MENDEZ #1504COL, FLORIDA C.P. 86040Tel: 01 (993) 3 52 00 47 / 3522074 / 3 52 20 09E-Mail: compumantenimientos@prodigy.net.mx |
| Puebla, Pue. (Matriz):RENTA Y DATOS, S.A. DE C.V. Domicilio:29 SUR 721 COL. LA PAZ72160 PUEBLA, PUE.Tel: 01(52).222.891.55.77 CON 10 LINEASE-Mail: datos@puebla.megared.net.mx | Veracruz, Ver.:CONEXION Y DESARROLLO, S.A DE C.V. Av. Americas # 419ENTRE PINZÓN Y ALVARADOFracc. Reforma C.P. 91919Tel: 01-22-91-00-31-67E-Mail: gacosta@qplus.com.mx |
| ChihuahuaSoluciones Globales en ComputaciónC. Magisterio # 3321 Col. MagisterialChihuahua, Chih.Tel: 4136954E-Mail: Cefeo@soluglobales.com | CuernavacaCompusupport de Cuernavaca SA de CVFrancisco Leyva # 178 Col. Miguel HidalgoC.P. 62040, Cuernavaca MorelosTel: 01 777 3180579 / 01 777 3124014E-Mail: aquevedo@compusupportcva.com |
| Distrito Federal:QPLUS, S.A. de C.V.Av. Coyoacán 931Col. Del Valle 03100, México, D.F.Tel: 01(52)55-50-00-27-35E-Mail : gacosta@qplus.com.mx | Guadalajara, Jal.:SERVICRECE, S.A. de C.V.Av. Niños Héroes # 2281Col. Arcos Sur, Sector Juárez44170, Guadalajara, JaliscoTel: 01(52)33-36-15-15-43E-Mail: mmiranda@servicrece.com |
| Guerrero AcapulcoGS Computación (Grupo Sesicomp)Progreso #6-A, Colo Centro39300 Acapulco, GuerreroTel: 744-48-32627 | Monterrey:Global Product ServicesMar Caribe # 1987, Esquina con Golfo PérsicoFracc. Bernardo Reyes, CP 64280Monterrey N.L. MéxicoTel: 8129-5103E-Mail: aydeem@gps1.com.mx |
| MERIDA:ELECTROSERAv Reforma No. 403Gx39 y 41Mérida, Yucatán, México CP97000Tel: (52) 999-925-1916E-Mail: rrrb@sureste.com | Oaxaca, Oax.:CENTRO DE DISTRIBUCION YSERVICIO, S.A. de C.V.Murguía # 708 P.A., Col. Centro, 68000, OaxacaTel: 01(52)95-15-15-22-22Fax: 01(52)95-15-13-67-00E-Mail. gpotai2001@hotmail.com |
| Tijuana:STDAv Ferrocarril Sonora #3780 L-CCol 20 de NoviembreTijuana, Mexico | FOR USA SUPPORT:ViewSonic Corporation14035 Pipeline Ave. Chino, CA 91710, USATel: 800-688-6688 (English); 866-323-8056 (Spanish);E-Mail: http://www.viewsonic.com |
Projector Mexico Warranty Term Template In UG
VSC_TEMP_2006

natural_image
Illustration of three colorful bird perched on a green surface against a red background (no text or symbols)ViewSonic®

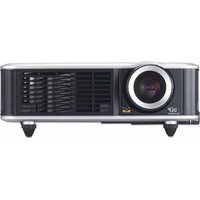
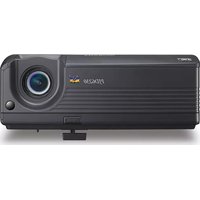
- Compliance Information
- FCC Statement
- For Canada
- CE Conformity for European Countries
- Following information is only for EU-member states:
- Important Safety Instructions
- Declaration of RoHS2 Compliance
- Copyright Information
- Product Registration
- For Your Records
- Product disposal at end of product life
- Important safety instructions ......2
- Introduction......4
- Positioning your projector......12
- Connection ......16
- Operation ......22
- Maintenance ....59
- Troubleshooting ......64
- Specifications ......65
- Copyright information...72
- Appendix......73
- Safety Instructions
- Safety instructions for ceiling mounting of the projector
- Projector features
- Shipping contents
- Standard accessories
- Optional accessories
- Projector exterior view
- Warning
- Controls and functions Projector
- Focus ring
- Zoom ring
- Menu
- Exit
- / / / (Keystone keys)
- Power
- Source
- Enter
- (MyButton)
- (Power indicator light)
- (Temperature indicator light)
- (Lamp indicator light)
- Color Mode
- / (Keystone keys)
- Left
- Blank
- Right
- (Panel Key Lock)
- Remote control
- Power
- Source selection keys
- • COMP1/COMP2
- • HDMI
- Auto Sync
- Enter
- Menu
- (Left mouse button)
- (Right mouse button)
- Mouse
- (Panel Key Lock)
- (Presentation Timer)
- (Volume)
- Eco Mode
- LED indicator
- (My Button)
- Source
- Laser
- Exit
- PgUp (Page Up)/PgDn (Page Down)
- Pattern
- Blank
- (Help)
- (Mute)
- (Zoom)
- Color Mode
- Audio Mode
- 27.3D
- (Volume Up)
- (Volume Down)
- Operating the LASER pointer
- Remote control code
- Using the remote mouse control
- Remote control effective range
- Replacing the remote control batteries
- Choosing a location
- Front Table
- Front Ceiling
- Rear Ceiling
- Rear Table
- Projection dimensions
- PJD6252L/PJD7326
- PJD6551W/PJD7526W
- PJD7720HD
- Connecting a computer or monitor
- Connecting a computer
- Connecting a monitor
- Connecting Video source devices
- Best video quality
- Better video quality
- Least video quality
- Connecting audio
- Connecting an HDMI device
- Connecting a Component Video source device
- Connecting an S-Video source device
- Connecting a composite Video source device
- Playing sound through the projector
- About the microphone input
- Using the cable management cover (for selected models)
- Starting up the projector
- Using the menus
- Utilizing the password function
- Setting a password
- If you forget the password
- Entering the password recall procedure
- Changing the password
- Disabling the password function
- Switching input signal
- Changing HDMI input settings
- Adjusting the projected image
- Adjusting the projection angle
- Auto-adjusting the image
- Fine-tuning the image clarity
- Correcting keystone
- For PJD6252L/PJD6551W/PJD7720HD:
- For PJD7326/PJD7526W:
- Adjusting 4 corners (PJD7326/PJD7526W)
- Magnifying and searching for details
- Selecting the aspect ratio
- About the aspect ratio
- Optimizing the image
- Selecting a picture mode
- Picture modes for different types of signals
- Using Screen Color
- Fine-tuning the image quality in user modes
- Adjusting Brightness
- Adjusting Contrast
- Adjusting Color
- Adjusting Tint
- Adjusting Sharpness
- Adjusting Brilliant Color
- Reducing image noise
- Selecting a gamma setting
- Selecting a Color Temperature
- Setting a preferred color temperature
- Color Management
- To adjust the settings:
- Setting the presentation timer
- To cancel the timer, perform the following steps:
- Hiding the image
- CAUTION
- Locking control keys
- Creating your own startup screen
- Operating in a high altitude environment
- Using the CEC function
- Using the 3D functions
- Controlling the projector through a LAN environment (for selected models)
- Configuring the LAN Control Settings
- If you are in a DHCP environment:
- If you are in a non-DHCP environment:
- Controlling the projector through a web browser
- About Crestron e-Control®
- \*\*Crestron RoomView
- PJLink™, SNMP, AMX and Xpanel formats supported
- Using the projector in standby mode
- Active VGA Out (for selected models)
- Active Audio Out
- LAN Control (for selected models)
- Adjusting the sound
- Adjusting the audio mode
- Muting the sound
- Adjusting the sound level
- Adjusting the Audio In 2 setting (for selected models)
- Adjusting the microphone sound level
- Turning off the Power On/Off Ring Tone
- Shutting down the projector
- Menu operation
- Menu system
- Description of each menu
- Care of the projector
- Cleaning the lens
- Cleaning the projector case
- Storing the projector
- Transporting the projector
- Using the dust filter (optional accessory)
- Installing the dust filter
- For first time installation:
- Obtaining the filter hour information
- Cleaning the dust filter
- Resetting the filter timer
- Lamp information
- Getting to know the lamp hour
- Extending lamp life
- Setting Lamp Mode as Eco
- Setting Auto Power Off
- Setting Sleep Timer
- Setting Power Saving
- Timing of replacing the lamp
- Replacing the lamp
- Type number:
- Projector specifications
- Dimensions
- Ceiling mount installation
- Tripod mount installation
- Copyright
- Disclaimer
- RS232 command table
- Customer Support
- Manual
- ¿Necesitas ayuda?
- Limitation of implied warranties:
- Exclusion of damages:
- Effect of local law:
- Sales outside the U.S.A. and Canada:
- Mexico Limited Warranty
- ViewSonic ® Projector
- What the warranty covers:
- How long the warranty is effective:
- Who the warranty protects:
- What the warranty does not cover:
- How to get service:
Brand : VIEWSONIC
Model : PJD6551W
Category : Video projector