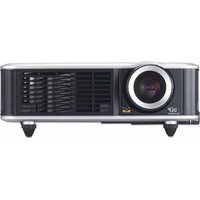
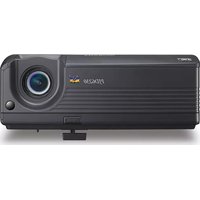
Cine5000 - Video projector VIEWSONIC - Free user manual and instructions
Find the device manual for free Cine5000 VIEWSONIC in PDF.


| Product Type | DLP Video Projector |
| Model | ViewSonic Cine5000 |
| Display Technology | 0.65" DMD |
| Native Resolution | 1280 x 768 |
| Brightness Modes | 250W Boost (2000h lamp life) / 200W Eco (3000h lamp life) |
| Projection Lens | Manual zoom and focus, 1.2:1 zoom ratio, 100% lens offset |
| Image Size | 33" - 255" diagonal |
| Throw Distance | 1.5m - 10m |
| Keystone Correction | Vertical ±16°, Horizontal ±7° |
| Color System Support | NTSC, PAL, SECAM, NTSC4.43 |
| PC Compatibility | VGA, SVGA, XGA, SXGA, Mac |
| Video Input Ports | HDMI (1), VGA (D-Sub 15-pin), S-Video, Composite, Component (YPbPr/YCbCr), Audio L/R, 12V Trigger Out |
| Audio | Built-in 2W mono speaker |
| Security | Kensington Lock slot |
| Power Supply | 100-240V AC, 50-60Hz, 330W max consumption |
| Dimensions (W x D x H) | 333 x 295 x 123 mm |
| Weight | 4.5 kg (10 lbs) |
| Lamp Type | 250W P-VIP (user-replaceable, cartridge design) |
| Lamp Life | 2000h in Boost mode, 3000h in Eco mode |
| Operating Temperature | 5°C to 35°C |
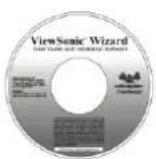
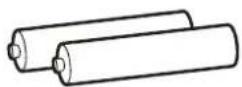
| Accessories Included | Remote control (with batteries), power cord, VGA cable, component video cable, audio cable, soft carry bag, CD wizard, user manual |
Frequently Asked Questions - Cine5000 VIEWSONIC
User questions about Cine5000 VIEWSONIC
0 question about this device. Answer the ones you know or ask your own.
Ask a new question about this device
Download the instructions for your Video projector in PDF format for free! Find your manual Cine5000 - VIEWSONIC and take your electronic device back in hand. On this page are published all the documents necessary for the use of your device. Cine5000 by VIEWSONIC.
USER MANUAL Cine5000 VIEWSONIC
Cine5000 DLP Projector
- User Guide
- Guide de l'utilisateur
- Bedienungsanleitung
- Guía del usuario
- Guida dell'utente
- Guia do usuário
- Användarhandbok
- Käyttöopas
- Руководство пользователя
- 使用手册
- 使用手册
Compliance Information
For U.S.A.
This device complies with part 15 of the FCC Rules. Operation is subject to the following two conditions: (1) The device may not cause harmful interference, and (2) this device must accept any interference received, including interference that may cause undesired operation.
This equipment has been tested and found to comply with the limits for a Class B digital device, pursuant to part 15 of the FCC Rules. These limits are designed to provide reasonable protection against harmful interference in a residential installation. This equipment generates, uses, and can radiate radio frequency energy, and if not installed and used in accordance with the instructions, may cause harmful interference to radio communications. However, there is no guarantee that interference will not occur in a particular installation. If this equipment does cause harmful interference to radio or television reception, which can be determined by turning the equipment off and on, the user is encouraged to try to correct the interference by one or more of the following measures:
- Reorient or relocate the receiving antenna.
- Increase the separation between the equipment and receiver.
- Connect the equipment into an outlet on a circuit different from that to which the receiver is connected.
- Consult the dealer or an experienced radio/TV technician for help.
FCC Warning
To assure continued FCC compliance, the user must use grounded power supply cord and the cables which are included with the equipment or specified. Also, any unauthorized changes or modifications not expressly approved by the party responsible for compliance could void the user's authority to operate this device.
For Canada
For European Countries
CE Conformity

The device complies with the requirements of the EEC directive 89/336/EEC as amended by 92/31/EEC and 93/68/EEC Art.5 with regard to “Electromagnetic compaty”, and 73/23/EEC as amended by 93/68/EEC Art.13 with regard to “Safety.”
User Information for all Countries
Notice: Use the cables which are included with the unit or specified.
Following information is only for EU-member states:
The mark shown to the right is in compliance with the Waste Electrical and Electronic Equipment Directive 2002/96/EC (WEEE).

The mark indicates the requirement NOT to dispose the equipment as unsorted municipal waste, but use the return and collection systems according to local law.
Important Safety Instructions
-
Read these instructions completely before using the equipment.
-
Keep these instructions in a safe place.
-
Heed all warnings.
-
Follow all instructions.
-
Do not use this equipment near water. Warning: To reduce the risk of fire or electric shock, do not expose this apparatus to rain or moisture.
-
Clean with a soft, dry cloth. If further cleaning is required, see “Cleaning the Display” in this guide for further instructions.
-
Do not block any ventilation openings. Install the equipment in accordance with the manufacturer's instructions.
-
Do not install near any heat sources such as radiators, heat registers, stoves, or other devices (including amplifiers) that produce heat.
-
Do not attempt to circumvent the safety provisions of the polarized or grounding-type plug. A polarized plug has two blades with one wider than the other. A grounding type plug has two blades and a third grounding prong. The wide blade and the third prong are provided for your safety. If the plug does not fit into your outlet, consult an electrician for replacement of the outlet.
-
Protect the power cord from being tread upon or pinched, particularly at the plug, and the point where if emerges from the equipment. Be sure that the power outlet is located near the equipment so that it is easily accessible.
-
Only use attachments/accessories specified by the manufacturer.
-
Use only with the cart, stand, tripod, bracket, or table specified by the manufacturer, or sold with the equipment. When a cart is used, use caution when moving the cart/equipment combination to avoid injury from tipping over.

-
Unplug this equipment when it will be unused for long periods of time.
-
Refer all servicing to qualified service personnel. Service is required when the unit has been damaged in any way, such as: if the power-supply cord or plug is damaged, if liquid is spilled onto or objects fall into the unit, if the unit is exposed to rain or moisture, or if the unit does not operate normally or has been dropped.
Copyright Information
Copyright © ViewSonic® Corporation, 2006. All rights reserved.
Macintosh and Power Macintosh are registered trademarks of Apple Computer, Inc.
Microsoft, Windows, Windows NT, and the Windows logo are registered trademarks of Microsoft Corporation in the United States and other countries.
ViewSonic, the three birds' logo, OnView, ViewMatch, and ViewMeter are registered trademarks of ViewSonic Corporation.
VESA is a registered trademark of the Video Electronics Standards Association. DPMS and DDC are trademarks of VESA.
PS/2, VGA and XGA are registered trademarks of International Business Machines Corporation.
Disclaimer: ViewSonic Corporation shall not be liable for technical or editorial errors or omissions contained herein; nor for incidental or consequential damages resulting from furnishing this material, or the performance or use of this product.
In the interest of continuing product improvement, ViewSonic Corporation reserves the right to change product specifications without notice. Information in this document may change without notice.
No part of this document may be copied, reproduced, or transmitted by any means, for any purpose without prior written permission from ViewSonic Corporation.
Product Registration
To meet your future needs, and to receive any additional product information as it becomes available, please register your product on the Internet at: www.viewsonic.com. The ViewSonic ^® Wizard CD-ROM also provides an opportunity for you to print the registration form, which you may mail or fax to ViewSonic.
For Your Records
Product Name:
Cine5000
ViewSonic DLP Projector
Model Number:
VS11481
Document Number:
Cine5000-1_UG_ENG Rev. 1A 08-10-06
Serial Number:
Purchase Date:

The lamp in this product contains mercury.
Please dispose of in accordance with local, state or federal laws.
1. Product Overview 4
1-1 Features 4
1-2 Package Contents 4
1-3 Main Unit 5
1-4 Control Panel 6
1-5 Rear Terminals 6
2. Installation 7
2-1 Turning on/off the projector 7
2-1-1 Starting up the projector 7
2-1-2 Shutting down the projector 7
2-1-3 LED Indication Status 7
2-2 Adjusting the Projector Image 8
2-2-1 Adjusting the Projected Height 8
2-2-2 Adjusting the Zoom and Focus 8
2-2-3 Adjusting the Projected Image Size 8
2-3 Operation 8
2-3-1 Connecting to a Personal Computer 8
3. Control Panel and Remote Control 9
3-1 Control Panel and Remote Control 9
3-1-1 Using Control Panel 9
3-1-2 Using the Remote Control 9
3-2 On-Screen Display Menu 10
3-2-1 How to Operate 10
3-2-2 Projector's OSD 10
4. Appendices 12
4-1 Troubleshooting 12
4-2 Maintenance 12
4-2-1 Replacing the Lamp 12
4-2-2 Cleaning the Projector 13
4-3 Specifications 14
1-1 FEATURES
◆ 250 W P-VIP lamp. Life 2000hrs at Boost mode, 3000hrs in Eco mode (200W).
◆ High efficiency cooling system with low system acoustic noise level.
◆ Lamp is easily replaceable by user.
◆ Manual zoom and focus lens with a 1:1.2 zoom ratio and 100% lens offset.
◆ 33" to 255" diagonal image size.
◆ 16.7million true colors.
PC compatibility: VGA / SVGA / XGA / SXGA / MAC.
◆ Video compatibility: NTSC / PAL / SECAM / Composite / S-video / Component (YPbPr / YCbCr) / SDTV (480i) / EDTV (480p) / HDTV (576i, 576p, 720p, 1035i, 1080i).
◆ Auto image synchronization (auto-tracking / frequency / position adjustment / source detect).
◆ Automatically saves adjustments for future use.
◆ On-screen menu with a choice of 8 languages.
Built-in 2W x 1 speaker
◆ Self-protection timer prevents hot re-strike of compact P-VIP lamp.
◆ Security feature: Kensington Lock.
1-2.PACKAGE CONTENTS
◆ Projector x 1
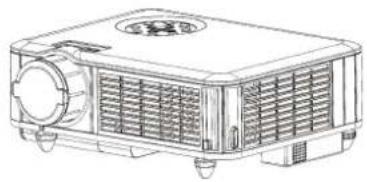
natural_image
Line drawing of a projector with ventilation grilles and fan (no text or symbols)PC Audio Cable x 1
◆ Component Video Cable x 1
natural_image
Coiled black cable with multiple connectors, no text or symbols visible◆ Owner's Manual x1

◆ Soft Carry Bag x 1

◆ CD Wiazrd x 1
Power Cord (US/EU)

natural_image
Pure electrical circuit lines without any symbols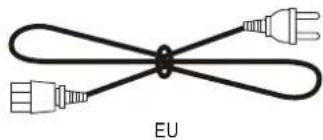
natural_image
Pure electrical circuit lines without any symbols◆ AAA Batteries x 2
◆ Remote Control x 1
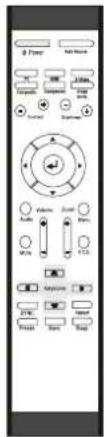
1-3.MAIN UNIT
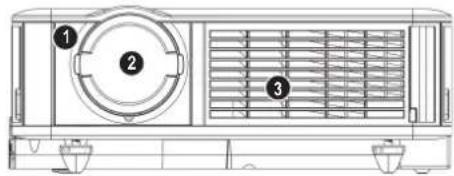
DRAWING 1
1 IR Receiver (Front)
2 Projection Lens
3 Hot Air Exhaust
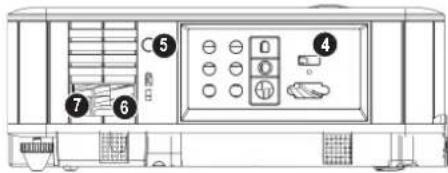
DRAWING 2
4 I/O Connection Panel
5 IR Receiver (Back)
6 AC Power Inlet
7 Power Switch

natural_image
Technical line drawing of a mechanical component with ventilation grilles and a numbered label (8), no readable text or symbols present.DRAWING 3
8 Elevator Button

natural_image
Technical line drawing of a device casing with numbered components (no text or symbols)DRAWING 4
9 Focus Ring
10 Zoom Ring
11 Control Panel
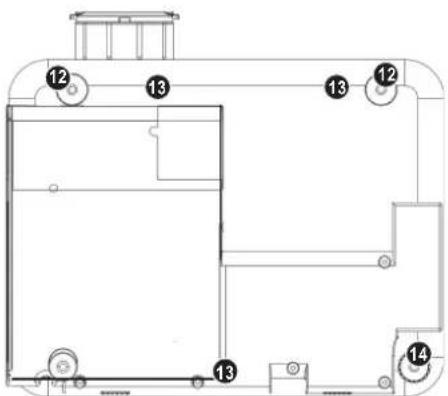
DRAWING 5
12 Elevator Feet
13 Ceiling Mount Screw Holes
14 Adjustable Foot
1-4.CONTROL PANEL
flowchart
graph TD
    A["Menu"] --> B["Source"]
    C["Vol+"] --> D["Vol-"]
    E["Power"] --> F["Boost"]
    G["Thermal"] --> H["Service"]
    I["Aspect"] --> J["Service"]
    K["Keystone"] --> L["Service"]
    M["Service"] --> N["Service"]
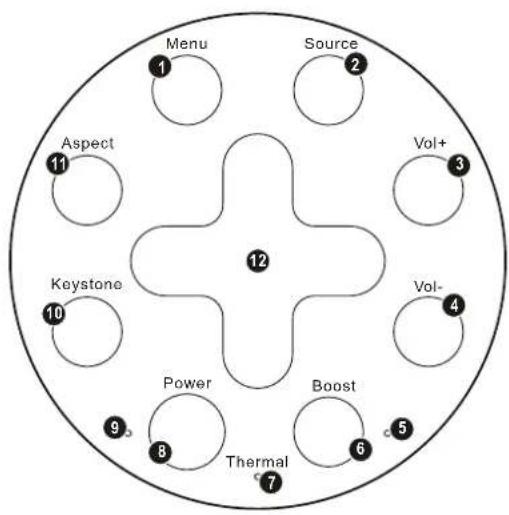
DRAWING 6
1-5. REAR TERMINALS
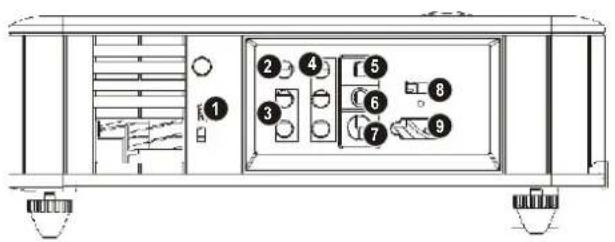
DRAWING 7
1 Menu
2 Source
3 Vol+
4 Vol-
5 Boost Mode Indicator
6 Boost
7 Thermal Indicator
8 Power
9 Power Indicator
10 Keystone
11 Aspect
12 Cursor
1 Kensington Lock
2 Composite Video Input
3 Audio Input (R / L)
4 Component Video Input
5 Trigger for Screen Relay (12V)
6 Audio Output
7 S-Video Input
8 HDMI Input
9 VGA Input
2-1.TURNING ON/OFF THE PROJECTOR
2-1-1. STARTING UP THE PROJECTOR
-
Ensure that the supplied power cord is securely connected at the AC inlet of the projector (Drawing 8) and power outlet.
-
Remove the lens cap.
-
Turn on the power switch. Ensure the "Power" indicator on the Control Panel is flashing blue, indicating the projector is in Standby mode.
-
Turn on the Lamp by pressing the "Power" button on the Control Panel or the "Power" button on the Remote Control. Ensure that the "Power" indicator is continuous blue, indicating the projector is on.
-
The start-up screen appears on the screen and starts to count down for 10 seconds.
-
The projector will detect the input source automatically.
-
Play your source device.

Power switch AC inlet
DRAWING 8
2-1-2.SHUTTING DOWN THE PROJECTOR
- Turn off your source device first.
-
Press the "Power" button on the Control Panel or press the "Power" button on Remote Control, and a message "Power off the projector?" will show on the screen.
-
Promptly press the "Power" button again to confirm turning off the projector. Otherwise the message will disappear after 5 seconds.
-
The projector will begin a 100 seconds cooling down phase. Note: Please don't turn off the power switch or disconnect the power cord during the cooling down period.
-
When the projector has cooled down, the "Power" indicator on the Control Panel will be flashing blue, indicating the projector is in Standby mode.
-
Turn off the power switch. Replace the lens cap.
-
Disconnect the power cord from the AC inlet of the projector and power outlet.
2-1-3.LED INDICATION STATUS
| Condition | Power Indicator | Thermal Indicator | Normal/Boost Indicator | Note |
| 1. Standby | Flashing Blue(1sec interval) | - | Green | Waiting for power on |
| 2. Operating | Blue | - | - | Normal operation |
| 3. Cooling | Blue | - | - | Cool lamp down for 100 sec |
| 4. Boost Mode in Use | Blue | - | Green | Boost mode is being used |
| 5. Fan Failure | Blue | Red(0.5sec interval) | - | Fan failure.There is a warning message displayed on the screen then the projector will turn itself off. |
| 6. Overheating | Blue | Red(0.5sec interval) | - | Overheating in the projector:There is a warning message displayed on the screen then the projector will power itself off. |
| 7. Overheating While Starting | Blue | Red(0.5sec interval) | - | The system will cool itself down for 8 sec automatically. |
| 8. Lamp Cover Open | - | Red | - | If the lamp cover is not properly seated after changing a new lamp, the power can't be turned on. |
2-2.ADJUSTING THE PROJECTED IMAGE
2-2-1. ADJUSTING THE PROJECTED HEIGHT
- Press the Elevator buttons. (Drawing 3)
- Raise the projector to the desired display angle, allowing the legs to extend, release the buttons to lock them in position.
- Use the Adjustable foot (Drawing 5) at the rear of the unit to fine-tune the display angle.
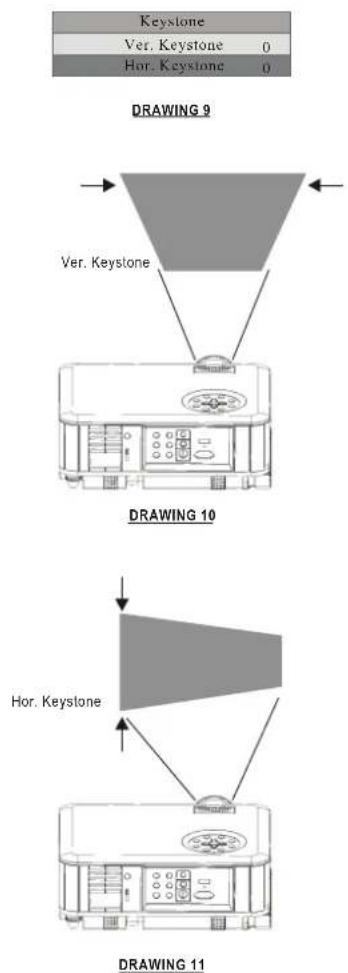
- Use the "Keystone" button on the Remote Control or in the projector's OSD to correct any distortion caused by tilting the projector.
- There are two adjustable directions shown on the screen, one is vertical keystone correction, the other is horizontal keystone correction; use the cursor buttons to select the Vertical or Horizontal Keystone correction. (Drawing 10 and Drawing 11) Press "Right" cursor for increasing the value. Press "Left" cursor for decreasing the value. (Drawing 9)
2-2-2.ADJUSTING THE ZOOM and FOCUS
Rotate the Zoom ring to adjust the image size. Rotate the Focus ring to focus the image. The projector will focus at distances from 1.5m (60in. / 5 ft.) to 10m (394 in. / 32.9 ft.). The optimum distance is from 1.5 m to 5 m (197 in. / 16.5 ft.).
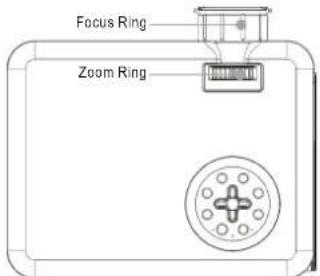
DRAWING 12
2-2-3.ADJUSTING THE PROJECTED IMAGE SIZE
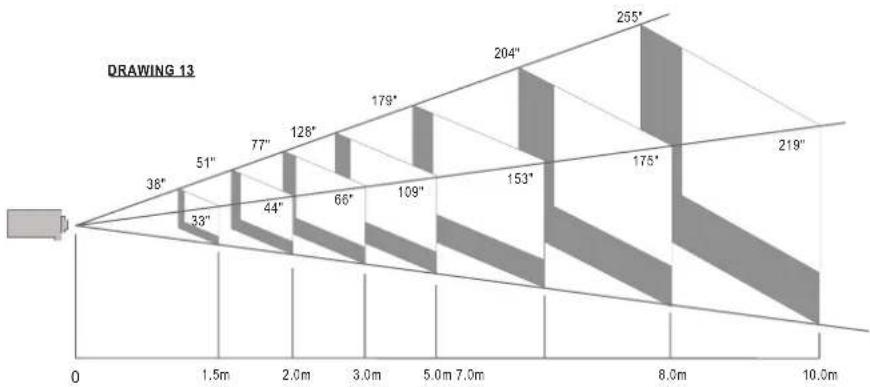
| Distance To Screen (Meter/Inch) | 1.5/60 | 2.0/79 | 3.0/118 | 5.0/197 | 7.0/276 | 8.0/315 | 10.0/394 |
| Max. Screen Diagonal (Meter/Inch) | 0.98/38 | 1.30/51 | 1.94/77 | 3.24/128 | 4.54/179 | 5.18/204 | 6.48/255 |
| Min. Screen Diagonal (Meter/Inch) | 0.83/33 | 1.11/44 | 1.67/66 | 2.78/109 | 3.89/153 | 4.44/175 | 5.55/219 |
2-3. OPERATION
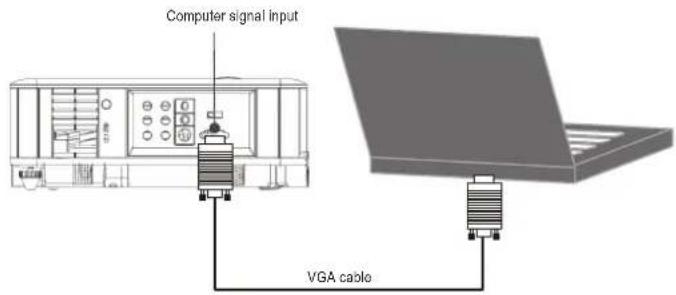
2-3-1. CONNECTING TO A PERSONAL COMPUTER
Connecting to a Notebook
- Use the cable to connect your Notebook to the projector. (Drawing 14)
- Press the "Monitor Output" function key of your Notebook.(Fn+
- The projector will automatically detect the source. If not, please press the "Source" button on the Control Panel of the projector or on the Remote Control to select the computer source.
DRAWING 14
3-1. CONTROL PANEL AND REMOTE CONTROL
Control functions through the Control Panel and Remote Control.
3-1-1. USING CONTROL PANEL
- MENU: Displays the OSD. Press again to exit the OSD.
- ASPECT: Selects your desired aspect ratio.
- KEYSTONE: Adjusts image distortion caused by tilting the projector. (two directions adjustable)
- POWER: Turns on or off the projector.
- BOOST: High brightness mode.
- VOL-: Decreases the volume.
- VOL+: Increases the volume.
- SOURCE: Selects "Composite Video", "S-Video", "Component-I Video (YCbCr)", "Analog YPbPr", "Computer", "HDMI" sources.
- UP: Cursor function or makes an adjustment based on your selection of a function.
- LEFT: Cursor function or makes an adjustment based on your selection of a function.
- DOWN: Cursor function or makes an adjustment based on your selection of a function.
- RIGHT: Cursor function or makes an adjustment based on your selection of a function.
- ENTER: Confirms the selection.
NOTE: When press the "Down button" the display screen would automatically adjust it's image according to PC resolution.

3-1-2. USING THE REMOTE CONTROL
- Power: Turns On / Off the projector.
- Auto Source: Selects PC, HDMI, S-Video, Component-I and Video (YCbCr), Analog YPbPr, Composite
- PC: Directly connect to PC mode.
- HDMI: Directly connect to HDMI mode.
- S-Video: Directly connect to S-Video mode..
- Composite: Directly connect to Video mode.
- Component: Directly connect to Video mode.
- Image mode: Selects your desired image mode in Vivid, Normal, Movie and User.
- Contrast +: Adjusts the contrast of image.
- Contrast -: Adjusts the contrast of image.
- Brightness -: Adjust the brightness of projected picture images.
- Brightness +: Adjust the brightness of projected picture images.
- Up: Moves up when selecting item.
- Left: Moves left when selecting item.
- Enter: Confirms your selection.
- Right: Moves right when selecting item.
- Down: Moves down when selecting item.
- Audio: Button to select audio function in OSD
- Mute: Mutes the audio output. Press once for Mute on, press again for Mute off.
- Vol+: Increase the volume of either the speaker.
- Vol -: Decrease the volume of either the speaker.
- Zoom +: Magnifies the image size.
- Zoom -: Magnifies the image size.
-
Menu: Presses once to display the OSD. Press again to exit the OSD.
-
ECO: ECO mode for saving lamp life.
- Keystone V+: Adjust image distortion in Vertical direction.
- Keystone H -: Adjust image distortion in Horizontal direction.
- Keystone H+: Adjust image distortion in Horizontal direction.
- Keystone V-: Adjust image distortion in Vertical direction.
- SYNC: To re-scan the image mode.
- Aspect: Select your desired aspect ratio (native/4:3/16:9)
- Freeze: Freeze the image. (With programs still running)
- Blank: Displays a blank screen instead of the current image.
- Sleep: Turns off the projector automatically after a period.

DRAWING 17
3-2.ON-SCREEN DISPLAY MENU
3-2-1. HOW TO OPERATE
- Press the "Menu" button on the Remote Control or Control Panel to enter the ON-Screen Display (OSD) menu.
- When the OSD is displayed, use "Cursor" buttons on the Control Panel or on the Remote Control to choose the item you need.
- Press the "Menu" button again to exit.
3-2-2.PROJECTOR'S OSD
3-2-2-1.MAIN MENU
Press the "Enter" button to enter the submenu, press it again to return to the main menu.
Main Menu includes:
Image
Display
Audio
System
Language

DRAWING 18
3-2-2-2.IMAGE
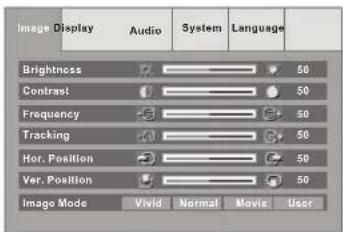
◆ Computer Image (RGB)
Brightness: Adjusts the brightness of the image.
Contrast: Adjusts the contrast of the image.
Frequency: Adjusts the frequency to match the frequency of your computer's graphic card.
Tracking: Synchronizes the signal timing with your computer's graphic card.
Hor. Position: Moves the image's horizontal position.
Ver. Position: Moves the image's vertical position. Image Mode: Chooses a mode you prefer.
Vivid: This mode is good for watching dynamic pictures.
Normal: This mode is the standard light engine mode.
Movie: This mode is good for movie pictures.
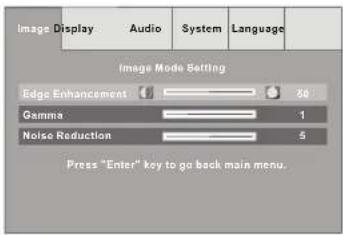
User: This mode allows you to adjust details of image. Press the "Right" button to enter the submenu.
Edge Enhancement: Adjusts the overall sharpness of the video signals.
Gamma: Adjusts the Gamma (mid-tone brightness) curve.
Noise Reduction: Adjusts signal noise reduction.
DRAWING 19
Submenu
DRAWING 20
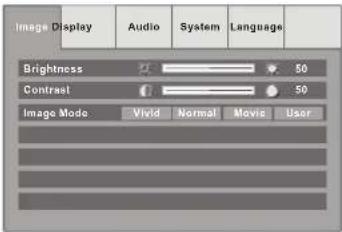
◆ Computer Image (HDMI & Component)
Brightness: Adjusts the brightness of the image.
Contrast: Adjusts the contrast of the image.
Image Mode: Chooses a mode you prefer.
Vivid: This mode is good for watching dynamic pictures.
Normal: This mode is the standard light engine mode.
Movie: This mode is good for movie pictures.
User: This mode allows you to adjust details of image. Press the "Right" button to enter the submenu.
Gamma: Adjusts the Gamma (mid-tone brightness) curve.
Noise Reduction: Adjusts signal noise reduction.
DRAWING 21
◆ Video Image (S-Video, Composite)
Brightness: Adjusts the brightness of the image.
Contrast: Adjusts the contrast of the image.
Color Satur.: Adjusts color saturation of the image.
Sharpness: Adjusts the sharpness of the image.
Tint: Adjusts the color balance of red and green.
Image Mode: Chooses a mode you prefer.
Vivid: This mode is good for watching dynamic pictures.
Normal: This mode is the standard light engine mode.
Movie: This mode is good for movie pictures.
User: This mode allows you to adjust details of image. Press the "Right" button to enter the submenu.
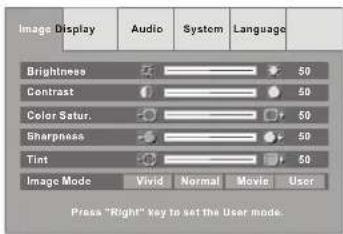
DRAWING 22
3-2-2-3.DISPLAY
Aspect Ratio: Selects your desired aspect ratio.
Zoom: Increases or reduces the size of the image.
Keystone: Adjusts image distortion caused by tilting the projector.
Color Temperature: Adjusts the color temperature of the image. A higher color temperature looks cooler. A lower color temperature looks warmer. When the color temperature is set to User mode, press "Down"
button to select Red, Green, or Blue adjustment.
Red, Green, Blue: Increases or decreases the value to find the desired color temperature.

DRAWING 23
3-2-2-4.AUDIO
Volume: Adjusts the volume.
Treble: Adjusts the treble audio.
Bass: Adjusts the Bass audio.
Mute: Mutes the speaker.
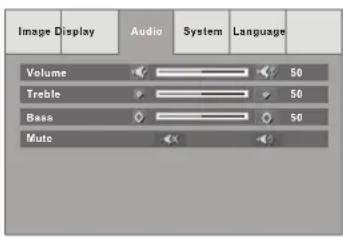
DRAWING 24
3-2-2-5.SYSTEM
OSD Location: Chooses the OSD location on the display screen.
Projection: Selects the projector's orientation.
Front: The factory default setting. For "tabletop" projection.
Front Ceiling: Inverts the image. For "ceiling mounted" projection.
Rear: Reverses the image. For "tabletop" rear projection.
Rear Ceiling: Reverses and inverts the image. For "ceiling mounted" rear projection.
Lamp Hours: Displays the cumulative lamp operation time.
Lamp Reset: Resets the lamp operation time after changing lamps.
Auto Source: Detects the input source automatically.
Factory Reset: Resets projector's parameters to the default settings.
Over Scan: Select your desired mode video or PC to do the over scan.
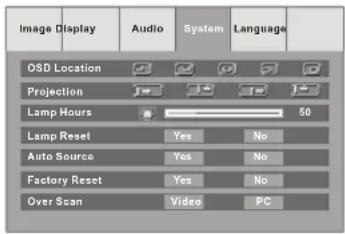
DRAWING 25
3-2-2-6. LANGUAGE
Select the OSD Language you need.
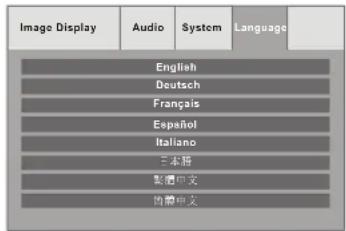
DRAWING 26
4-1. TROUBLE SHOOTING
1. No images appears
◆ Check the power cable connection at the power inlet of the projector and at the wall outlet.
Confirm that the main power switch at the rear of the projector is in the "on" position.
◆ Check the Power indicator. (Section 3-1)
◆ Confirm that the lens cap has been removed.
◆ Make sure the source device is properly connected to the projector, and is outputting a signal.
◆ Press "Source" button on either the projector or the Remote Control to ensure that the correct source is selected.
2. Image is blurred
◆ Ensure the distance between the projector and the screen is within the focus range of the lens. (Section 2-2)
Adjust the focus ring.
3. Image is too dark
Adjust the contrast or brightness in the image menu of projector properly.
◆ Has the lamp reached the end of its life?
If so replace the lamp.
4. Computer image is unstable or the projector isn't projecting the whole image
◆ Enter the "Image" menu to adjust the tracking or frequency.
◆ Verify that the computer's output resolution to the projector is less than or equal to 1280 x 768.
5. Image is stretched
Adjust the "Aspect Ratio" in the OSD of projector.
6. No sound
◆ Make sure the Mute option in Audio menu is off.
Make sure the Audio setup menu or speaker setup menu in DVD player's OSD is set properly.
◆ Make sure the speaker option in audio menu is set as required.
7. Remote control does not work
◆ Install new batteries.
Make sure there are no obstacles between you and the projector's IR receivers.
◆ Make sure you are attempting to operate it within its usable range. (Drawing 17)
8. The color of image is not correct
◆ Please reset all settings.
4-2.MAINTENANCE
4-2-1. REPLACING THE LAMP
When the lamp's total working time accumulates to over 1850 hours, the on-screen display (OSD) will deliver a message recommending that you replace the lamp. Please contact a service center to replace the lamp as soon as possible, or refer to the following instructions to replace it yourself.
TO REPLACE THE LAMP
- Turn off the projector by pressing the "Power" button.
- Allow the projector to cool down for at least one hour.
- Switch off the power and disconnect the power cord.
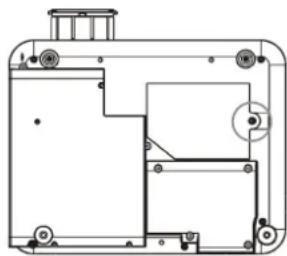
- Loosen the screw on the lamp cover and remove the lamp cover. (Drawing 27)
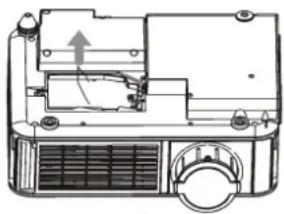
- Loosen three screws on the lamp module (Drawing 28) remove the lamp module by pulling on the handle. (Drawing 29)
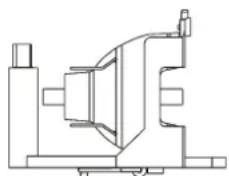
- Insert a new lamp module (Drawing 30) into the socket: make sure it is in position.
-
Reverse steps 4 and 5.
-
Ensure that the lamp cover is securely attached and flush with the bottom of the unit. The unit will not operate with the cover incorrectly installed.
- Reset the lamp timer.
natural_image
Technical line drawing of a mechanical device with no visible text or symbolsDRAWING 27

natural_image
Technical line drawing of a mechanical device with no visible text or symbolsDRAWING 28
natural_image
Technical line drawing of a mechanical device with no visible text or symbolsDRAWING 29
natural_image
Technical line drawing of a mechanical assembly (no text or symbols)DRAWING 30
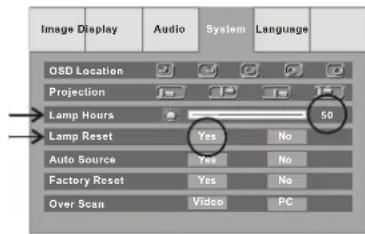
◆ To reset the lamp timer
- Press the Menu button on control panel or Remote Control.
- Go into the system menu and move the cursor to the lamp reset item.
- Select "Yes" to execute the lamp reset and the lamp hours will reset to 0 hour.
DRAWING 31
IMPORTANT
* Do not touch the lamp immediately after it has been used: it will be extremely hot. Allow the fan to finish its cooling process, then turn the projector off, and disconnect the power cord. Then allow at least one hour for the lamp to cool down before handling.
* Do not remove any screws other than the lamp cover screw and the lamp housing screws. Removing other screws could result in electric shock.
* Although the mercury content of the lamp is minuscule, spent lamps should be treated as hazardous waste. Consult federal, state/provincial or local regulations for proper disposal.
CAUTION
Continuing to use the lamp after the replace the lamp message has been displayed on the screen may result in the lamp exploding. If this occurs, pieces of glass may scatter inside the projector, and out into the room. If this occurs, do not touch them, as the pieces of glass may cause injury. The bulb contains a small amount of mercury: ventilate the area well. Contact your dealer for servicing: do not attempt to service the projector yourself.
4-2-2.CLEANING THE PROJECTOR
◆ Cleaning the cabinet
Turn off projector and unplug the power cord from the projector before cleaning the outer cabinet.
Wipe lightly with a soft, dry cloth. If the cabinet is very dirty, clean it with a soft, dampened cloth using mild commercial cleaner and finish with a dry cloth. Do not use liquid or aerosol cleaners.
◆ Cleaning the lens
Clean the lens carefully by using a blower or lens paper to prevent creating any scratches on lens.
4-3.SPECIFICATION
| Color system | NTSC / PAL / SECAM / NTSC4.43 |
| Computer Compatibility | SXGA (Compression) / XGA / SVGA / VGA / Mac |
| Screen Size (Diagonal) | 33"-255" |
| Throw Distance | 1.5m 10m |
| DMD Panel | Single 0.65" DMD |
| Number of Pixels | 983,040(1280x768) |
| Projection Lens | F2.4, Zoom Ratio: 1.2:1 |
| Projection Lamp | 250 W / 2000 Hours (Boost Mode), 200 W / 3000 Hours (Eco Mode) |
| Digital Keystone | +/- 16 Degrees (Vertical), +/- 7 Degrees (Horizontal) |
| Front Elevation | Up to 10 Degrees |
| Scanning Frequency | Automatic Frequency ControlH sync. 15kHz-82kHz, V sync. 50Hz-85Hz |
| Operating Temperature | 5°C to +35°C |
| Input | D-Sub 15-pin x 1 (VGA)RCA Jack x 3 (Component Video), RCA x 1 (Composite Video)Mini DIN 4-pin x 1 (S-Video), RCA x 2 (R, L-mono)HDMI x 1 (Digital Video & Audio) |
| Output | 3.5mm mini Jack x 1: Audio out3.5mm DC Power Jack x 1 (12V Trigger for Screen Relay) |
| Audio | 2W x 1 |
| Power Supply | 100 - 240V, 50 - 60Hz |
| Power Consumption | 330W |
| Dimensions (W x D x H) | 333 x 295 x 123mm |
| Net Weight | 4.5 kg (10 lb) |
| Regulations | 1. EMC - FCC Class B, CE Class B, CCC Class B2. Safety - UL, cUL, TUV, CB, NOM, GOST, SASO |
| Accessories | Power CordAudio CableComponent Video CableRemote ControlSoft Carry Bag for Projector |
Customer Support
For technical support or product service, see the table below or contact your reseller.
Note : You will need the product serial number.
| Country/Region | Web Site | T=TelephoneF=Fax | |
| United States | www.viewsonic.com/support/ | T=800 688 6688F=909 468 1202 | service.us@viewsonic.com |
| Canada www.viewsonic.com/support T=866 463 4775 service.ca@viewsonic.com | |||
| United Kingdom | www.viewsoniceurope.com/uk | T=0207 949 0307 service.eu@viewsoniceurope.com | |
| Europe, Middle East, Baltic countries, and North Africa | www.viewsoniceurope.com | Contact your reseller service.eu@viewsoniceurope.com | |
| Australia and New Zealand | www.viewsonic.com.au/support/ | AUS=1800 880 818NZ=0800 008 822 | service@au.viewsonic.com |
| Singapore/Malaysia/Thailand | www.viewsonic.com.sg/support/ | T=65 6461 6044 service@sg.viewsonic.com | |
| South Africa/Other countries | www.viewsonic.com | T=886 2 2246-3456F=886 2 2249-1751 | service@sd.viewsonic.com |
| Hong Kong www.hk.viewsonic.com/support/T=8523102 2900 service@hk.viewsonic.com | |||
| Macau www.hk.viewsonic.com/support/T=853 700303 service@hk.viewsonic.com | |||
| Korea www.viewsonic.com T=080 2659 080 service@kr.viewsonic.com | |||
Limited Warranty
ViewSonic® Projector
What the warranty covers:
ViewSonic warrants its products to be free from defects in material and workmanship during the warranty period. If a product proves to be defective in material or workmanship during the warranty period, ViewSonic will at its sole option repair or replace the product with a like product. Replacement product or parts may include remanufactured or refurbished parts or components.
How long the warranty is effective:
North and South America: Three (3) years warranty for all parts excluding the lamp, three (3) years for labor, and ninety (90) days for the original lamp from the date of the first consumer purchase. Europe except Poland: Three (3) years warranty for all parts excluding the lamp, three (3) years for labor, and ninety (90) days for the original lamp from the date of the first consumer purchase. Poland: Two (2) years warranty for all parts excluding the lamp, two (2) years for labor, and ninety (90) days for the original lamp from the date of the first consumer purchase. Other regions or countries: Please check with your local dealer or local ViewSonic office for the warranty information.
Lamp warranty subject to terms and conditions, verification and approval. Applies to manufacturer's installed lamp only. All accessory lamps purchased separately are warranted for 90 days.
Who the warranty protects:
This warranty is valid only for the first consumer purchaser.
What the warranty does not cover:
-
Any product on which the serial number has been defaced, modified or removed.
-
Damage, deterioration or malfunction resulting from:
a. Accident, misuse, neglect, fire, water, lightning, or other acts of nature, unauthorized product modification, or failure to follow instructions supplied with the product.
b. Repair or attempted repair by anyone not authorized by ViewSonic.
c. Any damage of the product due to shipment.
d. Removal or installation of the product.
e. Causes external to the product, such as electric power fluctuations or failure.
f. Use of supplies or parts not meeting ViewSonic's specifications.
g. Normal wear and tear.
h. Any other cause which does not relate to a product defect.
-
Any product exhibiting a condition commonly known as “image built-in” which results when a static image is displayed on the product for an extended period of time.
-
Removal, installation, and set-up service charges.
How to get service:
- For information about receiving service under warranty, contact ViewSonic Customer Support. You will need to provide your product's serial number.
- To obtain warranted service, you will be required to provide (a) the original dated sales slip, (b) your name, (c) your address, (d) a description of the problem, and (e) the serial number of the product.
- Take or ship the product freight prepaid in the original container to an authorized ViewSonic service center or ViewSonic.
- For additional information or the name of the nearest ViewSonic service center, contact ViewSonic.
Limitation of implied warranties:
There are no warranties, express or implied, which extend beyond the description contained herein including the implied warranty of merchantability and fitness for a particular purpose.
Exclusion of damages:
ViewSonic's liability is limited to the cost of repair or replacement of the product. ViewSonic shall not be liable for:
- Damage to other property caused by any defects in the product, damaged based upon inconvenience, loss of use of the product, loss of time, loss of profits, loss of business opportunity, loss of goodwill, interference with business relationships, or other commercial loss, even if advised of the possibility of such damages.
- Any other damages, whether incidental, consequential or otherwise.
- Any claim against the customer by other party.
Effect of state law:
This warranty gives you specific legal rights, and you may also have other rights which vary from state to state. Some states do not allow limitations on implied warranties and/or do not allow the exclusion of incidental or consequential damages, so the above limitations and exclusions may not apply to you.
Sales outside the U.S.A. and Canada:
For warranty information and service on ViewSonic products sold outside of the U.S.A. and Canada, contact ViewSonic or your local ViewSonic dealer.
Warranty Projectors Rev. 1d 1 of 1
4.3: Projector Warranty Release Date: 03-31-05


- Cine5000 DLP Projector
- Compliance Information
- For U.S.A.
- FCC Warning
- For Canada
- For European Countries
- CE Conformity
- User Information for all Countries
- Following information is only for EU-member states:
- Important Safety Instructions
- Copyright Information
- Product Registration
- For Your Records
- Product Overview 4
- Installation 7
- Control Panel and Remote Control 9
- Appendices 12
- 1-1 FEATURES
- 1-2.PACKAGE CONTENTS
- 1-3.MAIN UNIT
- 2-1.TURNING ON/OFF THE PROJECTOR
- 2-1-1. STARTING UP THE PROJECTOR
- 2-1-2.SHUTTING DOWN THE PROJECTOR
- 2-2.ADJUSTING THE PROJECTED IMAGE
- 2-2-1. ADJUSTING THE PROJECTED HEIGHT
- 2-2-2.ADJUSTING THE ZOOM and FOCUS
- 2-2-3.ADJUSTING THE PROJECTED IMAGE SIZE
- 2-3. OPERATION
- 2-3-1. CONNECTING TO A PERSONAL COMPUTER
- Connecting to a Notebook
- 3-1. CONTROL PANEL AND REMOTE CONTROL
- 3-1-1. USING CONTROL PANEL
- 3-1-2. USING THE REMOTE CONTROL
- 3-2.ON-SCREEN DISPLAY MENU
- 3-2-1. HOW TO OPERATE
- 3-2-2.PROJECTOR'S OSD
- 3-2-2-1.MAIN MENU
- 3-2-2-2.IMAGE
- ◆ Computer Image (RGB)
- ◆ Computer Image (HDMI & Component)
- ◆ Video Image (S-Video, Composite)
- 3-2-2-3.DISPLAY
- 3-2-2-4.AUDIO
- 3-2-2-5.SYSTEM
- 3-2-2-6. LANGUAGE
- 4-1. TROUBLE SHOOTING
- No images appears
- Image is blurred
- Image is too dark
- Computer image is unstable or the projector isn't projecting the whole image
- Image is stretched
- No sound
- Remote control does not work
- The color of image is not correct
- 4-2.MAINTENANCE
- 4-2-1. REPLACING THE LAMP
- TO REPLACE THE LAMP
- ◆ To reset the lamp timer
- IMPORTANT
- CAUTION
- 4-2-2.CLEANING THE PROJECTOR
- ◆ Cleaning the cabinet
- ◆ Cleaning the lens
- Customer Support
- Limited Warranty
- ViewSonic® Projector
- What the warranty covers:
- How long the warranty is effective:
- Who the warranty protects:
- What the warranty does not cover:
- How to get service:
- Limitation of implied warranties:
- Exclusion of damages:
- Effect of state law:
- Sales outside the U.S.A. and Canada:
- Warranty Projectors Rev. 1d 1 of 1
- 4.3: Projector Warranty Release Date: 03-31-05
Brand : VIEWSONIC
Model : Cine5000
Category : Video projector