CE-H24W11-S1 - Switch Siig - Free user manual and instructions
Find the device manual for free CE-H24W11-S1 Siig in PDF.

| Product Type | Network Switch |
| Brand | Siig |
| Model | CE-H24W11-S1 |
| Ports | 24 x Gigabit Ethernet (10/100/1000 Mbps) |
| Data Rate | 10/100/1000 Mbps per port |
| Switching Capacity | 48 Gbps |
| MAC Address Table | 8K entries |
| Power Supply | Internal AC 100-240V, 50-60Hz |
| Power Consumption | 20W (maximum) |
| Dimensions (W x D x H) | 17.3 x 7.1 x 1.7 inches (440 x 180 x 44 mm) |
| Weight | 3.3 lbs (1.5 kg) |
| Operating Temperature | 0°C to 40°C (32°F to 104°F) |
| Operating Humidity | 10% to 90% non-condensing |
| Standards | IEEE 802.3, 802.3u, 802.3ab, 802.3x |
| Mounting | Rackmount (1U) and desktop |
| LED Indicators | Power, Link/Activity per port |
| Cooling | Fanless (silent operation) |
| Warranty | Limited lifetime warranty |
| Package Contents | Switch, power cord, rackmount kit, quick installation guide |
| Maintenance | Keep clean, avoid dust, ensure adequate ventilation |
| Safety | CE, FCC compliant; use with grounded outlet |
| Spare Parts | Power supply unit, rackmount brackets (contact Siig support) |
| General Info | Unmanaged switch, plug-and-play, no configuration required |
Frequently Asked Questions - CE-H24W11-S1 Siig
User questions about CE-H24W11-S1 Siig
0 question about this device. Answer the ones you know or ask your own.
Ask a new question about this device
Download the instructions for your Switch in PDF format for free! Find your manual CE-H24W11-S1 - Siig and take your electronic device back in hand. On this page are published all the documents necessary for the use of your device. CE-H24W11-S1 by Siig.
USER MANUAL CE-H24W11-S1 Siig
natural_image
Red circular logo with a white abstract line design (no text or symbols)SIIG®
4x4 HDMI 2.0 4K HDR Matrix Switch with Cloud Control
User Manual

natural_image
Black SIIC 4K HDR wireless device with ports and indicator lights (no readable text or symbols beyond branding)
Safety and Notice
The 4x4 HDMI 2.0 4K HDR Matrix Switch has been tested for conformance to safety regulations and requirements, and has been certified for international use. However, like all electronic equipment, the 4x4 HDMI 2.0 4K HDR Matrix Switch should be used with care. Please read and follow the safety instructions to protect yourself from possible injury and to minimize the risk of damage to the unit.
- Follow all instructions and warnings marked on this unit.
- Do not attempt to service this unit yourself, except where explained in this manual.
- Provide proper ventilation and air circulation and do not use near water.
- Keep objects that might damage the device and assure that the placement of this unit is on a stable surface.
- Use only the power adapter and power cords and connection cables designed for this unit.
- Do not use liquid or aerosol cleaners to clean this unit.
• Always unplug the power to the device before cleaning.

text_image
Warning sign depicting a hand holding a device against a triangular background, with an exclamation mark symbol.ESD CAUTION
!
Package contents
• 4x4 HDMI 2.0 4K HDR Matrix Switch
• Power adapter DC 5V / 4A
- IR Receiver
- IR Remote control
- Rack-mounting ear set
- User Manual
Thank You for your purchase!
Features
- HDMI2.0a compliant
• Supports 4K2K@60 4:4:4 8bits
• Supports HDR*, which is 4K2K@60 4:2:0 10bits
• Supports resolution downscaling from 4K2K to 1080P
• HDCP1.4 & HDCP 2.2 compliant
• Single-link 594MHz [18Gbps] - Human body model — ±15kV [air-gap discharge] & ±8kV [contact discharge]
- Allows any source to be displayed on multiple displays at the same time
- Allows any HDMI display to view any HDMI source at any time
• Supports 7.1 channel digital audio
• Supports default HDMI EDID and learns the EDID of displays to matrix switcher - The matrix switcher can switch every output channels from any HDMI inputs by Push button, IR remote control, RS-232, IP control, cloud & Echo control.
- Easy installation with rack-mounting
-
Fast response time – 2\~3 seconds for channel switch
-
NOT supports
(1) Resolution downscaling from 4K2K@60 4:2:2 to 1080P
(2) Frame rate conversion
(3) 4K2K@60 4:2:2 to 4K2K@60 4:2:0 - Splitter can bypass 4K HDR data content, but can NOT process it and make HDR content 100% fit into 1080p
Layout
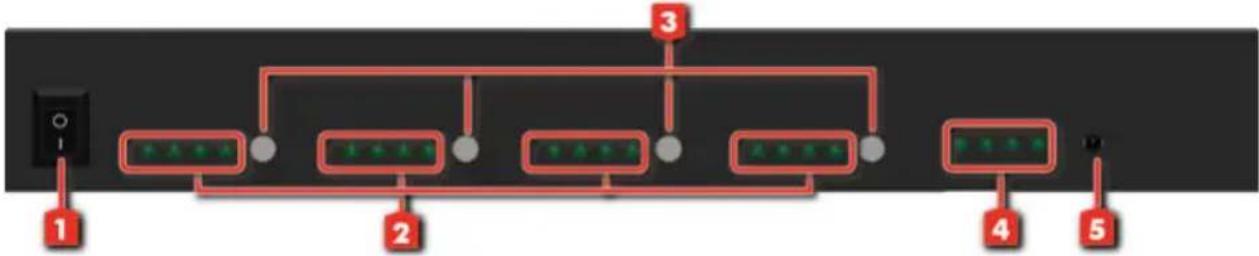
Front Panel
flowchart
graph TD
    A["Device 1"] --> B["Node 1"]
    B --> C["Node 2"]
    C --> D["Node 2"]
    D --> E["Node 3"]
    E --> F["Node 3"]
    F --> G["Node 4"]
    G --> H["Node 5"]
-
Power Switch:
-
Selected Source Status LED: When users use port channel push button, the indicator LED will show the selected source.
-
Port 1-4 Channel Push Button: Select input channel
-
Source Status: Input source detection LED
-
IR SENSOR: for receiving the IR commands from IR remote
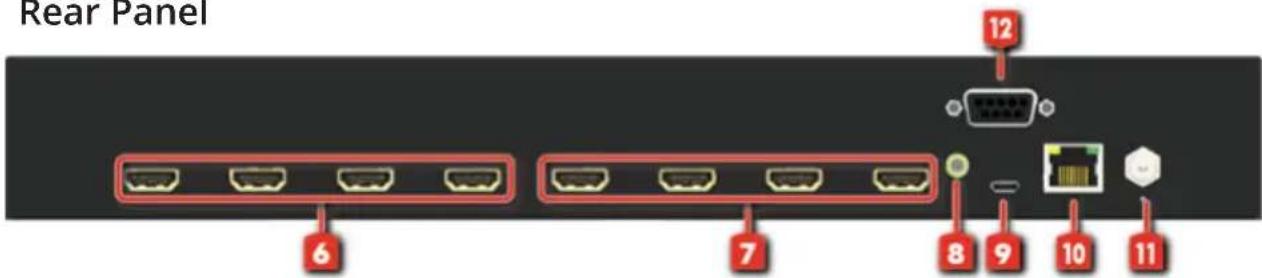
Rear Panel
text_image
Rear Panel 12 6 7 8 9 10 11-
INPUT 1-4: HDMI inputs
-
OUTPUT 1-4: HDMI outputs
-
System IR Receiver: Ext. IR receiver
-
Micro USB: Micro-USB port for F/W update
-
Ethernet: Ethernet control port
-
Power Jack: DC 5V/4A
-
RS-232: for software control and firmware update
* USB and RS-232 port cannot be used at the same time.
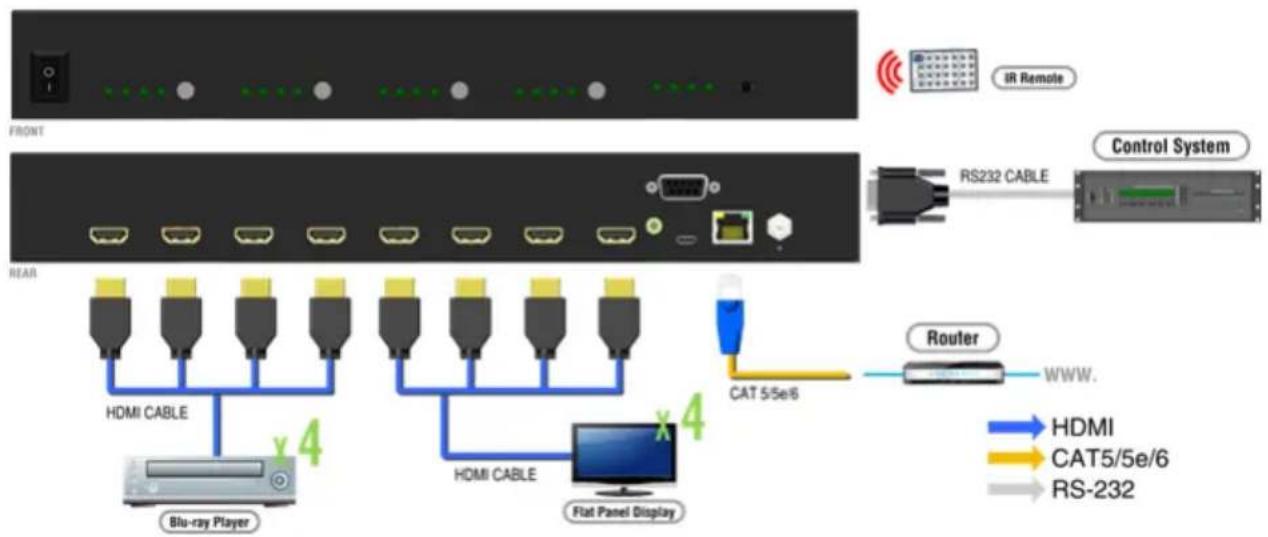
Application
flowchart
graph TD
    A["FRONT"] --> B["IR Remote"]
    B --> C["Control System"]
    C --> D["RS232 CABLE"]
    D --> E["Blu-ray Player"]
    E --> F["HDMI CABLE"]
    F --> G["Flat Panel Display"]
    G --> H["CAT 5/5e6"]
    H --> I["Router"]
    I --> J["WWW."]
    style A fill:#f9f,stroke:#333
    style B fill:#ccf,stroke:#333
    style C fill:#cfc,stroke:#333
    style D fill:#fcc,stroke:#333
    style E fill:#cff,stroke:#333
    style F fill:#ffc,stroke:#333
    style G fill:#cfc,stroke:#333
    style H fill:#fcc,stroke:#333
    style I fill:#ffc,stroke:#333
    style J fill:#fcc,stroke:#333
Operation Approach
Method A: Push-in Button
- Use Port 1-4 Channel Push Button to select the source
- Input1\~4 can be selected in order
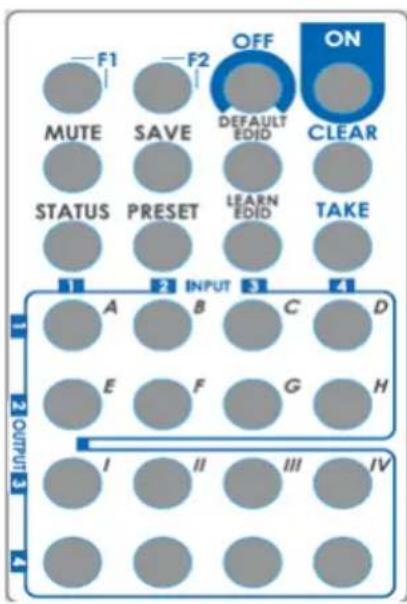
Method B: IR Remote Control
text_image
F1 F2 OFF ON MUTE SAVE DEFAULT EDID CLEAR STATUS PRESET LEARN EDID TAKE INPUT A B C D E F G H I II III IV OUTPUT-3 1 2 3 4| Button Function | |
| OFF Standby mode | |
| ON Power on the matrix switcher | |
| MUTE Turn off output's video & audio | |
| STATUS Preset output status | |
| SAVE Save current mapping mode | |
| PRESET Preset mapping mode | |
| DEFAULT EDID Begin default EDID selection | |
| LEARN EDID Begin EDID learning from one output | |
| CLEAR Clear the previous IR operation procedure | |
| TAKE Trigger the previous setting | |
| F1 Reserved | |
| F2 Reserved | |
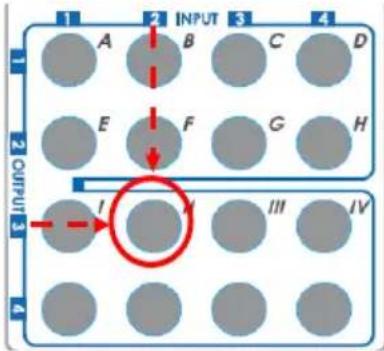
• IN/OUT Switch
| Operation Procedure | |
| IN/OUT Switch P | Push the button on the checkerboard to select input & output port |
| Ex: Input 2To Output 3 | Push the red circle button as below to select input 2 to output 3 |
text_image
1 2 INPUT 3 4 A B C D E F G H I III IV Output 3 4• Example of function key
| Operation | Procedure |
| Mute Output | Mute + A~D(Output 1~4) + Take |
| Ex: Mute Output 3 | 1. Press "MUTE" button |
| 2. Press number key "C" to select Output 3 | |
| 3. Press "TAKE" button | |
| Output Status | Status + A~D(Output 1~4) + CLEAR |
| Ex: Output 4 (Input 2) | 1. Press "STATUS" button |
| 2. Press number key "D" to select Output 4 | |
| 3. Press "CLEAR" button | |
| Save Current Mapping | Save + A~H(1-8 storage site) + Take |
| Ex: Save current mapping to 5 | 1. Press "SAVE" button |
| 2. Press number key "E" to select the storage site 5 | |
| 3. Press "TAKE" button | |
| Preset Mapping | Preset + A~H(1-8 storage site) + Take |
| Ex: Preset saved mapping from 5 | 1. Press "PRESET" button |
| 2. Press number key "E" to select the storage site 5 | |
| 3. Press "TAKE" button | |
| Learn default EDID | Default EDID + A~H(1-8 default EDID) + I~IV(input 1~4) + Take |
| Ex: Default EDID 2 Input 3 | 1. Press "DEFAULT EDID" button |
| 2. Press number key "B" to select default EDID 2 | |
| 3. Press number key "III" to select Input 3 | |
| 4. Press "TAKE" button | |
| Learn Output EDID | Learn + A~B(Output 1~2) + I~IV(input 1~4) + Take |
| Ex: Learn Output 4 Input 3 | 1. Press "LEARN" button |
| 2. Press number key "D" to select Output 4 | |
| 3. Press number key "III" to select Input 3 | |
| 4. Press "TAKE" button |
Method C: Software control through RS-232 port
- Please go to SIIG's website. Use product number "CE-H24W11-S1" to find & download the software
- Connect the Matrix via RS-232 cable (cable not included). Baud rates: 115200
- Run the control software and select the proper COM port from the drop down box, then click the serial port icon on the upper left corner of the application box to connect to the Matrix.

text_image
1 2 3 4 Mapping EDID Rename System Firmware| 1 Power On / Standby mode | |
| 2 Control via RS-232 | |
| 3 Control via Network | |
| 4 COM port selection |
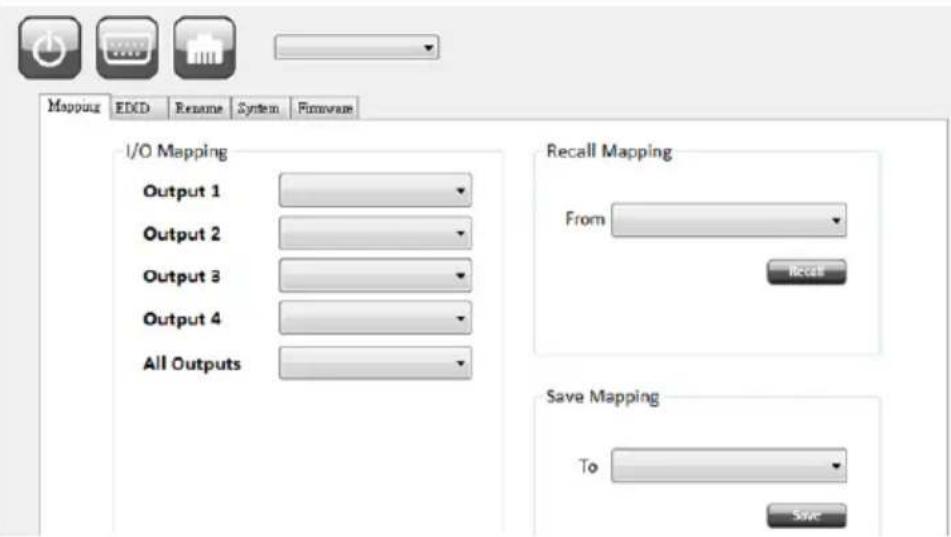
1. Mapping page
text_image
Mapping EDDI Rename System Firmware I/O Mapping Output 1 Output 2 Output 3 Output 4 All Outputs Recall Mapping From Recall Save Mapping To Save• I/O Mapping: Switch the input for each output
- Recall Mapping:
(1) Select the stored Mapping(1-8)
(2) Click "Recall" button to recall previous mapping which are saved
- Save Mapping:
(1) Select Mapping(1-8)
(2) Click "Save" button to save current mapping
2. EDID page
text_image
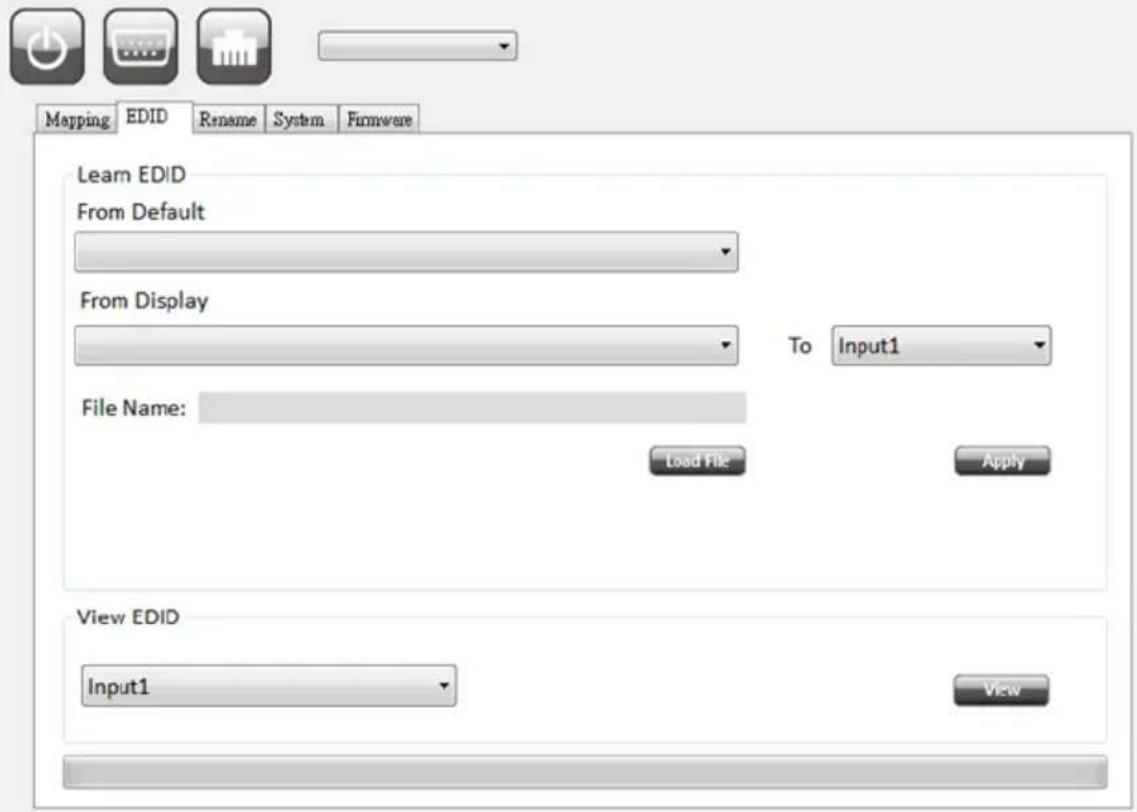
Mapping EDID Rename System Firmware Learn EDID From Default From Display To Input1 File Name: Load File Apply View EDID Input1 View- Learn EDID from Default to Input
(1) Select Default EDID (1-17 Default EDID)
(2) Select designated Input
(3) Click "Apply" button to learn from default EDID
- Learn EDID from Display to Input
(1) Select display
(2) Select designated Input
(3) Click "Apply" button to learn from display EDID
- Load EDID File to Input
(1) Click "Load File" button to select the EDID file
(2) Select designated Input
(3) Click "Apply" button to load EDID File
- View EDID
(1) Select Input, HDMI output or EDID file
(2) Click "View" button to read and analyze the EDID
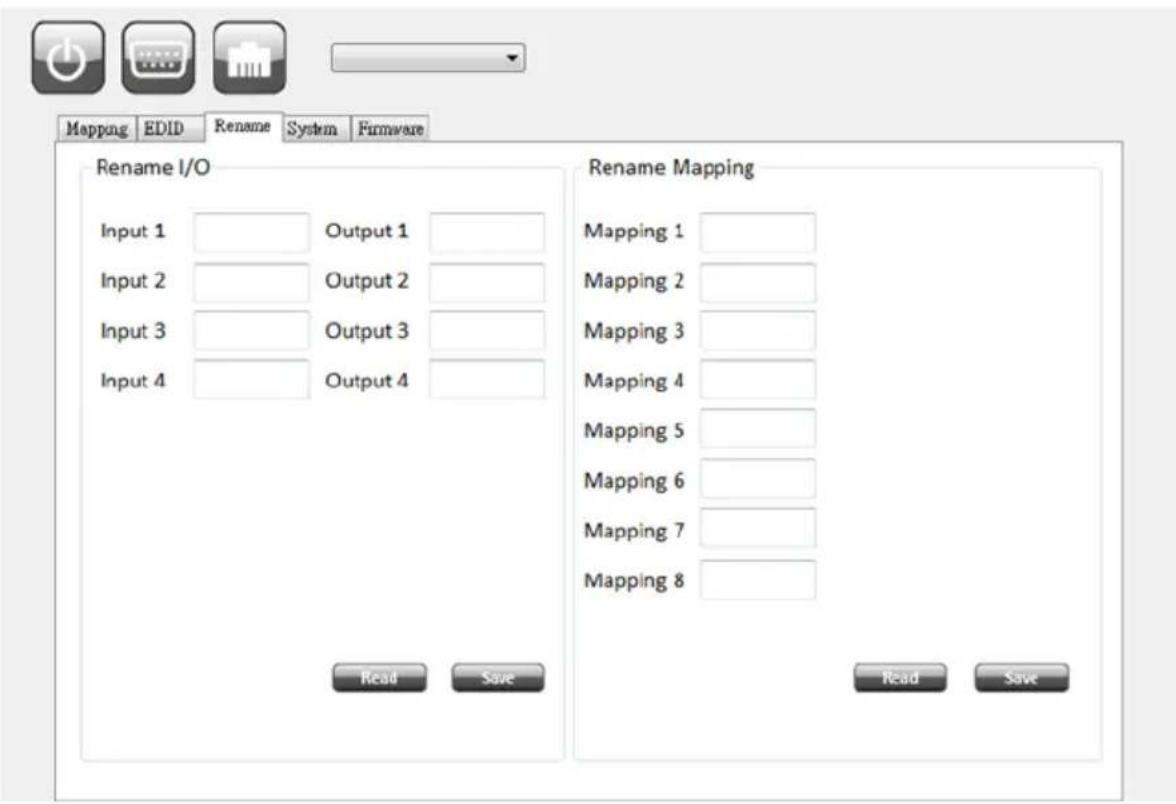
3. Rename page
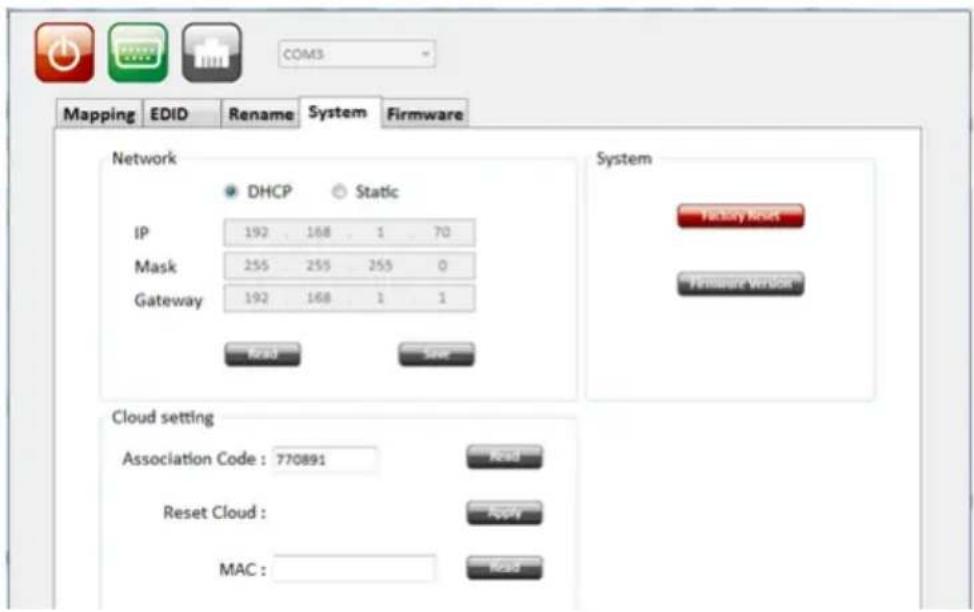
Network-DHCP mode: For networks with DHCP server
- Select DHCP and click "Read" button to get the IP address Information
Network-Static mode
- Click Static and then key in the "IP", "MASK", "GATEWAY" information. After setting IP address, please click "Save" button to save IP address Information
"Save" Button: Save the IP address which is manually entered
"Read" Button *The default IP address is 192.168.1.70
- Select "Static" to read the IP address from the device
System-Factory Reset: To restore the factory default settings
Firmware Version
• To get the F/W version information
Cloud setting-Association Code
- To get an “association code”. The device can use this code to pair with cloud server.
Cloud-Reset Cloud
• To reset cloud after a successful pairing
MAC: Read the device's MAC address information
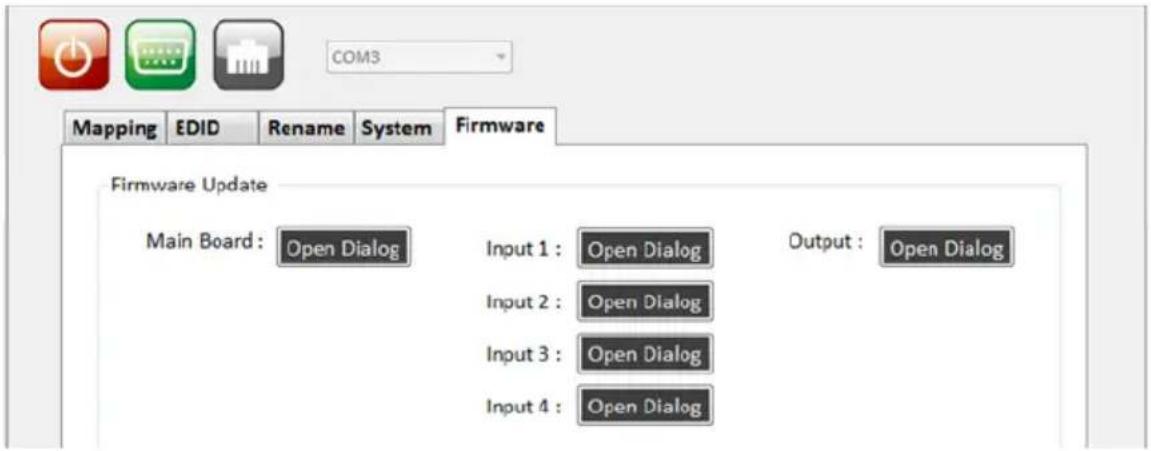
5. Firmware page
text_image
Mapping EDID Rename System Firmware Firmware Update Main Board: Open Dialog Input 1: Open Dialog Output: Open Dialog Input 2: Open Dialog Input 3: Open Dialog Input 4: Open DialogMain Board
Using RS-232 cable connect the device and your PC
text_image
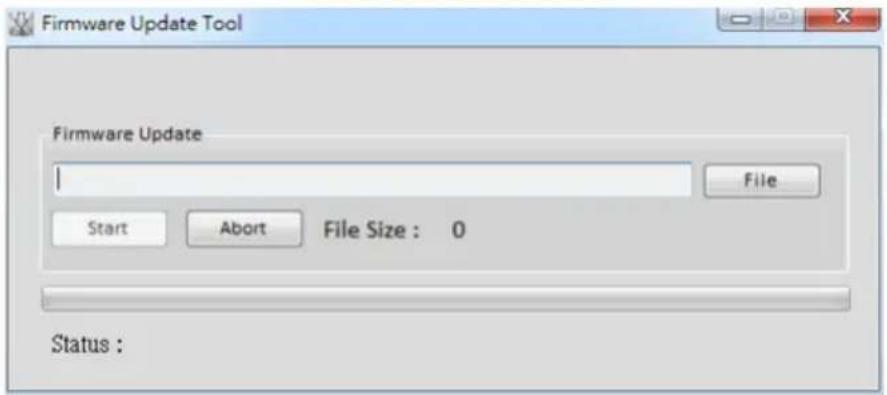
Firmware Update Tool Firmware Update I File Start Abort File Size : 0 Status :- Before you start to update, please make sure you have secured the connection between your computer COM port and the device.
- Click the "Open Dialog" button to open the firmware update window
- Click the "File" button to select the file which you want to update
- Click the "Start" button and firmware will start to update
- After updating, please power cycle the device
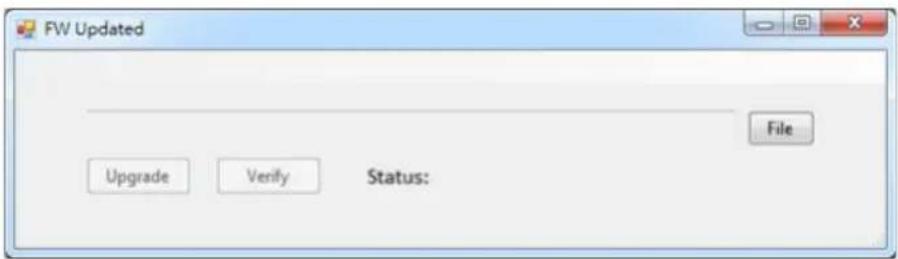
Output
Using RS-232 cable connect the device and your PC
text_image
FW Updated File Upgrade Verify Status:- Click the "Open Dialog" button to open the FW Updated window.
- Click the "File" button to select the firmware file
- Click the "Upgrade" button will start to update
- After updating, please power cycle the device
IN OUT
Using USB Micro-B cable connect the device and your PC
- Click the "Open Dialog" button to open the update window
- Open firmware update software and then device will start to update firmware automatically.
- After update process is done, software will show "Success" message and then be closed automatically.
- Click the "Open Dialog" button to update next input port
- Plug and unplug the USB Micro-B cable. Repeat the step 2 \~ step 5, until finishing all the input port firmware update.
Method D: Control through Web
The default IP address: 192.168.1.70

text_image
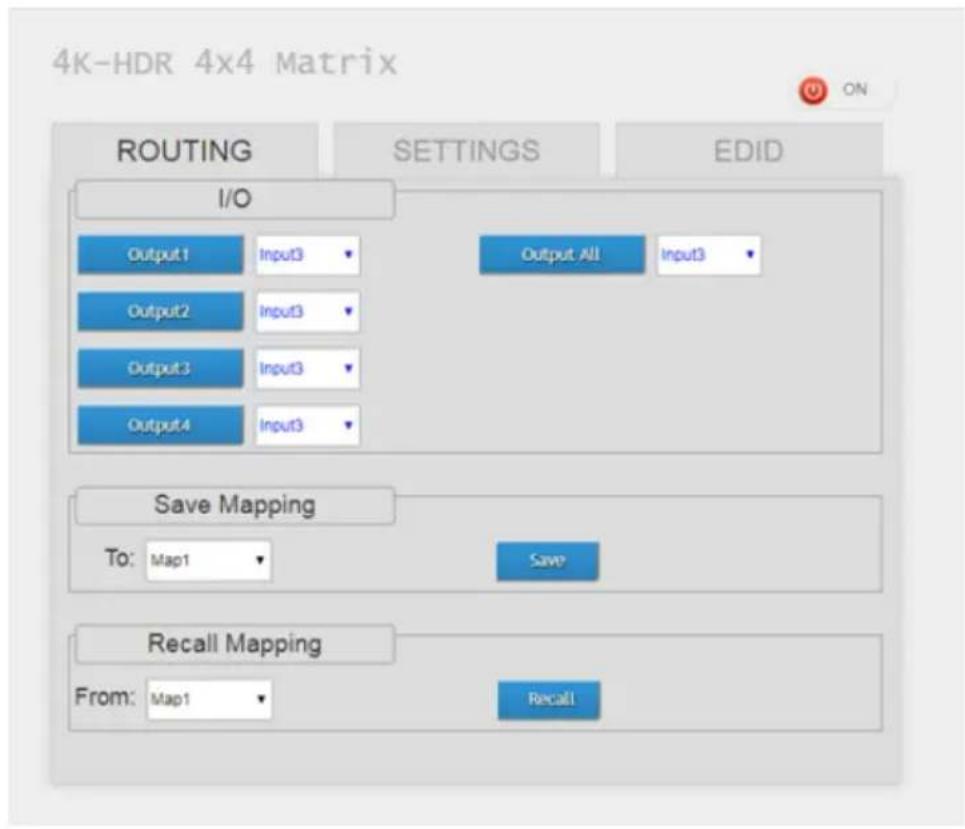
4K-HDR 4x4 Matrix ROUTING SETTINGS EDIDI/O Routing Tab
text_image
4K-HDR 4x4 Matrix ON ROUTING SETTINGS EDID I/O Output1 Input3 Output All Input3 Output2 Input3 Output3 Input3 Output4 Input3 Save Mapping To: Map1 Save Recall Mapping From: Map1 RecallRename I/O, Mapping Tab
4K-HDR 4x4 Matrix

ON
text_image
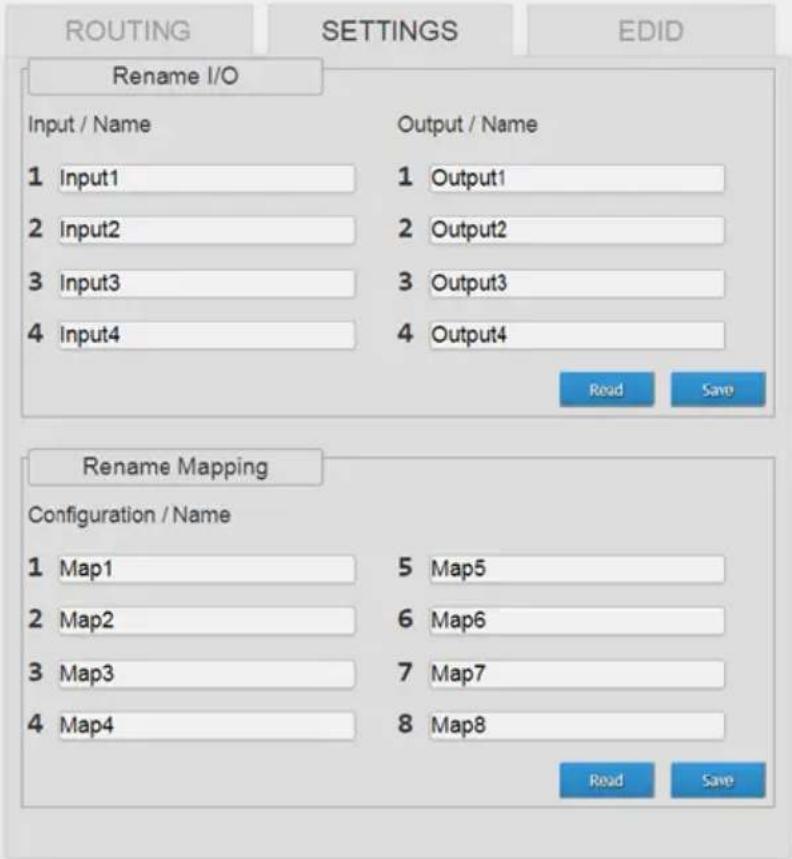
ROUTING SETTINGS EDID Rename I/O Input / Name Output / Name 1 Input1 1 Output1 2 Input2 2 Output2 3 Input3 3 Output3 4 Input4 4 Output4 Read Save Rename Mapping Configuration / Name 1 Map1 5 Map5 2 Map2 6 Map6 3 Map3 7 Map7 4 Map4 8 Map8 Read SaveEDID Tab
4K-HDR 4x4 Matrix

ON
text_image
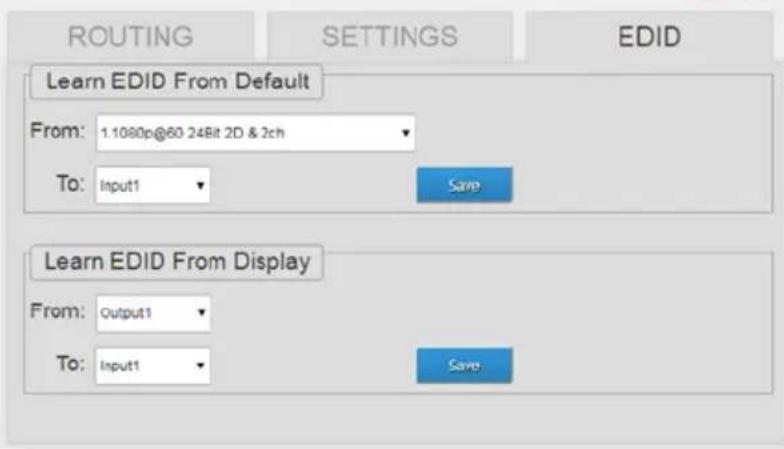
ROUTING SETTINGS EDID Learn EDID From Default From: 1.1080p@60.24Bit 2D & 2ch To: Input1 Save Learn EDID From Display From: Output1 To: Input1 SaveMethod E: Control through "intricloud" on internet
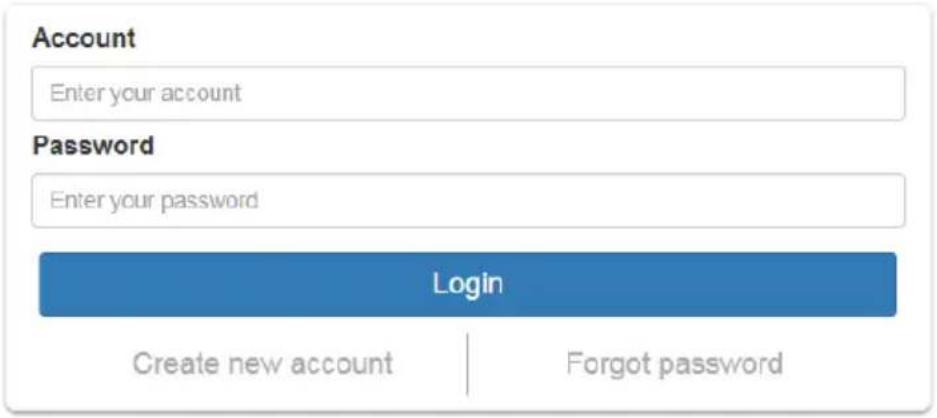
Create Account
The first time you use the intriCloud service, please create a new account.
- Access intriCloud (www.intri.cloud) and click "Create new account".
text_image
Account Enter your account Password Enter your password Login Create new account | Forgot password- The Registration page will pop up, please fill in your email and password information to create your private account.
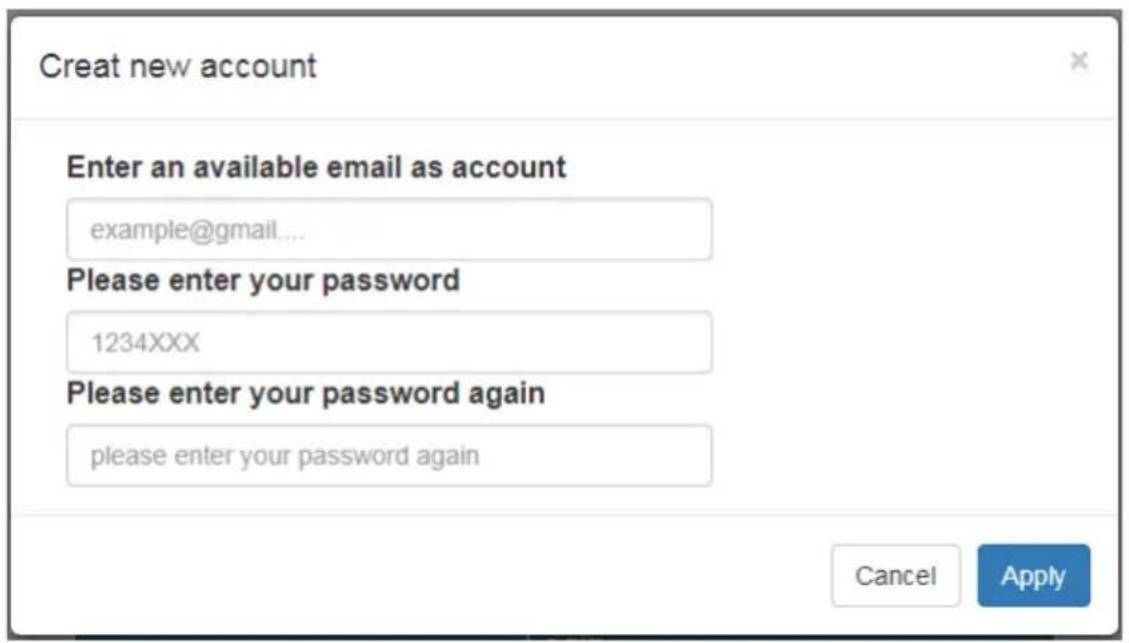
text_image
Creat new account Enter an available email as account example@gmail... Please enter your password 1234XXX Please enter your password again please enter your password again Cancel ApplyAdd Device to intriCloud
- First, please make sure the Matrix is connected to your Ethernet with internet access.
- Connect the Matrix to your PC via a RS-232 cable.
Confirm the status of software is connected - Click on Read to get an Association Code. Write down this code.
text_image
COM3 Mapping EDID Rename System Firmware Network DHCP Static IP 192 168 1 70 Mask 255 255 255 0 Gateway 192 168 1 1 System Factory Route Hardware Version Cloud setting Association Code : 770891 Reset Cloud : MAC :- Access your intriCloud account or use intriCloud APP, then log in to your account. On the upper right corner, click "Add Device".

text_image
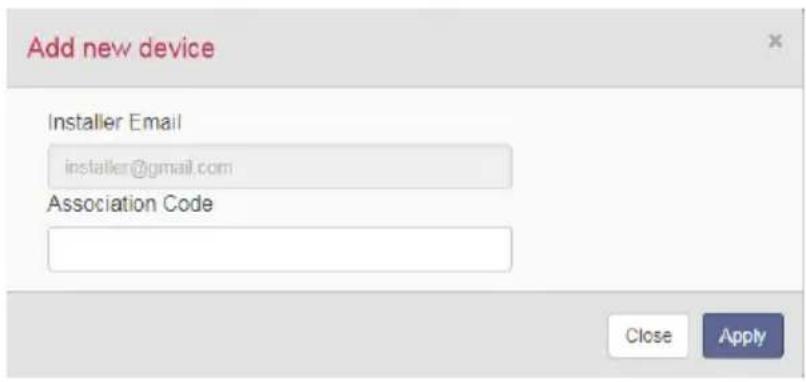
? No Device User Profile Change Password Add Device M2M Logout- Enter the Association code and click Apply for pairing with your Matrix.
text_image
Add new device Installer Email installer@gmail.com Association Code Close Apply- After adding the device, the device name will show on the upper right corner. You can click the button to switch to device control.

text_image
IntriCloud MENU SIIG Matrix-4x4 User Matrix-4x4Method E: Amazon Echo (Alexa) control
Connecting your intriCloud to Alexa. Make sure your Echo device is linked to your Amazon account before continuing.
- Go to alexa.amazon.com. Create an account or login using an existing amazon account.

text_image
amazon alexa Sign in Forgot password? Email (phone for mobile accounts) Amazon password Show password Keep me signed in. Details SIGN IN- Install intriCloud for Echo. Search using keyword "Intri Cloud" in Skills page and click "Enable". Then go to Settings to link it.

text_image
Home Search Now Playing Music, Video, & Books Lists Reminders & Alarms Skills intril cloud Intering Networks, Inc. **Alexa, open in la land**
text_image
Home Now Playing Music, Video, & Books Lists Intri Cloud Intriseng Networks, Inc. Rated: Guidance Suggested Shares DISABLE SKILL SETTINGS Account linking required- Click "Link Account" and the "IntriCloud" sign in box will pop up. Type in your Intri Cloud account and password, to successfully link Intri Cloud and Amazon Alexa.

text_image
Home Skill Settings Now Playing GENERAL Music, Video, & Books Account Linking Links Account Links your account provides access to personalized content. Disabling this skill will unlink your account.
text_image
Sign in IntrCloud Email address Password Sign in

Intri Cloud has been successfully linked.
What to do next:
→ Try saying: ""Alexa, open la la land""
→ Close this window to return to the skill page.
Voice Control
Step 1. ""Alexa, open la la land"" (into Intricloud)
Step 2. ""list device"" (What device connected to your Intricloud)
Step 3. ""select device"" (Select the device which you want to control)
Step 4. ""play (input) on (output)"" (adjust your display array)
Voice Commands
| Command description | |
| open la la land | into Intri Cloud |
| list device | show out what device connected to Intri Cloud |
| select device | select the device which you want to control |
| play "input" on "output" | adjust your display array |
| play "input" on all | play a HDMI source on all displays |
| mute "output" close a HDMI output | |
| mute all close all HDMI output | |
Notes: "Input" & "Output" should be the name which displays in RS232 Rename page or Intri Cloud website Mapping page.
EDID Learning
The EDID learning function is only necessary whenever you encounter any display on the HDMI output port that cannot play audio and video properly. Because the HDMI source devices and displays may have various level of capability in playing audio and video, the general principle is that the source device will output the lowest standards in audio format and video resolutions to be commonly acceptable among all HDMI displays. In this case, a 720p stereo HDMI signal output would be probably the safest choice. Nevertheless, the user can force the matrix to learn the EDID of the lowest capable HDMI display among others to make sure all displays are capable to play the HDMI signals normally.
There are TWO methods to do EDID Learning as below,
- IR Remote Control (Page 5)
- Software Control through RS-232 (Page 7)
There are seventeen embedded default EDID as below,
- Full-HD(1080p@60)-24bit 2D & 2ch
- Full-HD(1080p@60)-24bit 2D & 7.1ch
- Full-HD(1080p@60)-24bit 3D & 2ch
- Full-HD(1080p@60)-24bit 3D & 7.1ch
- HD(1080i@60)(720p@60)-24bit 2D & 2ch
- HD(1080i@60)(720p@60)-24bit 2D & 7.1ch
- Full-HD(1080p@60)-36bit 2D & 2ch
- Full-HD(1080p@60)-36bit 2D & 7.1ch
-
Full-HD(1080p@60)-24bit 2D & 2ch & Dolby 5.1ch
-
4k2k@30 2ch
-
4k2k@30 7.1ch
- 4k2k@30-3D-PCM2CH(2ch)
- 4k2k@30-3D-BITSTR(7.1ch)
- 4k2k@60-420-3D-PCM2CH(2ch)
- 4k2k@60-420-3D-BITSTR(7.1ch)
- 4k2k@60-3D-PCM2CH(2ch)
- 4k2k@60-3D-BITSTR(7.1ch)
FAQ
Q Can every TV work with the HDMI matrix?
A Basically, the answer is YES. But if your TV can not support 1080p, please refer the EDID LEARNING section to learn EDID from your TV.
Q What is EDID? Why do I need to learn EDID?
A EDID contains the whole information of the display such as the resolution and audio setting which this display can support. Therefore, based on the EDID information, media player will pick up the most suitable resolution and audio setting to the display. In order to faithfully transmit the EDID information from display to the media player, learning EDID from display to this device is necessary.
Q What should I do to learn EDID for the matrix?
A Due to the limitation of HDMI, the source device can only output one format of video and audio. In other words, the source device cannot output 720p and 1080p video at the same time, or output stereo and surround sound at the same time. Therefore, you may need to manually setup each HDMI input for desirable audio/video output format. The mechanism of EDID Learning is to pick up the HDMI display with the lowest capability among the ones you would use for this input source. For example, if user would like to play the Input-2 upon output-2, output-3 and output-4, and only output-3 cannot support 1080p [support up to 720p only], please learn the EDID from the display connected to the output-3 at the Input-2 port. Of course, if output-3 would get the HDMI signals from every HDMI input, please learn EDID information from output3 to all four HDMI inputs. For more information about EDID Learning, please refer to EDID LEARNING section.
Q My TV can support 1080p, but why there is no audio?
A The factory default EDID of this device is 1080p & 2ch audio. However, there would be a problem after you change to use 1080p & 7.1ch if the TV cannot support 7.1ch audio. Please use the default EDID,1080p &2ch audio.
Q When I set an audio amplifier (AV receiver) between TV and the matrix to extract 7.1ch audio, but why there is still no audio?
A Basically, the default EDID of the chosen input can support 7.1ch audio, but the problem is that the EDID of the amplifier still cannot match the default setting. Therefore, the best method is to learn EDID from the amplifier directly. Please refer to EDID LEARNING section and follow the steps to learn the EDID. When learning EDID from the amplifier, user just needs to connect the matrix and amplifier. Please don't connect HDMI cable between amplifier and TV when the EDID learning is proceeding.
Q When I play the same content upon multi-displays, why only the TV equipped with amplifier can have 7.1ch audio, and the others don't have 7.1ch audio even no stereo?
A Due to the limitation of HDMI, the source only can choose one video and one audio format to play, which can be either 1080p and 7.1ch or 1080p and stereo audio. It means when the user sets the matrix at 1080p and 7.1ch, the source will only play the content under this format. Therefore if the TV cannot decode 7.1ch audio, there is definitely no audio.
Support
For more info or tech support http://www.siig.com/support
Nov, 2018 Copyright © 2018 by SIIG, Inc. All rights reserved.