DV-DC996 - DVD player YAMAHA - Free user manual and instructions
Find the device manual for free DV-DC996 YAMAHA in PDF.

| Product Type | DVD Player |
| Brand | Yamaha |
| Model | DV-DC996 |
| Dimensions (W x H x D) | 430 mm x 55 mm x 250 mm |
| Weight | 2.8 kg |
| Power Supply | AC 120V, 60Hz (US model) |
| Power Consumption | 15 W (standby: <1 W) |
| Playback Formats | DVD-Video, DVD-R/RW, DVD+R/RW, CD-DA, CD-R/RW, MP3, JPEG |
| Video Outputs | Composite Video (RCA), S-Video, Component Video (Y, Pb, Pr) |
| Audio Outputs | 2-channel analog (RCA), Coaxial digital audio |
| Disc Compatibility | 12 cm and 8 cm discs |
| Remote Control | IR remote with full function buttons |
| Front Panel | Power button, Disc tray, Display panel, Open/Close button, Play/Pause, Stop, Skip |
| Rear Panel | Video outputs, Audio outputs, Power cord, Coaxial out |
| Region Code | Region 1 (North America) |
| Maintenance | Clean lens with DVD lens cleaner disc; wipe exterior with soft dry cloth |
| Safety | Do not place near water or heat sources; use only supplied power cord |
| Spare Parts Availability | Contact Yamaha customer service for remote control and power supply |
Frequently Asked Questions - DV-DC996 YAMAHA
User questions about DV-DC996 YAMAHA
0 question about this device. Answer the ones you know or ask your own.
Ask a new question about this device
Download the instructions for your DVD player in PDF format for free! Find your manual DV-DC996 - YAMAHA and take your electronic device back in hand. On this page are published all the documents necessary for the use of your device. DV-DC996 by YAMAHA.
USER MANUAL DV-DC996 YAMAHA
1 To assure the finest performance, please read this manual carefully. Keep it in a safe place for future reference.
2 Install this unit in a well ventilated, cool, dry, and clean place with at least 5 cm above, behind and on the both sides of this unit - away from direct sunlight, heat sources, vibration, dust, moisture, and/or cold.
3 Position this unit away from other electrical appliances, motors and transformers to avoid humming sounds, do not place this unit where it may get exposed to rain or any kind of liquid to prevent fire or electrical shock.
4 Avoid extreme temperature swings or excessive use of humidifier in the room where this unit is installed to prevent condensation inside this unit, which may cause an electrical shock, fire, damage to this unit, and/or personal injury.
5 Do not cover this unit with a newspaper, a tablecloth, a curtain, etc. in order not to obstruct heat radiation. If the temperature inside this unit rises, it may cause fire, damage to this unit and/or personal injury.
6 Avoid installing is unit in a place where foreign objects and liquid might fall. It might cause a fire, damage to this unit and/or personal injury. Do not place the following objects on this unit:
- Other components, as they may cause damage and/or discoloration on the surface of this unit.
- Burning objects (i.e., candles), as they may cause fire, damage to this unit and/or personal injury.
- Containers with liquid in them, as they may cause an electrical shock to the user and/or damage to this unit.
7 Do not operate this unit upside-down. It may overheat, possibly causing damage.
8 Do not use force on switches, controls or connection cables. Never pull the cables when disconnecting them.
9 Only voltage specified on this unit must be used. Using this unit with a higher voltage than specified is dangerous and may result in fire or other accidents. YAMAHA will not be held responsible for any damage resulting from the use of this unit with a voltage other than that specified.
10 Do not attempt to clean this unit with chemical solvents; this might damage the finish. Use a clean, dry cloth.
11 Disconnect the power cord from the wall outlet when not planning to use this unit for a long period of time, or during an electrical storm, as they may cause damage by lightning.
12 Do not attempt to modify or fix this unit. Contact the qualified YAMAHA service personnel when any service is needed. Cabinet should never be opened for any reasons.
13 Be sure to read 'TROUBLESHOOTING' section regarding common operating errors before concluding that this unit is faulty.
DANGER
Visible laser radiation when open. Avoid direct exposure to beam.
When this unit is plugged to the wall outlet, do not place your eyes close to the opening of the disc tray and other openings to look into inside.
Laser component in this product is capable of emitting radiation exceeding the limit for Class 1.
This unit is designed for home use only. Do not use this unit for business purposes.
Be sure to place this unit on a level surface. If not so, this unit will fail to work normally at the PLAYXCHANGE operation and cause damage to the disc(s) and this unit itself.
Caution for moving this unit
- When moving this unit, first remove all discs from the disc table and close the table by pressing the OPEN/CLOSE button, and then switch off the power after you confirm that the front panel display indicates as follows.

text_image
2 3 4 5 00:00:00Never switch off the power if the front panel display is not pictured as above, otherwise the unit will break down during moving because the internal mechanism is not locked.
- When moving this unit, be sure to first disconnect the power cord from the AC outlet and disconnect all cords connecting this unit to other equipment.
■ For U.K. customers
If the socket outlets in the home are not suitable for the plug supplied with this appliance, it should be cut off and an appropriate 3 pin plug fitted. For details, refer to the instructions described below.
Note
- The plug severed from the mains lead must be destroyed, as a plug with bared flexible cord is hazardous if engaged in a live socket outlet.
■ Special Instructions for U.K. Model
IMPORTANT
THE WIRES IN MAINS LEAD ARE COLOURED IN ACCORDANCE WITH THE FOLLOWING CODE:
Blue: NEUTRAL
Brown: LIVE
As the colours of the wires in the mains lead of this apparatus may not correspond with the coloured markings identifying the terminals in your plug, proceed as follows:
The wire which is coloured BLUE must be connected to the terminal which is marked with the letter N or coloured BLACK. The wire which is coloured BROWN must be connected to the terminal which is marked with the letter L or coloured RED.
Making sure that neither core is connected to the earth terminal of the three pin plug.
FEATURES
- 5-Disc Auto-changer for playing DVD-Video, audio CD and Video CD
- PLAYXCHANGE; Disc Changing Capability while playing another
- 1 OPTICAL and 1 COAXIAL Digital Outputs for Dolby Digital, DTS, MPEG and Linear PCM
-
96 kHz, 24 Bit Audio DAC for high sound quality
-
Compatible with almost all features of DVD discs (Multi-angle, Multi-language, Parental control, etc.)
- Easy Operation through On-screen Menu (Graphical User Interface)
- Multi-speed Playback Capability
- Component Video [U.S.A, Canada, Australia and General models], S-Video Outputs for high picture quality
CONTENTS
INTRODUCTION
FEATURES 1
GETTING STARTED 2
Checking the Package Contents .... 2
Disc Information 2
CONTROLS AND FUNCTIONS...... 4
Front Panel/Remote Control 4
Display 6
PREPARATION
REMOTE CONTROL 7
Installing Batteries in the Remote Control ... 7
Battery Replacement 7
Using the Remote Control.... 7
CONNECTIONS 8
Notes about Audio Connections...... 8
Digital Terminals 9
Analog Terminals 9
Video Terminals 10
Remote Control in/out Terminals [U.S.A. and Canada models] ...... 11
PLAYBACK
BASIC OPERATION 12
Before Starting Playback.... 12
Playing a Disc 13
Search (to advance or reverse playback rapidly).... 14
Skipping Chapters / Tracks 14
Still Picture (to pause playback) 15
Frame Advance / Reverse 15
Slow-Motion Play 15
SELECTING PLAY MODES...... 16
Repeat Play.... 16
A-B Repeat 17
Random-Sequence Play [VCD] [CD] ..... 17
Program Play [VCD] [CD].... 18
ADVANCED FEATURES.... 19
Menu Screen [DVD] 19
Playback Control [VCD] 19
Switching Audio Tracks [DVD] [VCD] ..... 20
Switching Subtitle Tracks [DVD] ...... 21
Switching Camera Angles 21
ON-SCREEN MENU 22
Operating On-Screen Menu 22
Disc Information Screen 23
Player's Information Screen 24
Shuttle Screen.... 24
SETUP MENU
SETUP MENU 25
Operating the Setup Menu 25
DESCRIPTION OF EACH ITEM...... 26
- Disc Language [DVD] 26
2.Ratings [DVD] 27
3.Menu Language 28
4.On-Screen Massages.... 28
5.FL Display 28
6.TV Aspect 28
-
Digital Audio Output 29
-
Other Settings ...... 30
APPENDIX
TROUBLESHOOTING 31
GLOSSARY 33
LANGUAGE CODE LIST 33
SPECIFICATIONS 34

DOLBY
DIGITAL
Manufactured under license from Dolby Laboratories. "Dolby", "Pro Logic" and the double-D symbol are trademarks of Dolby Laboratories. Confidential Unpublished Works. ©1992 – 1997 Dolby Laboratories, Inc. All rights reserved.
GETTING STARTED
Checking the Package Contents
Check that the following items are included in your package.
Remote control
text_image
YAMAHABatteries (AA, R06, UM-3) RCA pin cable (audio/video)

Disc Information
This DVD changer is designed for use with following types of disc only. Never attempt to load any other type of disc into this unit because it may damage this unit.
| Type of disc DVD-Video | 8 cm disc/12 cm disc | Video CD8 cm disc/12 cm disc | Audio CD8 cm disc/12 cm disc |
| Mark printed on the disc |   |   |  |
Notes
• This unit is not compatible with CD-R, CD-RW, Photo-CD, CD-ROM, DVD-Audio, DVD-ROM, DVD-RAM, SVCD, CDV, etc.
- Do not use any non standard shaped discs (heart, etc.).
- Do not use disc with tape, seals, or paste on it, damage to the unit may result.
- To reproduce DTS sound, it is necessary to connect a DTS decoder to this unit.
- Some DVD and VCD features described in this manual may not be available or may operate in a different way because they are subject to software producer's design. Check each disc's instruction.
Example:
*appears when you press the skip buttons to move to the next section.
■ Region management information DVD
This DVD player is designed to meet DVD standard that supports region management system. Check the regional code number marked on the disc packages. If the number does not match this unit's region number (see the below table or the back of this unit), this unit refuses to play that disc.
| Model Region number of this unit Discs can be played | |||
| U.S.A. and Canada models |  |  , ,  | or a mark which includes the region number ‘1’. |
| Europe and U.K. models |  |  , ,  | or a mark which includes the region number ‘2’. |
| General model |  |  , ,  | or a mark which includes the region number ‘3’. |
| Australia model |  |  , ,  | or a mark which includes the region number ‘4’. |
■ Notes about handling discs
- Hold discs by touching only the edges or center hole.
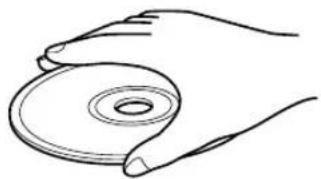
natural_image
Line drawing of a hand holding a circular object (no text or symbols)- When a disc is not currently being loaded on the disc tray, store it in an appropriate case.
- Playback of discs is generally not affected by small particles of dust or fingerprints on their playing surface. Even so, they should be kept clean. Wipe by using a clean, dry cloth. Do not wipe with a circular motion; wipe straight outward from the center.
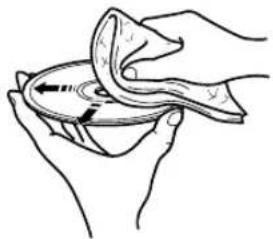
natural_image
Line drawing of two hands holding a circular object with a cloth, no text or symbols present- Do not try to clean the disc's surface by using any type of disc cleaner, record spray, anti-static spray or liquid, or any other chemical-based liquid, because such substances might irreparably damage the disc's surface.
- Do not expose discs to direct sunlight, high temperature or high humidity for a long period of time, because these might warp or otherwise damage the disc.
No!

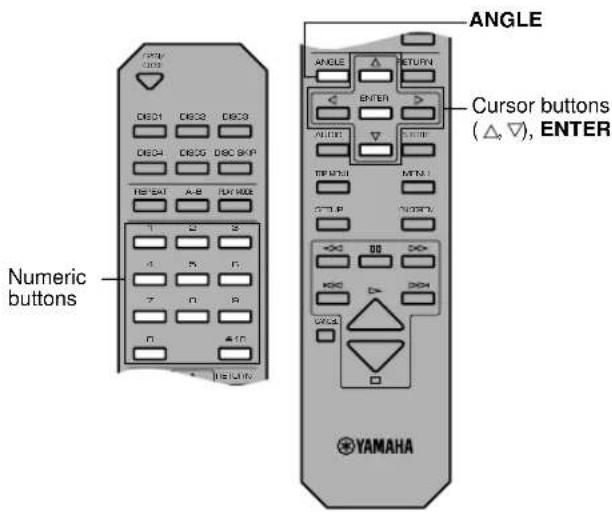
CONTROLS AND FUNCTIONS
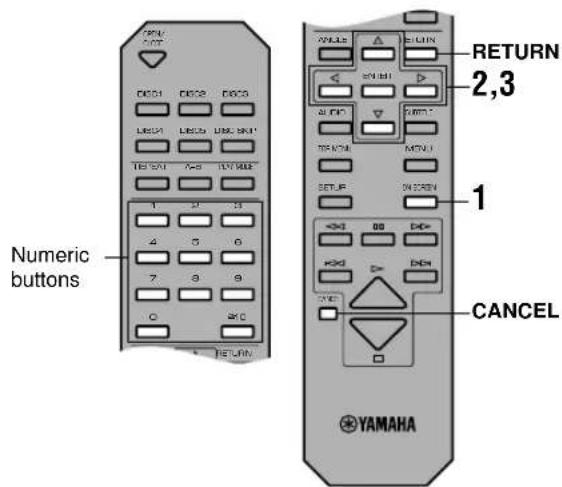
Front Panel/Remote Control
Front Panel
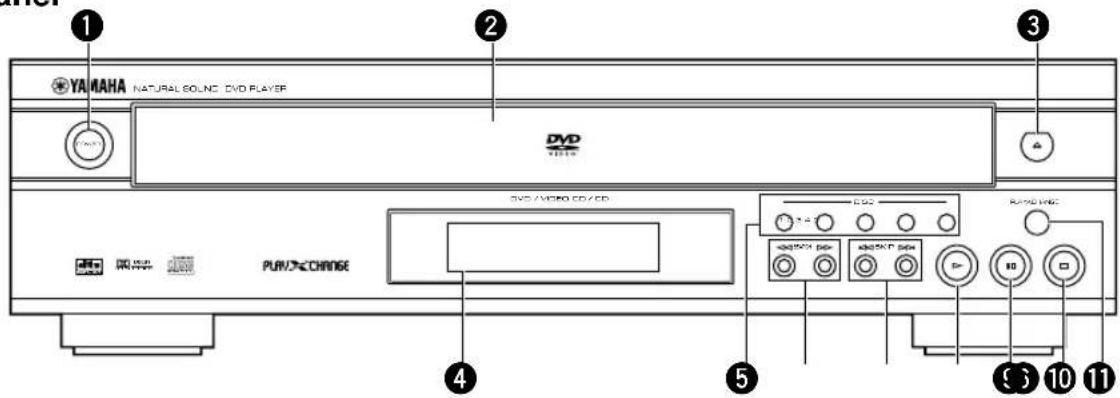
text_image
YAMAHA NATURAL SOLNC DVD PLAYER DVD PUB/2 CHANGE DVD VIDEO CD/CD 1 3 4 5 6 8 10 9 10 117
Remote Control
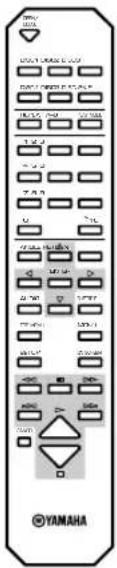
text_image
3 5 12 13 14 15 16 17 18 19 6 7 8 10 YAMAHA 20 21 22 23 24 25 26① POWER (p.13)
Press to turn the power on and off.
② Disc tray (p.13)
Up to 5 discs can be loaded on this tray.
③ open/close(OPEN/CLOSE) (p.13)
Press to open and close the disc tray.
④ Display panel
See p.6.
⑤ DISC (1,2,3,4,5) (p.13)
Press to play the disc loaded on the guide of the corresponding number.
6 (SEARCH) (p.14)
Use to advance or reverse playback rapidly.
⑦ ◀◀, ▷◀ (SKIP) (p.14)
▷▷: Press to skip to the beginning of the next chapter (track).
◀◀: Press to skip to the beginning of the currently played chapter (track).
8 ▷ (PLAY) (p.13)
Press to start playback.
⑨ (PAUSE) (p.15)
Press to pause.
10 □ (STOP) (p.13)
Press to stop playback.
⑪ PLAYXCHANGE (p.14)
Press to open and close the disc tray during playback. You can exchange discs other than the one being played.
⑫ REPEAT (p.16)
Press to repeat playback of a title, chapter, track, etc.
⑬ A-B (p.17)
Press to specify two points and to repeat playback between them.
14 Numeric buttons
Use to select a title, chapter, track, etc.
15 ANGLE
Press to change angles when the scene of the disc being played contains two or more angles.
⑯ Cursor buttons, ENTER
Use to select and determine an item on menu screen,etc.
17 AUDIO (p.20)
Press to change audio track language and/or format when the disc being played contains two or more different audio tracks.
18 TOP MENU
Press to go to the initial screen when operating in the menu screen.
19 SETUP (p.25)
Press to call up SETUP MENU screen.
20 DISC SKIP
Press to select another disc.
② PLAY MODE (p.17, 18)
Press to switch among random play, program play, and normal play.
22 RETURN (p.25)
Press to go back to the previous screen when operating in the menu screen.
②3 SUBTITLE (p.21)
Press to change subtitles when the disc being played contains several subtitles.
24 MENU (p.19)
Press to call up menu screen contained in the disc.
25 ON SCREEN (p.22)
Press to turn the on-screen menu (GUI icons) on and off on the video monitor.
26 CANCEL
Press to cancel a specific mode or a setting.
Display
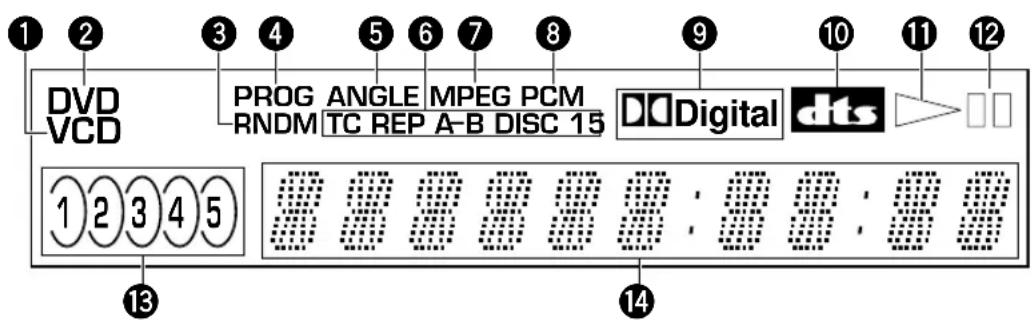
VCD lights up when a Video CD is selected and CD lights up when a CD is selected.
② DVD
Lights up when a DVD is selected.
③ RNDM
Lights up during random-sequence play.
4 PROG
Lights up during program play.
⑤ ANGLE
Lights up when the scene currently played contains different angle(s).
⑥ Repeat mode indicator
- T and REP light up when repeating a title or a track.
• C and REP light up when repeating a chapter. - REP and A-B light up when repeating between the two points you have specified.
- REP and DISC 1 light up when repeating the currently selected disc.
- REP and DISC 5 light up when repeating all the discs loaded on the disc tray.
⑦ MPEG DVD
Lights up when an audio track encoded with MPEG format is selected.
8 PCM DVD
Lights up when an audio track encoded with Linear PCM format is selected.
9 Digital DVD
Lights up when an audio track encoded with Dolby digital format is selected.
⑩ dts DVD CD
Lights up when an audio track encoded with DTS format is selected.
11
Lights up during playback.
12
Lights up while playback is paused.
⑬ 12345
One of these numbers lights up to show the currently selected disc, which is loaded on the guide of the corresponding number.
⑭ Multi-information display
Shows various information such as title, chapter or track number, elapsed playing time etc.
REMOTE CONTROL
Installing Batteries in the Remote Control
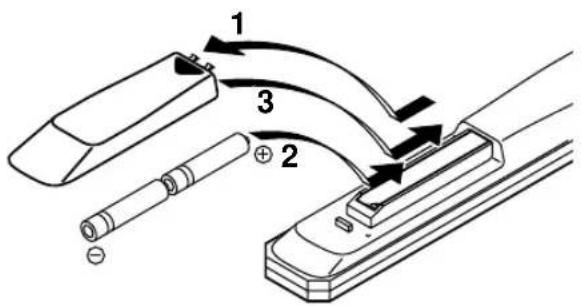
text_image
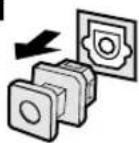
Diagram showing a device with labeled parts and directional arrows indicating motion or movement.1 Turn the remote control over and slide the battery compartment cover in the direction of the arrow.
2 Insert the batteries (AA, R06, UM-3 type) according to the polarity markings on the inside of the battery compartment.
3 Close the battery compartment cover.
Battery Replacement
If the remote control operates only when it is close to the unit, the batteries are weak. Replace all the batteries with new ones.
Notes
- Use only AA, R06 or UM-3 batteries for replacement.
- Be sure the battery polarity is correct. (See the illustration inside the battery compartment.)
- Remove the batteries if the remote control will not be used for an extended period of time.
- If the batteries have leaked, dispose of them immediately. Avoid touching the leaked material or letting it come into contact with clothing, etc. Clean the battery compartment thoroughly before installing new batteries.
Using the Remote Control
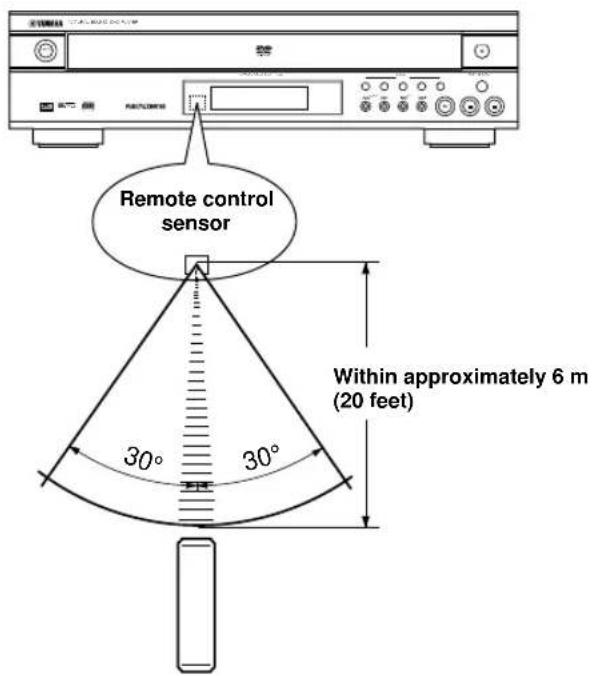
text_image
Remote control sensor Within approximately 6 m (20 feet) 30° 30°The remote control transmits a directional infrared beam. Be sure to aim the remote control directly at the infrared sensor during operation. When the sensor is covered or there is a large object between the remote control and the sensor, the sensor cannot receive signals. The sensor may not be able to receive signals properly when it is exposed to direct sunlight or a strong artificial light (such as a fluorescent or strobe light). In this case, change the direction of the light or reposition the unit to avoid direct lighting.
Notes
- Handle the remote control with care.
- Do not spill water, tea or other liquids on the remote control.
- Do not drop the remote control.
- Do not leave or store the remote control in the following conditions:
– high humidity or temperature such as near a heater, stove or bath; - dusty places; or
- extremely low temperature.
CONNECTIONS
CAUTION
- Never connect this unit and other equipment to power supply until all connections have been completed.
Be sure all connections are made correctly, observing the color-coding of terminals of both this unit and the equipment to be connected. Also refer to the instructions of the equipment to be connected.
text_image
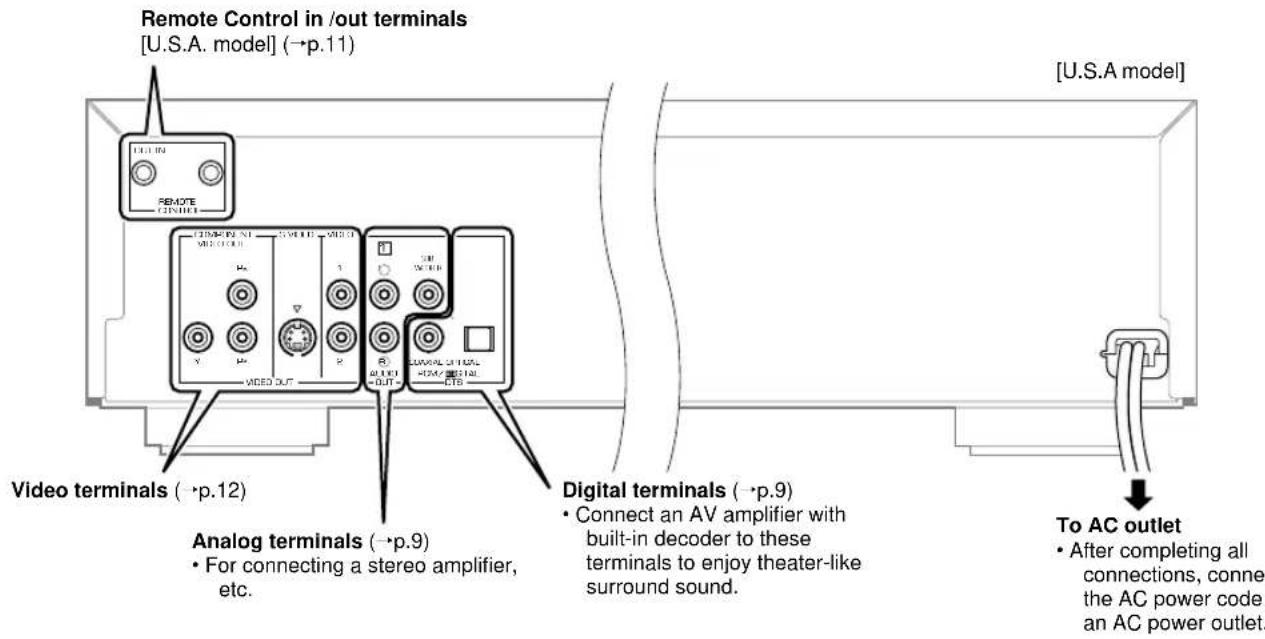
Remote Control in /out terminals [U.S.A. model] (→p.11) Video terminals (→p.12) Analog terminals (→p.9) • For connecting a stereo amplifier, etc. Digital terminals (→p.9) • Connect an AV amplifier with built-in decoder to these terminals to enjoy theater-like surround sound. To AC outlet • After completing all connections, connect the AC power code an AC power outlet.Notes about Audio Connections
Select the correct output format at '7 Digital Audio Output' on the SETUP MENU in accordance with your AV system.
| Equipment to be connected | Appropriate settings at ‘7 Digital Audio Output’ | |||
| 1. PCM Down Conversion* | 2. Dolby Digital | 3. DTS Digital Surround | 4. MPEG (Europe, U.K. and Australia models) | |
| AV amplifier with digital input(s) and Dolby Digital/DTS/MPEG decoder | Yes | Bitstream | Bitstream | Bitstream |
| AV amplifier with digital input(s) and Dolby Digital/ MPEG*1 decoder (without DTS decoder) | Yes | Bitstream | Off** | Bitstream |
| AV amplifier with Dolby Prologic decoder | Yes | PCM*** | Off** | PCM*** |
| Stereo amplifier without digital input | No | PCM*** | Off** | PCM*** |
* Select 'No' when the connected equipment has 96-kHz/24-bit D/A converter to enjoy high-fidelity audio. However, no digital signal is output if the disc you play is copyright-protected.
** No signal is output from this unit's digital audio output terminal.
*** Multi-channel signals are downmixed to 2-channels Linear PCM and then output from both digital and analog output terminals.
• See p.29 for further information.
Digital Terminals
[U.S.A. model]
flowchart
graph TD
    A["AV amplifier"] --> B["Component video output"]
    A --> C["Video output"]
    A --> D["Audio output"]
    A --> E["Subwoofer"]
    A --> F["Center speaker"]
    A --> G["Left main speaker"]
    A --> H["Right main speaker"]
    A --> I["Left rear speaker"]
    A --> J["Right rear speaker"]
1
2
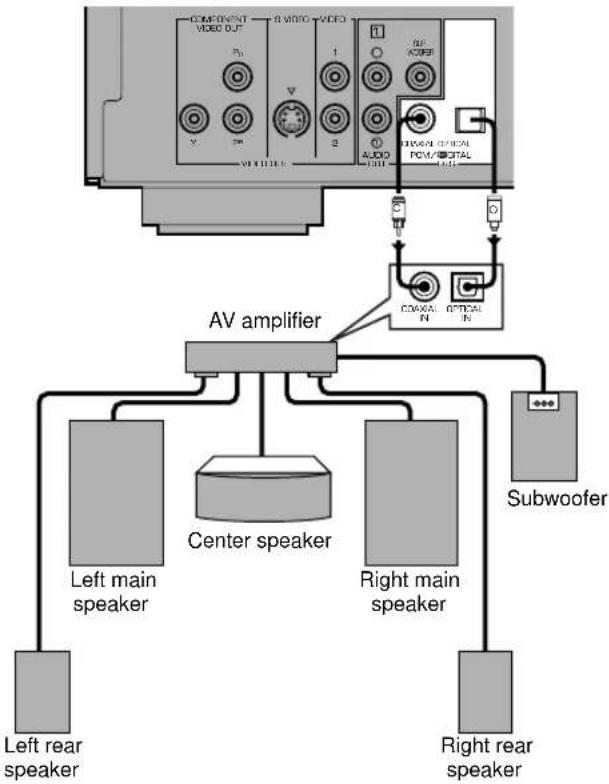
This unit has COAXIAL and OPTICAL digital output terminals. Connect one or both of them to your AV amplifier equipped with Dolby digital, DTS, or MPEG decoder using each specific cable (separate purchase).
■ When connecting the optical fiber cable
- Remove the cover when using the OPTICAL terminal. Keep the cover and attach it when the terminal is not being used to protect it from dust.
- Bend an optical cable as little as possible.
- Use commercially available optical fiber cable that conforms to EIA standards. Other cables may not function correctly.
Analog Terminals
[U.S.A. model]
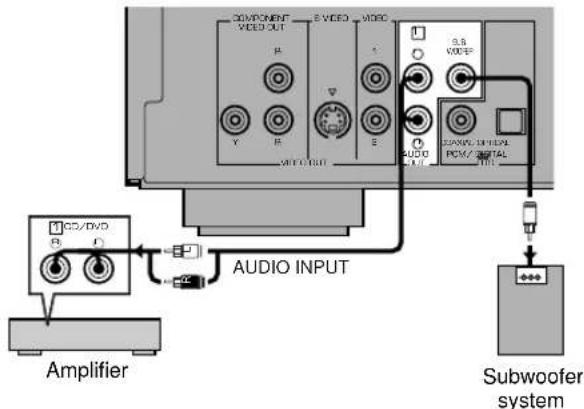
text_image
CD/DVD VIDEO OUT B VIDEO VIDEO VREF Y R E 3.8 W00EP AUDIO INPUT PCM/215TAL UAVOC AUX AUDIO INPUT Amplifier Subwoofer systemConnect AUDIO OUT L (left) and R (right) terminals of this unit to corresponding input terminals of your audio equipment such as stereo amplifier.
If the audio equipment does not have subwoofer output, you can use this unit's SUBWOOFER terminal to connect your subwoofer system (subwoofer with built-in amplifier). In that case, set the 'subwoofer' item on the on-screen menu to 'ON' (→p.24).
Video Terminals
[U.S.A. model]

flowchart
graph TD
    A["<A> <B> <C>"] --> B["COMPONENT VIDEO OUT"]
    A --> C["COMPONENT VIDEO IN"]
    A --> D["S VIDEO INPUT"]
    A --> E["VIDEO"]
    B --> F["VIDEO OUT"]
    C --> G["VIDEO OUT"]
    D --> H["VIDEO OUT"]
    E --> I["VIDEO OUT"]
    J["COMPONENT VIDEO OUT"] --> K["COMPONENT VIDEO IN"]
    L["COMPONENT VIDEO IN"] --> M["COMPONENT VIDEO OUT"]
    N["COMPONENT VIDEO IN"] --> O["COMPONENT VIDEO OUT"]
    P["COMPONENT VIDEO IN"] --> Q["COMPONENT VIDEO OUT"]
    R["COMPONENT VIDEO OUT"] --> S["COMPONENT VIDEO OUT"]
    T["COMPONENT VIDEO IN"] --> U["COMPONENT VIDEO OUT"]
    V["COMPONENT VIDEO IN"] --> W["COMPONENT VIDEO OUT"]
    X["COMPONENT VIDEO IN"] --> Y["COMPONENT VIDEO OUT"]
    Z["COMPONENT VIDEO IN"] --> AA["COMPONENT VIDEO OUT"]
    AB["COMPONENT VIDEO IN"] --> AC["COMPONENT VIDEO OUT"]
    AD["COMPONENT VIDEO IN"] --> AE["COMPONENT VIDEO OUT"]
    AF["COMPONENT VIDEO IN"] --> AG["COMPONENT VIDEO OUT"]
    AH["COMPONENT VIDEO IN"] --> AI["COMPONENT VIDEO OUT"]
    AJ["COMPONENT VIDEO IN"] --> AK["COMPONENT VIDEO OUT"]
    AL["COMPONENT VIDEO IN"] --> AM["COMPONENT VIDEO OUT"]
    AN["COMPONENT VIDEO IN"] --> AO["COMPONENT VIDEO OUT"]
If your AV amplifier has video output terminals, connect your amplifier (and then to your video monitor) so that you can use one video monitor for several different video sources (LD, VCR etc.) by simply switching the input source selector of your amplifier.
This unit has three types of video output terminals. Use one of them in accordance with the input terminals of the equipment to be connected.
Note
- Do not connect this unit to a video monitor through a video cassette recorder. If you do so, the picture may not be played back properly due to the copyright protection technology incorporated in this unit.
■ Component Video terminal
U.S.A, Canada, Australia and General models
Component video connection achieves high fidelity in reproducing colors (better performance than S-video connection), separating video signal into luminance (Y, terminal color-coded as green), and color difference ( P_B , blue/ P_R , red). Use commercially available coaxial cables. Amplifier (and Video monitor) with component input is required. Observe the color of each terminal when connecting. If your amplifier does not have component output terminals, connecting this unit's component output directly to your video monitor's component input can reproduce better video image.
Note
- Do not connect this unit's COMPONENT VIDEO OUT terminals to component video input terminals special for HD (High-Definition) TV.
■ S-Video terminal
S (separate) video connection achieves a clearer picture than composite video connection by separating color and luminance when transmitting signals. Use commercially available S-video cable. Amplifier (and Video monitor) with S-video input is required.
■ Composite Video terminal (1, 2)
Use RCA video cable supplied with this unit when connecting this unit to a video monitor.
VIDEO 1, 2 terminals of VIDEO OUT output the same signal. You can connect one to your amplifier's input using supplied RCA cable, and the other to another amplifier or a video monitor.
[U. K. model]
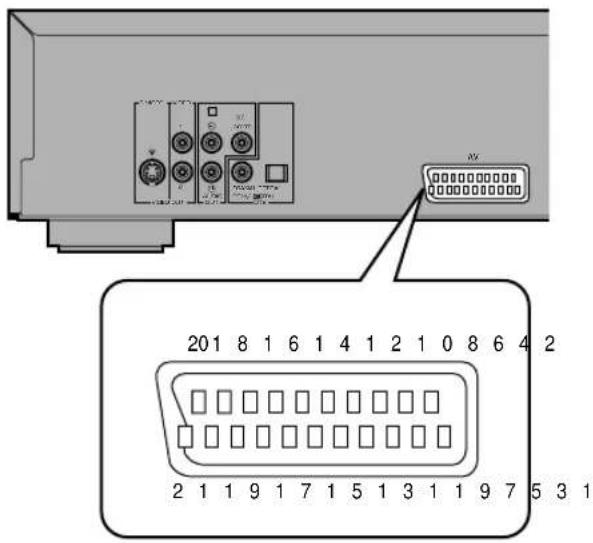
text_image
201 8 1 6 1 4 1 2 1 0 8 6 4 2 2 1 1 9 1 7 1 5 1 3 1 1 9 7 5 3 1■ 21-pin SCART terminal
U.K. and Europe models
If your video monitor has only 21-pin terminal for video input, and you want to connect it directly to this unit, you can use this unit's 21-pin SCART output terminal (this terminal does not output RGB component signals).
| Pin no. | Video | S video |
| 1 | Audio output (R) | Audio output (R) |
| 3 | Audio output (L) | Audio output (L) |
| 4 | Audio GND | Audio GND |
| 8 | Switching voltage | Switching voltage |
| 13 | No connection | S video (C) output GND |
| 14 | Blanking GND | Blanking GND |
| 15 | No connection | S video (C) output |
| 16 | Blanking | Blanking |
| 17 | Video output GND | S video (Y) output GND |
| 18 | Video input GND | Video input GND |
| 19 | Video output | S video (Y) output |
| 21 | GND | GND |
(Pin no.2, 5 to7, 9 to 12, 20: no connection)
- You can select 'Video' or 'S-Video' at the '6 AV Output' on the setup menu '9. Other settings'. See p.30.
Remote Control in/out Terminals [U.S.A. and Canada models]
[U.S.A. model]
![YAMAHA DV-DC996 - Remote Control in/out Terminals [U.S.A. and Canada models] - 1](/content/2026/06/1195566/images/b80a25a86ad4df3a151768e8a95aa14e21b73f4c43ad3ca264cfb7c8817be6c5.jpg)
natural_image
Interior view of a computer interface showing ports, connectors, and a control panel (no readable text or symbols)These terminals are used for custom installation system that transmits remote control signals via cables. Connect this unit's REMOTE CONTROL IN to the Remote control output of the control unit of your system.
By connecting this unit's REMOTE CONTROL OUT to another piece of equipment's Remote control input terminal, you can also operate that equipment with the system remote control.
BASIC OPERATION
Before Starting Playback
To play a disc properly, you need to adjust the formats of audio and video signals output from this unit in accordance with the equipment connected to this unit. See p.25 to 30 for more detailed information.
CAUTION
- Be sure to select the appropriate positions at '7 Digital Audio Output' on the SETUP MENU. Otherwise, there may be a case where digital signal which the connected equipment cannot process will be output and its noise could damage your ears and your speakers.
■ 6 TV Aspect
| Type of the connected video monitor Appropriate setting | |
| Conventional type 1. 4:3 | |
| Widescreen type 2. 16:9 | |
■ 7 Digital Audio Output
• To output digital signal from this unit
| The connected audio equipment has | Corresponding item Appropriate setting | |
| 96-kHz/24-bit D/A converter 1. | PCM Down Conversion | No |
| Dolby Digital decoder 2. Dolby D | Digital Bitstream | |
| DTS decoder 3. DTS Bitstream | ||
| MPEG decoder 4. MPEG [Europe | and U.K. models only] | Bitstream |
Notes
- When you select 'No' at 1. PCM Down Conversion, digital signal may not be output depending on the disc you play.
- Make sure to connect digital terminals of both this unit and the audio equipment as instructed on page 9.
• To output analog signal from this unit
| Item in ‘7 Digital Audio Output’ | Appropriate setting |
| 1. PCM Down Conversion | No |
| 2. Dolby Digital | PCM |
| 3. DTS | Off |
| 4. MPEG [Europe and U.K. models only] | PCM |
- Adjust some other settings such as on-screen display language, ratings, etc. as necessary. See SETUP MENU (p.25 to 30) for detail.
Playing a Disc
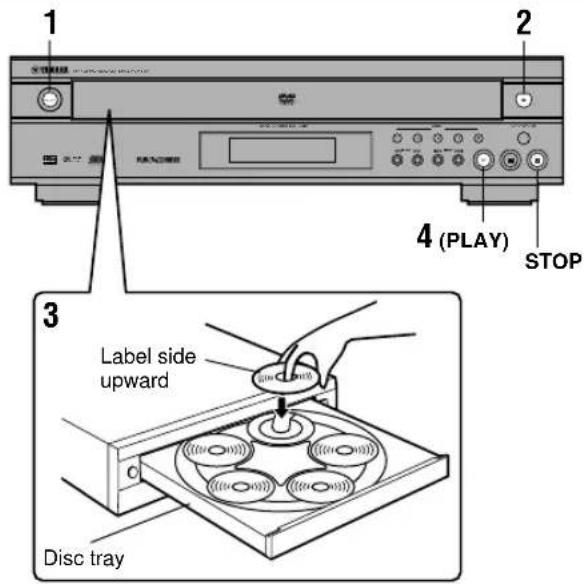
text_image
1 2 4 (PLAY) STOP 3 Label side upward Disc tray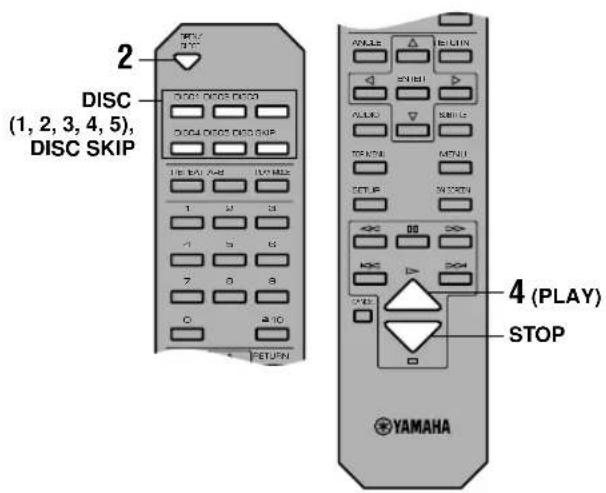
text_image
2 DISC (1, 2, 3, 4, 5), DISC SKIP 1 2 3 4 5 6 7 8 9 10 11 12 13 14 15 16 17 18 19 20 21 22 23 24 25 26 27 28 29 30 31 32 33 34 35 36 37 38 39 40 41 42 43 44 45 46 47 48 49 50 51 52 53 54 55 56 57 58 59 60 61 62 63 64 65 66 67 68 69 70 71 72 73 74 75 76 77 78 79 80 81 82 83 84 85 86 87 88 89 90 91 92 93 94 95 96 97 98 99 100U.S.A., Canada and General models

text_image
Press PLAY to Chapter PreviewEurope, U.K. and Australia models

text_image
Press PLAY to Chapter Review■ Preparation
Select DVD as the input source on your AV amplifier.
1 Press POWER to turn the power on.
2 Press OPEN/CLOSE (or ≅) to open the disc tray.
3 Load discs.
Use the disc guides (numbered, 1 to 5) to align the discs correctly.
4 Press ▷ (PLAY).
The disc tray closes and playback starts. This unit plays all discs on the tray in sequence.

- If necessary, select a desired disc using DISC SKIP or one of the DISC (1, 2, 3, 4 or 5) buttons.
- When a menu screen appears:
DVD See 'Menu Screen' in p.19. VCD See 'Playback Control' in p.19.
Note
- When this unit finishes playing a DVD, this unit stops playback or shows the menu screen and does not start playing the next disc.
■ To stop playback
Press □ (STOP).
Resume function
This unit memorizes where □ (STOP) was pressed (▶ indicator flashes on the display). When you press ▷ (PLAY) in this status, playback resumes from where it was stopped. To clear the memory, press □ (STOP) once more so that the ▶ indicator goes off.
Notes
- This function may not work with some discs or on some part of a disc.
- If you turn the power off, resume function is cleared.
Chapter review function [DVD]
This function plays the first few seconds of each chapter from the beginning of the title up to where the operation was stopped before starting normal playback so that you can review previous chapters.
1 Press > (PLAY) while the message as illustrated on the left is displayed on the screen.
2 Press ▷ (PLAY) again while the message is displayed on the screen.
Notes
- This function may not work with some DVDs.
- Canceling resume function will also clear the chapter review function.
text_image
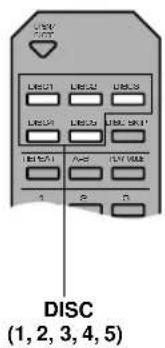
DISC (1, 2, 3, 4, 5)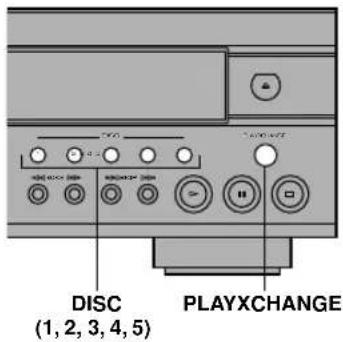
text_image
DISC (1, 2, 3, 4, 5) PLAYXCHANGE■ After operation
When this unit is not in use, remove discs and press POWER.
■ To select a specific disc
Press DISC (1, 2, 3, 4 or 5).
Playxchange
By pressing PLAYXCHANGE, you can open the disc tray and load or replace discs without interrupting play. However, never load a disc on the guide half hidden inside the unit because the disc currently being played is to be placed there.
Search (to advance or reverse playback rapidly)
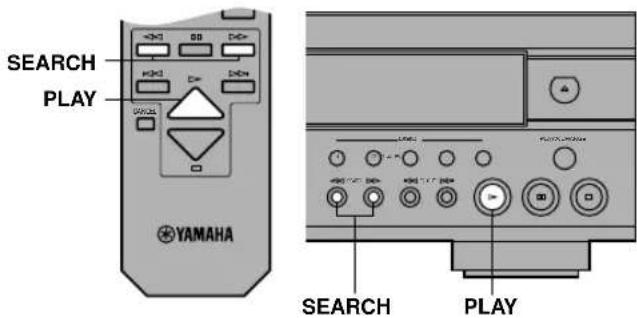
text_image
SEARCH PLAY YAMAHA SEARCH PLAYPress SEARCH >> (or <++) to search forward (or backward) during playback.
- To return to normal play, press (PLAY).

- Pressing the button repeatedly increases searching speed.
Skipping Chapters / Tracks
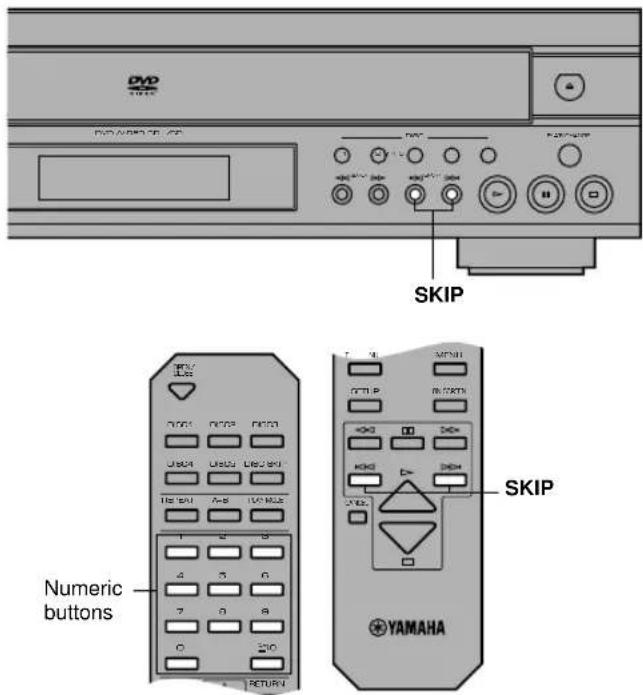
text_image
DVD SKIP Numeric buttons YAMAHAPress SKIP >> to skip forward or << to skip backward. Press once for each chapter (track) to be skipped.
Note
- When playing a VCD with playback control, skip operation may not function as described above.
■ To select a specific track VCD CD
Enter a desired track number using numeric buttons. To select a two-digit number, press ≥10 and then enter the upper figure and the last figure successively.
Example (to select track 17):
1 Press [ ≥10]
2 Press [1].
3 Press [7].
Still Picture (to pause playback)
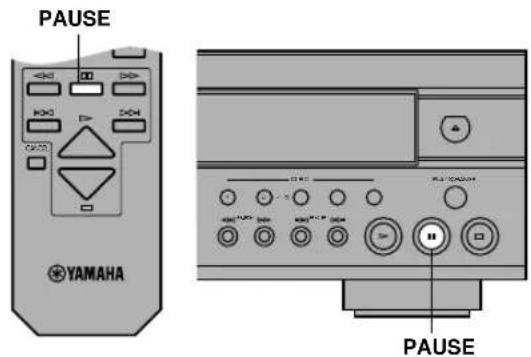
text_image
PAUSE YAMAHA PAUSEPress ☐ (PAUSE).
• To resume play, press ▷ (PLAY).
Frame Advance / Reverse
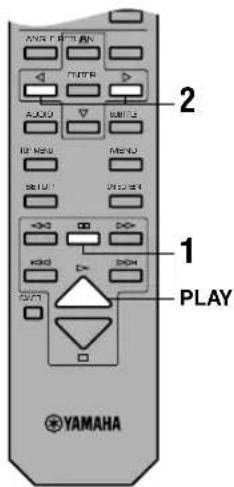
text_image
2 1 PLAY YAMAHADVD VCD
1 Press ☐ (PAUSE) during playback.
2 Press the cursor buttons [ , ◀] ▷
Each press advances (or reverses) still picture by one frame.
- To return to normal play, press (PLAY).
Slow-Motion Play
text_image
1 2 PLAY YAMAHA 2 PLAY 1DVD VCD
1 Press ☐ (PAUSE) during playback.
2 Press [◀◀, ▷▶].
• To return to normal play, press ▷ (PLAY).

- Pressing the button repeatedly increases the speed.
SELECTING PLAY MODES
Repeat Play

text_image
SPV CCT DISCI DISCI DISCI DISCI DISCI DISCI SKIP REPEAT M-H 1.2 P1 4.5 P 7.8 P 0 310 RE-UN
flowchart
graph TD
    A["Chapter Repeat"] --> B["TITLE Repeat"]
    B --> C["ALL DISC Repeat"]
    C --> D["REPEAT OFF"]
flowchart
graph TD
    A["Track REPEAT"] --> B["DISC REPEAT"]
    B --> C["RLL REPEAT"]
    C --> D["REPEAT OFF"]
Program repeat Random-sequence repeat
flowchart
graph TD
    A["STEP"] --> B["ALL REPEAT"]
    B --> C["REPEAT OFF"]
flowchart
graph TD
    A["①"] --> B["TRACK REPEAT"]
    B --> C["②"]
    C --> D["ALL REPEAT"]
    D --> E["③"]
    E --> F["REPEAT OFF"]
    F --> G["Feedback Loop"]
This function allows you to play your desired chapter, track or disc repeatedly.
■ Press [REPEAT] during playback.
Each time this button is pressed, repeat mode changes as follows. The name of the selected repeat mode scrolls once on the multi-information display and the corresponding indicators light up.
DVD
① CHAPTER REPEAT: The current chapter is played repeatedly.
⑥ TITLE REPEAT: The current title is played repeatedly.
© ALL REPEAT: All the discs loaded on the tray (DVD, VCD or CD) are played repeatedly.
(d) REPEAT OFF: Repeat play mode is canceled.
VCD CD
e TRACK REPEAT: The current track is played repeatedly.
④ DISC REPEAT: The current disc is played repeatedly.
⑨ ALL REPEAT: All the discs loaded on the tray (DVD, VCD or CD) are played repeatedly.
① REPEAT OFF: Repeat play mode is canceled.
Pressing [REPEAT] while playback is stopped switches 'ALL REPEAT' to 'REPEAT OFF' or vice versa.
■ Program repeat VCD CD
If REPEAT is pressed during program play (p.18), repeat mode changes as follows.
① 1 STEP REPEAT: Repeating the track being played
① ALL REPEAT: Repeating all the programmed tracks
⑨ REPEAT OFF: Canceling repeat mode (go back to normal program play)
■ Random-sequence repeat VCD CD
If REPEAT is pressed during random-sequence play (p.17), repeat mode changes as follows.
① TRACK REPEAT: Repeating the track being played
ALL REPEAT: Playing all the tracks repeatedly, each time in different random-sequence.
⑨ REPEAT OFF: Canceling repeat mode (go back to normal random-sequence play)
Notes
- Repeat play may not work properly with some DVDs.
- Repeat play does not work with an interactive DVD or during menu play of a VCD with playback control.
A-B Repeat
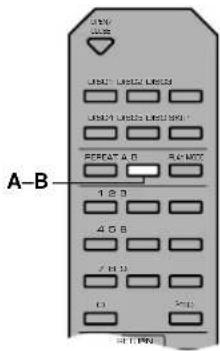
text_image
LINE LINE LINE1, LINE2, LINE3 LINE4, LINE5, LINE6, LINE7 PERFAT A B RUNOUT A-B 1 2 3 4 5 6 7 8 9 C1 SND HOTTON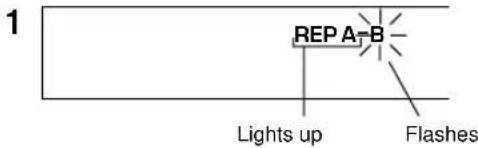
text_image
1 REP A-B Lights up Flashes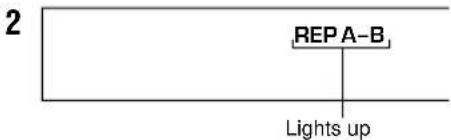
text_image
2 REP A-B Lights upThis function allows you to specify two points and play between them repeatedly.
1 Press A-B during play at the point where you want to start A-B repeat.
'REP' and 'A-' light up and 'B' flashes on the display.
2 Press A-B at the point where you want to end A-B repeat.
REP A-B appears on the display and repeat play of the section between point A and B starts.
■ To cancel A-B repeat
Press A-B repeatedly until A-B indicator on the display goes off.
Notes
- This function may not available with some DVDs.
- This function works only within a title (DVD) or a track (VCD, CD).
Random-Sequence Play [VCD] [CD]
![YAMAHA DV-DC996 - Random-Sequence Play [VCD] [CD] - 1](/content/2026/06/1195566/images/02747075e8d31db10c8fc8aa5eaff0db560fbe6f39f6c39e1c47bb79788c35b7.jpg)
text_image
1 2 STOP YAMAHA![YAMAHA DV-DC996 - Random-Sequence Play [VCD] [CD] - 2](/content/2026/06/1195566/images/a85d6593e919aabfbb2f084effadd6305320ea1c5f29b1ab7257c23371356891.jpg)
text_image
RNDM Lights upWhen you select this mode, this unit plays all tracks on all CDs and/or Video CDs loaded on the disc tray in random sequence.
1 Press PLAY MODE once or more while play-back is stopped.
RNDM indicator lights up on the display.
2 Press ▷ (PLAY) to start random-sequence play.
■ To cancel random-sequence mode
1 Press □ (STOP) twice during play.
Random-sequence play is suspended.
2 Press PLAY MODE once.
RNDM indicator goes off.
If you press > (PLAY) successively, normal playback starts from the beginning of the disc having been played before canceling random-sequence mode.
Opening the disc tray also cancels this mode.
Note
When this unit is in random-sequence mode while a Video CD (ver.2.0) is loaded, playback control is canceled during random-sequence playback.
Program Play [VCD] [CD]
![YAMAHA DV-DC996 - Program Play [VCD] [CD] - 1](/content/2026/06/1195566/images/b8209415702edb94d2915929fc61c34f275110e6bc3c0bc9e5c05a7804de8dfe.jpg)
text_image
2 1 3 1 2 3 4 ENTER Cursor buttons (<, >) CANCER STOP YAMAHA1
![YAMAHA DV-DC996 - Program Play [VCD] [CD] - 2](/content/2026/06/1195566/images/e3bb9c54a645abc7f9faa95854ccd0faa2af174e468860b46a9dd45b2e3cce27.jpg)
text_image
PROG 0 7 ... P:012
![YAMAHA DV-DC996 - Program Play [VCD] [CD] - 3](/content/2026/06/1195566/images/dc361c661ca73ef4e9bb7d69e7bd15045636fef3754596252ea900337b16a0fe.jpg)
text_image
PROG 5 7 ... P:0 1 Disc No. Program No.3
![YAMAHA DV-DC996 - Program Play [VCD] [CD] - 4](/content/2026/06/1195566/images/25798dd5095f5fed099129af305d95bee16b2d1d637f4ead6d120d924c0edf2b.jpg)
text_image
PROG 25 723 P:01 Disc No. track No. Program No.4
![YAMAHA DV-DC996 - Program Play [VCD] [CD] - 5](/content/2026/06/1195566/images/758797a0530d67367f6e2cc9e338e5bb18c55a492923a722fc7c1da65e357ecb.jpg)
text_image
PROG 23 0:01You can enjoy listening to your favorite tracks selected from one or more discs in any desired order by programming tracks.
1 Press PLAY MODE once or more while play-back is stopped.
The display shows the step information.
- To exit programming mode, press PLAY MODE twice.
2 Press DISC (1-5) to select the disc.
3 Press numeric buttons to select the track.
- Repeat step 2 and 3 to program other tracks in your desired order.
• See p.14 about how to enter the track with numeric buttons. - To program a whole disc, press ENTER ('ALL' appears on the display).
- Pressing □ (STOP) cancels all tracks programmed so far.
You can program up to 32 tracks to be played in desired order.
4 Press ▷ (PLAY) to start program play.
■ To cancel the programmed tracks
1 Press the cursor buttons (▶) to select the track you want to cancel.
2 Press CANCEL.
Opening the disc tray also cancels this mode.
Note
When you program a track of a Video CD (ver.2.0), playback control is canceled during program play.
ADVANCED FEATURES
Refer to the discographic information of each disc to determine whether the disc supports these features.
Menu Screen [DVD]
![YAMAHA DV-DC996 - Menu Screen [DVD] - 1](/content/2026/06/1195566/images/889463c0d49b0f307f00d0e877a75fb01a95d99c23736840afb12b64526c7bb0.jpg)
text_image
TOP MENU YAMAHA ANSIUE RETURN ENTER AUDIO BUTTER Cursors buttons, ENTER FIRMINT MENU FIRMINT MENUThere are DVDs which contain DVD menu screens that enable you to select title, chapter and audio track language, etc or other interactive operations. This section gives you general instruction about how to operate these screens. However, the operation methods may differ depending on the disc.
1 Press TOP MENU or MENU during playback to show menu screen.
- With some discs, menu screen appears automatically when you start playback.
2 Press the cursor buttons (, ∇, 1) to select the desired item.
3 Press ENTER to go to the screen of the selected item or to start playing the selected item.
- You may also use the numeric buttons to operate steps 2 and 3.
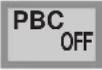
Playback Control [VCD]
![YAMAHA DV-DC996 - Playback Control [VCD] - 1](/content/2026/06/1195566/images/9f7e5befbe5c252186534472c0aea8db6b38f122f8223eb483552fec7272e46e.jpg)
text_image
Numeric buttons RETURN YAMAHAWhen ‘PBC’ appears on the display, this unit is in playback control mode. Menu screen appears on the video monitor so that you can use interactive functions supported by the disc being played.
■ To operate menu screen
- You can operate menu screens using the following buttons.
Numeric buttons: Press to select the desired item.
RETURN: Press to go back to the previous screen
▷: Press to play the selected item
▷: Press to show the next screen
◀◀: Press to show the previous screen
■ To cancel playback control
Press □ (STOP) when the playback control screen appears.
Note
Playback control is automatically canceled during program play or random-sequence play.
Switching Audio Tracks [DVD] [VCD]
![YAMAHA DV-DC996 - Switching Audio Tracks [DVD] [VCD] - 1](/content/2026/06/1195566/images/efb7ec55585761bc45d8ba77e8664fabf80f40c798c59fa58b7e7d24f1ad12c0.jpg)
text_image
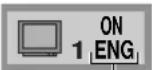
Numeric buttons YAMAHA Cursor buttons, ENTER AUDIOAudio track
Soundtrack number being played (“—” indicates a soundtrack is not recorded.)
![YAMAHA DV-DC996 - Switching Audio Tracks [DVD] [VCD] - 2](/content/2026/06/1195566/images/5df3b3c393bc45fcb439bb6bef27c12d22e37bd62c8d897adbc7f2825219e869.jpg)
text_image
Digital 1 ENG 3/2.1ch Hello Digital 2 FRA 3/2.1ch BonjourKaraoke Discs
![YAMAHA DV-DC996 - Switching Audio Tracks [DVD] [VCD] - 3](/content/2026/06/1195566/images/ca95dee5db32ce6d6a908fa84a7c0c9d027cbc028523e60f8dd78b997c5bdcf4.jpg)
text_image
DVD Vocal 1 U ←ON VCD L RSome DVDs are encoded with several audio tracks so that you can select the language, and/or the sound format.
1 Press AUDIO during playback.
The current audio track appears on the video monitor.
2 Press AUDIO repeatedly to select the desired audio track.
- You can also use the cursor buttons (, ) or the numeric buttons.
Note
With some discs, switching audio tracks during playback is prohibited. In that case, use SETUP MENU (p.26) to select it.
■ Turning on and off vocal for Karaoke disc
- Press AUDIO during playback.
- Press the cursor buttons [ △, ∇, ◀] or press AUDIO to change the setting.
| DVD Karaoke | Solo—: Vocal OFFON: Vocal ON |
| Duet—: Vocal OFF1+2: Vocal 1,2 ONV1: Vocal 1 ON, Vocal 2 OFFV2: Vocal 2 ON, Vocal 1 OFF | |
| VIDEO CD | LR: Vocal heard from the rightL: Vocal OFFR: Vocal heard from both left and right |
Note
With some discs, you may need to operate additional steps. Refer to the disc's instructions.
■ To turn the display off
Press ENTER.
Switching Subtitle Tracks [DVD]
![YAMAHA DV-DC996 - Switching Subtitle Tracks [DVD] - 1](/content/2026/06/1195566/images/d24fd489223f9885088594d8633443cf4b83c5c732d936d287c16b2e2f1c64ae.jpg)
text_image
Numeric buttons YAMAHA Cursors buttons ENTER SUBTITLESubtitle
![YAMAHA DV-DC996 - Switching Subtitle Tracks [DVD] - 2](/content/2026/06/1195566/images/067ba34b644e5235dac0cd0c3e717936440e97fd0fbe6ef14f3bf4a5b2f0fe71.jpg)
text_image
Subtitle language number being played +ON+ 1 ENG I love you +ON+ 2 FRA Je t'aimeSwitching Camera Angles
text_image
Numeric buttons YAMAHA ANGLE Cursor buttons (△,▽), ENTER ∠100 ∠200 ∠300 ∠400 ∠500 ∠600 ∠700 ∠800 ∠900 ∠1000 ∠100 ∠100 ∠100 ∠100 ∠100 ∠100 ∠100 ∠100 ∠100 ∠100 ∠100 ∠100 ∠100 ∠100 ∠100 ∠100 ∠100 ∠100 ∠100 ∠100 ∠200 ∠300 ∠400 ∠500 ∠600 ∠700 ∠800 ∠900 ∠1000Angle
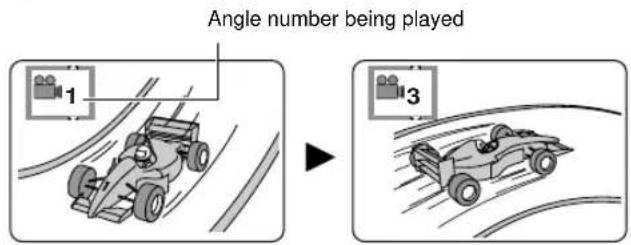
text_image
Angle number being played 1 3Some DVDs are encoded with multilingual subtitle tracks so that you can select one of them.
1 Press SUBTITLE during playback.
On-screen display that shows currently selected subtitle track language appears on the video monitor.
2 Press SUBTITLE repeatedly to select the desired subtitle track.
- You can also use the cursor buttons (, or the numeric buttons.
- Pressing the cursor buttons (, ◀ switches subtitles on and off.
Note
‘--’ appears if the disc does not have a subtitle.
■ To turn the display off
Press ENTER.
Some DVDs have scenes encoded with multiple camera angles so that different viewpoint can be selected during playback. ANGLE lights up on the front panel display while a scene encoded with multiple angles is being played.
1 Press ANGLE while ANGLE on the front panel display lights up.
On-screen display that shows currently selected angle appears on the video monitor.
2 Press ANGLE repeatedly to select the desired angle.
- You can also use the cursor buttons (, or the numeric buttons.
■ To turn the display off
Press ENTER.
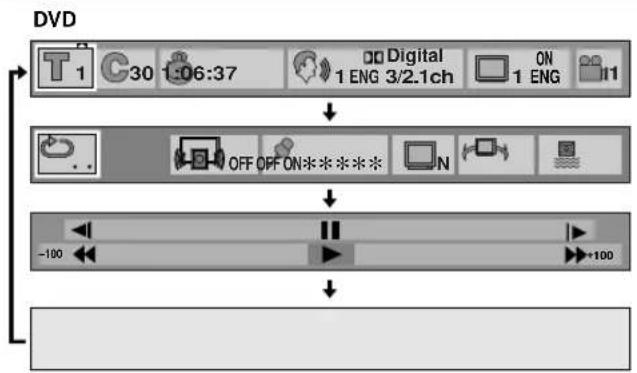
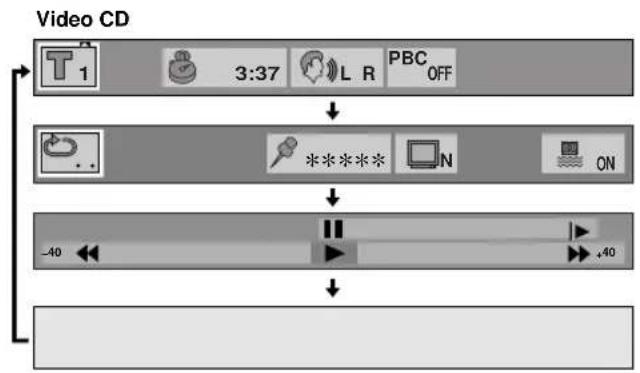
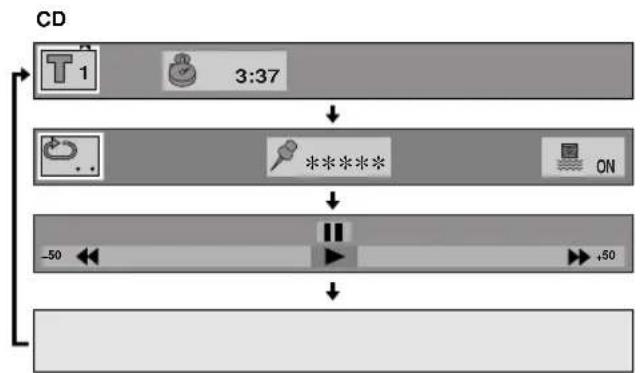
ON-SCREEN MENU
This unit features On-Screen Menu icons (Graphical User Interface) that makes operation easy and intuitive. Graphics that represent the functions appear in alignment on the upper side of the video monitor.
Operating On-Screen Menu
flowchart
graph TD
    A["1"] --> B["30:06:37"]
    B --> C["Digital 1 ENG 3/2.1ch"]
    C --> D["ON 1 ENG"]
    D --> E["OFF OFF ON*****"]
    E --> F["-100"]
    F --> G["+100"]
flowchart
graph TD
    A["1: 3:37"] --> B["3:37"]
    B --> C["L R"]
    C --> D["PBC OFF"]
    E["..."] --> F["..."]
    F --> G["*******"]
    G --> H["N"]
    H --> I["ON"]
    J["-40"] --> K["↓"]
    L["↓"] --> M["40"]
flowchart
graph TD
    A["CD 1"] --> B["3:37"]
    B --> C["OK"]
    C --> D["OK"]
    D --> E["-50"]
    E --> F["OK"]
    F --> G["+50"]
text_image
Numeric buttons YAMAHA RETURN 2,3 1 CANCEL1 Press ON SCREEN.
Each time ON SCREEN is pressed, the screen changes and appears on the video monitor as below.
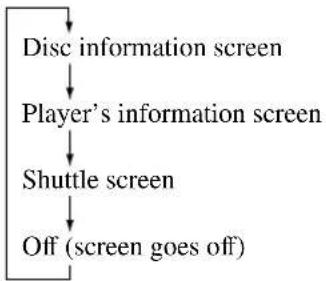
flowchart
graph TD
    A["Disc information screen"] --> B["Player's information screen"]
    B --> C["Shuttle screen"]
    C --> D["Off (screen goes off)"]
2 Press the cursor buttons (1, ▷) to select the item you want to adjust.
The selected item is highlighted in yellow.
3 Press the cursor buttons ( , ) to change setting.
- With some items, you need to press ENTER or ▷ (PLAY) to determine the setting.
- You can also use the numeric buttons when entering numbers to select a chapter, etc.
- You can also use RETURN or CANCEL to turn the screen off.
- and around the icon means that the item can be changed using the cursor buttons [ , ].

Note
- These screens may not be displayed, or partly cut off depending on the disc being played, or when the video monitor (TV)'s automatic zoom function is on. You can change their position lower at '4 On-Screen Message' on the SETUP MENU.
Disc Information Screen
Each icon shows the status of the currently played disc.
 | Title No. DVDTrack No. VCD CDSelect the desired title/track number and press ENTER to start playback. |
 | Chapter No. DVDSelect the desired chapter number and press ENTER to start playback. |
 | Time Index (hour:minute:second) DVDEnter the time and press ENTER to start playback from there.Example: To specify 1:06:37, press the numeric buttons 1, 0, 6, 3 and 7. |
 | Time display (minute:second) VCD CDElapsed time cannot be changed. When playing a VCD with playback control, elapsed time does not appear.Each time the cursor buttons (△) is pressed, the display changes as below. Elapsed time → Time remaining on the current track → Time remaining on the disc |
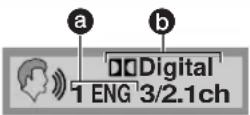 | Audio Track DVDSelect the desired audio track (language and sound format). Each time the cursor buttons (△) is pressed, the combination of language and sound format switches to another, in accordance with the disc's available audio tracks.Example: 1 ENG/LPCM → 1 ENG/ Digital → 2 FRA/LPCM → 2 FRA/ Digital...a Language: See the table a.b Sound format: See the table b for detail. |
 | Audio Track VCDSelect the desired channel(s) from LR (both left and right channels), L (left channel output from both left and right speakers) or R (right channel output from both left and right speakers). There are VCDs that contain one language on the left channel and another on the right so that you can select the desired language from the two. |
 | Subtitle, ON/OFF DVDSelect the desired subtitle track. See the table a. |
 | Angle DVDSelect the desired camera angle while a scene encoded with multiple angles is played. |
 | Playback Control VCDShows whether playback control is on or off (cannot be changed here).• To cancel the playback control function, see p.19. |
aLanguage bSound format
| ENG: EnglishFRA: FrenchDEU: GermanITA: ItalianESP: SpanishNLD: Dutch | SVE: SwedishNOR: NorwegianDAN: DanishPOR: PortugueseRUS: RussianJPN: Japanese | CHI: ChineseKOR: KoreanMAL: MalayVIE: VietnameseTHA: Thai*: Others |
| LPCM | 96k/48k:Sampling frequency (kHz)16b/20b/24b:Number of sample signals (bit) |
| Digital/DTS/MPEG [Europe, U.K. and Australia models] | ch: number of channels3 / 2 . 1 ch (example)Low frequency effect output from the subwooferTwo rear channels output from Surround (left/right) speakersThree front channels output from main (left/right) and center speakers |
Notes
- Display may differ in accordance with the disc's specification.
- Time remaining on the disc does not appear during program or random-sequence play.
- MPEG multi-channels may not appear properly (Europe, U.K. and Australia models).
Player's Information Screen
This screen enables you to operate various features equipped with this unit to expand your enjoyment for audio listening and video watching.
 | A-B RepeatPress ENTER during playback to specify the point A, then press ENTER again to specify the point B. This unit starts A-B repeat play. Pressing ENTER one more time cancels A-B repeat. |
 | Cinema DialogueDVDTurn this function on and off using the cursor buttons (△).When this function is on, volume level for dialogue increases so that you can catch it clearly even playing a disc at low volume. |
 | MarkerYou can mark up to five parts so that you can start playback these parts immediately.First press ENTER to select this item, then select one from five asterisks with the cursor buttons (◀)and press ENTER during playback to specify the point to start (the selected asterisk turns to be the marker no.).Press ENTER again to specify the point to complete marking.To recall a marker: Select the marker no. using the cursor buttons [◀, ▷] and press ENTER.To clear a marker: Select the marker no. using the cursor buttons [◀, ▷] and press CANCEL. Markers are all cleared when you open the tray or turn this unit off. |
 | Cinema ImageDVDVCD(for U.S.A. and Canada models)You can select the preferred video image.N: NormalC: Cinema (suited for movie viewing) |
 | Virtual Surround Sound (V.S.S)DVDWhen this function is on, you can enjoy a surround-like effect without using rear surround speakers. For optimum effect, keep the distance from main speakers to your listening position about 3 to 4 times the distance between the left and right main speakers.OFF: V.S.S off1: V.S.S natural effect2: V.S.S emphasized effect |
 | Subwoofer OutputDecide whether to output signals from this unit's subwoofer output terminal.ON: Select this position if a subwoofer is connected to this unit's subwoofer output terminal.OFF: Select this position if this unit's subwoofer output terminal is not used. |
Notes
- Subtitles around the markers may not appear.
• Virtual surround sound is only effective with discs encoded with multi-channel Dolby Digital format (except for karaoke discs). - When virtual surround sound is on, only the main speakers output the sound.
Shuttle Screen
You can operate multi-speed playback with this screen.

bar
| Category | Value | | -------------- | ----- | | Maximum Speed | 100 | | DVD | -100 | | Video CD | -40 | | CD | -50 |a Slow-motion play (Backward) DVD
Press [4, then [ ]
⑥ Still/Pause Press [4].
© Slow-motion play (Forward) DVD VCD
Press [△], then [□].
(d) Search (Backward)
Press [▽], then [◀].
⑧ Play Press [↓].
f Search (Forward) Press [▽], then [▷].

- Pressing the cursor button [] (or [] ) increases (or decreases) the speed of searching and slow-motion play up to five steps.
SETUP MENU
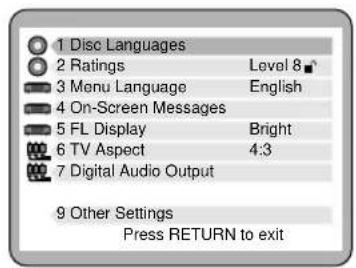
This unit provides you with the following items on the Setup menu to maximize the performance of this unit and your AV system. Select the appropriate positions as necessary.
- Disc Language ( p.26)
- Ratings ( p.27)
- Menu Language (→ p.28)
- On-Screen Messages (→ p.28)
- FL Display (→ p.28)
- TV aspect ( p.28)
- Digital Audio Output ( p.29)
- Other Settings (→ p.30)
Note
- Item no.8 does not exist.
Operating the Setup Menu
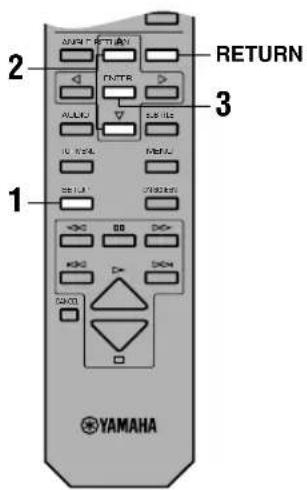
text_image
2 RETURN 3 1 YAMAHA1
text_image
1 Disc Languages 2 Ratings Level 8 3 Menu Language English 4 On-Screen Messages 5 FL Display Bright 6 TV Aspect 4:3 7 Digital Audio Output 9 Other Settings Press RETURN to exitThis section shows common procedures (some items require additional steps). Use the remote control to operate the setup menu.
1 Press SET UP while playback is stopped. The menu screen appears on the video monitor.
2 Select the desired item using the cursor buttons (△, ▼) and press ENTER.
Operating screen of the selected item appears on the video monitor.
3 Select the desired position using the cursor buttons (△, ▼) and press ENTER.

• To go back to the previous screen, press RETURN.
- To get out from the Setup menu mode, press SET UP.
DESCRIPTION OF EACH ITEM
1. Disc Language [DVD]
![YAMAHA DV-DC996 - Disc Language [DVD] - 1](/content/2026/06/1195566/images/560673cbd95de6709154dbce5c93a453623b58cde6cb448a12ff8331919229ef.jpg)
text_image
Disc Languages 1 Audio English 2 Subtitle Automatic 3 Menus English Press RETURN to exitYou can select the language of audio track, subtitle track and disc menu.
U.S.A. and Canada models
| 1 Audio | 1 English 2 French 3 Spanish4 Original* 5 Other** |
| 2 Subtitle | 1 Automatic*** 2 English 3 French4 Spanish 5 Other** |
| 3 Menus | 1 English 2 French 3 Spanish4 Other** |
Europe, U.K. and Australia models
| 1 Audio 1 English | 2 French 3 German4 Italian 5 Spanish 6 Original*7 Other** |
| 2 Subtitle 1 Automatic*** 2 English 3 French4 German 5 Italian 6 Spanish7 Other** | |
| 3 Menus | 1 English 2 French 3 German4 Italian 5 Spanish 6 Other** |
General model
| 1 Audio | 1 English 2 Chinese 3 Original*4 Other** |
| 2 Subtitle | 1 Automatic*** 2 English 3 Chinese4 Other** |
| 3 Menus | 1 English 2 Chinese 3 Other** |
* The original language of each disc is selected.
** You can select another language by selecting this position and entering the code for the desired language (see the 'Language code list' on p.33).
*** Subtitle track language is automatically determined according to the current status on ‘1 Audio’.
- When the audio track language reproduced during playback is the one selected at '1 Audio', the subtitle is not shown.
- When the audio track language reproduced during playback is other than the one selected at ‘1 Audio’, subtitle is shown in the language selected at ‘1 Audio’.
Notes
- If the disc does not have audio track of the selected language, the language designated by each disc is reproduced.
- Subtitle does not appear if the disc does not have one.
2. Ratings [DVD]
![YAMAHA DV-DC996 - Ratings [DVD] - 1](/content/2026/06/1195566/images/fa9f1d6bebe44713d3b95fb48fc1bd52c95bea5ea7d7a8e3072be2a431fec2e7.jpg)
text_image
Please set a rating limit 8 No Limit 7 6 5 4 3 2 1 0 Lock All Press RETURN to exit![YAMAHA DV-DC996 - Ratings [DVD] - 2](/content/2026/06/1195566/images/c2777937f8e019e28de9bdfed2c562c1f7634af5a64f3277128292f68e6ffaaf.jpg)
text_image
2 2,3 CANCEL YAMAHA![YAMAHA DV-DC996 - Ratings [DVD] - 3](/content/2026/06/1195566/images/4991da66d3c79b95a222b99774685bc7dcf678da3b152932eb884024faca40e4.jpg)
text_image
Ratings Enter a 4-digit password, then press ENTER. * * * * Press RETURN to exit![YAMAHA DV-DC996 - Ratings [DVD] - 4](/content/2026/06/1195566/images/71b0759728080fb1659052089efc65115f78cf6c22e5b852abdb7d60e868a709.jpg)
text_image
Ratings The player is locked. Remember the password. Press ENTER to continue Example: "4343"![YAMAHA DV-DC996 - Ratings [DVD] - 5](/content/2026/06/1195566/images/94e11c7ae70af3965c2f8769c766647fc29034de5aa44d30ab520eef8605ecc5.jpg)
text_image
Ratings 1 Unlock Player 2 Change Password 3 Change Level 4 Temporary Unlock Press RETURN to exitDepending on software capability, you can prevent discs or scenes with objectionable material from being played according to your desired rating. You can select the level and lock it by designating password.
| Level 8 | All DVDs can be played. |
| Level 7 to 1 | Level of restriction becomes severer as the number gets smaller. |
| Level 0 | All DVDs cannot be played. |
■ Setting method
1 Follow steps 1 to 3 of 'Operating the Setup Menu' (see p.25) to select the desired level.
2 Enter 4-digit number with numeric buttons and press ENTER.
- Press CANCEL if you want to re-enter other number. The screen that confirms your password appears. Do not forget your password.
3 Press ENTER.
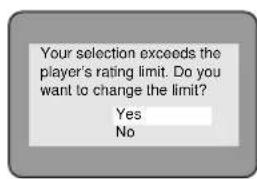
When you select a disc that exceeds the rating you have set, a message appears on the monitor. If you want to play the disc, select 'Yes' and enter your password. The unit unlocks the setting temporarily, locking again when the disc tray is opened or the unit is turned off.
text_image
Your selection exceeds the player's rating limit. Do you want to change the limit? Yes No■ To Change Settings
You must enter your designated password when you unlock the player (level is set to 8), change the level, change the password, or unlock the playback of currently selected disc.
Select '2 Ratings' and then follow each procedure appears on the screen.
Note
- In case you have lost the password and if you want to change the ratings settings, you must return the entire setup menu to the factory setting to cancel the previously specified password. See p.32 about resetting method.
3. Menu Language
Select the language used for on-screen display and setup menu.
U.S.A. and Canada models
Example: If you selected "2 Français"
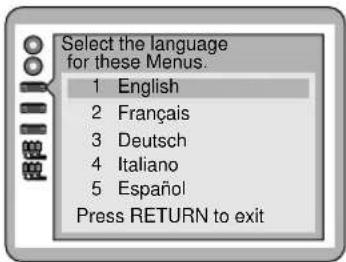
text_image
Select the language for these Menus. 1 English 2 Français 3 Deutsch 4 Italiano 5 Español Press RETURN to exit1 English
2 Français
3 Español
Europe, U.K. and Australia models
1 English
2 Français
3 Deutsch
4 Italiano
5 Español
General model
1 English
2 中文
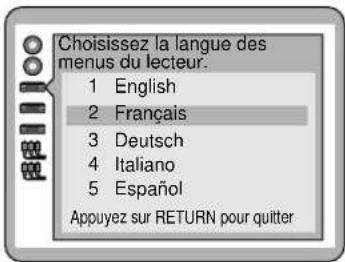
text_image
On-Screen Messages 1 On-Screen Messages On 2 Colour and Position True Press RETURN to exitYou can select whether to show on-screen message (information of the current status such as Play, Still, etc.) or not, and its color and position.
| On-Screen Messages | 1 On2 Off |
| Color and Position | 1Bue2Violet3Gicen4Bhe5Violet6GicnShown slightly lower. Select if the top of the screen is cut off. |
5. FL Display
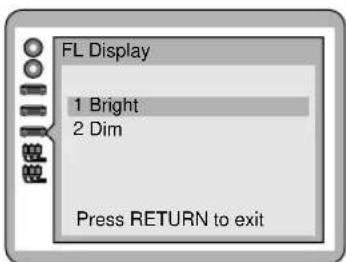
text_image
FL Display 1 Bright 2 Dim Press RETURN to exitSelect the brightness of the front panel display.
1 Bright
2 Dim
6. TV Aspect
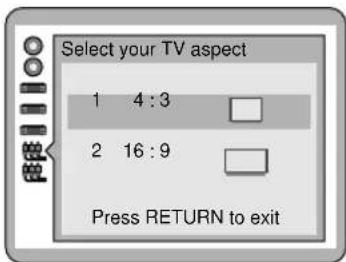
text_image
Select your TV aspect 1 4:3 2 16:9 Press RETURN to exitChange the setting to suit your type of video monitor.
14:3
Select when a conventional 4:3 aspect ratio video monitor is connected.
2 16:9
Select when a wide-screen type video monitor is connected.
- Regardless of the above description, select the optimum setting for your video monitor.
7. Digital Audio Output
Select the appropriate position for your AV system (AV amplifier, etc.) which this unit is connected to. When you setup your AV system, you must adjust this setting before starting playback. Otherwise, there may be a digital signal which the connected equipment cannot process and the consequent noise could damage your ears and your speakers.
U.K., Europe and Australia models

text_image
Digital Audio Output 1 PCM Down Conversion No 2 Dolby Digital Bitstream 3 DTS Digital Surround Off 4 MPEG PCM Press RETURN to exitU.S.A, Canada and General models
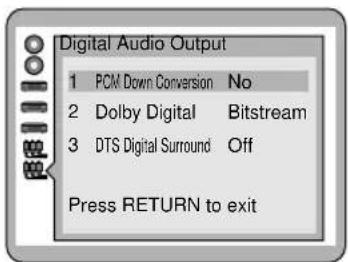
text_image
Digital Audio Output 1 PCM Down Conversion No 2 Dolby Digital Bitstream 3 DTS Digital Surround Off Press RETURN to exit| 1 PCM Down ConversionWhen playing a 96 kHz linear PCM disc, you can choose whether to output high-fidelity analog signal, or convert it down to 48 kHz to output digital signal. | 1 NoWhen playing a DVD recorded in 96 kHz linear PCM, signal of 96 kHz /24 bit sampling frequency is output and you can enjoy high quality sound. If the DVD is copyright-protected, no digital signal is output unless converted to 48 kHz.Select this position when connecting equipment without digital input.2 YesWhen playing a DVD recorded in 96 kHz linear PCM, signal is converted to 48 kHz /16 bit sampling frequency and can be output from digital output terminal even if the DVD is copyright-protected.It is recommended to select this position when connecting equipment with digital input.* |
| 2 Dolby DigitalTo select the signal format output from this unit when playing a DVD encoded with Dolby Digital. | 1 BitstreamDolby Digital bitstream signal is output from this unit's digital output.Select this position when connecting equipment incorporates Dolby Digital decoder.2 PCM**Signals converted to 2ch linear PCM is output from this unit.Select this position when connecting equipment which does not have Dolby Digital decoder. |
| 3 DTS Digital SurroundSelect whether to output DTS digital signal or not. | 1 Off**No digital signal is output even though the disc being played is encoded with DTS to prevent digital signal to be output.Select this position when connecting equipment which does not have a DTS decoder.2 BitstreamDTS bitstream is output when playing a disc encoded with DTS format.Select this position when connecting equipment incorporates a DTS decoder. |
| Europe, U.K. and Australia models4 MPEGTo select the signal format output from this unit when playing a DVD encoded with MPEG audio. | 1 PCM**Signals converted to 2ch linear PCM is output from this unit.Select this position when connecting equipment which dose not have a MPEG decoder.2 Bitstream***MPEG bitstream signal is output from this unit's digital output.Select this position when connecting equipment incorporates a MPEG decoder. |
* Select ‘No’ if the digital audio input of your audio equipment (AV amplifier, etc.) can handle 96 kHz /24 bit signal. If it is not acceptable for 96 kHz /24 bit digital audio signal, or the 96 kHz linear PCM disc you want to play is copyright-protected, it is recommended to set ‘1 No’ and make analog connection to enjoy high quality sound. If it is set to ‘2 Yes’, signal is converted to linear PCM 48 kHz before being output from analog output.
** When connecting equipment which does not have decoder for each format, be sure to select this position to prevent noise output as it could damage your ears and your speakers.
*** Depending on disc's capability, MPEG audio bitstream may not be output properly.
9. Other Settings
U.S.A. and Canada models
text_image
Other Settings 1 Still Mode Automatic 2 Audio during Search On 3 TV Mode (4:3) Pan&Scan 4 D. Range Compression Off 5 Still Picture Display Off 6 Black Level Control Lighter Press RETURN to exitU.K. and Europe models
text_image
Other Settings 1 Still Mode Automatic 2 Audio during Search On 3 TV Mode (4:3) Pan&Scan 4 D. Range Compression Off 5 Still Picture Display Off 6 AV Output Video 7 NTSC Disc Output PAL60 Press RETURN to exitGeneral and Australia models
text_image
Other Settings 1 Still Mode Automatic 2 Audio during Search On 3 TV Mode (4:3) Pan&Scan 4 D. Range Compression Off 5 Still Picture Display Off 6 NTSC Disc Output NTSC Press RETURN to exit| 1 Still ModeTo adjust the quality of still picture. | 1 Automatic2 FieldIf jittering occurs when ‘1 Automatic’ is selected, switch to this position.3 FrameIf detail such as small patterns or letters of still picture is not clear when ‘1 Automatic’ is selected, switch to this position. |
| 2 Audio during SearchTo select whether to hear audio during search forward at the initial search speed when playing DVD or VCD (CD can be heard at any speed).* | 1 On2 Off |
| 3 TV Mode (4:3)To select the picture style when playing a widescreen video disc on a standard 4:3 width-to-height ratio video monitor. | 1 Pan & ScanThe video appears in pan and scan style, with either one or both ends cut off.2 LetterboxThe video appears in letterbox style, with black bands on top and bottom of the monitor. |
| 4 D.(Dynamic) Range CompressionTo compress the dynamic range (the difference between the maximum level and the minimum level of sounds) as necessary.This item is only effective for Dolby Digital DVD. | 1 OffPlayed back with disc’s original dynamic range.2 OnThe range is compressed to make it easier to hear dialog, etc. even at low volume level.Select this position in occasions such as viewing late at night. |
| 5 Still Picture Display [DVD]To show I, P or B** during still picture mode. | 1 Off2 On Example: 'P' Picture Example: 'P' Picture |
* DTS audio is not heard during search regardless of the setting.
** I/P/B: When 'I' appears, it indicates that the frame is the original one and has greater amount of information than that of 'P' or 'B'. 'P' is made from 'I', and 'B' is to fill in the space between 'I' and 'P'. It is recommended to use 'I' picture for adjusting video image.
Black Level Control To adjust luminosity of black color according to the type of video To adjust luminosity of black color according to the type of video | 1 LighterSelect when you made video connection through the composite or S-video terminals.2 DarkerSelect when you made video connection through the component terminals. |
AV output  | 1 VideoComposite signal is output.2 S VideoS-video signal is output. |
   | 1 PAL 60Select when the connected video monitor can accept PAL 525/60 system.2 NTSCSelect when a Multi-system video monitor is connected. |
TROUBLESHOOTING
If this unit fails to operate normally, check the following points to determine whether the fault can be corrected, or if the fault is not listed in the PROBLEM column, disconnect the power code and contact your authorized YAMAHA dealer or service center.
■ General
| PROBLEM POSSIBLE CAUSE WHAT TO DO | Refer to Page | ||
| This unit fails to turn on when the POWER switch is pressed. | The power cord is not connected or the plug is not completely inserted. | Firmly connect the power cord. — | |
| The voltage selector on the rear panel is not set to the proper position. | Disconnect the power cord and set the selector to the position for your local main voltage. | — | |
| This unit does not work normally. | This unit is affected by an external shock (lightning, excessive static electricity, incorrect operation, etc.) | Turn the power off and disconnect the power cord. After about 30 seconds have passed, connect the power and operate the unit again. | — |
| Playback does not start. | The disc is damaged. Check the disc carefully; replace it if necessary. | — | |
| There is moisture on the laser pickup. Wait 20 to 30 minutes after switching the unit ON before trying to play a disc. | — | ||
| The disc has been loaded upside down. Reload the disc with the label side facing up. 13 | |||
| The disc is dirty. Clean the disc. | 3 | ||
| No picture. | Incorrect video connections. | Connect this unit and other equipment properly. | 10 |
| This unit's video input is not selected at the video monitor. | Set the video input at the video monitor to the position where this unit is connected (e.g. VCR2). | — | |
| Play is delayed, or starts at the wrong place. | The disc may be scratched or damaged. | Check the disc carefully; replace it if necessary. | — |
| This unit does not recognize discs ('No disc' appears on the display, or the display shows the status when no disc is loaded). | The disc(s) is not placed properly. | Place the disc(s) correctly along the guide(s). | — |
| No sound. | Incorrect output cable connections. | Connect the cables properly. If the problem persists, the cables may be defective. | 9 |
| Incorrect amplifier operation. | Set the amplifier controls to the correct input selection. | — | |
| Sound distorted. | V.S.S effect is emphasized too much. | Turn V.S.S. off. | 24 |
| Sound 'skips'. | This unit is being subjected to vibrations or impacts. | Relocate the unit. | — |
| The disc is dirty. Clean the disc. | 3 | ||
| Sound 'hums'. | Incorrect cable connections. | Securely connect the audio cables. If the problem persists, the cables may be defective. | 9 |
| Noise from a nearby tuner. | The tuner is too close to the unit. | Place the tuner and the unit farther apart. | — |
| Noise from inside of the unit. | The disc maybe warped. | Replace the disc. | — |
| The remote control does not work. | The batteries are weak. | Replace all batteries with new ones. | 7 |
| Direct sunlight or lighting (from an inverter type of fluorescent lamp, etc.) is striking the remote control sensor of this unit. | Relocate the unit. | 7 | |
DVD
| PROBLEM POSSIBLE CAUSE WHAT TO DO | Refer to Page | ||
| Picture does not match your video monitor. | The setting at ‘6 TV Aspect’ on the setup menu is not correct. | Select the proper position. 28 | |
| Audio track and/or subtitle language is not the selected one. | The disc does not contain the language you have selected. | — | |
| No subtitles. The disc does not have subtitles. — | |||
| Subtitle is turned off. Show subtitles by pressing | SUBTITLE or using on-screen menu. | ||
| Angle cannot be changed. | The disc or the scene being played does not support multi-angle. | — | |
| No sound from effect speakers (center and rear left/right) when digital signals from this unit are selected as the input source on your AV amplifier. | The setting at ‘7 Digital Audio Output’ on the setup menu is not correct. | If your AV amplifier has built-in decoders for Dolby Digital, DTS or MPEG, Select ‘Bitstream’ at corresponding position. | 29 |
| No sound when playing a disc encoded with DTS. | Digital connection is not made between this unit and your amplifier. | Make digital connection between this unit and your amplifier and adjust the settings at ‘7 Digital Audio Output’ on the setup menu. | 9, 29 |
| The password for setting parental level has been forgotten. | Clear all settings on the setup menu. See ‘Returning setup menu to the factory-setting’ below this table. | — | |
■ Returning setup menu to the factory-setting
While playback is stopped, press and hold ☐ (PAUSE), and then ✉ and PLAYXCHANGE on the front panel until 'Initialized' appears on the video monitor. All settings on the setup menu return to the factory settings.
■ Video CD
| PROBLEM POSSIBLE CAUSE WHAT TO DO | Refer to Page | |
| Menu does not appear. The disc does not have playback control function. | — |
GLOSSARY / LANGUAGE CODE LIST
■ Title
‘Title is a unit to divide the contents on a DVD disc. Generally, one title is assigned to one movie. When a disc has two or more titles, they are numbered in sequence as title 1, title 2, etc.
■ Chapter
A title on a DVD is subdivided into smaller divisions. They are referred as ‘chapters’ and numbered in sequence. You can use them to search the desired scene on a movie, etc.
■ Track
Tunes (or pictures) recorded on a CD or Video CD are referred as 'tracks'. Tracks are numbered in sequence as track 1, track 2, etc. They are useful for quick search for the desired tune (or picture).
■ Dolby Digital
Dolby Digital is a digital audio format which mainly provides high-quality multi-channel audio tracks for movies. It provides up to 6 independent channels compatible with 6 speaker configurations: Left main, right main, center, left surround, right surround and subwoofer. It stores a large volume of digital sound signals as data into a DVD, etc. with a high level data-compression technology.
■ DTS
DTS (Digital Theater System) is also a multi-channel digital audio format, providing 6 channel audio track. DTS encodes high-quality, 20 bit audio onto a compact disc, and a DVD with less data-compression.
■ Linear PCM
A basic digital audio format used in CDs. It is based on Pulse Code Modulation (PCM), an analog-to-digital conversion technology. No compression is applied to the data.
■ MPEG
There are two types of MPEG (Moving Picture Expert Group) audio format. MPEG 1 is mainly used in Video CDs. MPEG 2, improved from MPEG 1, provides high-quality multi-channel audio track up to 8 channels. MPEG 2 technology is mainly used in Europe, Australia, etc.
■ Playback control
This function is recorded on a Video CD, version 2.0. Pictures, music, etc. you want to play can be selected on a screen menu shown on the video monitor.
Language code list
| 6565:Afar | 6890:Bhutani | 7285:Hungarian | 7679:Laotian | 8084: Portuguese | 8469:Telugu |
| 6566:Abkhazian | 6976:Greek | 7289:Armenian | 7684:Lithuanian | 8185: Quechua | 8471:Tajik |
| 6570:Afrikaans | 6978:English | 7365:Interlingua | 7686:Latvian, Lettish | 8277: Rhaeto- | 8472:Thai |
| 6577:Ameharic | 6979:Esperanto | 7378:Indonesian | 7771:Malagasy | Romance | 8473:Tigrinya |
| 6582:Arabic | 6983:Spanish | 7383:Icelandic | 7773:Maori | 8279: Romanian | 8475:Turkmen |
| 6583:Assamese | 6984:Estonian | 7384:Italian | 7775:Macedonian | 8285: Russian | 8476:Tagalog |
| 6588:Aymara | 6985:Basque | 7387:Hebrew | 7776:Malayalam | 8365: Sanskrit | 8479:Tonga |
| 6590:Azerbaijani | 7065:Persian | 7465:Japanese | 7778:Mongolian | 8368: Sindhi | 8482: Turkish |
| 6665:Bashkir | 7073:Finnish | 7473:Yiddish | 7779:Moldavian | 8372: Serbo-Croatian | 8484:Tatar |
| 6669:Byelorussian | 7074:Fiji | 7487:Javanese | 7782:Marathi | 8373: Singhalese | 8487:Twi |
| 6671:Bulgarian | 7079:Faroese | 7565:Georgian | 7783:Malay | 8375: Slovak | 8575: Ukrainian |
| 6672:Bihari | 7082:French | 7575:Kazakh | 7784:Maltese | 8376: Slovenian | 8582: Urdu |
| 6678:Bengali; Bangla | 7089:Frisian | 7576:Greenlandic | 7789:Burmese | 8377: Samoan | 8590: Uzbek |
| 6679:Tibetan | 7165:Irish | 7577:Cambodian | 7865:Nauru | 8378: Shona | 8673: Vietnamese |
| 6682:Breton | 7168:Scots Gaelic | 7578:Kannada | 7869:Nepali | 8379: Somali | 8679: Volapük |
| 6765:Catalan | 7176:Galician | 7579:Korean | 7876:Dutch | 8381: Albanian | 8779: Wolof |
| 6779:Corsican | 7178:Guarani | 7583:Kashmiri | 7879:Norwegian | 8382: Serbian | 8872:Xhosa |
| 6783:Czech | 7185:Gujarati | 7585:Kurdish | 7982:Oriya | 8385: Sundanese | 8979: Yoruba |
| 6789:Welsh | 7265:Hausa | 7589:Kirghiz | 8065:Punjabi | 8386: Swedish | 9072: Chinese |
| 6865:Danish | 7273:Hindi | 7665:Latin | 8076:Polish | 8387: Swahili | 9085:Zulu |
| 6869:German | 7282:Croatian | 7678:Lingala | 8083:Pashto, Pushto | 8465: Tamil |
SPECIFICATIONS
■ Audio Section
Frequency response
DVD (48 kHz sampling): 2 Hz to 22 kHz
DVD (96 kHz sampling): 2 Hz to 44 kHz
CD, Video CD: 2 Hz to 20 kHz
Harmonic distortion + noise (1 kHz):....0.002%
S/N ratio: 115 dB (Weighted)
Dynamic range
DVD (48 kHz, 24 bit): 103 dB
CD, Video CD: 99 dB
Output level (1 kHz, 0 dB): 2±0.3 V
■ Video Section
VIDEO output: 1 Vp-p (75 ohms)
S VIDEO output
Y output: 1 Vp-p (75 ohms)
C output:
[U.S.A and Canada models] 0.286 Vp-p (75 ohms)
[Other than above models] 0.3 Vp-p (75 ohms)
COMPONENT VIDEO output
Y output: 1 Vp-p (75 ohms)
P_B output: 0.7 Vp-p (75 ohms)
Pr output: 0.7 Vp-p (75 ohms)
■ General
Power supply:
[U.S.A. and Canada models] 120 V, 60 Hz
[Europe and U.K. models].... 230 V, 50 Hz
[Australia model] 240 V, 50 Hz
[General model].... 110/120/220/240 V, 50/60 Hz
Power consumption: 18W
Laser pickup:
Wave length 665nm
Laser power ...... CLASS II
Laser output ...... Max. 1.0mW (Continuous)
Output value determined by 21 CFR CHAPTER1, SUBCHAPTER J
Dimensions: 435 (W) · 404 (D) · 116 (H) mm
Weight: 6.1 kg
Accessories: ....RCA pin cable (audio/video)
...... Remote control ...... Batteries (AA, R6, UM-3)
This product incorporates copyright protection technology that is protected by method claims of certain U.S. patents and other intellectual property rights owned by Macrovision Corporation and other rights owners. Use of this copyright protection technology must be authorized by Macrovision Corporation, and is intended for home and other limited viewing uses only unless otherwise authorized by Macrovision Corporation. Reverse engineering or disassembly is prohibited.
| CAUTIONUse of controls or adjustments or performance of procedures other than those specified herein may result in hazardous radiation exposure. |
| ATTENTIONL'emploi de commandes, de réglages ou un choix de procédures différents des spécifications de cette brochure peut entraîner une exposition à d'éventuelles radiations pouvant être dangereses. |
| ACHTUNGDie Verwendung von Bedienungselementen oder Einstellungen oder die Durchführung von Bedienungsvorgängen, die nicht in dieser Anleitung aufgeführt sind, kann zu einem Kontakt mit gefährlichen Laserstrahlen führen. |
| OBSERVERAAnvändning av kontroller och justeringar eller genomförande av procedurer andra än de som specificeras i denna bok kan resultera i att du utsätter dig för farlig strålning. |
| ATTENZIONEUso di controlli o regolazioni o procedure non specificamente descritte può causare l'esposizione a radiazioni di livello pericoloso. |
| PRECAUCIÓNEl uso de los controles o los procedimientos de ajuste o utilización diferentes de los especificados en este manual pueden causar una exposición peligrosa a la radiación. |
| VOORZICHTIGGebruik van bedieningsorganen of instellingen, of uitvoeren van handelingen anders dan staan beschreven in deze handleiding kunnen leiden tot blootstelling aan gevaarlijke stralen. |
| VARO!AVATTAESSA JA SUOJALUKITUS OHITETTAESSAOLET ALTTIINA NÄKYMÄTTÖMÄLLELASERSÄTEILYLLE. ÄLÄ KATSO SÄTEESEEN. |
| VARNING!OSYNLIG LASERSTRÅLNING NÄR DENNA DEL ÄRÖPPNAD OCH SPÄRREN ÄR URKOPPLAD.BETRAKTA EJ STRÅLEN. |
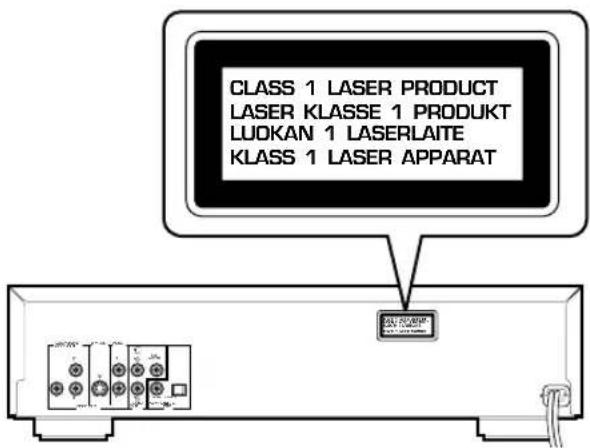
text_image
CLASS 1 LASER PRODUCT LASER KLASSE 1 PRODUKT LUOKAN 1 LASERLAITE Klass 1 LASER APPARAT(Except U.S.A. model)
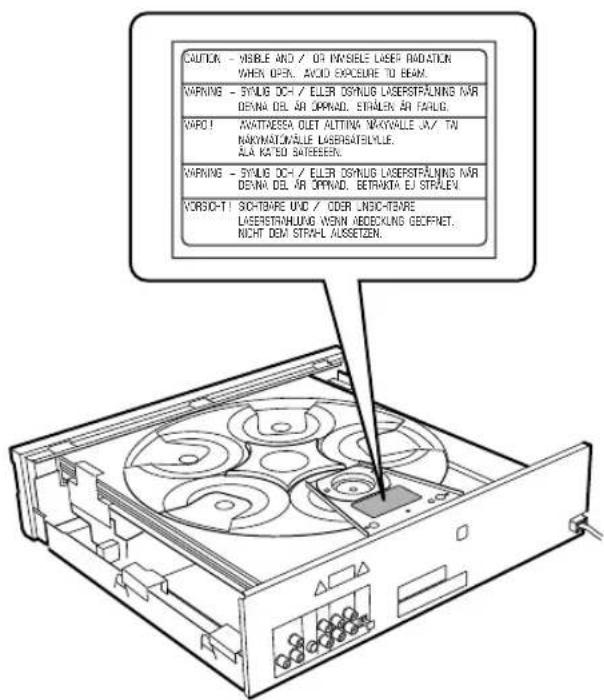
text_image
CAUTION - WIBLE AND / OR INVERSE LASER RADATION WHEN OPEN. AVOID EXPOSURE TO BEAM. WARNING - SYLIG DC4 / ELLER DSMUS LASERSTRALNING N/A DEANA DEL AN OPPNAD. STRALEN AN FAHLG. WHO! AVATTASSA OLET ALTINA NAYVALLE JA/ TN NAYMATIONÄLLE LASERSATEBMLLE. ALA KATÖD SATEEESN. WARNING - SYLIG DC4 / ELLER DSMUS LASERSTRALNING N/A DEANA DEL AN OPPNAD. BETAKTA EJ STRALEN. VORSO-T1 SOITBARE UND / CDER INSIC-TARE LASERSTRALUNG WMN ABDECKUNG GEFFNET. NICHT DEM STRAHL ALSETZEN.