
DV-DS1500 - DVD player YAMAHA - Free user manual and instructions
Find the device manual for free DV-DS1500 YAMAHA in PDF.

| Product Type | DVD Player (DVD-Audio, DVD-Video, SA-CD, Video CD, SVCD, Audio CD, CD-R/RW, DVD+R/RW, DVD-R/RW) |
| Brand | Yamaha |
| Model | DV-DS1500 |
| Dimensions (W x H x D) | 435 x 55 x 315 mm |
| Weight | Approx. 3.2 kg |
| Power Supply | AC 110-240V, 50/60Hz (model-dependent); Power consumption approx. 25 W, standby <1 W |
| Video Outputs | Component (Y Pb/Cb Pr/Cr), S-Video (Mini DIN 4-pin), Composite (RCA), SCART (Europe model only) |
| Audio Outputs | 6-channel analog (5.1), Mixed 2ch stereo, Coaxial digital, Optical digital |
| Progressive Scan | Yes, with DCDi (Directional Correction Deinterlacing) circuit |
| Audio DAC | 24-bit; DSD for SA-CD |
| Signal-to-Noise Ratio | 115 dB |
| Dynamic Range | 107 dB (SA-CD), 103 dB (DVD 48 kHz 24-bit) |
| Total Harmonic Distortion | 0.0017% (1 kHz, DVD 48 kHz 24-bit) |
| Laser Type | Semiconductor GaAlAs; wavelength 650 nm (DVD/SA-CD), 790 nm (VCD/CD); output 7 mW |
| Playback Features | Smart Resume (last 5 discs), Favorite Track Selection (FTS), Disc Lock, Parental Control, Zoom, Repeat, Shuffle, Karaoke Vocal, Night Mode, CD Up-sampling, JPEG slide show with rotation |
| TV System | PAL/NTSC compatible with conversion |
| Accessories Included | Remote control, 2x AA batteries, Audio/Video cable, Power cable |
| Cleaning and Maintenance | Cabinet: soft cloth with mild detergent; Discs: wipe from center outward with cleaning cloth; no liquid cleaners or solvents |
| Safety Notes | Do not expose to rain/moisture; avoid high temperatures; unplug during lightning; use only recommended attachments; service by qualified personnel only |
| Spare Parts and Repairability | Use manufacturer-specified replacement parts; do not attempt self-service; contact Yamaha service center |
| General Information | Region management; supports DTS and Dolby Digital decoding; laser safety warning; FCC/ICES-003 compliant |
Frequently Asked Questions - DV-DS1500 YAMAHA
User questions about DV-DS1500 YAMAHA
0 question about this device. Answer the ones you know or ask your own.
Ask a new question about this device
Download the instructions for your DVD player in PDF format for free! Find your manual DV-DS1500 - YAMAHA and take your electronic device back in hand. On this page are published all the documents necessary for the use of your device. DV-DS1500 by YAMAHA.
USER MANUAL DV-DS1500 YAMAHA
- Explanation of Graphical Symbols
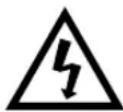
The lightning flash with arrowhead symbol, within an equilateral triangle, is intended to alert you to the presence of uninsulated “dangerous voltage” within the product’s enclosure that may be of sufficient magnitude to constitute a risk of electric shock to persons.

The exclamation point within an equilateral triangle is intended to alert you to the presence of important operating and maintenance (servicing) instructions in the literature accompanying the appliance.
1 Read Instructions — All the safety and operating instructions should be read before the product is operated.
2 Retain Instructions — The safety and operating instructions should be retained for future reference.
3 Heed Warnings — All warnings on the product and in the operating instructions should be adhered to.
4 Follow Instructions — All operating and use instructions should be followed.
5 Cleaning — Unplug this product from the wall outlet before cleaning. Do not use liquid cleaners or aerosol cleaners. Use a damp cloth for cleaning.
6 Attachments — Do not use attachments not recommended by the product manufacturer as they may cause hazards.
7 Water and Moisture — Do not use this product near water — for example, near a bath tub, wash bowl, kitchen sink, or laundry tub; in a wet basement; or near a swimming pool; and the like.
8 Accessories — Do not place this product on an unstable cart, stand, tripod, bracket, or table. The product may fall, causing serious injury to a child or adult, and serious damage to the product. Use only with a cart, stand, tripod, bracket, or table recommended by the manufacturer, or sold with the product.
Any mounting of the product should follow the manufacturer's instructions, and should use a mounting accessory recommended by the manufacturer.
9 A product and cart combination should be moved with care. Quick stops, excessive force, and uneven surfaces may cause the product and cart combination to overturn.

10 Ventilation — Slots and openings in the cabinet are provided for ventilation and to ensure reliable operation of the product and to protect it from overheating, and these openings must not be blocked or covered. The openings should never be blocked by placing the product on a bed, sofa, rug, or other similar surface. This product should not be placed in a built-in installation such as a bookcase or rack unless proper ventilation is provided or the manufacturer's instructions have been adhered to.
11 Power Sources — This product should be operated only from the type of power source indicated on the marking label. If you are not sure of the type of power supply to your home, consult your product dealer or local power company. For products intended to operate from battery power, or other sources, refer to the operating instructions.
12 Grounding or Polarization — This product may be equipped with a polarized alternating current line plug (a plug having one blade wider than the other). This plug will fit into the power outlet only one way. This is a safety feature. If you are unable to insert the plug fully into the outlet, try reversing the plug. If the plug should still fail to fit, contact your electrician to replace your obsolete outlet. Do not defeat the safety purpose of the polarized plug.
13 Power-Cord Protection — Power-supply cords should be routed so that they are not likely to be walked on or pinched by items placed upon or against them, paying particular attention to cords at plugs, convenience receptacles, and the point where they exit from the product.
14 Lightning — For added protection for this product during a lightning storm, or when it is left unattended and unused for long periods of time, unplug it from the wall outlet and disconnect the antenna or cable system. This will prevent damage to the product due to lightning and power-line surges.
15 Power Lines — An outside antenna system should not be located in the vicinity of overhead power lines or other electric light or power circuits, or where it can fall into such power lines or circuits. When installing an outside antenna system, extreme care should be taken to keep from touching such power lines or circuits as contact with them might be fatal.
16 Overloading — Do not overload wall outlets, extension cords, or integral convenience receptacles as this can result in a risk of fire or electric shock.
17 Object and Liquid Entry — Never push objects of any kind into this product through openings as they may touch dangerous voltage points or short-out parts that could result in a fire or electric shock. Never spill liquid of any kind on the product.
18 18 Servicing — Do not attempt to service this product yourself as opening or removing covers may expose you to dangerous voltage or other hazards. Refer all servicing to qualified service personnel.
19 Damage Requiring Service — Unplug this product from the wall outlet and refer servicing to qualified service personnel under the following conditions:
a) When the power-supply cord or plug is damaged,
b) If liquid has been spilled, or objects have fallen into the product,
c) If the product has been exposed to rain or water,
d) If the product does not operate normally by following the operating instructions. Adjust only those controls that are covered by the operating instructions as an improper adjustment of other controls may result in damage and will often require extensive work by a qualified technician to restore the product to its normal operation,
e) If the product has been dropped or damaged in any way, and
f) When the product exhibits a distinct change in performance - this indicates a need for service.
20 Replacement Parts — When replacement parts are required, be sure the service technician has used replacement parts specified by the manufacturer or have the same characteristics as the original part. Unauthorized substitutions may result in fire, electric shock, or other hazards.
21 Safety Check — Upon completion of any service or repairs to this product, ask the service technician to perform safety checks to determine that the product is in proper operating condition.
22 Wall or Ceiling Mounting — The unit should be mounted to a wall or ceiling only as recommended by the manufacturer.
23 Heat — The product should be situated away from heat sources such as radiators, heat registers, stoves, or other products (including amplifiers) that produce heat.
FCC INFORMATION (for US customers)
- IMPORTANT NOTICE: DO NOT MODIFY THIS UNIT!
This product, when installed as indicated in the instructions contained in this manual, meets FCC requirements. Modifications not expressly approved by Yamaha may void your authority, granted by the FCC, to use the product.
-
IMPORTANT: When connecting this product to accessories and/or another product use only high quality shielded cables. Cable/s supplied with this product MUST be used. Follow all installation instructions. Failure to follow instructions could void your FCC authorization to use this product in the USA.
-
NOTE: This product has been tested and found to comply with the requirements listed in FCC Regulations, Part 15 for Class "B" digital devices.
Compliance with these requirements provides a reasonable level of assurance that your use of this product in a residential environment will not result in harmful interference with other electronic devices. This equipment generates/uses radio frequencies and, if not installed and used according to the instructions found in the users manual, may cause interference harmful to the operation of other electronic devices. Compliance with FCC regulations does not guarantee that interference will not occur in all installations. If this product is found to be the source of interference, which can be determined by turning the product "OFF" and "ON", please try to eliminate the problem by using one of the following measures:
Relocate either this product or the device that is being affected by the interference.
Utilize power outlets that are on different branch (circuit breaker or fuse) circuits or install AC line filter/s.
In the case of radio or TV interference, relocate/reorient the antenna. If the antenna lead-in is 300 ohm ribbon lead, change the lead-in to coaxial type cable.
If these corrective measures do not produce satisfactory results, please contact the local retailer authorized to distribute this type of product. If you can not locate the appropriate retailer, please contact Yamaha Electronics Corp., 6660 Orangethorpe Ave. Buena Park, CA90622.
The above statements apply ONLY to those products distributed by Yamaha Corporation of America or its subsidiaries.
We Want You Listening For A Lifetime
YAMAHA and the Electronic Industries Association's Consumer Electronics Group want you to get the most out of your equipment by playing it at a safe level. One that lets the sound come through loud and clear without annoying blaring or distortion - and, most importantly, without affecting your sensitive hearing.
Since hearing damage from loud sounds is often undetectable until it is too late, YAMAHA and the Electronic Industries Association's Consumer Electronics Group recommend you to avoid prolonged exposure from excessive volume levels.

For Customer Use:
Read carefully the information located at the rear panel of the player and enter below the Serial No. Retain this information for future reference.
Model No.
Serial No.
FOR CANADIAN CUSTOMERS
To prevent electric shock, match wide blade of plug to wide slot and fully insert.
This Class B digital apparatus complies with Canadian ICES-003.
This digital apparatus does not exceed the Class B limits for radio noise emissions from digital apparatus as set out in the Radio Interference Regulations of the Canadian Department of Communications.
POUR LES CONSOMMATEURS CANADIENS
Use of controls or adjustments or performance of procedures other than those specified herein may result in hazardous radiation exposure.
CAUTION: READ THIS BEFORE OPERATING YOUR UNIT
1 T o assure the finest performance, please read this manual carefully. Keep it in a safe place for future reference.
2 Install this sound system in a well ventilated, cool, dry, clean place — away from direct sunlight, heat sources, vibration, dust, moisture, or cold. In a cabinet, allow about 2.5cm (1 inch) of free space all around this unit for adequate ventilation.
3 Locate this unit away from other electrical appliances, motors, or transformers to avoid humming sounds.
4 Do not expose this unit to sudden temperature changes from cold to hot, nor locate this unit in an environment with high humidity (i.e., a room with a humidifier) to prevent condensation inside this unit, which may cause an electrical shock, fire, damage to this unit, and/or personal injury.
5 A void installing this unit in a location where foreign objects may fall onto this unit or where this unit may be exposed to liquid dripping or splashing. On the top of this unit, do not place:
- Other components, as they may cause damage and/or discoloration on the surface of this unit.
- Burning objects (i.e., candles), as they may cause fire, damage to this unit, and/or personal injury.
- Containers with liquid in them, as they may fall, spilling the liquid and causing an electrical shock to the user and/or damage to this unit.
6 Do not cover this unit with a newspaper, tablecloth, curtain, etc. in order not to obstruct heat radiation. If the temperature inside this unit rises, it may cause fire, damage to this unit, and/or personal injury.
7 Do not plug in this unit to a wall outlet until all connections are complete.
8 Do not operate this unit upside-down. It may overheat, possibly causing damage.
9 Do not use excessive force on switches, knobs and/or cords.
10 When disconnecting the power cord from the wall outlet, grasp the plug; do not pull the cord.
11 Do not clean this unit with chemical solvents; this might damage the finish. Use a clean, dry cloth.
12 Use only the voltage specified on this unit. Using this unit with a higher voltage than specified is dangerous and may cause fire, damage to this unit, and/or personal injury. YAMAHA will not be held responsible for any damage resulting from use of this unit with a voltage other than as specified.
13 To prevent damage by lightning, disconnect the power cord from the wall outlet during an electrical storm.
14 Do not attempt to modify or fix this unit. Contact qualified YAMAHA service personnel when any service is needed. The cabinet should never be opened for any reason.
15 When not planning to use this unit for long periods of time (i.e., vacation), disconnect the AC power plug from the wall outlet.
16 Be sure to read the "TROUBLESHOOTING" section on common operating errors before concluding that this unit is faulty.
17 Before moving this unit, press STANDBY/ON to set the unit in standby mode, then disconnect the AC power plug from the wall outlet.
18 Place this unit on a flat, hard and stable surface.
19 There must be sufficient room in front of the player for the disc tray to be opened.
20 The mechanical parts of the set contain self-lubricating bearings and must not be oiled or lubricated.
The unit is not disconnected from the AC power source as long as it is connected to the wall outlet, even if this unit itself is turned off. This state is called the standby mode. In this state, this unit is designed to consume a very small quantity of power.
WARNING
TO REDUCE THE RISK OF FIRE OR ELECTRIC SHOCK, DO NOT EXPOSE THIS UNIT TO RAIN OR MOISTURE.
NOTE:
Pictures shown maybe different between countries.
Never make or change connections with the power switched on.
When playing DTS encoded CDs, excessive noise will be heard from the analog stereo outputs. To avoid possible damage to the audio system, the consumer should take proper precautions when the analog stereo outputs of the player are connected to an amplification system. To enjoy DTS Digital Surround™ playback, an external 5.1-channel DTS Digital Surround™ decoder system must be connected to the digital output of the player.
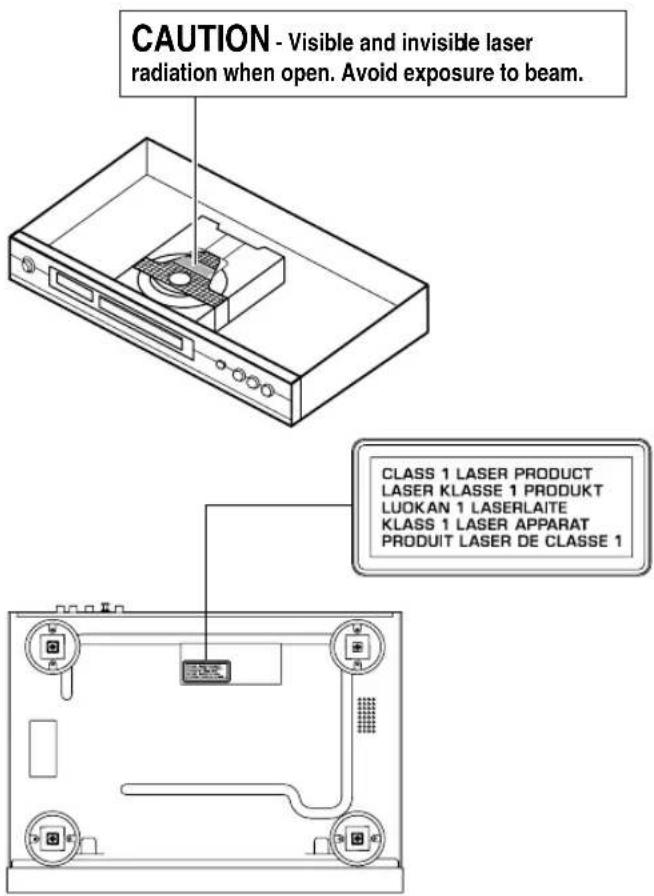
LASER SAFETY
This unit employs a laser. Due to possible eye injury, only a qualified service person should remove the cover or attempt to service this device.
CAUTION
VISIBLE AND INVISIBLE LASER RADIATION WHEN OPEN. AVOID EXPOSURE TO BEAM.
LASER DIODE PROPERTIES
Type Semiconductor laser GaAlAs
Wave length 650 nm (DVD/SA-CD)
790 nm (VCD/CD)
Output Power 7 mW (DVD/SA-CD/VCD/CD)
DANGER
This unit emits visible laser radiation when open. Avoid direct eye exposure to beam.
When this unit is plugged into a wall outlet, do not place your eyes close to the opening of the disc tray and other openings or look inside.
Table of Contents
Introduction 2
Patent information 2
playable disc formats ....2
Region management information....2
Supplied accessories ....3
Installing batteries in the remote control....3
Using the remote control....3
Maintenance....3
Functional Overview 4
Front panel....4
Rear panel 5
Remote control 6
Preparation 7
Audio connection....7
Digital audio connections....7
Analog audio (6CH DISCRETE) connection....7
Analog audio (MIXED 2CH) connection ....7
Video connections....8
Switching on 8
Setups before the initial playback 9
On-screen menu 10
General operation.... 10
Preferences 10
Features.... 10
Adv. picture.... 10
Picture 10
Sound....11
Toolbar 11
Program.... 11
View....11
Play Option 12
Search.... 12
Slide Show.... 12
Setup.... 12
Access 12
Features.... 12
TV....12
Audio Menu.... 13
Language....14
Speakers.... 14
DVD/CD mode.... 15
SA-CD mode....15
Operation 16
Basic playback.... 16
DVD-Video and DVD-Audio.... 16
Playing a disc....16
Smart Resume 16
DVD features 17
Menu....17
Camera angle....17
Changing the audio language and format....17
Subtitle language 17
DVD-Audio features.... 17
Changing pages....17
Playing bonus groups....17
DVD Video Mode 17
SA-CD (Super Audio CD) 18
Playing a disc....18
Sound mode - SA-CD playback 18
Audio CD....19
Playing a disc....19
Video CD and Super Video CD.... 19
Playing a disc....19
Playback Control (PBC)....19
MP3....20
MP3 disc features 20
Playing a disc....20
Choosing an Album/Track to playback....20
MP3 text....20
JPEG....21
JPEG disc features....21
Playing a disc....21
Slide show setting....21
Rotating the image....21
General features 22
Moving to another segment....22
Search....22
Slow motion....22
Still picture and frame-by-frame playback 22
Time search 22
Repeat....23
Repeat A-B....23
Shuffle....23
Scan 23
Zoom 23
FTS video/audio program....24
Activating/deactivating the FTS program 24
Erasing a track/chapter/index from the FTS list 24
Erasing all tracks/chapters/indexes from the FTS list......24
Disc lock.... 24
Activating/deactivating Disc lock....24
Authorizing discs....24
Deauthorizing discs....25
Parental Control.... 25
Activating/deactivating Parental Control....25
Country....25
Changing the four-digit PIN 25
If you forget your four-digit code....25
Troubleshooting 26
Specifications 27
Introduction
Thank you for purchasing the YAMAHA DVD AUDIO/VIDEO SA-CD player. This Owner's Manual explains its basic operations.
Patent information

Manufactured under license from Dolby Laboratories.
"Dolby", "Pro Logic", and the double-D symbol are trademarks of Dolby Laboratories.

"DTS" and "DTS Digital Surround" are registered trademarks of Digital Theater Systems, Inc.

"DCDi" is a trademark of Faroudja, a division of Genesis Microchip, Inc.
This product incorporates copyright protection technology that is protected by method claims of certain U.S. patents and other intellectual property rights owned by Macrovision Corporation and other rights owners. Use of this copyright protection technology must be authorized by Macrovision Corporation, and is intended for home and other limited viewing uses only unless otherwise authorized by Macrovision Corporation. Reverse engineering or disassembly is prohibited.
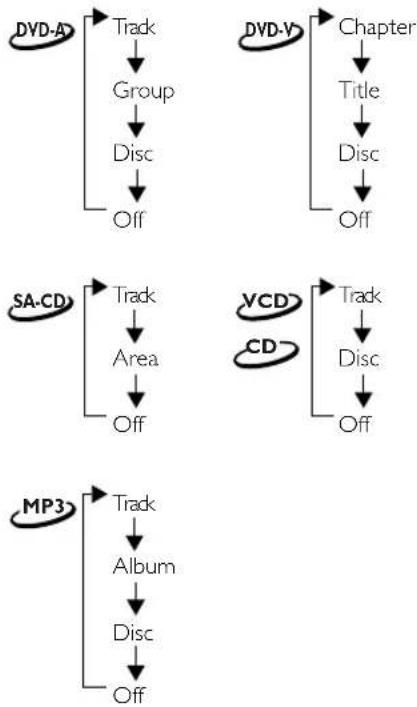
playable disc formats
This unit can play the disc types associated with the logos shown below. (Do not attempt to load any other type of disc into the unit, or the unit may be damaged.)

This manual refers to disc types using the following symbols:
| DVD-Audio DVD-Video Video CD *1 | ||
| SA-CD(Super Audio-CD) | Audio CD MP3 | |
*1 icon includes Super Video CD.
Notes:
- This unit is designed for use with SA-CD, DVD-Video, DVD-Audio, Video CD, Super Video CD, Audio CD, CD-R and CD-RW (MP3 and JPEG supported), DVD+R and DVD+RW, DVD-R and DVD-RW.
- CD-R and CD-RW discs cannot be played unless they have been finalized.
- DVD+R and DVD+RW discs cannot be played unless they have been finalized.
- DVD-R and DVD-RW discs must be recorded in Video format and must be finalized.
- Some discs cannot be played depending on disc characteristics or recording conditions.
- Be sure to use only CD-R and CD-RW discs from reliable manufacturers.
– Dolby Digital, DTS digital surround, and MPEG digital audio are supported. - PAL and NTSC are supported.
- This unit features the PAL and NTSC video system converting function to allow you watching the different types of video discs on one TV (see "TV System" on page 13).
- Do not use any non-standard shaped discs (heart, etc.).
- Do not use discs that have tape, scales, or paste on them or damage to the unit may result.
- Do not use discs with surfaces printed by a commercial label printer.
- Some DVD discs require specific features or allow only limited function during playback.
- “∅” may appear on the TV screen to indicate that a function is unavailable.
- Photo CD, CD-ROM, DVD-ROM, DVD-RAM, CDV and nonstandard CD discs cannot be played on this unit.
Region management information
The unit is designed to support the Region Management System. Check the regional code number on the disc package. If the number does not match the unit's region number (see table below, or see back of unit), the unit may be unable to play the disc.
| Model | Region number of the unit | Discs that can be played (Example) |
| U.S.A. and Canada models | ||
| U.K. and Europe models | ||
| General model | ||
| Australia model |
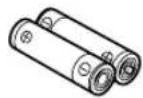
Supplied accessories
Check your package to make sure it contains the following items:
Remote control Batteries (x2) (AA, R6, UM-3)
Audio/Video cable Power cable


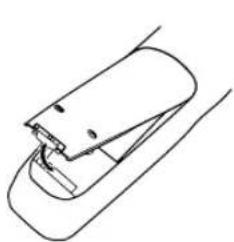
Installing batteries in the remote control
Insert the batteries in the correct direction by aligning the + and - marks on the batteries with the polarity markings (+ and -) inside the battery compartment.
natural_image
Simple line drawing of a car's side view showing front and rear sections (no text or symbols)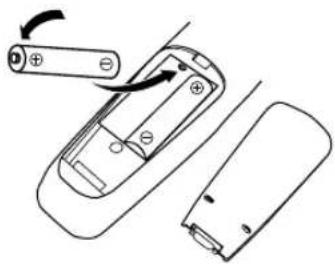
natural_image
Diagram of a mobile phone rear panel showing battery placement and casing structure (no text or symbols)1 Remove the back cover.
2 Insert the two supplied batteries (AA, R6, UM-3) into the battery compartment.
3 Close the back cover.
Replace worn batteries
Worn batteries limit the operating range of the remote control. Replace both batteries at the same time.
- Replace both batteries if you notice a decrease in the operating range of the remote control.
- Do not use old batteries with new ones.
- Do not use different types of batteries (such as alkaline and manganese) together. Read the battery packaging
carefully. Different types of batteries may be the same shape or color.
- If the batteries leak, dispose of them immediately. Avoid touching the leaked material or letting it come into contact with clothing, etc. Clean the battery compartment thoroughly before installing new batteries.
Using the remote control
Handling the remote control
- Do not spill water or other liquids on the remote control.
- Do not drop the remote control.
- Do not leave or store the remote control in the following types of conditions:
– high humidity such as near a bath
– high temperature such as near a heater or stove - extremely low temperature
- dusty places
Maintenance
Cleaning the cabinet
- Use a soft cloth slightly moistened with a mild detergent solution. Do not use a solution that contains alcohol, spirits, ammonia or abrasives.
Cleaning discs
- When a disc becomes dirty, clean it with a cleaning cloth. Wipe the disc from the center out. Do not wipe in a circular motion.
- Do not use solvents such as benzene, thinner, commercial cleaners, or anti-static spray designed for analog records.
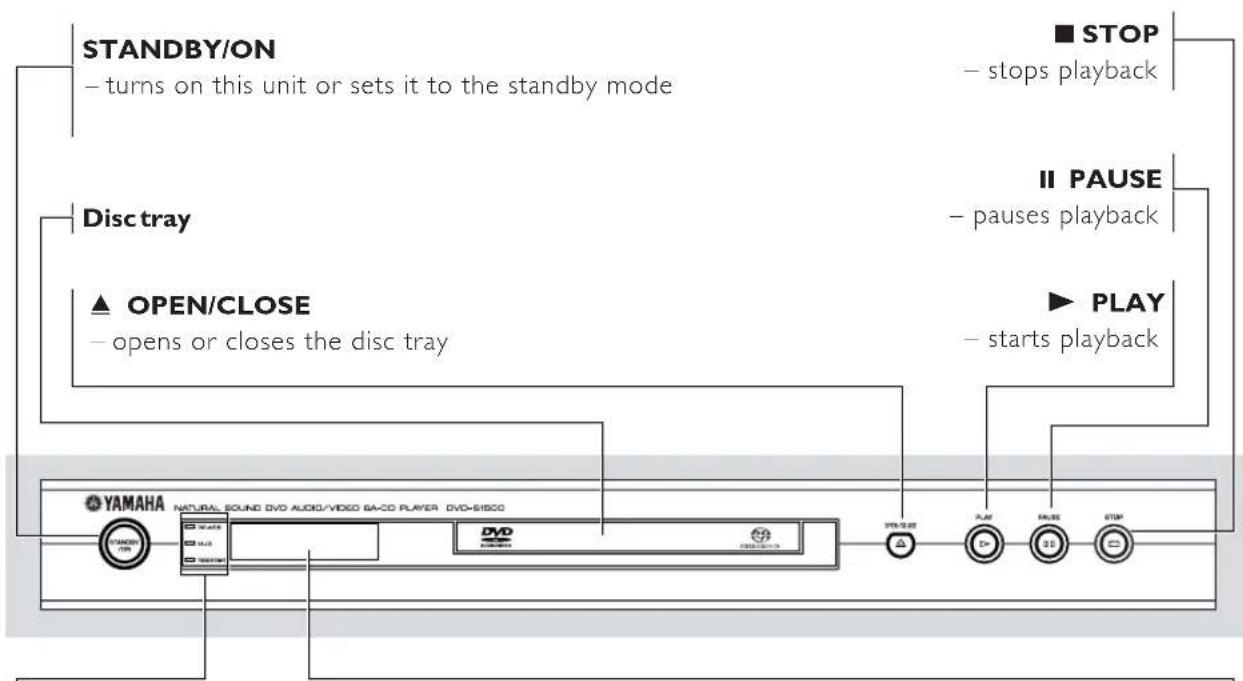
Functional Overview
Front panel
flowchart
graph TD
    A["STANDBY/ON"] --> B["Turns on this unit or sets it to the standby mode"]
    B --> C["■ STOP"]
    C --> D["Stands playback"]
    A --> E["Disc tray"]
    E --> F["II PAUSE"]
    F --> G[" pauses playback"]
    A --> H["▲ OPEN/CLOSE"]
    H --> I["Opens or closes the disc tray"]
    I --> J["▶ PLAY"]
    J --> K["Starts playback"]
    A --> L["YAMAHA"]
    L --> M["NATURAL SOUND DVD AUDIO/VIDEO BA-CD PLAYER DVD-S1500"]
    M --> N["Play"]
    N --> O["Stop"]
DVD-AUDIO indicator
— lights up when the unit detects DVD-Audio signals
SA-CD indicator
- lights up when the unit detects SA-CD signals
PROGRESSIVE indicator
— lights up when the unit enters Progressive mode
Front panel display
— shows information about the operational status of the unit
A.DRCT
- lights up when you enter the AUDIO DIRECT mode by pressing the AUDIO DIRECT button on the remote control during audio disc playback
ML.CH
- lights up when you play multi-channel audio source
D.MIX
- lights up when you play the discs that allow down mixing of the multi-channel audio sources
A.DRCT ML.CH D.MIX
Rear panel
Caution: Do not touch the inner pins of the jacks on the rear panel. Electrostatic discharge may cause permanent damage to the unit.
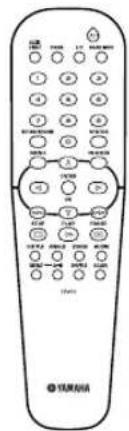
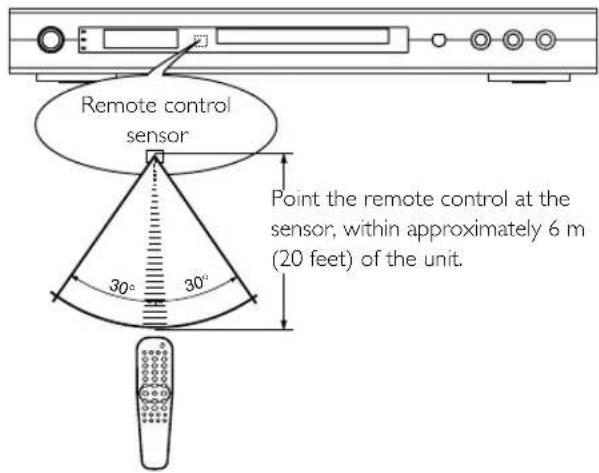
Remote control
* Press and hold button for about two seconds.
Preparation
- There are various ways to connect the player, depending on the equipment you wish to use. The following drawings illustrate some possible configurations.
- Please refer to manuals for other equipment as necessary to ensure that you make the correct connections.
- Do not connect the player via your VCR. The video quality could be distorted by the copy protection system.
- Do not connect the player's audio output jack to the phono input jack on your audio system.
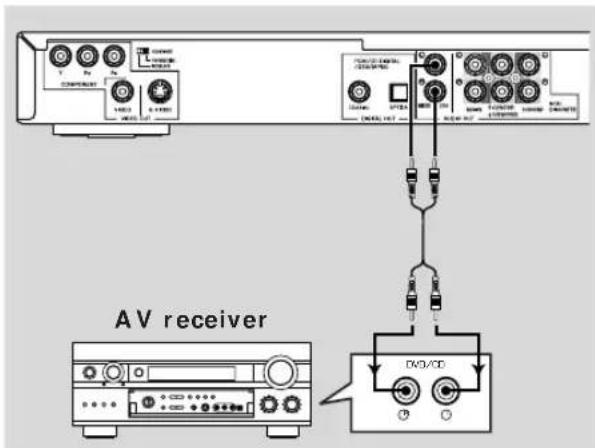
Audio connection
Digital audio connections
This unit features COAXIAL and OPTICAL digital output jacks. Connect one or both of them to digital input jacks of an AV receiver. You can also enjoy high-quality stereo sound at sampling frequencies of 88.2 and 96 kHz, assuming the material is not copy-protected and the equipment you connect is compatible with these signals.
Notes:
- If the audio format of the digital output does not match the capabilities of your receiver, the receiver will produce a strong, distorted sound or no sound at all. Make sure to select the appropriate audio format on the disc menu screen. Pressing AUDIO once or more may change not only the audio language but also the audio format. The selected format name will be displayed for several seconds in the status window.
- SA-CD audio signal is not output from DIGITAL OUT jacks.
- If you wish to enjoy Dolby Digital, DTS, and MPEG you must connect this unit to the AV receiver that support those.
Analog audio (6CH DISCRETE) connection
Connect a receiver with multi-channel audio input terminals to enjoy surround sound with no sampling frequency limitation. We recommend this connection to obtain maximum performance of SA-CD discs and DVD-Audio multi-channel sound.
flowchart
graph TD
    A["ACV Receiver"] --> B["Front"]
    A --> C["Center"]
    A --> D["Subwoofer"]
    A --> E["Surround"]
    B --> F["AV Receiver"]
    C --> F
    D --> F
    E --> F
Analog audio (MIXED 2CH) connection
Use the audio cable supplied with the player to connect AUDIO OUT L (left) and R (right) jacks of the player to the corresponding input jacks on your audio equipment, such as an AV receiver.
Video connections
If your AV receiver features video output jacks, connect this unit to the AV receiver (and then to your TV). This enables you to use one TV for several different video sources (LD, VDR etc.) by simply switching the input source selector on your AV receiver.
This unit features three types of video output jacks (Component, Video and S-Video). Connect the appropriate video output jack to your equipment.

flowchart
graph TD
    A["TV"] --> B["AV receiver"]
    B --> C["Component IN"]
    B --> D["Component OUT"]
    B --> E["Video IN"]
    B --> F["Video OUT"]
    B --> G["SVIDEO IN"]
    B --> H["SVIDEO OUT"]
    C --> I["Component IN"]
    D --> J["Component OUT"]
    E --> K["Video IN"]
    F --> L["Video OUT"]
    G --> M["Video IN"]
    H --> N["Video OUT"]
SCAN MODE selector
This selector switches the type of output signal from the COMPONENT VIDEO OUT jacks on this unit.
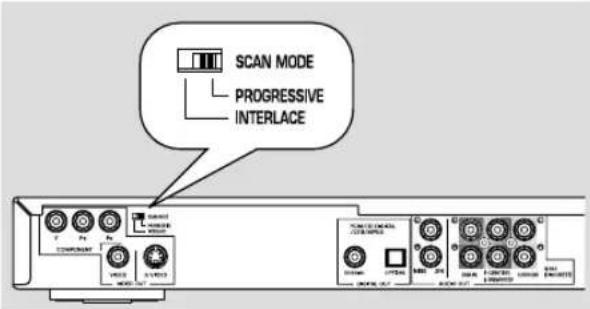
INTERLACE:
Select INTERLACE if you are connecting the component to a standard (interlace format) TV.
PROGRESSIVE:
Select PROGRESSIVE if your TV accepts NTSC progressive or PAL progressive signals. This setting will enable you to enjoy accurate color reproduction and high quality images. This unit features DCDi circuit. The PROGRESSIVE indicator on the front panel lights up during progressive playback.
Notes:
- In the PROGRESSIVE mode, 4:3 aspect images are stretched horizontally on the wide screen TV. We recommend to change the TV screen's aspect ratio settings for progressive signals if you wish to watch the original aspect ratio images without distortion. You can also change the aspect ratio settings in the [4:3 Aspect] parameter in the On-screen menu.
- Some TVs and projectors are not compatible with this unit. If you notice picture distortion when outputting the progressive signals, switch the SCAN MODE selector to INTERLACE.
CONSUMERS SHOULD NOTE THAT NOT ALL HIGH DEFINITION TELEVISION SETS ARE FULLY COMPATIBLE WITH THIS PRODUCT AND MAY CAUSE ARTIFACTS TO BE DISPLAYED IN THE PICTURE. IN CASE OF 525 OR 625 PROGRESSIVE SCAN PICTURE PROBLEMS, IT IS RECOMMENDED THAT THE USER SWITCH THE CONNECTION TO THE "STANDARD DEFINITION" OUTPUT. IF THERE ARE QUESTIONS REGARDING OUR VIDEO MONITOR COMPATIBILITY WITH THIS MODEL 525P AND 625P DVD PLAYER, PLEASE CONTACT OUR CUSTOMER SERVICE CENTER.
This unit is compatible with the complete line of YAMAHA products, including the projectors DPX-1100, LPX-510 and the plasma monitor PDM-4210.
Switching on
1 Connect the AC power cord to the power outlet.
2 Switch on the TV and this unit.
3 Set the TV to the correct Video IN channel. (e.g. EXT1, EXT2, AV1, AV2, AUDIO/VIDEO, etc. refer to your TV owner's manual for detail.)
→ The front panel display lights up and the default screen appears on the TV.
4 If you are using an external equipment (e.g. audio system or receiver), turn them on and select the appropriate input source that was used to connect to this unit. Refer to the equipment owner's manual for detail.
Note:
- If you do not have a proper picture or sound, refer to "Troubleshooting" section.
Setups before the initial playback
We recommend to setup some of the basic menu items before the initial playback.
1 Press STANDBY/ON /to turn on the unit.
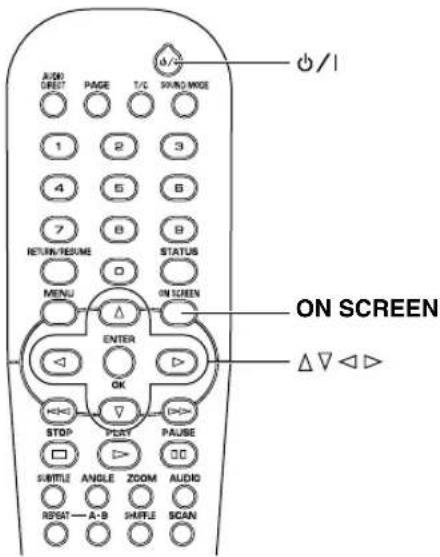
2 Press ON SCREEN.
→ On-screen menu is displayed on the screen.
3 Follow the procedure described below to set the following menu items.
①Menu Language (see page 14)
You can select the language displayed in the On-screen menu.
1 Go to [Menu Language] (Setup → Language → Menu Language) by using ▲▼◀▶ buttons on the remote control, then press ▶.
→ Choices are displayed on the right column.
2 Select a language to be displayed in the On-screen menu by using ▲▼ buttons.
3 Press ◀ to return to the previous menu.
②Default Audio (see page 14)
You can select the audio language spoken in video discs. Available choices are determined by the disc.
1 Go to [Default Audio] (Setup → Language → Default Audio) by using ▲▼◀▶ buttons on the remote control, then press ▶.
→ Choices are displayed on the right column.
2 Select a language by using ▲▼ buttons.
3 Press ◀ to return to the previous menu.
③Default Sub-title (see page 14)
You can select the subtitle language set as default. Available choices are determined by the disc.
1 Go to [Default Sub-title] (Setup → Language → Default Sub-title) by using ▲▼◀▶ buttons on the remote control, then press ▶.
→ Choices are displayed on the right column.
2 Select a default subtitle language by using ▲▼ buttons.
3 Press ◀ to return to the previous menu.
④TV shape (see page 12)
You can select the aspect ratio of the video displayed on the TV monitor.
Select [Wide-screen] if you connect to a wide-screen monitor. If you connect to a conventional monitor, select [4:3 Pan Scan] (the left and right sides are trimmed when you play 16:9 video) or [4:3 Letterbox] (black areas appear at the top and bottom when you play 16:9 video).
1 Go to [TV Shape] (Setup → TV → TV shape) by using ▲▼◀▶ buttons on the remote control, then press ▶. → Choices are displayed on the right column.
2 Make a choice by using ▲▼ buttons.
3 Press ◀ to return to the previous menu.
⑤Analog output (see page 13)
Enables you to specify the type of analog output suitable for your AV receiver. Select [Multichannel] if you are using a multi-channel AV receiver with 6-ch discrete inputs. If your AV receiver does not have 6-ch discrete inputs, select one of [Stereo], [Dolby Surr-compat], or [3D Sound].
1 Go to [Analog output] (Setup → Audio Menu → Analog output) by using ▲▼◀▶ buttons on the remote control, then press ▶.
→ Choices are displayed on the right column.
2 Select an item for the analog output signal by using ▲▼ buttons.
3 Press ◀ to return to the previous menu.
⑥Digital output (see page 13)
Enables you to specify the type of digital output suitable for your AV receiver. Select [PCM only] if your AV receiver is not capable of decoding multi-channel audio. Select [All] if you connected this unit's digital out jacks to a multi-channel AV receiver.
1 Go to [Digital output] (Setup → Audio Menu → Digital output) by using ▲▼◀▶ buttons on the remote control, then press ▶.
→ Choices are displayed on the right column.
2 Select an item for the digital output signal by using ▲▼ buttons.
3 Press ◀ to return to the previous menu.
Note:
- Press ON SCREEN again to exit from the On-screen menu.
- You can find the selection of the helpful menu items in [Preference] and [Setup].
Go to [Preference] if you want to customize this unit for your personal requirement such as the Wake-up timer. Go to [Setup] if you want to set the operational status of this unit.
The On-screen menu enables you to customize this unit to suit your requirements.
General operation
1 Press ON SCREEN on the remote control.
→ The On-screen menu appears on the screen.
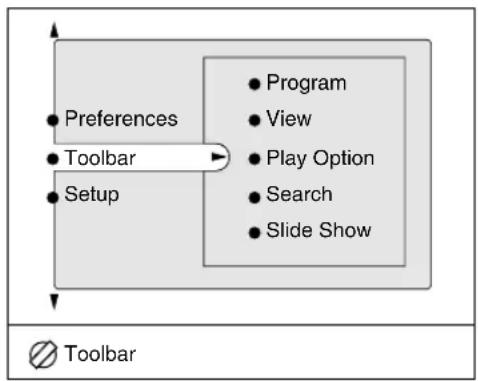
flowchart
graph TD
    A["Preferences"] --> B["Toolbar"]
    C["Setup"] --> B
    B --> D["Program"]
    B --> E["View"]
    B --> F["Play Option"]
    B --> G["Search"]
    B --> H["Slide Show"]
2 Press ▲▼◀▶ to navigate the On-screen menu and to change the settings.
3 Press ON SCREEN to exit from the On-screen menu.
Preferences

Features
Dimmer
Adjusts the brightness of the front panel display. You can use this function if the brightness of the front panel display disturbs your enjoyment of the home theater.
Choices: Low, Medium, Normal
Initial setting: Normal
Wake-up timer
Turns on the player from standby mode after a preset amount of time. The timer is then reset to zero. You can set the timer for up to 600 minutes.
Choices: 0 to 600 minutes
Initial setting: 0
Status window
Displays the current status of the player. Select [Off] to suppress display of the Status window.
Choices: On, Off
Initial setting: On
Adv. picture
Allows you to fine-tune the following video parameters.
4:3 Aspect
You can adjust the aspect ratio of the projected images on the screen. This function is available for progressive scan output only.
Select [NL Stretch] for display of 4:3 image on the 16:9 screen with non-linear stretching (Center position of screen is stretch less than the side).
Select [4:3 Pillar Box] to display 4:3 image on the 16:9 screen without stretching.
No aspect ratio adjustment is made when [AUTO] is selected.
We recommend setting the aspect ratio on your TV if the function is available.
Choices: 4:3 Pillar Box, NL Stretch, Auto
Initial setting: Auto
TrueLife
Produces more dynamic picture by increasing the picture contrast and the color intensity. This function is available for progressive scan output only.
Choices: 0 to +7
Initial setting: 0
DCDi
DCDi (Directional Correction Deinterlacing) computes and tracks the angle of the screen edge to fill in the missing pixel on the TV screen. DCDi will optimize the image quality significantly, especially during the slow motion playback. This function is available for progressive scan output only.
Choices: On, Off
Initial setting: On
Chroma Delay
The chroma (color) and luminance (brightness) signals are not synchronized. The Chroma Delay setting allows you to adjust the advance delay of the chroma signal to yield a perfectly clear picture. This function is available for signals output from COMPONENT VIDEO OUT only.
Choices: -3 to +3
Initial setting: 0
Gamma
Enables you to adjust the intensity of the picture non-linearly. A positive value enables you to bring out low level detail in dark scenes, while a negative value emphasizes contrast. This function is available for signals output from COMPONENT VIDEO OUT only.
Choices: -7 to +7
Initial setting: 0
Picture
Video shift
Adjusts the position of the image on the screen by scrolling it to the left or right.
Choices: +1 to +7
Initial setting: +4
Saturation
Adjusts the video color saturation. This function is not available for signals output from COMPONENT VIDEO OUT.
Choices: -7 to +7
Initial setting: 0
Contrast
Accentuates bright and dark parts of the video. This function is not available for signals output from COMPONENT VIDEO OUT.
Choices: -7 to +7
Initial setting: 0
Picture Mode
Adjusts the color tone to suit your preference and the playing source. [Personal] will be chosen automatically when you change the value in the following menus; [Saturation], [Contrast], [Brightness], and [Sharpness]. This function is not available for signals output from COMPONENT VIDEO OUT.
Choices: Rich, Natural, Soft, Animation, Personal Initial setting: Natural
Brightness
Adjusts the overall brightness of the picture. This function is not available for signals output from COMPONENT VIDEO OUT.
Choices: -7 to +7
Initial setting: 0
Sharpness
Adjusts the sharpness of the video. This function is not available for signals output from COMPONENT VIDEO OUT.
Choices: -7 to +7
Initial setting: 0
Sound
Karaoke Vocal
Enables you to play multi-channel karaoke DVDs. The karaoke channels on the disc will be mixed into normal stereo when you choose On.
Choices: On, Off
Initial setting: Off
Note:
- If you select [Multi-channel] in the [Analog output] menu, the MIXED 2CH jacks do not output the downmixed stereo.
ClearVoice
Increases the relative volume of dialog for easy listening at night. This function is available for only certain multi-channel discs.
Choices: On, Off
Initial setting: Off
Night Mode
When set to [On], the dynamics of the sound output is optimized. High volume output is softened, enabling you to watch your favorite action movie without disturbing others.
Choices: On, Off
Initial setting: Off
CD Up-sampling
Allows you to upgrade a CD from 44.1 kHz / 16 bit to a higher sampling rate for superior sound quality.
Choices: On, Off
Initial setting: Off
Note:
- If you select [Multi-channel] in the [Analog output] menu, this function will not be performed.
Toolbar

Program
You can create your own playlist using this menu. First, go to [Tracks], then select the tracks/chapters, etc. to include in your playlist. The programmed playlist will be activated when you choose [On] in the [Program] menu.
Clear all
Deletes all Programmed contents.
Program
Set the FTS program playback on or off.
Choices: On, Off
Initial setting: Off
Tracks
Selects tracks and chapters for your FTS list.
Play list
Shows the programmed FTS list.
Note:
- For details about FTS and the settings of [Program] menu items, see the descriptions followed by "FTS video/audio program" on page 24.
View
Rotate
Rotates a JPEG image.
Choices: -180^ , -90^ , 0, +90^ , +180^
Initial setting: 0
Zoom
Activates the zoom function. A cursor will be displayed on screen. Move the cursor using the ▲▼◀▶ buttons, then select a size by pressing the ENTER button repeatedly. To exit zoom mode, press RETURN/RESUME repeatedly until the cursor disappears from the screen.
Chapter Preview
Plays the first 10 seconds of each chapter/track on the disc. Pressing SCAN on the remote control performs the same function as well.
Choices: On, Off
Initial setting: Off
Angle
Some DVD discs feature a multiple angle function, enabling you to watch certain scenes from various angles. Function availability and the number of camera angles vary according to the disc.
Page
Turns pages of DVD-Audio still images.
Play Option
DVD Video Mode
Some DVD-Audio discs include DVD-Video contents that can be played on conventional DVD-Video players. To play such contents, select [On]. The setting returns to [Off] when you eject a disc or turn the unit to standby mode.
Choices: On, Off
Initial setting: Off
Audio
Selects the sound format and audio language. Available choices are determined by the disc.
Disc Navigation
You can direct to a track, etc. by using this menu.
Subtitle
Selects the subtitle language. Available choices are determined by the disc.
Search
Frame by Frame
Advances or reverses one frame at a time. This function is available for video discs only. [Previous Frame] is not available for VCD and SVCD.
Choices: Previous Frame, Current Frame, Next Frame
Fast
Selects a speed for fast forward or fast reverse playback.
Choices: -32, -8, -4, 1, 4, 8, 32
Initial setting: 1
Time
You can move to a certain spot by indicating the elapsed time.
Slow
Selects a speed for the slow forward or slow reverse playback.
Choices: -1, -1/2, -1/4, -1/8, 0, 1/8, 1/4, 1/2, +1
Initial setting: 0
Slide Show
Use this feature for JPEG slide show playback.
Picture Time
Sets the duration for each image.
Choices: Slow, Medium, Fast
Initial setting: Medium
Setup

Access
Disc lock
This function enables you to restrict others from accessing certain discs.
If this setting is on, you need to enter the four-digit PIN to modify the [Access] menu settings before you can play the disc.
Choices: On, Off
Initial setting: Off
Change PIN
Enables you to change the four-digit PIN.
To change the four-digit PIN, enter the current PIN first, then enter the new four-digit PIN.
Enter PIN
Enter the four-digit PIN to unlock the disc or to display the Access menu.
Parental level
DVD movies may contain scenes that are unsuitable for children. Therefore, some discs contain parental control information that may apply to the entire disc or to certain scenes. Ratings are country-specific. You can specify a country code in the On-screen menu. See “Country” on page 25.
Choices: 0 to 8
Initial setting: 0
Country
Selects a country to apply its rating system to Parental Level control.
Features
PBC
A VCD menu screen is displayed when this setting is on.
Choices: On, Off
Initial setting: On
Sleep Timer
Places this unit in standby mode when playback is stopped and this unit is not operate for 20 minutes.
Choices: On, Off
Initial setting: Off
TV
TV shape
If you connect to a conventional 4:3 aspect TV, select [4:3 panscan] (the left and right sides are trimmed when you play 16:9 video) or [4:3 letterbox] (black areas appear at the top and bottom when you play 16:9 video). Select [Wide-screen] if you connect to a Wide-Screen TV.
Choices: 4:3 panscan, 4:3 letterbox, widescreen Initial setting: 4:3 panscan
4:3 panscan
4:3 letterbox
Widescreen

natural_image
Three-panel illustration showing mountain landscapes with a full moon, trees, and a tree under the sun (no text or symbols)TV System (NTSC/PAL conversion)
Allows you to select [PAL], [NTSC] or [Auto] mode to match your TV system. You can play PAL discs on NTSC monitor, and NTSC discs on PAL monitor.
Choices: PAL, NTSC, Auto
The following conversions are supported.
| Disc Format | Output format | ||
| Selected mode | |||
| NTSC PAL AUTO | |||
| NTSC NTSC PAL NTSC | |||
| PAL NTSC PAL PAL | |||
Notes:
- In progressive scan mode, the output signals from the VIDEO and S VIDEO jacks are same as the format of the disc you play.
- Some image distortion occurs when switching the NTSC and PAL mode.
-
If your TV does not accept the selected mode while you change the [TV System] setting, the screen will be distorted so that you cannot recognize the On-screen menu. When it occurs, you can change the [TV System] settings by the remote control operations. Follow the procedures below.
-
Choosing [PAL]:
Press PLAY (▶)/2/5/6/PLAY (▶) on the remote control.
- Choosing [NTSC]:
Press PLAY (▶)/2/5/7/PLAY (▶) on the remote control.
Audio Menu
Digital output
Enables you to specify the type of digital output to suit your AV receiver. Select [PCM only] if your receiver is not capable of decoding multi-channel audio.
Select [All] if you connected this unit's digital out jacks to a multi-channel decoder receiver.
Choices: Off, PCM only, All
Initial setting: All
Note:
- Digital output is not available for SA-CDs.
Analog output
Enables you to specify the type of analog output suitable for your AV receiver.
Choices: Stereo, DolbysurrCompat, 3D sound, Multi-channel
Initial setting: Multi-channel
Stereo: In this setting, the multi-channel audio is down-mixed to a stereo signal. Select this setting when connecting to a TV, stereo amplifier/receiver, etc.
DolbysurrCompat: Select this setting when using equipment with a Dolby Surround Pro Logic decoder. In this setting, the multi-channel audio (Dolby Digital, MPEG-2, DTS) is downmixed to a Dolby Surround-compatible 2-ch output. SA-CD and PCM signals with a sampling frequency of over 88.2 kHz are downmixed to normal stereo.
3D sound: In a setup without rear speakers (analogue stereo output), 3D Sound remixes the six channels of digital surround (except for SA-CD and PCM signals with a sampling frequency of over 88.2 kHz) into a two speaker output while retaining all of the original audio information. The result is the sensation of being surrounded by multiple speakers.
Multi-channel: Select this setting when using a multi-channel AV receiver with 6-ch discrete inputs. The multi-channel audio signals those of like DVD-Audio, DVD-Video, and SA-CD are output from the respective 6-ch discrete output jacks. In this mode, this unit will perform DTS decoding, Dolby Digital 5.1-channel decoding, or MPEG Multichannel decoding when applicable, and Dolby Pro Logic II decoding on 2-ch sound tracks except for SA-CD and PCM signals with a sampling frequency of over 88.2 kHz.
PCM output
Enables you to select PCM digital output at 48 kHz or 96 kHz. If you select [48 kHz], PCM data will be converted to 2-ch 48 kHz or less. Select [48 kHz] if the connected equipment cannot process signals with a sampling frequency of 96 kHz or 88.2 kHz.
Choices: 96 kHz, 48 kHz
Initial setting: 96 kHz
Note:
- Signals are converted to either 48 kHz or 44.1 kHz despite the above settings if the disc has copy protection.
- If you select [96 kHz], signals with a sampling frequency of over 96 kHz are converted to 2-ch 88.2 kHz or 96 kHz.
SA-CD Direct
Enables you (with a suitable speaker system) to bypass the bass management system for multi-channel SA-CD playback, so you can enjoy the pure SA-CD quality.
Choices: On, Off
Initial setting: Off
Note:
- When [SA-CD Direct] is On, the speaker settings will not be applied during SA-CD playback.
Language
Enables you to select a language for audio, subtitles, On-screen menus or DVD menus. The selected languages will be used for all discs, until you modify your settings. If the selected language is not available on the disc, the default language designated by the disc will be applied.
Default Sub-title
Selects a default subtitle language. This setting also applies to DVD menu items.
Menu Language
Selects a language for the On-screen display.
Default Audio
Selects a default audio language.
Speakers
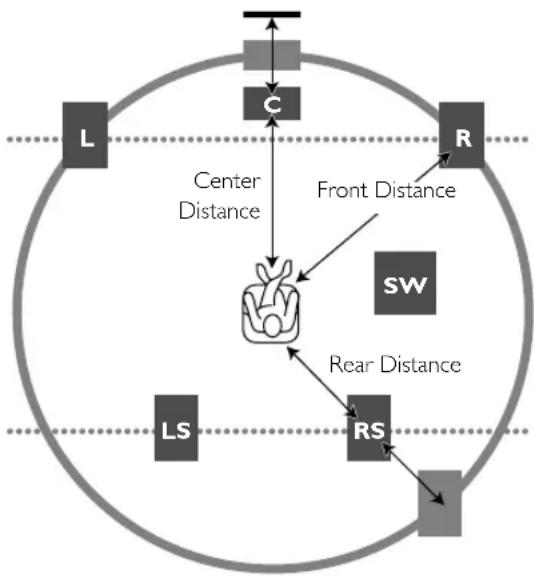
Use this menu to specify speaker size, on/off status, and speaker distance to optimize your listening environment. Placing all speakers except for the subwoofer at equal distances from the listener is the most ideal way of the speaker positioning in 5.1 channel system. Set the following menu items to create the better listening environment.
You can use the following 7 settings to select the size and layout for your speakers.
| Speaker Size / Layout | |||
| Front Center Surround Subwoofer | |||
| Large Large | Large On | ||
| Small Off | Off On | ||
| Small Small | Small On | ||
| Large Off | Off Off | ||
| Large Small | Small Off | ||
| Large Off | Small Off | ||
| Large Small | Off Off | ||
flowchart
graph TD
    L["Left"] --> C["C"]
    C --> Center["Center"]
    Center --> R["R"]
    R --> Front["Front Distance"]
    Front --> SW["SW"]
    SW --> Rear["Rear Distance"]
    Rear --> RS["RS"]
    RS --> LS["Left"]
    Center --> Center
    Center --> R
    Center --> SW
    Center --> L
    Center --> R
    Center --> SW
    Center --> L
    Center --> R
    Center --> SW
    Center --> L
    Center --> R
    Center --> SW
    Center --> L
    Center --> R
    Center --> SW
Notes:
- These settings are effective only on analog output signals.
- When playing DVD-Audio, all speaker size is set to Large and the subwoofer is set to On, regardless of the setting you adjusted.
Front Distance
Sets the distance from your listening place to the front speakers. We recommend to place the front left speaker and right speaker at the same distance from the listening point.
Choices: 1 to 12 m
Initial setting: 1.9 m
Centre Distance
Sets the distance from your listening place to the center speaker.
Choices: Varies depending on the [Front Distance] setting.
Initial setting: 1.9 m
Note:
- The available range of choice differs depending on the [Front Distance] setting.
Rear Distance
Sets the distance from your listening place to the rear speakers. We recommend to place the rear left speaker and rear right speaker at the same distance from the listening point.
Choices: Varies depending on the [Front Distance] setting.
Initial setting: 1.9 m
Note:
- The available range of choice differs depending on the [Front Distance] setting.
Front Size
Specifies the front speaker size.
Choices: Large, Small
Initial setting: Large
Center size
Specifies the center speaker size.
Choices: Large, Small, Off
Initial setting: Large
Surround Size
Specifies the surround right speaker size.
Choices: Large, Small, Off
Initial setting: Large
Subwoofer
If you wish to use a subwoofer, select On. Otherwise select Off.
Choices: On, Off
Initial setting: On
Note:
- You may not be able to make settings that match your speaker layout.
DVD/CD mode
Adjusts the volume of each speaker for audio playback (excluding SA-CDs). If you adjust the volume level for any speaker, the volume level for the other speakers is adjusted accordingly.
Front R Vol
Choices: -6 to +6
Initial setting: 0
Front L Vol
Choices: -6 to +6
Initial setting: 0
Center Vol
Choices: -6 to +6
Initial setting: 0
Surround R Vol
Choices: -6 to +6
Initial setting: 0
Surround L Vol
Choices: -6 to +6
Initial setting: 0
Subwoofer Vol
Choices: -6 to +6
Initial setting: 0
SA-CD mode
You can adjust the volume level output from each channel for SA-CD playback.
You must choose Multi-channel for Analog output to make this function available. (See “Analog output” on page 13.)
If you adjust the volume level for any speaker, the volume level for the other speakers is adjusted accordingly.
Cut-off frequency
Cut off frequency adjustment for a subwoofer.
Choices: +60, +80, +100, +120 (Hz)
Initial setting: +120 (Hz)
Slope
Filter slope adjustment for a subwoofer.
Choices: +12, +18, +24 (dB/oct)
Initial setting: +24 (dB/oct)
Front R Vol
Choices: -6 to +6
Initial setting: 0
Front L Vol
Choices: -6 to +6
Initial setting: 0
Centre Vol
Choices: -6 to +6
Initial setting: 0
Surround R Vol
Choices: -6 to +6
Initial setting: 0
Surround L Vol
Choices: -6 to +6
Initial setting: 0
Subwoofer Vol
Choices: -6 to +6
Initial setting: 0
Operation
Notes:
— Unless otherwise stated, all operations described herein are based on remote control usage.
- Some operations can be carried out using the On-screen menu on the TV screen.
Basic playback
1 Press STANDBY/ON to turn on the unit.
2 Press OPEN/CLOSE ▲ on the front panel to open the disc tray.
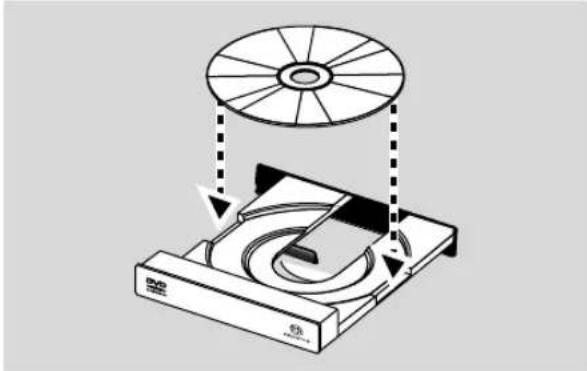
3 Place the disc in the tray, with the label facing up.
4 Press OPEN/CLOSE ▲ again to close the tray.
→ READING appears in the Status window on TV and on the player's front panel display, and playback starts.
→ If you press PLAY when the tray is open, this unit closes the tray and starts playback.
natural_image
Diagram of a CD/DVD disc assembly with an open disc and rotating disk (no text or symbols)Note:
- If Disc Lock is set to On and the disc inserted is not authorized, you must enter a four-digit code. (see "Access" on page 12).
DVD-Video and DVD-Audio
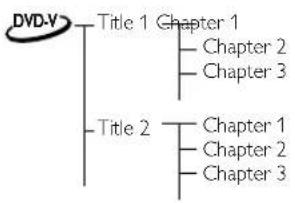
• DVD-Video discs may contain one or more titles, and each TITLE may contain one or more chapters.
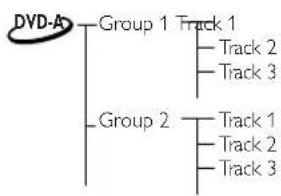
• DVD-Audio discs may contain one or more groups, and each group may contain one or more tracks.
Disc Structure
flowchart
graph TD
    A["Group 1"] --> B["Track 1"]
    A --> C["Track 2"]
    A --> D["Track 3"]
    E["Group 2"] --> F["Track 1"]
    E --> G["Track 2"]
    E --> H["Track 3"]
Playing a disc
1 Insert the disc and close the tray. Playback starts automatically.
→ The TV screen and the player's front panel display show the disc type, information and playing time.
2 When the Disc Menu appears on the TV screen, use the
▲▼◀▶ buttons or the numerical buttons on the remote control to select an option and continue playback. If the titles are numbered, press the numerical buttons or use the ▲▼ button to select the desired title in the menu bar.
3 To stop playback, press the STOP button.
Smart Resume
This unit memorizes the last five discs and their next starting points where they are stopped at the last time operation.
Using this function, you can quickly return to the scene you were watching last time.
To interrupt playback:
Press STOP to interrupt playback.
Resuming playback of the disc that has not been ejected from this unit
- Press PLAY
→ Playback resumes automatically from the point where the playback was interrupted.
- Press STOP again, then press RETURN/RESUME on the remote control.
→ Playback resumes from the point where the playback was interrupted.
- Press STOP again, then press PLAY.
→ Playback starts from the beginning of the disc.
- Press PLAY when the resume icon is on screen.
→ Playback resumes from the point where the playback was interrupted.
Resuming playback of the disc that has been ejected from this unit
- Re-load the disc.
→ Playback starts from the beginning of the disc.
- Press PLAY when the resume icon is on screen, or press RETURN/RESUME when the playback is not performing.
→ Playback resumes from the point where the playback was interrupted.
Note:
- The Smart Resume function is also compatible with VCDs and SVCDs.
DVD features DVD-Audio features
Menu
DVDs may contain menus to navigate the disc and access special features such as audio language selection, subtitle language selection, and other options.
1 Press MENU.
→ If the disc includes a menu, it will appear on screen.
- To access to the disc menu, press T/C first, then press MENU.
2 Press the appropriate numerical buttons or use the
▲▼◀▶ buttons to highlight your selection in the DVD menu, then press the ENTER/OK button to confirm.
3 To remove the menu, press MENU again.
Camera angle
Some discs contain scenes that were shot simultaneously from various angles.
This unit allows you to select the desired camera angle.
- When this unit encounters a scene shot from multiple angles, it will so indicate in the screen.
→ The angle icon remains displayed until multiple angles are no longer available.
- Press ANGLE repeatedly or use ▲▼ buttons to select the desired angle.
→ Playback shifts to the selected angle.
- You can also access the angle function in the On-screen menu (Toolbar View Angle).
Changing the audio language and format
1 Press AUDIO on the remote control to activate the audio language selection menu.
2 Choose a language by pressing the AUDIO button repeatedly or by pressing the ▲▼ buttons.
3 Press the ENTER/OK button to confirm.
Note:
- You can also select an audio language and an audio format also in the On-screen menu. (Toolbar → Play Option → Audio)
Subtitle language
1 Press SUBTITLE on the remote control to activate the subtitle language selection menu.
2 Choose a language by pressing the SUBTITLE button repeatedly or by pressing the ▲▼ buttons.
3 Press the ENTER/OK button to confirm.
Note:
- You can also select a subtitle language in the On-screen menu. (Toolbar → Play Option → Sub-title)
The DVD-Audio is developed for the sole purpose of creating high quality pure sound with Linear PCM and Packed PCM (Loss less coding) in up to six audio-channels. The sampling frequency of 192 kHz/24 bits are supported.
Moreover, many DVD-Audio discs offer slide show and page turn capabilities.
When you play a down mix prohibited disc, D.MIX indicator turns off. Multi-channel tracks will play regardless of the Analog output settings in the On-screen menu. The MIXED 2CH jacks output the front L and R signals only.
Changing pages
Some DVD-Audio discs contain information pages that can include photo galleries, artist biographies, lyrics, etc. Every time you press the PAGE button on the remote control, the page is turned to the next. When you change pages, the page number appears in the status window.
Playing bonus groups
Some discs contain bonus groups that require a four-digit password to gain access. In this case, consult the disc jacket and other packaging for information.
1 While playback is stopped, press T/C button.
→ The group and track list is displayed on the TV screen.
2 Press the ▲▼ buttons to select a bonus group, then press the ▶ button.
3 Enter a four-digit password using the numeric buttons, then press the ENTER/OK button.
→ To exit from the password entry screen without entering the password, press STOP.
4 Press the ▲▼ buttons to select a track, then press the ENTER/OK button.
DVD Video Mode
Some DVD-Audio discs include DVD-Video contents that can be played on conventional DVD-Video players. In the On-screen menu (Toolbar → Play option → DVD Video Mode), select [On] to play the DVD-Video content, or select [Off] for normal playback.
Notes:
- The DVD-Audio indicator lights up when a DVD-Audio disc is playing.
- When you set DVD-Video mode ON, the DVD-Audio indicator turns off.
SA-CD (Super Audio CD)
The SA-CD standard is based on Direct Stream Digital (DSD) technology. This new direct-stream digital format comprises a 1-bit system that has a digital sampling frequency that is 64 times higher than that of conventional audio CD.
There are three types of SA-CD discs: single-layer, dual-layer and hybrid discs. Each type may contain two areas of recorded information: a High Quality Stereo area and a High Quality Multi-channel area.
- A single layer disc can contain both information areas.
- A dual layer disc can contain both information areas. Double the information can be stored on the disc, thanks to the second layer.
- A hybrid disc can contain both information areas, and also a second, standard CD layer, making it playable on standard CD players.
Recorded information may vary per area, as indicated in the disc inlay. You can select areas before or during playback while you are playing SA-CD via the remote control or via the On-screen display on your TV.
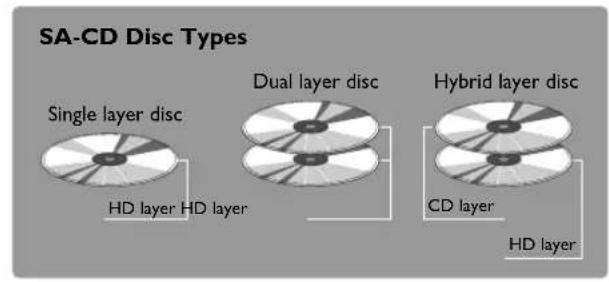

• SA-CD contains only TRACKS.
- Select tracks using the playlist on the screen or by pressing the numerical buttons.
- If SA-CD-text is available on the disc, it will be displayed on the TV screen.
flowchart
graph TD
    A["SA-CD"] --> B["<HD layer>"]
    A --> C["Multichannel area (if available)"]
    A --> D["<HD layer>"]
    A --> E["Stereo area (if available)"]
    A --> F["CD layer (in Hybrid discs only)"]
    B --> G["TRACK 1"]
    B --> H["TRACK 2"]
    B --> I["TRACK 3"]
    C --> J["TRACK 1"]
    C --> K["TRACK 2"]
    C --> L["TRACK 3"]
    D --> M["TRACK 1"]
    D --> N["TRACK 2"]
    D --> O["TRACK 3"]
Playing a disc
1 Insert the disc and close the tray.
Playback starts automatically.
→ The TV screen will display the current playing status and current playing track list in the area.
2 Playback will stop at the end of the disc.
3 To stop playback, press STOP.
- [Analog output] setting in the On-screen menu (Setup → Audio Menu → Analog output) allows you to specify which area of SA-CD to play automatically when you insert the disc. When you select [Stereo], stereo area is selected. When you select the other choices, multi-channel area is selected.
- If you set the playback area that the disc does not contain, this unit automatically play the available area on the disc.
Sound mode - SA-CD playback
You can change the playback area of the SA-CD by pressing the SOUND MODE button on the remote control.
Press the SOUND MODE at any time to select the multi-channel area or the stereo area in the HD layer. Press the SOUND MODE button when the disc is stopped to select the CD layer.
Select the area by pressing the SOUND MODE button repeatedly.
- On hybrid discs (with SA-CD and CD layers), the player will always start playing the SA-CD layer.
- The SA-CD indicator lights only when the SA-CD layer is selected.
- You can program the playlist in the same area only.
Audio CD
• Audio CDs contain only TRACKS.
• They can be played on this unit with the audio output connected to a stereo system or to your TV.
- Select tracks using the track list on the TV screen or by pressing the numerical buttons or ▲▼ buttons.
Disc structure

Playing a disc
1 Insert the disc and close the tray.
→ Playback starts automatically.
→ The TV screen will display the track list and current playing status.
2 Playback will stop at the end of the disc.
3 To stop playback, press STOP.
Video CD and Super Video CD
Current VCD 2.0 and Super Video CD 1.0 standard features include:
• Video CDs may contain one or more tracks, and tracks may contain one or more indexes.
- You can display either tracks or indexes.
Disc structure

The following VCD and SVCD features and formats are supported:
| Features Video | CDs 2.0 Super Video | CDs 1.0 |
| Video bit rate resolution NTSC resolution PAL | MPEG-1 constant 1,150 Kbps352x240, 29.97Hz352x288, 25Hz | MPEG-2 variable up to 2.6 Mbps480x180 interlaced, 29.97Hz480x576 interlaced, 25Hz |
| Still picture (photo) resolution NTSC resolution PAL | MPEG-1352x240, 704x480352x288, 704x576 | MPEG-2 (1 Frame)480x480, 704x480480x576, 704x576 |
| Audio sampling bit rate audio channels surround sound | MPEG-1 layer II44.1KHz224Kbps1 stereo / 2 monoStereo with Dolby Pro-Logic | MPEG-1 layer II44.1KHz32-384Kbps< 2 stereo / 4 monoMPEG-1 (5+1) extension |
| Overlay graphics/text sub-channels coding | overlay video plane<= 44 color CLUT (2brts/pixel) |
The following formats are not supported for VCDs:
– HQ-VCD encoded at 2.4Mbps or 2.6Mbps
- XVCD (eXtended VCD) with higher resolution and data rate
- DIVX format files
Playing a disc
1 Insert the disc and close the tray.
→ Playback starts automatically.
→ The current track number and its elapsed playing time are displayed in the status window.
2 Playback will stop at the end of the disc.
3 To stop playback, press STOP.
- The Disc Resume feature is also available for VCDs and SVCDs (see the "Smart Resume" section on page 16).
- When you play a Karaoke disc, you can change the vocal by pressing AUDIO on the remote control.
Notes:
Playback Control (PBC)
Playback Control is a feature on some Video CDs and Super Video CDs that enables users to access selected tracks directly from the disc menu.
1 Insert a Video CD or Super Video CD that features PBC, then press PLAY.
2 Navigate the menu using the buttons indicated on the TV screen until your chosen passage starts to play. If a PBC menu displays a list of tracks, you can select a track directly.
3 Enter your choice using the numerical buttons (0-9).
4 Press RETURN or I◀◀ to return to the previous menu. Press ▶▶▶I to proceed to the next menu.
5 You may also select PBC OFF in the On-screen menu.
→ When PBC OFF is selected, PBC menus are unavailable.
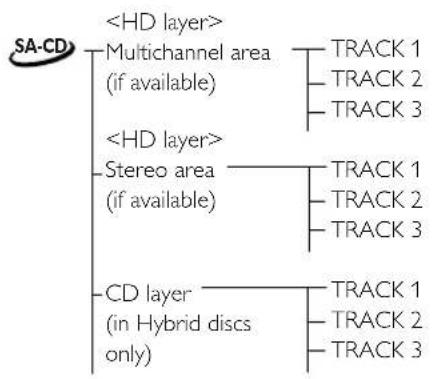
MP3
You can play MP3 music that was recorded onto a CD-R or CD-RW by a computer.
Disc structure (example)
- Since the MP3 format can store several albums onto a disc, a folder is assigned to an "Album," and a file is assigned to a "Track."
MP3 disc features
The MP3-CD formats (ISO9660 format) support the following:
- MP3 files must have the extension ".MP3" or ".mp3"
• Max. 30 characters
• Max. nested directory is 8 levels.
• Max. album number is 99.
• Max. track number is 999.
• Supported VBR bit-rate
• Supported sampling rates of 32, 44.1, 48/16, 22.05, and 24 kHz
The following features are not supported for MP3 discs:
- The discs that have any types of file other than MP3 and JPEG.
• The simultaneous playback of the MP3 and JPEG files.
• Chinese filenames and text
• Non-finalized closed discs
• Discs recorded in UDF format
Additional note for MP3 disc playback:
- The disc read time may exceed 10 seconds due to the large number of songs compiled onto one disc.
- Multi-session discs are supported.
- The digital output signals of MP3 files are copy-protected.
Downloading MP3 files from the internet or copying songs from your own legal discs is a delicate process.
Playing a disc
1 Insert the disc and close the tray.
→ Playback starts and the playlist appears automatically. If the disc includes both MP3 and JPEG files, the selection menu appears on the screen and asks you which file to play.
2 Playback will stop at the end of the disc.
3 To stop playback, press STOP.
Choosing an Album/Track to playback
You can choose an Album/Track to playback from the list displayed in the TV screen.
1 In the playlist, press ▲▼ to select the Album/Track to playback.
2 Press ◀▶ to select the Album/Track in the next layer to playback.
MP3 text
MP3-CD discs may contain text information called ID3
Tag (e.g., track name, album name, artist name, etc.) that can appear on the TV screen during playback.
JPEG
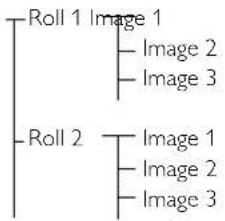
This player can playback JPEG format pictures on a personally recorded CD-R/RW disc or commercial CD.
Disc structure
flowchart
graph TD
    A["Roll 1 Image 1"] --> B["Image 2"]
    A --> C["Image 3"]
    D["Roll 2"] --> E["Image 1"]
    D --> F["Image 2"]
    D --> G["Image 3"]
JPEG disc features
The JPEG format (ISO 9660 format) supports the following:
• Max nested directories, 8 levels.
• Max numbers of rolls are 99.
• Max numbers of pictures are 999.
- The files with the extensions of "JPEG", ".jpeg", "JPG", or ".jpg".
The following types of disc and conditions are not supported.
• Discs with playback control functions
- The discs that have any types of file other than MP3 and JPEG
• The simultaneous playback of the JPEG and MP3 files
• Progressive JPEG formatted discs
• Non-finalized discs
• UDF formatted discs
Notes:
- The disc read time may exceed 10 seconds if the disc has large amount of pictures. The read time may vary depending on the file types and sizes.
- Multi-session discs are supported.
Playing a disc
1 Insert the disc and close the tray.
→ Playback starts automatically.
→ Thumbnails are displayed on screen.
A chosen thumbnail can be displayed on full screen. Move the cursor with ▲▼◀▶ to select the thumbnail, and press ENTER/OK. Press MENU to return to the thumbnail screen.
2 Press PLAY during a full screen mode.
→ The slide show starts.
3 To stop playback, press STOP.
→ The slide show stops.
- Press MENU to return to the thumbnail screen.
- When you press PAUSE, the slide show pauses. To return to the normal slide show, press PLAY.
- Repeat function is also available for JPEG discs.
Slide show setting
You can set the duration of each image.
flowchart
graph LR
A["JPEG image 1"] --> B["JPEG image 2"]
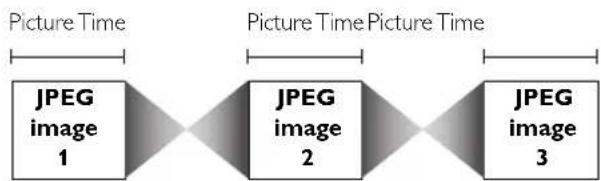
B --> C["JPEG image 3"]
Picture Time
1 Press ON SCREEN.
→ The On-screen menu appears.
2 Go to [Picture Time] (Toolbar → Slide Show → Picture Time) by using ▲▼◀▶ buttons, then press ▶.
3 Make a choice with ▲▼.
Choices: Slow (about 8 sec), Medium (about 5 sec), Fast (about 2 sec)
4 To return to the previous menu, Press ◀.
• To exit from the On-screen menu, press ON SCREEN.
Rotating the image
You can rotate the JPEG image.
1 Press ON SCREEN.
→ The On-screen menu appears on the screen.
2 Go to [Rotate] (Toolbar → View → Rotate) by using
▲▼◀▶ buttons, then press ▶.
3 Make a choice with ◀▶.
Choices: -180, -90, 0, +90, +180
4 To return to the previous menu, Press ◀.
• To exit from the On-screen menu, press ON SCREEN.
Note:
- This function is not available during slide show playback.
General features
Moving to another segment

When a disc includes more than one segment, you can quickly move to another segment by the following operation.
Moving to the appointed segment directly
1 Press T/C button on the remote control.
→ The T/C menu appears on the screen.
2 Press ▲▼ or the numerical buttons to select a segment.
Press RETURN/RESUME button on the remote control to erase the T/C menu from the screen.
Moving to the next/previous segment
Press ▶▶▶ I or ◀◀◀ briefly during playback to proceed to the next segment or to return to the beginning of the current segment.
Press I◀◀ twice quickly to step back to the previous segment.
Numeric button operation
For the direct access to a segment, enter the segment number using the numerical buttons (0-9) on the remote control.
For example to select the segment number 12, press 1 first, then press 2.
Search

Key control:
To search forward or reverse at various speeds, hold down ▶▶▶1 or ▶◀◀ for more than two seconds. The choices are for audio discs, -8, -4, +4, +8; and for video discs, -32, -4, +4, +32.
OSD control:
1 Select [Fast] in the On-screen menu (Toolbar → Search → Fast).
2 Press ◀▶ to select the desired speed.
3 Select +1 to resume playback at normal speed.
Slow motion DVD-A DVD-V VCD
1 Select [Slow] in the On-screen menu (Toolbar → Search
→ Slow), then press ▶.
→ Playback pauses.
2 Press ◀▶ to select the desired speed: -1, -1/2, -1/4 or -1/8 (reverse), or +1/8, +1/4, +1/2 or +1 (forward).
3 Select +1 to resume playback at normal speed.
4 If you press the II button, the speed will be set to zero (PAUSE).
5 To exit slow motion mode, press PLAY.
Notes:
- You can use this function for DVD-Audio while the disc is playing its video content.
- Slow motion in reverse is not available for VCDs and SVCDs.
Still picture and frame-by-frame playback

Key control:
You can activate frame-by-frame playback by pressing PAUSE repeatedly.
OSD control:
1 Select [Frame by Frame] in the On-screen menu (Toolbar → Search → Frame by Frame), then press ▶. → Playback pauses.
2 Press the ◀▶ button to select the previous or next picture frame.
3 To exit frame-by-frame playback, press PLAY.
Note:
- You can use this function for DVD-Audio while the disc is playing its video content.
Time search

The Time Search function enables you to start playback at a specific time on the disc.
1 Select [Time] in the On-screen menu (Toolbar → Search
→ Time).
→ Playback pauses.
→ The elapsed playing time is displayed in a time edit window.
2 Enter hours, minutes and seconds from left to right in the time edit window using the remote control numerical buttons.
→ Each time an item is entered, the next item is highlighted.
3 Press the ENTER/OK button to confirm the selected time.
→ Playback starts from the selected time position on the disc.
4 Press ON SCREEN to remove the menu bar.
Repeat
Press REPEAT button to repeat a certain segment of the disc.
Each time you press REPEAT, the repeat mode changes as follows:
This feature may not be available on some discs.
Repeat A-B

- Repeat a sequence in a track

— Repeat a sequence in a title
1 Press A-B at the desired starting point.
→ RPT A- is displayed on the front panel display.
2 Press A-B again at the desired end point.
→ RPT A-B appears briefly on the front panel display, and the repeat sequence begins.
3 To exit the sequence, press A-B.
→ RPT OFF is displayed on the front panel display.
Shuffle

This function shuffles the playing order of chapters or tracks within a title/group/album (if the title/group/album has more than one chapter or track). When Shuffle Play within a title/group/album finishes, the unit continues shuffle playback within the next title/group/album.
1 Press SHUFFLE during playback.
→ SHUFFLE appears on the screen for about two seconds.
2 To return to normal playback, press SHUFFLE again.


This function shuffles the playing order of tracks on a disc.
1 Press SHUFFLE during playback.
→ SHUFFLE appears on the screen for about two seconds.
2 To return to normal playback, press SHUFFLE again.
Note:
- For SA-CD this function works in the currently selected area only.
Scan


Plays the first 10 seconds of each segment on the disc.
1 Press SCAN.
2 To continue playback at your chosen segment, press SCAN again or press PLAY.
Note:
- You can also access this function by selecting [Chapter Preview] in the On-screen menu.
Zoom


This function allows you to enlarge the video image and pan through the enlarged image during playback or pause.
1 Press ZOOM on the remote control, or select [Zoom] in the On-screen menu (Toolbar → View → Zoom) and press ▶ to enter zoom mode.
→ The cursor appears on screen.
2 Press the ▲▼◀▶ buttons to move around the image on screen.
3 Press the ENTER/OK button to enlarge the image. Each time you press the ENTER/OK button, the zoom factor changes from x1 to x2 to x4 to x8.
4 To exit from zoom mode, press ENTER/OK repeatedly to select x1. Then, press the ZOOM button in order to turn off the cursor from the screen.
FTS video/audio program


- The FTS (Favorite Track Selection) function enables you to store your favorite tracks, etc.
• The FTS list can contain up to 20 items. - The most recent program list is placed on the top of the existing list.
1 Press ON SCREEN on the remote control → The On-screen menu appears.
2 Go to [Tracks] (Toolbar → Program → Tracks) by using the ▲▼◀▶ buttons, then press the ▶ button.
3 Press the ▲▼ button to select the item to store in your FTS list, then press the ENTER/OK.
→ The selected item flashes momentarily when it is stored in the FTS list.
4 Repeat the above procedure to set the FTS list.
5 Press the ◀ button, then press ON SCREEN to exit from the On-screen menu.
→ This unit starts playing the FTS list automatically.
- You can check your FTS list in the On-screen menu (Toolbar → Program → Play list). Press the ▲▼ buttons to navigate the playlist menu.
- For SA-CD, you can program FTS list in the currently selected area only.
- For DVD-Audio, the password must have been entered in order to play bonus tracks.
Note:
Activating/deactivating the FTS program
You need to select [On] in the [Program] menu to activate the FTS function.
1 Press ON SCREEN on the remote control
→ The On-screen menu appears.
2 Go to [Program] (Toolbar → Program → Program) by using the ◀▶ ▲▼ buttons, then press the ▶ button.
3 Press the ▲▼ to select On or Off.
4 Press the ◀ button, then press ON SCREEN to exit from the On-screen menu.
Erasing a track/chapter/index from the FTS list
You can erase the items that you programmed in the FTS list.
1 Press ON SCREEN on the remote control → The On-screen menu appears.
2 Go to [Play list] (Toolbar → Program → Play list) by using the ▲▼◀▶ buttons, then press the ▶ button.
3 Press the ▲▼ button to select the item you want to erase, then press ENTER/OK.
→ The selected item disappears from the list.
4 Press the ◀ button, then press ON SCREEN to exit from the On-screen menu.
Erasing all tracks/chapters/indexes from the FTS list
You can erase everything at once in the FTS list.
1 Press ON SCREEN on the remote control
→ The On-screen menu appears.
2 Go to [Clear all] (Toolbar → Program → Clear all) by using the ▲▼◀▶ buttons, then press the ▶ button.
→ "Cleared" appears momentarily, then all items in the list are erased.
3 Press the ◀ button, then press ON SCREEN to exit from the On-screen menu.
Disc lock


Activating/deactivating Disc lock
Using this function you can prohibit the access of others to certain discs.
1 Press ON SCREEN on the remote control
The On-screen menu appears.
2 Go to [Enter PIN] (Setup → Access → Enter PIN) using the ▲▼◀▶ buttons, then press the ▶ button.
3 Enter the four-digit PIN of your own choosing.
4 Move to [Disc lock] menu using the ▲▼ buttons.
5 Select [On] or [Off] using the ▲▼ buttons.
6 Press the ◀ button, then press ON SCREEN to exit the On-screen menu.
→ If you select [On] in the [Disc lock] menu, unauthorized discs will not be played unless the four-digit PIN is entered.
Note:
- Confirmation of the four-digit PIN is necessary when:
• The PIN is entered for the very first time (see above), - The PIN is changed or cancelled (see "Changing the four-digit PIN" on page 25).
- If you select OFF in the [Disc lock] menu, the FTS function will not be performed.
Authorizing discs
When [Disc Lock] is [ON], you must authorize discs before you can play them.
1 Insert the disc.
The Disc lock dialog will appear.
2 Enter your four digit PIN for [Play once] or [Play always].
- If you enter the four-digit PIN for Play Once, the disc can be played one time only. You must re-enter the code if disc is ejected or the power is turned off.
- If you enter the four-digit PIN for [Play always], the disc can be played anytime, even when [Disc lock] is [ON].
Notes:
- The player memory can maintain 120 authorized (Disc locked) disc titles. A disc title will be added to the list if [Play always] is selected.
– Each time a Disc locked disc is played, it will be added to the top of the list. When the list is full (120), the last disc in the list will be replaced when a new disc is added.
- Double-sided DVDs and multi-volume VCDs may have a different ID for each side. In order to make Disc Locks to such discs, each side must be authorized.
Deauthorizing discs
If you authorize a disc for [Play always], the disc content will always be available for playback — until you deauthorize the disc. Follow the procedure below to deauthorize a disc.
1 Insert the disc.
→ Playback starts automatically.
2 Press STOP within about 10 seconds after appears in the screen.
→ will appear on the screen, indicating that the disc is now locked.
Parental Control

DVD movies may contain scenes that are unsuitable for children. Therefore, discs may contain Parental Control information that may apply to the entire disc or to certain scenes. These scenes are rated from 1 through 8. Alternative, more suitable scenes may be available on the disc. Ratings are country-specific. The Parental Control feature enables you to prevent discs from being played by your children or, in some cases, to substitute alternative scenes.
Activating/deactivating Parental Control
1 When the disc playback is stopped, press ON SCREEN on the remote control.
→ The On-screen menu appears.
2 Go to [Enter PIN] (Setup → Access → Enter PIN) by using the ▲▼◀▶ buttons, then press the ▶ button.
3 Enter your four-digit PIN.
4 Press the ▲▼ button to select [Parental level], then press the ▶ button.
5 Press the ◀▶ button to select a rating from 1 through 8 for the disc.
Rating 0:
Parental Control is not active. The disc plays in full.
Ratings 1 to 8:
If you set a rating for the player, all scenes with the same rating or lower will be played. Higher rated scenes will not be played unless an alternative that has the same rating or lower is available on the disc. If no suitable alternative is available, playback will stop and the four-digit code will be required to proceed.
6 Press the ENTER/OK button, then press the ON SCREEN button to exit the On-screen menu.
Country
You can apply a rating system associated with a specific country to the Parental Level control.
1 When the disc playback is stopped, press ON SCREEN on the remote control
→ The On-screen menu appears.
2 Go to [Enter PIN] (Setup → Access → Enter PIN) by using the ▲▼◀▶ buttons, then press the ▶ button.
3 Enter your four-digit PIN.
4 Press the ▲▼ button to select [Country], then press the ▶ button.
5 Select a country using the ▲▼ button.
6 Press the ENTER/OK button to confirm your selection and exit.
Changing the four-digit PIN
1 When the disc playback is stopped, press ON SCREEN on the remote control
→ The On-screen menu appears.
2 Go to [Enter PIN] (Setup → Access → Enter PIN) by using the ▲▼◀▶ buttons, then press the▶ button.
3 Press the ▼ button to highlight [Change PIN], then press the ▶ button.
4 Enter the current four-digit PIN again, then enter a new four-digit PIN.
5 Enter the new PIN a second time.
6 Press the ON SCREEN button to exit the menu.
→ The new four-digit code is in effect.
If you forget your four-digit code
1 Press ▲ OPEN/CLOSE to remove the disc, then press ▲ OPEN/CLOSE again to close the tray.
2 Press ON SCREEN on the remote control
→ The On-screen menu appears.
3 Go to [Enter PIN] (Setup → Access → Enter PIN) by using the ▲▼◀▶ buttons, then press the ▶ button.
4 Press the ■ button for four times.
→ "Enter New PIN" appears on screen.
5 Enter your new four-digit PIN
Note:
- The factory default PIN is 0000.
Troubleshooting
WARNING
Under no circumstances should you try to repair the system yourself, as this will invalidate the warranty. Do not open the system as there is a risk of electric shock.
If a fault occurs, first check the points listed below before taking the system in for repair.
| Problem Solution | |
| No power | - Check to ensure that the AC power cord is properly connected. |
| No picture | - Check to ensure that the TV is switched on.- Check the video connection. |
| Distorted picture | - Occasionally, a small amount of image distortion may be visible. This is not a malfunction. |
| Completely distorted picture or black and white picture when playing a DVD/ Super Audio CD or Video CD | - Make sure the NTSC/PAL setting on the DVD player matches the video signal of your television. (See “TV System (NTSC/PAL conversion)” on page 13.) |
| No sound or distorted sound | - Adjust the volume.- Check that the speakers are connected correctly. |
| No audio at digital output | - Check the digital connections.- Check the settings menu to ensure that the digital output is set to ALL or PCM.- Check to ensure that the audio format of the selected audio language matches your receiver capabilities. |
| Disc does not play. | - Check that the disc label is facing up.- Determine if the disc is defective by trying another disc. |
| Picture freezes momentarily during playback. | - Check the disc for fingerprints or scratches.- Clean with a soft cloth, wiping from center to outside edge. |
| Fails to return to start-up screen when disc is removed | - Reset the unit by switching the player off, then on again. |
| No response to remote control | - Aim the remote control directly at the sensor on the front of the player.- Reduce the distance to the player.- Replace the batteries in the remote control.- Re-insert the batteries with their polarities (+/- signs) as indicated. |
| Buttons do not work or player stops responding. | - To completely reset the player, unplug the AC cord from the AC outlet for 5-10 seconds. |
| No response to some operating commands during playback | - Certain operations may not be permitted by the disc. Refer to the instructions for the disc. |
| Cannot read CDs/DVDs | - Use a cleaning CD/DVD to clean the lens before sending this unit in for repair. |
| The picture is not displayed in a proper position on the screen | - Change the parameter of the Video Shift menu in the On-screen menu (Preferences → Picture → Video Shift). See page 10, 10. |
| Connect record MP3 | - SCMS copy protected discs cannot e recorded digitally. Try recording by analog jacks. |
If the problem is not listed above, or if the instructions fail to help, turn off the power to the unit, disconnect the power cable, and contact the nearest authorized YAMAHA dealer or service center.
Specifications
PLAYBACK SYSTEM
| DVD-Audio |
| DVD-Video |
| Super Audio-CD, Stereo/Multi-channel and Hybrid disc |
| DVD+R, DVD+RW |
| DVD-R, DVD-RW (Video Format) |
| Video CD (VCD) |
| Super Video CD (SVCD) |
| CD-Audio (CD-DA) |
| CD-R/CD-RW (CD-DA, VCD, SVCD) |
| MP3, JPEG |
TV STANDARD (PAL/50Hz) (NTSC/60Hz)
| Number of lines 625 525 |
| Playback Multistandard (PAL/NTSC) |
VIDEO PERFORMANCE
| YUV output Y: 1Vpp into 75 ohmPb/Cb Pr/Cr: 0.7Vpp into 75 ohm |
| S-Video output Y: 1Vpp into 75 ohmC: 0.3Vpp into 75 ohm (PAL)C: 0.286Vpp into 75 ohm (NTSC) |
| Video output 1 Vpp into 75 ohm |
AUDIO FORMAT
| DSD Multi-channel and Stereo |
| Dolby Digital/DTS/MPEG Compressed Digital |
| PCM/Packed PCM fs.48, 96, 192, and 44.1, 88.2, 176.4kHz |
| 16, 20, 24bits |
| MP3 (ISO9660) 32, 44.1, 48, and 16, 22.05, 24kHz |
| Full decoding of Dolby Digital, DTS and MPEG multi-channel sound/ analogue stereo sound |
| Dolby Surround-compatible downmix from Dolby Digital multi- channel sound |
| 3D Sound for virtual 5.1 channel sound on two speakers |
| Dolby Pro Logic II 5.1 ch decoding from the stereo source |
SA-CD AUDIO PERFORMANCE
| D/A Converter DSD | |
| SA-CD fs 2.8224MHz | |
| Max. output voltage (0dB) 2V rms | |
| Signal-Noise Ratio 115 dB | |
| Dynamic Range | 107 dB |
| Total Harmonic Distortion (1kHz) | 0.0017 % |
AUDIO PERFORMANCE (Without upsampling)
| DA Converter | 24 bits | |
| DVD | fs 96 kHz | 2 Hz - 44 kHz |
| CD/Video CD | fs 44.1 kHz | 2 Hz - 20 kHz |
| Signal-Noise Ratio | 115 dB | |
| Dynamic Range | 103 dB(DVD 48 kHz 24 bit) | |
| Total Harmonic Distortion (1kHz) 0.0017 % | ||
| (DVD 48 kHz 24 bit) | ||
CONNECTIONS
| SCART | Euroconnector x1 (Europe model only) |
| Y Pb/Cb Pr/Cr | Cinch 3x (green, blue, red) |
| S-Video Output | Mini DIN, 4 pins |
| Video Output | Cinch (yellow) x1 |
| Audio Mixed 2 ch Output | Cinch (white/red) |
| Digital Output | 1 coaxial, 1 optical |
| 6 channel analogue output | |
| Audio Main L/R | Cinch (white/red) |
| Audio Surround L/R | Cinch (white/red) |
| Audio Centre | Cinch (blue) |
| Audio Subwoofer | Cinch (black) |
CABINET
| Dimensions (w x h x d) | 435 x 55 x 315 mm |
| Weight | Approx. 3.2 Kg |
POWER SUPPLY
| Power inlet | |
| U.S.A and Canada models | AC120V, 60Hz |
| Australia model AC240V, 50Hz | |
| U.K. and Europe models | AC230V, 50Hz |
| General model | AC110-240V, 50/60Hz |
| Power usage | Approx. 25 W |
| Power usage standby < 1W | |
Specifications subject to change without notice.

YAMAHA
©2004 All rights reserved
- FCC INFORMATION (for US customers)
- We Want You Listening For A Lifetime
- For Customer Use:
- FOR CANADIAN CUSTOMERS
- POUR LES CONSOMMATEURS CANADIENS
- CAUTION: READ THIS BEFORE OPERATING YOUR UNIT
- WARNING
- NOTE:
- LASER SAFETY
- CAUTION
- LASER DIODE PROPERTIES
- DANGER
- Table of Contents
- Introduction 2
- Functional Overview 4
- Preparation 7
- On-screen menu 10
- Operation 16
- Troubleshooting 26
- Specifications 27
- Introduction
- Patent information
- playable disc formats
- Notes:
- Region management information
- Supplied accessories
- Installing batteries in the remote control
- Replace worn batteries
- Using the remote control
- Handling the remote control
- Maintenance
- Cleaning the cabinet
- Cleaning discs
- Functional Overview
- Front panel
- DVD-AUDIO indicator
- SA-CD indicator
- PROGRESSIVE indicator
- Front panel display
- A.DRCT
- ML.CH
- D.MIX
- Rear panel
- Remote control
- Preparation
- Audio connection
- Digital audio connections
- Analog audio (6CH DISCRETE) connection
- Analog audio (MIXED 2CH) connection
- Video connections
- SCAN MODE selector
- INTERLACE:
- PROGRESSIVE:
- Switching on
- Setups before the initial playback
- General operation
- Preferences
- Features
- Dimmer
- Wake-up timer
- Status window
- Adv. picture
- 4:3 Aspect
- TrueLife
- DCDi
- Chroma Delay
- Gamma
- Picture
- Video shift
- Saturation
- Contrast
- Picture Mode
- Brightness
- Sharpness
- Sound
- Karaoke Vocal
- ClearVoice
- Night Mode
- CD Up-sampling
- Toolbar
- Program
- Clear all
- Tracks
- Play list
- View
- Rotate
- Zoom
- Chapter Preview
- Angle
- Page
- Play Option
- DVD Video Mode
- Audio
- Disc Navigation
- Subtitle
- Search
- Frame by Frame
- Fast
- Time
- Slow
- Slide Show
- Picture Time
- Setup
- Access
- Disc lock
- Change PIN
- Enter PIN
- Parental level
- Country
- PBC
- Sleep Timer
- TV
- TV shape
- TV System (NTSC/PAL conversion)
- Audio Menu
- Digital output
- Analog output
- PCM output
- SA-CD Direct
- Language
- Default Sub-title
- Menu Language
- Default Audio
- Speakers
- Front Distance
- Centre Distance
- Rear Distance
- Front Size
- Center size
- Surround Size
- Subwoofer
- DVD/CD mode
- Front R Vol
- Front L Vol
- Center Vol
- Surround R Vol
- Surround L Vol
- Subwoofer Vol
- SA-CD mode
- Cut-off frequency
- Slope
- Centre Vol
- Operation
- Basic playback
- DVD-Video and DVD-Audio
- Playing a disc
- Smart Resume
- To interrupt playback:
- Resuming playback of the disc that has not been ejected from this unit
- Resuming playback of the disc that has been ejected from this unit
- DVD features DVD-Audio features
- Menu
- Camera angle
- Changing the audio language and format
- Subtitle language
- Changing pages
- Playing bonus groups
- SA-CD (Super Audio CD)
- Sound mode - SA-CD playback
- Audio CD
- Video CD and Super Video CD
- The following formats are not supported for VCDs:
- Playback Control (PBC)
- MP3
- MP3 disc features
- The MP3-CD formats (ISO9660 format) support the following:
- The following features are not supported for MP3 discs:
- Additional note for MP3 disc playback:
- Choosing an Album/Track to playback
- MP3 text
- JPEG
- JPEG disc features
- The JPEG format (ISO 9660 format) supports the following:
- The following types of disc and conditions are not supported.
- Slide show setting
- Rotating the image
- General features
- Moving to another segment
- Moving to the appointed segment directly
- Moving to the next/previous segment
- Numeric button operation
- Key control:
- OSD control:
- Slow motion DVD-A DVD-V VCD
- Still picture and frame-by-frame playback
- Time search
- Repeat
- Repeat A-B
- Shuffle
- Scan
- FTS video/audio program
- Activating/deactivating the FTS program
- Erasing a track/chapter/index from the FTS list
- Erasing all tracks/chapters/indexes from the FTS list
- Activating/deactivating Disc lock
- Authorizing discs
- Deauthorizing discs
- Parental Control
- Activating/deactivating Parental Control
- Rating 0:
- Ratings 1 to 8:
- Changing the four-digit PIN
- If you forget your four-digit code
- Troubleshooting
- Specifications
- YAMAHA
Brand : YAMAHA
Model : DV-DS1500
Category : DVD player