DME535XE1 - Microwave oven DE DIETRICH - Free user manual and instructions
Find the device manual for free DME535XE1 DE DIETRICH in PDF.

User questions about DME535XE1 DE DIETRICH
0 question about this device. Answer the ones you know or ask your own.
Ask a new question about this device
Download the instructions for your Microwave oven in PDF format for free! Find your manual DME535XE1 - DE DIETRICH and take your electronic device back in hand. On this page are published all the documents necessary for the use of your device. DME535XE1 by DE DIETRICH.
USER MANUAL DME535XE1 DE DIETRICH
Safety recommendations P.36
How to install your oven
Electrical connections P.37-38
Dimensions for installation use P.39
How to use your oven
The oven programmer P.40
How to set the clock P.41
How to cook straightaway P.42
How to programme the cooking P.43
How to delay cooking (pre-selected end time) P.44
How to cook economically P.45
How to use the Grill+ feature P.46
How to use the timer P.47
How to adjust the brightness of the display panel P.47
Cooking methods P.48-49
Cleaning the oven cavity
Pyrolysis explained P.50
When to clean by pyrolysis P.50
Starting pyrolysis straightway P.51
Delaying cleaning by pyrolysis P.52
Changing a bulb P.52
Troubleshooting P.53
EASY COOK P.54-60
Throughout this manual,

indicates safety recommendations,
indicates advice to help you make the best use of your oven
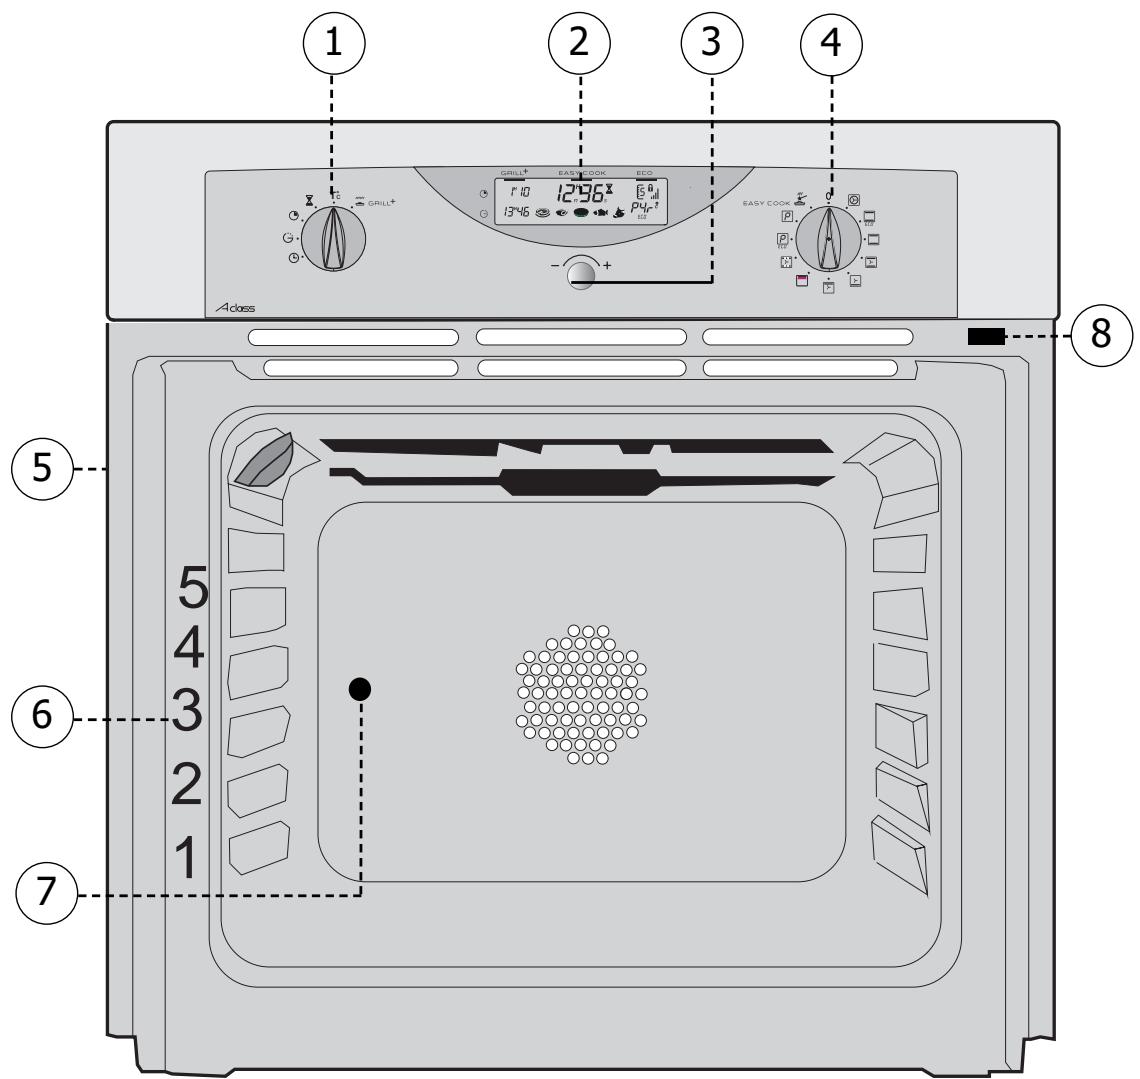
Your oven
OVEN FEATURES
1 Method selector
2 Programme selector
3 Control knob
4 Function selector
5 Light
6 Shelf positions
7 Hole for rotisserie
Door-open detector plate
Accessories
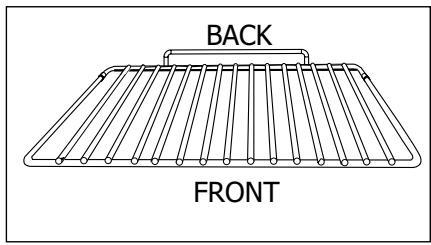
Anti-tip safety shelf
GB
Food can either be placed on the shelf in a dish or cake tin for cooking or browning, or may be placed directly on the shelf itself.
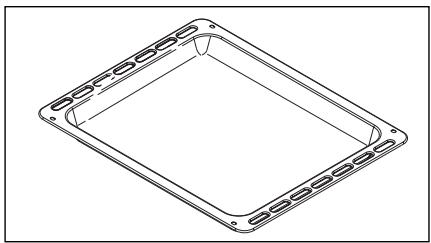
Multi-purpose baking tray
This tray has a raised edge and can be used for baking pastries (choux buns, meringues, small cakes, flaky pasties, etc).
Joints should not be cooked in this tray
uncovered because fat could spit all over the oven sides.
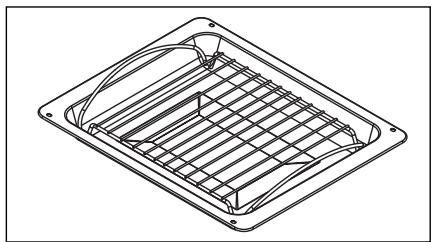
Grill pan
With special trivet for grilling
The pan can be used for collecting juices when cooking with the grill element by itself or with the oven set to pulsed grill (grill and fan) or when roasting on Easycook.
It is particularly useful as a large roasting tray for meat and vegetables.
When using Easycook or a function with a base element never cook with the grill tray sitting on the bottom of the oven as this could the enamel

Grill pan handle
Safety recommendations
Please read these instructions before installing and using your oven. The oven has been designed for domestic use only for cooking food. No asbestos has been used in its construction.
USING FOR THE FIRST TIME:
Before you use your oven for the first time, leave it empty and, with the door closed, turn it on to maximum temperature and let it heat up for 15 minutes. This "burns off the newness of the oven". During this time there may be some smell from the mineral wool that insulates the oven and there could be some smoke. This is perfectly normal.
NORMALUSE:
-
Always close the door properly. The oven is fitted with a seal designed to work with a closed door.
-
Never lean or let anyone sit on the oven door when it is open.
-
The oven parts and accessories can become hot when the door is left partially open and the grill on. Always keep children at a safe distance.
-
When the oven is on it will get hot. Take care not to touch the heating elements inside the oven.
-
Always protect your hands with oven gloves or something similar when removing food, accessories or containers from the oven.
-
Do not line your oven or grill pan with kitchen foil. The metal will increase the heat produced and could ruin the food and damage the enamel.
-
Never use a spray or a high-pressure washer to clean the oven.
-
During self-cleaning, surfaces can become hotter than in normal use. Children must be kept at a distance.
During the action of pyrolysis, accessible surfaces become much hotter than during normal cooking. Keep children at a distance.
Always check that the oven is off before you clean the inside.
- For your safety your oven is equipped with an AUTOMATIC STOP should you inadvertently forget to turn off your oven. After 10 hours' operation, the AS (Automatic Stop) function is activated and your oven stops heating. AS is displayed in place of the time and a series of 2 successive pips is sounded for a certain time.

Ensure that the function selector is returned to 0 to re-use your oven.
How to install your oven
Electrical connections
GB

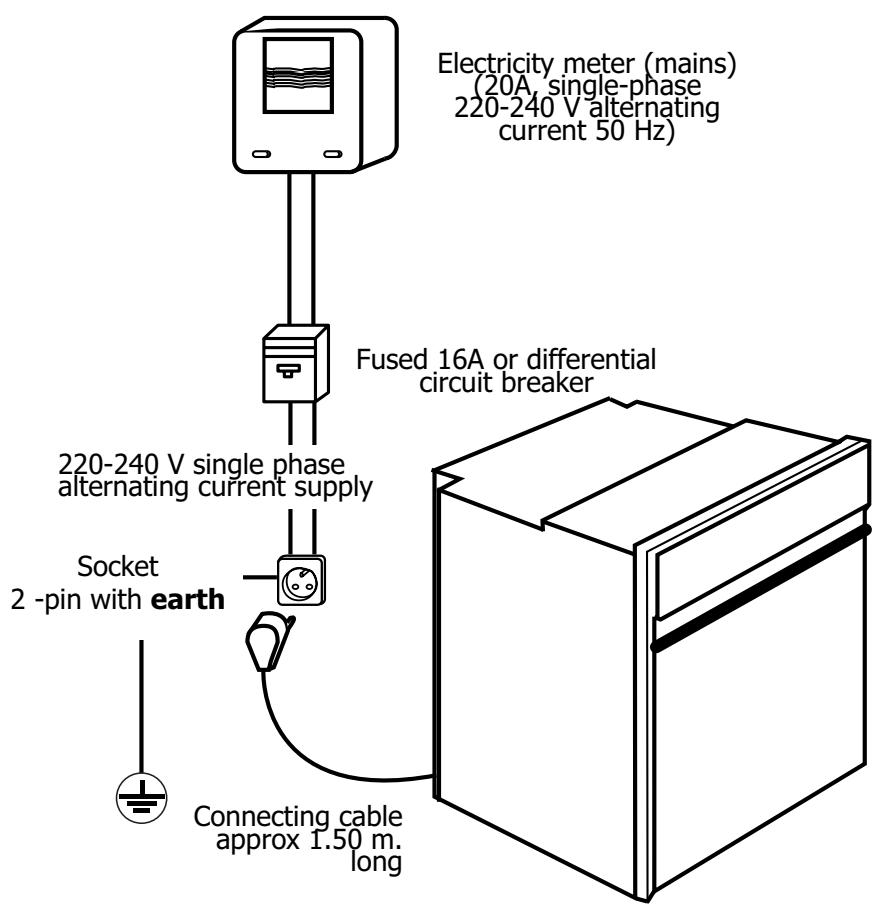
Before connecting your oven, make sure you are using the correct size cable. The cross-section should be the same as the cable connected to the oven. Use a 16-amp fuse.
How to inst a
The electrical connections are made before the oven is installed in its housing.
-
The oven must be connected using an approved 3-core cable (live, neutral and earth 1± ) with 1.5 ~mm square conductors. This should be connected via a 3- pin-socket (live, neutral, and earth 1± to the main supply which should be should be a 220 - 240 ~V , alternating single-phase current. If the oven is not connected using a plug and socket, it must be connected to a multi-pole switch with a minimum gap of 3 ~mm between contacts. The earth wire (green and yellow) should be connected to the terminal marked with the earth symbol 1± on the appliance and to the earth in the switch.
-
Where the oven is connected using a separate plug and socket this must be accessible after the oven has been installed.
- The neutral wire (blue) of the oven must be connected to the neutral in the main supply.
Fitting new wiring and/or changing cables.
- The supply cable (H05 RR-F, H05 RN-F or H05 W-F) must be long enough to allow the oven to rest on the floor in front of its housing. With the oven sitting on the floor and disconnected:
- Open the trapdoor at the bottom right hand side at the back of the oven by removing the 2 screws and swinging the door away.
- Remove the sheath from each wire in the new cable up to 12mm .
- Twist the ends carefully together.
- Unscrew the terminal screws and remove the wires that need changing.
- Pass the new cable through the wire clamp to the right of the terminals.
- Connect the wires up in accordance with the markings on the terminals.
- Make sure all wires are trapped under the screws.
- The brown wire (live) going to terminal marked L.
- The green and yellow wire (earth) going to the one marked 12 .
- The blue wire (neutral) going to the terminal marked N.
- Tighten the screws and check, by tugging on each wire, that they are firmly connected.
- Tighten the clamp to hold the cable.
- Close the trapdoor using the two screws.

We cannot accept any liability in the event of an accident resulting from non-existent or faulty earthing.
I l I y o u r o v e n
GB
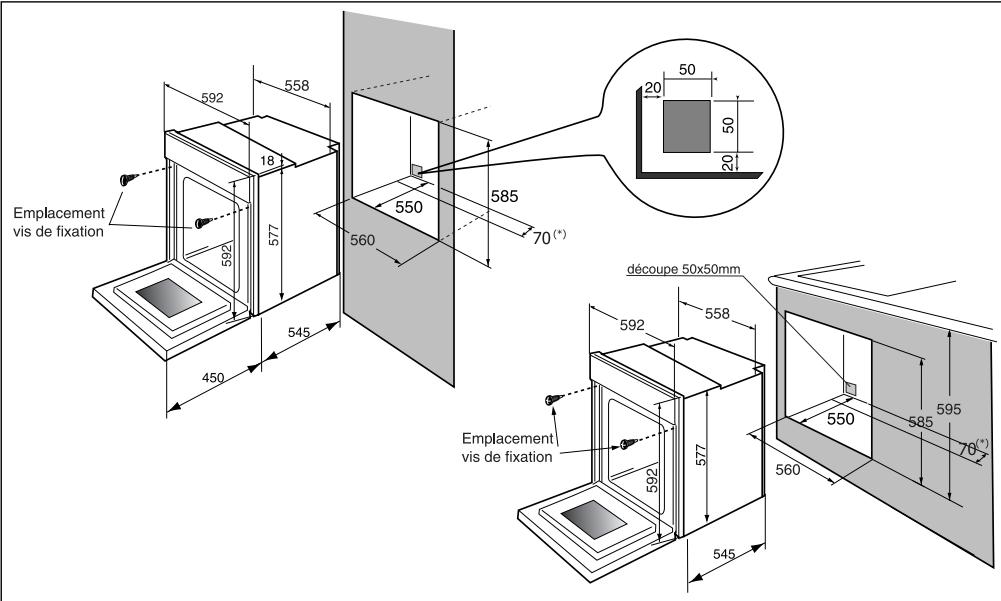
Dimensions for installation use
The oven may be housed either under a work surface or built into a column that is open* or closed with a suitable opening.
Your oven works at its best and produces excellent results when cooking and cleaning itself, if its air circulation is not compromised:
- The oven must be centred in the unit so that there is a minimum distance of 5 mm between it and the surrounding unit.
- The housing unit or its outer surface must be capable of withstanding heat.
- To ensure the oven rests firmly in the housing, screw it to the housing unit using the holes on the side uprights provided (see diagram).
To do this:
1) Remove the rubber stoppers masking the fixing holes.
2) To prevent the housing unit splintering, drill two holes 3mm in diameter in the wall of the housing unit opposite the fixing holes.
3) Attach the oven using the two screws.
4) Conceal the hole using the rubber stoppers. (These also help to cushion the closing of the oven door).
(*) If the housing unit is open at the back, the gap must not be more than 70 mm.

If you are unsure about fitting this oven yourself please use a qualified electrician.
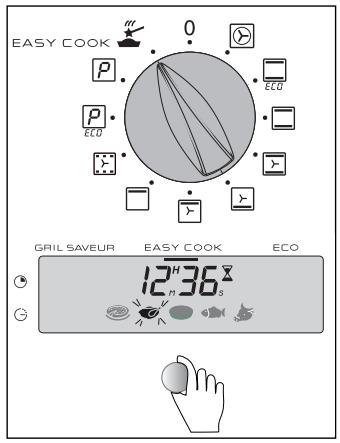
Your oven
1. The oven programmer
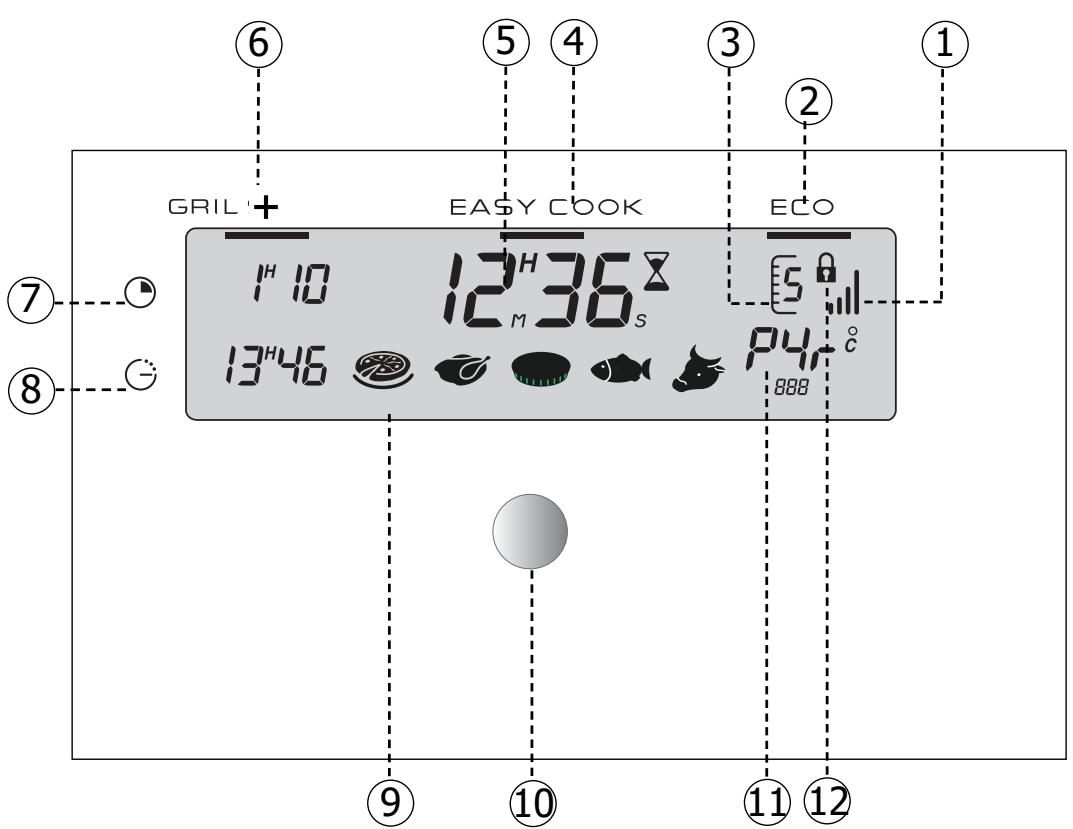
1 Temperature increase indicator
(2) ECO (economical) cooking indicator
(3) Recommended shelf position for dish
EASY COOK indicator
⑤ Time display (time of day and timer)
⑥ Grill+ indicator
(7) Length of cooking time
(8) End of cooking time
EASY COOK dishes indicator
10 Control knob
11 Oven temperature and pyrolysis indicator
12 Door locked indicator
2. How to set the clock
GB
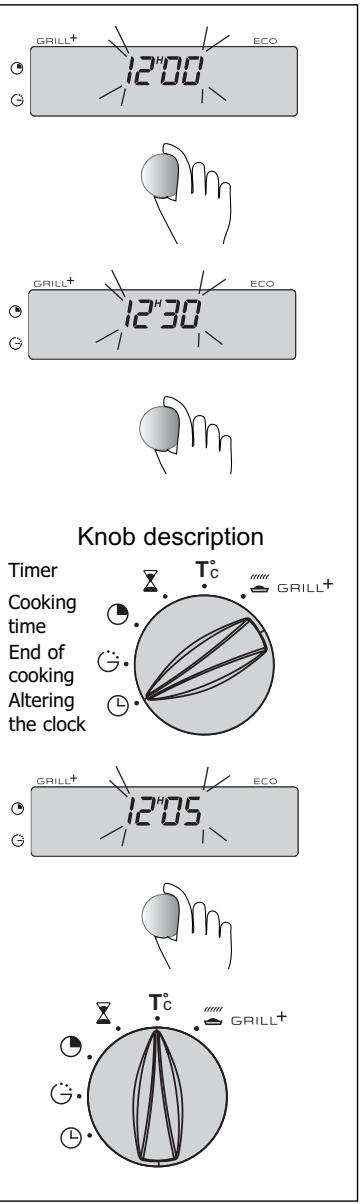
a) When the oven is first switched on at the mains
- Set the time of day by turning the knob (the faster you turn the knob the quicker the time is displayed).
- The oven assumes the time is correct a few seconds after you stop turning the knob -> The display stops blinking.
Time chosen is 12.30.
b) Altering the clock
- Turn the programme selector to the re-set position " ① "
- The time display blinks and you can alter the time.
- Turn the knob to obtain the correct time (back or forwards).
- When the correct time is shown, turn the selector to "T°C" (temperature control) -> and the display will stop blinking.
If you omit the last step, the oven will automatically assume the time after a few seconds.
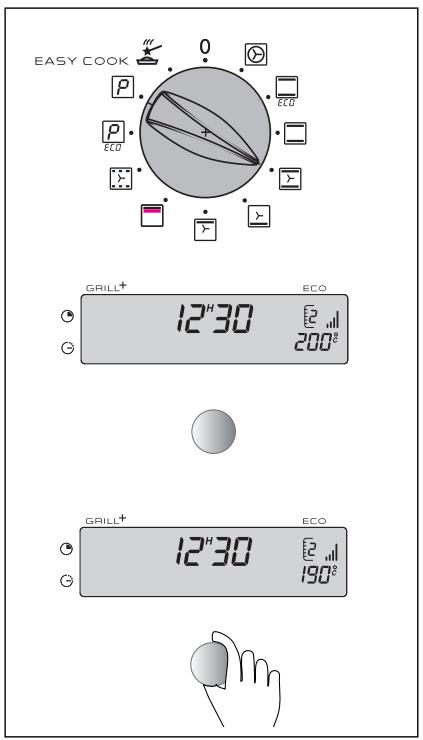
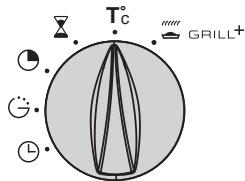
3. How to cook straightaway
The timer display only shows the time of day. It should not be blinking.
- Choose how you want to cook your food: Turn the dial until it is indicating your choice.
Example:position" l
- Place your dish in the oven at the shelf position recommended in the display.
E.g" ~一~ " -> means shelves 1 or 2.
- Your oven will suggest the best temperature for the method chosen. In this case 200^ . However, you can override the suggestion by using the knob below the display.
E.g " ~一~ " is now at 190^
After this, the oven heats up, the temperature increase indicator is busy and reflects how hot the oven is.
When the oven has reached the right temperature, it gives 3 beeps.

After cooking the fan continues to work for a while to ensure the elements cool right down.
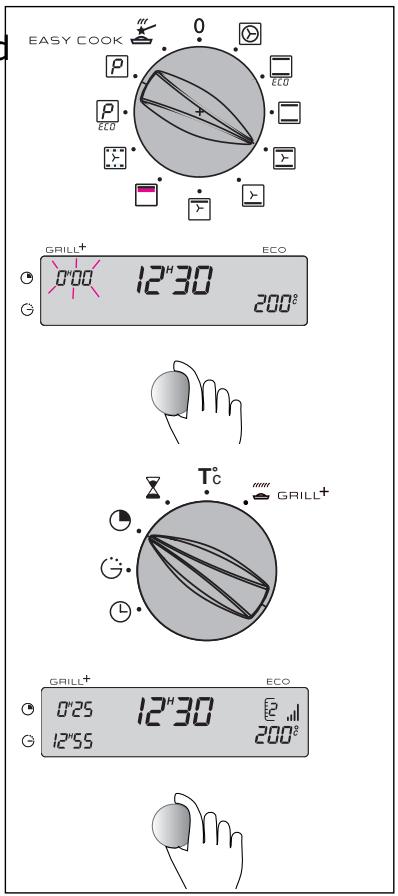
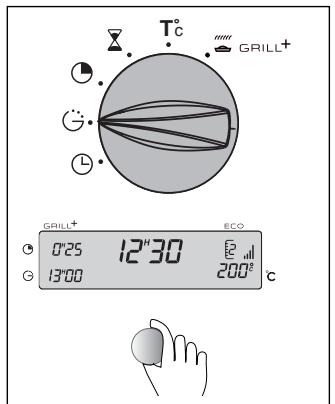
4. How to programme the cooking
GB
a) To turn on the oven manually but programme the oven to turn off (delayed cooking)
- Choose the method of cooking and adjust the temperature if necessary.
The example is "Temperature
- Turn the programme selector to "①" The cooking time display shows 0:00 and blinks. You can now set how long to cook for.
- Turn the knob until the time is displayed.
E.g. 25 minutes
The oven will automatically assume this time is correct after a few seconds
-> The display will stop blinking.
Immediately the display stops blinking the countdown starts.
The time cooking will finish (start time + cooking time) is shown in the display panel.
For this example: cooking will end at 12:55 pm
After this, the oven heats up, the temperature increase indicator is busy and reflects how hot the oven is. When the oven has reached the right temperature, it gives 3 beeps.
At the end of the cooking time, the oven gives a series of beeps for some minutes. To switch the beeps off, turn the method selector to T^0C and the feature selector to 0.
How to use your oven
b) Delayed cooking with a pre-selected cooking time (you decide how long the food will cook for and when the cooking will stop)
- As for a), choose the method and the temperature and select the length of time to cook for.
Now, immediately turn the method selector to "G".
The end of cooking time will blink in the display panel.
- To postpone this, turn the knob until the time you want appears.
In the example shown, cooking will stop at 1 pm (13:00)
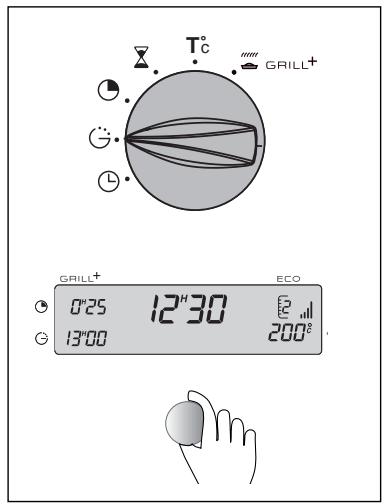
When you have done this, cooking is delayed and will start later and finish at 13:00. When cooking finishes the oven gives a series of beeps until you turn the feature switch to "0".
After you have programmed in the times you can still:

- Change the length of cooking time
- Cancel the programme at any time by re-setting the cooking time to 0:00
5. How to cook economically*
GB
The programme display must be showing the time of day without blinking.

- Turn the feature selector to " and the ECO indicator will appear in the panel.
- Place your dish in the oven according to the suggestion.
E.g "ECU" -> means shelves 1 or 2 are the best
- Your oven will now display the best temperature to cook at for your method. E.g. 200^ C . If you want to change this, use the knob beneath the display panel.
The display shows "EGB" at 190^
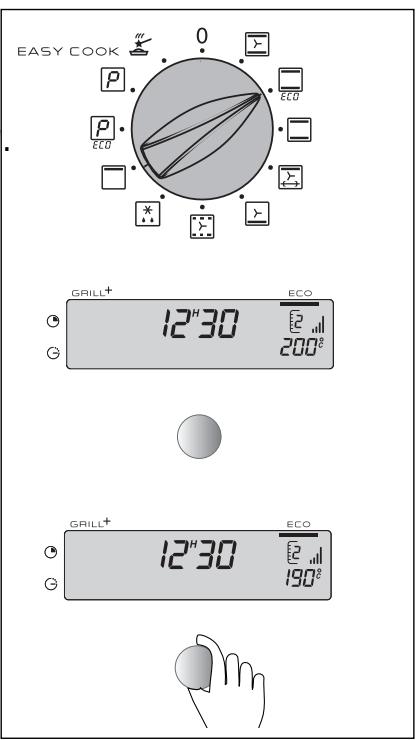
After this, the oven heats up, the temperature increase indicator is busy and reflects how hot the oven is.
When the oven has reached the right temperature, it gives 3 beeps.
To optimise ECO cooking, do not preheat and do not open the door.
*This setting is designed to reduce the energy required for cooking by up to 20% , while still producing the same results.
ECO means it is energy-efficient as stated on the label.

After cooking the fan continues to work for a while to ensure the elements cool right down.
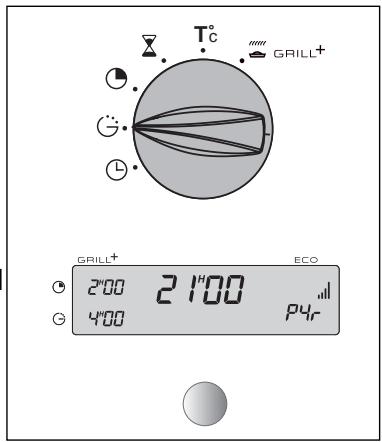
6. How to use the Grill+ feature
This feature enables you to brown the top of the dish after it has been cooked by another method. For the last 5 minutes of cooking time, the grill switches on.
It will only operate in conjunction with the following functions: 念 一 一 .
After selecting one of the above functions GRIL+ is selected by adding 5 minutes to the cooking time or turning the feature selector to GRILL+ when cooking
ends.
- Set the cooking method and alter the temperature if required.
- Turn the programme selector to GRILL+, the cooking time will blink 0:05 (this is the minimum time this feature operates for when used with another cooking method).
- Turn the knob to add the normal cooking time. After a few seconds, the display will stop blinking.
- When you have done all three, the oven will warm up and a horizontal bar will light up in the display panel under the word GRILL+ to indicate it is working. 5 minutes after the main cooking ends the GRILL+ indicator will start blinking.

Never place dishes too close to the grill element or the food will burn rather than brown gently. Always use a shelf position at the bottom of the oven (1 or 2).
Suitable dishes:
- Cheese-topped pasta, leeks in cheese sauce, fish in sauscs, fruit crumble etc..
Typical example of this feature in use :
Cauliflower cheese sprinkled with extra cheese:
- Select cooking method
- Select temperature (180^)
3.Select GRILL+ - Select time: 25 minutes.
The sauce will heat for 20 minutes and then the cheese topping will brown for 5.

You can either switch this feature on or off during the main cooking period. Simply turn the knob below the display. You can also use this feature during a delayed cooking cycle.
7. How to use the minute minder
GB
Your oven is fitted with a separate minute timer. It is not connected to the oven's programmes. You can use it just like a kitchen timer.
This feature can be used even when the oven is working. Using the minute minder will cause the time of day to disappear temporarily from the display.
- Turn the method selector to "X" -> the display blinks and a small egg-timer lights up.
- Turn the knob until the time you want is displayed (up to 59 minutes 59 seconds)
E.g.: 15 minutes 30 secs
A few seconds later the display stops blinking and you will see the countdown taking place. When the minute minder reaches 0, it will beep to let you know.


You can alter or switch the minute minder off at any time.
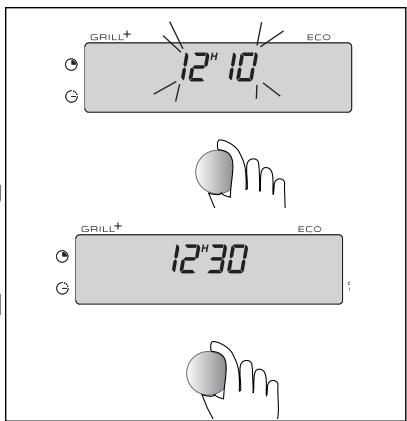
8. How to adjust the brightness of the display panel
To adjust the brightness of the display panel:
- Set the time of day to 12:10
- Keep hold of the knob and continue turning until the light is as you want it.
Once you have adjusted the brightness you will need to reset the time of day.
Cooking methods
| Symbol | Feature | Description |
| ECO | Fan oven A heating element at the back of the oven and the fan help cook the food. | No pre-heating necessary except for food with a relatively short cooking time (e.g. small biscuits on several shelves). |
| * | Conventional oven ECO Food is cooked by a top and bottom element. No fan. | This programme allows about 20% saving with no preheating. The ECO feature is used to label the oven. |
| * | Conventional oven Food is cooked by a top and bottom element. No fan. | Pre-heating needed to reach the required temperature. |
| * | Pulsed conventional oven Food is cooked by a top and bottom element and the fan. | Temperature rises rapidly. Some food can be started off in a cold oven |
| Pulsed bottom oven Food is cooked by the bottom element with gentle heat from the grill and the pulsed-air fan. | Food is cooked from underneath. Place the wire shelf on the first shelf from the base. | |
| Pulsed grill Cooking is done alternately by the top element and by the fan. | No pre-heating required. Suitable for poultry and succulent joints that have a spit-roasted appearance. Large joints can be accommodated by placing directly on the shelf and using the multi-purpose baking tray on the bottom rail to catch the juices. | |
| Adjustable grill Cooking is done by the top element only. No fan. | Warm up for 5 minutes. Slide the grill pan onto the shelf beneath the grill. | |
| 48 | Warming oven Heating from top and bottom elements with pulsed air. | Stays warm Cooking methods referred to in the information about energy labelling in accom |
Cooking methods
Recommendations
king on one shelf time will be the same.
Recommended to prevent meat drying out, and for cooking vegetables and fish and food placed on up to 3 shelves, where cooking time will be longer. Reduce temperatures by 20^ - 30^
You will save energy during cooking but the cooking time may be longer. Do not keep opening the door. Do not place any trays, shelves on the base as there is an element under the enamel.
Recommended for food requiring slow, careful cooking such as game and braising joints. Ideal for sealing red meat joints and simmering
covered casseroles whose contents have been partially cooked on the hob first. Donot place any trays, shelves on the base as there is an element under the enamel.
Recommended for meat, fish and vegetables, preferably in a earthenware dish. Do not place any trays, shelves on the base as there is an element under the enamel.
Recommended for dishes with a lot of liquid (quiches and fruit pies) as the pastry base is cooked through. Use also for food that rises (bread and cakes) and uncovered soufflés.
To seal and cook through lamb chops and sides of beef. To keep fish in their
The power is adjustable from 30 to 100% (positions 1 to 4 on the display). For efficient cooking, we recommend using higher power levels.
Recommended for leaving breads to rise (keeping temperature below 40^ ), keeping dishes warm and thawing food.
Cleaning the
1. Pyrolysis explained
-
Your oven is self-cleaning. It does this by burning off the spatters and drips produced, at high temperature. The smoke and smells that this produces are removed as the air passes through a catalyst.
-
It is not necessary to run the pyrolysis feature after every use of the oven, simply when the oven is dirty.
-
To make it more efficient, this oven has 2 pyrolytic cleaning cycles.
-
An energy-saving one (PYRO ECO) lasting 90 minutes (plus cooling down time means the oven is locked for 2 hours) and consuming 25% less energy than the standard cycle. Used after the second or third time you cook meat, this feature will ensure your oven stays clean.
-
Standard cycle (PYRO) lasting 2 hours (plus cooling down time means the oven is locked for 2112 hours) and suitable for cleaning a really dirty oven.
-
As a safety measure, once the temperature is higher than normal use the door automatically locks. You cannot unlock it even by turning the pyrolysis feature off.
2. When to clean by pyrolysis
If your oven smokes when the pre-heat feature is on or if there is a lot of smoke during a cooking cycle run the pyrolysis cycle. You can also use this feature if there is an unpleasant smell of cooking when the oven is cold.
| FOOD WITH LITTLE SPATTERING | Biscuits, vegetables, cakes quiches, soufflés | You do not need to use pyrolysis feature |
| FOOD THAT SPATTERS | Meat, fish (in an open dish) stuffed vegetables | Use the pyrolysis feature after 3 oven uses |
| FOOD THAT SPITS BADLY | Large pieces of meat on the spit | If a lot of spitting occurs, run the pyrolysis feature afterwards. |

Do not wait until the oven is coated in dirt before cleaning it.
oven cavity
3. Starting pyrolysis straightway
GB
- Check that the time of day is glowing steadily in the display panel (not blinking).
- Turn the feature selector to PYRO or PYRO ECO.
The
The time for the pyrolysis to work is 2 hours (PYRO ECO) or 212 (PYRO). This includes the cooling-down time until the door is unlocked.
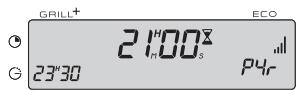

The display will show you when you can use your oven again.
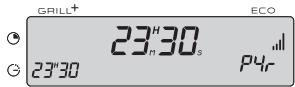
When it shows P4r on the display, the pyrolytic cycle (or the energy-saving pyrolytic cycle) is working.
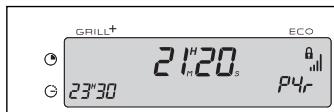
During the cycle, a padlock appears on the
display to remind you the door is locked.
At the end of the cycle the display shows.
When the disappears you can open the door.
- Move the function selector back to 0.
- When the oven is completely cold use a damp cloth to remove the white ash and the oven will once more be ready for you to cook in.


Before embarking on pyrolytic cleaning, make sure there are no cooking pots in the oven and you have removed any large splashes or drips.
4. Delaying cleaning by pyrolysis
Follow the instruction on how to carry out a pyrolitic cleaning straightway then
- Set the method selector to "G".
The end of cooking time blinks and you can now adjust the time.
- Turn the knob until the finish time is shown.
E.g. pyrolysis will finish at 4 am.
After this the start of pyrolytic cleaning is delayed and will finish at 4 am.
When the cleaning is finished, turn all the selectors to the off position.
Changing a bulb
- The light bulb is housed in the ceiling of your oven.
Warning! Switch off the power at the main switch before attempting to change the bulb. Leave the oven to cool if necessary.
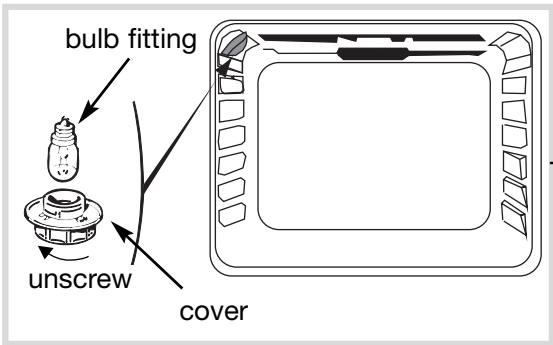
a) Turn the shade a quarter of a turn to the left
b) Unscrew the bulb in the same direction.
The bulb used is a:
-15W
- 220-240 V
- 300^
- E 14 screw-fitting bulb
c) Change the bulb, replace the shade and switch your oven back on at the mains.

It is easier to unscrew the shade and bulb if you wear a rubber glove.
Troubleshooting
If you're not sure that your oven is working properly, it doesn't necessarily mean that there's a problem. In all cases, check the following points:
GB
If you realize that..
Possible causes
The oven isn't heating.
- The oven isn't connected to the power supply.
- The fuse has blown.
- The temperature selected is too low.
The sensor is faulty - The oven has overheated. It has been put out of use for safety reasons
What should you do?
The temperature light does not go out.
- The door lock is faulty.
-
The temperature sensor is faulty.
-
Connect to power supply.
- Change the fuse, checking that it is
16A - Increase the temperature selected.
- Contact the After-Sales Service.
- Contact the After-Sales Service.
- Contact the After-Sales Service.
The light inside the oven isn't working.
- The lamp is unusable.
-
The oven isn't connected to the power supply or the fuse has blown.
-
Change the bulb.
- Connect to power supply or change fuse.
The cooling fan keeps working after the oven is turned off.
The fan can keep working for up to an hour after the oven switches off if is over 125^
- If it has not stopped after 1 hour
- Open the door to help the oven
cool down more quickly.
- Contact the After-Sales Service.
Cleaning by pyrolysis has not occurred.
The door is not shut properly.
- The door-locking system is faulty.
- The temperature sensor is faulty.
The plate that detects when the door is shut is faulty.
-
Check the door is properly closed.
-
Contact the After-Sales Service.
- Contact the After-Sales Service.
- Contact the After-Sales Service.
Advantages and operating method
1. Advantages and working principle
The "EASY COOK" feature means you no longer have to set the temperature or the cooking method.
Your oven automatically works these out for you to give the best results.
The "EASY COOK" method is done in two stages:
1) Input. The oven uses its electronic scanners to record the cooking details of each thing you want to cook.
You will notice the oven carrying out this operation because the right-hand end of the display panel will become busy. This may take between 5 and 40 minutes to complete.
DO NOT OPEN THE OVEN DOOR DURING THIS STAGE: it will give a faulty reading.
2) Calculation. The oven works out the cooking time required. The AUTO symbol appears on the display panel. The oven shows the amount of cooking time remaining as well as the actual time of day it will finish. If you want to open the door to rearrange the food, add more liquid etc, you can.
3) When cooking finishes a series of beeps is heard.
2. Instructions for use
ALL COOKING IS DONE WITHOUT PREHEATING THE OVEN
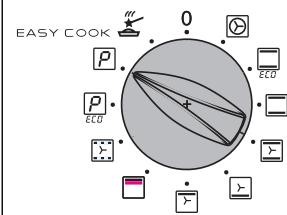
a) Cooking straightaway:
Set the selector to "EASY COOK".
In the display, you will see a selection of dishes.
Using the button choose the one you want
Place the dish in the oven at the level suggested in the display.
Close the door. The oven starts the cooking cycle as the oven's sensors start working and the display panel becomes busy. The cooking time is displayed.
When cooking ends the oven beeps several times.
Avantage et原則
GB
b) Delayed cooking:
Turn the selector to "EASY COOK".
Choose which dish you are going to cook from the display panel using the button.
Place your dish in the oven and shut the door.
Turn method selector to "G".
Turn the knob + or - to set the time you want the food cooked by.
E.g. 1 pm (13:00).
When you have done this the start of cooking will be delayed. The cooking time is worked out automatically. As when cooking straightaway, the
time allowed may be adjusted by the oven during cooking and the end result may vary by a couple of minutes (+ or -) compared with the initial time given.
3. Tips
Once the "Auto symbol" appears in the display panel, you can open the oven door.
Once it starts flashing however, if you open the oven door, it will make a warning sound and the dishes symbol will blink.
The "EASY COOK" feature MUST START WITH A COLD OVEN. You must wait for the oven to cool down completely before using the Easy Cook method again. If the oven is not cool enough, the temperature and the dish symbols will blink in the display panel and you will not be able to cook.
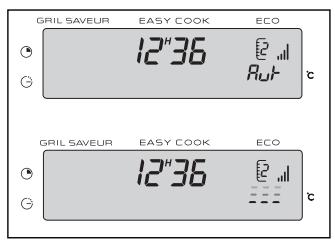
4. Troubleshooting
If you realize that...
Beeps and symbols
The symbol --- is flashing in the display panel.
"Auto" is displayed
The "EASY COOK" feature selector, symbols and temperature are blinking and a beep is audible.
Possible causes
- You have opened the door while the oven is scanning. The programme has been cancelled.
- The oven is calculating the best cooking time.
- The oven has now worked out the appropriate cooking time.
- The oven is too hot to use the "EASY COOK" feature.
What should you do?
- Let the oven cool down and try again.
- This is perfectly normal.
- This is perfectly normal.
- Either wait for the oven to cool down or use a different cooking method.
EASY COOK F E

Pizza
- Bought freshly made pizza
- Pizza base ready for use
Home-made pizza - Frozen pizza
with grated cheese in top - petits pains (in package)

Poultry
- Chicken weighing 1 to 1.8 kg
- Duckling, pheasant etc
Flans
- Freshly made flans
- Frozen flans
Quiches - Frozen uncooked meat in pastry

Fish
Whole fish
(Sea bream, hake etc)
Served individually
(trout and mackerel)
with flavourings and white wine baked fish

Roast
Beef
- Roast joints
(left very pink in the middle)
ATURES GUIDE
GB
TIPS:
- Place them directly on the shelf to make the dough base crispy
- Place on the enamelled tray to have a softer base.
TIPS:
- Use the spit. Remember to place the grill pan underneath to catch the juices.
- Cook in a chicken brick to avoid fat splashes.
- Prick the skin to prevent splattering.
TIPS:
- Use a non-stick aluminium flan tin: the pastry: the pastry on the bottom will be crisper.
- For bought frozen flans and quiches, take them out of their aluminium container before placing on the shelf.
TIPS:
- Only use this feature for whole fish cooked flat. Fish wrapped in pastry or grilled needs a pre-heated oven for best results.
TIPS:
- If you prefer your beef well cooked, use a conventional cooking method.
- Remove the joint from the fridge at least 1 hour before cooking is to start (see tips on the next page).
Remove as much basting fat from the joint as possible. Place the joint in an earthenware dish with a little water and a teaspoon of oil. Do not sprinkle with salt until cooking is over.
Handy Hints and Tips
Pizza
To ovoid having cheese and tomato sauce dripping in the oven, place the pizza on a sheet of baking parchment directly on the shelf.
Poultry
Make sure the dish in which the chicken cooks is big enough to prevent fat burning.
Flans / Quiches:
Metal trays are better than glass or porcelain, which are often too thick and food takes longer to cook. Metal also gives a crisp finish to the pastry. When cooking fruit tarts, to prevent the juice soaking into the pastry and leaving it soggy, sprinkle the base with some semolina, crushed biscuits, grounds almonds or tapioca to absorb the excess. When cooking savoury flans with vegetables containing a high-water content (leaks, spinach broccoli or tomatoes) or frozen, sprinkle with a tablespoon of cornflour.
Fish :
Check when buying that the fish has a pleasant smell and if it is a sea fish, with a faint salty tang. The fish should be firm and solid and the scales well attached to the skin. The eyes should be shiny and raised and the gills bright and moist.
Beef (AND MEAT IN GENERAL)
Always remove meat from the fridge well in advance of cooking. The sudden change in temperature from cold to hot can toughen meat. Ideally beef should be well browned on the outside, red in the middle but hot throughout. Do not sprinkle with salt before cooking as this draws out the blood and dries out the meat. Try to turn meat using spoons rather than a fork to keep the blood in the joint. Always leave the cooked joint for 5 to 15 minutes after cooking to recover. Wrap it in kitchen foil and leave in the open warm oven. During this time the juices, which were drawn out, can soak back into the meat.
Use earthenware dishes to roast joints; glass ones tend to make the meat spit. Do not use the enamel grill tray for roasting.
Recipes
GB
Pizza (using a ready-prepared dough base for each pizza)
*Vegetable pizza: 6 tbsp. tomato sauce; 1 large courgette, diced; half a pepper diced; half a small aubergine, sliced; 2 tomatoes, sliced; 50 g grated Gruyère cheese, oregano, salt and pepper
*Roquefort cheese and smoked bacon: 6 tbs. tomato sauce, 4 rashers smoked back bacon; 100 g Roquefort, diced; 50 g walnuts; 60 g grated Gruyère.
*Sausage and cottage cheese: 200 g cottage cheese, sieved, drained and spread on the dough base; 4 sausages sliced in rounds; 150 g ham in strips; 5 olives; 50 g grated Gruyère; oregano, salt and pepper.
Flans / Quiches Using a non-stick aluminium flan tin 30 cm diam.
Flaky pastry apple praline flan:
Line a flan tin with flaky pastry and prick all over with a fork. Bring 200 ml cream with a vanilla pod in it to the boil. Leave to cool. Beat together 2 eggs and 30 g sugar and add the cooled cream. Dice two eating apples and roll in 70 g praline. Spoon the cream and apples into the flan case and cook in the oven.
Quiches : Use an aluminium flan tin 27 to 30 cm diam
Ready-made shortcrust pastry
Beat together 3 eggs and 500ml thick cream
Salt, pepper and nutmeg.
Choice of toppings: 8 rashers bacon cooked and chopped,
or 1 kilo cooked chicory and 200 g grated Gouda or 200 g broccoli, 4 rashers bacon in bits and 50 Stilton cheese
or 200 g salmon and 100 g spinach cooked and drained
Recipes
Fish
Sea bream with dry cider:
1 sea bream weighing 1.5kg
500 g mushrooms.
2 cooking apples.
2 shallots.
2 tbsp thick cream.
100g butter.
500 ml cider; salt and pepper
Gut and clean the fish and remove the scales. Chop the shallots, slice the mushrooms, place them in a dish and lay the fish on top. Pour in the cider, add salt, pepper and a few knobs of butter and place in the oven. Fry the unpeeled, quartered apples in the remaining butter. When the fish is cooked, remove it from its dish and place on a warm plate. Sieve the liquid off, save the mush rooms and reduce the stock. Add the cream to the juices and serve with the apples and mushrooms.
Poultry
Stuff with a handful of fresh tarragon or coat with a mix made from 6 gloves of garlic crushed with a pinch of rock salt and several peppercorns.
Roast beef
Sauces to go with beef.
SAUTERNES and ROQUEFORT Sauce:
Sweat 2 tbsp finely chopped shallots in butter.
Add 100 ml Sauternes and allow to reduce.
Add 100 g Roquefort cheese and let it melt slowly.
Add 200 ml thin cream, salt, pepper and bring to the boil.
BRANDY and PINK PEPPERCORS Sauce:
Sweat 2 tbsp chopped shallots.
Add 150 ml red win and leave to reduce.
Add the yolk of an egg, 1 tbsp tomato ketchup, 200 g butter, salt and pepper.
Whisk together, while pouring in 3 tbsp brandy and 1 tsp crushed pink peppercorns.
PEAR and WATERCRESS Sauce :
Cook a pear in enough white wine to cover it. Drain the wine into a jug and mash the pear.
Blanch a small bunch of watercress, drain and chop.
Braise 1 tbsp chopped shallots in butter.
Add the drained wine and reduce.
Add the pear, watercress and 200 ml thin cream.
Add salt and pepper and bring lightly to the boil.
Notes
Notes
Notes