ACDC-400-TTL - Lamp Impact - Free user manual and instructions
Find the device manual for free ACDC-400-TTL Impact in PDF.

User questions about ACDC-400-TTL Impact
0 question about this device. Answer the ones you know or ask your own.
Ask a new question about this device
Download the instructions for your Lamp in PDF format for free! Find your manual ACDC-400-TTL - Impact and take your electronic device back in hand. On this page are published all the documents necessary for the use of your device. ACDC-400-TTL by Impact.
USER MANUAL ACDC-400-TTL Impact
natural_image
Black Impact CRUISER light bulb mounted on a stand against a yellow background (no text or symbols visible on the device body)ACDC-500-TTL
Cruiser AC/DC 500 Ws
TTL Monolight
INSTRUCTIONS
Introduction
Thank you for choosing Impact.
The Cruiser TTL-500 is a professional 500 Ws monolight that runs on AC power or an included rechargeable lithium-ion battery that provides over 350 full-power flashes. It features a 9-stop brightness range that's adjustable in 1/10-stop increments. The Cruiser is perfect for studio use, and it's also ideal for location work where a powerful flash is needed for stunning outdoor fashion and portrait results.
This monolight has a simple user interface that allows for optimal performance with minimal setup and adjustment time. It has group and channel functions that allow you to isolate your units and prevent them from being triggered by other flashes in the vicinity. For TTL and HSS operation, the Cruiser has an integrated 2.4 GHz receiver that's compatible with Canon, Nikon, and Sony cameras when used with the Cruiser Wireless Controller. An integrated optical sensor allows the Cruiser to be used as an optical slave for a variety of studio applications. An adjustable 10 Ws LED modeling light draws minimal power and gives off nominal heat.
The Cruiser is easy to transport. With the included universal-voltage battery charger, you can use the Cruiser TTL-500 at home or abroad.
Features
- 500 Ws monolight
• Supports TTL and HSS when used with the Cruiser Wireless Controller - Wireless TTL, optical slave, and direct sync options
- Flash duration from 1/1000 to 1/9000 sec.
• 10 Ws LED modeling lamp
• Built-in 2.4 GHz receiver - User-replaceable flashtube
- Runs on battery or AC power
Box Contents
- Cruiser TTL Monolight
- Battery
- Battery charger
- Stand mount
- PC cord
- 7 in. reflector
- AC adapter
- Protective cap
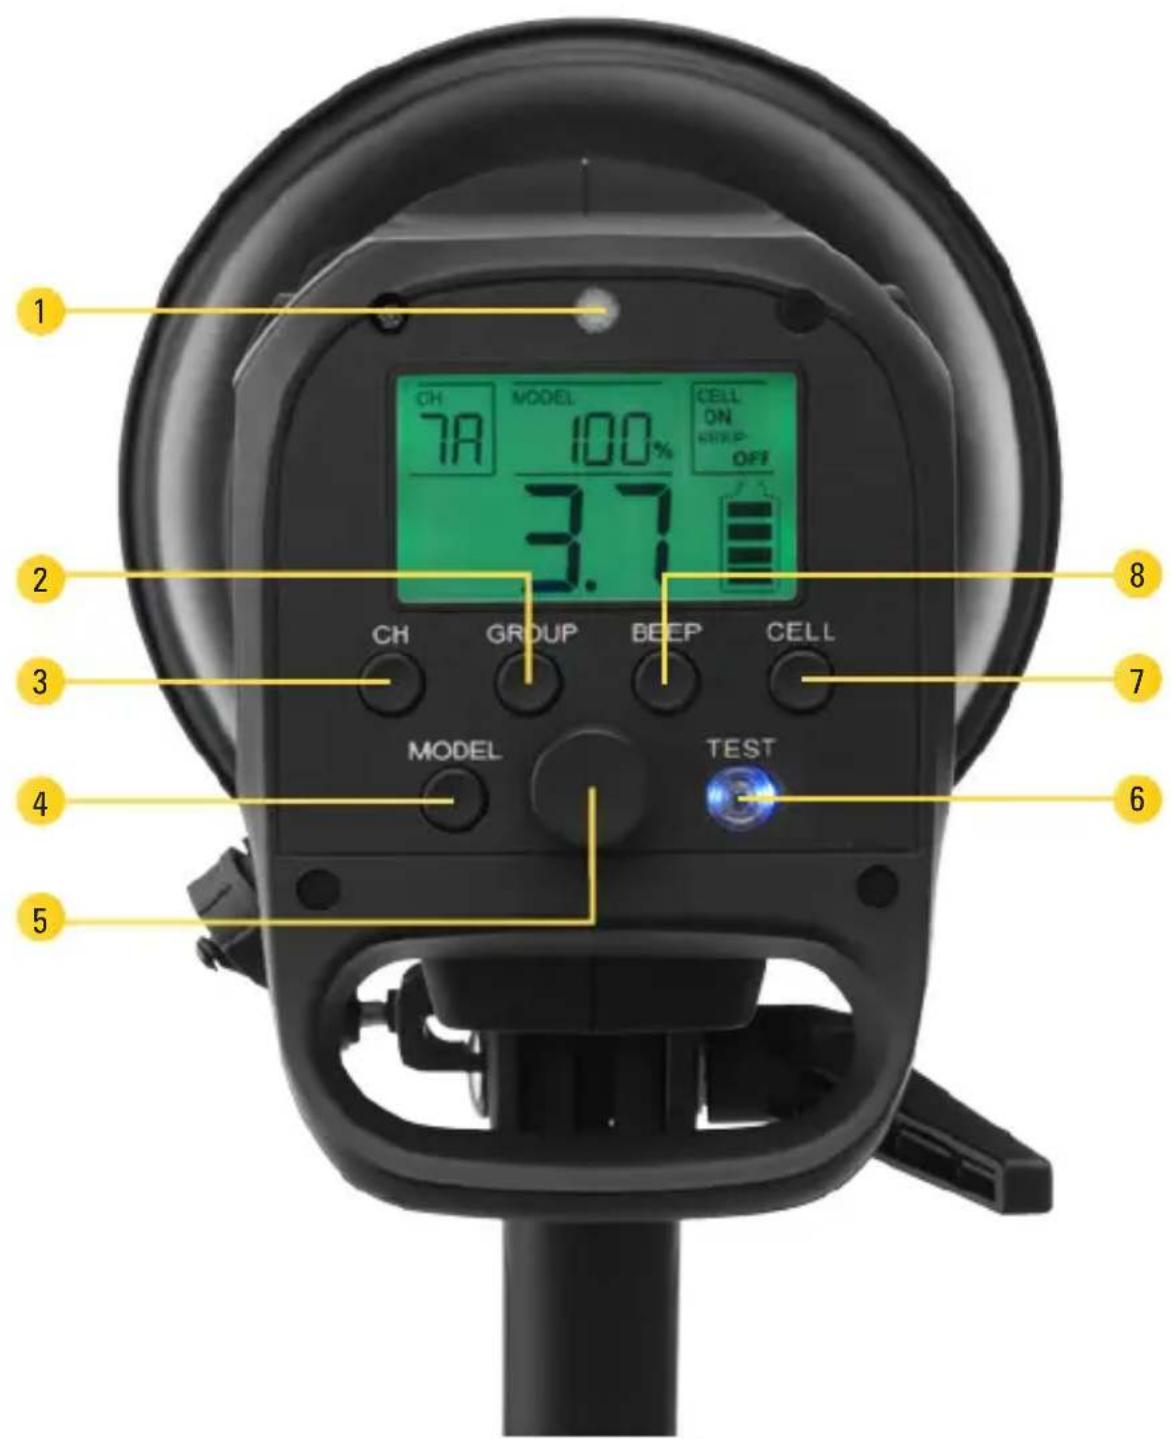
Overview
- Optical slave eye Optical sensor
- Group button Selects group A, B, or C.
- Channel button Selects channel 1 to 8.
- Model button Turns the modeling light on and off, and selects between 100% and 50% brightness.
- Power dial Adjusts the flash output from 2 to 10, in 1/10-stop increments.
- Test button Fires a test flash.
- Optical slave button Turns optical sensor mode on and off.
- Sound button Turns alert sound on and off.
Overview (continued)
text_image
1 CH 7A MODEL 100% CELL ON BEEP OFF 3.7 2 CH GROUP BEEP CELL 3 7 4 MODEL TEST 6 5Overview (continued)
Top/side view:
- S-type reflector
- Glass dome
- Flashtube
- Modeling LED
- Accessory release
- Battery compartment / Battery contacts
- Umbrella locking screw
- Tilt lock
- Locking screw
- 5/8-inch receiver
- Umbrella mount
- Air vent
- AC power port
- Three-way power switch
a. Up: AC power
b. Down: Battery power
c. Center: Off
- Micro-USB port
- 3.5 mm sync port
Battery:
- Charge indicator lights/button
- Battery release button
- Battery contacts
- DC power input
LCD screen:
- Channel and group
- Manual/TTL
- Power output
- Battery icon
- Sound
- Optical slave
- Modeling light
Overview (continued)

text_image
impact CRUSER 1 2 4563 18 19 20 17 16 15 7 8 121314 11 9 10 27 26 25 21 CH 78 MODEL 100% CELL ON BEEP ON 26 25 22 TTL 3.7 23 24Cruiser Wireless Controller
- Group buttons
Press to select group A, B, or C. The selected group is outlined. Press and hold to enable or disable a group.
- Mode button
Selects Manual or TTL mode.
- Sync button
(Canon and Sony)
Selects first-curtain sync, second-curtain sync. Go to our website impactstudiolighting.com for information on the Cruiser's compatibility with Sony cameras.
- Plus (+) and minus (-) buttons
Raise and lower the output power of the selected channel. Press to change power in increments of 1/10-stop. Press and hold to rapidly scroll through the power range. In TTL mode, press to adjust EV compensation.
- Power LED
Indicates when power is on.
-
Power button
-
Channel button
Selects channels 1 to 8.
- Test button
Fires a test flash.
- Modeling light button
Turns the modeling light on and off for the selected group, and selects between 100% and 50% brightness. The modeling light can be set independently for each group.
- Sound button
Turns the alert sound on and off.
-
Mounting foot
-
Locking collar
-
Battery compartment
Cruiser Wireless Controller (continued)

text_image
impact | CRUISER 1 2 3 4 5 TEST A B C * A B C 0.0 - 0.9 0.0 TTL MODE SYNC CHANNEL 10 9 8 7 6 13 12 11Cruiser Wireless Controller (continued)
LCD screen:
- Modeling light 5. Channel
- Output power 6. Sound
- Manual/TTL 7. Group
- FCS, SCS, HSS indicators

text_image
* A B C 0.0 -0.9 0.0 TTL MODE SYNC CHANNEL 345Firmware Notice
The latest firmware updates are available on impactstudiolighting.com. If there are compatibility or performance issues with your camera, make sure your unit has the latest firmware version.
Precautions ⚠️
Before using the Cruiser TTL, please read the following safety notices carefully and thoroughly. This will ensure safe use and help prevent damage to your flash and injury to yourself or others.
! Prolonged, fast shooting at fast recycling rates might cause overheating. The Cruiser TTL's protection circuit will shut the unit off for approximately 5 to 10 minutes if overheating occurs.
Warning
- There are no user-serviceable parts inside the unit. Only qualified service engineers should access the inside of the case. Due to the high-voltage circuitry inside this device, do not attempt to disassemble or repair the unit yourself. Doing so will void the warranty.
- Do not fire the flash at close range directly into the eyes of people or animals. This can
cause damage to the retina and may even lead to blindness.
- If the flashtube or modeling light becomes cracked or damaged in any way, replace immediately.
- Frequent use of HSS will have an adverse effect on the lifetime of the flashtube.
- Do not use or store the Cruiser TTL 500 in flammable conditions (such as environments containing flammable gases or liquid chemicals). This could damage the flash, start a fire, or cause an electric shock.
- Do not clean the Cruiser TTL 500 with agents containing corrosive or flammable substances such as paint thinner, benzene, or nail-polish remover.
- This product is not water resistant. Keep it away from rain, snow, humidity, and general moisture.
Precautions ⚠️ ≤ (continued)
- Use only the correct, recommended battery.
- If you detect excessive heat, smoke, or a burning smell coming from the flash, immediately stop operation, and remove the battery to prevent the product from igniting or melting. Take the product to an authorized service center for repair.
- If the product is not used for two months, turn the unit on for 10 minutes with the modeling light off, and fire the flash several times over that time period to charge the capacitors.
- Turn the power off and remove the battery when the monolight is not in use.
- Handle this product with care.
- Do not stare at the lights when they are powered on.
- Clean this product with only a soft, dry cloth.
• Always wear cotton gloves when handling the flashtube.
- Keep this product away from children.
• Make sure that this product is intact and that there are no missing parts before use.
- All images are for illustrative purposes only.
Recycling lithium-ion batteries
Lithium-ion batteries are recyclable. You should help preserve the environment by returning your used rechargeable batteries to a collection and recycling location near you.
For more information about recycling rechargeable batteries, call the Call2Recycle helpline toll free at 1-800-822-8837, or visit www.rbrc.com (www.call2recycle.org).
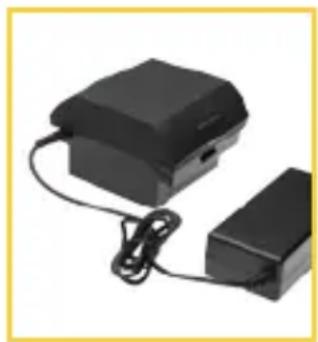
Charging and Installing the Battery
A rechargeable battery and multivoltage charger are included with the Cruiser TTL 500.
Note: Impact recommends fully charging the battery before its initial use and after an extended period of inactivity (more than two months).
natural_image
Two black electronic devices with cables, one connected to a smaller terminal block (no visible text or symbols)To charge and then install the battery, follow these steps:
-
Plug the AC cord into a wall outlet. The charger's indicator light will glow green when the charger is receiving power.
-
Connect the DC cord to the battery. The charger indicator light will glow red when the battery is charging, and green when the battery is charged.
natural_image
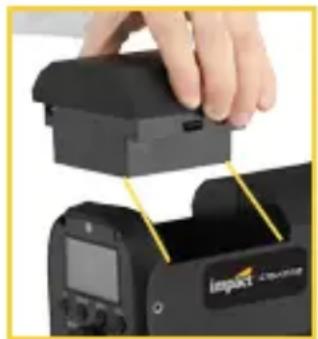
Close-up of a hand holding a black electronic device with yellow measurement lines, next to a camera module (no visible text or symbols)- Install the battery by orienting the contacts on the inside edge of the battery with the contacts in the battery compartment. Press it down into the battery compartment until the locking buttons click shut.
Checking the Battery Level
When the battery is installed in the Cruiser, the remaining charge is always displayed by the battery icon on the LCD screen.
If the battery is not installed, check the battery level by pressing and holding the charge indicator button. The indicator lights will show the remaining charge.

natural_image
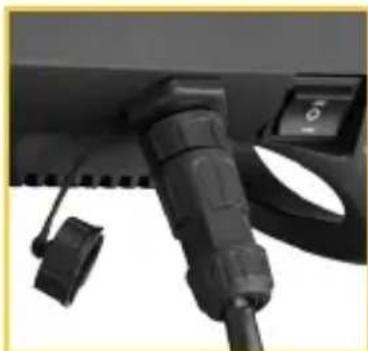
Black electronic device with indicator lights and a small circular button (no visible text or symbols)Wall Outlet Operation
The Cruiser is equipped with a universal power input so it can be used in the US and abroad with the proper plug adapter.
For AC operation:
-
Remove the protective cap from the AC power port.
-
Insert the 4-pin plug into the power port, and then turn the locking collar clockwise to secure the plug in place.
-
Attach the AC cord to the power adapter, and plug it into a wall outlet.
natural_image
Close-up of a black automotive plug connector with a control panel (no visible text or symbols)Preparing for Use
Mounting on a Light Stand
The Cruiser TTL-500 features a 5/8-inch baby receiver. If your light stand or mounting plate does not have a 5/8-inch post, make sure to use the appropriate adapter to mount the Cruiser.
- Set the 5/8-inch baby receiver onto your light stand's mounting pin, and tighten the locking screw until secure.
- Adjust the angle, and then secure it with the tilt lock.
Attaching the Reflector
The Cruiser is equipped with a S-Mount to let you add light modifiers like the included reflector, as well as softboxes and other light-shaping attachments.
-
Remove the protective cap by pulling back the accessory release button and turning the cap counterclockwise.
-
To attach the reflector, align the three studs on the reflector with the three mounting slots on the flash head.
-
Press the reflector in, and turn clockwise until the reflector clicks into place.

natural_image
Close-up of a black and silver camera lens being adjusted for use, with no visible text or symbolsPreparing for Use (continued)
Mounting an Umbrella
- Loosen the umbrella locking screw, and insert the umbrella shaft through the two mounting loops.
- Tighten the locking screw to secure the umbrella.
Connecting Your Camera to the Cruiser
The Cruiser has a 3.5 mm sync input for a wired connection to your camera or a wireless receiver (other than the Cruiser Wireless Controller). Use the following steps to connect your devices:
- Insert a 3.5 mm sync cable into the Cruiser's sync port.
- Insert the PC connector to your camera's PC socket.
Note: Check you camera's instruction manual for more detailed information about PC sync capabilities.

natural_image
Close-up of a hand adjusting a black camera lens on a utility pole (no visible text or symbols)
text_image
impad
natural_image
Close-up of a DSLR camera with attached cable and adjustment knobs (no visible text or symbols)Attaching the Cruiser Wireless Controller to Your Camera
- Loosen the locking wheel by turning it counterclockwise.
- Slide the mounting foot all the way into your camera's hot shoe.
- Turn the locking wheel clockwise to tighten until secure.
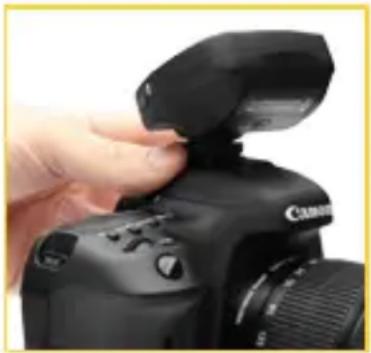
natural_image
Close-up of a hand adjusting the camera's top panel, showing the lens and control buttons (no text or symbols visible)Note: Make sure your camera has the appropriate settings. Consult the camera's user manual to set features for TTL and HSS modes.
Powering On and Firing a Test
- To power on the Cruiser, move the power switch to either AC or battery power mode. When the Test button lights up, the Cruiser is charged and ready to fire.
- Press the Test button to fire a flash.
The Test button will turn off while the Cruiser is recycling. When it lights up, the unit is ready to fire again.
Note: Channel and group settings from the previous session are stored in the Cruiser's memory. When the Cruiser is powering up, it will be set to the channel and group that were previously selected.
Configuring the Settings
Selecting Channels and Groups Via the Cruiser
The Cruiser and the wireless remote must be set to the same channel.
- Press the CH button repeatedly to cycle through channels 1 to 8. Selecting “—” (dash) disables wireless communication.
- Press the Group button repeatedly to select group A, B, or C.
Selecting Channels and Groups via the Remote
To select a group, press one of the group buttons (A, B, or C). A border will surround the selected group.
Groups with the "--"indicator are disabled, press and hold the corresponding group button to enable the group. The most recent brightness value will appear under the group letter. Press the button a second time to select the group.
To select a channel, repeatedly press the channel button to scroll through channels 1 to 8.
Setting the Modeling Light Output via the Cruiser
Press the Model button repeatedly to select 50% power, 100% power, or off.
Setting Modeling Light Output via the Remote
- To select the group you want to control, press one of the group buttons (A, B, or C).
- Press the Model button once for a modeling light power of 50%. The modeling light icon will appear next to the group.
Configuring the Settings (continued)
- Press the Model button again for a modeling light power of 100%.
- Pressing the Model button a third time to turn the modeling light off.
Note: The wireless remote can set modeling light power on each group individually. Changing the modeling light options on one group will not affect the others.
Alert Sound
Press the Sound button to toggle the sound function on or off.
When activated, the alert will sound whenever a change is made to the settings (except flash output power). The tone is also a recycling alert and will sound when the Cruiser is recharged and ready to fire.
In TTL mode, the tone will sound when the power requirement for a correct exposure is greater or less than the Cruiser's output range.
Optical Slave
The Cruiser can be used as an optical slave. To set the Cruiser to fire when it senses the flash from another flash unit, follow these steps:
Manually adjust the flash and modeling light power (see page 20).
Press the CELL button. The Cell indicator on the LCD screen will read On to show that the optical sensor has been activated.
Using the Cruiser in Manual Mode
The Cruiser's flash power output level can be set manually in 1/10-stop increments over a 9-stop range. 10 is the full-power flash, and each stop halves the light output.
To use the Cruiser in manual mode, follow these steps:
- Connect the sync cord to the Cruiser and to your camera. Follow your camera's instructions for using the correct camera settings for manual exposure photography.
Note: If the TTL icon appears onscreen while using the Cruiser Wireless Controller, press the Mode button on the wireless controller to exit TTL mode.
- Set the flash power output, and adjust the modeling light power.
- Set the exposure setting you want to use on your camera (check your camera's manual for specific instructions).
- Take a test exposure, and make the necessary changes to the camera or monolight.
Tip: For best results, use a handheld flash meter when shooting in the manual flash mode.
Using the Cruiser in TTL Mode
TTL mode can be used only when the Cruiser is paired with the Cruiser Wireless Controller. When the wireless controller is mounted on a compatible camera, the camera's TTL metering system automatically sends the Cruiser the appropriate flash output level.
To set the monologht to TTL mode, follow these steps:
- Set the channel and groups on the Cruiser (see page 18).
- Follow the instructions under Selecting Channels and Groups on page 18 to set the wireless controller's channel and group.
Important! If you're using the wireless remote but the Cruiser is not in TTL mode, half-pressing the shutter button on your camera will automatically return the Cruiser to TTL mode.
To exit TTL mode, press the Mode button on the wireless remote.
Using TTL with the Wireless Controller
Make sure the wireless remote and the Cruiser are set to the same channel. All Cruiser fixtures set to that channel, regardless of group, will switch to TTL mode when the channel is selected on the wireless remote.
- Press the Mode button to activate TTL.
When TTL is selected, the output power values on all groups switch to flash exposure compensation values (EV -3.0 to +3.0) that can be adjusted in 1/10-stop increments.
- To change the EV compensation value, select the group and use the + or - buttons.
The compensation value will be stored in the wireless remote's memory and will be displayed the next time TTL mode is activated.
When TTL mode is deactivated, the most recently used power output values return to the wireless remote's display.
Using High-Speed Sync (HSS)
High-speed sync lets you use shutter speeds as fast as 1/8000 second. It gives you the option to shoot under bright sunlight while using a wider aperture to darken the background, or to freeze motion.
Activating HSS
Canon: Press the Sync button repeatedly to scroll to HSS. When selected, the HSS icon will appear on the Cruiser's LCD screen.
To deactivate HSS, press the Mode button to enter first-curtain or second-curtain sync.
Nikon and Sony: HSS mode is set on the camera. Refer to your camera's user manual for enabling HSS.
Note: When HSS is activated on the wireless remote, the minimum available power output is 8.0.
If a group is set at a lower output, the wireless remote automatically resets the power to 8.0. When HSS is deactivated, the power output will return to the previous output setting.
Second-Curtain Sync (SCS)
For Canon cameras:
- Activate SCS mode on your camera.
- On the wireless remote, press the Sync button repeatedly until SCS (▶) is selected.
To deactivate SCS, press the Sync button to select first-curtain sync (▶) or HSS.
For Nikon and Sony cameras:
SCS is enabled on the camera. Refer to your camera's manual to activate SCS. When it's enabled, the wireless remote will automatically switch to SCS mode.
When SCS is disabled on your camera, the wireless remote will return to first-curtain sync.
Replacing the Flashtube
-
Turn off the power, remove the battery, and wait at least 10 minutes for the flashtube to cool.
-
Remove the glass cover by gently pulling it off of the flash head.
-
Using white cotton gloves or a clean cloth, remove the retention wire wrapped around the top of the flashtube.
-
With needle-nose pliers, unhook the retention spring loop.
-
Once the spring is unhooked, grip the base of the flashtube on each side, and carefully pull it from the retaining sockets.
-
Apply firm, even pressure at the base of the flashtube to gently push the pins of the new flashtube into the sockets.
-
With needle-nose pliers, hook the retention spring over and above the flashtube.

natural_image
Close-up of a hand using a tool to adjust or install a mechanical component (no visible text or symbols)
natural_image
Close-up of hands using a tool to adjust or install a mechanical component (no visible text or symbols)Note: This step can be done by hand. Make sure not to touch the flashtube with your bare fingers.
- Replace the glass cover.
FCC Declaration of Conformity
This device complies with Part 15 of the FCC Rules. Operation is subject to the following two conditions: (1) This device may not cause harmful interference and (2) This device must accept any interference received, including interference that may cause undesired operation.
Specifications
| Monolight | |
| Maximum power 500 Ws | |
| ISO 100, direct flash @ 10 ft. (3 m) f 16.8 | |
| TTL compatibility Canon, Nikon, Sony | |
| HSS compatibility Canon, Nikon, (1/8000 on available models) | |
| Trigger modes Wireless controller, manual, photocell, and sync cord | |
| Recycle speed 3.0 sec. | |
| Wireless remote receiver Built-in | |
| Wireless range 328 ft. (100 m) | |
| Channels 1 to 8, off | |
| Groups 3 (A, B, C) | |
| Sync-flash voltage 4.3 V | |
| Sync mode Wireless trigger, Optical, Direct sync 1/8 in. (3.5 mm) | |
| Color temperature 5600 K (±200 K) | |
| Flash-head mount type Bowens S-mount | |
| LED modeling lamp | 10 Ws |
| Recycling alerts Audio and visual | |
| Overheat limit | Yes |
| Dimensions (with dome and handle) | 14 × 4.9 × 6.6 in. (35.6 × 12.4 × 16.8 cm) |
| Weight | Without battery: 4.4 lb. (2 kg)With battery: 5.9 lb. (2.7 kg) |
Specifications (continued)
| Battery & Charger | |
| Battery type Li-ion | |
| Voltage 14.4 V | |
| No. of flashes @ full power 350 | |
| Charging time (approximate) 3 hr. | |
| Charger Input: AC 100 to 240 V, 50/60 HzOutput: DC 16.8 V, 2.5 A | |
| Overheat limit | |
| Dimensions Battery: 3.7 | × 4.2 × 2.6 in. ( 9.4 × 10.7 × 6.6 cm) |
| Weight Battery: 1.5 lb. (680.4 g) | Charger: 0.6 lb. (272 g) |
| Wireless Remote | |
| Frequency 2.4 GHz | |
| Channels 8 (1 to 8) | |
| Groups 3 (A, B, C) | |
| Connections 3.5 mm sync port, Micro-B USB | |
| Operating range 328 ft. (100 m) | |
| Dimensions 3 | × 2.37 × 2 in. ( 7.6 × 6 × 5.2 cm) |
| Weight (with batteries) | 3.2 oz. (90.7 g) |
Battery 2 × AAA 1.5 V alkaline, lithium, or NiMH batteries
One-Year Limited Warranty
This Impact product is warranted to the original purchaser to be free from defects in materials and workmanship under normal consumer use for a period of one (1) year from the original purchase date or thirty (30) days after replacement, whichever occurs later. The warranty provider's responsibility with respect to this limited warranty shall be limited solely to repair or replacement, at the provider's discretion, of any product that fails during normal use of this product in its intended manner and in its intended environment. Inoperability of the product or part(s) shall be determined by the warranty provider. If the product has been discontinued, the warranty provider reserves the right to replace it with a model of equivalent quality and function.
This warranty does not cover damage or defect caused by misuse, neglect, accident, alteration, abuse, improper installation or maintenance. EXCEPT AS PROVIDED HEREIN, THE WARRANTY PROVIDER MAKES NEITHER ANY EXPRESS WARRANTIES NOR ANY IMPLIED WARRANTIES, INCLUDING BUT NOT LIMITED TO ANY IMPLIED WARRANTY OF MERCHANTABILITY OR FITNESS FOR A PARTICULAR PURPOSE. This warranty provides you with specific legal rights, and you may also have additional rights that vary from state to state.
To obtain warranty coverage, contact the Impact Customer Service Department to obtain a return merchandise authorization ("RMA") number, and return the defective product to Impact along with the RMA number and proof of purchase. Shipment of the defective product is at the purchaser's own risk and expense.
For more information or to arrange service, visit www.impactstudiolighting.com or call Customer Service at 212-594-2353.

IMPACT®
A Gradus Group Brand
Product warranty provided by the Gradus Group.
www.gradusgroup.com
Impact is a registered trademark of the Gradus Group.
© 2017 Gradus Group LLC. All Rights Reserved.