FRC-RLSLB - Lamp Impact - Free user manual and instructions
Find the device manual for free FRC-RLSLB Impact in PDF.

| Product Type | LED Desk Lamp |
| Model | FRC-RLSLB |
| Brand | Impact |
| Dimensions (L x W x H) | 15 x 10 x 30 cm |
| Weight | 0.5 kg |
| Power Source | AC 100-240V, 50/60Hz |
| Power Consumption | 10W |
| Light Source | LED (non-replaceable) |
| Color Temperature | 3000K-6500K adjustable |
| Brightness Levels | 5 levels with dimmer |
| Adjustable Arm | Yes, flexible gooseneck |
| Base Type | Clamp or weighted base |
| Certifications | CE, RoHS |
| Energy Class | A+ |
| Lifespan | Up to 50,000 hours |
| Material | Aluminum and ABS plastic |
| Cleaning | Wipe with dry soft cloth |
| Safety Features | Overheating protection, anti-slip base |
| Warranty | 2 years |
Frequently Asked Questions - FRC-RLSLB Impact
User questions about FRC-RLSLB Impact
0 question about this device. Answer the ones you know or ask your own.
Ask a new question about this device
Download the instructions for your Lamp in PDF format for free! Find your manual FRC-RLSLB - Impact and take your electronic device back in hand. On this page are published all the documents necessary for the use of your device. FRC-RLSLB by Impact.
USER MANUAL FRC-RLSLB Impact
natural_image
Close-up of a ring light setup mounted on a tripod against a solid yellow background (no text or symbols visible)Fluorescent Ring Light with Dimmer INSTRUCTIONS
Introduction
Thank you for choosing Impact.
The Impact Fluorescent Ring Light with Dimmer is a continuous light for photography and video. It casts a soft, wraparound light without the harsh shadows of conventional flashes. This ring light produces a pleasing daylight glow at 5200 K for a natural light quality, and a textured silver lining in the housing maximizes output. The fluorescent lamp produces minimal heat so you can place it close to your subject without overheating them. A user-controlled dimmer adjusts the brightness from 100% to 30%.
The Impact FRC-RLSLB mounts to most light stands that have a 5/8 in. stud. A flexible mounting-arm adapter enables you to mount and bend the light into position, and an included mini ball head allows you to attach your point-and-shoot camera into the center of the ring. Use the mobile phone adapter to attach your smartphone, and the cold shoe extension to mount other options to your light rig.
Included diffusion and tungsten conversion panels clip easily to the housing of the ring light. The mirror accessory lets your model make quick touch-ups before the next shot. Feel secure transporting everything from one location to the next with the padded carrying case.
Precautions
- Please read and follow these instructions, and keep this manual in a safe place.
- Fluorescent bulbs contains mercury. Do not handle broken bulb material containing mercury without suitable protection.
- Keep this unit away from water and any flammable gases or liquids.
- Make sure the unit is powered off when plugging it into a power source.
- Use only the correct, recommended voltage.
- Do not attempt to disassemble or repair the equipment—doing so will void the warranty, and Genaray will not be responsible for any damage.
- Handle the unit with care.
- Do not stare directly at the lights when they are powered on.
- Clean the unit with only a soft, dry cloth.
- All images are for illustrative purposes only.
Overview
- 19 in. Ring light fixture
• Light stand mounting knob
- 5/8 in. mounting spigot
- Angle tilt knob
- Power/dimmer switch
- 18 in. Fluorescent ring lamp (user replaceable)
- Clip-on diffuser panel ( ×4 )
- Clip-on tungsten conversion panel (×4)
- 10 in. Flex Arm with 5/8 in. Mount
- Mini ball head mount
- Cold shoe extension
- Smartphone cradle
- Mirror attachment
- Screwdriver and mounting hardware
- Padded carrying case
Operating Instructions
Mounting on a light stand
The Impact Ring Light mounts to any standard 5/8 in. studded light stand. Loosen the light stand mount locking knob and seat the mounting receiver onto the stud of the light stand. Tighten the locking knob until secure, but do not overtighten.

natural_image
Close-up of a hand adjusting a ring light fixture with a yellow arrow pointing to a small object (no text or symbols visible)Attaching the flexible stand mount
The flex arm mount attaches to any standard 5/8 in. studded light stand. Loosen the locking knob on the flex arm mount, and seat the mounting receiver onto the stud of the light stand. Tighten the locking knob until secure.

natural_image
Close-up of a black cable with connectors and a transparent dome, mounted on a stand (no text or symbols visible)Operating Instructions
Loosen the ring light's stand mounting knob and seat the mounting receiver on top of the flexible stand mount.
Tighten the light stand mounting knob until secure. Adjust the ring light into the desired angle.
Connecting to a power supply
Plug the power cord into a grounded 110/120 V AC power supply only.
Adjusting the light angle
Loosen the angle tilt knob and position to the desired angle. Retighten the angle tilt knob, but do not overtighten.
Switching on the power/dimmer
With the ring light facing away from you, rotate the power/dimmer knob counterclockwise until you hear a click. The lamp will take a few seconds to turn on and will be at full brightness. Within a few more seconds, it will decrease brightness to the current dimmer setting.
Operating Instructions
Adjusting the brightness
With the ring light facing away from you, rotate the power/dimmer knob to adjust the highest setting.
Loosen the mounting foot at the base of the mini ball head. With the ring light facing away from you, slide the mini ball head mounting foot into the center shoe mount on the ring light housing. Rotate clockwise to tighten. It may be necessary to pull up on the mini ball head and rotate clockwise when tightening.
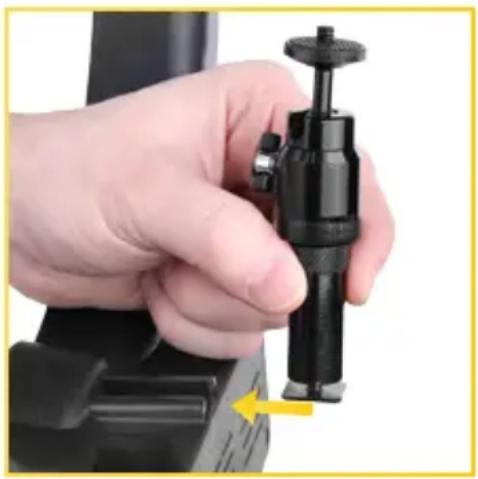
natural_image
Close-up of a hand holding a black mechanical device with a yellow arrow pointing to the base (no visible text or symbols)Operating Instructions
Attaching your camera
Align the stud on the mini ball head with the tripod mount of your camera. Rotate your camera clockwise onto the stud until secure. Use the locking thumbwheel on the ball head to tighten the attachment.
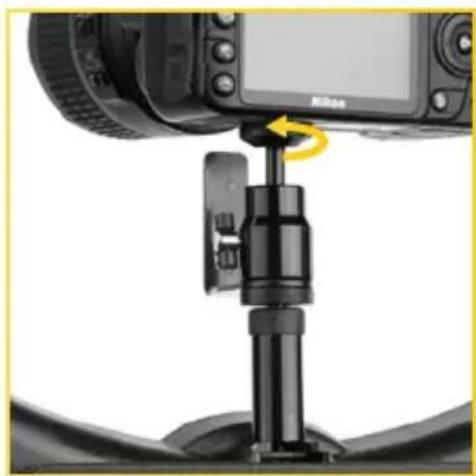
natural_image
Close-up of a camera setup with a mounted camera and adjustment knob, no visible text or symbolsAdjusting the mini ball-head angle
Loosen the ball-head locking screw and adjust the angle of your camera to the desired position. Retighten the ball-head locking screw to secure your camera.

natural_image
Close-up of a hand adjusting a black mechanical clip with a camera module (no visible text or symbols)Operating Instructions
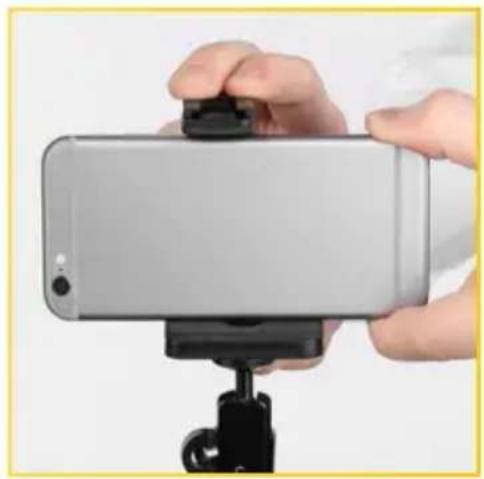
Attaching the smartphone cradle
Align the threaded socket on the bottom of the cradle with the mini ball head's stud. Rotate the cradle clockwise until secure.

natural_image
Hand holding a black mechanical clamp or clip assembly with a yellow arrow pointing to a component (no text or symbols visible)Securing your smartphone on the cradle
Pull up on the rubber tab at the top of the cradle to expand the cradle's jaws. Place your smartphone into the cradle and release the tab to secure the phone. Use the adjustment thumb wheel to adjust the cradle for a snug fit for your phone.
natural_image
Close-up of a hand holding a silver smartphone mounted on a tripod, no visible text or symbolsOperating Instructions
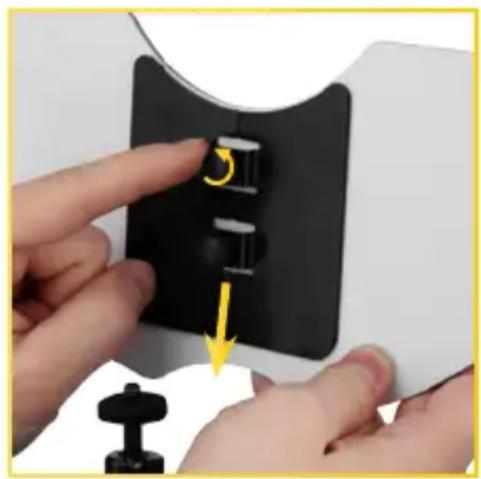
Attaching the cold shoe extension
Use this extension if more height is needed when employing the ball head or the smartphone cradle. Loosen the cold shoe foot at the base of the extension and slide the extension into the cold shoe mount on the ring light. Tighten the extension by turning clockwise until tight. Screw the mini ball head and/or the smartphone cradle onto the extension and tighten the locking wheel until secure.
Attaching the mirror
Note: for easiest mirror attachment, lay the ring light on a flat surface, or if it's mounted on a light stand, tilt it back so that it isn't standing upright.
With the mirror facing forward toward your subject, align the mirror's mounting holes with the screw holes on the ring light. Use the included screwdriver and screws to attach the mirror. Remove the plastic film from the mirror before use.
natural_image
Close-up of hands adjusting a black plastic clip with a yellow arrow pointing to the clip (no text or symbols visible)Operating Instructions
Attaching the diffuser or tungsten conversion panels
The panels clip onto the front housing of the light ring to modify the light. Each one has tabs that clip onto the housing, and alignment lips to match up with the adjacent panels. Find the panel with the half-dome tab to align with the bottom of the lamp housing. Place and align the next panel so that one lip overlaps the next.
For the last panel, slide its alignment lip under the lip of the first panel. Firmly clip the panel onto the housing.
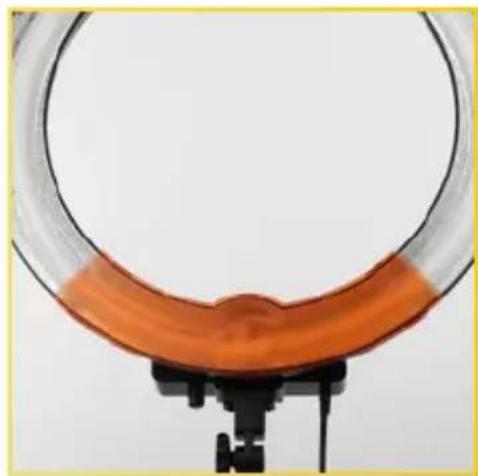
natural_image
Close-up of a ring-shaped object with orange liquid, mounted on a stand (no text or symbols visible)
natural_image
Close-up of a translucent orange glass or foil-like structure with no visible text or symbolsChanging the Lamp
Changing the fluorescent lamp
When changing the fluorescent lamp, make sure to replace it with the Impact Replacement 18 in. Ring Lamp (FRC-RLSL LAMP).
-
Unplug the Impact Ring Light from the power supply.
-
Detach the four-pin plug from the fluorescent lamp.
-
Firmly grip either side of the four outer clips and gently pull them apart while lifting them off of the lamp.
-
Gently remove the lamp from each one of the four clips in the ring light housing.

natural_image
Close-up of a hand adjusting a white plastic tube with reflective surfaces (no text or symbols visible)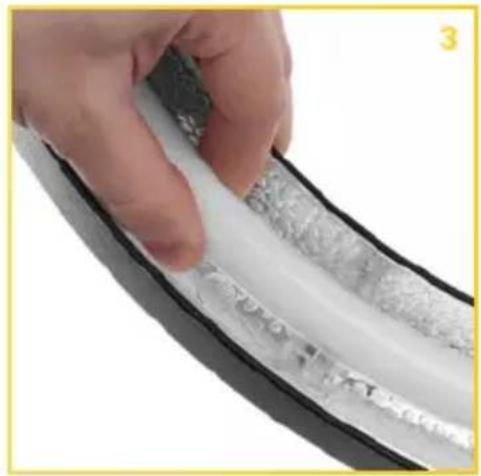
natural_image
Close-up of a hand holding a white flexible hose with metallic insulation (no text or symbols visible)Changing the Lamp
- Place the new, replacement 18" ring lamp and position it above the four clips in the ring light housing.
- Gently clip the fluorescent lamp into each one of the four ring light housing clips.
- Attach the four-pin plug to the ring lamp.
Specifications
| Power requirements 120 V, 50/60 Hz | |
| Power consumption 75 W | |
| Tungsten equivalent 300 W | |
| Output Max illuminance: 1300 lx @1 mMin illuminance: 340 lx @ 1 m | |
| Light source Fluorescent, user replaceable | |
| Lamp life 6,000 hr. | |
| Color temperature 5200 K (±200 K) | |
| Reflector Silver lining | |
| CRI 90 | |
| Dimming Yes | |
| Dimensions | Outer diameter: 19" (48.3 cm)Inner diameter: 14.5" (36.8 cm)Depth 2.625 in. (6.7 cm)Power cord length: 7.6' (2.3 m) |
| Weight 2.85 lb. (1.3 kg) | |
One-Year Limited Warranty
This IMPACT product is warranted to the original purchaser to be free from defects in materials and workmanship under normal consumer use for a period of one (1) year from the original purchase date or thirty (30) days after replacement, whichever occurs later. The warranty provider's responsibility with respect to this limited warranty shall be limited solely to repair or replacement, at the provider's discretion, of any product that fails during normal use of this product in its intended manner and in its intended environment. Inoperability of the product or part(s) shall be determined by the warranty provider. If the product has been discontinued, the warranty provider reserves the right to replace it with a model of equivalent quality and function.
This warranty does not cover damage or defect caused by misuse, neglect, accident, alteration, abuse, improper installation or maintenance. EXCEPT AS PROVIDED HEREIN, THE WARRANTY PROVIDER MAKES NEITHER ANY EXPRESS WARRANTIES NOR ANY IMPLIED WARRANTIES, INCLUDING BUT NOT LIMITED TO ANY IMPLIED WARRANTY OF MERCHANTABILITY OR FITNESS FOR A PARTICULAR PURPOSE. This warranty provides you with specific legal rights, and you may also have additional rights that vary from state to state.
To obtain warranty coverage, contact the Impact Customer Service Department to obtain a return merchandise authorization ("RMA") number, and return the defective product to Impact along with the RMA number and proof of purchase. Shipment of the defective product is at the purchaser's own risk and expense.
For more information or to arrange service, visit www.impactstudiolighting.com or call Customer Service at 212-594-2353.

IMPACT®
A Gradus Group Brand
Product warranty provided by the Gradus Group.
www.gradusgroup.com
IMPACT is a registered trademark of the Gradus Group.
© 2017 Gradus Group LLC. All Rights Reserved.