AE10758 - Safe Barska - Free user manual and instructions
Find the device manual for free AE10758 Barska in PDF.

User questions about AE10758 Barska
0 question about this device. Answer the ones you know or ask your own.
Ask a new question about this device
Download the instructions for your Safe in PDF format for free! Find your manual AE10758 - Barska and take your electronic device back in hand. On this page are published all the documents necessary for the use of your device. AE10758 by Barska.
USER MANUAL AE10758 Barska
BARSKA® Optics, as manufacturer, warrants this new precision optical product to be free of original defects in materials and/or workmanship for the length of time specified by this warranty. This warranty does not include damage caused by abuse, improper handling, installation, maintenance, normal wear-and-tear, unauthorized repairs or modifications and tampering in anyway. This warranty is limited to the original purchaser and is not transferable.
This warranty applies only to products purchased in the United States of America and Canada.
In the event of a defect within 30 days, the consumer must return the defective unit to the BARSKA dealer (the place of purchase) at his/her own expense.
Beyond 30 days, BARSKA products should be sent to the following address for warranty repairs. Products must be packed carefully and sturdily to prevent damage in transit, and returned freight prepaid to:
BARSKA® OPTICS
1721 Wright Ave.
La Verne, CA 91750, USA
For additional and updated information
please visit our website at www.barska.com
Please email info@barska.com or call 1.888.666.6769 for Return Merchandise Number (RMA#) before any returns. NOTE: All merchandise received without a valid RMA # will be returned to shipper at his/her own expense.
Please include all of the following when returning BARSKA products for service and/or replacement:
- Please write your complete details
(Name, Address, Telephone #, E-mail address, RMA#, etc.) - Purchase receipt or Proof of Purchase. (Original/Copy)
- A brief explanation of the defect.
- A Check/Money Order of \$35.00 cover inspection, shipping and handling.
*Please allow 6-8 weeks for delivery.
This product will either be replaced or repaired at the discretion of the warrantor. If it's a discontinued item, we will replace the product with an equivalent product. Should the repair not be covered by this warranty, an estimate will be sent for your approval. Non-warranty repairs or refurbishing of your optical products are always provided at a reasonable cost.
BARSKA® shall not be liable for any consequential, incidental and/or contingent damages whatsoever. We will not pay shipping, insurance or transportation charges from you to us, or any import fees, duties and or taxes. This warranty supersedes all previous BARSKA warranties.


natural_image
Exterior view of a BAREKAI telescope on a tripod (no text or symbols visible)TELESCOPE
STARWATCHER
625 POWER HIGHEST ATAINABLE POWER 900114
BARSKA®
675 Power, 900114 Starwatcher Telescope 675 Power, 900114 Starwatcher Telescope

natural_image
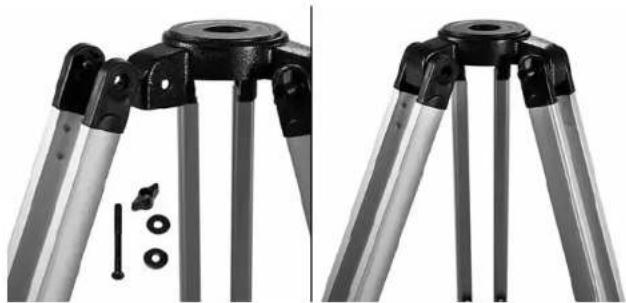
Collection of mechanical components and fasteners laid out on a white surface, including gears, bolts, and nuts (no text or symbols visible)Included Screws:
- Attach the Tripod Leg x 3 to the Tripod Connector with the 3 screws. Screw is shown in the picture on the left. Should look like picture on the right when finished.
natural_image
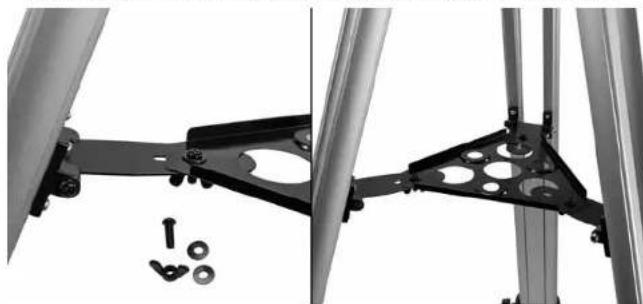
Close-up of a tripod-mounted camera with metal frame and small mechanical components (no text or symbols visible)- Attach the Tripod Leg x 3 to Accessory Tray with the 3 screws. Screw is shown in the picture on the left. Should look like picture on the right when finished.
natural_image
Mechanical assembly diagram showing a bracket with mounting holes and bolts, alongside a metallic frame (no text or symbols visible)www.barska.com
BARSKA®
675 Power, 900114 Starwatcher Telescope 675 Power, 900114 Starwatcher Telescope
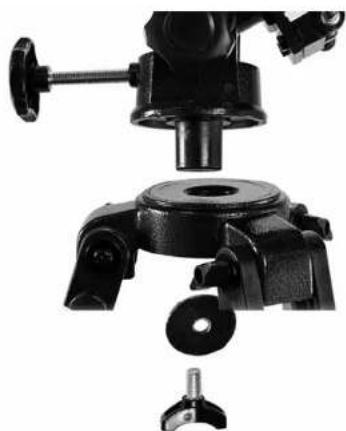
- Attach Equatorial Mount to the newly built tripod with the screw shown in the picture below.
natural_image
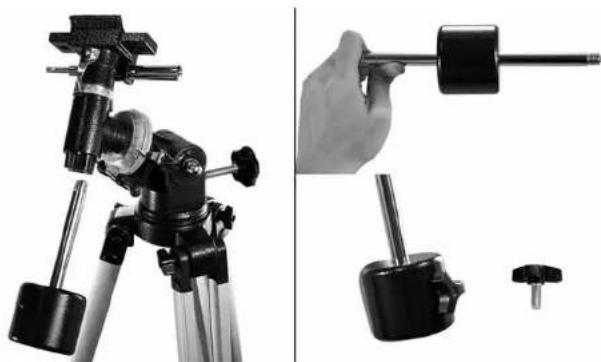
Close-up of a black mechanical clamp device with mounting base and handle (no visible text or symbols)- Attach Counter Weight to Counter Weight Shaft and screw the newly made Counter Weight to the Equatorial Mount as shown on the left and tighten the Counter Weight with screw.
natural_image
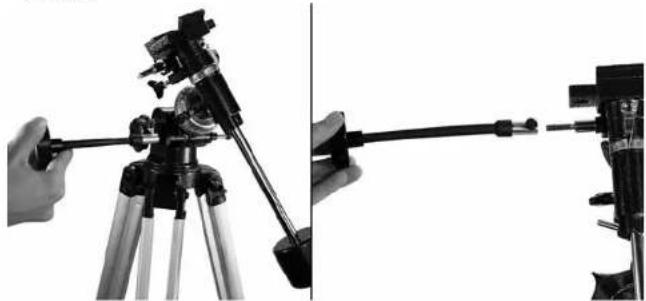
Two black-and-white photos showing a tripod-mounted camera setup and a hand holding a tool, both without any visible text or symbols.www.barska.com
- Attach & tighten Shorter Control Cable to Equatorial Mount shown in picture on the left and Longer Control Cable to Equatorial Mount shown in picture the right.
natural_image
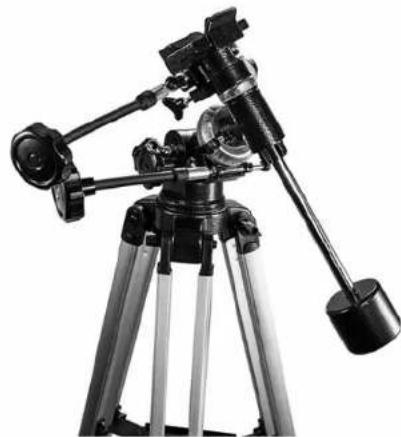
Two black-and-white photos showing a tripod-mounted camera setup with a hand operating the cable (left) and a mounted camera on a stand (right), both without any visible text or symbols.NOTE Should look like picture below on the after you have installed the counterweight and 2 control cables.
natural_image
Black-and-white photo of a tripod-mounted surveying instrument with adjustable arms and legs (no visible text or symbols)www.barska.com
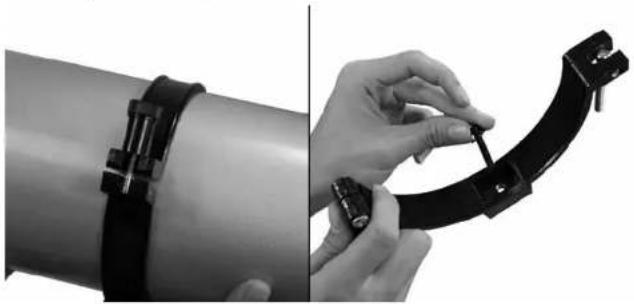
- Insert Screw x 2 into Telescope Ring Mounts x 2 and attach the Telescope Ring Mounts to the Telescope Main Body, make sure that the spacing between hthe rings fit into the Equatorial Mount.
natural_image
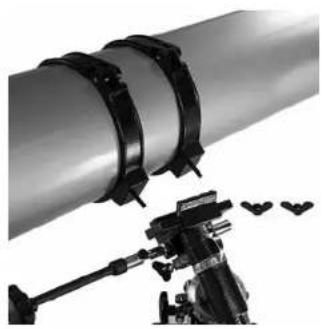
Two-panel image showing a hand adjusting a black mechanical component with a spring, alongside a pipe fitting (no text or symbols visible)- Attach the Telescope Main Body to the Equatorial Mount as shown below.
natural_image
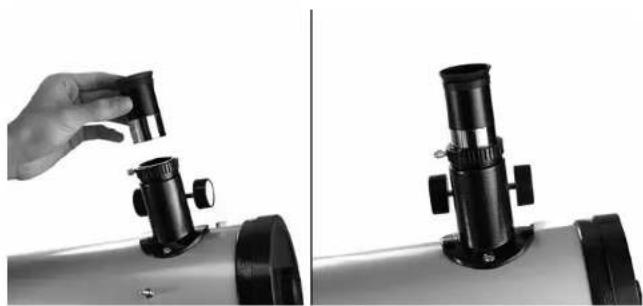
Close-up of a pipeline with attached black metal brackets and a mounted camera on a tripod (no visible text or symbols)- Attach Eyepiece onto the Telescope Main Body as shown on the left. Should look like picture on the right when finished. Can attach Barlow Lens instead.
natural_image
Two-panel black-and-white photo showing a hand adjusting a small object on a tripod-mounted optical instrument (no text or symbols visible)- Attach Finder Scope to the Telescope Main Body with the silver screws shown in the picture as shown below.

natural_image
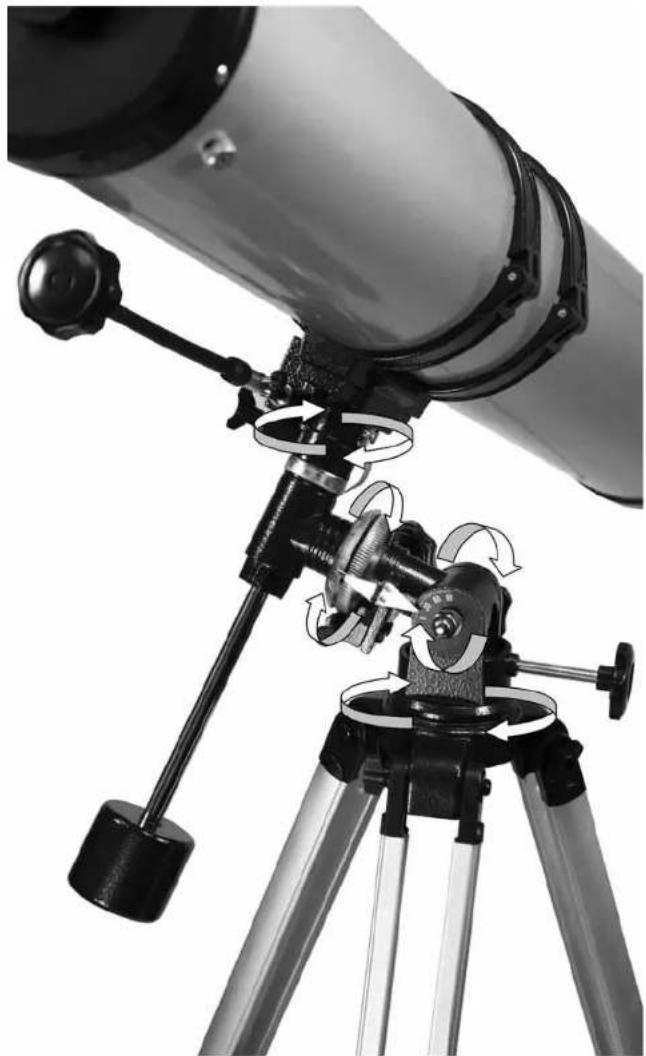
Close-up of a person using a telescope on a tripod, no visible text or symbolsTelescope Movement:
For more drastic movement move the equatorial mount, and for minor slight movements move the telescope main body with the degree references. Refer to the image for reference.
In order to move the telescope horizontally (left to right):
- Rotating entire Equatorial Mount: Loosen Horizontal Axis Lever and use the Short Control Cable to pan the Equatorial Mount horizontally (left to right). After you set the telescope in the desired position tighten the Horizontal Axis Lever.
- Rotating Telescope Main Body with Degree Reference: Loosen the Polar Axis Lever and use the Long Control Cable to pan the Telescope Main Body horizontally (left to right) and use the Longitude Scale for degree adjustments. After you set the telescope in the desired position tighten the Polar Axis Lever.
In order to move the telescope vertically (up and down):
-
Moving Equatorial Mount: Loosen Declination Axis Lever and Declination Axis Clamp and use the Counterweight to move the telescope to the desired position. After you set the telescope in the desired position tighten both the Declination Axis Lever and the Declination Axis Clamp.
-
Moving Telescope Main Body with Degree Reference: Loosen Latitude Lever and use Counterweight to move the Telescope Main Body vertically (up and down) and use the Latitude Scale for degree adjustments. After you set the telescope in the desired position tighten Latitude Lever
Adjusting the Finder Scope:
Since the telescope has a limited field of view, it can be quite difficult to locate a given star or planet. For this reason the telescope is fitted with a finder scope with reticule for orientation. It is advisable to complete the following settings in daylight.
- Insert the eyepiece with the lowest magnification in the Zenith mirror or Zenith prism. Look at a stationary easily recognizable object that is not further away than 300m. Turn the telescope with the horizontal axle, and move the vertical axle until the object is in the middle of the field of view, and then focus the image. Tighten the adjusting screw on the mount so that the telescope remains in this position (the higher the object is above the horizon, the easier it is to locate).
natural_image
Close-up of a telescope mounted on a tripod, showing mechanical components and rotational motion arrows (no text or symbols visible)www.barska.com
BARSKA®
675 Power, 900114 Starwatcher Telescope 675 Power, 900114 S
BARSKA®
- Now look through the finder scope. If the object seen through the telescope is not visible, then release the adjusting screws and move the finder scope until the object can be seen. Now retighten the adjusting screw while ensuring that the object remains visible in the centre or the finder scope. To simplify this procedure use the adjusting screws to adjust the object in the centre. The finder scope will move in the direction of the screw in which it is being turned. All screws can be finally tightened as soon as the setting with the eyepiece coincides with that of the finder scope.
EQUATORIAL MOUNT 900114: The Equatorial mount, in conjunction with the micro adjustable Altitude control, and the Azimuth Lock enables you to observe the entire night sky, or any celestial body, without having to move the tripod.
WHICH MAGNIFICATION? SELECTING THE CORRECT EYEPIECE
Magnification defines the power of a telescope to enlarge an image or to 'pull it in' closer for viewing.
Example:
$$ \frac {7 0 0 \mathrm{mm} \text { focal length }}{1 2 . 5 \mathrm{mm} \text { focal length of eyepiece }} = 5 6 \times \text { magnification } $$
The required magnification depends upon the object being observed. The following general guideline is recommended for this purpose: Ideal viewing conditions are obtained if the magnification is not more than 15x - 20x the diameter of the objective lens, i.e. an optimal magnification of 100x - 125x can be expected with 60 mm diameter objective lens to observe most celestial objects. A lower magnification power is advisable for the observation of stars.
The field of view is wider so that the object for observation is more easily localized. The highest magnification power should only be used for particularly clear observations of the moon an object that is relatively close and exceptionally bright, so that good detail resolution is achieved at high magnification ratios.
Barlow Lens:
The Barlow lens increases the magnification of the telescope. A 3x Barlow lens will therefore triple the telescope's magnification power. Consequently a 56x magnification can be tri-pled to 168x with a 3x Barlow lens. The highest magnification power of the Barlow lens should only be used for large and bright objects such as the moon and the brightest planets, as well as for nights with optimal observation conditions.
Do not use the Barlow lens and the erecting eyepiece in conjunction with the angle prism as this produces a particularly low resolution level with the result that the image can no longer be sharply focuses. To use the Barlow lens take the angle prism out of the tube. Insert the Barlow lens into the focus tube and then attach the required eyepiece to the Barlow lens, focusing is then completed in the customary manner.
10 11
www.barska.com
VERY IMPORTANT GENERAL REMARKS
CAUTION
TO AVOID EYE DAMAGE NEVER LOOK THROUGH THE TELESCOPE INTO ANOTHER OPTICAL INSTRUMENT, INTO THE SUN OR A LIGHT SOURCE. NEVER LEAVE THE TELESCOPE UNATTENDED, A CHILD COULD LOOK AT THE SUN WITH IT AND SUFFER PERMANENT EYE DAMAGE.
Avoid sudden temperature fluctuations as the moisture in the air will condense on the objective lens. Should this happen, then place the objective lens not too close to a source of heat and allow the moisture to evaporate slowly.
When mounting the parts ensure that the securing screws are not tightened too firmly. This could damage the parts or the internal thread of the holders with the result that the screws can no longer be tightened.
www.barska.com