AX11652 - Safe Barska - Free user manual and instructions
Find the device manual for free AX11652 Barska in PDF.


| Product Type | Safe |
| Brand | Barska |
| Model | AX11652 |
| Lock Type | Electronic digital keypad |
| Override Access | Emergency backup key included |
| Material | Heavy-duty steel construction |
| Color | Black |
| Exterior Dimensions (HxWxD) | 9.8 x 7.5 x 7.5 inches |
| Interior Dimensions (HxWxD) | 9.0 x 6.8 x 6.8 inches |
| Weight | 12.5 lbs (5.7 kg) |
| Power Source | 4 x AA batteries (not included) |
| Battery Life | Approximately 1 year |
| Low Battery Indicator | Red LED warning light |
| Mounting Options | Pre-drilled holes for floor or wall mounting |
| Locking Bolts | 2 live-door locking bolts |
| Door Thickness | 0.08 inches (2 mm) |
| Body Thickness | 0.06 inches (1.5 mm) |
| Interior | Carpeted floor |
| Warranty | 1 year limited warranty |
Frequently Asked Questions - AX11652 Barska
User questions about AX11652 Barska
0 question about this device. Answer the ones you know or ask your own.
Ask a new question about this device
Download the instructions for your Safe in PDF format for free! Find your manual AX11652 - Barska and take your electronic device back in hand. On this page are published all the documents necessary for the use of your device. AX11652 by Barska.
USER MANUAL AX11652 Barska
User's Manual for Biometric Safe
Read all instructions before using this safe.
WARNING
- New Safe is in either Pre-registered mode or Factory Default mode; ANY fingerprint can open the safe. Only a successfully registered Fingerprint(s) can terminate Factory Default mode.
- Register at least two different fingerprints and test a few times before closing the safe door.
- Test with a non-registered fingerprint. If the safe opens, the safe is still in Factory Default mode.
- Avoid leaving safe door open and unattended; it will allow unauthorized individuals to add their fingerprints and/or reprogram the safe, gaining full access to the safe and the contents.
- Test the Emergency Keys and store them in a secure place, NOT inside of the safe.
- To maximize the security and performance of the safe, test registered fingerprints every 6 months.
- Initialization button cover must be restored after every use.
- If user resets the safe to Factory Default mode: ANY fingerprint can open the safe.
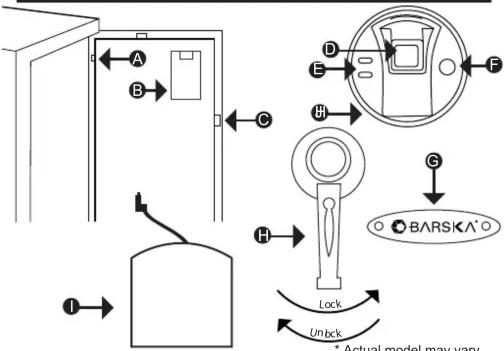
A. Initialization Button
B. Battery Compartment
C. Bolts
D. Fingerprint Scanner
E. Indicator Lights
F. Wake-Up Button
G. Logo Plate and Emergency Key Access
H. Handle
I. External Battery Pack
J. External Battery Access
GETTING STARTED
- Remove Emergency Keys from accessory package
- To expose the Emergency Key access, remove Logo Plate (G) screws with provided tool
- Insert Emergency Key into key access, push and turn counter-clockwise
- Turn Handle (H) clockwise to open the safe
- Continue with INSTALL BATTERIES
INSTALL BATTERIES
- Remove Battery Compartment (B) cover
- Insert 4 AA batteries and restore battery cover
- Continue with FINGERPRITN REGISTRATION
FINGERPRINT REGISTRATION
IMPORTANT: The safe is in either Pre-registered mode or Factory Default mode, test safe to determine factory settings below
Pre-registered mode: Safe can NOT be opened with any fingerprint(s)
Factory Default mode: Safe can be opened with ANY fingerprint(s)
-
With the safe door open, press and release Initialization Button (A)
-
Immediately place a finger on the Fingerprint Scanner (D) - Hold finger still
- 1 beep will be heard recognizing the fingerprint; followed by
2 consecutive beeps - Remove finger
- Registration is complete
Successful Registration
Registration is successful when a total of 3 beeps are heard
Unsuccessful Registration
2 short beeps will be heard; repeat registration process again
3. To register another fingerprint - repeat steps 1 - 2
4. Continue with TEST (NON) REGISTERED FINGERPRINTS
TEST (NON) REGISTERED FINGERPRINTS
- Test multiple Non-Registered fingerprints
Close safe door, turn Handle (H) counter-clockwise to lock the safe
- Press and release Wake-Up Button (F)
- Place a non-registered finger on the Fingerprint Scanner (D)
- Turn Handle (H) clockwise, the door should not open
- If the door opens with a non-registered fingerprint, registration was unsuccessful; the safe is still in Factory Default mode
-
Repeat steps under FINGERPRINT REGISTRATION, and test multiple non-registered fingerprints
-
Test a Registered fingerprint
-
With door closed, press and release Wake-Up Button (F)
- Place a registered finger on the Fingerprint Scanner (D)
- Turn Handle (H) clockwise, the door should open
- Registration was successful, if it only opened with registered fingerprint(s)
CLOSE/OPEN SAFE DOOR
CLOSE: Close safe door, turn Handle (H) counter-clockwise to lock the safe
OPEN: Press and release Wake-Up Button (F)
- Place a registered finger on Fingerprint Scanner (D)
- Turn Handle (H) clockwise to open the safe
BEEP SOUND OPTIONS
Beep OFF: Press and HOLD the Initialization Button (A) (20 - 30 seconds) until the Indicator Lights (E) flash green once
- RELEASE the Initialization Button
Beep ON: Press and HOLD the Initialization Button (A) (20 - 30 seconds) until the Indicator Lights (E) flash green, followed by 1 beep
- RELEASE the Initialization Button
OPEN SAFE WITH EMERGENCY KEY
- To expose the Emergency Key access, remove Logo Plate (G) screws with provided tool
- Insert Emergency Key into key access, push and turn key counter-clockwise, and turn Handle (H) clockwise to open the safe
NOTE: Store Emergency Keys in a secure place, NOT inside of the safe
OPEN SAFE WITH EXTERNAL BATTERY PACK
Use this option when internal batteries are low
- Insert 4 AA batteries into External Battery Pack (I)
- Plug into External Battery Access (J)
See reverse side for more information
10/12
BC266
-
Press and release Wake-Up Button (F)
-
Place a registered finger on Fingerprint Scanner (D)
- Turn Handle (H) clockwise to open the safe
DELETE ALL STORED FINGERPRINTS / RESET TO FACTORY DEFAULT MODE
- Open safe, remove Battery Compartment (B) cover and all 4 AA batteries
- Press and release Wake-Up Button (F) a few times until no beeps are heard
- Press and HOLD the Initialization Button (A)
- Re-insert batteries; on the 4th battery you will hear 1 beep, followed by 2 consecutive beeps indicating safe is in Factory Default mode
- RELEASE Initialization Button (A)
- Repeat steps 1-3 if a total of 3 beeps are not heard
- Restore Battery Compartment (B) cover
- All fingerprints stored in the safe have been deleted
NOTE: The safe is in Factory Default mode, ANY fingerprint can open the safe
- Continue with FINGERPRINT REGISTRATION and TEST (NON) REGISTERED FINGERPRINTS
LOW BATTERY WARNING
- When the door is closed and 3 repetitive beeps are heard, and Indicator Lights (E) flash red, it indicates the batteries are low
- Replace batteries immediately
- Open safe, remove Battery Compartment (B) cover and all 4 AA batteries
- Insert 4 new AA batteries and restore Battery Compartment (B) cover
NOTE: All registered fingerprints remain stored
CARE AND MAINTENANCE
- To maximize the security and performance of the safe, keep Fingerprint Scanner (D) clean; use a dry cloth to remove any smudges or prints off the Fingerprint Scanner after each use
- Test registered fingerprints every 6 months
-
Keep liquids away from the control panel. Spills on the control panel will cause damage and possibly electric shock
-
Secure safe in a proper area to prevent from falling and causing damage or injury
- DO NOT disassemble the product. For all repairs, contact BARSKA Customer Service
- DO NOT use chemicals or cleaning agents to clean the safe
MOUNTING INSTRUCTIONS
The safe may be mounted to a wall or floor. Be aware of the load bearing. Failure to do so can result in personal injury and/or damage to property. Use appropriate tools when performing work and always use eye protection
Wall Mounting
Do not mount the safe without anchoring to the wall
- Find the studs in the wall, at your desired location. Most studs are 16 inches or 24 inches apart
- Check the wall for concealed wires or pipes
- Measure the location of the pre-set drill holes; mark their exact position onto the wall ensuring that the studs or anything else behind will not interfere
- Drill the appropriate size holes for the anchors you are using
- Carefully press the anchor into the holes at this time
- Mount the safe by running screws from inside of the safe and securing to anchors; ensure the safe is mounted securely
Floor Mounting
- Use proper drill tools depending on the type of floor you are mounting the safe (wood, tile, or concrete)
- Measure the location of the pre-set drill holes; mark their exact position onto the floor
- Drill the appropriate size holes for the anchors you are using
- Carefully press the anchor into the holes at this time
- Mount the safe by running screws from inside of the safe and securing to anchors; ensure the safe is mounted securely

natural_image
Simple 3D diagram of a rectangular block with mounting holes, no text or symbols present* Actual model may vary

BARSKA®
1 YEAR LIMITED WARRANTY
Biometric Safe
BARSKA warrants this new safe to be free of original defects in material and/or workmanship under normal use for a period of twelve (12) months from the date product is received by purchaser. This warranty does not include damage caused by improper installation or maintenance. Damage from misuse, abuse, accident (such as dropping), normal wear and tear, fire, flood, or acts of nature. Damage from service or repairs other than those performed by BARSKA. Labor, cost and shipping charges for the removal and replacement of defective parts beyond the initial twelve-month warranty period. All transportation and shipping charges. Removing or altering the seal under any circumstances will automatically void the warranty.
This warranty is limited to original purchaser and is not transferable. This warranty applies only to products purchased in the United States.
Please email info@barska.com or call 1.888.666.6769 for Return Merchandise Number (RMA#) before any returns. The RMA number must appear on the outside of the shipping package. Product must be packed carefully and sturdily in its original packaging to prevent damage in transit and returned freight pre-paid to:
BARKA OPTICS
Repair Department
1721 Wright Avenue
La Verne, CA 91750
Please include all of the following when returning BARSKA products for service and/or replacement:
- Please write your complete details (Name, Address, Telephone #, E-mail address, RMA#, etc.)
- Purchase receipt or Proof of Purchase. (Original/Copy)
- A brief explanation of the defect.
- A Check/Money Order of \$60.00 to cover inspection, shipping and handling.
*Please allow 6-8 weeks for delivery.
BARSKA will examine and test returned product and repair or replace defective part(s) or units with new part(s) or a new unit if necessary within the warranty period. Purchaser is required to remit \$60.00 to BARSKA for return shipping and handling at time product is returned. If repair is required after warranty period expiration, purchaser will be charged for replacement parts and return shipping.
BARSKA® Optics shall not be liable for any consequential, incidental and/or contingent damages whatsoever. We will not pay shipping, insurance or transportation charges from you to us, or any import fees, duties and or taxes. This warranty supersedes all previous BARSKA® Optics warranties.
© 2012 BARSKA®
1721 Wright Ave | La Verne, CA 91750 | USA
BC240 9/12 (t) 888.666.6769 | (f) 909.445.8169 | www.barska.com
- User's Manual for Biometric Safe
- Read all instructions before using this safe.
- WARNING
- GETTING STARTED
- INSTALL BATTERIES
- FINGERPRINT REGISTRATION
- TEST (NON) REGISTERED FINGERPRINTS
- CLOSE/OPEN SAFE DOOR
- BEEP SOUND OPTIONS
- OPEN SAFE WITH EMERGENCY KEY
- OPEN SAFE WITH EXTERNAL BATTERY PACK
- DELETE ALL STORED FINGERPRINTS / RESET TO FACTORY DEFAULT MODE
- LOW BATTERY WARNING
- CARE AND MAINTENANCE
- MOUNTING INSTRUCTIONS
- Wall Mounting
- Floor Mounting
- YEAR LIMITED WARRANTY
- Biometric Safe
Brand : Barska
Model : AX11652
Category : Safe