DR-BT101iK - Headphones SONY - Free user manual and instructions
Find the device manual for free DR-BT101iK SONY in PDF.

User questions about DR-BT101iK SONY
0 question about this device. Answer the ones you know or ask your own.
Ask a new question about this device
Download the instructions for your Headphones in PDF format for free! Find your manual DR-BT101iK - SONY and take your electronic device back in hand. On this page are published all the documents necessary for the use of your device. DR-BT101iK by SONY.
USER MANUAL DR-BT101iK SONY
Wireless Stereo Headset
Operating Instructions US
To reduce the risk of fire or electric shock, do not expose this apparatus to rain or moisture.
To reduce the risk of electrical shock, do not open the cabinet. Refer servicing to qualified personnel only.
Do not install the appliance in a confined space, such as a bookcase or built-in cabinet.
Do not expose the batteries (battery pack or batteries installed) to excessive heat such as sunshine, fire or the like for a long time.
Excessive sound pressure from earphones and headphones can cause hearing loss.
The Bluetooth word mark and logos are owned by the Bluetooth SIG, Inc. and any use of such marks by Sony Corporation is under license.
Microsoft, Windows and Windows Vista are registered trademarks or trademarks of Microsoft Corporation in the United States and/or other countries.
iPod, Macintosh and Mac OS are trademarks of Apple, Inc., registered in the U.S. and other countries.
MPEG Layer-3 audio coding technology and patents licensed from Fraunhofer IIS and Thomson.
Other trademarks and trade names are those of their respective owners.
Owner's Record
For the Bluetooth headset, the model number is located on the surface of the right housing and the left rear side rails of the headband. You can check the serial number at the left by detaching the earpad.
For the Bluetooth transmitter, the model number and the serial number
are located on the rear of the transmitter. Record these numbers in the spaces provided below. Refer to them whenever you call upon your Sony dealer regarding this product.
Model No. DR-BT101
Serial No. ____
Model No. TMR-BT8iP
Serial No. ____
Information
If you have any questions about this product, you may call:
Sony Customer Information Service Center
1-800-222-7669 or
http://www.sony.com/
Declaration of Conformity
Trade Name: SONY
Model No.: DR-BT101
Responsible Party: Sony Electronics Inc.
Address: 16530 Via
Esprillo, San
Diego, CA 92127
USA
Telephone No.: 858-942-2230
This device complies with Part 15 of the FCC Rules. Operation is subject to the following two conditions: (1) this device may not cause harmful interference, and (2) this device must accept any interference received, including interference that may cause undesired operation.
This device complies with Part 15 of FCC Rules and RSS-Gen of IC Rules. Operation is subject to the following two conditions: (1) this device may not cause harmful interference, and (2) this device must accept any interference received, including interference that may cause undesired operation of this device.
You are cautioned that any changes or modifications not expressly approved in this manual could void your authority to operate this equipment.
This equipment must not be co-located or operated in conjunction with any other antenna or transmitter.
This equipment complies with FCC/IC radiation exposure limits set forth for uncontrolled equipment and meets the FCC radio frequency (RF) Exposure Guidelines in Supplement C to OET65 and RSS-102 of the IC radio frequency (RF) Exposure rules. This equipment has very low levels of RF energy that it is deemed to comply without testing of specific absorption ratio (SAR).
Note
This equipment has been tested and found to comply with the limits for a Class B digital device, pursuant to Part 15 of the FCC Rules. These limits are designed to provide reasonable protection against harmful interference in a residential installation. This equipment generates, uses and can radiate radio frequency energy and, if not installed and used in accordance with the instructions, may cause harmful interference to radio or television reception, which can be determined by turning the equipment off and on, the user is encouraged to try to correct the interference by one or more of the following measures:
- Reorient or relocate the receiving antenna.
- Increase the separation between the equipment and receiver.
- Connect the equipment into an outlet on a circuit different from that to which the receiver is connected.
- Consult the dealer or an experienced radio/TV technician for help.
RECYCLING LITHIUM-ION BATTERIES
Lithium-Ion batteries are recyclable.
You can help preserve our environment by returning your used rechargeable batteries to the collection and recycling location nearest you.
For more information regarding recycling of rechargeable batteries, call toll free 1-800-822-8837, or visit http://www.rbrc.org/
Caution: Do not handle damaged or leaking Lithium-Ion batteries.

text_image
RECYCLE RBRC Li-Ion 7.800.822.8837Informations
Compatible iPod models
The compatible iPod models are as follows. Update your iPod to use the latest software before you use it.

iPod touch
2nd generation

iPod nano
4th generation
(video)
iPod touch
iPod nano
3rd generation
(video)
iPod classic

iPod nano
2nd generation
(aluminum)

iPod 5th
generation (video)

iPod nano
1st generation

iPod 4th generation (color display)

iPod 4th generation

iPod mini
Notes
- This Bluetooth transmitter is designed for iPod only. You cannot connect any other portable audio players.
- Sony cannot accept responsibility in the event that data recorded to iPod is lost or damaged when using an iPod connected to this Bluetooth transmitter.
Table of Contents
WARNING 2
What is Bluetooth wireless technology? 6
Welcome! 7
Getting Started
Checking supplied items .....8
Location and Function of Parts 9
Bluetooth headset 9
Bluetooth transmitter .....10
Basic use of headset ......11
Charging the headset ......11
Wearing 14
Connecting to an iPod ......15
Operating
Listening to music of the iPod ....17
Controlling an iPod with the headset ....19
Indications of the transmitter ....21
Indications of the headset .....22
Advanced operation
Pairing with other Bluetooth devices ....23
What is pairing? 23
Pairing transmitter with other Bluetooth receiving devices ...24
Pairing headset with other Bluetooth transmitting devices ....27
Re-pairing the transmitter and the headset 29
Calling with headset ......31
Preparation for calling (Bluetooth connection) ....31
To receive a call....33
To call 33
To terminate a call ......33
Controlling the Bluetooth mobile phone – HFP, HSP......34
Calling while playing back music ....35
Additional Information
Precautions ......36
Troubleshooting ....39
Initializing 42
Initializing the transmitter .....42
Initializing the headset .....42
Specifications ......43
General 43
Transmitter 43
Headset 44
System requirements for battery charge using USB ....45
What is Bluetooth wireless technology?
Bluetooth ^® wireless technology is a short-range wireless technology that enables wireless data communication between digital devices, such as a computer or digital camera. Bluetooth wireless technology operates within a range of about 10 meters (about 30 feet).
Connecting two devices as necessary is common, but some devices can be connected to multiple devices at the same time. You do not need to use a cable for connection, nor is it necessary for the devices to face one another, such is the case with infrared technology. For example, you can use such a device in a bag or pocket.
Bluetooth standard is an international standard supported by thousands of companies all over the world, and employed by various companies worldwide.
Communication System and Compatible Bluetooth Profiles of this product
Profile is standardization of the function for each Bluetooth device specification. This product supports the following Bluetooth version and profiles:
Communication System :
Transmitter: Bluetooth Specification version 2.0 + EDR ^*1
Headset: Bluetooth Specification version 2.1 + EDR ^*1
Compatible Bluetooth Profiles:
- A2DP (Advanced Audio Distribution Profile)
- AVRCP (Audio/Video Remote Control Profile)
(The following two profiles are headset only.) - HSP (Headset Profile) ^*2 : Talking on the phone/Operating the phone.
- HFP (Hands-free Profile) ^*2 : Talking on the phone/Operating the phone by hands-free.
^*1 Enhanced Data Rate
*2 When you use a Bluetooth mobile phone supported by both HFP (Hands-free Profile) and HSP (Headset Profile), set to HFP.
Notes
- To be able to use theBluetooth function, the Bluetooth device to be connected requires the same profile as this product's.
Note also that even if the same profile exists, devices may vary in function depending on their specifications.
- Due to the characteristic of Bluetooth wireless technology, the sound played on this product is slightly delayed from the sound played on the Bluetooth device during listening to the music or talking on the telephone.
Welcome!
This product is an audio kit comprising of a transmitter and headset using Bluetooth wireless technology.
You can enjoy music wirelessly by transmitting the audio signals to a headset by connecting the Bluetooth transmitter to iPod (see page 4 for compatible iPod models) with the iPod connector* (30 pin).
* iPod connector is a dedicated multiple connector for connecting accessories to your iPod.
This product's features are as follows:
- Wireless headset and transmitter for streaming of high-quality stereo music from iPod.
• Transmits music to headset using Bluetooth wireless technology. - Headset and transmitter have been pre-paired for easy connection and use.
• Comfortable and lightweight headset ideal for music listening. - Basic remote control operation (play, pause, etc.) of iPod functions by included headset via Bluetooth connection.
- Transmitter power supplied from iPod so no additional battery or charging is needed (for transmitter only).
- USB rechargeable function (for headset only).
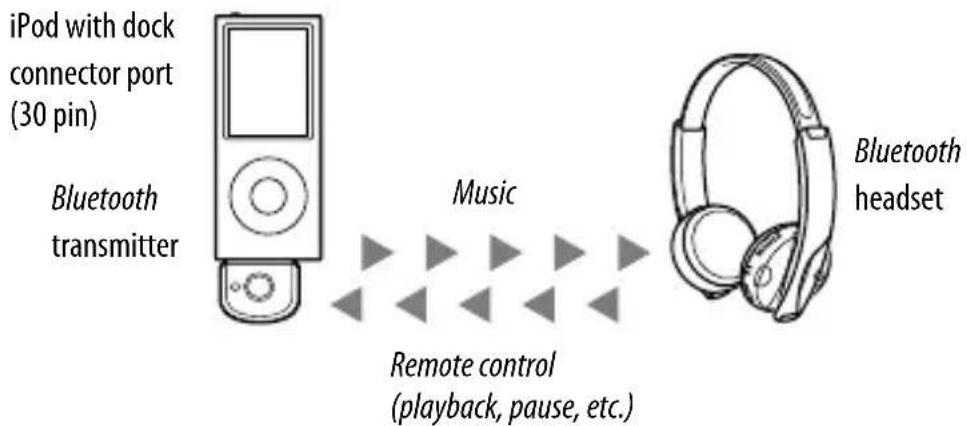
flowchart
graph LR
    A["iPod with dock connector port (30 pin)"] --> B["Bluetooth transmitter"]
    B --> C["Music"]
    C --> D["Remote control ( playback, pause, etc. )"]
    D --> E["Bluetooth headset"]

Tip
For details on Bluetooth wireless technology, see page 6.
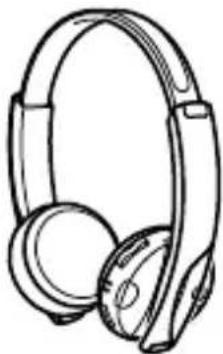
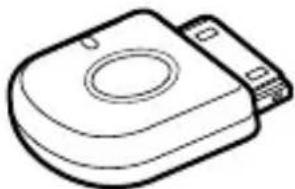
Checking supplied items
- Bluetooth headset DR-BT101 (1)
natural_image
Line drawing of a pair of耳机 earbuds (no text or symbols)- Bluetooth transmitter TMR-BT8iP (1)
natural_image
Line drawing of a mechanical device with a circular top and rectangular base (no text or symbols)- USB (ψ) cable (1)
- Operating Instructions (this book) (1)
- Warranty Card (1)
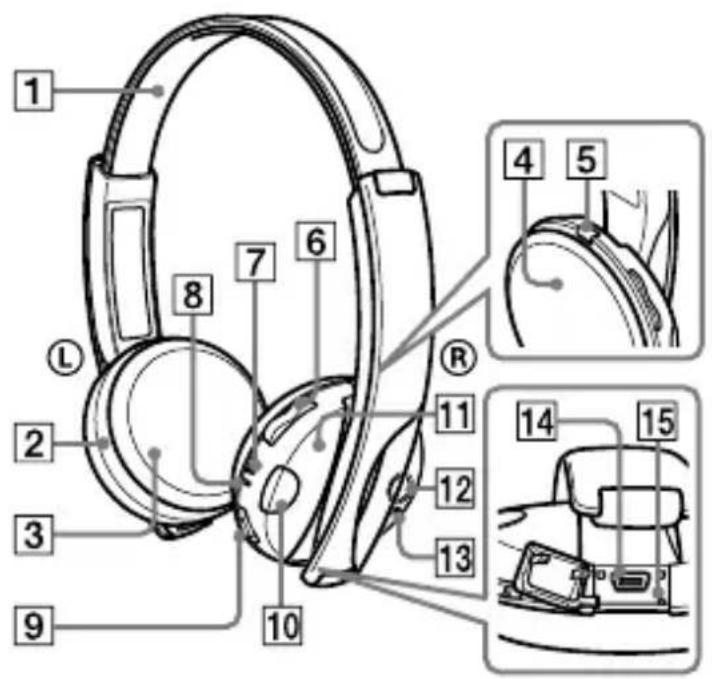
Location and Function of Parts
Bluetooth headset
text_image
1 2 3 9 L 7 6 8 10 11 12 13 14 15 4 51 Headband
2 Left (L) unit
3 Left earpad
4 Right earpad
5 PAIRING button
6 VOL (volume) +*/- buttons
7 Indicator (blue)
Indicates the communication status of the unit.
8 Indicator (red)
Indicates the power status of the unit.
9 Jog switch
Controls various functions when listening to music.
10 Multi function button
Controls various call functions.
11 Right (®) unit
12 POWER button
13 Microphone
14 USB(ψ) jack
15 RESET button
* This button has a tactile dot.
Bluetooth transmitter
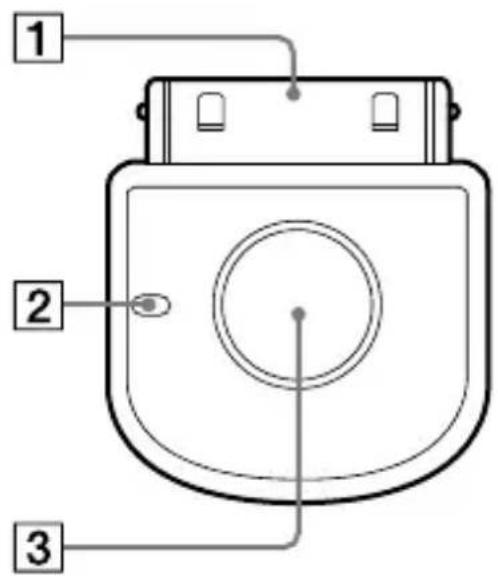
text_image
1 2 31 iPod connector (30 pin)
Connects to the dock connector of an iPod (page 15).
2 Transmitter indicator
Indicates the transmitter's status (page 21).
3 Power button
Performs the following:
- Turning on/off of the transmitter (page 15).
- Pairing (page 23).
- Initializing the transmitter (page 42).
Hereafter, “Bluetooth headset” is abbreviated as “headset,” and “Bluetooth transmitter” as “transmitter.”
Basic use of headset
Charging the headset
The headset contains a rechargeable Lithium-Ion battery, which should be charged before using for the first time.
1 Open the cover of the USB ( ) jack on the headset.
2 Connect the supplied USB ( ) cable to the jack on the headset, and then connect the other end to a computer.
When connecting, confirm the direction of as in the illustration, and then insert the connector.
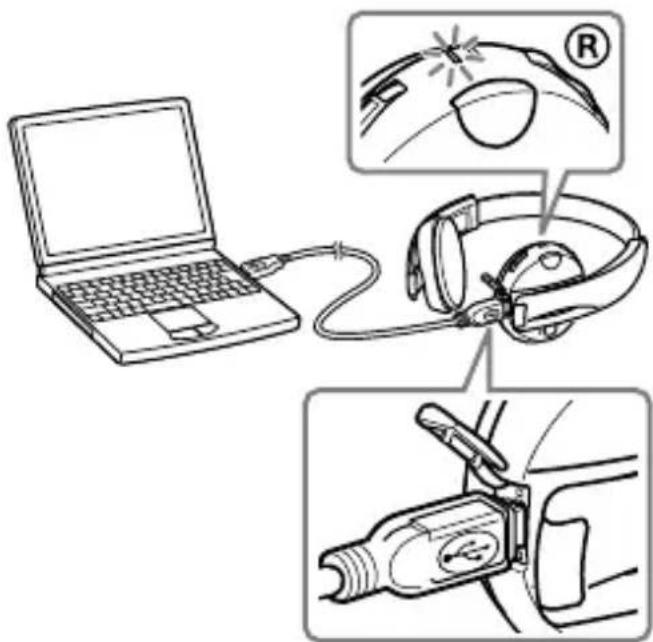
text_image
Diagram illustrating a device connection to a laptop, showing ear protection and charging mechanism with labeled parts.Charging starts when the headset and the computer are connected. Make sure that the headset indicator (red) lights up. Charging is completed in about 4 hours* and the indicator (red) goes off automatically.
* Time required to recharge an empty battery.
Notes
- If this headset is not used for a long time, the headset indicator (red) may not light up when you connect the USB cable to charge this unit. In this case, do not disconnect the USB cable from the headset and wait until the indicator (red) lights up.
- When you close the cover of the USB ( ) jack after charging, push the cover thoroughly until the tab is fully inserted.
- For system requirements for a personal computer that can charge the battery using USB, see “Specifications” (page 45).

Tips
- If the USB cable is connected to a computer while the unit is turned on, the headset will be turned off automatically.
- To charge the headset from an AC outlet, use USB charging AC Power Adaptor AC-U50AD (sold separately ^* ). For details, refer to the manuals supplied with the USB charging AC Power Adaptor.
- This headset cannot be turned on while charging.
* The above optional accessory is not provided in some areas.
Caution
If the headset detects a problem while charging, the headset indicator (red) may turn off, although charging is not complete.
Check for the following causes:
- Ambient temperature exceeds the range of 0^ - 40^ (32°F - 104°F).
- There is a problem with the battery.
In this case, charge again within the above-mentioned temperature range.
If the problem persists, consult your nearest Sony dealer.
Notes
- If the battery is not used for a long time, battery may be quickly depleted, however, after a few recharges, battery life will improve.
- If the life of the built-in rechargeable battery drops to half the normal length, the battery should be replaced. Consult your nearest Sony dealer for replacement of the rechargeable battery.
- Avoid exposure to temperature extremes, direct sunlight, moisture, sand, dust or mechanical shock. Never leave in a car parked in the sun.
- Use only the supplied USB cable. Do not use any other USB cable.
- If the computer enters into hibernation mode while connected to the unit, charging will not be completed properly. Check the setting of the computer before charging. The headset indicator (red) will go off automatically even if the computer enters into hibernation mode. Charge the unit again in this case.
- Use the supplied USB cable only, and connect directly to a computer. Charging will not be completed properly by an indirect connection, such as via a USB hub.
Battery usage hours\*
Status Approx. usage hours
Communication time (including music playback 13 hours time) (up to)
Standby time (up to) 200 hours
* Time stated above may vary, depending on ambient temperature or conditions of use.
Checking the remaining battery
When pressing the POWER button while the headset is turned on, the headset indicator (red) flashes. You can check the remaining battery by the number of times the headset indicator (red) flashes.
| Headset Indicator (red) | Status |
| 3 times Full | |
| 2 times Mid | |
| 1 time Low (needs to charge) |
Note
You cannot check the remaining battery immediately after the headset is turned on, or while pairing.
When the battery is almost empty
The headset indicator (red) flashes slowly automatically.
When the battery becomes empty, a beep sounds and the headset will turn off automatically.
Wearing
1 Extend the headset to adjust the length.
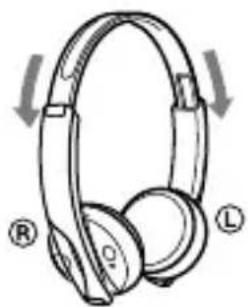
natural_image
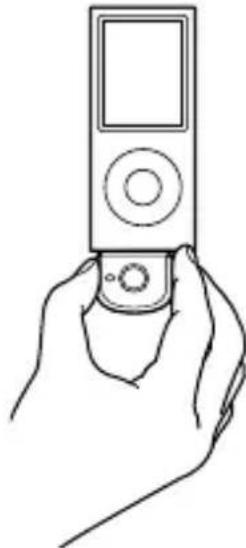
Line drawing of a pair of headphones with labeled buttons (R, L) and directional arrows indicating rotation or adjustment (no text or symbols beyond labels)2 Put the unit marked Ⓛ on your left ear and Ⓗ on your right ear, then place the headband across your head.
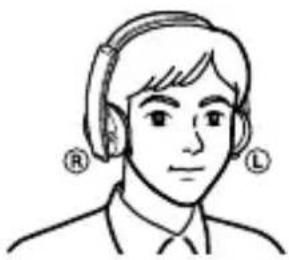
natural_image
Line drawing of a person wearing headphones (no text or symbols)Connecting to an iPod
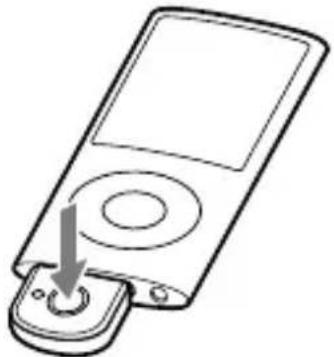
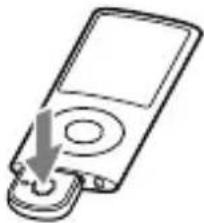
Connect the transmitter to the dock connector port of an iPod (see page 4 for compatible iPod models) firmly.

text_image
Dock connector port (30 pin) Power buttonTo turn on the transmitter
1 Connect the transmitter to the iPod.
2 Press the power button of the transmitter for about 1 second to turn it on, or start to play back on iPod.
When the transmitter turns on, the indicator flashes twice.
Note
If the transmitter cannot turn on, operate the iPod.
To turn off the transmitter
To turn off the transmitter, press and hold the transmitter's power button for about 1 second. The transmitter indicator flashes once and the transmitter turns off.

Tip
Maximum communication time or standby time may vary depending on your iPod.
Notes
- To listen to music from the headphone jack of the iPod, disconnect the transmitter from the iPod.
- While the transmitter is turned on, it consumes power from the iPod. We recommend disconnect the transmitter from iPod when not using the Bluetooth function.
- If the headphone is connected to the iPod while the iPod is playing back, it consumes power from iPod.
- If you turn off the transmitter while the iPod is playing back, iPod will power off.
- It is not recommended to turn off iPod as the linkage will lost between the transmitter and the Bluetooth receiving device.
- There is no need to charge the transmitter as it will receive power from the connected iPod. It is recommended to check the iPod's remaining battery before using.
Listening to music of the iPod
You can listen to music of the iPod (see page 4 for compatible iPod models) on the headset.
1 Press and hold the POWER button on the headset for about 2 seconds.
The headset indicator (blue) and headset indicator (red) flash together twice and the headset is turned on.
2 Connect the transmitter to the iPod then turn on the iPod and start playback on the iPod.
The transmitter indicator status will vary as follows, and the Bluetooth connection between the transmitter and the headset is established.
Transmitter indicator flashes twice: Power is on

Transmitter indicator flashes (at about 1-second intervals):
Connecting in process

Transmitter indicator flashes twice slowly (at about 5-second intervals): Connected (Playback will start automatically)
If the Bluetooth connection is not established within 5 minutes ^* , the transmitter automatically turns itself off. In this case, turn it on again by pressing and holding the power button on the transmitter for about 1 second.
* iPod backlight may turn on in this 5 minutes.
Notes
- If the Bluetooth connection cannot be established with the headset paired already, try pairing again (page 29).
- If playback cannot start automatically, try start playback on iPod.
- If you press and hold the power button on the transmitter for about 1 second, the transmitter will connect to the iPod and start playback automatically.
-
Even if you control the volume on the iPod, sound from the headset will not change.
-
If the transmitter and the headset become out of range and the Bluetooth connection terminates, repeat the procedure from step 1.
- Playback through a Bluetooth connection may cause noise, sound break, or playback speed change depending on the location and the usage (page 36).

You can control the volume on the headset. (The volume of the iPod is not changed.) You can also fast-forward or fast-rewind while playing back (page 19).
Controlling an iPod with the headset
You can control an iPod (see page 4 for compatible iPod models) using the control button of the headset.
Before starting remote control operation, check that step 1 and 2 of "Listening to music of the iPod" are completed (page 17).
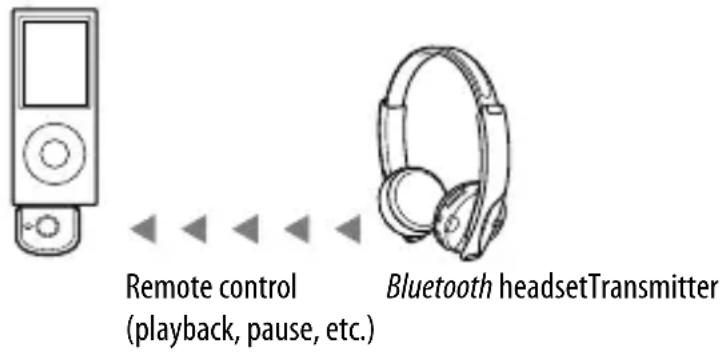
text_image
Remote control ( playback, pause, etc. ) Bluetooth headsetTransmitterControl for the iPod
You can playback or pause the iPod by pressing the ▶■ button on the headset.
You can turn off the iPod and transmitter by pressing and holding the ▶■ button on the headset for more than 2 seconds.
Control music
You can skip forward or backward each song on the iPod by pressing the ◀◀◀/▶▶▶ button. You can also fast-forward or fast-rewind songs by holding down the ◀◀◀/▶▶▶ button.
Notes
- Even if you control the volume on the iPod, the volume of the headset does not change.
- When operating the iPod by remote control, do not cover the transmitter with your hands, etc.
- You may need to press the play/pause button twice depending on theBluetooth receiving device.
- You may need to press the play/pause button of the Bluetooth receiving device twice when you operate the button on the iPod.
- Operation of the iPod with the transmitter by the Bluetooth receiving device will vary depending on the Bluetooth receiving device's specification.
- When the iPod is playing a video or photo, remote control operation may become unstable.

Tip
When you press the pause button on the Bluetooth receiving device, the iPod goes to pause mode for 10 minutes and the iPod backlight is turns on and off at interval.
natural_image
Line drawing of a hand holding a flip phone (no text or symbols)Do not cover the transmitter with hands.
Indications of the transmitter
| Status Indicator | |
| Power on | Flashes twice |
| Power off | Flashes once |
| Pairing | Flashes quickly |
| Connecting | Flashes (at about 1-second intervals) |
| Connected | Listening*1 (flashes twice at about 5-second intervals) |
| With no music*2 (flashes once at about 5-second intervals) | |
*1 When press ▶II on the iPod, the music pause. The indicator flashes twice on the transmitter. The transmitter transmit the data of no sound.
*2 When press the pause button on the Bluetooth receiving device, the music pause. The indicator flashes once on the transmitter. The transmitter does not transmit the music.
Indications of the headset
B : Headset indicator (blue)
R : Headset indicator (red)
| Status Indicator | ||
| Pairing | Searching | B ●- ●- ●- ●- ●- ●- ●- ●- ...R ●- ●- ●- ●- ●- ●- ●- ... |
| Connecting | Connectable | B ●- - ●- - ●- - ●- - ●- - ●- ...R - |
| Connecting | B ●- - ●- - ●- - ●- - ●- - ●- ...R ●- - ●- - ●- - ●- - ●- ... | |
| Connected | HFP/HSP or A2DP(Standby for receivingaudio signal) | B ●- - - - - - - ●- - - - - ...R - |
| HFP/HSP andA2DP(Standby for receivingaudio signal) | B ●- ●- - - - - - ●- ●- - - - ...R - | |
| Music | Listening | B ●●- - - - - - ●●- - - - - ...R - |
| Listening duringstandby fortelephone call | B ●●●- - - - - - ●●●- - - - ...R - | |
| Phone | Incoming call | B ●●●●●●...R - |
| Talking | B ●●- - - - - - ●●- - - - - ...R - | |
| Calling whileplaying back music | B ●●●- - - - - - ●●●- - - - ...R - | |
Pairing with other Bluetooth devices
What is pairing?
Bluetooth devices need to be “paired” with each other beforehand.
Once Bluetooth devices are paired, there is no need for pairing again, except in the following cases:
- Pairing information is deleted after repair, etc.
- This product is paired with 9 or more receiving devices.
This product can be paired with up to 8 Bluetooth device respectively. If a new device is paired after 8 devices have been paired, the device whose latest connection time is the oldest among the 8 paired devices is replaced by the new one.
• This product is initialized.
All pairing information is deleted (page 42).
Pairing transmitter with other Bluetooth receiving devices
1 Turn on the power of iPod.
(Make sure the iPod is in pause mode.)
2 Connect the transmitter to the iPod (page 15).
3 Place the transmitter and the Bluetooth receiving device to be paired together within 1 m (3 ft).
4 Set the Bluetooth receiving device to enter "pairing mode."
See the operating instructions supplied with the Bluetooth receiving device.
Notes
- Passcode* of the transmitter is fixed at “0000,” “1234,” or “8888.”
Depending on the Bluetooth receiving device, it may be necessary to input the passcode (in this case, “0000,” “1234,” or “8888”). The transmitter cannot be paired with a Bluetooth receiving device whose passcode is not “0000,” “1234,” or “8888.” - If the Bluetooth receiving device requires a passcode, input "0000."
* Passcode may be called “Passkey” “PIN code,” “PIN number,” or “Password.”
5 Press and hold the power button of the transmitter for about 7 seconds or more to enter "pairing mode."
After about 1 second, the transmitter indicator will flash twice, but keep pressing the power button.
Notes
- When first power on the transmitter after initialized, the transmitter will enter “pairing mode” automatically.
- The pairing information is initialized if you press and hold the power button for 15 seconds. The transmitter indicator lights up for 5 seconds before the initialization starts. Release the button immediately when the transmitter indicator lights up.
natural_image
Line drawing of a mobile phone with a scroll wheel and a button, showing no text or symbolsWhen the transmitter indicator flashes quickly, stop pressing.
The transmitter enters "pairing mode."
The transmitter indicator status will vary as follows, and pairing is established with the Bluetooth receiving device.
The transmitter indicator flashes quickly: pairing mode

The transmitter indicator flashes (at about 1-second intervals) when responding to the Bluetooth receiving device: Connectable (Pairing successful)

The transmitter indicator flashes (at about 5-second intervals): Connected
Notes
- “Pairing mode” of the transmitter is released after about 5 minutes. If pairing is not established within about 5 minutes, repeat the above procedure from step 4. iPod backlight may turn on in this 5 minutes.
- To enter “pairing mode,” you need to turn off the power of the transmitter first.
When not completed pairing
Repeat the procedure from step 2.
To quit "pairing mode"
Press and hold the power button of the transmitter for about 1 second to turn off the transmitter.

Tip
When pairing the transmitter with a number of Bluetooth receiving devices, repeat steps 3 to 5 for each device individually.
Note
For using the Bluetooth function, it is required that the Bluetooth device on the other side is corresponding with the same profile as the transmitter. However, even if it is corresponding with the same profile, functions may differ depending on the specification of the Bluetooth device.
Pairing headset with other Bluetooth transmitting devices
1 Place the Bluetooth transmitting device to be paired together within 1 m (3 ft) of the headset.
2 Press and hold the PAIRING button for 2 seconds or more to enter standby for pairing while the headset is turned off.
The headset indicators (blue and red) flash together and the headset enters into pairing mode.
natural_image
Diagram of a mechanical joint or seal assembly with no visible text or symbols3 Turning Bluetooth transmitting device to pairing standby mode.
See the operating instructions supplied with the Bluetooth transmitting device.
The list of detected devices appears on the display of the Bluetooth transmitting device.
The headset is displayed as "DR-BT101."
This headset indicator status will vary as follows, and pairing is established with the Bluetooth transmitting device.
The headset indicators (blue and red) flash quickly: pairing mode

The headset indicator (blue) flashes (at about 1-second intervals) when responding to the Bluetooth transmitting device: Connectable (Pairing successful)

The headset indicator (blue) flashes (at about 5-second intervals): Connected
Note
Passcode* of the headset is fixed at “0000.” Depending on the Bluetooth receiving device, it may be necessary to input the passcode (in this case, “0000”). The headset cannot be paired with a Bluetooth receiving device whose passcode is not “0000.”
* Passcode may be called “Passkey,” “PIN code,” “PIN number,” or “Password.”
When not completed pairing
Repeat the procedure from step2.
To quit "pairing mode"
Press and hold the POWER button of the headset for about 2 seconds to turn off the headset.
Note
For using the Bluetooth function, it is required that the Bluetooth device on the other side is corresponding with the same profile as the headset. However, even if it is corresponding with the same profile, the function may differ depending on the specification of the Bluetooth device.
Re-pairing the transmitter and the headset
1 Turn on the power of iPod.
(Make sure the iPod is in pause mode.)
2 Connect the transmitter to the iPod (page 15).
3 Place the transmitter and the headset to be paired together within 1 m (3 ft).
4 Press and hold the PAIRING button for 2 seconds or more to enter standby for pairing while the headset is turned off.
The headset indicators (blue and red) flash together and the headset enters into pairing mode.
natural_image
Diagram of a mechanical joint or seal assembly with no visible text or symbols5 Press and hold the power button of the transmitter for about 7 seconds or more to enter "pairing mode."
After about 1 second, the transmitter indicator will flash twice, but keep pressing the power button.
natural_image
Line drawing of a vintage-style electronic device with a scroll wheel and a button, showing a downward arrow (no text or symbols)Notes
- When first power on the transmitter after initialized, the transmitter will enter “pairing mode” automatically.
- The pairing information is initialized if you press and hold the power button for 15 seconds. The transmitter indicator lights up for 5 seconds before the initialization starts. Release the button immediately when the transmitter indicator lights up.
- “Pairing mode” is released after about 5 minutes. If pairing is not established within about 5 minutes, repeat the above procedure from step4. iPod backlight may turn on in this 5 minutes.
- To enter “pairing mode,” you need to turn off the power of the transmitter first.
Calling with headset
Preparation for calling (Bluetooth connection)
Check the following before operating the headset.
- The Bluetooth function is active on the mobile phone.
- Pairing of the headset and the Bluetooth mobile phone is complete.

text_image
VOL + VOL - Headset indicator (blue) Headset indicator (red) Multi function button POWER button1 Press and hold the POWER button for about 2 seconds while the headset is turned off.
The headset indicator (blue) and headset indicator (red) flash together twice, the headset turns on and then the headset tries to connect to the last Bluetooth mobile phone that was used.

Tip
The headset will stop trying to connect to the Bluetooth mobile phone after 1 minute. In such a case, press the multi function button to try to connect again.
When the headset does not connect to a Bluetooth mobile phone automatically
You can make a connection by operating Bluetooth mobile phone or by operating the headset to connect the last connected Bluetooth device.
A To make a connection by operating Bluetooth mobile phone
1 Make the Bluetooth connection (HFP or HSP*) from the Bluetooth mobile phone to the headset.
Refer to the manual supplied with your Bluetooth mobile phone for operation details.
The list of recognized devices appears on the display of the Bluetooth mobile phone. The headset is displayed as “DR-BT101.”
When you use the Bluetooth mobile phone features both HFP (Hands-free Profile) and HSP (Headset Profile), set to HFP.
Note
When connecting to a Bluetooth mobile phone which is different from the last connected one, make the connection following the above procedure.
* For details on profiles, see page 6.
B To make a connection with the last connected Bluetooth device by operating the headset.
1 Press the multi function button.
The headset indicator (blue) and headset indicator (red) start flashing at the same time, and the headset performs the connection operation for about 5 seconds.
Note
When listening to music with this headset, a Bluetooth connection cannot be made with the multi function button.
To adjust the volume
Press the VOL + or - button.

Tips
- You cannot adjust the volume when not communicating.
• Volume level for calling and listening to music can be set independently.
Even if you change the volume while playing back the music, the volume of a call does not change.
To receive a call
When an incoming call arrives, a ring tone will be heard from the headset.
1 Press the multi function button on the headset.
The ring tone differs in the following ways, depending on your mobile phone.
- ring tone set on the headset
- ring tone set on the mobile phone
- ring tone set on the mobile phone only for Bluetooth connection
Note
If you received a call by pressing the button on the Bluetooth mobile phone, some Bluetooth mobile phones may have handset use priority. In this case, set to talk with the headset by pressing and holding the multi function button for about 2 seconds, or by operating the Bluetooth mobile phone. For details, refer to the manual supplied with your Bluetooth mobile phone.
To call
1 Use the buttons on your mobile phone when making a call.
If no dial tone is heard on the headset, press and hold the multi function button for about 2 seconds.
Tip
You can call in the following way, depending on the Bluetooth mobile phone. Refer to the manual supplied with your mobile phone on operating details.
- When not communicating, you can call using the voice-dial function by pressing the multi function button.
- You can call the last dialled number by pressing the multi function button for about 2 seconds.
To terminate a call
You can end a call by pressing the multi function button on the headset.
Controlling the Bluetooth mobile phone – HFP, HSP
The operation of the buttons on the headset varies depending on your mobile phone.
HFP (Hands-free Profile) or HSP (Headset Profile) is used for Bluetooth mobile phone. Refer to the operating instructions supplied with your Bluetooth mobile phone on supported Bluetooth profiles or how to operate.
HFP (Hands-free Profile)
| Bluetooth mobile phone Status | Multi function button | |
| Short Press Long Press | ||
| Standby Start Voice | Dial^* 1 | Last number redial |
| Voice Dial active Cancel | Voice Dial^* 1 | — |
| Outgoing call End | outgoing call Change call device | |
| Incoming call Answer | Reject | |
| During call End call | Change call device | |
HSP (Headset Profile)
| Bluetooth mobile phone Status | Multi function button | |
| Short Press Long Press | ||
| Standby — Dial* | 1 | |
| Outgoing call End | outgoing call* 1 | End outgoing call or change call device to headset*2 |
| Incoming call Answer — | ||
| During call End call* | 3 | Change call device to headset |
*1 Some functions may not be supported depending on the Bluetooth mobile phone. Refer to the operating instructions supplied with your mobile phone.
^*2 This may vary, depending on the Bluetooth mobile phone.
*3 Some functions may not be supported when calling using the Bluetooth mobile phone.
Calling while playing back music
The Bluetooth connection using HFP or HSP as well as A2DP is necessary to make a call while playing back music.
For example, to make a call using a Bluetooth mobile phone while listening to music on a Bluetooth compatible music player, the headset needs to be connected to the mobile phone using HFP or HSP.
Make a Bluetooth connection between the headset and the device in use following the procedures outlined below.
1 Make a Bluetooth connection between the headset and the mobile phone in use with HFP or HSP following the procedures outlined in "Calling with headset" (page 31).
2 Make a Bluetooth connection between the transmitter and the headset (page 17).
To make a call while playing back music
1 Press the multi function button while playing back music (page 34), or operate your Bluetooth mobile phone to make a telephone call.
If no dial tone is heard on the headset, press and hold the multi function button for about 2 seconds.
To receive a call while playing back music
When an incoming call arrives, the music pauses and the ring tone is heard from the headset.
1 Press the multi function button and talk.
After finishing the call, press the multi function button. The headset is switched back to music playback.
When no ring tone is heard even if an incoming call arrives
1 Stop music playback.
2 When ringing, press the multi function button and talk.
Precautions
On Bluetooth communication
- Bluetooth wireless technology operates within a range of about 10 meters (about 30 feet).
Maximum communication range may vary depending on obstacles (human body, metal, wall, etc.) or electromagnetic environment.
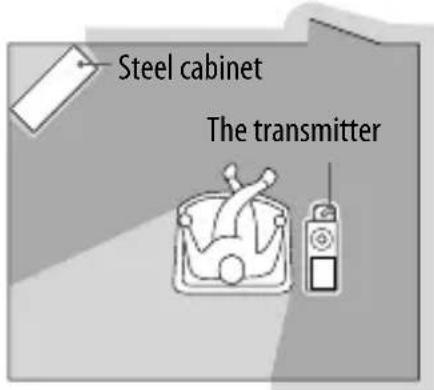
text_image
Steel cabinet The transmitter
Optimal performance

Limited performance
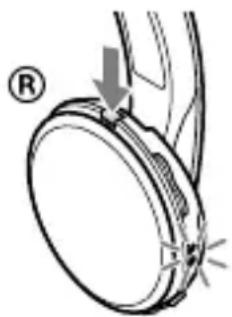
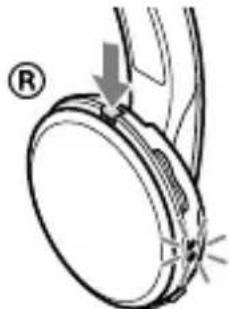
- The antenna of the headset is built into the right housing as illustrated in the dotted line.

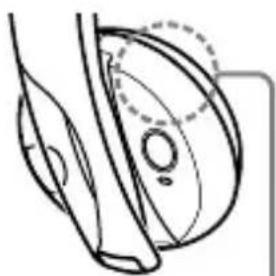
natural_image
Diagram of a mechanical component with curved surfaces and a dashed circular feature (no text or symbols)Location of built-in antenna
The antenna of the transmitter is shown as illustrated in the dotted line.
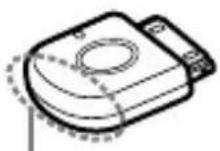
Location of built-in antenna
The sensitivity of the Bluetooth communication will improve by turning the direction of the built-in antenna to the connected Bluetooth device.
The communication distance shortens when the obstacles are between the antenna of the connected device and this product.
- The following conditions may cause noise, sound break or playback speed change.
- When using inside the metal bag.
- When using inside the backpack or shoulder bag.
- A device using 2.4 GHz frequency, such as a wireless LAN device, cordless telephone, or microwave oven, is in use near this product.
- Because Bluetooth devices and wireless LAN (IEEE802.11b/g) use the same frequency, microwave interference may occur and resulting in communication speed deterioration, noise, or invalid connection if this unit is used near a wireless LAN device. In such as case, perform the following.
- Use this unit at least 10 m (about 30 ft) away from the wireless LAN device.
- If this unit is used within 10 m (about 30 ft) of a wireless LAN device, turn off the wireless LAN device.
- Install this unit and Bluetooth device as near to each other as possible.
- Microwaves emitting from a Bluetooth device may affect the operation of electronic medical devices. Turn off this unit and other Bluetooth devices in the following locations, as it may cause an accident.
- where inflammable gas is present, in a hospital, train, airplane, or a petrol station
- near automatic doors or a fire alarm
- This unit supports security capabilities that comply with the Bluetooth standard to provide a secure connection when the Bluetooth wireless technology is used, but security may not be enough depending on the setting. Be careful when communicating using Bluetooth wireless technology.
- We do not take any responsibility for leakage of information during Bluetooth communication.
-
Connection with all Bluetooth devices cannot be guaranteed.
-
A device featuring Bluetooth function is required to conform to the Bluetooth standard specified by Bluetooth Sig, Inc. and be authenticated.
- Even if the connected device conforms to the above mentioned Bluetooth standard, some devices may not be connected or work correctly, depending on the features or specifications of the device.
- While talking on the phone hands free, noise may occur, depending on the device or communication environment.
- Depending on the device to be connected, it may require some time to start communication.
On safety
- Do not drop, hit, or otherwise expose the product to strong shock of any kind. This could damage the product.
- Do not disassemble or attempt to open any parts of the product.
On placement
- Do not place the product in any of the following locations.
- Direct sunlight, near a heater, or other extremely high-temperature location
- Dusty location
- An unsteady or inclined surface
- Location exposed to large amounts of vibration
- Bathroom or other high-humidity location
- In a car subject to the direct rays of the sun
Note on using in a car
Do not attempt to connect this product, or to operate this product, an audio output device or a car radio while driving or waiting at a traffic signal.
Cleaning
Clean the product with a soft, dry cloth, or a soft cloth lightly moistened with a mild detergent solution. Do not use any type of solvent, such as alcohol or benzene, which may damage the finish.
Others
- Using the Bluetooth device may not function on mobile phones, depending on radio wave conditions and location where the equipment is being used.
- If you experience discomfort after using the Bluetooth device, stop using the Bluetooth device immediately. Should any problem persist, consult your nearest Sony dealer.
- Listening with this product at high volume may affect your hearing. For traffic safety, do not use this product while driving or cycling.
- Do not put weight or pressure on this product as it may cause the product to deform during long storage.
- The earpads may deteriorate due to long-term storage or use.
- If you have any questions or problems concerning this product that are not covered in this manual, please consult your nearest Sony dealer.
Troubleshooting
If you run into any problems using this product, use the following checklist and read the product support information on our website. Should any problem persist, consult your nearest Sony dealer.
| Symptom Cause / Remedy | |
| The transmitter is not turned on.(Or turns off shortly after turning on.) | → Press and hold the transmitter's power button for about 1 second.→ Check the remaining battery of the iPod. If the remaining battery is not enough, charge the iPod.→ Reset your iPod.→ If your iPod have no content, add some content to your iPod. |
| The headset is not turned on. | → Charge the battery of the headset.→ The headset cannot be turned on while charging.Remove the USB cable from the headset, and then turn on the power. |
| No sound | → Check the connection between the transmitter and the iPod.→ Check that both the transmitter and the headset are turned on.→ Ensure that the transmitter is not too far from the headset, or this product is not receiving interference from a wireless LAN, other 2.4 GHz wireless device, or microwave oven.→ Pair the transmitter and the headset again (page 29).→ Check that music is being played back by the iPod.→ Check that the volume of the headset is not set too low. |
| Low sound level | → Turn up the volume of the headset as high as possible to the extent that sound is not distorted. |
| Cannot change the volume. | → Change the volume on the headset. |
| Distorted sound | → Turn down the volume of the headset to the point where the sound is no longer distorted.→ Ensure that this product is not receiving interference from a wireless LAN, other 2.4 GHz wireless device, or microwave oven.→ Turn off the EQ of iPod. |
| The correspondence distance is short. (Sound skips.) | → If a device that generates electromagnetic radiation, such as a wireless LAN, other Bluetooth device(s), or a microwave oven is nearby, move away from such sources.→ Remove any obstacle between the transmitter and the headset or move away from the obstacle.→ Locate the transmitter and the headset as near as possible.→ Re-position or re-orient the transmitter and the headset. |
| The headset does not operate properly. | → Reset the headset. Pairing information is not deleted by this operation.Insert a small pin, etc., into the hole, and push until you feel a click.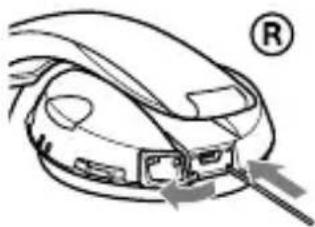 |
| Pairing cannot be done. | → Locate the transmitter and the headset as near as possible.→ Check if you input correct passcode of the transmitter (page 24).→ Check if you input correct passcode of the headset (page 27). |
| Bluetooth connection cannot be established with a device that has been “paired” before. | → Locate the transmitter and other Bluetooth device(s) as near as possible.→ Pairing information may be deleted. Pair the device again. |
| Cannot make the Bluetooth connection. | → Check that this product is turned on.→ The Bluetooth connection is terminated. Make the Bluetooth connection again. |
| Cannot make the Bluetooth connection from your mobile phone to the headset. | → Press the multi function button of the headset. (The Bluetooth connection is unavailable during music playback on the headset.)→ Perform the Bluetooth connection with the Bluetooth compatible mobile phone. (For details on how to operate the Bluetooth compatible mobile phone, see the operating instructions supplied with it.) |
Symptom Cause / Remedy
| Charging cannot be done. | → Check that the headset and the computer are firmly connected by the USB cable.→ Check that the computer is turned on.→ Check that the computer is not in standby, sleep or hibernation mode. |
| Charging time is too long. | → Check that the headset and the computer are directly connected, not via a USB hub. |
| The headset cannot be recognized by a computer. | → The USB cable is not connected properly to the USB port of the computer. Connect the USB cable again.→ Check that the headset and the computer are directly connected, not via a USB hub.→ A problem may occur with the connected USB port of the computer. Connect to another USB port if it is available.→ Try the USB connection procedure again in cases other than those stated above. |
Initializing
Initializing the transmitter
You can reset the transmitter to its default and delete all pairing information.
1 Connect the transmitter to the iPod.
2 Press and hold the power button for more than about 15 seconds.
During these 15 seconds, the transmitter indicator changes in sequence as follows:
- flash (at about 1 second intervals) for about 5 seconds
- flash quickly for about 5 seconds
– lights up for about 5 seconds - flash 4 times
Then, the transmitter is reset to default setting and all pairing information is deleted.
Note
Do not operate your iPod while initializing the transmitter.
Initializing the headset
You can reset the headset to its default (such as volume setting) and delete all pairing information.
1 If the headset is turned on, press and hold the POWER button for about 2 seconds to turn off the headset.
2 Press and hold the POWER button and multi function button together for about 7 seconds.
The headset indicator (blue) and the headset indicator (red) flash together four times, and the headset is reset to the default setting. All pairing information is deleted.
Specifications
General
Output
Bluetooth Specification Power Class 2
Maximum communication range
Line of sight approx. 10 m (30 ft) ^*1
Frequency band
2.4 GHz band (2.4000 GHz - 2.4835 GHz)
Modulation method
FHSS
Transmission range (A2DP)
20 - 20,000 Hz (Sampling frequency 44.1 kHz)
Supplied accessories
USB (Ψ) cable (1)
Operating instructions (this book) (1)
Recommended accessory
USB Charging AC Power Adaptor: AC-U50AD (not supplied) ^*2
Transmitter
Communication System
Bluetooth Specification Version 2.0 + EDR (Enhanced Data Rate)
Compatible Bluetooth Profiles ^4
A2DP (Advanced Audio Distribution Profile)
AVRCP (Audio Video Remote Control Profile)
Supported Codec ^*4
SBC ^*5
Terminal
iPod connector (30 pin)
Operating temperature
0^ to 35^ (32°F to 95°F)
Dimensions
Approx. 31 × 28 × 8 ~mm
$$ \left(1 ^ {1} / _ {4} \times 1 ^ {1} / _ {8} \times {} ^ {1 1} / _ {3 2} \text { in }\right) (\mathrm{w/h/d}) $$
(including protruding parts)
Mass
Approx. 5 g (0.2 oz)
*1 The actual range will vary depending on factors such as obstacles between devices, magnetic fields around a microwave oven, static electricity, reception sensitivity, antenna's performance, operating system, software application, etc.
^2 The optional accessory is not provided in some areas.
*3 Bluetooth standard profiles indicate the purpose of Bluetooth communication between devices.
*4 Codec: Audio signal compression and conversion format
^5 Subband Codec
Headset
Communication System
Bluetooth Specification version 2.1 + EDR (Enhanced Data Rate)
Compatible Bluetooth Profiles\*1
A2DP (Advanced Audio Distribution Profile) AVRCP (Audio Video Remote Control Profile) HSP (Headset Profile) HFP (Hands-free Profile)
Supported Codecs ^*2
SBC ^*3 , MP3
Supported content protection method
SCMS-T
Power source
DC 3.7 V: Built-in lithium-ion rechargeable battery
Mass
Approx. 125 g (4.4 oz)
Receiver
Type
Open air, dynamic
Driver unit
30 mm dome type
Reproduction frequency range
14 - 24,000 Hz
Microphone
Type
Electret condenser
Direction characteristic
Omni directional
Effective frequency range
100 - 4,000 Hz
Operating temperature
0^ to 45^ (32°F to 113°F)
^1 Bluetooth standard profiles indicate the purpose of Bluetooth communication between devices.
*2 Codec: Audio signal compression and conversion format
^3 Subband Codec
System requirements for battery charge using USB
Personal Computer pre-installed with any of the following operating systems and USB port:
Operating Systems
(when using Windows)
Microsoft Windows Vista® Home
Basic / Home Premium / Business /
Ultimate / Windows® XP Home
Edition / Professional / Media Center
Edition (Service Pack2 or later) /
Media Center Edition 2004 & 2005
(Service Pack2 or later)
(when using Macintosh)
Mac OS X (version.10.3 or later)
Design and specifications are subject to change without notice.
ADVERTENCIA
text_image
RECYCLE RBRC LI-Ion 7.800.822.8837- A2DP (Advanced Audio Distribution Profile)
- AVRCP (Audio/Video Remote Control Profile)
natural_image
Line drawing of a pair of耳机 earpieces (no text or symbols)• Transmisor Bluetooth TMR-BT8iP (1)

natural_image
Line drawing of a mechanical device with a circular top and rectangular base (no text or symbols)- Cable USB (Ψ) (1)
- Manual de instrucciones (este documento) (1)
- Tarjeta de garantía (1)
text_image
Diagram showing a laptop connected to an ear with a magnified inset highlighting the eyewear feature.natural_image
Line drawing of a pair of headphones with labeled buttons (R, L) and directional arrows indicating rotation or adjustment (no text or symbols beyond labels)natural_image
Line drawing of a person wearing headphones (no text or symbols)Conexión a un iPod
natural_image
Line drawing of a hand holding a flip phone (no text or symbols)natural_image
Line drawing of a mobile phone with a scroll wheel and power button (no text or symbols)natural_image
Diagram of a mechanical component with a circular base and highlighted section, showing no text or symbols.natural_image
Diagram of a mechanical component with a circular base and highlighted section, showing no text or symbols.natural_image
Line drawing of a vintage-style mobile phone with a scroll and key (no text or symbols)Notas
HSP (Headset Profile)
natural_image
Line drawing of a mechanical component with no visible text or symbolsA2DP (Advanced Audio Distribution Profile) AVRCP (Audio Video Remote Control Profile)
Códecs admitidos\*4
SBC ^*5
Terminal
A2DP (Advanced Audio Distribution Profile)
AVRCP (Audio Video Remote Control Profile)
HSP (Headset Profile)
HFP (Hands-free Profile)
Códecs admitidos ^*2
SBC ^*3 , MP3
Edition / Professional / Media Center
Edition (Service Pack 2 o posterior) /
Media Center Edition 2004 & 2005
(Service Pack 2 o posterior)
(con Macintosh)