SL-1210M5GPP - Turntable TECHNICS - Free user manual and instructions
Find the device manual for free SL-1210M5GPP TECHNICS in PDF.

| Product Type | Direct Drive Turntable |
| Model | SL-1210M5GPP |
| Brand | Technics |
| Drive Method | Direct Drive |
| Motor | Quartz-locked, high-torque |
| Platter | Aluminum die-cast, 332 mm diameter, 2.0 kg |
| Speeds | 33 1/3 and 45 rpm |
| Pitch Control | ±8% or ±16% with quartz lock |
| Wow and Flutter | 0.01% (WRMS) |
| Signal-to-Noise Ratio | 78 dB (DIN B) |
| Tonearm | Static-balanced S-shaped, gimbal suspension |
| Effective Tonearm Length | 230 mm |
| Overhang | 15 mm |
| Tracking Force Range | 0 - 4 g (direct reading) |
| Headshell | Removable, standard mount |
| Output | Phono (RCA) with ground terminal |
| Power Supply | AC 110-240 V, 50/60 Hz |
| Power Consumption | 13 W |
| Dimensions (W x H x D) | 453 x 169 x 353 mm |
| Weight | 11.5 kg |
| Accessories | Slip mat, overhang gauge, lead weight, screw set |
| Turntable Maintenance | Clean platter and rubber mat with dry cloth; tonearm base with mild detergent |
| Safety | Use only supplied power cord; avoid liquid ingress |
| Repairability & Spare Parts | Technics service centers; replaceable stylus, headshell, and motor |
Frequently Asked Questions - SL-1210M5GPP TECHNICS
User questions about SL-1210M5GPP TECHNICS
0 question about this device. Answer the ones you know or ask your own.
Ask a new question about this device
Download the instructions for your Turntable in PDF format for free! Find your manual SL-1210M5GPP - TECHNICS and take your electronic device back in hand. On this page are published all the documents necessary for the use of your device. SL-1210M5GPP by TECHNICS.
USER MANUAL SL-1210M5GPP TECHNICS
Operating Instructions
Model No. SL-1210M5G
natural_image
Top-down view of a Technics T450 audio amplifier on a black stand (no visible text or symbols)
natural_image
Black-and-white illustration of a saxophone with a megaphone resting on an open musical score sheet, no text or symbols visible.Technics®
Before connecting, operating or adjusting this product, please read these instructions completely. Please keep this manual for future reference.
RQT7021-Y
Dear customer
Thank you for purchasing this product.
For optimum performance and safety, please read these instructions carefully.
Table of contents
Supplied accessories....2
IMPORTANT SAFETY INSTRUCTIONS .... 3
Features 4
Preparation of the cartridge 4
Controls 4
Putting the player together .... 5
Connections and installation 5
Connecting to an amplifier and AC power supply cord .... 5
Connecting to an Audio Mixer (not included) 6
Installation 6
Preparatory adjustments 6
Horizontal balance and stylus pressure 6
Anti-skating 7
Armlift height 7
Tone arm height 7
Fit the dust cover 7
Playing records 8
Adjustments while using the unit 9
Pitch control 9
Adjusting tone arm horizontal weight to reduce skipping when
scratch playing. 9
Adjusting the turntable brake speed 9
Maintenance 10
Product service 10
Troubleshooting guide 11
Specifications 11
User memo:
DATE OF PURCHASE ____
DEALER NAME
DEALER ADDRESS
TELEPHONE NUMBER
The model number and serial number of this product can be found on either the back or the bottom of the unit.
Please note them in the space provided below and keep for future reference.
MODEL NUMBER SL-1210M5G
SERIAL NUMBER
WARNING:
TO REDUCE THE RISK OF FIRE, ELECTRIC SHOCK OR PRODUCT DAMAGE, DO NOT EXPOSE THIS APPARATUS TO RAIN, MOISTURE, DRIPPING OR SPLASHING AND THAT NO OBJECTS FILLED WITH LIQUIDS, SUCH AS VASES, SHALL BE PLACED ON THE APPARATUS.
CAUTION!
DO NOT INSTALL OR PLACE THIS UNIT IN A BOOKCASE, BUILT-IN CABINET OR IN ANOTHER CONFINED SPACE. ENSURE THE UNIT IS WELL VENTILATED. TO PREVENT RISK OF ELECTRIC SHOCK OR FIRE HAZARD DUE TO OVERHEATING, ENSURE THAT CURTAINS AND ANY OTHER MATERIALS DO NOT OBSTRUCT THE VENTILATION VENTS.
Supplied accessories
Please check and identify the supplied accessories.
Use numbers indicated in parentheses when asking for replacements parts.
(Only for U.S.A.) To order accessories contact 1-800-332-5368 or the website (http://www.panasonic.com).
□ Turntable .... 1pc. (SFTE172-01Z1)
□ Turntable mat .... 1pc. (RGS0008)
□ Disc slip sheet set (RGS0005Z-1) .... 1
- Disc slip sheet
- Transparent sheet

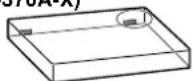
□ Dust cover .... 1pc. (RYF0370A-X)
☐ Head shell (with stylus weight) (SFPCC31006K) ..... 1pc.
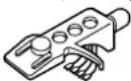
A cartridge is not included.
□ Balance weight ..... 1pc. (SFPWG17201BK)

□ Auxiliary weight ..... 1pc. (SFPWG17202)

☐ EP record adaptor (SFWE010A) ...... 1pc.

□ Shell weight ...... 1pc. (SFPZB3501)

□ Overhang gauge ..... 1pc. (SFK0135-01)

□ Screw set for cartridge 1
• Nuts(RHN26003)
• Screws-short(SFCZV8801-1)
•Screws-long(SFPEV9801-1)
• Washers(SFPEW9601)

□ Sticker .... 1pc. (RQLC0142-1)

CAUTION:
TO PREVENT ELECTRIC SHOCK MATCH WIDE BLADE OF PLUG TO WIDE SLOT, FULLY INSERT.
The following mark and symbols are located on the bottom of the unit.

CAUTION
RISK OF ELECTRIC SHOCK DO NOT OPEN

CAUTION: TO REDUCE THE RISK OF ELECTRIC
SHOCK, DO NOT REMOVE SCREWS.
NO USER-SERVICEABLE PARTS INSIDE
REFER SERVICING TO QUALIFIED SERVICE PERSONNEL.

The lightning flash with arrowhead symbol, within an equilateral triangle, is intended to alert the user to the presence of uninsulated "dangerous voltage" within the product's enclosure that may be of sufficient magnitude to constitute a risk of electric shock to persons.

The exclamation point within an equilateral triangle is intended to alert the user to the presence of important operating and maintenance (servicing) instructions in the literature accompanying the appliance.
IMPORTANT SAFETY INSTRUCTIONS
Read these operating instructions carefully before using the unit. Follow the safety instructions on the unit and the applicable safety instructions listed below. Keep these operating instructions handy for future reference.
1) Read these instructions.
2) Keep these instructions.
3) Heed all warnings.
4) Follow all instructions.
5) Do not use this apparatus near water.
6) Clean only with dry cloth.
7) Do not block any ventilation openings. Install in accordance with the manufacturer's instructions.
8) Do not install near any heat sources such as radiators, heat registers, stoves, or other apparatus (including amplifiers) that produce heat.
9) Do not defeat the safety purpose of the polarized or grounding-type plug. A polarized plug has two blades with one wider than the other. A grounding-type plug has two blades and a third grounding prong. The wide blade or the third prong are provided for your safety. If the provided plug does not fit into your outlet, consult an electrician for replacement of the obsolete outlet.
10) Protect the power cord from being walked on or pinched particularly at plugs, convenience receptacles, and the point where they exit from the apparatus.
11) Only use attachments/accessories specified by the manufacturer.
12) Use only with the cart, stand, tripod, bracket, or table specified by the manufacturer, or sold with the apparatus. When a cart is used, use caution when moving the cart/apparatus combination to avoid injury from tip-over.
13) Unplug this apparatus during lightning storms or when unused for long periods of time.
14) Refer all servicing to qualified service personnel. Servicing is required when the apparatus has been damaged in any way, such as power-supply cord or plug is damaged, liquid has been spilled or objects have fallen into the apparatus, the apparatus has been exposed to rain or moisture, does not operate normally, or has been dropped.

THE FOLLOWING APPLIES ONLY IN THE U.S.A.
CAUTION:
This equipment has been tested and found to comply with the limits for a Class B digital device, pursuant to Part 15 of the FCC Rules.
These limits are designed to provide reasonable protection against harmful interference in a residential installation. This equipment generates, uses and can radiate radio frequency energy and, if not installed and used in accordance with the instructions, may cause harmful interference to radio communications. However, there is no guarantee that interference will not occur in a particular installation. If this equipment does cause harmful interference to radio or television reception, which can be determined by turning the equipment off and on, the user is encouraged to try to correct the interference by one or more of the following measures:
- Reorient or relocate the receiving antenna.
- Increase the separation between the equipment and receiver.
- Connect the equipment into an outlet on a circuit different from that to which the receiver is connected.
- Consult the dealer or an experienced radio/TV technician for help.
Any unauthorized changes or modifications to this equipment would void the user's authority to operate this device.
This device complies with Part 15 of the FCC Rules. Operation is subject to the following two conditions: (1) This device may not cause harmful interference, and (2) this device must accept any interference received, including interference that may cause undesired operation.
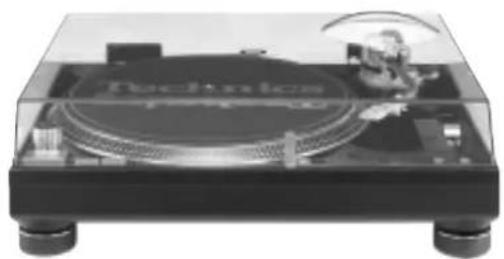
Features
A masterpiece amongst turntables with a worldwide reputation.
Highly accurate turntable speed maintained continuously with a quartz pitch control.
- The [± 16 / ± 8] button can control a wide range between -8% and +8% and -16% and +16% .
The [±16/±8] indicator LED illuminates in the dark.
- The pitch can be varied throughout the range maintaining perfect accuracy.
- Pitch can be instantly reset to the rated speed (33 1/3 or 45 r/min) with the reset button.
• The pitch control slider can be easily replaced.
The direct drive produces high torque.
- Wow and flutter below 0.01 %. Starting torque of 1.5 kg-cm enabling the turntable to reach 33 1/3 r/min in 0.7 seconds.
- Smooth stops are achieved with a fully electronic braking system. The braking speed can be adjusted with the brake speed control knob.
Tone arm with gimbal suspension
- Using the balance weight control measurement units on the tone arm, you can quickly change stylus pressure settings to the appropriate pressure.
- Stylus skipping can be reduced using horizontal weight control for scratch play.
- The tone arm can be finely adjusted in a range of 6 millimeters with the lockable height control.
Anti-vibration design with 3 layer cabinet construction and large insulating legs.
Pop-up stylus light.
• A blue LED light illuminates the stylus.
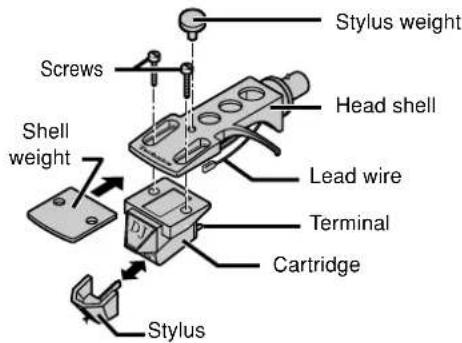
Preparation of the cartridge
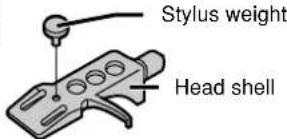
1 Attach a cartridge (not included).
Follow the cartridge's instructions to correctly attach it to the head shell.
- Use the included shell weight when using a light cartridge (3.5 to 6.5 grams).
- Remove the stylus weight. Using the stylus weight ( -page 6).
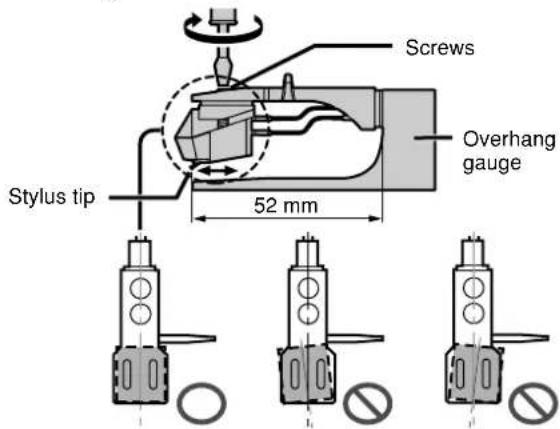
2 Adjust the overhang.
Fit the included overhang gauge to the head shell. Adjust the overhang and facing of the cartridge and tighten the screws.
• Line the stylus tip up with the end of the gauge.
• The cartridge should be parallel on the shell head.
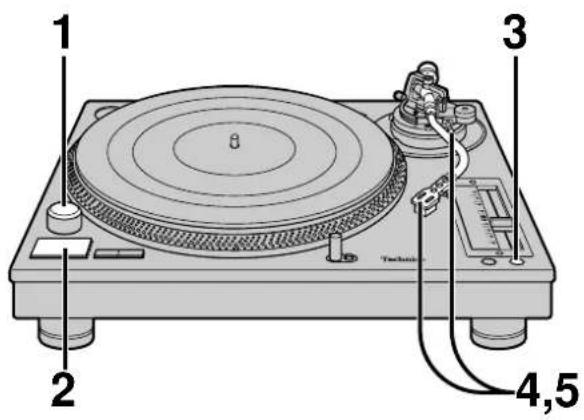
Controls
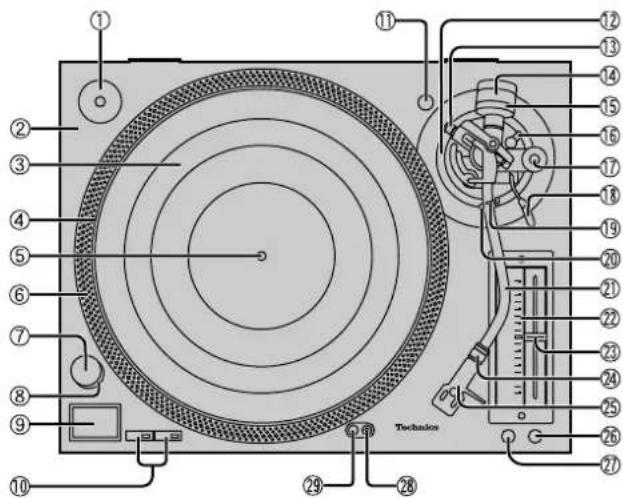
No. Name Reference page(s)
① EP record adaptor 8
② Turntable base 4
③ Turntable mat (Or disc slip sheet) ..... 5
④ Turntable 5
⑤ Center spindle .... 5
⑥ Strobe mirrors 9
⑦ Power switch (power) 8
⑧ Strobe light, pilot lamp 8
⑨ Start-stop button (start-stop) 8
⑩ Speed select buttons (33, 45) ....8
⑪ Shell stand .... 4
⑫ Arm-height control 7
⑬ Horizontal weight control knob ..... 9
⑭ Balance weight 5
⑮ Stylus pressure control 6
⑯ Arm lock 7
⑰ Anti-skating control 6
⑱ Cue lever 6
⑲ Arm clamp 6
⑳ Arm rest 6
② Tone arm 5
② Pitch indicator 9
②3 Pitch control (pitch adj.) 9
⑳ Locking nut 5
⑲ Head shell 5
②6 Reset button (reset) 8
②7 Variable range pitch button (±16/±8) 9
⑳ Stylus light switch 8
⑲ Stylus light 8
Putting the player together
In order to prevent damage during shipping some of the equipment has been disassembled.
Put the player together in the following order.
- Do not connect the AC power supply cord until set up is complete.
- Leave the dust cover off until set up and adjustments are complete.
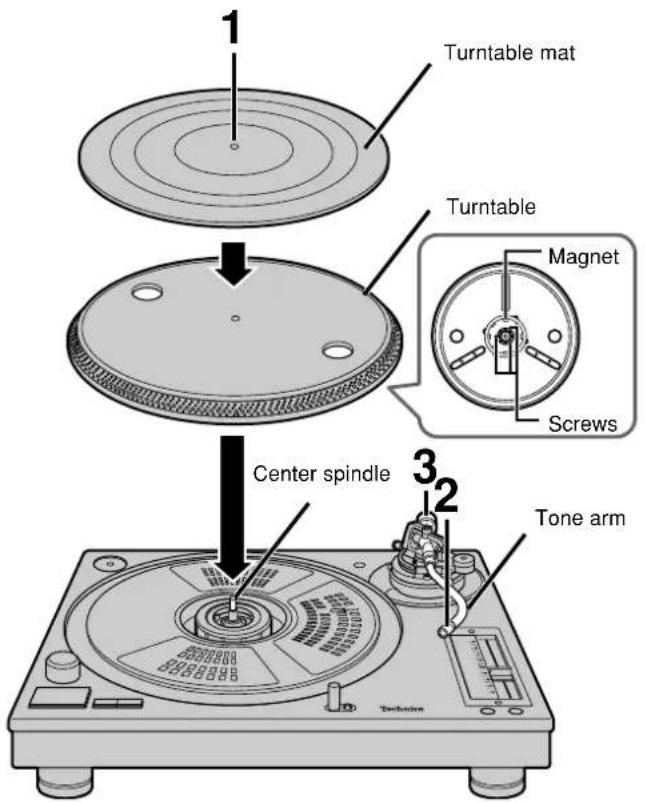
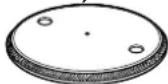
1 Fit the turntable and turntable mat.
Put the turntable on the center spindle and then lay the mat on top.
- Be very careful when putting the turntable on the main unit. The magnet on the bottom of the turntable is finely adjusted and sharp contact can cause it to move and lead to poor operation. Ensure the magnet remains free from dust and iron particles.
- Do not adjust the screws attaching the magnet to the turntable. The rated performance of the unit cannot be guaranteed if the magnet is moved.
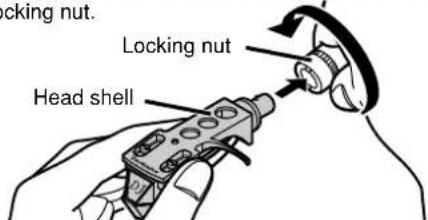
2 Attach the head shell.
Fit the head shell into the tone arm, keep it horizontal and tighten the locking nut.
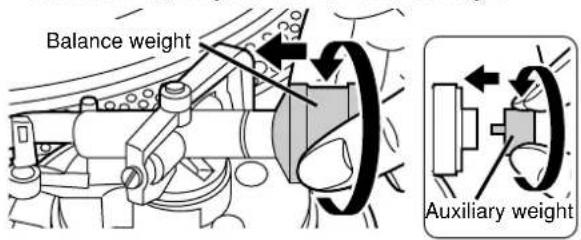
3 Attach the balance weight to the rear of the tone arm.
If the cartridge weighs between 10 and 13 grams, attach the included auxiliary weight to the main balance weight.
Connections and installation
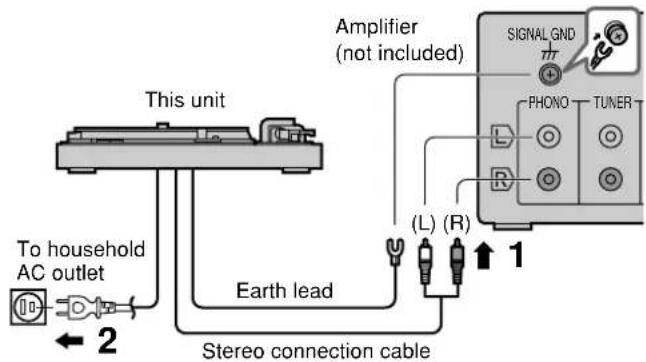
Connecting to an amplifier and AC power supply cord
1. Connect the PHONO earth lead and stereo PHONO cables to the amplifier PHONO terminals.
Stereo connection cable
White (L) Red (R)
- If the earth lead isn't connected, a hum will be heard from the AC power source.
- You will not have adequate volume or sound quality if connecting to an amplifier that has no PHONO terminals.
2. Connect the AC power supply cord.
- Connect this cord only after all other connections are complete.
- Confirm the wattage of AC outlets on amplifiers and receivers before using them for this unit. This unit consumes 14.5 W.
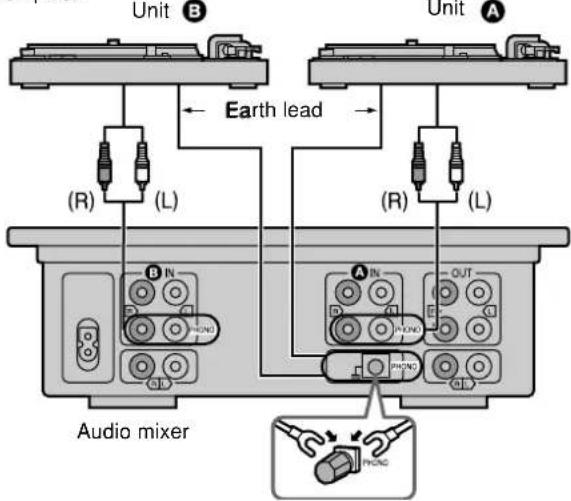
Connections and installation
Connecting to an Audio Mixer (not included)
- Disconnect all units from the power source before making any connections.
- Reconnect the AC power supply cord after all other connections are complete.
Installation
• Install the unit on a horizontal surface protected from vibrations.
- Keep this unit as far as possible from speakers.
Note
- Ensure the unit is not exposed to direct sunlight, dust, humidity, and heat from a heating appliance.
- This unit may pick up interference from a radio if there is one nearby. Keep radios as far as possible from this unit.
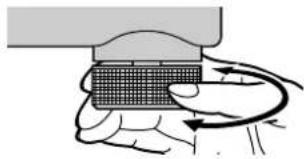
Adjusting the height of the insulators
Place the unit where it is to be used and adjust the height of the legs to make the unit horizontal.
natural_image
Illustration of a hand holding a small electronic component with a curved arrow indicating rotation (no text or symbols)Preparatory adjustments
Horizontal balance and stylus pressure
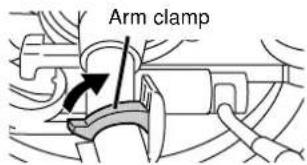
1 Release the tone arm.
- Remove the stylus cover, taking care not to damage the stylus, then release the arm clamp.
- Free the tone arm from the arm rest.
2 Adjust horizontal balance
- Push the cue lever down.
- Turn the anti-skating control to "0".
- Turn the balance weight until the arm is approximately horizontal.
Take care at this time not to allow the stylus to touch the unit.

3 Turn the stylus pressure control to "0"
- Return the tone arm to the arm rest and fix it with the arm clamp.
- Turn the stylus pressure control to "0". Hold the balance weight still while doing this.
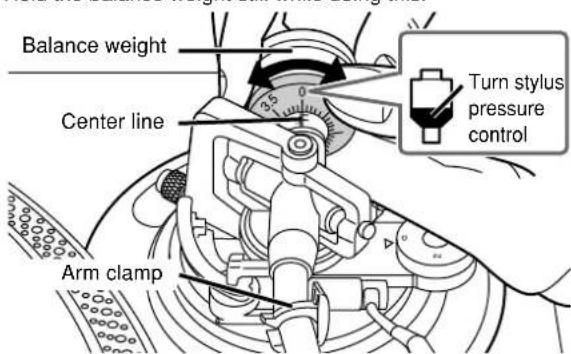
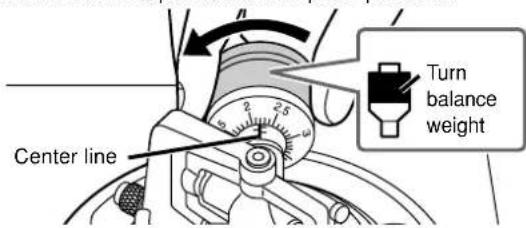
4 Adjust stylus pressure
Turn the balance weight to adjust to the appropriate pressure for the cartridge you are using.
See the cartridge's instructions for recommended stylus pressure. The stylus pressure control will turn at the same time. Stop when the center line points to the required pressure.
For your reference
Use the stylus weight (included) to increase stylus pressure by 4 grams.
Using the balance weight control
Make note of the balance weight setting for your stylus cartridge, you can quickly change the stylus pressure without having to re-adjust the horizontal balance of the arm each time you remove and re-attach the stylus cartridge.
① Attach the cartridge to the tone arm you are using.
② Turn the balance weight control to the setting you previously used to balance the weight including cartridge.
③ Turn the stylus pressure control dial to the setting you previously used to balance the weight including cartridge.

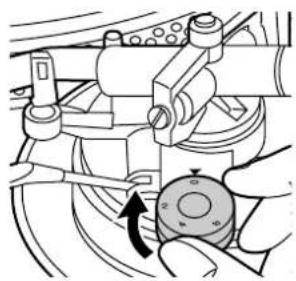
Anti-skating
Adjust the dial to the same value as the stylus pressure control when playing normal music.
For scratch play
Adjust the control to reduce skipping.
natural_image
Mechanical assembly diagram showing a hand operating a rotating component with directional arrows (no text or symbols)Armlift height
Preparation
- Put a record on the turntable.
- Take off the stylus cover and release the arm clamp.
Use a screwdriver to turn the armlift screw.
Make this adjustment only if the cartridge you are using makes it necessary.
- Turning the screw clockwise lowers the armlift.
- Turning the screw anti-clockwise raises the armlift.
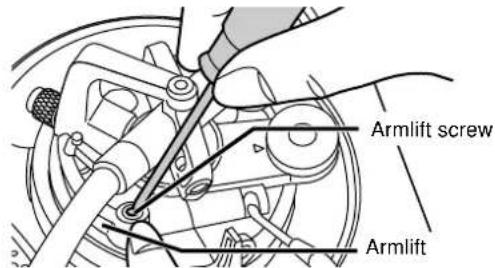
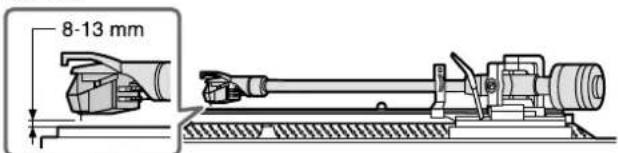
Note
Armlift height (the distance between the record and stylus when the cue lever is raised) is set to between 8 and 13 millimeters at time of shipment.
+
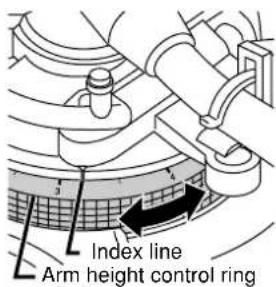
Tone arm height
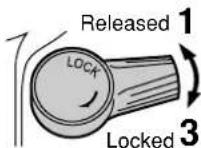
- Release the arm lock.
2. Adjust the arm height.
- Adjust the ring using the chart below as reference so the arm height matches the indicated height of the cartridge. Measurements are marked on the arm height control ring in 0.5 millimeter intervals.
| Cartridge height (H) in millimeters | Height control position | |
| 17 | 0 | |
| 18 | 1 | |
| 19 | 2 | |
| 20 | 3 | |
| 21 | 4 | |
| 22 | 5 | |
| 23 | 6 |
- If you do not know the height of your cartridge, rest the stylus on a record and adjust the height control until the tone arm and record are parallel.

- Lock the arm after adjusting the height.
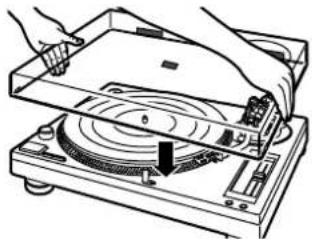
Fit the dust cover
Hold the dust cover with both hands and fit it over the player from directly above.
natural_image
Diagram of hands operating a CD or DVD disc with a rotary knob and indicator lights (no text or symbols present)Playing records
Preparation
- Put a record on the turntable.
- Take off the stylus cover and release the arm clamp.
To temporarily stop play
Lift the cue lever.
The stylus lifts off the record.
Refer to page 9 for fine adjustments to the pitch
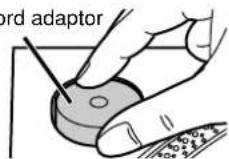
When using EP records
- Take the EP record adaptor out of its holder and fit it over the center spindle.
- Press [45] to change the speed.
EP record adaptor
When play finishes
- Lift the cue lever and move the tone arm back to the arm rest.
- Press [start-stop].
The electronic brake gently stops the turntable.
- Turn [power] to turn the unit off.
- Clamp the tone arm and put the stylus cover back on.
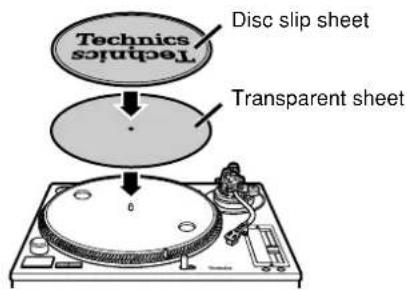
When the player is to be used for scratch play.
Use the disc slip sheet instead of the turntable mat. This enables the record to be easily moved during play.
- Top (printed side): Lay the record on this side.
- Bottom: Slippery side.
For a different kind of slip
Put the transparent sheet under the disc slip sheet.
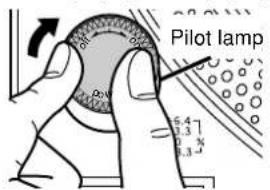
1 Turn [power] to turn the unit on.
• The pilot lamp comes on.
- 33 1/3 r/min is automatically selected and the indicator lights.
- Press [45] if you are playing a 45 r/min record.
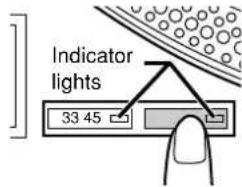
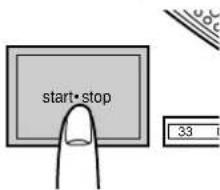
2 Press [start-stop].
The turntable starts revolving.
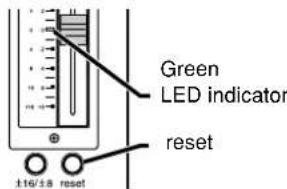
3 Press [reset] to light the pitch control green LED lamp.
The pitch returns to 33 1/3 or 45 r/min.
Use the above indicated pitch for playing standard music.
4 Lift the cue lever and move the tone arm over the record.

5 Lower the cue lever.
The tone arm moves down and play starts.
natural_image
Mechanical assembly diagram showing a hand operating a valve with a black arrow indicating force direction (no text or labels)To light up the stylus
- Press the stylus light switch. A blue LED light rises up and illuminates the stylus.
- When the light is not required, press it down. The light also goes out.
Note
Press the switch firmly. If the switch is lightly pressed, the light may come on but not rise up.

Pitch control
Fine adjustment to the number of revolutions per minute.
1 Press [reset] to turn off the green LED light.
2 Press [±16/±8] to select the pitch.
- When [± 16 / ± 8] is pressed once (up position), the [± 16] pitch indicator lights on the pitch control slider.
- When [± 16 / ± 8] is pressed twice (down position), the [± 8] pitch indicator lights on the pitch control slider.
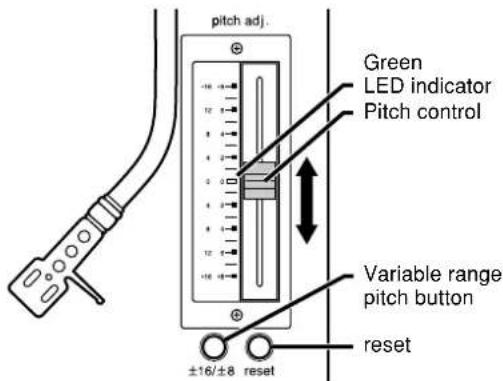
3 Slide [pitch adj.] while the turntable is revolving.
Move the control to the required position.
• The numbers represent approximate percentages.
- Pitch can be adjusted between -8% and +8% or -16% and +16% .
To reset pitch to the preset value
Press [reset].
The green LED indicator lights and the pitch immediately returns to the set value (33 1/3 or 45 r/min), regardless of any adjustments made with [pitch adj.].
Press [reset] again and pitch returns to the adjusted value.
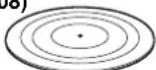
To measure pitch
The four rows of strobe mirrors around the edge of the turntable can assist you in measuring pitch.
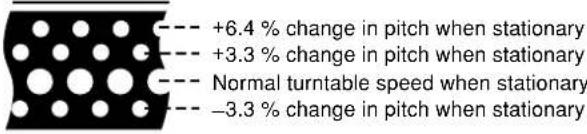
They are lit by the strobo light as they pass and each row appears to stand still at a different pitch.

Note
Read the pitch control slider replacement instructions that comes with this product carefully when replacing the pitch control slider.
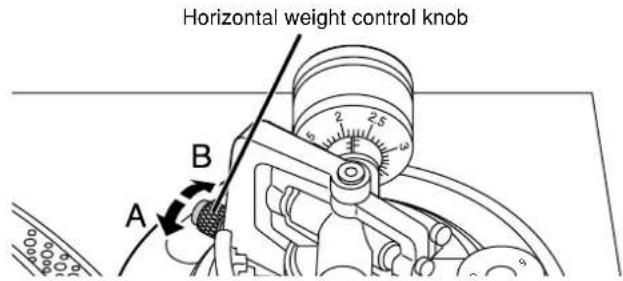
Adjusting tone arm horizontal weight to reduce skipping when scratch playing.
The horizontal weight of the tone arm can be adjusted using the horizontal weight control knob on the gimbal suspension to reduce skipping when scratch playing.
For scratch play
Turn the knob all the way in the "A" direction to apply horizontal weight.
For normal play
Turn the knob all the way in the "B" direction to reduce horizontal weight.
- Do not move the horizontal weight control knob when playing music.
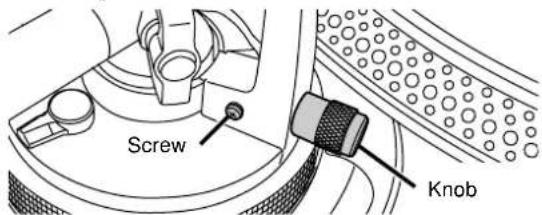
When the horizontal weight control knob becomes worn out
Replace with a new horizontal weight control knob.
Loosen the fastening screw to remove the knob.
Note
Consult with a qualified dealer when purchasing a horizontal weight control knob.
Use the following product number when asking for the replacement. Product reference No. RGZ0053Z-S.
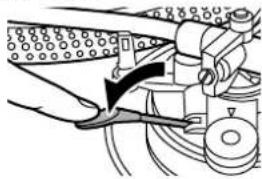
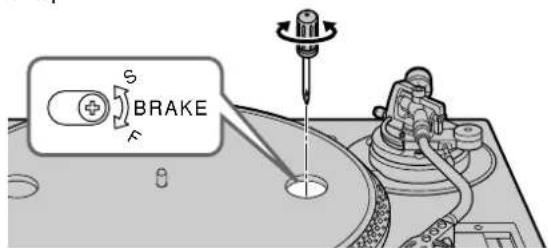
Adjusting the turntable brake speed
Brake speed can be adjusted by pressing [start-stop] until the turntable stops.
Use a small screwdriver in the hole on the turntable to adjust the brake speed.
S: Slow stop
F: Fast stop
Maintenance
Care of the parts
To clean this unit, wipe with a soft, dry cloth.
- Never use alcohol, paint thinner, or benzine to clean this unit.
- Before using chemically treated cloth, read the instructions that came with the cloth carefully.
Note
Do not wipe the dust cover while playing a record.
This can cause static electricity. This static can cause the tone arm to be attracted towards the cover.
Thoroughly clean dust off the stylus and record.
- Use a soft brush to clean the stylus. Brush from the base to the tip.
- Use a good quality record cleaner to keep your records clean.
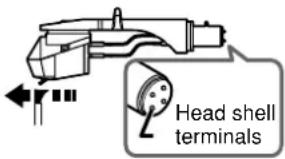
Wipe the head shell terminals occasionally.
Use a soft cloth. Turn the amplifier off before fitting or removing the head shell.
- Damage to your speakers can occur if the head shell is moved while the volume is turned up.
- Leave the stylus cover on while handling the head shell to prevent damaging the stylus.
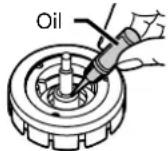
Oiling the center spindle.
Apply 2 or 3 drops every 2000 hours of operation. Use SFW0010 oil (not included).
Moving the unit
Repackage the unit in the packaging it came in.
If you no longer have the packaging, do the following:
- Return the tone arm to the arm rest and tape it in place.
- Remove the balance weight and head shell from the tone arm and carefully wrap them.
• Take off the turntable and turntable mat and carefully wrap them. - Carefully wrap the main unit in a blanket or paper.
Product service
-
Damage requiring service—The unit should be serviced by qualified service personnel if:
(a) The AC power supply cord or AC adaptor has been damaged; or
(b) Objects or liquids have gotten into the unit; or
(c) The unit has been exposed to rain; or
(d) The unit does not operate normally or exhibits a marked change in performance; or
(e) The unit has been dropped or the cabinet damaged. -
Servicing—Do not attempt to service the unit beyond that described in these operating instructions. Refer all other servicing to authorized servicing personnel.
-
Replacement parts—When parts need replacing ensure the servicer uses parts specified by the manufacturer or parts that have the same characteristics as the original parts. Unauthorized substitutes may result in fire, electric shock, or other hazards.
-
Safety check—After repairs or service, ask the servicer to perform safety checks to confirm that the unit is in proper working condition.
Product information
For product information or assistance with product operation:
In the U.S.A., contact the Panasonic Customer Call Center at 1-800-211-7262, or e-mail consumerproducts@panasonic.com, or the website (http://www.panasonic.com).
In Canada, contact the Panasonic Canada Inc. Customer Care Centre at 905-624-5505, or visit the website (www.panasonic.ca), or an authorized Servicentre closest to you.
Troubleshooting guide
Before requesting service, make the below checks. If you are in doubt about some of the check points, or if the remedies indicated in the chart do not solve the problem:
In the U.S.A., contact the Panasonic Customer Call Center at 1-800-211-7262, or e-mail consumerproducts@panasonic.com, or the website (http://www.panasonic.com).
In Canada, contact the Panasonic Canada Inc. Customer Care Centre at 905-624-5505, or visit the website (www.panasonic.ca), or an authorized Servicentre closest to you.
| Problem | Probable cause(s) | Suggested remedy | Reference page(s) |
| No power. | Is the AC power supply cord plugged in? | Plug the cord in firmly. | 5 |
| There is power but no sound. Sound is weak. | Are connections to the amplifier/receiver's PHONO terminals correct? | Connect the stereo pin cables to the amplifier's PHONO terminals. | 5 |
| Left and right sounds are reversed. | Are the stereo connection cable connections to the amplifier or receiver reversed? | Double check all connections. | 5 |
| Humming heard during play. | Are there other appliances or their AC power supply cords near the stereo connection cable?Is the earth lead connected? | Separate the appliances and their AC power supply cords from this unit. | — |
| Make sure the earth lead is correctly connected. | 5 |
Specifications
Turntable section
Type Quartz direct drive
Manual turntable
Drive method Direct drive
Motor Brushless DC motor
Turntable platter Aluminum diecast
Diameter 33.2 cm (13-5/64")
Mass 1.7 kg (3.74 lb.)
Turntable speeds 33 1/3 r/min, 45 r/min
Variable range pitch ±8 %, ±16 % (two settings)
Starting torque 1.5 kg·cm (1.3 lb·in)
Build-up characteristics 0.7 s. from standstill to 33 1/3 r/min
Braking system Electronic brake
Wow and flutter 0.01 % WRMS
※
0.025 % WRMS (JIS C5521)
±0.035 % peak (IEC 98A Weighted)
Rumble -56 dB (IEC 98A Unweighted)
-78 dB (IEC 98A Weighted)
*This rating refers to turntable assembly alone, excluding effects of record, cartridge or tonearm, but including platter. Measured by obtaining signal from built-in frequency generator of motor assembly.
Tonearm section
Type Universal
Effective length 230 mm (9-1/16")
Arm height adjustment range 0 - 6 mm
Overhang 15 mm (19/32")
Effective mass 12 g (without cartridge)
Offset angle 22°
Friction Less than 7 mg (lateral, vertical)
Tracking error angle
Within 2° 32' (at the outer groove of 30 cm (12") record)
Within 0° 32' (at the inner groove of 30 cm (12") record)
Stylus pressure adjustment range 0 - 4 g
Applicable cartridge weight range 3.5 - 13 g
11 - 20.5 g (including headshell)
(with auxiliary weight) 9.5 - 13 g
17 - 20.5 g (including headshell)
(with shell weight) 3.5 - 6.5 g
11 - 14 g (including headshell)
Headshell weight 7.5 g
General
Power supply AC 120 V, 60 Hz
Power consumption 14.5 W
Dimensions (W×H×D) 45.3 × 17.2 × 35.5 cm
(17-27/32" × 6-25/32" × 13-31/32")
Mass 11.7 kg (25.74 lb)
Note
Specifications are subject to change without notice.
Mass and dimensions are approximate.

PRINTED WITH SOYINK
This manual was printed with soy based ink.
Panasonic Consumer Electronics Company, Division of Matsushita Electric Corporation of America
One Panasonic Way Secaucus,
New Jersey 07094
http://www.panasonic.com
© 2003 Matsushita Electric Industrial Co., Ltd.
Printed in Japan
Panasonic Sales Company, Division of Matsushita Electric of Puerto Rico, Inc. ("PSC")
San Gabriel Industrial Park, Carolina,
Puerto Rico 00985
Panasonic Canada Inc.
5770 Ambler Drive
Mississauga, Ontario L4W 2T3
www.panasonic.ca

RQT7021-Y
M0203TK0
