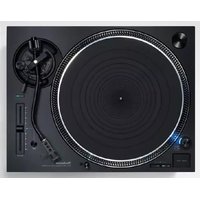
USER MANUAL SL-Q30 TECHNICS
Operating instructions

natural_image
Black-and-white illustration of a vintage radio with a blank open lid and a circular base (no text or symbols visible)
Before use
Caution:
- Do not plug in the AC power plug before completing assembly.
- Attach the dust cover last to make assembly and adjustments easier.
●These instructions apply to units of different colour.
off: This symbol indicates the "stand-by" mode, which means that when the switch is in this position, the unit is switched off but not entirely.
on: This symbol indicates "on". Push to switch the unit on. Push again to switch the unit to the stand-by mode.
■ Removing the transport screws and protector
Remove transport screws. (Fig. 1)
Remove transport protector of the tonearm (Fig. 2) and tape on side of cartridge. (Fig. 3)
Save for future use.
■ Checklist of parts
Turntable unit 1
Turntable platter 1
Turntable mat 1
Dust cover 1
45-rpm adaptor 1
Assembly
■ Installing the turntable platter
- Place the platter on the center spindle.
Note:
In our direct drive system, the motor's rotor-magnet is attached to the underside of the platter. Handle the platter carefully during assembly and be sure the rotor-magnet does not get dusty or attract iron filings.
Do not remove or loosen the rotor-magnet screws.
(Fig. 4)
Tampering with the rotor-magnet may interfere with motor performance.
- Place the turntable mat on the platter.
Be sure the slot in the mat is over the protrusion (record size sensor) on the platter. (Fig. 5)
Note:
After placing the mat on the platter, turn the platter clockwise about ten full rotations by hand.
This is necessary to assure correct operation of the automatic mechanism.
About stylus pressure (tracking force)
The tracking force is already set to 1.25 g so no adjustment is necessary. (Fig. 6)
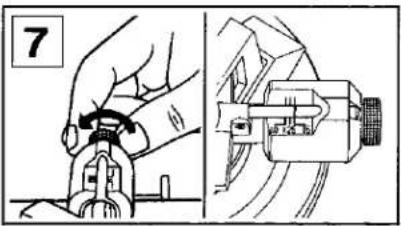
When records with a high modulation level are played or when the turntable is used where the temperature is low or in a location subject to vibrations, sound may be distorted and the stylus may skip. If this occurs, rotate the stylus adjustment knob at the rear to the "1.5" setting. (Fig. 7)
If the knob is set to "1.0" the tracking force will be lighter.
■ Adjusting the anti-skating control (Fig. 8)
This is set to the same level as the tracking force (1.25); there is no need to adjust it yourself. However, if the index mark (▼) is off center, reset it to the proper position. If the tracking force is set to 1.5 g, the anti-skating control also must be set to "1.5".
■ Attaching the dust cover (Fig. 9)
Hold both sides of the cover and lower it into the hinge slots. To remove the cover, open it and pull upward.
Note: Opening or closing the cover during play may cause vibrations and groove skipping. If you must open the cover during play, do so very gently.
Placement
■ Place the unit in a stable and horizontal position where there is little or no vibration.
This unit features double-isolated suspension system. To take maximum advantage of this feature, place the unit or a stable, level surface. Do not put anything between the turntable base and the surface on which it is placed.
■ Place the unit away from the speakers so that it will be subject to as little direct sound radiation as possible.
■ Do not place the unit where it will be exposed to direct sunlight, dust, moisture or heat.
■ Place it in a well ventilated location.
■ If you try to listen to a radio near the turntable while it is turning, you may hear some interference.
Connections
■ Connect the output jacks (Fig. 10)
Output jacks
L (White) → L Channel
R (Red) → R Channel
GND (Spade lug) → GND
Note:
To avoid hum, be sure to make a secure ground connection between turntable and amplifier or receiver.
■ Plug in the AC power plug
Plug the AC power plug into on AC wall socket.
Operation
■ Automatic play
- Put a record on the turntable mat.
- If the cartridge has a detachable stylus protector, remove it.
- Release the arm clamp.
- Push the on-off switch to the "on" position (■).(Fig. 11) The 33 (33-1/3 rpm) speed indicator will light, so will the strobe illuminator/pilot lamp.
Note:
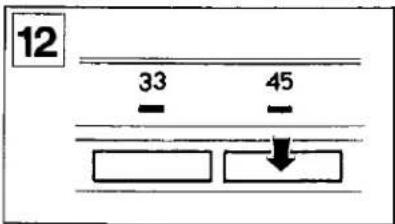
33-1/3 rpm is selected automatically whenever the on-off switch is turned on. Remember to push the 45 rpm selector to play 45s.(Fig. 12)
- Push the start/stop switch. (Fig. 13)
The tonearm automatically selects the record size [for 30 cm (12") and 17 cm (7") records only] and begins record play.
At the end of the record, the tonearm will automatically return to the arm rest and the turntable will stop.





natural_image
Mechanical component diagram showing a lever mechanism with no visible text or symbols

natural_image
Illustration of hands using a tool to adjust or install a mechanical component, no text or symbols present


natural_image
Hand holding a tool with a curved arrow indicating motion (no text or symbols)


Thank you for choosing the SL-Q30.
For optimum performance and safety, please read these instructions carefully.
Parts identification

Caution for safe use of this apparatus (For UNITED KINGDOM)
Caution
●This apparatus is double insulated, safety earth not required.
Important
●The wires in this mains lead are coloured in accordance with the following code:
Blue: Neutral
Brown: Live
As the colours of the wires in the mains lead of this apparatus may not correspond with the coloured markings identifying the terminals in your plug, proceed as follows.
The wire which is coloured BLUE must be connected to the terminal which is marked with the letter N or coloured BLACK. The wire which is coloured BROWN must be connected to the terminal which is marked with the letter L or coloured REC.
This equipment should be disconnected from the mains when not in use.
WARNING: To reduce the risk of fire or electric shock, do not expose this appliance to rain or moisture.
Specifications
■ General
| Power supply: | 240 V, 50 Hz |
| Power consumption: | 7 W |
| Dimensions: | 43×10.6×37.5 cm |
| (W×H×D) | (16-15/16''×4-7/32''×14-3/4'') |
| Maximum height when top (dust cover) is open. |
| 43×37×42 cm |
| (16-15/16''×14-9/16''×16-17/32'') |
| Weight: | 6.2 kg (13.7 lb.) |
■ Turntable section
| Type: | Quartz Direct driveFully automatic turntableAuto startAuto returnAuto stopRepeat playManual play |
| Drive method: | Direct drive |
| Motor: | Brushless DC motor |
| Drive control method: | Quartz-phase-locked control |
| Turntable platter: | Aluminum die-castDiameter 31.2 cm |
| Turntable speeds: | 33-1/3 rpm and 45 rpm |
| Wow and flutter: | 0.012% WRMS*0.025% WRMS (JIS C5521)±0.035% peak(IEC 98A Weighted) |
■ Cartridge section
| Type: | Moving magnet stereo cartridge |
| Magnetic circuit: | All laminated core |
| Frequency response: | 10 Hz~30 kHz20 Hz~10 kHz ± 1 dB |
| Output voltage: | 2.5 mV at 1 kHz, 5 cm/s. zero to peak lateral velocity(7 mV at 1 kHz, 10 cm/s. zero to peak 45° velocity [DIN 45 500]) |
| Channel separation: | 22 dB at 1 kHz |
| Channel balance: | Within 2 dB at 1 kHz |
| Recommended load |
| Impedance: | 47 kΩ~100 kΩ |
| Compliance (dynamic): | 12 × 10^-6 cm/dyne at 100 Hz |
| Stylus pressure range: | 1.25 ± 0.25 g ( 12.5 ± 2.5 mN) |
| Weight: | 6 g (cartridge only) |
| Replacement stylus: | EPS-24CS |
Specifications subject to change without notice.
Weight and dimensions shown are approximate.
*This rating refers to turntable assembly alone, excluding effects of record, cartridge or tonearm, but including platter.
Measured by obtaining signal from built-in frequency generator of motor assembly.
Rumble: -56 dB (IEC 98A Unweighted) -78 dB (IEC 98A Weighted)
■ Tonearm section
| Type: | Statically-balanced straight tonearmPlug-in connector cartridge system |
| Effective length: | 230 mm (9-1/16") |
| Overhang: | 15 mm (19/32") |
| Tracking error angle: | Within 2°32' at the outer groove of 30 cm (12") recordWithin 0°32' at the inner groove of 30 cm (12") record |
| Friction: | Less than 7 mg (lateral/vertical) |
| Effective mass: | 7.5 g (without cartridge) |
| Stylus pressure adjustment range: | 1.25±0.25 g |
| Applicable cartridge weight range: | 6 g |
| Phono cable capacitance: | 135 pF |
Notes and maintenance
■ Do not touch or hold the tonearm during automatic operation.
■ Carefully remove dust and dirt from records and stylus. (Fig. 25)
Dust and dirt degrade sound quality and cause excessive wear of the stylus and grooves.
■ Wipe the dust cover and turntable base with a soft, dry cloth.
Never use volatile cleaners such as alcohol, benzine or thinner.
Do not use chemically treated dust cloths. Do not expose the cover to insecticide spray.
To remove stubborn spots, first pull out the AC plug and detach the cover.
Then wipe the cover with a soft cloth slightly moistened with a mild soap and water solution.
Do not wipe the cover during play, or the tonearm may be attracted toward the cover due to the generation of static electricity.
■ Using a stabilizer is not recommended because it may interfere with the performance of the double-isolated suspension cabinet.
■ Transporting and shipping the turntable
Pack the unit in the reverse order from unpacking. Use the original packing material if possible. Otherwise, take these steps:
- Remove the platter and mat and wrap them together with sufficient protection for the motor-rotor on the underside of the platter.
●Tape or tie the tonearm to the arm rest so it cannot shake free.
- Wrap the turntable base with a blanket or soft paper to avoid scratches or damage.
■ Playing special records
Follow "Manual play" for playing the following types of records. (Special records may interfere with correct automatic operation.)
This is not a malfunction of the turntable.
●Non-standard size records [standard sizes (EIA, IEC, DIN, JIS) and 17 (7"), 25 (10") and 30 cm (12").
(However, 25 cm (10") records can not be selected automatically by the record size sensor.)
●Sono-sheets, or light and thin records.
●Badly warped records.
■ About the strobe
This unit's strobe illuminator LED is synchronized with the quartz crystal oscillator frequency.
Use the strobe as a reference for precise speed rotation.
Note:
Unlike conventional units, the strobe illuminator is not synchronized with fluorescent lamps.
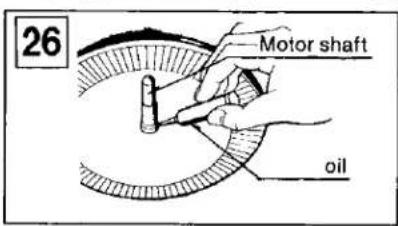
■ Lubricating the motor shaft (Fig. 26)
Apply 2 or 3 drops of oil after every 2000 hours of operation. Note that the interval between lubrication is much longer than for conventional motors (200–500 hours).
Be sure to use only special oil (part number SFWO 010) available from your audio dealer.
Suggestions for safety
Before using this unit, be sure to read applicable items of the operating instructions and these safety suggestions carefully; and afterwards keep them handy for future reference. Take special care to follow the warnings indicated on the unit itself as well as in the operating instructions.
- Avoid places where there is water or humidity.
Do not use this unit near a bathtub, washbasin, swimming pool, or the like. Damp basements should also be avoided.
- Do not allow water or any foreign object to get inside this unit.
Do not place small metal objects or anything containing liquid on or near the unit.
- Avoid placement of the unit where it will be exposed to the direct rays of the sun, or where ventilation is inadequate.
Do not place this unit in a bookcase or between cabinets, or where curtains or furniture may obstruct the ventilation holes.
- Place this unit away from heat-emitting appliances.
Never place this unit near a radiator, heat register, stove, or any other heat-emitting equipment (including amplifiers).
- Placement
Place the unit on a stable, vibration-free, level shelf or stand.
- Use of a cart or stand.
When deciding on a cart or stand, be sure to use only with the cart or stand recommended by the manufacturer.
- Wall or ceiling installation.
If the unit is to be mounted on a wall or ceiling, be sure to do so only as recommended by the manufacturer.
8. Check the voltage rating of this unit before connecting the unit to a power supply.
Be sure to connect the unit only to the type of power supply indicated in the operating instructions, or as indicated on the unit itself.
- Care of the power cord and plug.
Take care that the cord is not bent sharply (especially near its connection to the unit or near the plug), that nothing is placed on it, and that it is not pinched or crushed. Never take hold of the plug or cord if your hand is wet, and always be sure to grasp the plug body when connecting or disconnecting it.
- If the unit will not be used for a long period of time:
Be sure to disconnect the power cord.
- Maintenance
Refer to the operating instructions for details.
- Never attempt repairs yourself:
(a) If the power cord or plug is damaged.
(b) If a foreign object or liquid falls into the unit.
(c) If the unit is exposed to rain.
(d) If the unit does not function normally, or if operation shows an unusual change.
(e) If the unit has been dropped and the cabinet or chassis are damaged ... etc.
Unplug the power cord and consult with a qualified technician (or the dealer from whom the unit was purchased or the nearest servicenter).
- Repairs
Except for adjustments explained in the operating instructions, do not attempt any repairs yourself. Be sure to request service from a qualified technician (or your dealer or nearest servicenter).
Note:
- The record size sensor does not operate for 25 cm (10") records or other records of non-standard sizes. Operate the turntable manually in such cases.
- When there is no record on the turntable mat, the platter will rotate once or twice but tonearm will not move toward the center spindle.
- Push the on • off switch to the off (■) position to turn off the unit.
■ Manual play
- Perform steps 1-4 of automatic playback.
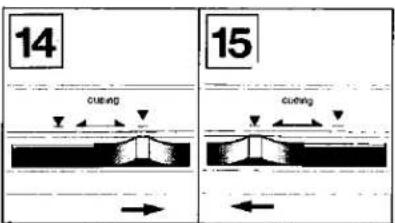
- Set the cueing control to the "▼" position. (Fig. 14)
- Move the tonearm over the desired groove. The platter will start turning.
- Set the cueing control to the "☐" position (Fig. 15)
At the end of the record, the tonearm will automatically return to the arm rest and the turntable will stop.
■ Repeat play
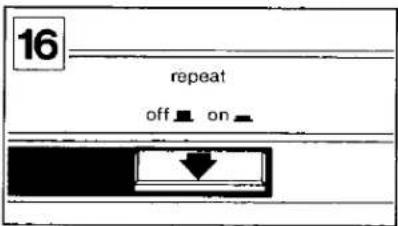
Push the repeat switch to the "on" position (■). (Fig. 16)
To stop repeat play, push the repeat switch again to the off (■) position.
Note:
Do not set the repeat switch during automatic operation (auto-start, auto-return).
■ Stopping the turntable
Push the start/stop switch. (Fig. 13)
The tonearm will return to the arm rest and the turntable will stop.
■ Temporarily interrupting play
Set the cueing control to the “▼” position. (Fig. 14)
This will make the tonearm rise off the record.
■ Playing 45-rpm records having large center holes
Put the 45-rpm adaptor over the center spindle. (Fig. 17)
Push the "45" speed selector. (Fig. 12.)
■ If the unit is not to be used for some time
Secure the tonearm with the arm clamp.
If the cartridge has a detachable stylus protector, put it back on after use.
Close the dust cover.
Adjustments
Arm-lift height adjustment
The arm-lift height (distance between the stylus tip and the record surface when the cueing control is at the “▼” position) has been adjusted at the factory to approximately 5 to 8 mm (3/16"\~5/16"). (Fig. 18)
If the clearance is too narrow or too wide, turn the adjustment screw clockwise or counterclockwise. (Fig. 19)
Clockwise rotation
—distance between the record and stylus tip is decreased.
Counterclockwise rotation
—distance between the record and stylus tip is increased.
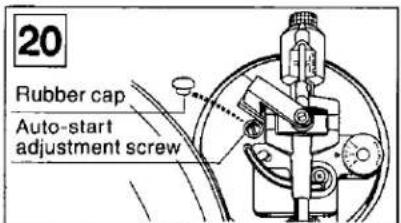
■ Adjustment of automatic start position
(Fig. 20)
Note:
The auto-start and auto-return adjustment screws are located together.
When the tonearm is in or near the arm rest the auto-start adjustment screw is visible (Fig. 20), when the tonearm is near the center of a record, the auto-return adjustment screw is visible. (Fig. 21)
If the stylus does not land in the lead-in groove, adjust as follows.
- Clamp the tonearm to the arm rest.
-
Remove the rubber cap. (Fig. 20)
-
Turn the screw with a screwdriver, clockwise or counterclockwise as necessary.
If the stylus tip sets down too far in the recorded groove, —turn counterclockwise.
If the stylus tip sets down outside of the record, —turn clockwise.
Adjust so the stylus tip lands 1\~2 mm in from the edge of the record.
■ Adjustment of automatic return position
(Fig. 21)
(Remove the rubber cap.)
- Put the stylus protector on the cartridge.
- Move the tonearm toward the center of the record. The auto-return adjustment screw will appear.
If the tonearm tends to return to the arm rest before the play has finished,
—turn counterclockwise.
If the tonearm fails to return after the final groove, —turn clockwise.
Stylus replacement
The replacement stylus for this cartridge is EPS-24CS.
Stylus life varies with the conditions of use.
Noise or scratchiness may indicate a worn or damaged stylus.
Stylus replacement is recommended after about 1000 hours of playing time. Holding the sides of the stylus assembly, pull out to remove the old stylus. Line up the new stylus assembly with the cartridge and push in firmly so that the stylus is securely in place (Fig. 22)
Notes:
- Be very careful not to touch the stylus tip or cantilever during above procedures.
●There should be no gap between the stylus assembly and the cartridge body.
Cartridge replacement
Plug-in connector cartridges are now available from Ortofon (Denmark), Shure (U.S.A.), Audio Technica (Japan) as well as from Technics. All of these cartridges are designed for perfect matching with this turntable in all areas including weight, tracking force, stylus tip position, and center of gravity. Therefore, you have the option of employing a wide range of cartridge from the world's top manufacturers without the trouble of lead wire connections or tracking force adjustment.
- Attach the tonearm to the arm rest with the tonearm clamp.
- Remove the cartridge attachment screw.
- Carefully pull the cartridge out from the tonearm being sure you don't touch the stylus.
- Align the pins on the new cartridge with the tonearm connector and plug it into the tonearm as far as it will go. (Fig. 23)
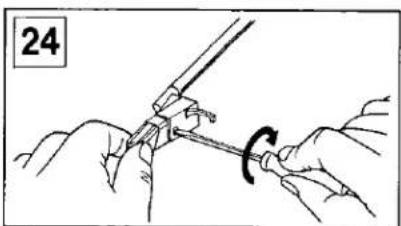
- Tighten the cartridge attachment screw.(Fig. 24)
Matsushita Electric Trading Co., Ltd.
P.O. Box 288, Central Osaka Japan
PC PA PE XS XL EK