
SL-1210MK7EB - Turntable TECHNICS - Free user manual and instructions
Find the device manual for free SL-1210MK7EB TECHNICS in PDF.


| Type | Direct Drive Manual Turntable |
| Drive Method | Coreless Direct Drive (Brushless DC Motor) |
| Turntable Platter | Aluminum Diecast, Diameter: 332 mm, Weight: Approx. 1.8 kg (including slipmat and slip sheet) |
| Turntable Speeds | 33-1/3 rpm, 45 rpm, 78 rpm (selectable via switch) |
| Pitch Control Range | ±8% or ±16% (selectable) |
| Starting Torque | 1.8 kg-cm |
| Build-up Time | 0.7 s from standstill to 33-1/3 rpm |
| Wow and Flutter | 0.025% WRMS |
| Tone Arm Type | Static Balance, Effective Length: 230 mm, Overhang: 15 mm |
| Arm Height Adjustment Range | 0 – 6 mm |
| Stylus Pressure Adjustment Range | 0 – 4 g (direct reading) |
| Anti-skating Control | Adjustable to match stylus pressure |
| Head Shell Weight | Approx. 7.6 g |
| Applicable Cartridge Weight (without auxiliary weight) | 5.6 – 12.0 g |
| Power Supply | AC 110 – 240 V, 50/60 Hz |
| Power Consumption | 8.0 W (ON), Approx. 0.2 W (OFF) |
| Dimensions (W x H x D) | 453 x 169 x 353 mm |
| Mass | Approx. 9.6 kg |
| Operating Temperature Range | 0 °C to +40 °C |
| Operating Humidity Range | 35% to 80% RH (no condensation) |
| Special Functions | Reverse playback, torque/brake adjustment, LED colour selection (red/blue), stylus light, ±16% pitch |
| Included Accessories | Turntable, slipmat, slip sheet, dust cover, head shell, balance weight, PHONO cable, PHONO earth lead, AC mains lead, cartridge screw set, EP record adaptor |
Frequently Asked Questions - SL-1210MK7EB TECHNICS
User questions about SL-1210MK7EB TECHNICS
0 question about this device. Answer the ones you know or ask your own.
Ask a new question about this device
Download the instructions for your Turntable in PDF format for free! Find your manual SL-1210MK7EB - TECHNICS and take your electronic device back in hand. On this page are published all the documents necessary for the use of your device. SL-1210MK7EB by TECHNICS.
USER MANUAL SL-1210MK7EB TECHNICS
natural_image
Black Technics 1000/1000 transceiver with visible branding and control knobs (no text-heavy elements)SL-1210MK7
Direct Drive Turntable System
Operating Instructions
Music is borderless and timeless, touching people's hearts across cultures and generations.
Each day the discovery of a truly emotive experience from an unencountered sound awaits.
Let us take you on your journey to rediscover music.
Rediscover Music™
Technics
Delivering the Ultimate Emotive Musical Experience to All
At Technics we understand that the listening experience is not purely about technology but the magical and emotional relationship between people and music.
We want people to experience music as it was originally intended and enable them to feel the emotional impact that enthuses and delights them.
Through delivering this experience we want to support the development and enjoyment of the world's many musical cultures. This is our philosophy.
With a combination of our love of music and the vast high-end audio experience of the Technics team, we stand committed to building a brand that provides the ultimate emotive musical experience by music lovers, for music lovers.
Director
Michiko Ogawa

Introduction
Thank you for purchasing this product. Please read these instructions carefully before using this product, and save this manual for future use.
- About descriptions in these operating instructions - Pages to be referred to are indicated as “(⇔ 00)”.
- The illustrations shown may differ from your unit.
Sales and Support Information
Customer Communications Centre
- For customers within the UK: 0333 222 8777
● For customers within Ireland: 01 447 5229 - Monday–Friday 9:00 am – 5:00 pm, (Excluding public holidays).
- For further support on your product, please visit our website: www.technics.com/uk/
Features
Coreless direct drive motor for high torque and reliability
- The newly developed coreless direct drive motor can reduce minute vibration during rotation while maintaining high torque.
- The high-precision motor control technology switches the drive mode depending on the operational status of the motor and thus enables high torque and stability.
- The digital control method improves tracking and accuracy, allowing for accurate and stable pitch control.
High-precision bearings for highly sensitive tone arm
- The machine-cut, high-precision bearing used in the tone arm bearing with gimbal suspension allows for improved tracking, making skating less likely even during the most intense performances.
Vibration-cutting highly rigid cabinet and high-damping insulator
- This unit is designed to not only deliver high-quality sound and high feedback resistance, but also to efficiently cut off external vibration in very loud environments.
Functions to deliver a wide range of performances
- Allows for torque and brake speed adjustment.
- Allows for reverse playback.
- Allows the user to select from two LED lamp colours depending on user's preference or the environment.
Table of contents
Before use
Safety precautions ....04
Accessories 07
Parts Name 08
Getting started
Putting the player together ....09
- Attaching the cartridge ....09
- Attaching the head shell ......09
- Before fitting the turntable ....11
- Fitting the turntable ....11
● Fitting the slipmat .....11 - Attaching the balance weight ......11
- To remove turntable ....11
Connections and installation ....12
- Connecting to a pre-main amplifier or component system / Connecting to a mixer ....12
- Installation ....13
● Fit the dust cover .....13
Adjustment....14
● Horizontal balance .....14
- Stylus pressure ....14
- Anti-skating 15
● Tone arm height .....16
- Armlift height ......17
- Operation settings
(LED colour setting / Reverse playback setting / 78 rpm setting / Torque setting / Brake setting)....17
Playing back
Playing records 18
Pitch control (fine adjustment to pitch) .....20
Maintenance
Maintenance....21
Troubleshooting guide ......22
Specifications....23
Safety precautions
Warning Caution
Unit
- To reduce the risk of fire, electric shock or product damage,
-Do not expose this unit to rain, moisture, dripping or splashing.
-Do not place objects filled with liquids, such as vases, on this unit.
-Use only the recommended accessories.
-Do not remove covers.
-Do not repair this unit by yourself. Refer servicing to qualified service personnel.
-Do not let metal objects fall inside this unit.
-Do not place heavy items on this unit.
AC mains lead
- To reduce the risk of fire, electric shock or product damage,
-Ensure that the power supply voltage corresponds to the voltage printed on this unit.
-Insert the mains plug fully into the socket outlet.
-Do not pull, bend, or place heavy items on the lead.
-Do not handle the plug with wet hands.
-Hold onto the mains plug body when disconnecting the plug.
-Do not use a damaged mains plug or socket outlet. - The mains plug is the disconnecting device. Install this unit so that the mains plug can be unplugged from the socket outlet immediately.
- Ensure the earth pin on the mains plug is securely connected to prevent electrical shock.
-An apparatus with CLASS I construction shall be connected to a mains socket outlet with a protective earth connection.
Unit
- Do not place sources of naked flames, such as lighted candles, on this unit.
- This unit may receive radio interference caused by mobile telephones during use. If such interference occurs, please increase separation between this unit and the mobile telephone.
- This unit is intended for use in moderate climates.
- Do not put any objects on this unit. This unit becomes hot while it is on.
Placement
- Place this unit on an even surface.
- To reduce the risk of fire, electric shock or product damage,
-Do not install or place this unit in a bookcase, built-in cabinet or in another confined space.
Ensure this unit is well ventilated.
-Do not obstruct this unit's ventilation openings with newspapers, tablecloths, curtains, and similar items.
-Do not expose this unit to direct sunlight, high temperatures, high humidity, and excessive vibration. - Ensure that the placement location is sturdy enough to accommodate the weight of this unit ( 23).
- Do not lift or carry this unit by holding the knobs. Doing so may cause this unit to fall, resulting in personal injury or malfunction of this unit.
- Keep any IC card or magnetic card such as a credit card away from the turntable.
-Otherwise the IC card or magnetic card may become unusable due to the magnetic effect.
Caution for AC Mains Lead
(For the AC mains plug of three pins)
For your safety, please read the following text carefully.
This appliance is supplied with a moulded three pin mains plug for your safety and convenience.
A 10-ampere fuse is fitted in this plug.
Should the fuse need to be replaced please ensure that the replacement fuse has a rating of 10-ampere and that it is approved by ASTA or BSI to BS1362.
Check for the ASTA mark ♦ or the BSI mark on the body of the fuse.
If the plug contains a removable fuse cover you must ensure that it is refitted when the fuse is replaced.
If you lose the fuse cover the plug must not be used until a replacement cover is obtained.
A replacement fuse cover can be purchased from your local dealer.
Before use
Remove the connector cover.
How to replace the fuse
The location of the fuse differ according to the type of AC mains plug (figures A and B).
Confirm the AC mains plug fitted and follow the instructions below.
Illustrations may differ from actual AC mains plug.
- Open the fuse cover with a screwdriver.

- Replace the fuse and close or attach the fuse cover.

Safety precautions (continued)
Disposal of Old Equipment
Only for European Union and countries with recycling systems

These symbols on the products, packaging, and/or accompanying documents mean that used electrical and electronic products must not be mixed with general household waste.
For proper treatment, recovery and recycling of old products, please take them to applicable collection points in accordance with your national legislation.
By disposing of them correctly, you will help to save valuable resources and prevent any potential negative effects on human health and the environment.
For more information about collection and recycling, please contact your local municipality.
Penalties may be applicable for incorrect disposal of this waste, in accordance with national legislation.
Accessories
In order to prevent damage during shipping some of the equipment has been disassembled. Please check and identify the supplied accessories. (Some accessories parts are supplied in a bag.)
Turntable (1 pc.) (TYL0332)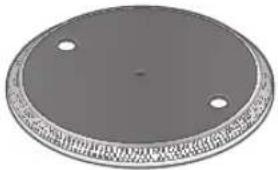 | Slipmat (1 pc.) (TBMX5361)Slip sheet (1 pc.) (TBMX5371) One of each is provided with the unit. The slip sheet is a thin, transparent sheet.Be careful not to throw it away by mistake. One of each is provided with the unit. The slip sheet is a thin, transparent sheet.Be careful not to throw it away by mistake. | Dust cover (1 pc.) (TTFA0454)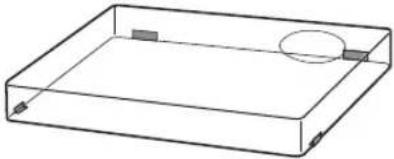 |
| Technics label (1 pc.) (TBMA7331) Technics | ||
EP record adaptor (1 pc.) (TPH0339) | Balance weight (1 pc.) (TYL0295) | Head shell (1 pc.) (TYL0331) |
Screw set for cartridge (1 set) (TTV0022)Nuts (2 Screws-short (2 pc.) Screws-long (2 pc.) Washers (2 pc.) (Supplied in a bag) | PHONO cable (1pc.) (K4EY4YY00003) pc.)  | PHONO earth lead (1pc.) (K4EY1YY00189) |
AC mains lead (1 pc.) (K2CT3YY00096) | ||
- The model numbers of the accessories are as of February 2019.
They are subject to change without notice. - Keep the packaging materials after taking out the goods.
You will need them when carrying the product over long distances. - Follow the local regulations when disposing of the product.
- Do not use any other AC mains lead, PHONO cable and PHONO earth lead except the supplied one.
- Keep the cartridge, nuts, screws and washers out of reach of children to prevent swallowing.
Parts Name
Numbers such as ( 18) indicate reference pages.

Back

Putting the player together
Attaching the cartridge
Attention
- When performing scratching (including reverse play), use a cartridge and stylus for DJs.
1 Attach a cartridge (store-bought) tentatively.
Follow the cartridge's instructions to correctly attach it to the head shell, and tighten the screws lightly.
- If the mounting screws are included in the cartridge, use them.
- When playing SP records, use a cartridge for SP records.
- Use a commercially available mini flat screwdriver (4 mm).
- Be careful not to touch the stylus tip.
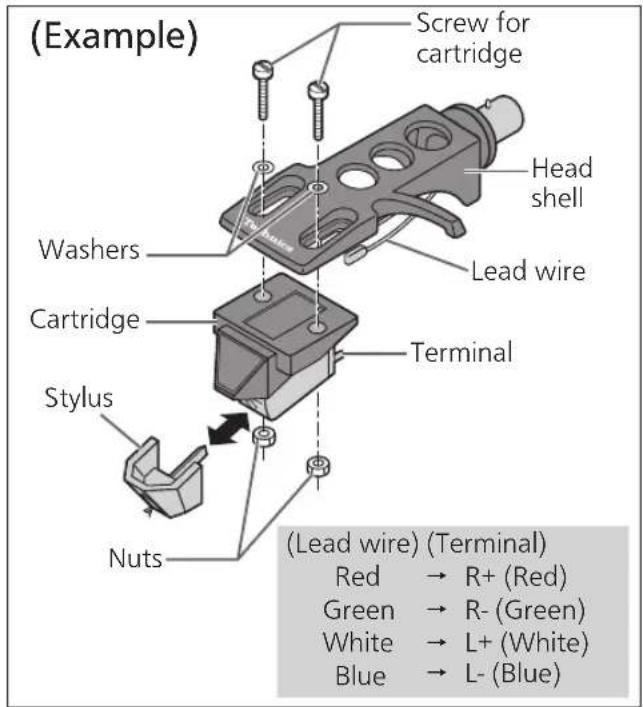
2 Adjust the overhang.
- Be careful not to touch the stylus tip.
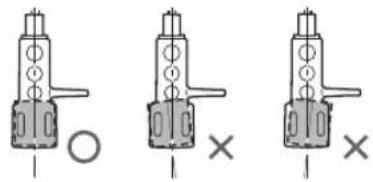
① Move the cartridge to adjust the overhang in such a way that the stylus tip is at 52 mm from the head shell mounting end, as shown in the figure below.

② The cartridge should be parallel on the shell head when viewed from the top and side (the illustration is the top view).
natural_image
Three mechanical component diagrams showing a cylindrical assembly with mounting holes and a cross symbol, no text or labels present.③ Tighten the screw for cartridge.
- Be careful not to allow the cartridge to slip out of place.

Note
- The head shell stand ( 8) can be used to store the head shell with the cartridge attached, or to store the head shell temporarily removed to replace the cartridge and the like. It allows you to prevent cartridge and/or stylus failure or trouble due to head shell overturning.
- Depending on the cartridge type, attaching the dust cover ( 13) when the head shell is stored in the head shell stand with the cartridge attached may cause the dust cover to touch and break the cartridge. Be sure the head shell is not stored in the head shell stand when attaching the dust cover.
Attaching the head shell
3 Fit the head shell with the cartridge into the tone arm. Keep the head shell horizontal and tighten the locking nut.
- Be careful not to touch the stylus tip.

Putting the player together (continued)
In order to prevent damage during shipping, some of the equipment has been disassembled. Put the player together in the following order.
Attention
- Before setting up, put on the stylus guard to protect the stylus tip, return the tone arm to the arm rest and fix it with the arm clamp.
- Do not connect the AC mains lead until set up is complete.
- When fitting the turntable, prevent foreign material from getting in between the main unit and turntable.
- Do not touch or scratch the board.

Before fitting the turntable
1 Remove the magnet cover from the turntable.
- There is a magnet and its cover on the back side of the turntable. Remove the magnet cover before fitting to the main unit.
Back side of the turntable

Attention
- Keep any magnetic-sensitive object such as a magnetic card and watch away from the magnet.
● Prevent the turntable from hitting the main unit or falling off. Prevent dust or iron powder from adhering to the magnet on the back side. - Do not touch the fixing screws (three locations) of the turntable. The rating performance cannot be guaranteed if they are out of position.
Fitting the turntable
2 Slowly set the turntable on the centre spindle.
Attention
- Be careful when handling the turntable, as it is heavy.
- Keep your fingers from being caught.
● Wipe off fingerprints or dirt with a soft cloth.
Fitting the slipmat
3 Lay the slipmat and slip sheet on the turntable.
- A record on the rotating turntable can be stopped manually as well as rotated in reverse.
- Laying a slip sheet on the turntable changes the slip-cueing feel.

Attention
- When performing scratching (including reverse play), use a cartridge and stylus for DJs.
Attaching the balance weight
4 Attach the balance weight to the rear of the tone arm.
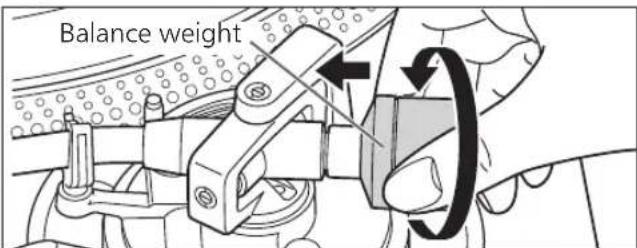
Note
● The inside of the balance weight is greased.
To remove the turntable
As shown in the figure on the right, set your fingers in the two holes on the turntable, hold the centre spindle down and remove the turntable upward.

natural_image
Illustration of a hand pressing down on a circular object with an upward arrow (no text or symbols)Connections and installation
- Turn off all units and disconnect the AC mains lead from the socket before making any connections.
- Connect the AC mains lead only after all other connections are completed.
- Be sure to connect the PHONO earth lead. Otherwise mains hum may occur.
- Refer also to the instruction manual of the connected device.
1 Connect the PHONO cable and PHONO earth lead to the PHONO input terminals of the connected equipment.
- You will not have adequate volume or sound quality if the connected amplifier has no PHONO input terminals.
2 Connect the AC mains lead.
- Confirm the wattage of the AC outlet on the connected equipment before using it for this unit. For the power consumption of this unit, see the specifications. (⇒ 23)
Connecting to a pre-main amplifier or component system / Connecting to a mixer


Attention
- Tighten the PHONO earth terminal using a Phillips head screwdriver.
Note
- The operation switch does not separate entire unit from mains even if in "OFF" position. Remove the plug from the mains socket if you will not be using the unit for an extended period of time. Place the unit so that the plug can be easily removed.
Installation
Install the unit on a horizontal surface protected from vibrations.
Keep this unit as far as possible from speakers.
■ Adjusting the height to make the unit horizontal

Raise the main unit to turn the insulators and adjust the height.
- Clockwise: Reduces the height.
- Anti-clockwise: Increases the height.
Attention
- Do not turn the insulators too far. Doing so may cause them to come off or damage them.
Fit the dust cover
1 While holding the dust cover from both sides, put it in place by aligning its four corners with the four corners of the unit.
- When removing, lift the dust cover straight up.

natural_image
Illustration of hands operating a CD or DVD disc with a measuring tool, showing mechanical components and a vertical arrow indicating measurement direction (no text or symbols present)Attention
- Return the tone arm to the arm rest and fix it with the arm clamp before you attach or detach the dust cover.
- Remove the dust cover while playing.
- Be sure the stylus light ( 19) is pressed down when attaching the dust cover. If the dust cover is attached with the stylus light raised, it may touch the dust cover.
■ Notes for installation
- Before you move the unit, turn the unit off, pull out the power plug and disconnect all connected devices.
- Ensure the unit is not exposed to direct sunlight, dust, humidity, and heat from a heating appliance.
- This unit may pick up interference from a radio if there is one nearby. Keep the unit as far as possible from a radio.
- Do not install the unit on a heat source.
- Avoid a place with large temperature variations.
- Avoid a place with frequent condensation.
- Avoid an unstable place.
- Do not put an object on the unit.
- Do not install the unit in a confined space such as a book shelf.
● Install the unit at a position well away from walls or other devices to ensure effective heat radiation from the inside of the unit. - Make sure the installation location is sufficiently strong to withstand the total weight of the unit and system. ( 23)
- Note that the unit may be damaged by cigarette smoke or moisture from an ultrasonic humidifier.
Condensation
Think of taking out a cold bottle from a refrigerator. If you leave it in a room for a while, dewdrops will form on the bottle surface. This phenomenon is called "condensation".
- Conditions causing condensation
◇ Rapid temperature change (caused by moving from a warm place to a cold place or vice versa, rapid cooling or heating, or direct exposure to cooled air)
◇ High humidity in a room with much steam, etc.
◇ Rainy season
- Condensation may damage the unit. If it has occurred, turn the unit off and leave it until it adapts to the ambient temperature (approximately 2 to 3 hours).
Adjustment
Horizontal balance Stylus pressure
Preparation
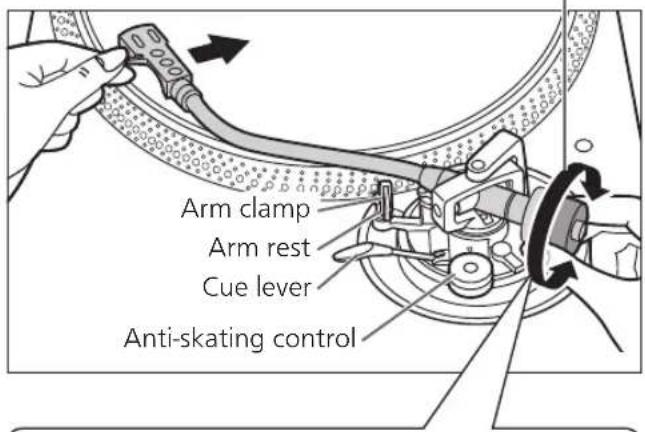
- Remove the stylus cover, taking care not to damage the stylus, then release the arm clamp.
- Lower the cue lever.
- Turn the anti-skating control to "0".
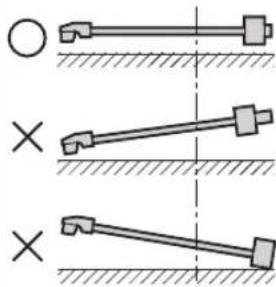
1 Free the tone arm from the arm rest and adjust horizontal balance by turning the balance weight.
Hold the tone arm and turn the balance weight in the arrow direction to adjust the balance until the arm is approximately horizontal.
● Take care not to allow the stylus tip to touch the turntable or main unit.
Balance weight

natural_image
Diagram showing three mechanical linkage configurations with cross symbols, no text or labels presentBalanced and the tone arm is parallel to the turntable.
The balance weight is too far forward.
The balance weight is too far back.
Preparation
- Return the tone arm to the arm rest and fix it with the arm clamp.
1 Turn the stylus pressure control until "0" comes to the centre line of the rear of the tone arm.
● Hold the balance weight still while doing this.


Note
- Refer to the user's guide for your stylus for the appropriate stylus pressure.
2 Turn the balance weight to adjust to the appropriate stylus pressure for the cartridge.
● The stylus pressure control will turn together with the balance weight.
- Turn until the centre line points to the appropriate stylus pressure.
Balance weight

Hold here to turn Turns together

Anti-skating
1 Turn the anti-skating control to adjust it to the same value as the stylus pressure control.

natural_image
Illustration of a hand using a mechanical tool to adjust a dial indicator (no text or symbols present)Note
- For stylus pressures 3 g and above, adjust anti-skating control to "3".
- When performing scratching (including reverse play), adjust the anti-skating control depending on the scratch movements to perform to reduce skating.
Adjustment (continued)
Tone arm height
Make this adjustment only if the cartridge you are using makes it necessary.
Preparation
- Put a record on the turntable.
1 Release the arm lock.
Arm lock

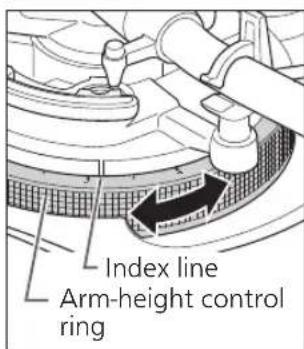
2 Adjust the height with the arm-height control ring.
Adjust the arm height until the tone arm becomes parallel to the record.
① Use the chart below as reference to find the appropriate position mark for the height of your cartridge.
(For supplied head shell)
 | Cartridge height (H) in millimeters | Height control position |
| 17 | 0 | |
| 18 | 1 | |
| 19 | 2 | |
| 20 | 3 | |
| 21 | 4 | |
| 22 | 5 | |
| 23 | 6 |
② Turn the arm-height control ring to align the position mark with the index line. 0 to 6 mm are marked on the arm-height control ring.
Note
- When performing scratching (including reverse play), adjust the arm-height control ring depending on the scratch movements to perform to reduce skating.
- When you don't know the cartridge height (H) or when you don't use the supplied head shell
Remove the stylus cover, taking care not to damage the stylus, then release the arm clamp. Lower the cue lever, rest the stylus on the record and adjust the height control until the tone arm and record are parallel.
- If the cartridge height (H) is too small to make them parallel to each other, add a "cartridge spacer" (not supplied).

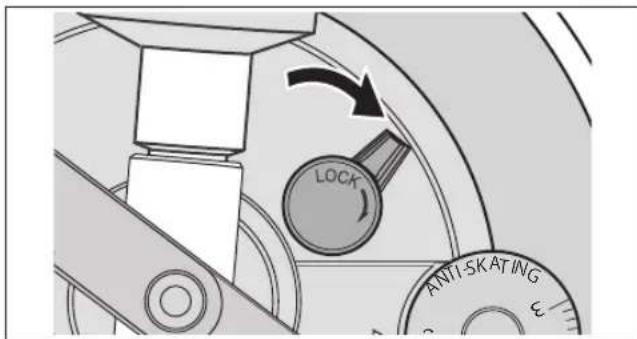
3 After arm height adjustment is finished, lock the tone arm by turning the arm lock knob.
- Be sure to turn the arm lock knob to the end as shown in the figure below. You may need to apply some force to do so.
Attention
- Be careful not to damage the stylus tip.
- Do not use the product with the arm lock released.
- For finer adjustment, use a level (not included) to adjust the arm height so that the cartridge becomes parallel to a record.
Armlift height
Make an adjustment according to your cartridge if necessary.
Preparation
- Put a record on the turntable.
- Remove the stylus cover, taking care not to damage the stylus, then release the arm clamp.
- Lift the cue lever and move the tone arm over the record.
1 Check the armlift height (distance between the stylus tip and record surface).
If adjustment is needed, go to step 2.
- The armlift height is factory-adjusted to 8 to 13 mm.

2 Return the tone arm to the arm rest and fix it with the arm clamp. Turn the adjustment screw.
- Turning the screw clockwise lowers the armlift.
- Turning the screw anti-clockwise raises the armlift.

Operation settings
Allows for LED colour setting, reverse playback setting, 78 rpm setting, torque setting and brake setting.
①Turn the unit off and pull out the power plug. ②Adjust as desired by setting the switches with a fine Phillips head screwdriver and the like.

LED colour setting
Allows you to select red or blue for the colour of the strobe light, speed select buttons, pitch range select button and RESET LED lamp.
| Switch no.: 1 (LED) | |
| Red | OFF (Factory setting) |
| Blue | ON |
Reverse playback setting
Allows you to disable or enable reverse playback. ( 19)
| Switch no.: 3 (REV) | |
| REV disabled | OFF (Factory setting) |
| REV enabled | ON |
78 rpm setting
Allows you to disable or enable 78 rpm. ( 19)
| Switch no.: 4 (78) | |
| 78 rpm disabled | OFF (Factory setting) |
| 78 rpm enabled | ON |
Torque setting
Allows you to select from four levels of strength to adjust the torque.
| Switch no.: 5 (TQ1) Switch no.: 6 (TQ2) | |||
| High | 1 | ON ON | |
| 2 | OFF ON | ||
| Low | 3 | OFF (Factory setting) OFF (Factory setting) | |
| 4 | ON OFF | ||
Brake setting
Allows you to select from four levels of brake strength to stop the turntable after [START-STOP] is pressed.
| Switch no.: 7 (BK1) Switch no.: 8 (BK2) | |||
| High | 1 | OFF ON | |
| 2 | OFF (Factory setting) OFF (Factory setting) | ||
| 3 | ON OFF | ||
| Low | 4 | ON ON | |
Playing records
Preparation
★1 Put a record (not included) on the turntable.
*2 Take off the stylus cover and release the arm clamp.
1 Turn [ON/OFF] to turn the unit on.
The strobe light comes on. 33-1/3 rpm is automatically selected and the indicator [33] lights.
2 Press [START-STOP].
The turntable starts revolving.
Strobe light


Attention
Do not press [START-STOP] when the turntable is removed.
If you have accidentally pressed [START-STOP]
- The indicator of the speed select button ([33] or [45]) starts blinking.
If it is blinking, turn [ON/OFF] to turn the unit off, fit the turntable and then turn [ON/OFF] to turn the unit on.

3 Press [RESET] to light the pitch control RESET LED lamp.
The unit plays at a preset pitch (33-1/3, 45 or 78 rpm) regardless of the [PITCH ADJ] position.
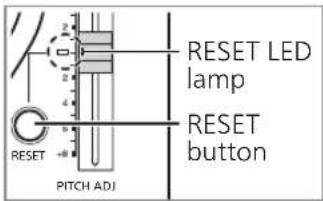
● Fine adjustment to pitch ( 20)
4 Lift the cue lever and move the tone arm over the record.
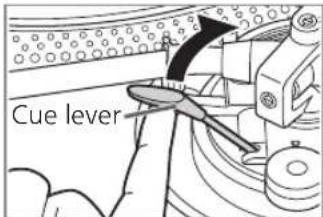
5 Lower the cue lever slowly. The tone arm moves down slowly.

natural_image
Mechanical assembly diagram showing a lever mechanism with no visible text or symbolsPlay starts.
■ To play in reverse
- Enable reverse playback with the Reverse playback setting ( 17).
- Simultaneously press the turntable speed select button or buttons ([33], [45] or [33] and [45]) and [START-STOP] while the turntable is rotating.
- Reverse playback starts at the turntable speed selected by pressing the speed select button or buttons.
- To return to normal playback, press [START-STOP] again while pressing the turntable speed select button or buttons.
- Pressing [START-STOP] again after pressing [START-STOP] during reverse playback starts normal playback.
- Simultaneously pressing the turntable speed select button or buttons and [START-STOP] with the turntable stopped starts reverse playback.
■ To temporarily stop play
Lift the cue lever.
● The stylus lifts off the record.
- To start play again, lower the cue lever.
■ When play finishes
① Lift the cue lever, return the tone arm to the arm rest and lower the cue lever.
② Press [START-STOP]. The electronic brake gently stops the turntable.
③ Turn [ON/OFF] to turn the unit off.
④ Clamp the tone arm with the arm clamp.
⑤ Put the stylus cover back on (to protect the stylus tip).
■ To light up the stylus
The stylus tip is illuminated during play.
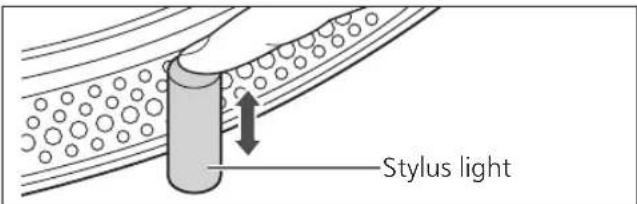
Press the stylus light.
● The stylus light (white LED) rises up and illuminates the stylus.
- Press down the stylus light to turn off the light.
■ When playing EP records
- Press the speed select button [45] ([45] lights).
- Fit the EP record adaptor over the centre spindle.
■ When playing SP (78 rpm) records
- Enable 78 rpm with the 78 rpm setting ( 17).
- Press the speed select buttons [33] and [45] at the same time (78 rpm: [33] and [45] light).
■ When using a record stabilizer (not included)
- See the instruction manual of the record stabilizer.
● Maximum weight: 1 kg
Pitch control (fine adjustment to pitch)
1 Press [RESET] to turn off the RESET LED lamp.
2 Press the pitch range select button to select the pitch range.
• [×2] light on: ±16 %
- [×2] light off: ±8 %
3 While the turntable is revolving
Slide [PITCH ADJ].
- Pitch can be adjusted between approx. -8 % and +8 % or approx. -16 % and +16 % according to your selection.
● The numbers represent approximate percentages for your adjustment.
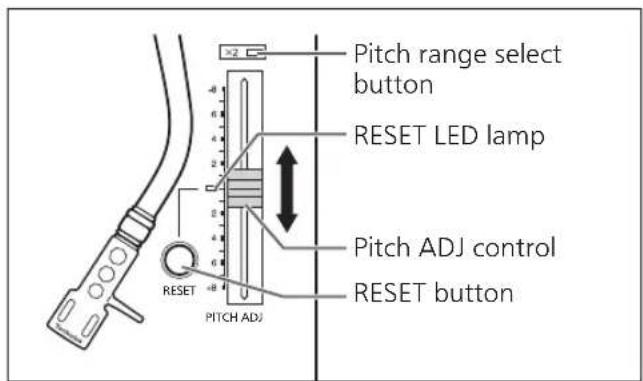
■ To reset pitch to the preset value
Press [RESET].
The RESET LED lamp lights and the pitch immediately returns to a preset value regardless of the [PITCH ADJ] position.
(33-1/3, 45 or 78 rpm)
- RESET LED on: Fixed to the preset value.
- RESET LED off: Can be adjusted with [PITCH ADJ].
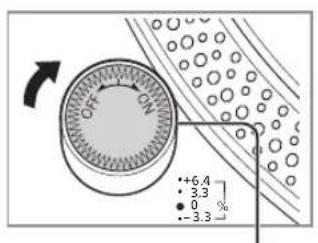
■ To measure pitch
The four rows of strobe mirrors around the edge of the turntable can assist you in measuring pitch.
Strobe mirrors
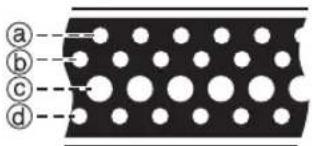
(a)+6.4% change in pitch when stationary
(b)+3.3% change in pitch when stationary
©Normal turntable speed (33-1/3, 45 or 78 rpm) when stationary
(d)-3.3 % change in pitch when stationary
Attention
The strobe mirrors are lit by the strobe light (LED lighting) synchronized with the precise frequency of the digital control.
Always use this LED lighting to measure the pitch.

Maintenance
■ Care of the parts
Thoroughly clean dust off the stylus and record.
- Take off the head shell with the cartridge and clean the stylus using a soft brush. Brush from the base to the tip.
- Use a record cleaner to keep your records clean.
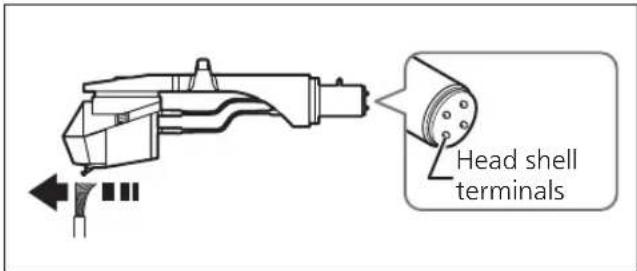
Wipe the head shell terminals occasionally. Wipe the head shell terminals with a soft cloth and fit the head shell to the tone arm.
Turn the amplifier volume down or turn the amplifier off before fitting or removing the head shell.
Damage to your speakers can occur if the head shell is moved while the volume is turned up.
■ Cleaning the dust cover and cabinet
Wipe the dust cover and cabinet with a soft cloth.
Do not touch the board while cleaning. Otherwise, the player may fail.
When dirt is heavy, wring a wet cloth tightly to wipe the dirt, and then wipe it with a soft cloth.
- Do not use solvents including benzene, thinner, alcohol, kitchen detergent, a chemical wiper, etc. This might cause the exterior case to be deformed or the coating to come off.
- Do not wipe the dust cover when it is in place. Doing so may cause the tone arm to be attracted towards the dust cover as a result of the generated static electricity. Be sure the dust cover is removed while playing a record.
■ Moving the unit
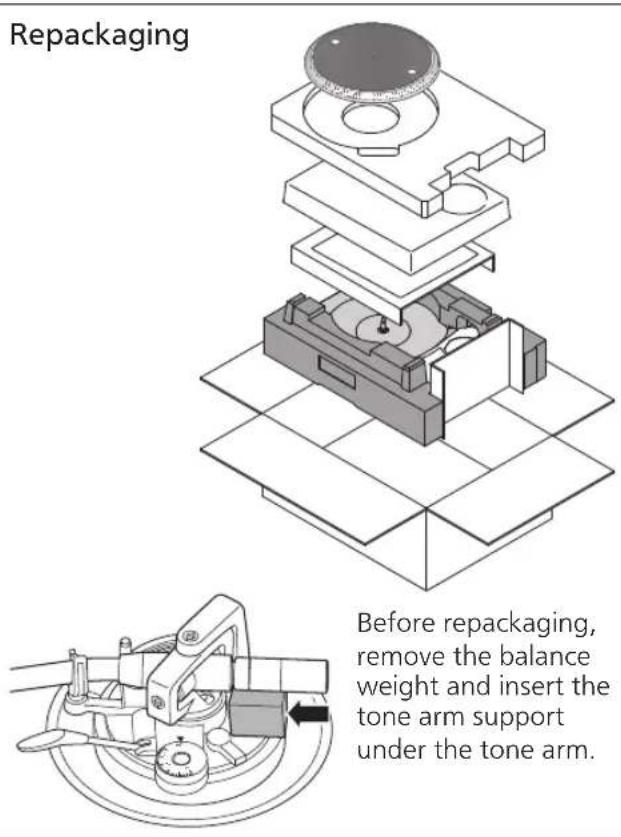
Repackage the unit in the packaging it came in.
Keep the packaging materials after taking out the goods.
If you no longer have the packaging, do the following:
● Take off the turntable and slipmat and carefully wrap them.
- Remove the head shell and balance weight from the tone arm and carefully wrap them
- Clamp the tone arm with the arm clamp and tape it in place.
- Carefully wrap the main unit in a blanket or paper.
■ WEEE symbol
Disposal of the product outside the EU countries

This symbol is valid within the EU only.
Contact a local governmental office or your dealer to confirm a right manner of disposal.
Troubleshooting guide
Before requesting service, make the below checks. If you are in doubt about some of the check points, or if the remedies indicated in the chart do not solve the problem, contact your dealer.
No power.
- Is the AC mains lead plugged in?
→Plug the mains lead in firmly. (⇒ 12)
There is power but no sound.
Sound is weak.
- Are connections to the amplifier/receiver's PHONO terminals correct?
→Connect the PHONO cables to the amplifier's PHONO input terminals. (⇒ 12)
Left and right sounds are reversed.
- Are the stereo connection cable connections to the amplifier or receiver reversed?
→Double check all connections. (⇒ 12) - Are connections of the head shell's lead wires to the cartridge terminals correct?
→Double check all connections. (⇒ 9)
Humming is heard during play.
- Are there other appliances or their AC mains lead near the stereo connection cable?
→Separate the appliances and their AC mains lead from this unit. - Is the earth lead connected?
→Make sure the earth lead is correctly connected. (⇒ 12)
The indicator on the speed select button [33] or [45] blinks.
Perform the following operations when the indicator on the speed select button [33] or [45] blinks. The symptom may be improved.
① Turn [ON/OFF] to OFF.
② Pull out the power plug, wait for three seconds, and then insert the plug again.
③ Turn [ON/OFF] to ON and press [START-STOP] to rotate the turntable.
- If the indicator on the speed select button blinks again, check which one is blinking and contact our service representative.
Specifications
| General | |
| Power supply AC 1 | 10 - 240 V, 50/60 Hz |
| Power consumption | 8.0 W (ON)Approx. 0.2 W (OFF) |
| Dimensions (W×H×D) | 453 x 169 x 353 mm |
| Mass Approx. 9.6 k | g |
| Operating temperature range | 0 °C to +40 °C |
| Operating humidity range | 35 % to 80 % RH(no condensation) |
| Turntable section | |
| Type Direct drive manual turntable | |
| Drive method Direct drive | |
| Motor Brushless DC motor | |
| Turntable platter Aluminum diecast Diameter: 332 mm Weight: About 1.8 kg (Including slipmat and slip sheet) | |
| Turntable speeds 3 | 3- 1/3 rpm, 45 rpm(with switch 78 rpm) |
| Variable range pitch | ±8, ±16 % |
| Starting torque 1.8 k g-cm | |
| Build-up characteristics | 0.7 s. from standstill to 33-1/3 rpm |
| Braking system Electronic brake | |
| Wow and flutter 0 | 025 % WRMS |
| Tone arm section | |
| Type Static Balance | |
| Effective length 23 | 0 mm |
| Overhang 15 mm | |
| Tracking error angle | Within 2° 32'(at the outer groove of 30 cm (12") record)Within 0° 32'(at the inner groove of 30 cm (12") record) |
| Offset angle 22° | |
| Arm-height adjustment range | 0 - 6 mm |
| Stylus pressure adjustment range | 0 - 4 g (direct reading) |
| Head shell weight | Approx. 7.6 g |
| Applicable cartridge weight range | 5.6 - 12.0 g(without auxiliary weight)14.3 - 20.7 g(including the head shell) |
| Shell terminal ø1.2 | mm 4 pin terminal |
Specifications are subject to change without notice.
Manufactured by : Panasonic Corporation
Kadoma, Osaka, Japan
Importer for Europe : Panasonic Marketing Europe GmbH
Panasonic Testing Centre
Winsbergring 15, 22525 Hamburg, Germany
EU

Panasonic Corporation
Web Site: http://www.panasonic.com
- SL-1210MK7
- Technics
- Delivering the Ultimate Emotive Musical Experience to All
- Introduction
- Features
- Table of contents
- Before use
- Getting started
- Playing back
- Maintenance
- Safety precautions
- Warning Caution
- Unit
- AC mains lead
- Placement
- Caution for AC Mains Lead
- How to replace the fuse
- Safety precautions (continued)
- Disposal of Old Equipment
- Only for European Union and countries with recycling systems
- Accessories
- Parts Name
- Putting the player together
- Attaching the cartridge
- Attention
- Attach a cartridge (store-bought) tentatively.
- Adjust the overhang.
- Note
- Attaching the head shell
- Fit the head shell with the cartridge into the tone arm. Keep the head shell horizontal and tighten the locking nut.
- Putting the player together (continued)
- Before fitting the turntable
- Remove the magnet cover from the turntable.
- Fitting the turntable
- Slowly set the turntable on the centre spindle.
- Fitting the slipmat
- Lay the slipmat and slip sheet on the turntable.
- Attaching the balance weight
- Attach the balance weight to the rear of the tone arm.
- To remove the turntable
- Connections and installation
- Connect the PHONO cable and PHONO earth lead to the PHONO input terminals of the connected equipment.
- Connect the AC mains lead.
- Connecting to a pre-main amplifier or component system / Connecting to a mixer
- Installation
- Fit the dust cover
- Adjustment
- Horizontal balance Stylus pressure
- Preparation
- Free the tone arm from the arm rest and adjust horizontal balance by turning the balance weight.
- Turn the stylus pressure control until "0" comes to the centre line of the rear of the tone arm.
- Turn the balance weight to adjust to the appropriate stylus pressure for the cartridge.
- Anti-skating
- Turn the anti-skating control to adjust it to the same value as the stylus pressure control.
- Adjustment (continued)
- Tone arm height
- Release the arm lock.
- Adjust the height with the arm-height control ring.
- - When you don't know the cartridge height (H) or when you don't use the supplied head shell
- After arm height adjustment is finished, lock the tone arm by turning the arm lock knob.
- Armlift height
- Operation settings
- LED colour setting
- Reverse playback setting
- rpm setting
- Torque setting
- Brake setting
- Playing records
- Turn [ON/OFF] to turn the unit on.
- Press [START-STOP].
- Press [RESET] to light the pitch control RESET LED lamp.
- Lift the cue lever and move the tone arm over the record.
- Lower the cue lever slowly. The tone arm moves down slowly.
- ■ To play in reverse
- ■ To temporarily stop play
- ■ When play finishes
- ■ To light up the stylus
- Press the stylus light.
- ■ When playing EP records
- ■ When playing SP (78 rpm) records
- ■ When using a record stabilizer (not included)
- Pitch control (fine adjustment to pitch)
- ■ Care of the parts
- ■ Cleaning the dust cover and cabinet
- ■ Moving the unit
- ■ WEEE symbol
- Troubleshooting guide
- No power.
- There is power but no sound.
- Sound is weak.
- Left and right sounds are reversed.
- Humming is heard during play.
- The indicator on the speed select button [33] or [45] blinks.
- Specifications
Brand : TECHNICS
Model : SL-1210MK7EB
Category : Turntable