ARMSTSLG - Office StarTech.com - Free user manual and instructions
Find the device manual for free ARMSTSLG StarTech.com in PDF.

| Product Type | Single Monitor Arm |
| Brand | StarTech.com |
| Model | ARMSTSLG |
| Maximum Screen Size | 32 inches |
| Weight Capacity | 22 lbs (10 kg) |
| VESA Compatibility | 75x75mm, 100x100mm |
| Material | Steel and Aluminum |
| Installation Type | Clamp or Grommet Mount |
| Adjustment Type | Tilt, Swivel, Height |
| Tilt Range | -45° to +45° |
| Swivel Range | 180° |
| Height Adjustment | 12 inches (30 cm) |
| Cable Management | Integrated cable clips |
| Arm Reach | 20 inches (51 cm) |
| Desk Thickness Compatibility | 0.4 to 2.6 inches (1 to 6.6 cm) |
| Weight | 6.5 lbs (2.95 kg) |
| Dimensions (W x D x H) | 4.5 x 8.7 x 22.8 inches (11.4 x 22.1 x 57.9 cm) |
| Color | Black |
| Warranty | 5 years |
| Included Accessories | Mounting hardware, cable clips |
| Maintenance | Wipe with dry cloth; avoid solvents |
| Safety Compliance | UL, TUV, CE |
Frequently Asked Questions - ARMSTSLG StarTech.com
User questions about ARMSTSLG StarTech.com
0 question about this device. Answer the ones you know or ask your own.
Ask a new question about this device
Download the instructions for your Office in PDF format for free! Find your manual ARMSTSLG - StarTech.com and take your electronic device back in hand. On this page are published all the documents necessary for the use of your device. ARMSTSLG by StarTech.com.
USER MANUAL ARMSTSLG StarTech.com
natural_image
Black outdoor flatbed storage stand with adjustable arms and base (no text or symbols visible)ARMSTSLG
*actual product may vary from photos
FR: Guide de l'utilisateur - fr.startech.com
DE: Bedienungsanleitung - de.startech.com
ES: Guía del usuario - es.startech.com
NL: Gebruiksaanwijzing - nl.startech.com
PT: Guia do usuário - pt.startech.com
IT: Guida per l'uso - it.startech.com
For the latest information, technical specifications, and support for this product, please visit www.StarTech.com/ARMSTSLG or www.StarTech.com/ARMSTSCORNR
Use of Trademarks, Registered Trademarks, and other Protected Names and Symbols
PHILLIPS ^® is a registered trademark of Phillips Screw Company in the United States or other countries.
This manual may make reference to trademarks, registered trademarks, and other protected names and/or symbols of third-party companies not related in any way to StarTech.com. Where they occur these references are for illustrative purposes only and do not represent an endorsement of a product or service by StarTech.com, or an endorsement of the product(s) to which this manual applies by the third-party company in question. Regardless of any direct acknowledgement elsewhere in the body of this document, StarTech.com hereby acknowledges that all trademarks, registered trademarks, service marks, and other protected names and/or symbols contained in this manual and related documents are the property of their respective holders.
Warning Statements
- Assemble this product according to the instructions.
- Read the entire manual and ensure the instructions are fully understood before assembling and/or using this product.
- Do not exceed the weight capacity of this product. Overloading this product might result in injury or property damage.
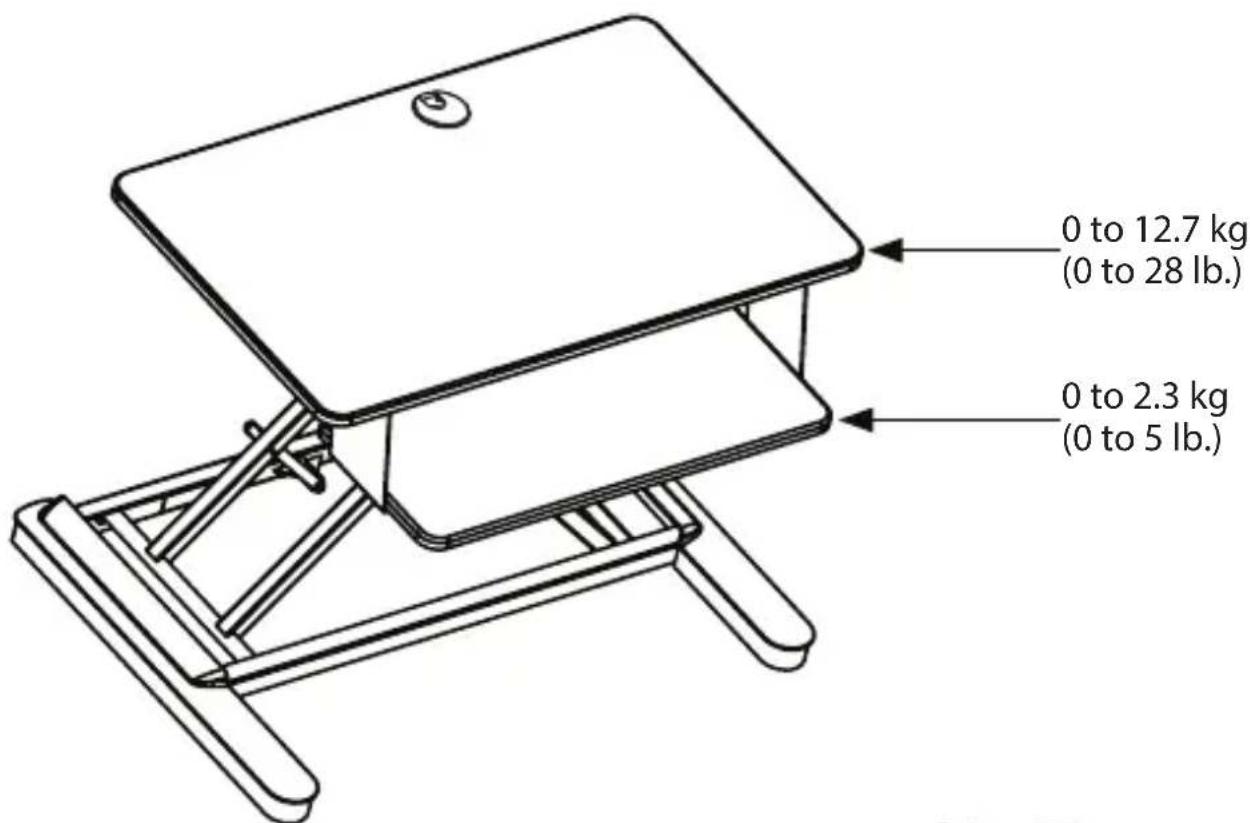
• Weight capacity of the workstation: 12.7 kg (28 lb.)
• Weight capacity of the keyboard tray: 2.3 kg (5 lb.)
- Do not allow children to climb on this product, or use this product without proper supervision.
- This product is intended for indoor use only and should not be used outdoors.
- Do not over-tighten the screws. If any resistance is encountered, stop tightening.
- Never operate this product if parts are missing or damaged.
- Ensure the desk or mounting surface for this product can support the combined weight of the workstation and the mounted equipment. Failure to do so may result in property damage and/or personal injury.
- When lowering or raising the workstation, ensure the mounted equipment is properly secured or supported and the speed is slow enough to prevent any equipment instability. Failure to do so may result in property damage and/or personal injury.
- Ensure all equipment cables are of adequate length for the highest workstation position. Failure to do so may result in property damage and/or personal injury.
- Tipping Hazard! This product is freestanding and therefore prone to tipping if mishandled or overloaded. Exercise caution when moving, loading, unloading and adjusting the product. Failure to do so could result in equipment damage and/or personal injury.
- Stored Energy Hazard! This product contains a spring mechanism which can cause the assembly and/or mounted equipment to move forcibly, and quickly, when released via the actuating lever or handle. Read and follow the operating instructions and heed any precautions provided. Before operating the lever or handle, understand the motion created by the spring mechanism and always exercise caution. Failure to do so may result in property damage and/or serious personal injury.
- Pinch hazard! Keep your fingers clear from moving components when you move the workstation up or down
Varningsmeddelanden
Raise or lower the Workstation....6
Adding equipment to the Workstation......7
Place free-standing equipment onto the Workstation....7
Clamp equipment to the grommet hole 9
Adjust the tension of the Workstation....10
Reposition the keyboard tray....11
Warranty Information 13
Limitation of Liability....13
Product dimensions ARMSTSLG

text_image
160 mm (6.3") 22 mm (0.9)
text_image
15 mm (0.6") 15 mm (0.6") 560 mm (22.0") 422 mm (16.6")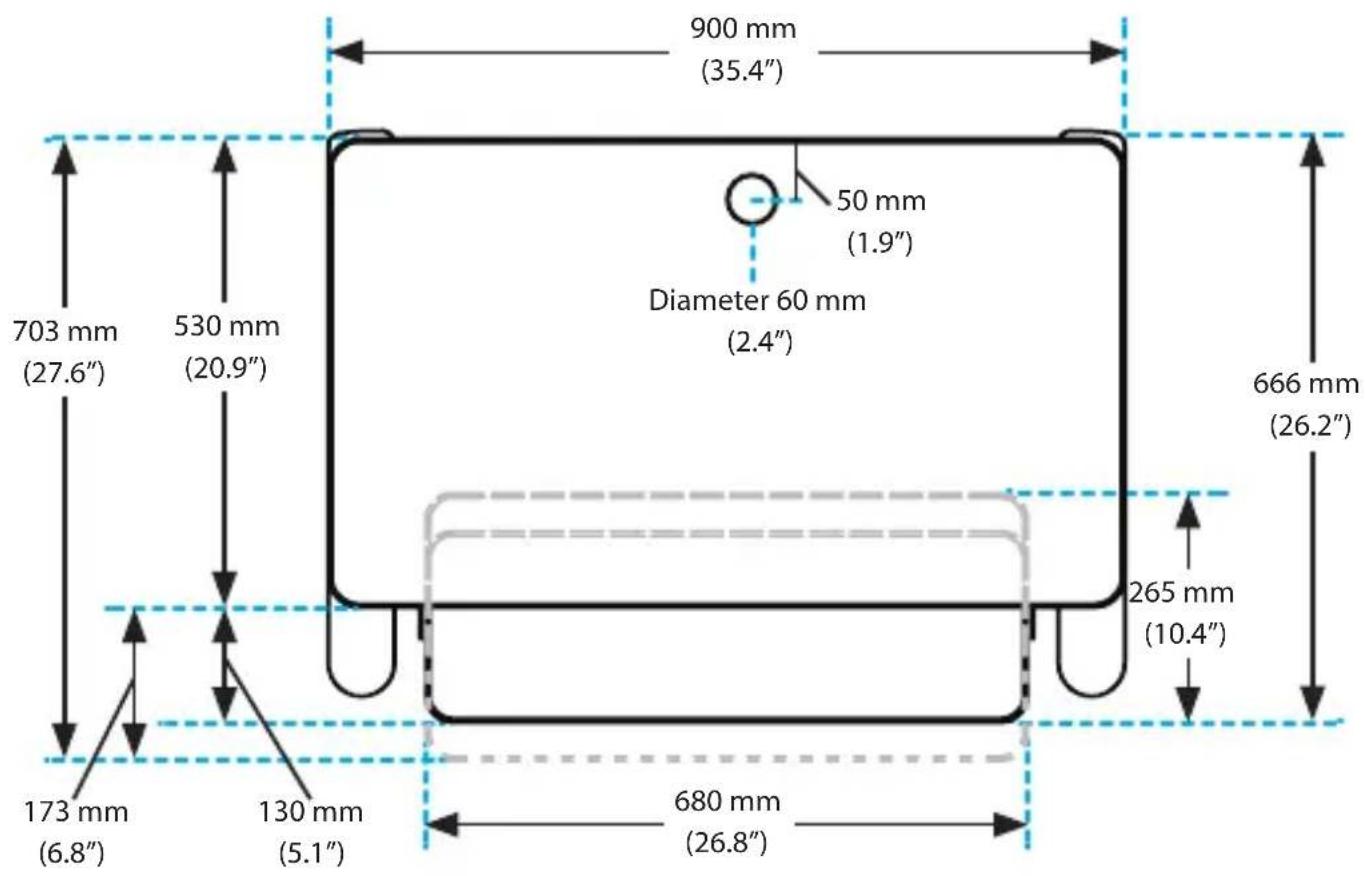
text_image
900 mm (35.4") 703 mm (27.6") 530 mm (20.9") Diameter 60 mm (2.4") 50 mm (1.9") 666 mm (26.2") 265 mm (10.4") 173 mm (6.8") 130 mm (5.1") 680 mm (26.8)Weight capacity
text_image
0 to 12.7 kg (0 to 28 lb.) 0 to 2.3 kg (0 to 5 lb.)Instruction manual
ARMSTSCORNR
text_image
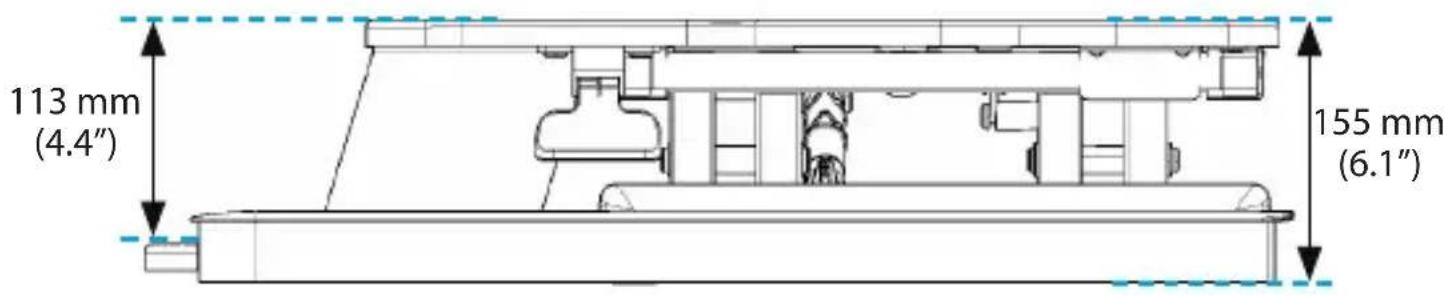
113 mm (4.4") 155 mm (6.1")
text_image
452 mm (17.8") 585 mm (23")
text_image
1135 mm (44.7") 449.66 mm (17.7") 50 mm (1.97") 667 mm (26.3") 530 mm (20.9") 60 mm (2.4") 640 mm (25.2") 128 mm (5") 680 mm (26.8)Weight capacity

text_image
0 to 12.7 kg (0 to 28 lb.) 0 to 2.3 kg (0 to 5 lb.)Package contents
• 1 x sit-to-stand workstation
- 1 x small hex key
- 1 x large hex key
- 1 x clamp plate
- 1 x M10 x 50 mm bolt
- 1 × ^3/_8 - 16 × 50 ~mm bolt
• 1 x instruction manual
Requirements
- 1 x wrench (if you use the grommet hole to mount your equipment)
Requirements are subject to change. For the latest requirements, please visit www.StarTech.com/ARMSTSLG
-- or --
www.StarTech.com/ARMSTSCORNR.
Raise or lower the Workstation
Stored Energy Hazard! This product contains a spring mechanism which can cause the assembly and/or mounted equipment to move forcibly, and quickly, when released via the actuating lever or handle. Read and follow the operating instructions and heed any precautions provided. Before operating the lever or handle, understand the motion created by the spring mechanism and always exercise caution. Failure to do so may result in property damage and/or serious personal injury.
Tipping Hazard! This product is freestanding and therefore prone to tipping if mishandled or overloaded. Exercise caution when moving, loading, unloading and adjusting the workstation. Failure to do so could result in equipment damage and/or personal injury.
Pinch hazard! During the upward or downward movement of the workstation, pinch points can be created by the sliding and rotating components. To avoid injury or property damage, keep your hands, arms and property away from these moving components and pinch points. Failure to follow this instruction may result in property damage and/or serious injury.
Caution! Ensure all equipment cables are of adequate length for the highest workstation position. Failure to do so may result in property damage and/or personal injury.
Warning! When lowering or raising the workstation, ensure the mounted equipment is properly secured or supported and the speed is slow enough to prevent any equipment instability. Failure to do so may result in property damage and/or personal injury.
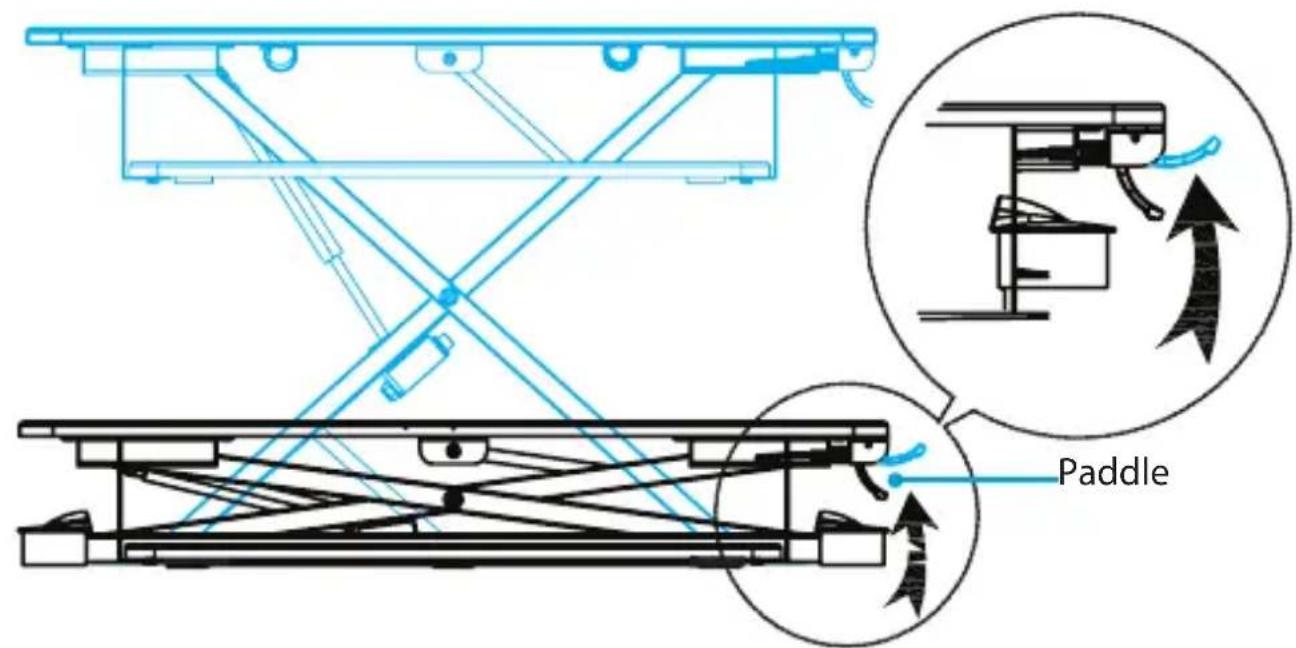
figure 1
text_image
Paddle-
To move the workstation up or down, squeeze the paddle located on the right side of the Workstation. (figure 1)
-
When the workstation is at the desired height, release the paddle to lock the Workstation into position.
Adding equipment to the Workstation
You can place equipment onto the Workstation or you can use the provided hardware and grommet hole to mount your equipment to the Workstation.
Warning! If you attach a monitor arm to the Workstation, make sure that you don't position the monitors beyond the edge of the desk surface. If you extend the monitors past the desk surface, you could create a tipping hazard. Make sure that you lower the Workstation to its lowest position before you add equipment to it, distribute the weight across the Workstation evenly, and don't extend the monitors beyond the edge of the adjustable desk surface.
Place free-standing equipment onto the Workstation
-
Move the Workstation to the lowest position.
-
Place your equipment (for example, monitors, keyboard, mouse, and so on) onto the workstation. (figure 2)
Warning! Do not exceed the weight capacity of the Workstation.
figure 2
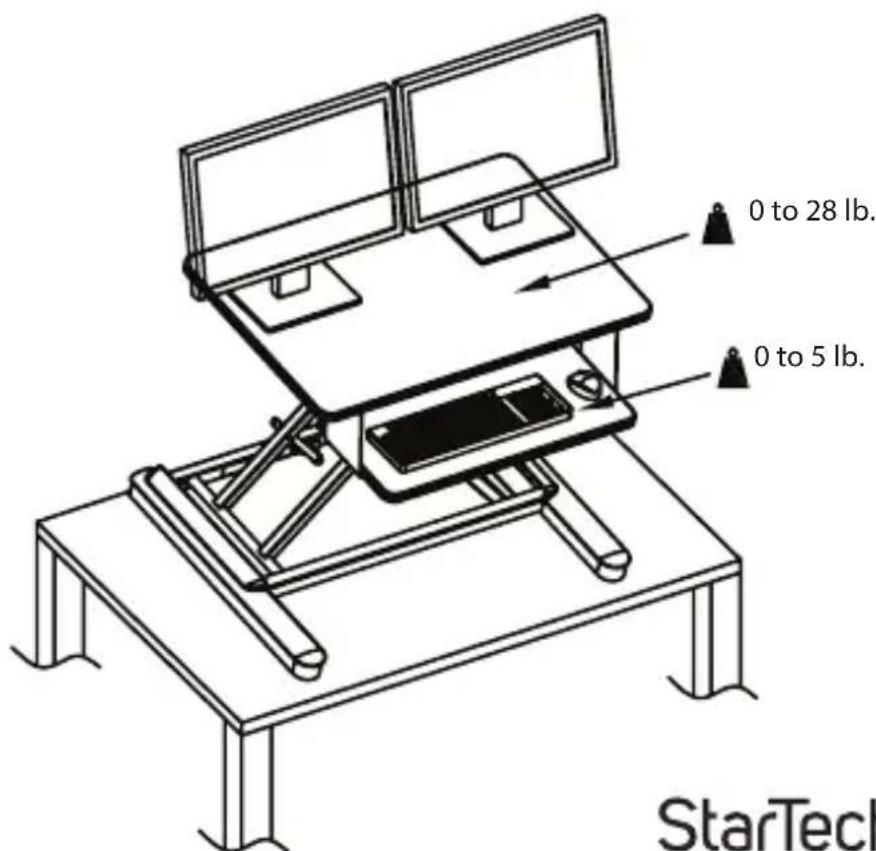
text_image
0 to 28 lb. 0 to 5 lb. StarTech- Make sure that your equipment is stable on the workstation before you move the Workstation.
- Raise the Workstation a short distance. If you can't easily move the Workstation upwards or it begins to move downwards when you squeeze the paddle, you need to adjust the tension. For more information about how to do this, see the "Adjust the tension of the Workstation" section of the manual.
- Position your equipment cables so that they run through the loops located at the back of the Workstation. (figure 3)
- If necessary, reposition the keyboard tray. For more information about how to do this, see the "Reposition the keyboard tray" section of the manual.
figure 3
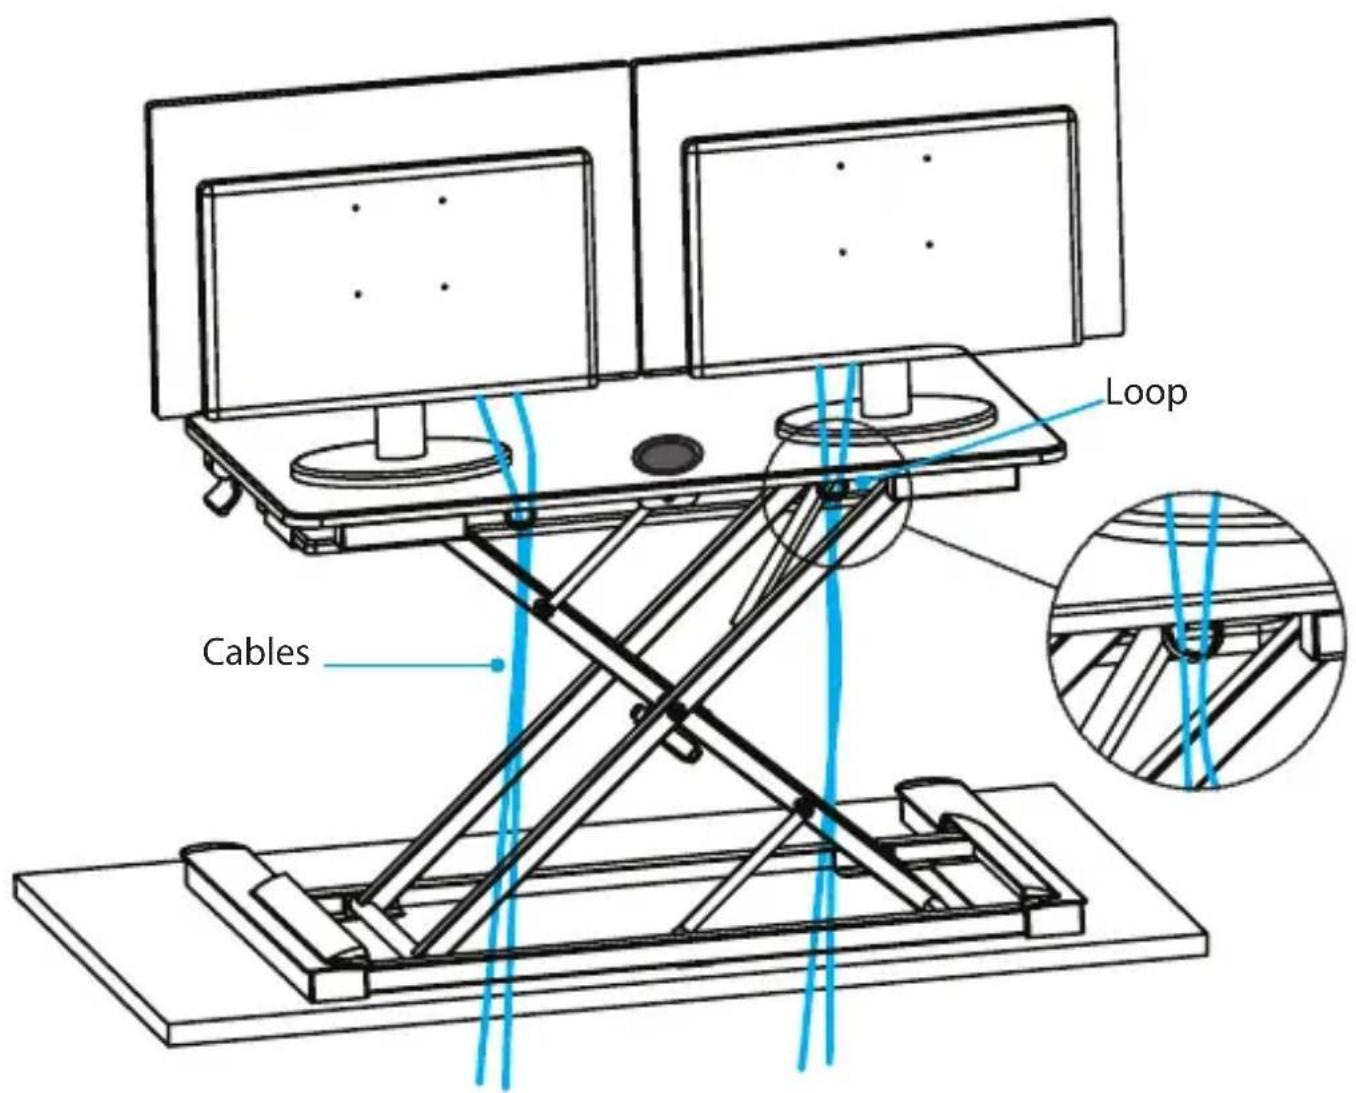
text_image
Cables LoopClamp equipment to the grommet hole
Warning! Do not exceed the weight capacity of the Workstation.
StarTech.com offers optional monitor mounting accessories that are compatible with the Workstation. For example, the ARMDUAL, ARMSLIM, ARMPIVOT, and so on. To attach a mounting accessory to the grommet hole on the Workstation, complete the following steps.
Note: If the mounting accessory is configured for a desk mount, you need to reconfigure it for a grommet hole mount. For more information about how to do this, see the documentation that came with the mounting accessory.
- Move the Workstation to the highest position.
- Position the mounting accessory over the grommet hole on the Workstation.
- Depending on the size of the threaded hole on the mounting accessory, thread either the M10 x 50 mm bolt or the ^3/_8 - 16 x 50 mm bolt through the clamp plate.
Note: If the threaded hole on the mounting accessory isn't compatible with the bolts provided with the Workstation, you may need to use the hardware that came with the mounting accessory, if suitable.
-
Hold the mounting accessory upright, thread the bolt up through the grommet hole and into the accessory, and use a wrench to tighten the bolt. (figure 4)
-
To mount additional equipment, move the Workstation to the lowest position and add your equipment.
figure 4

text_image
Mounting accessory Grommet hole Clamp plate M10 x 50 bolt or ³/₈ - 16 x 50 mm bolt-
Make sure that your equipment is stable on the workstation before you move the Workstation.
-
Raise the Workstation a short distance. If you can't easily move the Workstation upwards or it begins to move downwards when you squeeze the paddle, you need to adjust the tension. For more information about how to do this, see the "Adjust the tension of the Workstation" section of the manual.
-
Position your equipment cables so that they run through the loops located at the back of the Workstation. (figure 5)
-
If necessary, reposition the keyboard tray. For more information about how to do this, see the "Reposition the keyboard tray" section of the manual.
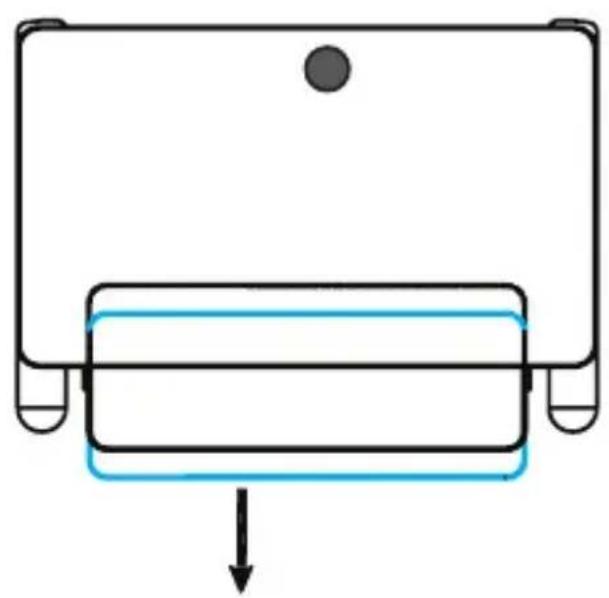
Adjust the tension of the Workstation
Warning! Remove all equipment from the Workstation before you begin to adjust the tension.
- Carefully remove all of the equipment from the Workstation.
figure 5
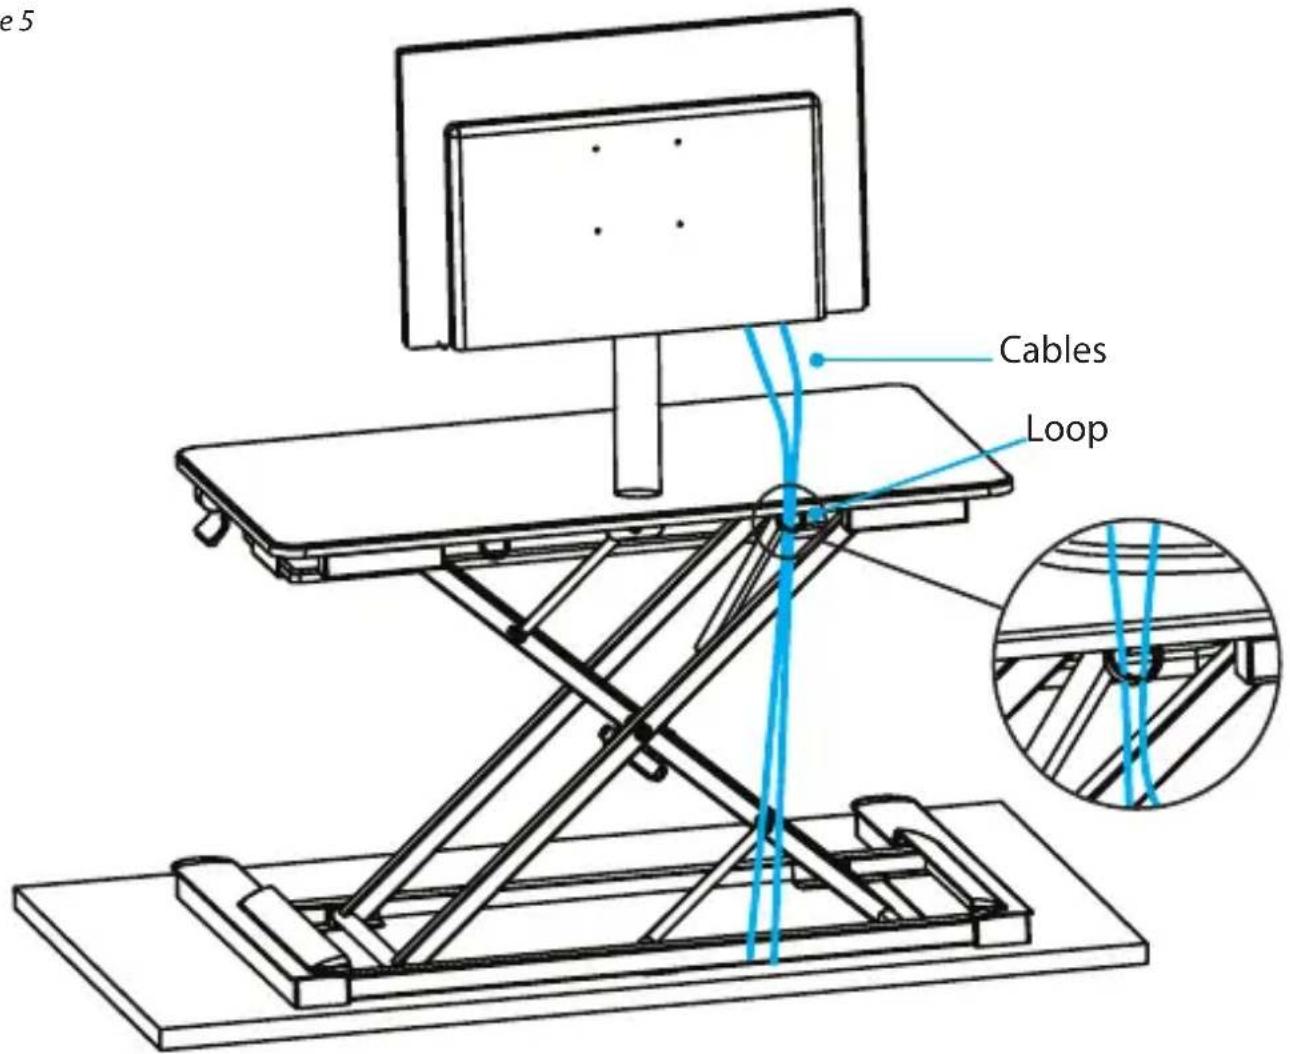
text_image
e 5 Cables Loop-
Raise the Workstation to the highest position.
-
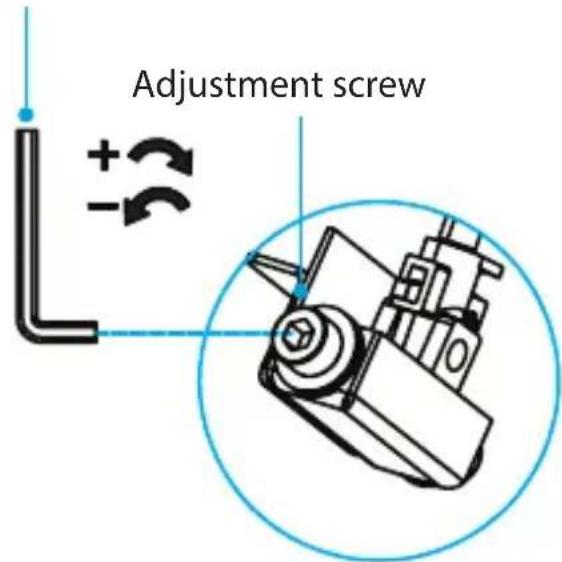
To adjust the tension of the Workstation, use the large hex key to turn the adjustment screw clockwise or counterclockwise. (figure 6)
-
To check to see if the tension requires further adjustment, move the Workstation to the lowest position. Place the equipment back onto the Workstation and do one of the following:
- If the tension is at the appropriate setting for the weight of the equipment, move the Workstation to the desired height.
- If you need to adjust the tension further, complete steps 1 to 3 until the tension is at the appropriate setting for the weight of the equipment.
Reposition the keyboard tray
- Carefully remove all of the equipment from the Workstation.
- Raise the Workstation to a position that enables you to access the underside of the keyboard tray.
- Use the small hex key to remove the two sets of six screws from the underside of the keyboard tray. (figure 7)
- Move the keyboard tray, line up the holes, and insert the two sets of six screws.
- Use the small hex key to tighten the screws.
figure 6

natural_image
Isometric line drawing of a folding table with a flat base and support structure (no text or symbols)Large hex key
text_image
Adjustment screwfigure 7

text_image
Small hex keyNote: The Workstation is flipped over in the first drawing to illustrate where the screws are located.
natural_image
Simple diagram of a mechanical component with a downward arrow indicating force or direction (no text or symbols)Warranty Information
This product is backed by a two-year warranty.
For further information on product warranty terms and conditions, please refer to www.startech.com/warranty.
Limitation of Liability
In no event shall the liability of StarTech.com Ltd. and StarTech.com USA LLP (or their officers, directors, employees or agents) for any damages (whether direct or indirect, special, punitive, incidental, consequential, or otherwise), loss of profits, loss of business, or any pecuniary loss, arising out of or related to the use of the product exceed the actual price paid for the product.
Some states do not allow the exclusion or limitation of incidental or consequential damages. If such laws apply, the limitations or exclusions contained in this statement may not apply to you.
Hard-to-find made easy. At StarTech.com, that isn't a slogan. It's a promise.
StarTech.com is your one-stop source for every connectivity part you need. From the latest technology to legacy products — and all the parts that bridge the old and new — we can help you find the parts that connect your solutions.
We make it easy to locate the parts, and we quickly deliver them wherever they need to go. Just talk to one of our tech advisors or visit our website. You'll be connected to the products you need in no time.
Visit www.startech.com for complete information on all StarTech.com products and to access exclusive resources and time-saving tools.
StarTech.com is an ISO 9001 Registered manufacturer of connectivity and technology parts. StarTech.com was founded in 1985 and has operations in the United States, Canada, the United Kingdom and Taiwan servicing a worldwide market.
Reviews
Share your experiences using StarTech.com products, including product applications and setup, what you love about the products, and areas for improvement.
| StarTech.com Ltd. | StarTech.com LLP | StarTech.com Ltd. | StarTech.com Ltd. |
| 45 Artisans | 4490 South | Unit B, Pinnacle 15 | Siriusdreef 17-27 |
| Crescent | Hamilton Road | Gowerton Road | 2132 WT |
| London, Ontario | Groveport, Ohio | Brackmills, | Hoofddorp |
| N5V 5E9 | 43125 | Northampton | The Netherlands |
| Canada | U.S.A. | NN4 7BW | |
| United Kingdom |
FR: fr.startech.com
DE: de.startech.com
ES: es.startech.com
NL: nl.startech.com
IT: it.startech.com
JP: jp.startech.com