32710 - Battery Lindy - Free user manual and instructions
Find the device manual for free 32710 Lindy in PDF.

User questions about 32710 Lindy
0 question about this device. Answer the ones you know or ask your own.
Ask a new question about this device
Download the instructions for your Battery in PDF format for free! Find your manual 32710 - Lindy and take your electronic device back in hand. On this page are published all the documents necessary for the use of your device. 32710 by Lindy.
USER MANUAL 32710 Lindy
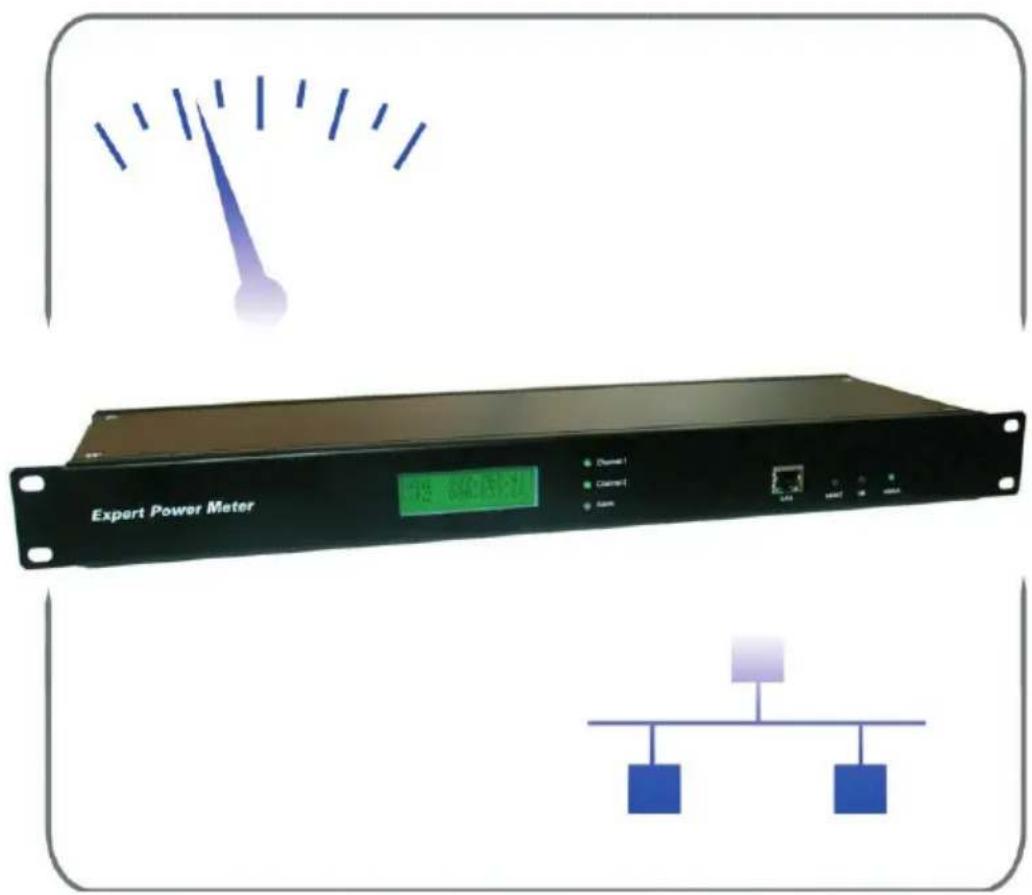
The Energy Meter for IT environments
text_image
Expert Power Meter 78 6403121 Channel 1 Channel 2 Samp USB USB USB
GUDE
ANALOG - und
DIGITALSYSTEME
GmbH
Manual Expert Power Meter
2.1 Extent of delivery 4
2.2 Starting up the device 4
2.3 LCD-Panel 5
2.4 Status LED 5
- Configuration 6
3.1 Automatic confi guration by using DHCF 6
3.2 Configuration by using Gbl_Conf.exe 6
3.3 Configuration by using the Webinterface 7
3.4 IP Access Control List 12
3.5 SNMP 12
3.6 Syslog 13
- Operating 14
4.1 Operating at the device 14
4.2 Controlling EPM by webinterface 15
- Product Features 16
5.1 Bootloader mode 16
5.2 Firmware update 16
5.3 Technical information 17
5.4. Default Settings 17
- Support 18
Declaration of CE conformity 19
Contact 20
Security Advise
The device must be installed only by qualified personnel accord
ing to the following installation and operating instructions. The manufacturer does not accept responsibility in case of improper use of the device and particularly any use of equipment that ma cause personal injury or material damage.
The device contains no user-serviceable parts. All repairs must be performed by factorytrained service personnel.
Check that the power cords, plugs and sockets are in pro condition.
The device can be connected only to 230V AC (50 or 60 Hz sockets.
Always plug the device into properly earthed power sockets
The device is intended for indoor use only. Do NOT install them in an area where excessive moisture or heat is present.
Because of safety and approval issues it is not allowed to modify the device without our permission.
Please note the safety advises and manuals of connected devices, too.
The device is NOT a toy. It has to be used or stored out or range of children.
Packaging material is NOT a toy. Plastics has to be stored out of range of children. Please recycle the packaging materials.
In case of further questions, about installation, operation or usage of the device, which are not clear after reading the manual, please do not hesitate to ask our support team.
1. Description
Expert Power Meter (EPM) is a 19" device, that makes it possible to measure energy consumption for two channels.
It operates as an energy consumption meter and measures current, voltage and active/apparent power. All of these information can be requested by Ethernet or directly at the device.
The energy consumption meter measures the spent energy on two counters, one shows the total energy consumption since starting-up EPM, the other counter is resettable.
2. Hardware
2.1 Extent of delivery
Included in delivery are:
• Expert Power Meter (EPM)
• Power supply cable (IEC)
• CD-ROM containing Software and Manua
2.2 Starting up the device
1.) Connect the power supply cable to the EPM Power Connector on the back side of Expert Power Meter.
Your EPM is now booting and shortly after ready for being connected to consumers and the Ethernet.
2.) Plug the Ethernet cable into the connector on the front side of EPM.
3.) Connect the power cable of one or both consumers to the power-out connectors on the back side of EPM.
If a consumer is active, EPM will automatically start to count the energy consumption.

text_image
Expert Power Meter Channel 1 Channel 2 Alarm LAN select ok status 1 2, 3, 4 5 6 7 8Figure 1 Front side

text_image
9 10 Figure 2 Back side- 2-line LCD-Display
- Channel 1 LED
- Channel 2 LED
- Alarm LED
- Ethernet Connector
- Button „select“
- Button „ok“
- Status LED
- EPM Power Connector (10A)
- 2 x Consumer Power Connector (10 A)
2.3 LCD-Panel
While booting up the device, the product name , the version of the firmware and the IP address o EPM are visible:
- Product name (A) and version of the firmware (B) - IP address (B) of EPM

text_image
Powermeter V1.2 192.168.0.2After booting up energy consumption counters for both clie channels are displayed:
- Channel 1 counter (D) - Channel 2 counter (E)

text_image
kWh1 000,000 kWh2 000,0002.4 Status LED
The Status LED (8) shows different states of the device:
- Status LED red: Device is not connected to the ethernet
- Status LED orange: Device is connected to the ethernet, TCP/IP settings are not allocated
- Status LED green: Device is connected to the ethernet, TCP/IP settings allocated, device is ready to use
- Status LED blinks alternately red and green : Device is in Bootloader mode.
3. Confi guration
3.1 Automatic configuration by using DHCP
After power-up, EPM looks for a DHC server in the network and requests a free IP address from this server.
Please check at your DHCP server, which IP address was provided to EPM and make sure, that this IP address will reserved.
3.2 Configuration by using Gbl\_Conf.exe
To change the TCP/IP settings of your EPM you need the tool Gbl_Conf.exe. This tool can be found on the CD-ROM or is free to download from our website www.gude.infc.
Additionally you can update the firmware, deactivate password and IP ACL and set EPM back to default settings, when you use this tool (see more in chapter 5).
To check the current configuration, please choose your EPM from the list in the left window.
If the displayed IP address is the default IP addre (192.168.0.2) no DHCP server is located in your network or it was not possible to provide a free IP address to EPM.
In this case, activate the bootloader mode of EPM and enter a valid IP address and the network mask. Save your confi guration Program Devic→Save Confi.
Deactivate the bootloader mode of EPM. Then choose Search→All Devices to refresh the status of Gbl_Conf.exe.
Now Gbl_Conf.exe shows the updated TCP/IP configuration of EPM.

text_image
LAN: Loadless v1.35 - search network devices Search - Launch Browser - Open/Show Options ? LAN: Loadless v1.35 - Loadless v1.36 Network Configuration MAC Address: IP Address 00:19:32:00:01:1A 192.168.0.2 Network: Gateway 255.255.255.0 192.168.0.1 Use HTTP password HTTP Port: TCP/IP Settings by DHCP 80 Enable IP ACL GBL serial debug Routing Manual Update Update Current Link: Tubbit, half-uplex Host OS: Windows 2000 Version 5.0, Build 2.195 BootLoader Version: 23 - GBL v4 - vC.ColeFree Resource Version 1.2 Host OS: Windows 2000 Version 5.0, Build 2.195 GBL_Cord.exe v1.35 searching devices, please wait... T Devices foundFigure 3 Gbl_Cont.exe
3.3 Confi guration by using the Webinterface
Open your Browser. Enter the IP address of EPM, to connect with it:
http://"IP-Address of EPM"/

text_image
Expert Power Meter Expert Power Meter [Login]Figure 4 Log in
and Login.
To enter the confi guration menu, click on „Confi guration“ on the upper left side of the screen.
Configuration - Channels
Channel 1/Channel 2
Shows the energy consumption (kWh) since the last counter-rese for this channel.
Channel 1 total/Channel 2 total
Shows the energy consumption (kWh) since power up for this channel.
Reset Channel 1/Rese Channel 2
Click on the button to reset the counter of this channel.

text_image
Control Panel Configuration Logout Channels - IP Address - IP ACL - HTTP - SNMP - Syslog Configuration - Channels Channel 1 000,000.00 kWh Channel 1 total 000,000.00 kWh Reset Channel 1 Channel 2 000,000.00 kWh Channel 2 total 000,000.00 kWh Reset Channel 2 Expert Power Meter - 1.2Figure 5 Confi guration
- Channels
Configuration - IP Address
Hostname
Enter the host name of EPM. EPM uses this name to connect with DHCP server.

Special signs may destabilize your network.
IP Address
Here you can change the IP address of EPM.

text_image
Control Panel Configuration Logout Channels - IP Address - IP ACL - HTTP - SNMP - Syslog Configuration - IP Address • Hostname: EPMETER • IP Address: 192.168.0.2 • Network: 255.255.255.0 • Gateway: 192.168.0.1 • Use DHCP @ yes C no ApplyFigure 6 Confi guration - IF address
Netmask
Here you can change the netmask of EPM.
Gateway
Here you can change the standard gateway of EPM.
Use DHCP
Here you can set, i EPM shall get its TCP/IP settings directly fro your DHCP server. If DHCP is activated EPM proves if a DHCP server is active inside of your LAN. Then EPM requests TCP/IP settings from this server. If there is no DHCP server inside of yc network, we recommend to deactivate this function
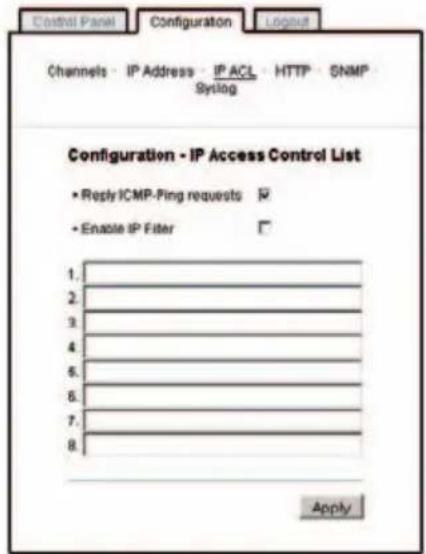
Configuration IP ACI
Reply ICMP-Ping requests
Here you can set, i EPM shell react on pings.
Enable IP Filter
Here you can activate the IP Acces Control List (IP ACL) of EPM.
If you locked yourself out by mistake, please activate the boolader mode o EPM, start Gbl_Conf.exe and deactivate IP ACL
text_image
Control Panel Configuration Logout Channels - IP Address - IP ACL - HTTP - SNMP Systlog Configuration - IP Access Control List • Reply ICMP-Ping requests ✓ • Enable IP Filter ✓ 1. 2. 3. 4. 5. 6. 7. 8. ApplyFigure 7 Confi guration IP ACL
If IP ACL is active, DHCP and SNMP only work, if all necessary servers and clients are registered in this List.

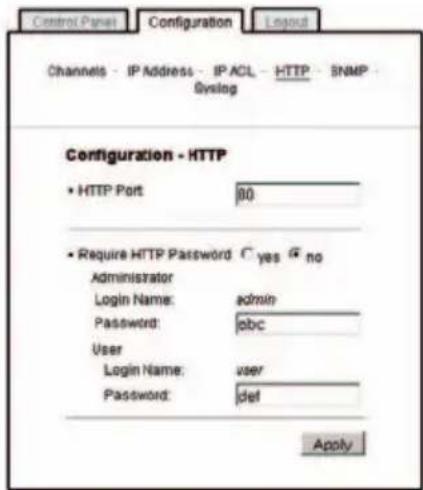
Configuration - HTTP
HTTP Port
Here you can enter the HTTP port number, if necessary. Possible numbers are 1 ... 65534 (standard: 80). To get access to EPM, you have to enter the port number behind the IP address of EPM:
http://192.168.0.2:1720/
Require HTTP Password
If it is required, you can activate a password request. Then you have to enter two passwords, one administrator password and one user password. Each password has a maximum length of 15 signs. If an administrator password is active you can log in to change setting only with this password. User ar able to log in with the user pas word to see the monitor information.
text_image
Control Panel Configuration Layout Channels - IP Address - IP ACL - HTTP - SNMP - Syslog Configuration - HTTP • HTTP Port 80 • Require HTTP Password C yes G no Administrator Login Name: admin Password: abc User Login Name: user Password: def ApplyFigure 8 Confi guration - HTTF
If you have forgotten your password, activate the bootloader mode of EPM, start Gbl_Conf.exe and deactivate the password request.
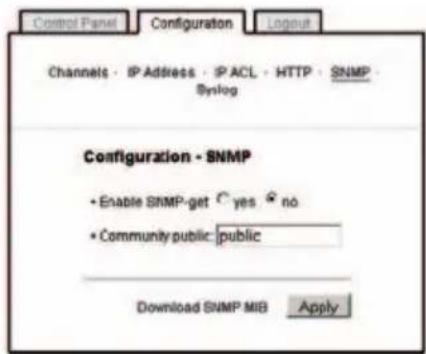
Configuration - SNMI
Enable SNMP-get
Here you can activate SNMP of EPM
SNMP public community
Here you can enter the SNMP community public
text_image
Control Panel Configuration Logout Channels · IP Address · IP ACL · HTTP · SNMP Syslog Configuration - SNMP • Enable SNMP-get C yes # no • Community public: public Download SNMP MIB ApplyFigure 9 Confi guration - SNMP
Download SNMP-MIB
Here you can download the MIB of EPM.
Use SNMP only if your network is fi tted for. More informati about the SNMP functions of EPM, you can fi nd in chapter 3.6, on http://www.gude.info/wiki or ask our support team.

Configuration - Syslog
Use Syslog
Here you can activate syslog of EPM.
Syslog Server IP
If syslog is active enter here the IP address of you syslog server
Syslog Port
If syslog is active enter here the port number, that your syslog server uses to receive syslog information.

text_image
Control Panel Configuration Layout Channels - IP Address - IP ACL - HTTP - SNMP - Syslog Configuration - Syslog • Enable Syslog Yes no Syslog Server IP: 192.168.0.1 Syslog Port: 534 ApplyFigure 10 Confi guration - Syslog
3.4 IP Access Control List
IP Access Control List (IP ACL) acts as an IP filter EPM. Wether it is active hosts and subnets only can contact EPM, if their IP adresses are stated in this IP ACL.
e.g.: „http://192.168.0.1“ or „http://192.168.0.1/24“
If you locked yourself out by mistake, please activate the bootloader mode of EPM, start Gbl_Conf.exe and deactivate IF ACL.
You can find more information about configuration of IP ACL in chapter 3.3 or have a look at www.gude.info/wiki.
3.5 SNMP
To get detailed status information of EPM SNMP can be used. SNMP communicates via UDP (port 161) with EPM:
Supported SNMP commands:
- SNMPGET: request status information
- SNMPGETNEXT: request the next status information
You will need a Network Management System, e.g. HP-Op View, OpenNMS, Nagios etc., or the command line tools of NE ^™ SNMP to request information of EPM via SNMP
SNMP Communities
SNMP authentifi es requests by so called communities The public community has to be added to SNMP-read-requests and the private community to SNMP write requests. You can set the SNMP communities like read/write passwords. SNMP v1 and v2 transmit the communities without encryption. Therefore it is simple to spy out these communities. We recommend to use a DMZ or IP ACL.
MIBs
All information, that can be requested or changed, the so called „Managed Objects“, are described in „Management Information Bases“ (MIBs)
There are three MIBs, which can be requested from EPM:
„gadsepm“ (GUDEADS-EPM-MIB="gadsepm") was created especially for EPM.
At least, there are so called Object Identifiers (OID) subordinated to those three structures. An OID describes the location of an information inside a MIB.
You can find more information about configuration of SNMP in chapter 3.3 or have a look at www.gude.info/wiki.
3.6 Syslog
Syslog messages are simple text messages transmitted to a syslog server using UDP
Linux OS regularly have a syslog daemon installed, e.g. syslog-ng. For Windows there are some freeware tools available.
On following events, EPM will send a syslog message:
- Booting up
- Switching off
- Activation/deactivation of syslog
- Load more than 10 A, load again less than 10 A
You can find more information about configuration of Syslog in chapter 3.3 or have a look at www.gude.info/wik.
4. Operating
4.1 Operating at the device
To switch the device directly you can use the buttons „select“ and „ok“ on the front side. With „select“ you are able to switch between several menu items, to select one of them press the button „ok“. (see Figure 11)

flowchart
graph TD
    A["Power Current"] --> B["Channel 1"]
    B --> C["Channel 2"]
    C --> D["Ethernet/LAN"]
    D --> E["System"]
    A --> F["Consumption"]
    B --> G["Current Voltage"]
    B --> H["Real Power"]
    B --> I["Consumption Consumption total"]
    B --> J["Apparent Power"]
    B --> K["up to Main menu"]
    C --> L["Current Voltage"]
    C --> M["Real Power"]
    C --> N["Consumption Consumption total"]
    C --> O["Apparent Power"]
    C --> P["up to Main menu"]
    D --> Q["DHCP IP Address"]
    D --> R["MAC Address"]
    D --> S["Host name"]
    D --> T["up to Main menu"]
    E --> U["Firmware"]
    E --> V["Product name"]
    E --> W["Hardware ID Production Date"]
    E --> X["up to Main menu"]
Figure 11 Menu
4.2 Controlling EPM by webinterface
Open your Browser. Enter the IP address of EPM, to connect with it:
http://"IP-Address of EPM"/

Shows the energy consumption (kWh) since the last counter reset for this channel.
Channel total
Shows the energy consumption (kWh) since power-up for this channel.
Active Power
Shows the current active power (W) of the consumer connected to this channel.
Apparent Power
Shows the current apparent power (VA) of the consumer connected to this channel.
Current
Shows the current (A) of this channel.
Figure 13 Status

text_image
Control Panel Configuration Logout Expert Power Meter - Status Channel 1 Channel 1 000,000.00 KWh Channel 1 total 000,000.00 KWh Active Power 0 W Apparent Power 0 VA Current 0.000 A Channel 2 Channel 2 000,000.00 KWh Channel 2 total 000,000.00 KWh Active Power 0 W Apparent Power 0 VA Current 0.000 A Voltage 221 V (autorefresh:3s)5. Product Features
5.1 Bootloader mode
To activate the Bootloader mode of your EPM press the buttons „select“ and „ok“ simultaneously for three seconds.
Whether EPM is in Bootloader mode, you can see by using the Gbl_Conf.exε: „BOOT-LDR“ is added to the host name of your EPM. Moreover the status LED blinks regularly and the following information is shown on the LCD-Panel:
Bootloader V X.X „Current IP Address“
While your EPM is in Bootloader mode you can update the firmware, deactivate IP ACL and passwords and reset the device to fab settings.
To deactivate the Bootloader mode, press the buttons ,select" and "ok" again simultaneously for three seconds.
5.2 Firmware update
To update the firmware EPM, you need the software too Gbl_Conf.exe and an up-to-date version of the firmware
Activate the Bootloader mode o EPM and choose it i Gbl_Conf.exe. Now execute Program Device→Firmware Update, choose the location of the new firmware and confi rr
The up-to-date versions of the fi rmware and Gbl_Conf.exe can be downloaded from our website www.gude.infc.
5.3 Technical information
| Connections: | Ethernet (RJ45) |
| 2 Power Ports (IEC C13, 10A) | |
| EPM Power-inlet (Plug IEC C14, 10A) | |
| Netweork | 10 MBit 10baseT Ethernet |
| Protocols: | TCP/IP, HTTP, SNMP, Syslog |
| Power: | 230 V, 10A |
| Temperature: | 0°C-50°C |
| Dimensions: | 19“, 1 ru |
5.4. Default Settings
In order to restore the default settings bootloader mode of EPM must be activated see 5.1). Besides that the program Gbl_Conf.exe is required.
Run Gbl_Conf.exe and select the EPM whose settings should be restored. Then click on Program Device→Reset to Fab default.
Please notice that all current settings will be deleted. The default settings will be loaded when EPM's bootloader mode is deactivated.
Default Settings EPM
| Name: | EPMeter |
| IP address: | 192.168.0.2 |
| Netmask: | 255.255.255.0 |
| Gateway: | 192.168.0.0 |
| DHCP: | enabled |
| Password: | disabled |
| IP ACL: | disabled |
| HTTP Port: | 80 |
6. Support
More information, current drivers and software can be found on http://www.gude.info.
In case of further questions, about installation or operation EPM, please have a look a www.gude.info/wiki and do not hesitate to contact our support (mail@gude.info)
Die Firma / The manufacturer
are in accordance with the following european directives
Referenz-Nummer / Reference no.
Titel / Title
89/336/EWG / 89/336/EEC
and comply with the following european standards.
Norm / Titel /
Standard Title
EN 55022:1998 + A1, A2 Information technology equipment: Radio disturbance characteristics - Limits and methods of measurement
EN 55024:1998 - A1, A2 Information technology equipment: Immunity characteristics - Limits and methods of measurement
EN 60950:2000 Safety for Industrial Control Equipment
Köln, 21.09.2007