KU1550V - Déchets ménagers Roper - Free user manual and instructions
Find the device manual for free KU1550V Roper in PDF.

User questions about KU1550V Roper
0 question about this device. Answer the ones you know or ask your own.
Ask a new question about this device
Download the instructions for your Déchets ménagers in PDF format for free! Find your manual KU1550V - Roper and take your electronic device back in hand. On this page are published all the documents necessary for the use of your device. KU1550V by Roper.
USER MANUAL KU1550V Roper
natural_image
Line drawing of a double-door refrigerator with control knob and side supports (no text or symbols)Undercounter Compactor
Use and Care Guide

text_image
ROPERAppliances
KU1550V
Thank you for choosing a Roper appliance.
This Use and Care Guide will help you operate and maintain your new, quality-built Roper undercounter compactor. Keep this Use and Care Guide in a safe place for future reference.
Complete and mail the Product Registration Card.
This card enters your warranty into our warranty system that insures efficient claim processing, can be used as a proof of purchase for insurance claims and helps Roper to contact you immediately in the unlikely event of a product-safety recall.
Contents
Grounding Instructions 2
Important Safety Instructions 2
Using The Compactor 3
Open the drawer 3
Put in the trash ____ 3
Close the drawer 3
Start the compactor 3
Air fresheners 3
Removing a filled bag ____ 4
Installing a new bag ____ 4
Caring For The Compactor ____ 4
Changing The Compactor's
Front Panel 5
How The Compactor Works ____ 5
Before You Call For Service 6
If You Need Assistance, Service
Or Replacement Parts 8
Grounding Instructions
text_image
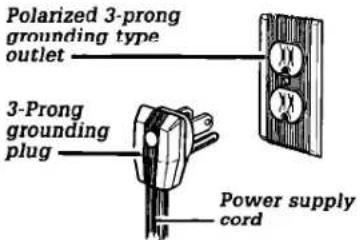
Polarized 3-prong grounding type outlet 3-Prong grounding plug Power supply cordThe compactor is for use on a single phase, 115-volt, 60 Hz, AC only 15 or 20 ampere fused and properly grounded circuit and is equipped with a grounding plug as shown above. Time delay fuse or circuit breaker is recommended. It is recommended that a separate circuit serving only this appliance be provided. For your personal safety, the compactor must be grounded. In the event of an electrical short circuit, grounding reduces the risk of electric shock by providing an escape wire for the electric current. This appliance is equipped with a polarized 3-prong grounding plug. It must be plugged into a correctly polarized mating 3-prong grounding type outlet, properly installed and grounded in accordance with the National Electrical Code and local codes and ordinances. No adapter should be used with this appliance.
WARNING
Electrical Shock Hazard Do not modify the power supply plug provided with the compactor. If it will not fit the outlet, or if you are in doubt as to whether the wall outlet is properly grounded, check with a qualified electrician. Failure to do so could result in electrical shock or personal injury.
IMPORTANT SAFETY INSTRUCTIONS
WARNING
To reduce the risk of fire, electric shock, or injury to persons when using your compactor, follow basic precautions, including the following:
- Read all instructions before using the compactor.
- Close supervision of children is necessary when the compactor is used near children.
- Do not allow compactor to be used as a toy, or to run unattended at any time. Lock key switch when not in use and store key out of reach of children.
- Do not touch moving parts.
- Have appliance examined, repaired or adjusted by an authorized serviceman.
- Do not compact:
- lighted cigarettes, cigars or other hot or burning items.
- any container or aerosol can containing insecticide, hair spray, paint, engine starting
fluid or other poisonous, toxic, or explosive products.
- volatile flammable material such as oily rags, thinner, etc., which would create a fire hazard or explosion.
- Do not take apart this appliance. Incorrect reassembly can cause electric shock when subsequently used.
- Use only for intended use as described in this manual. Do not use other than manufacturer's recommended attachments.
9 Never lift the bag by the sides. Broken glass or other sharp objects in the bag can cause injury. -
This compactor is designed for household use only.
-
Unplug compactor from electrical outlet before servicing.
- The compactor must be electrically grounded. See the grounding instructions.
- Do not overload trash bag with heavy material such as glass.
- Never operate the compactor if:
- it is not working right.
- it is damaged
- parts are missing.
- the cord set, plug or motor is damaged in any manner.
- Never use or store flammable fluids (dry cleaning solvents, gasoline, kerosene, etc.) in or near your compactor. These substances give off vapors that can create a fire hazard or explosion.
- See Installation Instructions.
SAVE THESE INSTRUCTIONS
Additional safety instructions and your responsibilities
- Do not shove items down into the compactor with hands or feet. Let the compactor do the compacting.
- Always place glass bottles, etc., on their sides in the center of the
drawer. The waste paper below and beside the bottle can help keep broken glass near center of bag.
-
Do not install or store compactor where it will be exposed to the weather.
-
You are responsible for making sure that your compactor:
- is used only for jobs normally expected of home compactors.
- is properly installed and leveled on a floor that can support its weight.
Using The Compactor
Model KU1550V
text_image
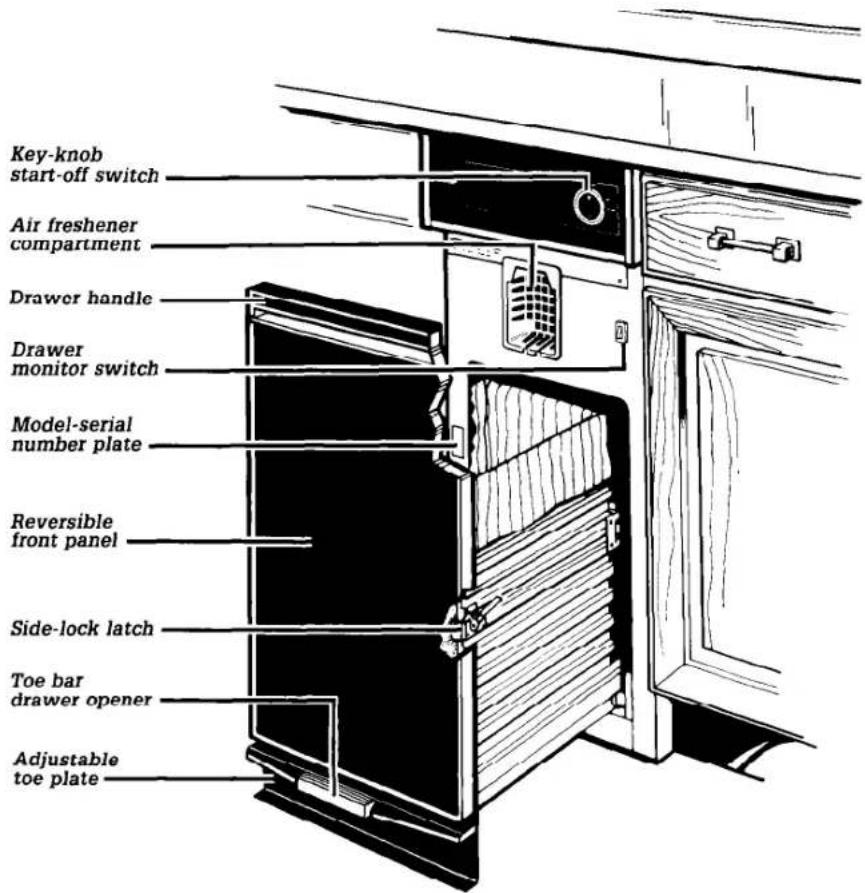
Key-knob start-off switch Air freshener compartment Drawer handle Drawer monitor switch Model-serial number plate Reversible front panel Side-lock latch Toe bar drawer opener Adjustable toe plateOpen the drawer

text_image
Lift and pull the handle or...Press the toe bar to open the drawer.
Put in the trash.
- Wrap or cover wet or messy trash.
- Load bottles or cans on their sides in the center of the drawer.
- Do not compact items that may develop offensive odors such as raw meat, fish, grapefruit rinds, disposable diapers, or personal hygiene items.
Close the drawer.
Push drawer in until it stops.
Start the compactor

text_image
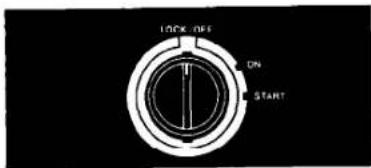
LOCK/OFF ON STARTTurn the key-knob to START. Let the knob go. The compactor will stop at the end of the cycle.
To stop the compactor during a cycle:
text_image
LOCK OFF ON START- Turn the key-knob to LOCK/OFF.
- Turn it to ON. The compacting ram will rise.
- When the ram stops rising, you can open the drawer.
To remove the key-knob:
- Turn the key-knob to LOCK/OFF.
- Remove and store in safe place out of children's reach.
Air fresheners
natural_image
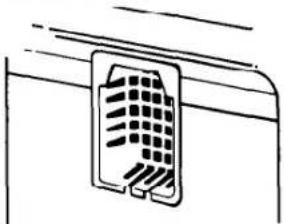
Simple line drawing of a mechanical component with no text or symbolsThe Air Freshener Compartment is designed to help control odors that might develop in the trash. There are many solid air fresheners available on the market.
Check air freshener occasionally. It should last 4 to 6 weeks.
- Put "adjustable" air freshener in compartment.
- Adjust according to directions.
Removing a filled bag
When the trash is compacted to the top of the drawer, remove the bag. If the bag is too heavy, compact less before emptying in the future.
WARNING
Personal Injury Hazard Sharp objects may protrude through bag after removal from compactor. Handle bag carefully. Failure to do so may result in personal injury.
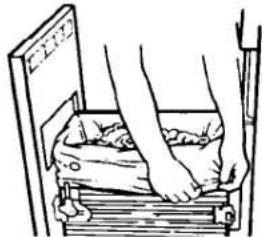
- Pull the drawer completely open.
natural_image
Illustration of a person using a bench to lift a bag, no text or symbols present- Remove top of bag from bag retainer buttons. Pull up all 4 bag cuffs.
natural_image
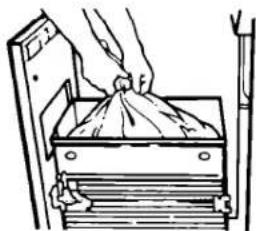
Illustration of hands placing a bag onto a wooden cabinet (no text or symbols)- Close bags with twist ties provided.
natural_image
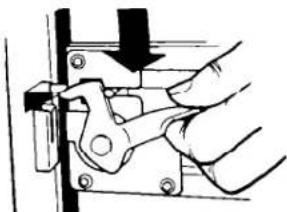
Hand using a mechanical clamp or bracket to adjust a metal frame (no text or symbols visible)- Push side-lock latch down and tilt drawer side open. Grasp the bag above the twist tie with both hands and lift the bag out of the drawer.
Installing a new bag
Before installing a new bag, be sure:
- The drawer side is securely locked.
- The container is clean and free of sharp debris that may puncture the bag.
Do not use any kind of bag other than those designed especially for use in your compactor. Compactor bags may be purchased from your dealer.
To install a new bag:

natural_image
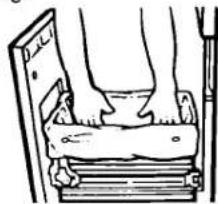
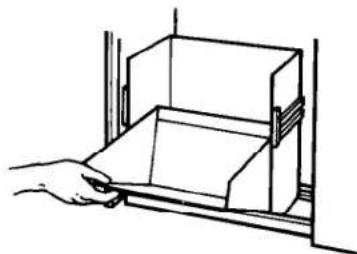
Line drawing of a person pressing down on a wooden plank (no text or symbols)- Place folded bag into the drawer. Open bag and pull top edges over the drawer top.
- Lock bag in place by pulling the 4 prepunched holes over the bag retainer buttons. Holes will expand over the buttons without harming the bag.
natural_image
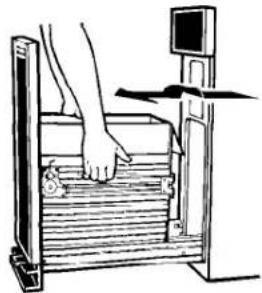
Line drawing of a person's legs and feet resting on a wooden plank (no text or symbols)- Press inside of bag against the drawer bottom, sides and corners for a smooth fit.
Caring For The Compactor
WARNING
Personal Injury Hazard Wear protective gloves when cleaning the inside of the compactor. Failure to do so may result in cuts if bits of broken glass are present.
Before cleaning the compactor, turn the key-knob to the OFF position and remove.
If you will be away for more than a couple of days, remove the compactor bag. Lock the compactor and remove the key-knob. Store the key-knob in a safe place.
Clean exterior surfaces:
-
Wipe with warm, sudsy water and a damp cloth. Rinse. Dry with a soft cloth.
-
Wipe up spills right away. Some foods can damage the finish if left on the compactor surface.
Clean inside the drawer:
- Remove the bag. (See "Removing a filled bag" above.)
- Wear protective gloves. There may be bits of glass in the drawer.
natural_image
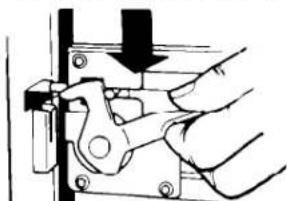
Hand operating a mechanical clamp or bracket assembly (no text or symbols visible)- Press side-lock latch down.
natural_image
Line drawing of a hand opening a rectangular box into a rack (no text or symbols)- Hold side-lock latch and tilt side of drawer until the latch clears the drawer front.
NOTE: Drawer side can be removed by tilting it out, then lifting out.
- Wash with a damp cloth using warm, sudsy water. Rinse. Dry with a soft cloth.
- If drawer side was removed, slide it back into the tilted position.
- Press the side-lock latch down while pressing the side to the upright position.
- Lock the side-lock latch.
Clean inside the cabinet:
- Wear protective gloves. There may be bits of glass in the cabinet.
- Pull the drawer out until it stops.
- Note the tracks in which the drawer rollers move.
natural_image
Line drawing of a person using a balance scale on a wooden platform (no text or symbols)-
Lift the front to clear the drawer stops.
-
Grasp the drawer on the sides.
-
Pull it out the rest of the way.
-
Set it down gently.
-
Vacuum inside of cabinet. Liquid spills or wet trash should be cleaned up by hand, or use a vacuum designed to pick up liquids.
-
Wash, rinse and dry inside.
-
Replace drawer.
To remove and replace the air freshener compartment:

natural_image
Hand inserting a grid into a device (no text or symbols visible)The air freshener compartment can be removed for cleaning.
- To remove, lift cover and pull.
- To replace, set in the bottom first. Then snap in the top.
Wipe off the ram cover:
-
Wear protective gloves. There may be bits of glass on the ram cover.
-
Wipe glass particles off ram cover with a cloth or paper towels.
-
Use warm sudsy water to remove foods. Rinse. Dry with a soft cloth.
Changing Compactor's Front Panel
The color panel on the front of your compactor's drawer reverses to another color. You may also be able to order extra color panels. Contact your dealer for details.
To change the color of your compactor's front panel, follow the directions below. All you need is a medium-sized screwdriver.
- Slide drawer out.
natural_image
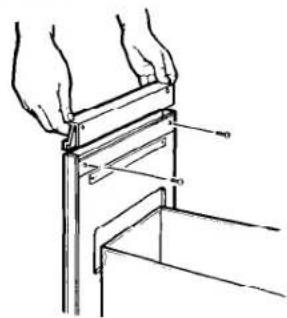
Technical line drawing of hands holding a metal bracket with a handle, showing structural details (no text or symbols)- Remove two screws shown.
- Remove handle.

natural_image
Simple line drawing of a hand pressing down an open box with an upward arrow (no text or symbols)- Install desired color panel in front, behind drawer trim. Be careful — edges may be sharp.
- Make sure panels are all the way down.
- Be sure to replace cardboard spacer in its former position.
- Replace handle and screws.
- Slide drawer back in.
OPTION: Match your kitchen's color scheme by replacing color panel with your own creation (wallpaper, paneling). See Installation Instructions.
WARNING
Personal Injury Hazard Do not handle froet panels care- lessly when changing; metal edge could cause injury.
How The Compactor Works
natural_image
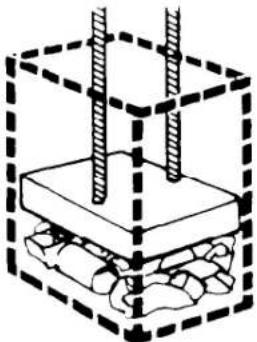
Diagram of a mechanical assembly with two vertical rods inserted into a base, enclosed in a dashed box (no text or symbols)When operating, the compacting ram does not go all the way to the drawer bottom. You will not see compacting of the first few loadings.
Compaction starts after the drawer is about 1/3 full. You may hear a noise when glass breaks. Strong glass bottles may not break at all. The trash in a full compactor bag will be about 1/4 the size of its original bulk.
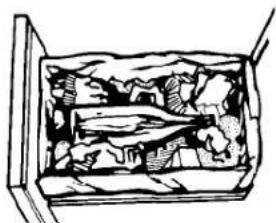
natural_image
Cross-sectional diagram of a container filled with various items, no visible text or symbolsBottles or cans not placed in the center may become caught between the ram and the drawer. The Drawer Monitor Switch senses a "misload" and causes the ram to return to the "up" position without compacting. Load bulky trash, bottles and cans in the center of the drawer.
Before You Call For Service
If you are having an operating problem, check the list to see what the cause might be before you call for assistance.
| OPERATING PROBLEM | CHECK THAT | WHAT TO DO |
| Compactor will not run | ▪ Compactor is properly connected to a live circuit with the proper voltage.▪ Fuse has blown or circuit breaker has tripped.▪ Drawer is completely closed.▪ The key-knob is being turned all the way to START before releasing. | Plug compactor into a properly grounded outlet. (See Installation Instructions.)Replace fuse or reset circuit breaker.Push drawer closed.Restart by turning key-knob all the way to the left. |
| Drawer will not open | ▪ Ram is all the way up. | Turn the key-knob to START and release. |
| Trash is not compacting | ▪ Drawer is loaded properly.▪ Compactor is 1/3 filled. | Reload drawer. If anything gets between the ram and the drawer, the ram will return to the “up” position without compacting.Continue to put trash in compactor and run cycle. Drawer must be at least 1/3 full before compactor will compact. |
| Not enough compaction or force | ▪ Too many items are being put in drawer before compacting. | Use the compacting cycle frequently. Compacting works best when only a few items are loaded. |
| Bottles do not break | ▪ Bottles are centered in drawer. | Load bottles on their side in the center of the drawer. Not all bottles will break every time, depending on the bottle and the trash below it. |
THIS PAGE INTENTIONALLY LEFT BLANK
If You Need Assistance, Service Or Replacement Parts...
Read the warranty. Contact your local dealer to recommend a local service company or to obtain replacement parts.
You will need the model number and serial number when you call for assistance or service. Both numbers are located on the frame (see illustration on page 3).
LIMITED WARRANTY

text_image
ROPERThis Roper appliance is warranted by Whirlpool Corporation to be free from defect in material and workmanship to the original domestic purchaser. Any parts which we find to be defective will be repaired or replaced at our option subject to the following limitations:
Appliances
- Repair or replace during the first thirty (30) days from the date of purchase any finishes (porcelain, enamel or other) and glass parts which we find to be defective.
- Repair or replace during the first (1st) year from date of purchase any other part except for the finish, which we find to be defective.
- Repair or replace during the first five (5) years from date of purchase any magnetron (on those units so equipped) which we find to be defective. Labor on any magnetron under warranty is limited to the first (1st) year from date of purchase.
- During the second (2nd) through the fifth (5th) years from the date of original purchase on any product so equipped, any part of the refrigerating system (compressor, evaporator, condenser, drier or connecting tubing) or any part of the washer gear case assembly found defective in material or workmanship, will be supplied. Labor on the gear case assembly under this warranty is limited to the first (1st) year from the date of original purchase.
- Replacement parts furnished under the terms of this warranty are warranted only for the unexpired portion of the original warranty period and transportation charges relative to obtaining parts involved are the responsibility of the original consumer purchaser.
- This warranty applies only to products properly installed, adjusted and operated in accordance with instructions found in the product literature. This warranty does not apply to any product which has been subjected to alteration, misuse, improper installation or delivery damage. Nor does it apply to costs for any service requested for demonstration or to confirm proper operation of appliance, or when used in other than, single-family household use.
- Any repairs made under the terms of this warranty must be performed by a Roper brand appliance servicer authorized by warrantor.
SHOULD YOU HAVE ANY QUESTIONS CONCERNING THIS WARRANTY, PLEASE CONTACT:
Customer Relations Dept.
Call Toll Free 1-(800) 44-ROPER
ROPER Brand Appliances
1-(800) 447-6737
2000 M 63 North
Between 8:00 a m - 4:30 p.m
Benton Harbor, MI 49022
Monday thru Friday, Eastern Time
If you write or call, please furnish complete model and serial number of appliance and date of purchase. Under no circumstances shall Whirlpool Corporation be liable under this warranty for any loss of any incidental or consequential damages and all IMPLIED WARRANTIES ARE LIMITED TO THE SAME TIME PERIODS STATED HEREIN ON EXPRESS WARRANTIES FOR ROPER BRAND APPLIANCES.
Some states do not allow the exclusion or limitation of consequential damages or limitations of how long an implied warranty may last, so the above limitations or exclusions may not apply to you. This warranty gives you specific legal rights, and you may have other rights which may vary from state to state. THIS IS A LIMITED WARRANTY WITHIN THE MEANING OF THAT TERM AS DEFINED IN THE MAGNUSON-MOSS ACT OF 1975.
If you need service for your Roper brand appliance:
- Contact your selling dealer for the authorized servicer in your area - OR-
■ Phone 1-(800) 44-ROPER [1-(800)447-6737] BETWEEN 8:00 - 4:30 Eastern Time - Monday thru Friday.

text_image
ROPERAppliances