Impulse 8100 - Sports Watch HOLUX - Free user manual and instructions
Find the device manual for free Impulse 8100 HOLUX in PDF.

User questions about Impulse 8100 HOLUX
0 question about this device. Answer the ones you know or ask your own.
Ask a new question about this device
Download the instructions for your Sports Watch in PDF format for free! Find your manual Impulse 8100 - HOLUX and take your electronic device back in hand. On this page are published all the documents necessary for the use of your device. Impulse 8100 by HOLUX.
USER MANUAL Impulse 8100 HOLUX
Heart-Rate Smartwatch Impulse 8100

text_image
HOLUX Step Distance Calorie ExerciseUser Manual
V1.0
Safety instructions
- Read this manual carefully before use to ensure safe operation of the device.
- The device is not a medical device and only used for the measurement in normal exercises. Make sure the device is worn in the correct measuring position. If you feel uncomfortable during the exercise, stop and seek medical advice immediately. The user must use the device carefully and it is up to the user rather than HOLUX to take all safety responsibilities.
- If you feel discomfort in your skin or an allergic reaction occurs, stop wearing the device and seek medical advice immediately.
- Do not use or store the device in the following environments to avoid failure or damage.
- Don't expose the device to extreme temperatures or humidity or operate it in such environments;
- Do not use the device in dusty areas.
- Though the device provides waterproof function (IP67 water resistance), the following instructions must be followed when you use the device:
- Don't soak the device or use it in water;
- Don't take shower or sauna bath with the device worn around the wrist to avoid affecting or damaging the
waterproof function;
- Do not rinse the device directly under a faucet to avoid affecting or damaging the waterproof function.
- Do not remove or replace the battery. Only well trained service personnel are allowed to disassemble/install the internal components. Note: Explosion may occur if the battery is not replaced with a new one of the same model or equivalent type. Contact the manufacturer to dispatch professional service personnel for battery replacement.
- Do not try to disassemble or repair device yourself to avoid failure or device malfunction or occurrence of accidents.
Warranty Statement
- This warranty applies to parts and services that are manufactured and sold through HOLUX. The warranty length is one year from date of purchase (starting from the date on the sales receipt). Under normal user operation, HOLUX provides free repair services.
- HOLUX is not responsible for providing repairs or replacements of any software; HOLUX does not provide any warranty service for third party software/hardware.
-
Important instructions
-
Note: This warranty does not cover damage or malfunction from the below causes: unauthorized disassembly/modification of unit, abuse or incorrect usage, accidental and other unpreventable causes, operation under variables mentioned that are different from those in this product user manual, using parts not made or sold by HOLUX, or repairs done by anyone other than HOLUX and authorized retail/service providers.
-
Expendable parts are not covered in the warranty.
-
HOLUX is not responsible for any program, data, or portable storage media damages or loss. Please contact your local HOLUX authorized service provider to learn more about geographical limitations, proof of purchase requests, response time agreements, and other specific maintenance service requests.
-
The content of this user manual is subject to change without prior notice. Please contact us if you have any question or notice any errors in descriptions in the user manual.
Copyright Information
No part of this manual, including the products and software described in it, may be reproduced, transmitted, transcribed, stored in a retrieval system, or translated into any language in any form or by any mean, without the express written permission of Holux Technology, Inc.
Copyright, All Rights Reserved.
Federal Communications Commission (FCC) Statement
This equipment has been tested and found to comply with the limits for a Class B digital device, pursuant to Part 15 of the FCC Rules. These limits are designed to provide reasonable protection against harmful interference in a residential installation. This equipment generates uses and can radiate radio frequency energy and, if not installed and used in accordance with the instructions, may cause harmful interference to radio communications. However, there is no guarantee that interference will not occur in a particular installation. If this equipment does cause harmful interference to radio or television reception, which can be determined by turning the equipment off and on, the user is encouraged to try to correct the interference by one or more of the following measures:
- Reorient or relocate the receiving antenna.
- Increase the separation between the equipment and receiver.
- Connect the equipment into an outlet on a circuit different from that to which the receiver is connected.
- Consult the dealer or an experienced radio/TV technician for help.
CAUTION: Any changes or modifications not expressly approved by the grantee of this device could void the user's
authority to operate this equipment.
This device complies with Part 15 of the FCC Rules. Operation is subject to the following two conditions: (1) This device may not cause harmful interference, and (2) this device must accept any interference received, including interference that may cause undesired operation.
For product available in the USA/Canada market, only channel 1\~11 can be operated. Selection of other channels is not possible.
RF Exposure Warning
This equipment must be installed and operated in accordance with provided instructions and the antenna(s) used for this transmitter must be installed to End-users and installers must be provided with antenna installation instructions and transmitter operating conditions for satisfying RF exposure compliance.
Content
PRODUCT INTRODUCTION.... 10
PRODUCT OVERVIEW....11
BASIC KEY FUNCTIONS....12
ACCESSORIES....13
CHARGING THE BATTERY 14
HOW TO WEAR THE SMARTWATCH 15
MAINTENANCE OF THE PRODUCT 15
HOW TO USE IMPULSE 8100.... 16
POWER ON/OFF 16
INITIAL SETUP....17
MENU FUNCTION....18
Legends....20
Step Function 21
Distance Function 24
Calorie Calculation 27
Exercise Function....30
Heart-rate Measurement Function 36
Sleep Monitor Function 40
Fatigue Detection Function 45
Music Playback 49
Stopwatch 51
Countdown 53
Electronic Compass....56
Setup Mode....58
APP INSTALLATION 73
NORMAL CARE AND MAINTENANCE.... 77
SPECIFICATION.... 79
Product Introduction
Thank you for purchasing HOLUX Heart-Rate Smartwatch Impulse 8100.
Impulse 8100 is a smartwatch designed for people who are in pursuit of a healthy lifestyle and convenience in exercising. It has the most advanced integrated physical monitoring technology and can accurately measure the heart-rate for long periods continuously so that users can monitor their heart and lung functions and exercise effectiveness. It can also detect when the user is tired and notify him/her to drive safely, and provides sleep analyses. It also uses the steps function that allows the setting of walking target value as needed, and calculates calorie consumption to help remind the amount of daily exercise achieved.
Impulse 8100 supports Bluetooth pairing with various smartphones to be used to remind users of incoming calls and messages, and record their exercising status. It can also be used with a dedicated APP to help tracking the exercising results. Results are integrated into cloud data to perform analysis and management of the physical conditions.
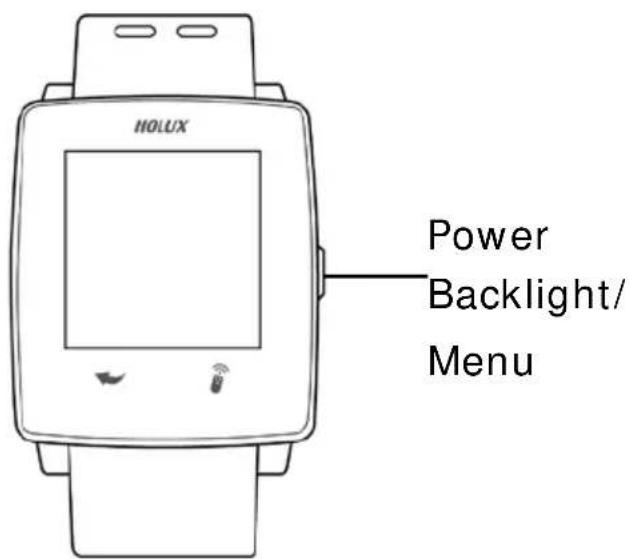
Product Overview
Front View
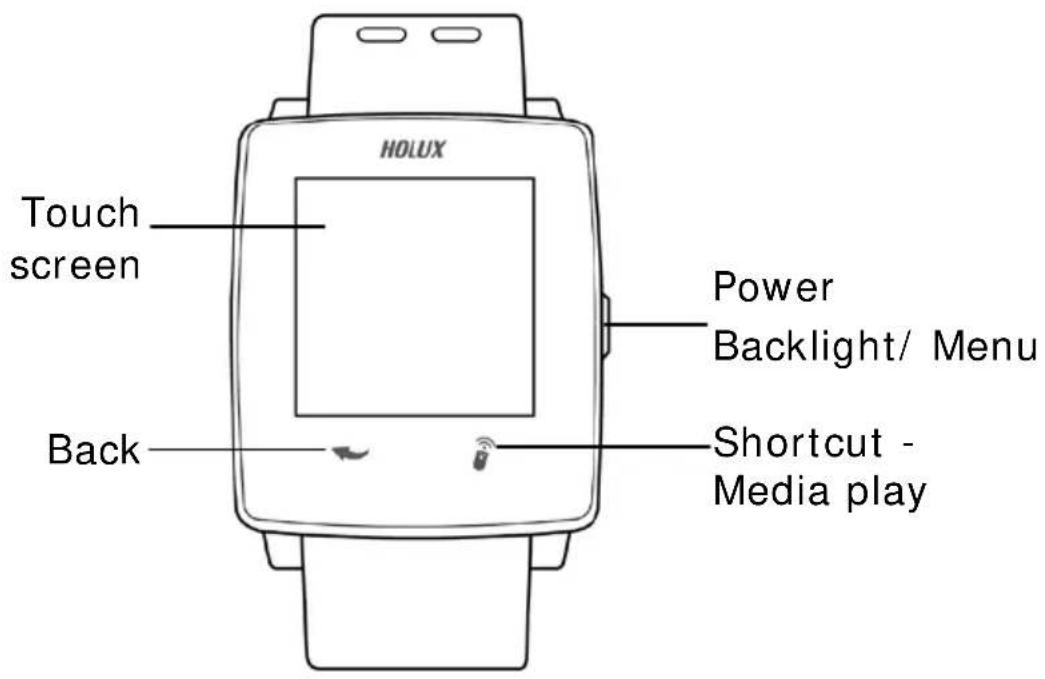
text_image
HOLUX Touch screen Power Backlight/ Menu Back Shortcut - Media playRear View
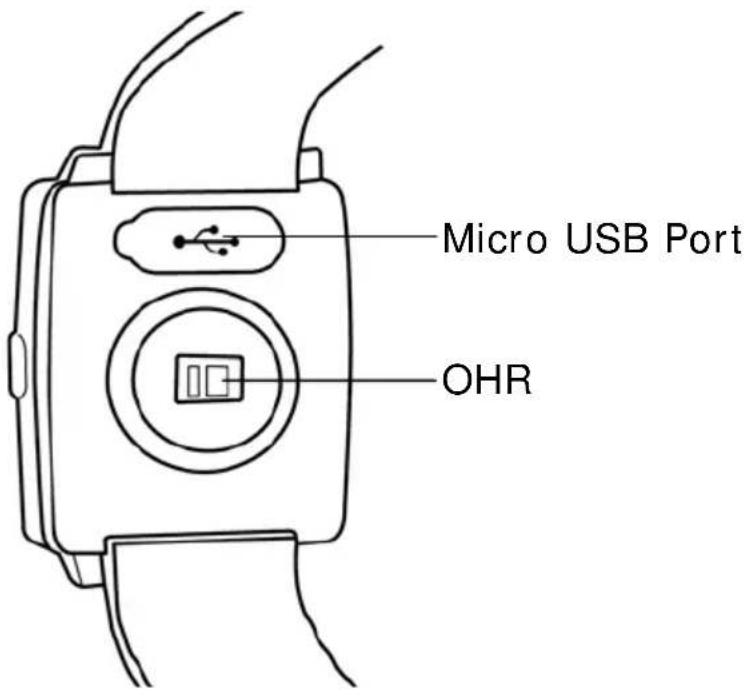
text_image
Micro USB Port OHRBasic key functions
| Key Operation and Function | |
| Power | ● Press and hold the key for 3 seconds to turn on the power.● Press and hold the key for 8 seconds to reset the system if the device cannot operate normally. |
| Backlight/Menu | ● Backlight: Press the key for 1 second to turn on/off the backlight.● Menu: Press and hold the key for 3 seconds to open the menu screen and show the power on/off, Bluetooth connection, heart rate detection, and warning messages. You can select the function that you need from the screen.● Screen lock: Press the key for 1 second and follow the on-screen instructions to unlock the screen. |
| Back Return to the previous page. | |
| Shortcut – Media play | Press to enter the music play page. |
Accessories
Check the box for the following supplied accessories. If any is missing, contact your supplier immediately.
| Impulse 8100 | Micro USB cable | Quick Guide |
 |  |  |
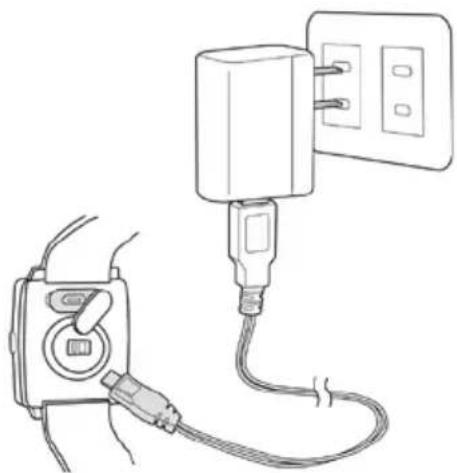
Charging the Battery
Using the AC charger (Optional)
Plug the micro USB plug of the AC charger into the micro USB port on the rear of the Smartwatch. Plug the AC charger into a wall outlet.
natural_image
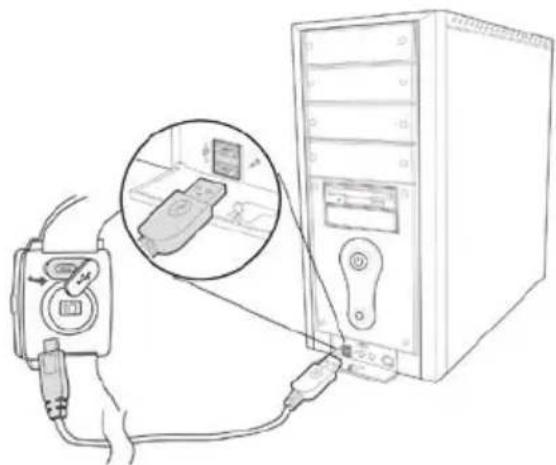
Line drawing of a plug connecting to a wall-mounted power outlet (no text or symbols)Connecting to a PC
Connect the micro USB plug of the USB cable to the mini USB port on the rear of the Smartwatch. Connect the USB plug (larger) or the USB cable to a USB port on your computer.
natural_image
Line drawing of a computer setup with a monitor connected to a tower, showing cable and socket (no text or symbols)How to wear the Smartwatch
When using Impulse 8100, wear your watch on the wrist below the wrist bone as shown in the following figure. To measure the heart rate correctly, make sure the strap fits snugly around the wrist to ensure the watch is pressed against the skin.

text_image
Wrist boneMaintenance of the product
- You can use a damp cloth to wipe the watch or use gentle soap solution to remove oil or dirt.
- Use a wet cotton swab to clean the area around the sensor. Clean it every week if you use the product frequently.
- Be careful not to scratch the sensor part to avoid damage.
- Keep the watch away from any powerful chemical agents, such as gasoline and acetone, to avoid damage.
How to use Impulse 8100
Power on/ off
Power on: Press and hold the Power key until the boot page appears on the LCD screen.
※ Make sure the battery is fully charged (charging time: about 2 hours) before using the product to ensure normal operation of the system.
text_image
HOLUX Power Backlight/ MenuPower off: Press and hold the Power key for 3 seconds and the
following options appear on the screen. Press Power to turn off the device.

text_image
Power BLT HR Beep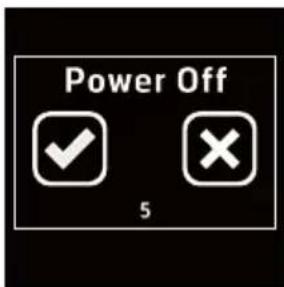
text_image
Power Off 5Initial setup
When using the device for the first time, follow the on-screen instructions to complete the initial setup process. If you reset the device to its default settings, the initial setup process will be activated automatically when the device is turned on.
Slide the screen to the right and configure the following settings:
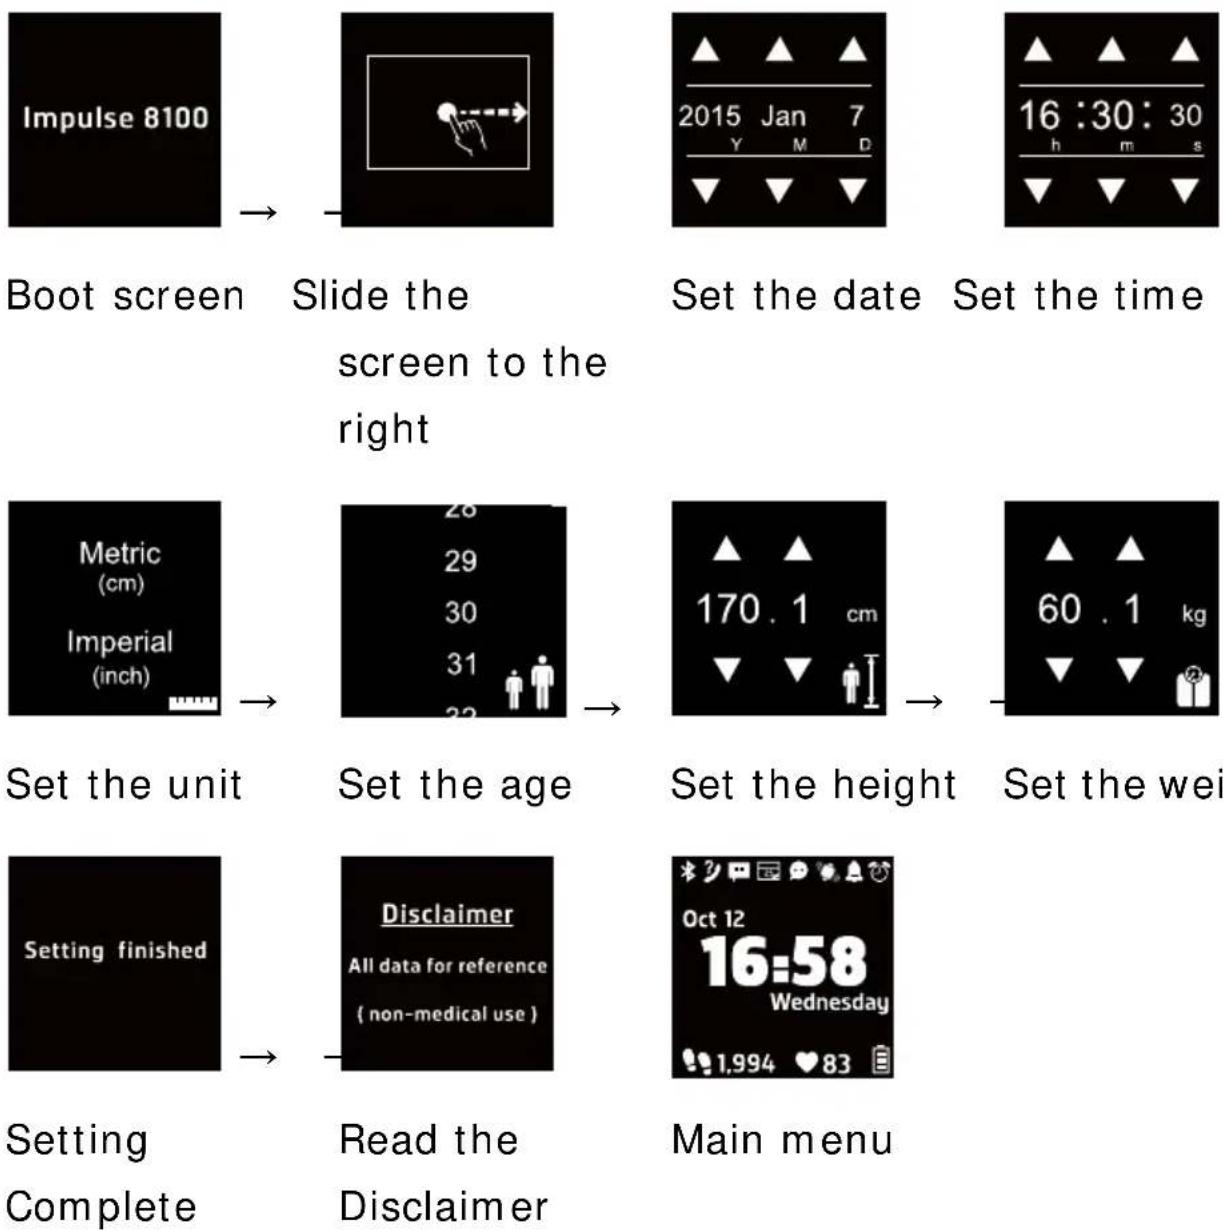
screen to the right
Set the weight
Menu function
The time page appears once you turn on the device. Slide the screen to the left or right to navigate the function pages. The following table lists the available functions.

text_image
Oct 12 16:58 Wednesday 1,994 ♥ 83
text_image
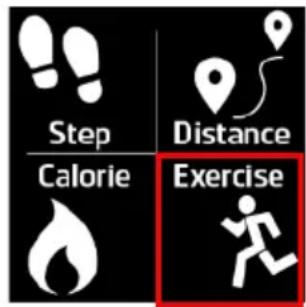
Step Distance Calorie ExerciseMain menu page
Display the basic information including the date, time, and power status.
Menu page 2 (slide to the right)
Display total steps taken, total distance travelled, total calories burned, and exercise functions.

text_image
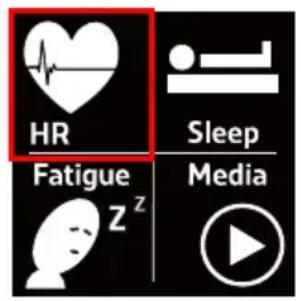
HR Sleep Fatigue z MediaMenu page 3 (slide to the right)
Display the heart rate measurement, sleep, fatigue measurement, and music play functions.
※To m easure your heart rate, stay calm and relax for 20-30 seconds after activating the HR function. After the device detects your heart rate, only then you can do normal activities.

text_image
Stopwatch Countdown Compass Setup7,841

text_image
629 82 33°C7

25 8
Menu page 4 (slide to the right)
Display the stopwatch, countdown, compass, and setup functions.
Slide the screen upward in any menupage to display the information of thecurrent measurement. Press the Back key

to return to the previous page.
Legends
The icons on the main page are described below.
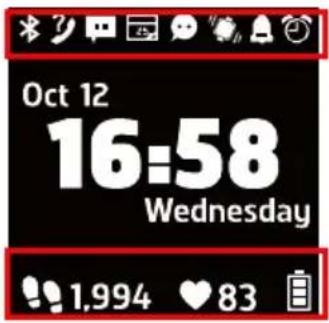
text_image
Oct 12 16:58 Wednesday 1.994 ♥ 83 | Bluetooth on |  | Connected to mobile phone via Bluetooth |
 | Missed Calls prompt on mobile phone |  | Unread Messages prompt on mobile phone |
 | Event notification prompt on mobile phone |  | Unread app Messages prompt on mobile phone |
 | Alarm clock |  | Buzzer mode |
 | Vibrate mode |  | Screen lock |
 | Power level displayPower level 65~100%;Power level 35~65%;Power level 10~35%;Power level <10%; a low power message appears. | ||
Step Function
The step function can help the user calculate the number of steps you have walked. Select the step function button to enter Step mode.

text_image
Step Distance Calorie Exercise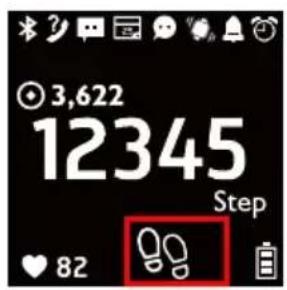
text_image
3,622 12345 Step 82
text_image
3,622 12345 Step ♥ 82
text_image
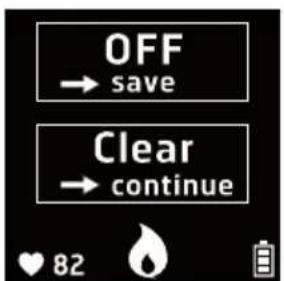
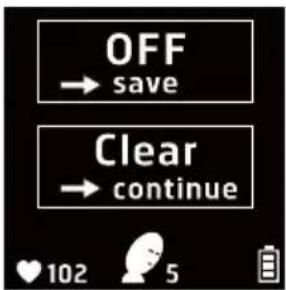
OFF → save Clear → continue ❤ 8Enabling Step Mode
In the "Step" page, slide the screen to the right

and select ■ to enable the step function and start calculating and recording the number of steps taken.
Once the function is enabled, the icon will be
displayed as "solid" ( ).
Disabling Step Mode
To stop or clear the step record, slide the screen to the right again.

text_image
OFF → save: Stop counting and save the
record. : Clear the current record and continue counting. : Clear the current record and continue counting. | ||
| In the step function page, slide the screen downwards to configure the target value, browse the history lists, and delete history records. | ||
 | Set target valueSlide the screen upwards/downwards to select a target value. will appear once the value is selected. Press the return button  to save the target value and return to the previous page.The target value set will be displayed on the main step function page. to save the target value and return to the previous page.The target value set will be displayed on the main step function page. | |
bar
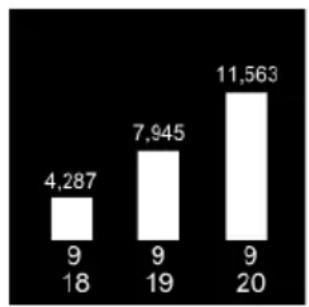
| Category | Value | |---|---| | 9 | 4,287 | | 18 | 9 | | 9 | 7,945 | | 20 | 11,563 |Browse History Record
All step records are displayed according to the date.
Slide the screen to the left/right to display the records of other dates.

7,841

text_image
629 82 33°C
82
33°C
7
Slide the screen upwards to display related information currently detected.
Press the return button

to return to the
previous page.
Distance Function
Calculates the distance travelled according to the length of the user's pace. In the menu page, select Distance to enter the Distance Calculation mode.

text_image
Step Distance Calorie Exercise
text_image
0 12.94 KM ❤️ 82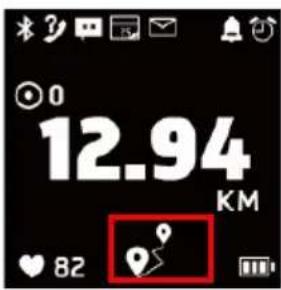
text_image
0 12.94 KM ❤️ 82Enable Distance Calculation
In the distance function page, slide the screen
ON to the right and select to enable the distance calculation function.
Once the function is enabled, the icon will be
displayed as "solid" ( )

text_image
OFF → save Clear → continue ❤️ 82Disable Distance Calculation
To stop or clear distance calculation records, slide the screen to the right again.

text_image
OFF → save: Stop counting and save the
record. : Clear the current record and continue counting. : Clear the current record and continue counting. | ||
| In the distance calculation function page, slide the screen downwards to configure the target value, browse the history lists, and delete history records. | ||
 | Set target valueSlide the screen upwards/downwards to select a target value. will appear once the value is selected. Press the return button  to save the target value and return to the previous page.The target value set will be displayed on the main distance function page. to save the target value and return to the previous page.The target value set will be displayed on the main distance function page. | |

bar
| Category | Value | |---|---| | 9/18 | 4,287 | | 9/19 | 7,945 | | 9/20 | 11,563 |Browse History Record
All distance records are displayed according to the date.
Slide the screen to the left/right to display the records of other dates.

7,841
text_image
629 82 33°C
82
33°C
7
Slide the screen upwards to display related information currently detected.
Press the return button

to return to the
Calorie Calculation
This function can calculate and display calorie consumption. In the menu page, select Calorie to enter the Calorie Calculation mode.

text_image
Step Distance Calorie Exercise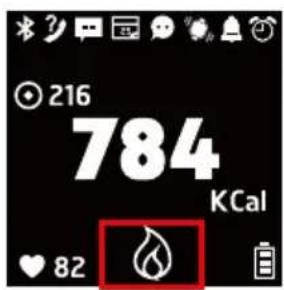
text_image
216 784 KCal ♥ 82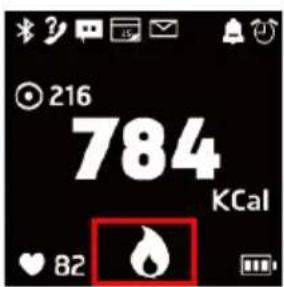
text_image
216 784 KCal ♥ 82Enable Calorie Calculation
In the calorie function page, slide the screen
ON to the right and select to enable the calorie calculation function.
Once the function is enabled, the icon will be
displayed as "solid" ( ) .
text_image
OFF → save Clear → continue ❤ 82Disable Calorie Calculation
To stop or clear the calorie record, please slide the screen to the right again.

text_image
OFF → save: Stop counting and save the
record. : Clear the current record and continue counting. : Clear the current record and continue counting. | ||
| In the calorie calculation function page, slide the screen downwards to configure the target value, browse the history lists, and delete history records. | ||
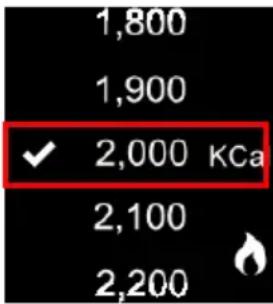 | Set target valueSlide the screen upwards/downwards to select a target value. Thenwill appear once the value is selected. Press save the target value and return to the previous page.The target value set will be displayed on the main calorie function page. save the target value and return to the previous page.The target value set will be displayed on the main calorie function page. | |
Set target value
bar
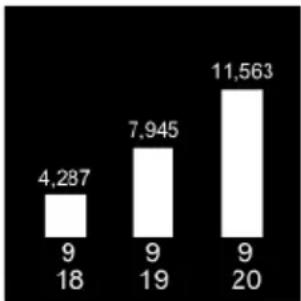
| Category | Value | |---|---| | 9/18 | 4,287 | | 9/19 | 7,945 | | 9/20 | 11,563 |Browse History Record
All calories burned records are displayed according to the date.
Slide the screen to the left/right to display the records of other dates.

7,841

629

82

33°C

7
Slide the screen upwards to display related information currently detected.
Press the return button

to return to the
Exercise Function
This device provides multiple exercise modes
(walking/running/biking/hiking) in which the system calculates the speed, pace, distance, and exercise time using the user's smartphone GPS function. It also allows the user to set different heart-rate zones.
In the menu page, select 📄 to enter the Exercise mode.
text_image
Step Distance Calorie Exercise
text_image
Walking Running Biking Hiking
text_image
Connect to APP GPS Without GPS HistoryIn the exercise function page, slide the screen upwards/downwards to select the exercise mode needed.
Connect to Smartphone APP (Enable GPS Function)
When connected to the smartphone's GPS function, the device is able to calculate of the speed, pace, distance, exercise time, heart-rate, and calorie etc.
To connect to the phone through Bluetooth, do the following:
- Before connecting to the smartphone,
make sure to enable the Bluetooth function on the device.
Select the Bluetooth option (as marked in the illustration) to enable the Bluetooth function.

text_image
Power HR BEep BLT
text_image
Power HR BEep BLT- Enable the phone's APP and Bluetooth function and pair it with this device. Once
the connection is successful, the icon will appear.

- Once the connection is complete, then
select

to enter the
connection screen.
text_image
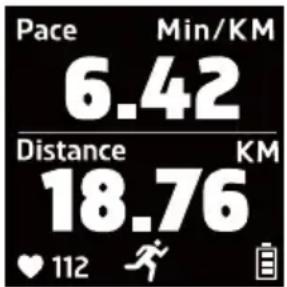
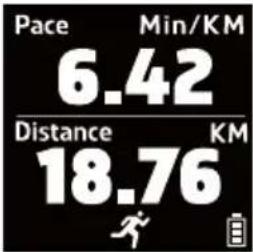
Pace Min/KM 6.42 Distance KM 18.76 ♥ 112Pace/ Distance:
Displays the current pace status and exercise distance.

text_image
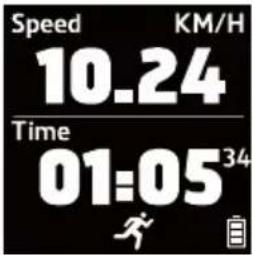
Speed KM/H 10.24 Time 01:05 34 ♥ 112Speed/Time:
Displays the currentspeed and exercise time.
text_image
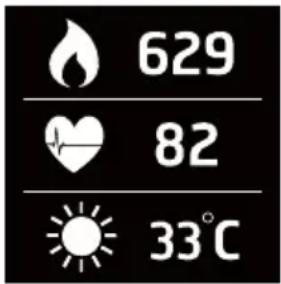
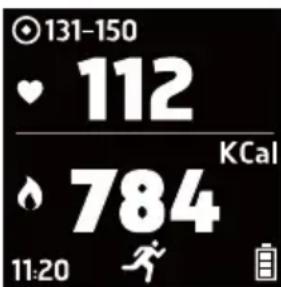
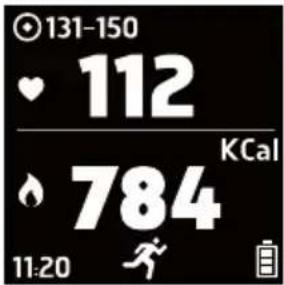
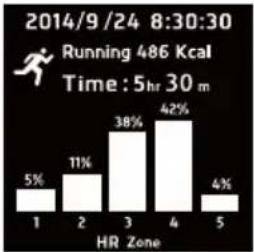
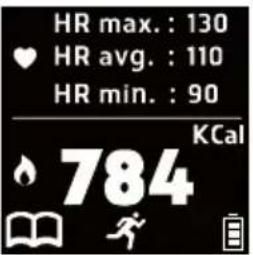
131-150 112 KCal 784 11:20Heart-rate/Calorie:
Displays the current heart-rate status and the number of calories you burn during the exercise.
text_image
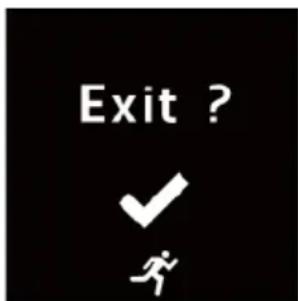
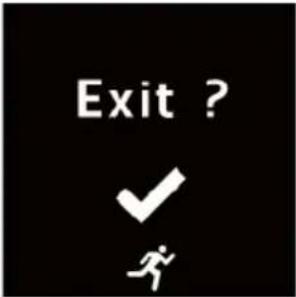
Exit ? ✓ #Press the return button

and a confirm exit
message will appear.
Press

to exit the
exercise mode and return to the menu page.

text_image
Walking Running Biking HikingNo GPS Function (Can only be used with Walking/ Running modes)
Without GPS function, the device will only display the information about the heart-rate reading and total calories burned.
 |  | Heart-rate/ Calorie:Displays the current heart-rate status and the number of calories you burn during the exercise. | |
 | Press the return buttonand a confirm exit message will appear.Press to exit the exercise mode and return to the menu page. | ||
 |  | Browse History RecordPast history records and times are displayed according to the date. Select an entry to browse or delete the entry. | |
 |  |  : Delete this data entry. : Delete this data entry. : Browse this data entry. : Browse this data entry. | |
 the screen to the left/right to switch between different information pages. the screen to the left/right to switch between different information pages. | |||
 |  | ||
 |  | ||
Press the return button  to return to the previous page. to return to the previous page. | |||
 |  | Set Heart-rate ZoneSlide the screen upwards/downwards to select the heart-rate zone.The will appear once a heart-rate zone is selected. Press the return | |
| HR Target | |||
Set Heart-rate Zone
| button to save the settings and return to the previous page.※ Different heart-rate zones will be displayed according to the user's age. |
Heart-rate Measurement Function
Equipped with the built-in heart-rate sensor, the device is capable to perform continuous and long term heart-rate measurement.
In the menu page, select HR to enter the Heart-Rate Measurement mode.
text_image
HR Sleep Fatigue z Media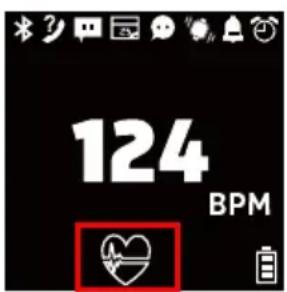
text_image
124 BPM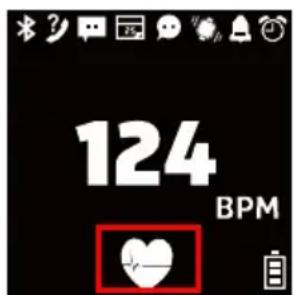
text_image
124 BPMEnable Heart-rate Measurement
In the heart-rate measurement function page, slide the screen to the right and select

to enable the heart-rate measurement function.
Once the function is enabled, the icon will be
displayed as "solid" ( ).
After enabling the heart-rate measurement function, please first remain stationary for about 20-30 seconds. A big and small heart
symbol (beating continuously) will be displayed on the screen. If the heart-rate value is not displayed after 30 seconds of detection, please verify the position where the smartwatch is worn and perform the measurement again. Then, wait until the smartwatch detects the heartbeat before starting normal activities. | |
 | Disable heart-rate measurement functionTo stop or clear the heart-rate measurement record, slide the screen to the right again. : Stop measuring and save the record. : Stop measuring and save the record. |
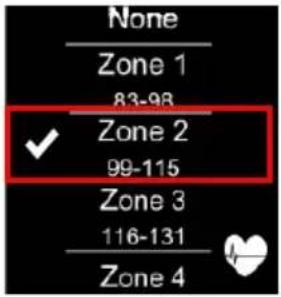
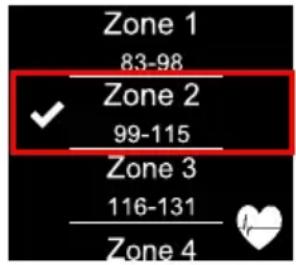
 | In the heart-rate measurement function page, slide the screen downwards to configure the target heart-rate zone value, browse the history lists, and delete history records. |
Disable heart-rate measurement function
text_image
Zone 1 83-98 ✓ Zone 2 99-115 Zone 3 116-131 Zone 4Zone 1
83-98

Zone 2
99-115
Zone 3
116-131
Zone 4
132-148
Zone 5
149-166

Set Target Zone Value
Slide the screen
upwards/downwards to
select the target zone
value. The

will
appear once a target zone
value is selected. Press
the return button

to
save the target zone value
and return to the previous
page.
The target zone value set will be displayed on the main heart-rate measurement function page.

Different heart-rate zones will be displayed according to the user's age.
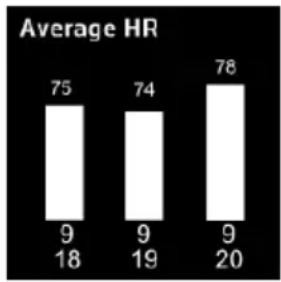
bar
Average HR | Category | Value | Count | |---|---|---| | 1 | 75 | 9 | | 2 | 74 | 9 | | 3 | 78 | 9 | | 4 | 18 | 19 | | 5 | 20 | 20 |Browse History Record
All heart-rate records are displayed according to the date.
Slide the screen to the left/right to display the records of other dates.

7,841
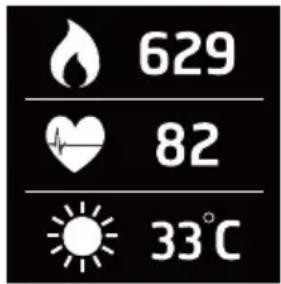
text_image
629 82 33°C
82
33^ C
7
Slide the screen upwards to display related information currently detected.
Press the return button

to return to the
Sleep Monitor Function
The sleep monitor function can detect the user's sleep quality, sleep time, and Wake After Sleep Onset (WASO) status etc. In the menu page, select Sleep to enter the Sleep Monitor mode.
text_image
HR Sleep Fatigue Z Media
text_image
Apr 20 12:42 AM Wednesday ♥102
text_image
Apr 20 12:42 AM Wednesday ♥102Enable Sleep Monitor
In the sleep monitor function page, slide the
screen to the right and select ON to enable the sleep monitor function.
Once the function is enabled, the icon will be
displayed as "solid" ( ) .
During the sleep monitor process, slide the screen downwards to browse the current monitoring record.
 | Slide the screen upwards/downwards to browse the following information: Sleep Quality Start/End time Time in Bed WASO Onset Latency | |
 | Disable Sleep Monitor FunctionTo perform data analysis and calculation, make sure to disable this function after you leave the bed or when you wake up. To stop or clear the sleep monitor record, slide the screen to the right again. : Stop monitoring, then display and save the record. : Stop monitoring, then display and save the record. : Clear the current record and continue monitoring.※ The sleep monitor function will automatically turn off after being enabled for over 24 hours. Reminder: extensive sleep time may cause potential danger tothe body. : Clear the current record and continue monitoring.※ The sleep monitor function will automatically turn off after being enabled for over 24 hours. Reminder: extensive sleep time may cause potential danger tothe body. | |
  | Resting Heart-rate MeasurementResting Heart Rate (RHR) will start automatically 1 minute after disabling sleep mode; the measurement time is 3 minutes.※ When measuring RHR, the heart-rate measurement function will be enabled automatically.※ The lower the RHR (except for pathological ones), the lower the burden on the heart. | |
 | In the sleep monitor function page, slide the screen downwards to browse and delete the history records. | |
 | Browse History RecordPast history records and times are displayed according to the date.Press an entry to browse or delete it. : Delete this data entry. : Delete this data entry. | |
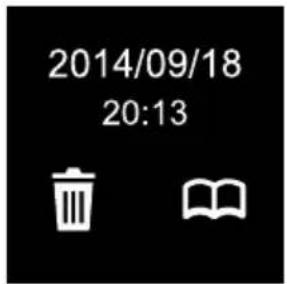
text_image
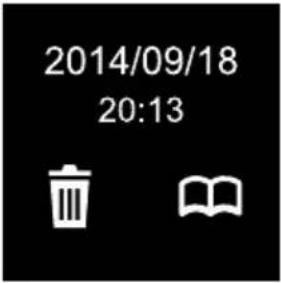
2014/09/18 20:13: Browse this record entry.
After selecting 📁, slide the screen upwards/downwards to browse different information.
2014.9.24
Sleep Quality
93%
text_image
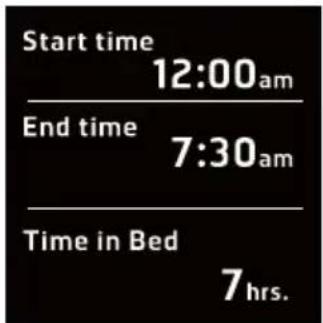
Start time 12:00am End time 7:30am Time in Bed 7hrs.WASO
30min.
Onset Latency
15min.
Press the return button

to return to the
previous page.

7,841
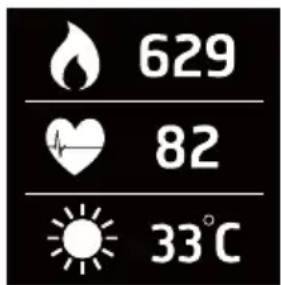
text_image
629 82 33°C
629
82
33^ C
7
Slide the screen upwards to display related information currently detected.

to return to the
Press the return button
previous page.
Fatigue Detection Function
The fatigue detection function uses an exclusive patented algorithm that uses heart-rate changes to determine the fatigue level of the user and send a warning in advance. The advance fatigue warning can be used for driving safety to prevent the
danger of drowsy driving. In the menu page, select to enter the Fatigue Detection mode.

text_image
HR Sleep Fatigue z Media
text_image
Apr 20 12:42 AM Wednesday ♥102Enable Fatigue Detection
In the fatigue detection function page, slide

the screen to the right and select ■ to enable the fatigue detection function.
Once the function is enabled, the icon will be
displayed as "solid" (☐).


text_image
Apr 20 12:42 AM Wednesday ♥102
text_image
Screenshot of a social media or messaging app interface showing a white cartoon character with a 'OK' button and status icons below.When the device detects fatigue status, the device will vibrate and play beep sound. The screen will also display as shown in the figure to the left.
※ Reminder: The beep will continue and the screen will appear for 30 seconds, and the vibration reminder will last for 5 seconds. Please turn off this screen and find an appropriate place to rest immediately.
During the fatigue detection process, slide the screen downwards to browse the current detection record.
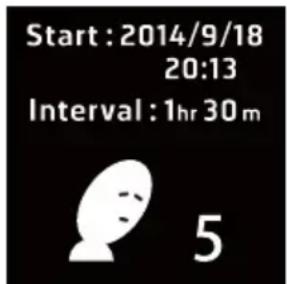
text_image
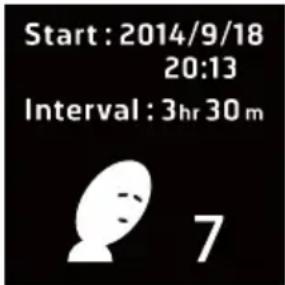
Start : 2014/9/18 20:13 Interval : 1hr 30 m 5Displays current detection time and the number of fatigues.
Press the return button

to return to the
previous page.
 | Disable Fatigue Detection FunctionTo stop or clear the fatigue detection record, slide the screen to the right again. : Stop detection and save the record. : Stop detection and save the record. : Clear the current record and continue detection. : Clear the current record and continue detection. | |
 | In the fatigue detection function page, slide the screen downwards to browse and delete the history records. | |
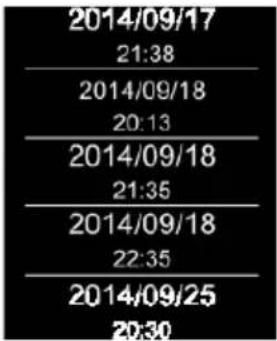 | Browse History RecordPast history records and times are displayed according to the date. Press an entry to browse or delete it. : Delete this data entry. : Delete this data entry. : Browse this record entry. : Browse this record entry. | |
 | ||
Browse History Record
After selecting  detection time and number of fatigues will be displayed. detection time and number of fatigues will be displayed. | ||
 Press the return button Press the return button  to return to the previous page. to return to the previous page. | ||
 7,841 7,841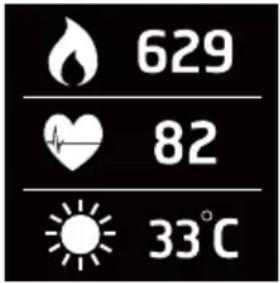  7 7 | Slide the screen upwards to display related information currently detected.Press the return button to return to the previous page. | |
Music Playback
This function supports controlling the music playback on the smartphone through Bluetooth connection. In the menu page,
select Media to enter the Music Playback mode.

text_image
HR Fatigue z Sleep Media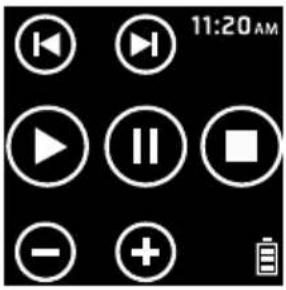 | The function descriptions of the icons displayed on the music playback function page are as follows: | |
| Control Icon | Description | |
| Volume adjustment | ||
| Previous track/Next track | ||
| Play/Pause/Stop | ||
| Press the return button to return to the previous page. | ||

7,841

text_image
629 82 33°C
629
82
33^ C
7
Slide the screen upwards to display related information currently detected.

to return to the
Press the return button
previous page.
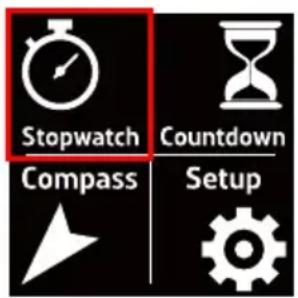
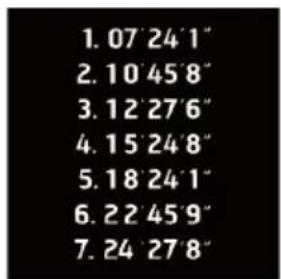
Stopwatch
This device is equipped with the stopwatch function. In the menu page, select Stopwatch to enter the Stopwatch mode.
text_image
Stopwatch Countdown Compass Setup
text_image
8 23:47 10 11:20The function descriptions of the icons displayed on the stopwatch function page are as follows:
| Control Icon Description | ||
 | Start/Pause | Start or pause stopwatch |
 | Reset Add an | record and reset the stopwatch |

Press the return button previous page.
text_image
1. 07 24'1" 2. 10 45'8" 3. 12 27'6" 4. 15 24'8" 5. 18 24'1" 6. 22 45'9" 7. 24 27'8"Slide the screen downwards to browse the history records.

7,841
text_image
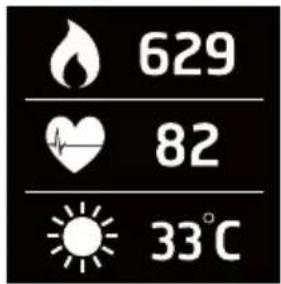
629 82 33°CSlide the screen upwards to display related information currently detected.
Press the return button 📤 to return to the previous page.

7
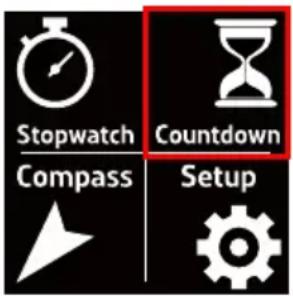
Countdown
This device is equipped with the countdown timer function. In the menu page, select Countdown to enter the Timer mode.
text_image
Stopwatch Countdown Compass Setup
text_image
00 58:24 11:20The function descriptions of the icons displayed on the timer function page are as follows:
| Control Icon Description | ||
 | Start/Pause Start or pause the countdown timer. | |
 | Restart countdown | Clear and restart the countdown. |

Press the return button previous page.
| BeeperVibrationSet time | Slide the screen downwards to configure the beeper, vibration, and countdown timer settings.Press the return button  to return to the previous page. to return to the previous page. | |
 | Beeper:Select whether to turn the beeper on/off. | |
 | Vibration:Select whether to turn the vibration reminder on/off. | |

7,841

text_image
629 82 33°C
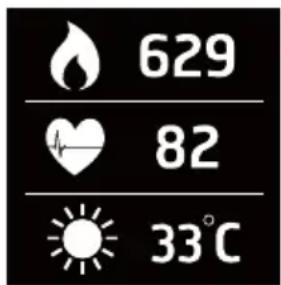
Slide the screen upwards to display related information currently detected.
Press the return button 📤 to return to the previous page.
Electronic Compass
The electronic compass function works just like a normal compass. It can display the digital sign direction. In the menu page, select Compass to enter the Electronic Compass mode.

text_image
Stopwatch Countdown Compass Setup
text_image
N E W SA digital sign direction will be displayed in the electrical compass function page.
text_image
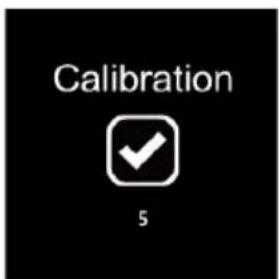
Calibration 5Electronic Compass Calibration
Slide the screen downwards to perform the
electronic compass calibration. Tap ▼ and

text_image
Please track the direction to calibrate the compass.then start the calibration of the electronic compass. Follow the on-screen instructions to calibrate the electronic compass.

7,841
text_image
629 82 33°C
Slide the screen upwards to display related information currently detected.
Press the return button 📤 to return to the previous page.
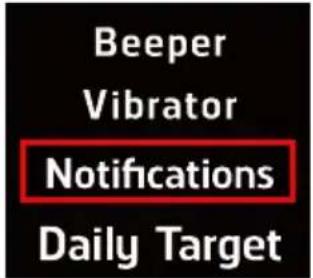
Setup Mode
In the menu page, select enter the Setup mode.

text_image
Stopwatch Countdown Compass SetupDisplay
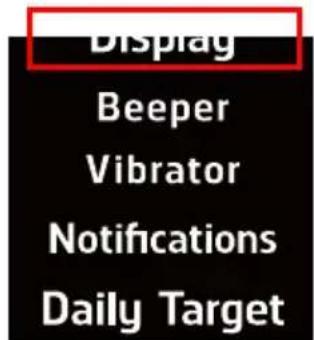
text_image
Display Beeper Vibrator Notifications Daily TargetBLE Time Mode Set Alarm
Date & Time Personal Data Factory Reset FW Update
About
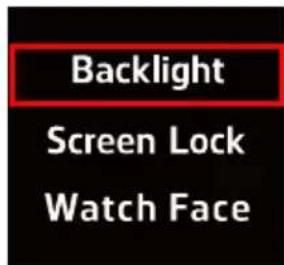
Backlight
Configure the backlight function setting. It can be set to 'Always on', "5 seconds", "10
seconds", and "30 seconds". The √ will appear after selecting an option. Press the
return button 📁 to save the setting and return to the previous page.
text_image
Backlight Screen Lock Watch Face
text_image
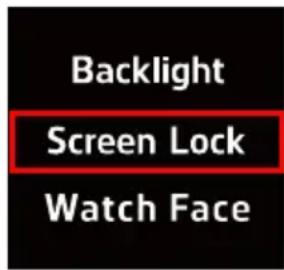
Always on 5 sec. 10 sec.Screen Lock
Screen lock can be set to "Off", "10 seconds", "30 seconds", "60 seconds", "3 minutes", "5
minutes", and "10 minutes". The 📋ll appear after selecting an option. Press the return button 📌 to save the setting and return to the previous page.
text_image
Backlight Screen Lock Watch Face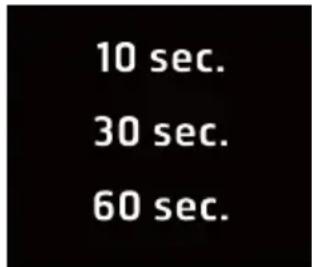
text_image
10 sec. 30 sec. 60 sec.Unlock Screen
Press the “Menu button” under the main menu page and then follow the on-screen instructions to unlock the screen lock function.

text_image
Only once Forever 30Watch Face Format
Slide the screen to the left/right to select desired watch face format. There are four watch face formats available for selection. After selecting the desired watch face format,
then press the return buttonto save the setting and return to the previous page.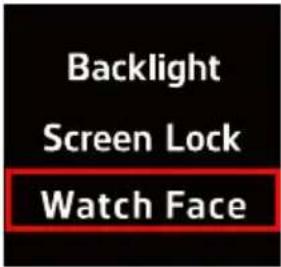 | ||||
 |  |  |  | |
Beeper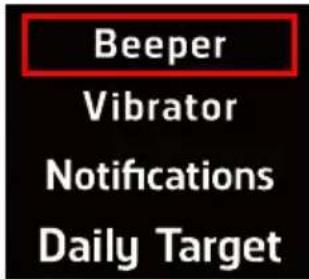 BLETime Mode BLETime Mode | Select whether to turn the beeper on/off. The will appear after selecting an option,then press the return buttonto save the setting and return to the previous page. will appear after selecting an option,then press the return buttonto save the setting and return to the previous page. | |||
| Vibrator | Select whether to turn the vibration reminderon/off. Thewill appear after selecting an | |||
 | option, then press the return button  to save the setting and return to the previous page. to save the setting and return to the previous page. | |||
| BLE Time Mode |  | |||
| Notifications | 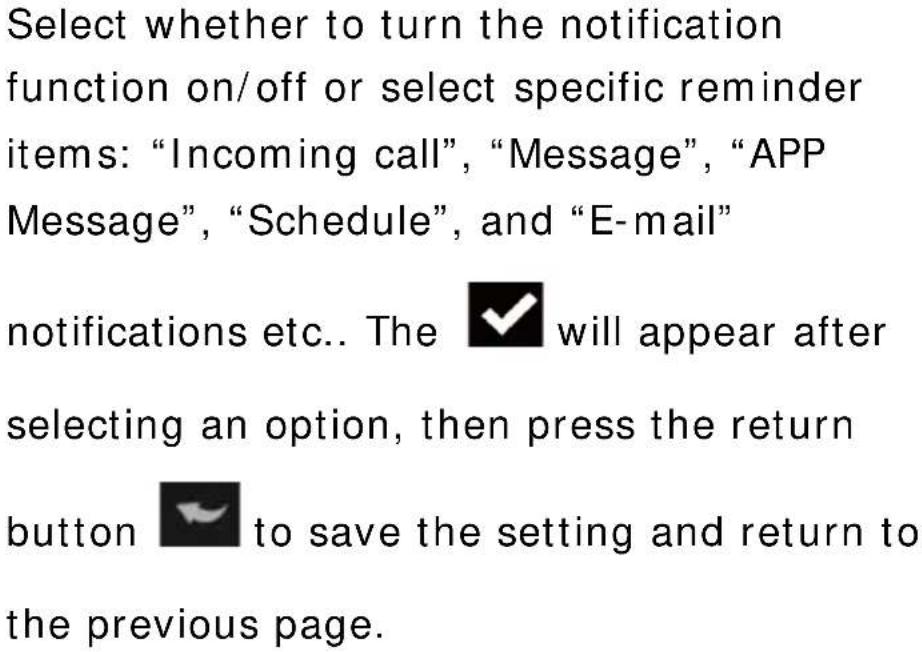 | |||
 | ||||
| BLE Time Mode |  Off Off | |||
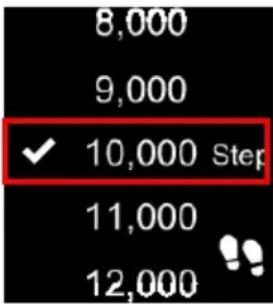
Daily Target

text_image
Beeper Vibrator Notifications Daily TargetBLE Time Mode
Step
Set the step value. The √ will appear after selecting an option, then press the return button ↻ to save the setting and return to the previous page.

text_image
Step Distance Calorie Heart Rate
text_image
8,000 9,000 10,000 Step 11,000 12,000Distance
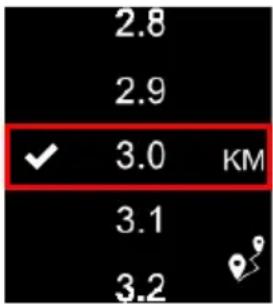
Set the target distance. The ✅ I appear after selecting an option, then press the return button ✅ to save the setting and return to the previous page.

text_image
Step Distance Calorie Heart Rate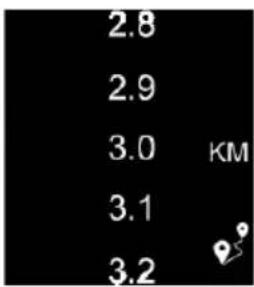
text_image
2.8 2.9 3.0 KM 3.1 3.2Calorie
Set the number of calories to consume. The

will appear after selecting an option,
then press the return button

to save the
setting and return to the previous page.

text_image
Step Distance Calorie Heart Rate
text_image
1,800 1,900 2,000 KCal 2,100 2,200Heart-rate Zone
Select the target zone. The

appear
after selecting an option, then press the
return button

to save the setting and
return to the previous page.

text_image
Step Distance Calorie Heart Rate
text_image
None Zone 1 83-98 Zone 2 99-115 Zone 3 116-131 Zone 4| Bluetooth | Select whether to turn Bluetooth connection on/off. The √ will appear after selecting an option, then press the return button √ to save the setting and return to the previous page. | |
 | ||
| BLE Time Mode | 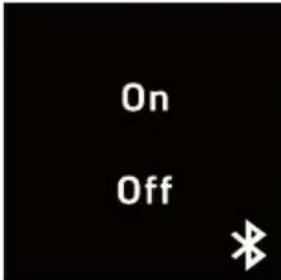 | |
| Time Mode | After enabling this function, this device will only provide the watch function and the other functions will be disabled. To disable this mode, please press the “menu button” on the right of this device and double-tap the screen on the watch page to enable other features. | |
 | ||
| BLE Time Mode |  |  |
| AlarmBeeperVibratorNotificationsDaily TargetSet AlarmDate & TimePersonal Data | Select whether to turn the alarm functionon/off, The √ will appear after selecting anoption, then press the return button 📋 tosave the setting and return to the previouspage.  | |
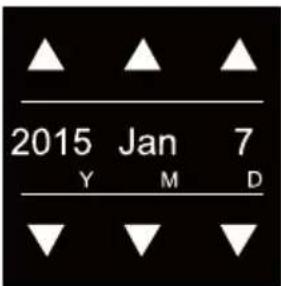
| Date/ TimeFormatBeeperVibratorNotificationsDaily Target | Set DateSet the current date. Press the return button 🎨 to save the settings and return to theprevious page. | |
 |  | |
Set Alarm
Date & Time
Personal Data
Factory Reset
FW Update
About
Set Time
Set the current time. Press the return button

to save the setting and return to the previous page.

text_image
Set Date Set Time Time Format
text_image
16 :30: 30 h m sSet Time Format
Time format can be set to "24-hour" or
“12-hour”. The √ will appear after selecting an option, then press the return button 📋 to save the setting and return to the previous page.

text_image
Set Date Set Time Time Format
text_image
24H 12HPersonal Data

text_image
Beeper Vibrator Notifications Daily TargetSet Alarm Date & Time
Personal Data
Factory Reset FW Update
About
Gender
Select male/female. The √ will appear after selecting an option, then press the return button 📋 to save the setting and return to the previous page.

text_image
Gender Age Unit Height
text_image
Male FemaleAge
Set age. The √I appear after selecting
an option, then press the return button

to save the setting and return to the previous page.

text_image
Gender Age Unit Height
text_image
28 29 30 31 32Unit
Set the measurement unit. The √ will appear selecting an option, then press the return button ↗ to save the setting and return to the previous page.

text_image
Gender Age Unit Height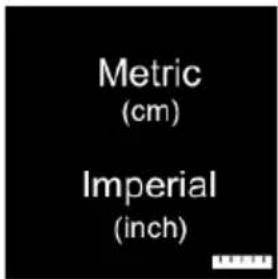
text_image
Metric (cm) Imperial (inch)Height
Enter your height. Press the return button to save the setting and return to the previous page.

text_image
Unit Height Weight Stride Length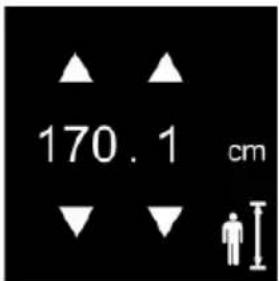
text_image
170.1 cmWeight
Enter your weight. Press the return button

to save the setting and return to the previous page.

text_image
Unit Height WeightWeight
Stride Length

text_image
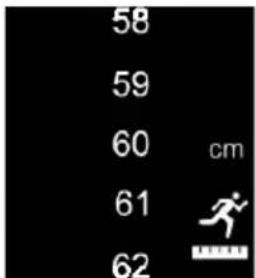
60 . 1 kgStride Length (Walk)
Set the stride length for walking. The

appear after selecting an option, then press
the return button

to save the setting and
Height
Weight
Stride Length (WaIK)
Stride Length (Run)
return to the previous page.

text_image
58 59 60 cm 61 62Set Stride Length (Run)
Set the stride length for running. The

will appear after selecting an option, then
press the return button

setting and return to the previous page.
Height
Weight
Stride Length
(WaIK)
Stride Length
(Run)
text_image
58 59 60 cm 61 62Factory Reset

text_image
Beeper Vibrator Notifications Daily TargetDefault factory settings will be restored after
tapping

| Set AlarmDate & TimePersonal DataFactory ResetFW UpdateAbout |  |
| FW UpdateBeeperVibratorNotificationsDaily TargetSet AlarmDate & TimePersonal DataFactory ResetFW UpdateAbout | It will connect to the Internet and update the |
About

text_image
Beeper Vibrator Notifications Daily TargetSet Alarm
Date & Time
Personal Data
Factory Reset
FW Update
About
Display the related information of this device.
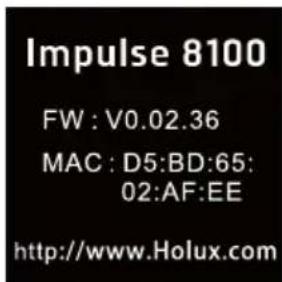
text_image
Impulse 8100 FW : V0.02.36 MAC : D5:BD:65: 02:AF:EE http://www.Holux.comAPP Installation
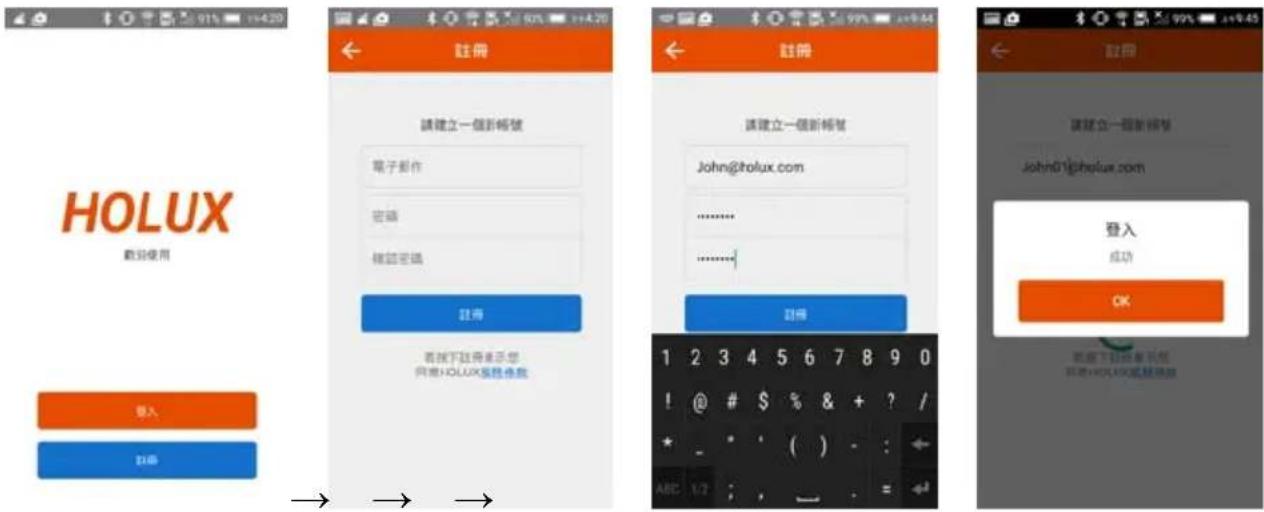
Using the Bluetooth connection, this device can be used with the Impulse APP installed on your smartphone. The Impulse APP can be used to display related activity and training records.
Step 1: On your smartphone, go to the Google Play Store, search for the “Impulse” APP. Then download and install the APP.
※ Please confirm that both the “Internet Communication” and “Bluetooth” functions on the smartphone are enabled. For more information on related smartphone operations, please refer to the instructions in the user manual of the smartphone.
Step 2: Launch the Impulse APP
Step 3: Follow the on-screen instructions to complete account registration and related settings.
※ Please enable the “Bluetooth” function on the smartphone and connect to the Internet either using Wi-Fi or 3G connection.
Register and Login
HOLUX Heart-Rate Smartwatch Impulse 8100
Device pairing and binding (make sure the Bluetooth functions on both the smartphone and Impulse 8100 are enabled)

※ If you do not want to bind to a device, select “Ignore and Next”.
Basic Data Setting

You can start using the Impulse APP after completing the settings.
Remove Device Pairing and Binding
The device information under the “Setup” function can be used to remove device binding.

Normal Care and Maintenance
To ensure the unit's normal operation and extended life span, please note the following while using and storing:
- Do not drop the unit
If violently impacted or shocked, serious damage may be caused.
- Avoid sudden temperature changes
Condensation may occur when entering a warm room on a cold day. To prevent condensation from damaging the unit, please place into an airtight plastic bag before sudden temperature changes.
- Keep away from strong magnetic fields
When using or storing, please keep away from strong electromagnetic/ radioactive or magnetic field equipment.
- Operating temperature
The products operating temperature is between 0^ C \~ 60^ C; please do not operate under extreme temperatures.
- Avoid exposure to sunlight
Please avoid long periods of sunlight or high temperature exposure.
- Cleaning the screen
Using a soft clean cloth to wipe the screen is recommended; do not use ordinary tissue to wipe the screen.
- Do not disassemble
Please do not disassemble the product, this may void the warranty and damage the unit.
- Storage
When the product is not being used for a long period, store the device in a cool and dry place. For long-term storage, keeping the unit in a dry box is recommended.
Please do not keep the product in the following environments:
- Unventilated and humid locations.
- In an environment where humidity is over 90%.
Specification
| Processor | Low power 32bit processor |
| Memory | 4MB for activity and sleep log |
| Display | 1.28" Touch screen (128x128 pixels), high contrast LCD display |
| Sensor | Optical Heart Rate (OHR) SensorG-sensorCompass |
| Alert Vibration | Buzzer |
| Bluetooth | 4.0 low energy (BLE) |
| Battery | Rechargeable Li-ionTime Mode : 60 daysContinuous OHR Mode : 20 hours |
| Dimension | 37.4(W)x42.2(L)x12.1(H)mm |
| Weight 56g | |
| Mobile application Android/ iOS | |
| Dustproof & Waterproof | IP67 |
