P4018AV BH - Saw POULAN - Free user manual and instructions
Find the device manual for free P4018AV BH POULAN in PDF.

User questions about P4018AV BH POULAN
0 question about this device. Answer the ones you know or ask your own.
Ask a new question about this device
Download the instructions for your Saw in PDF format for free! Find your manual P4018AV BH - POULAN and take your electronic device back in hand. On this page are published all the documents necessary for the use of your device. P4018AV BH by POULAN.
USER MANUAL P4018AV BH POULAN
545186804Rev.53/15/10BRW
IDENTIFICATIONOFSYMBOLS

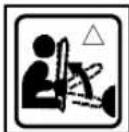
WARNING! This chain saw can be dangerous! Care- lessor improper use can cause serious or even fatal injury.

Readandunderstandthe instructionmanualbefore usingthechainsaw.

Alwayswearappropriateearprotection, eyeprotection and head protection.
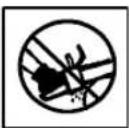
Alwaysusetwohandswhenoperatingthechainsaw.
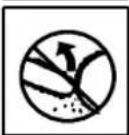
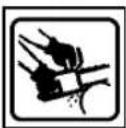
WARNING! Contacting the guide bartip with any object should be avoided; tip contact may cause the guide barto moves suddenly upward and backward, which may cause serious injury.
Measured maximum kickback value without chainbrake for the bar and chain combination on the label.
StartingReminder
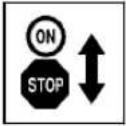
MoveON/STOPswitchto theONposition.
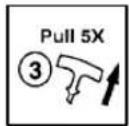
Pullthestarterrope sharply5timeswithyour righthand.
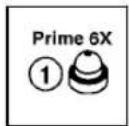
Slowlypressprimerbulb 6 times.
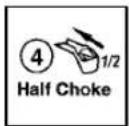
Pushthechoke/fastidle leverintotheHALF CHOKEposition.

Pullchoke/fastidlelever outtothefulleextent(to theFULLCHOKEposition).
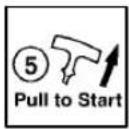
Pullthestarterropesharply withyourrighthanduntil theenginestarts.
SAFETYRULES

WARNING:Alwaysdisconnect
sparkplugwireandplacewirewhereitcannotcontactsparkplugtopreventaccidental startingwhensettingup,transporting,adjustingormakingrepairsexceptcarburetor adjustments.
Becauseachainsawisahigh-speedwood-cuttingtool, specialsafetyprecautionsmust beobservedtoreducetheriskofaccidents. Carelessorimproperuseofthistoolcan causeseriousinjury.
PLANAHEAD
- Readthismanualcarefullyuntilyoucompletelyunderstandandcanfollowwallsafety rules, precautions,andoperatinginstructionsbeforeattemptingtousetheunit.
- Restricttheuseofyoursawtoadultusers whounderstandcanfollowsafety rules, precautions,andoperatinginstructionsfoundinthismanual.
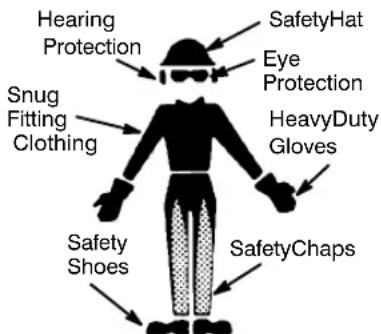
- Wearprotectivegear. Alwaysusesteel-toed safety footwear with non-slip soles; snug-fittingclothing; safetychaps; heavy-
duty, non-slip gloves; eyeprotections such as non-fogging, vented goggles or face screen; an approved safety hard hat; and sound barriers (ear plugs or mufflers) to protect your hearing. Regular users should have hearing checked regularly as chains a noisec and damage hearing. Secure hair aboves houlder length.
text_image
Hearing Protection Snug Fitting Clothing Safety Hat Eye Protection HeavyDuty Gloves Safety Shoes SafetyChaps- Keepallpartsofyourbodyawayfromthe chainwhentheengineisrunning.
- Keepchildren, bystanders, and animalsa minimum of 30 feet (10 meters) away from the work area. Donotallow other people or animalstobenear the chainsaw when starting or operating the chainsaw.
- Donothandleoroperateachainsawwhen youarefatigued,ill,orupset,orifyouhave takenalcohol,drugs,ormedication.You mustbeingoodphysicalconditionandmentallyalert.Chainsawworkisstrenuous.If youhaveanyconditionthatmightbeaggravatedbystrenouswork,checkwithyour doctorbeforeoperatingachainsaw.
- Carefullyplanyoursawingoperationinadvance.Donotstartcuttinguntilyouhavea clearworkarea,securefooting,and,ifyou arefellingtrees,aplannedretreatpath.
OPERATE YOURSAWSAFELY
- Donotoperateachainsawwithonehand. Seriousinjurytotheoperator, helpers, bystandersoranycombinationofthesepersonsmayresultfromone-handedoperation.Achainsawisintendedfor two-handeduse.
- Operatethechainsawonlyinawell-ventilatedoutdoorarea.
- Donotoperatesawfromaladderorinatree.
- Makesurethechainwillnotmakecontact withanyobjectwhilestartingtheengine. Nevertrytostartthesawwhentheguide barisinacut.
- Donotputpressureonthesawattheendof thecut. Applyingpressurecancauseyouto losecontrolwhenthecutiscompleted.
- Stoptheenginebeforesettingthesaw down.
- Donotoperateachainsawthatisdamaged, improperlyadjusted,ornotcompletelyandsecurelyassembled. Always replacebar,chain,handguard,orchain brakeimmediatelyifitbecomesdamaged, brokenorisotherwiseremoved.
- Withtheenginestopped, handcarry the chainsawwiththemufflerawayfrom your body, and the guide bar and chainto the rear, preferably covered with ascabbard.
- Haveallchainsawserviceperformedbya qualifiedservicedealerwiththeexception oftheitemlistedinthemaintenancesectionofthismanual. Forexample,ifimpropertoolsareusedtoremoveorholdtheflywheelwhenservicingtheclutch,structural damagetothe flywheelcan occur and causetheflywheeloburst.
- Make certain the saw chain stops moving when the throttle trigger is released. For correction, refer to CARBURETORADJUSTMENT.
- Nevermodifyoursawinanyway.
- Keep the handles dry, clean, and free of oil or fuel mixture.
- Keepfuelandoilcaps, screws, and fasteners securely tightened.
- Use only Poulan accessories and replacement parts as recommended.
HANDLEFUELWITHCAUTION
- Donotsmokewhilehandlingfuelorwhile operatingthesaw.
- Eliminate all sources of sparks or flame in the areas where fuel is mixed or poured. There should be no smoking, open flames, or work that could cause sparks. Allow green to cool before refueling.
- Always have fire extinguishing tools available if you should need them.
- Mixandpourfuelinanoutdoorareaon bareground;storefuelinacool,dry,well ventilatedplace;and use an approved, marked container for allfuelpurposes. Wipeupallfuelspillsbeforestartingsaw.
- Moveatleast10feet(3meters)fromfuelingsitebeforestartingengine.
- Turntheengineoffandletsawcoolina non-combustiblearea, notondryleaves, straw, paper, etc. Slowlyremovefuelcap andrefuelunit.
- Storetheunitandfuelinanareawherefuel vaporscannotreachsparks or open flamesfromwaterheaters,electricmotors orswitches,furnaces,etc.
KICKBACK
WARNING: Avoidkickbackwhich
canresultinserious injury. Kickbackisthe backward, upwardorsuddenforwardmotion of the guidebar occurringwhenthesaw chainneartheuppertipof the guidebar contactsanyobjects such asalogorbranch, or whentewoodclosesinandpinchesthe sawchaininthecut. Contactingaforeignobjectinthewoodcanalsoresultinlossof chainsawcontrol.
- Rotational Kickback can occur when the movingchaincontactsanobjectattheupper tipoftheguidebar. Thiscontactcancause thechaintodigintotheobject,whichstops thechainforaninstant. Theresultisalightningfast,reversereactionwhichkicks the guidebarupandbacktowardtheoperator.
- Pinch-Kickback can occur when the wood closes in and pinchesthemoving sawchain in the cut along the top of the guide bar and the sawchain is suddenly stopped. This sudden stopping of the chain results in are reversal of the chain force used to cut wood and cause the sawtomove in the opposite direction of the chain rotation. Thesawis driven straight back toward the operator.
- Pull-Incanoccurwhenthemovingchain contactsaforeignobjectinthewoodinthe cutalongthebottomoftheguidebarandthe sawchainissuddenlystopped. This sudden stoppingpullsthesawforwardandaway from the operator and couldeasilycausethe operatortolosecontrolofthesaw.
AvoidPinch--Kickback:
- Beextremelyawareofsituationsorobstructionsthatcancausematerialtopinch thetopoforotherwisestopthechain.
- Donotcutmorethanonelogatatime.
- Donottwistthesawasthebariswith-drawnfromanundercutwhenbucking.
AvoidPull--In:
•Alwaysbegincuttingwiththeengineatfull speedandthesawhousingagainstwood.
- Use wedges made of plastic or wood. Never use metal to hold the cut open.
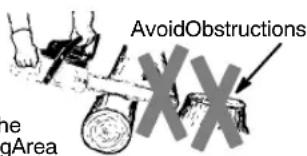
KickbackPath
text_image
AvoidObstructions me gAreaClearThe WorkingArea
REDUCETHECHANCEOF KICKBACK
- Recognizethatkickbackcanhappen. Withabasicunderstandingofkickback, youcanreducetheelementofsurprise whichcontributestoaccidents.
- Neverletthemovingchaincontactanyobjectatthetipoftheguidebar.
- Keeptheworkingareafreefromobstructionssuchasothertrees,branches,rocks, fences,stumps,etc.Eliminateoravoid anyobstructionthatyoursawchaincould hitwhileyouarecutting.Whencuttinga branch,donotlettheguidebarcontact branchorotherobjectsarounddit.
-
Keepyoursawchainsharpandproperly tensioned.Alooseordullchaincanincreasethechanceofkickbackoccurring. Followmanufacturer'schainsharpening andmaintenanceinstructions.Checktensionatregularintervalswiththeengine stopped,neverwiththeengine running. Makesurethebarnutsaresecurelytightenedaftertensioningthechain.
-
Beginandcontinuecuttingatfullspeed.If thechainismovingataslowerspeed, thereisgreaterchanceofkickbackoccurring.
• Cutonelogatatime. - Useextremec cautionwhenre-enteringa previouscut.
- Donotattemptcutsstartingwiththetipof thebar(plungecuts).
- Watchforshiftinglogsorotherforcethat couldcloseacutandpinchorfallintochain.
- Use the Reduced-Kickback Guide Bar and Low-Kickback Chain specified for yoursaw.
MAINTAINCONTROL
Standtothe
leftofthesaw

text_image
the saw reverseThumbon
undersideof
handlebar
Neverreverse handpositions
text_image
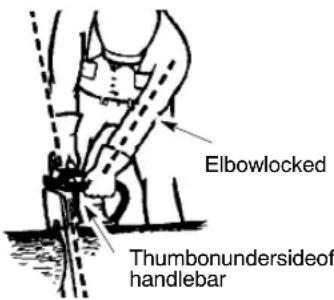
Elbowlocked Thumbonundersideof handlebar- Keepagood, firmgriponthesawwith both handswhentheengineisrunninganddon't letgo. Afirmgripwillhelpyoureducekickbackandmaintaincontrolofthesaw. Keep thefingersofyourlefthandencircling and yourlefthumbunderthefronthandlebar. Keepyourrighthandcompletelyaroundthe rearhandlewhetheryourarerighthandedor lefthanded. Keepyourleftarmstraightwith theelbowlocked.
- Positionyourlefthandonthefronthandlebarsoitisinastraightlinewithyourright handontherearhandlewhenmaking buckingcuts. Neverreverserightandlef handpositionsforanytypeofcutting.
- Standwithyourweightevenlybalancedon bothfeet.
•Standslightlytotheleftsideofthesawto keepyourbodyfrombeinginadirectline withthecuttingchain. - Donotoverreach.Youcouldbedrawnor thrownoffbalanceandlosecontrolofthe saw.
- Donotcutaboveshoulderheight.Itisdifficult to maintain control of saw above shoulderheight.
KICKBACKSAFETYFEATURES


WARNING:Thefollowingfeatures cludedonyoursawtohelpreducethe rdfokkickback;however,suchfeatures ottotallyeliminatethsdanger.Asa sawuser,donotrelyonlyonsafetyde-Youmustfollowwallsafetyprecau-instructions,andmaintenanceinthis ualtohelpavoidkickbackandother swhichcanresultinseriousinjury.
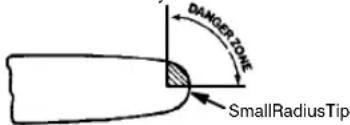
- Reduced--KickbackGuideBar, designed withasmallradiustipwhichreduce the sizeofthekickbackdangerzoneonthe bartip. AReduced--KickbackGuideBar hasbeendemonstratedtosignificantlyreducethenumberandseriousnessofkick-backswhentestedinaccordancewith safetyrequirementsforgasolinepowered chainsawsassetbyANSIB175.1.
ReducedKickback Symmetrical Guide Bar
text_image
DANGER ZONE SmallRadiusTipSymmetricalGuideBar
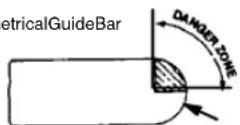
LargeRadiusTip
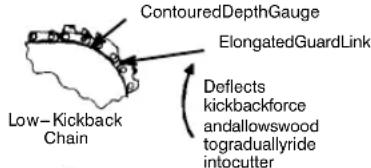
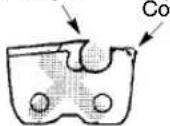
- Low--Kickback Chain, designed with a contoureddepthgaugeand guardlink whichdeflectkickbackforceandallow woodtograduallyrideintothecutter.Low--KickbackChainhasmetkickbackperformancerequirementswhentestedona representativesampleofchainsawsbelow3.8cubicinchdisplacementspecified inANSIB175.1.
text_image
ContouredDepthGauge ElongatedGuardLink Low-Kickback Chain Deflects kickbackforce andallowswood tograduallyride intocutter
CanObstructMaterial
NotaLow– KickbackChain
- FrontHandGuard, designed to reduce the chance of your left hand contacting the chain if your hand slips off the front handle bar.
- Positionoffrontandrearhandlebars, designedwithdistancebetweenhandlesand "in-line" witheachother. Thespreadand"inline"positionofthehandsprovidedbythis designworktogethertogivebalanceandresistanceincontrollingthepivotofthesaw backtowardtheoperatorifikbackoccurs.
CHAINBRAKEANDCKAANGLE
- ChainBrake, designed to stop the chain in the event of kickback.

WARNING: WEDONOTREP-
RESENT AND YOU SHOULD NOT ASSUME THAT THE CHAIN BRAKE WILL PROTECTYOUINTHEEVENTOFAKICKBACK. Kickback is a lightning fast action whichthrowsthebarandrotatingchainback anduptowardtheoperator.Kickbackcanbe causedbyallowingcontactofthebartipinthe dangerzonewithanyhardobject. Kickback can also be caused by pinching the saw chain alongthetopoftheguidebar.Thisactionmay pushtheguidebarrapidlybacktowardtheoperator.Eitheroftheseeventsmaycauseyou tolosecontrolofthesawwhichcouldresultin seriousinjuryorevendeath. DONOTRELY UPONANYOFTHEDEVICESBUILTINTO YOURSAW.YOUSHOULDUSETHESAW PROPERLY AND CAREFULLY TO AVOID KICKBACK.Reduced--kickbackguidebars and low-kickback saw chains reduce the chanceandmagnitudeofkickbackandare recommended.Yoursawhasalowkickback chainandbarasoriginalequipment. Repairs onachainbrakeshouldbemadebyanauthorizedservicingdealer. Takeyourunittothe placeofpurchaseifpurchasedfromaservicingdealer,ortothenearestauthorizedmaster servicedealer.
- TipcontactinsomecasesmaycausealightningfastreverseREACTION,kickingguide barupandbacktowardoperator.
- Pinchingthesawchainalongthetopofthe guidebarmaypushtheguidebarrapidly backtowardtheoperator.
- Eitherofthesereactionsmaycauseyouto losecontrolofthesawwhichcouldresultin seriousinjury.Donotrelyexclusivelyupon devicesbuiltintoyoursaw.
WARNING:
Computed kickback
angle(CKA)listedonyoursawandlistedinthe CKAtablebelowrepresentsangleofkickback your barandchaincombinationswillhave whentestedinaccordancewithCSA(CanadianStandardsAssociation)andANSIstandards.Whenpurchasingreplacementbarand chain,considerationsshouldbegiventothe lowerCKAvalues.LowerCKAvaluesrepresentsaferanglestotheuser,highervaluesindicatemoreangleandhigherkickenergies. Computedanglesrepresentedindicatetotal energyandangleassociatedwithoutactivation ofthechainbrakeduringkickback.Activated anglerepresentschainstoppingtimerelativeto activationangleofchainbreakandresulting kickangleofsaw.InallcaseslowerCKAvaluesrepresentasaferoperatingenvironment fortheuser.
The following guide bar and chain combinations meet kickback requirements of CSA Standards Z62.1, Z62.3, & ANSIB175.1 when used on saws listed in this manual. Use of bar and chain combinations other than those listed is not recommended and may not meet the CKA requirements per standard.
Computedkickbackangle(CKA)Table
| MODEL | BAR | P/N | CKAwithoutchainbrake | |
| P/NLength | CHAIN | |||
| P3314/P3314WS | 9520443681 | 4" | 952051209 | 33° |
| P3314WSA | ||||
| P3416/P3516PR | 952044370 | 16" | 952051211 | 33° |
| P4018WM/P4018WT | 952044418 | 18" | 33952051338 | |
| P3818AV/P4018AV | ||||
| P4018AVBH | ||||
NOTE: If this sawistobe used for commerciallogging,achainbrakeisrequired and shall not be removed or otherwise is- abled to comply with Federal OSHA Regulations for Commercial Logging.

WARNING: Theengineexhaust in thisproduct containschemicalsknowneStateofCaliforniatocausecancer, defectsorotherreproductiveharm.
SAFETY NOTICE: Exposure to vibrations through prolonged use of gasoline powered handtools could cause blood vessel over damage in the fingers, hands, and joints of people prone to circulation disorders or abnormal swellings. Prolonged use in cold weather has been linked to blood vessel damage in otherwise healthpeople. If symptoms occur such as numbness, pain, loss of strength, change in skin color or texture, or loss of feeling in the fingers, hands, or joints, discontinue the use of this tool and seek medical attention. An anti-vibration system does not guarantee the avoidance of these problems. Users who operate powertoolson a continual and regular basis must monitor closely the physical condition and the condition of this tool.
nSPECIAL NOTICE: Your saw is equipped with atemperature limiting muffler and spark arresting screen which meets the requirements of California Codes 4442 and 4443. All U.S. forestland and the states of California, Idaho, Maine, Minnesota, New Jersey, Oregon, and Washington require by law that many internal combustion engines to be equipped with aspark arrestingscreen. If you operate each chainsawinastate or locale where such regulation sexist, you are legally responsible for maintaining the operating condition of these parts. Failure todos oisa violation of the law. Referto the SERVICE section formaintenance of the sparkarresting screen.
Failure to follow all Safety Rules and Precautionscanresultinserious injury. If situations occur which are not covered in this manual, use care and good judgement. If you need assistance, contact your authorized serviced dealer or call 1-800-554-6723.
STANDARDS: This saw is listed by Underwriter's Laboratories, Inc., in accordance with:
ANSIB175.1--2000AmericanNational Standards for Gasoline-Powered Chain Saws-SafetyRequirements
CSAZ62.1-03ChainSaws-Occupational HealthandSafety
CSAZ62.3-96ChainSawKickbackOccupationalHealthandSafety
ASSEMBLY
Protective gloves (not provided) should be wornduring assembly.
ATTACHING THE BAR & CHAIN (If not alreadyattached)

WARNING: If received assembled,
repeatallstepstoensureyoursawisproperly assembledandallfastenersaresecure. Alwaysweargloveswhenhandlingthechain. The chain is sharp and can cut you even when itisnotmoving!
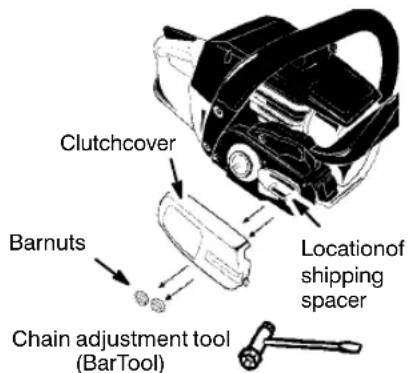
- Loosen and remove the bar nuts and the clutch cover from the saw.
- Removetheplasticshippingspacer(if present).
text_image
Clutchcover Barnuts Locationof shipping spacer Chain adjustment tool (BarTool)- Anadjustingpinandscrewisusedtoadjustthetensionofthechain.Itisveryimportantwhenassemblingthebar,thatthe pinlocatedontheadjustingscrewalligns into a hole in the bar. Turning the screw will
movetheadjustmentpinupanddownthe screw.Locatethisadjustmentbeforeyou beginmountingthebarontothesaw.See followingillustration.
natural_image
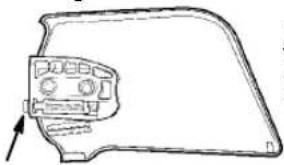
Line drawing of a car front panel with no text or symbolsInside viewof clutch cover
Adjustmentlocatedonclutchcover
- Turntheadjustingscrewbyhandcounterclockwiseuntiltheadadjustingpinjust touchesthestop. This should allow the pintobenearthecorrect position.
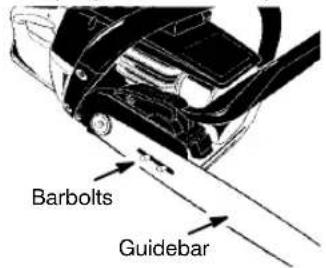
5.Slideguidebaronbarboltsuntilguide barstopsagainstclutchdrumsprocket.
text_image
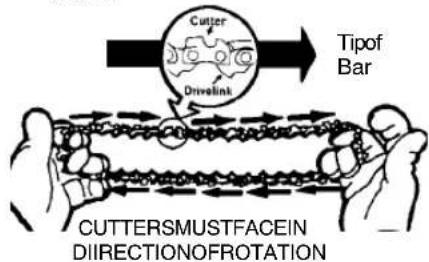
Barbolts Guidebar- Carefully remove the chain from the package. Hold chain with the drivelinks as shown.
text_image
Cutter Drivint Tipof Bar CUTTERSMUSTFACEIN DIIRECTIONOFROTATION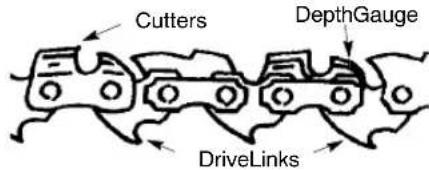
text_image
Cutters DepthGauge DriveLinks-
Placechainoverandbehindclutchretainer, fittingthedrivelinksintheclutch drumsprocket.
-
Fitbottomofdrivelinksbetween the teethinthesprocketinthenoseofthe guidebar.
9.Fitchaindrivelinksintobargroove.
-
Pullguidebarforwarduntilchainissnug inguidebargroove.Ensurealdrive linksareinthebargroove.
-
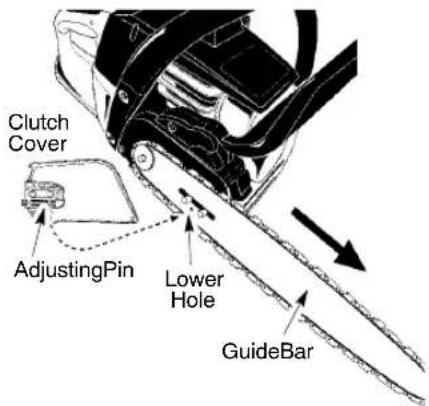
Now, install clutch covermakingsure the adjusting pin is positioned in the lower hole in the guide bar. Remember this pin moves the bar forward and backward asthescrewisturned.
text_image
Clutch Cover AdjustingPin Lower Hole GuideBar- Installbarnutsandfingertightenonly. Oncethechainistensioned, you will needtotightenbarnuts.
CHAINTENSION
(Including units with chain already installed)
WARNING: Wearprotective gloves when handling chain. The chain is sharp and can cut you even when it is not moving.
NOTE: When adjusting chain tension, makesurethebarnutsarefingertightonly. Attemptingtotensionthechainwhenthe bar nutsaretightcancausedamage.
Checkingthetension:
Usethescrewdriverendofthechainadjust-menttool(bartool)tomovechainaround guide bar. If the chain does not rotate, it is too tight. If the chain is too loose, it will sag below thebar.
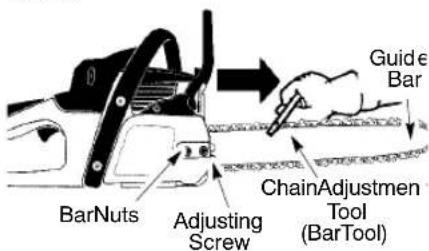
text_image
Guide e Bar BarNuts Adjusting Screw ChainAdjustmen Tool (BarTool)Adjustingthetension:
Chain tension is very important. Chains stretch during use. This is especially true during the first few times you use yoursaw. Always check chaintension each time before you start the chainsaw.
- Loosen bar nuts until they are finger tight against the clutch cover.
- Turnadjustingscrewclockwise until chain solidly contacts bottom of guide barrail.
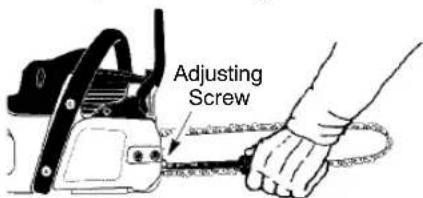
text_image
Adjusting Screw- Usingbartool, rollchainaroundguidebar to ensure all links are in bargroove.
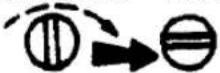
- Liftuptipofguidebartocheckforsag. Releasetipofguidebar, thenturnadjustingscrew 14 turnclockwise. Repeat untilsagdoesnotexist.
AdjustingScrew-- 1/4 Turn
- While lifting tip of guide bar, tighten bar nuts securely with the bartool.
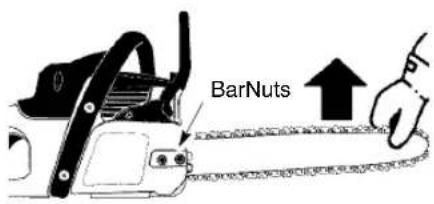
text_image
BarNuts- Use the crew driver end of the bartool to move chain around guide bar.
- If chain does not rotate, it is too tight. Slightly loosen barn nuts and loosen chain by turning the adjustment screw 14 turn counterclockwise. Retighten bar nuts.
- If chainistooloose, it willsag below the guidebar. DONOToperatethesawif the chainisloose.
NOTE: Thechainistensioned correctly whentheweightofthechaindoesnotcauseit tosagbelowtheguidebar(withthechainsaw sittinginanuprightposition),butthechainstill movesfreelyaroundtheguidebar.
WARNING: Ifthesawisoperated withaloosechain,thechaincouldjumpoffthe guidebarandresultinseriousinjurytotheoperatorand/ordamagethechainmakingitunusable.Ifthechainjumpsofftheguidebar,inspecteachdrivelinkfordamage.Damaged chainmustberepairedorreplaced.
OPERATION
KNOWYOURCHAINSAW
READTHISINSTRUCTIONMANUALANDSAFETYRULESBEFOREOPERATINGYOUR CHAIN SAW. Compare the illustrations with your unit to familiarize yourself with the location of thevariouscontrolsandadjustments.Savethismanualforfuturereference.

text_image
Chain AdjustmentTool (BarTool) FrontHandGuard FrontHandle StarterRope ON/STOP Switch Choke/FastIdle Lever Chain Muffler Bar Sprocket Hole BarOilFillCap StarterHousing FuelMixFillCap PrimerBulb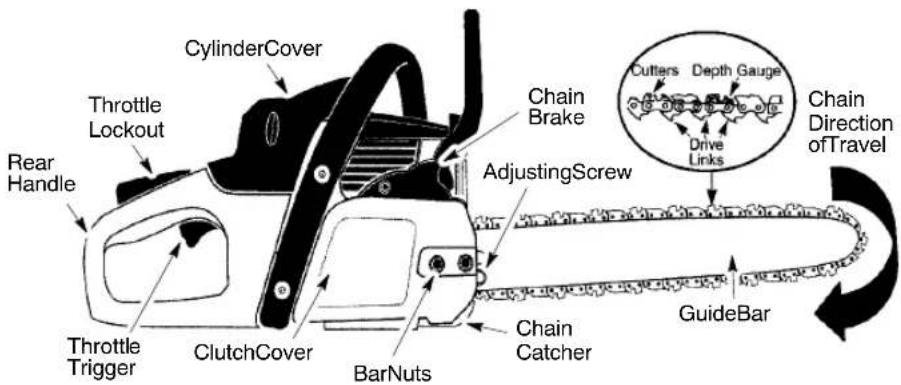
text_image
CylinderCover Throttle Lockout Rear Handle Throttle Trigger ClutchCover BarNuts AdjustingScrew Chain Brake Chain Catcher GuideBar Cutters Depth Gauge Drive Links Chain Direction of TravelON/STOPSWITCH
TheON/STOPSWITCHisusedtostopthe engine.
THROTTLETRIGGER
The THROTTLE TRIGGER controls engine speed.
THROTTLELOCK--OUT
TheTHROTTLELOCK--OUTmustbe pressedbeforeyoucansqueezethethrottle trigger. Thisfeaturepreventsyoufromaccidentallysqueezingthetrigger.
CHOKE/FASTIDLELEVER
Thechokeandfastidlearesetbypullingthe CHOKE/FASTIDLELEVERouttothefullextentforcoldstartingorafterrefueling.The chokeprovidesadditionalfueltotheengine duringcoldstarting.
PRIMERBULB
ThePRIMERBULBcirculatesfueltothecar-buretortoprovidequickerstarting.
CHAINBRAKE
The chainbrakeisadevicedesignedtostop the chain if kickback occurs. The chain brake
activatesautomaticallyintheeventofkickback. Thechainbrakeactivatesmanuallyifthe fronthandguarddispushedforward. Thechain brakeisdisengagedbypullingthefronthand guardbacktowardthefronthandleasfaras possible.
CHAINTENSION
Itisnormalforanewchaintostretchduringthe first15minutesofoperation.Youshouldcheck yourchaintensioneachtimebeforeyoustart thechainsaw.SeeCHAINTENSIONunder theASSEMBLYsection.

WARNING: Ifthesawisoperated
withaloosechain,thechaincouldjumpoff theguidebarandresultinseriousinjuryto theoperatorand/ordamagethechainmakingitunusable.
BEFORESTARTINGENGINE

WARNING: Mufflerisveryhotdur-ndafteruse.Donottouchthemuffleror w combustible material such as dry sorfueltodoso.

WARNING: Besuretoreadthefuel dinginformationinthesafetyrulessec- of this manual before you begin. If you do understandthefuelhandlinginformation otattempttofuelyourunit. Seekhelp someonethatdoesunderstandthein- nationorcallithecustomerassistance lineat1-800-554-6723.
FUELINGENGINE

WARNING: Remove fuel cap slow- enrefueling.

HELPFULTIP
To obtain the correctoilmix ratio, pour 3.2 ounces of 2--cyclesyntheticoil into one gallon off fresh gas.
Thisengineiscertifiedtooperateonunleaded gasoline. Beforeoperation, gasolinemustbe mixed with agoodqualitysynthetic2-cyclear-cooledengineoidesignedtobemixedatara-tioof40:1.Poulan/WEEDEATERbrandsyn-theticoilisrecommended.A40:1 ratio is obtained by mixing 3.2 fluid ounces (95ml) of oil with 1 gallon (4 liters) of unleaded gasoline. Included with this sawisa 3.2 ounce (95ml) container of Poulan/WEEDEATERbrandsyn-theticoil. Pour the entire contents of this con-tainer into 1 gallon (4 liters) of gasolineto achieve the proper fuel mixture. DONOTUSE automotive or marine oil. These oil will cause engined damage. When mixing fuel follow the instructions printed on the container. Always read and follow the safety rules listed under HANDLE FUEL WITH CAUTION.
CAUTION: Never use straight gasoline in your unit. This will cause permanent engine damage and void the limited warranty.
FUELREQUIREMENTS
Thisenginerequirestheuseofminimum87 octane[R+M]/2cleangasoline.
IMPORTANT
Useofalcoholblendedfuels(calledgasoholor usingethanolomethanol)cancausemajor engineperformanceanddurabilityproblems.

WARNING: Alternativefuels(not
gasoline)suchasE-15(15%alcohol),E-20 (20%alcohol),E--85(85%alcohol)areNOT classifiedasgasolineandareNOTapproved forusein2--strokegasolineengines.Useofalternativefuelswillcauseproblemssuchas: improperclutchengagements,overheating,vaporlock,powerloss,lubricationdeficiency, deteriorationoffuellines,gasketsandinternal carburetorcomponents,etc.Alternativefuels causehighmoistureabsorptionintothefuel/oil mixtureleadingtooilandfuelseparation.
BARANDCHAINLUBRICATION
Thebarandchainrequirecontinuouslubrication. Lubricationisprovidedbytheautomaticoilersystemwhentheoiltankiskept filled.Lackofoilwillquicklyruinthebarand chain. Toolittleoilwillcauseoverheating shown by smoke coming from the chain and/ordiscolorationofthebar.
Infreezingweatheroilwillthicken, making it necessary to thin bar and chain oil with a small amount (5 to 10%) of #1 Diesel Fuel or kerosene. Bar and chain oil must be free flowing for the oil system to pump enough oil for adequate lubrication.
GenuinePoulanbarandchainoilisrecommendedtoprotectyourunitagainstexcessivewearfromheatandfriction.Poulan oil resistshightemperaturethinning.
If Poulan barandchainoil is not available, use a good grade SAE30 oil.
- Never use waste oil for bar and chain lubrication.
•Alwaysstoptheenginebeforeeremoving theoilcap.
CHAINBRAKE
Ensurechainbrakeisdisengagedbypulling thefronthandguardbacktowardthefront handleasfaraspossible. Thechain brakemustbe disengagedbeforecuttingwiththesaw.

WARNING:Thechainmustnot
movewhentheengine runersatidlespeed. If thechainmovesatidlespeedrefertoCAR-BURETORADJUSTMENTwithin this manual. Avoidcontactwiththemuffler.Ahot mufflercancauseseriousburns. Tostoptheengine movetheON/STOP switchtotheSTOPposition.
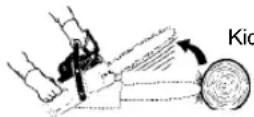
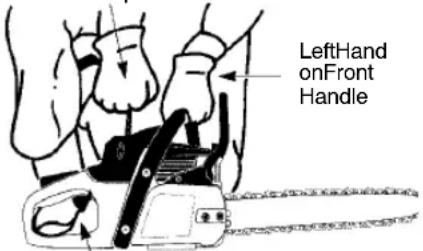
Tostarttheengineholdthesawfirmlyonthe groundasillustrated.Makesurethechainis freetoturnwithoutcontactinganyobject.
Use only 15" - 18" (40 - 45 cm) of ropeperpull.
Holdsawfirmlywhilepullingstarterrope.
StarterRopeHandle
text_image
LeftHand onFront HandleRightFootThroughRearHandle

WARNING: Donotattemptthrow
ordrop--startthechainsaw.Doingsowillput theoperatoratriskofseriousinjurydueto lossofcontrolofthechainsaw.
IMPORTANTPOINTSTOREMEMBER
Whenpullingthestarterrope,donotusethe fullextentoftheropeasthiscancausethe ropetobreak.Donotletstarterropesnap back.Holdthehandleandlettheropere-windslowly.
Forcoldweatherstarting,starttheunitat FULLCHOKE;allowtheenginetowarmup beforesqueezingthethrottletrigger.
NOTE: Donotattempttocutmaterial with thechoke/fastidleleverintheFULLCHOKE position.
HELPFULTIP
If you'renginestilldoesnot startafter followingthese instructions, please call 1-800-554-6723.
STARTINGACOLDENGINE(orwarm engineafterrunningoutoffuel)
NOTE: Inthefollowingsteps,whenthe choke/fastidleleverispulledouttothefull extent,thecorrectthrottlesettingforstarting issetautomatically.
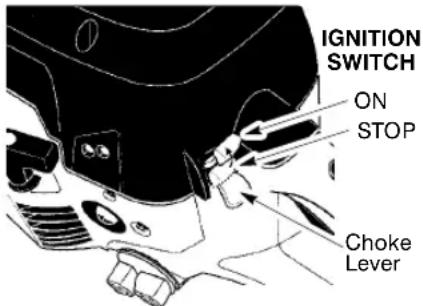
text_image
IGNITION SWITCH ON STOP Choke Lever- Move ON/STOP switch to the ON position.
- Slowlypressprimerbulb6times.
- Pullchoke/fastidleleverouttothefull extent(totheFULLCHOKEposition)
- Pullthestarterropesharply5timeswith yourrighthand.Then,proceedtothe nextstep.
NOTE: If the engines sounds as if it is trying to start before the 5th pull, stop pulling and immediately proceed to then next step.
- Pushthechoke/fastidleleverintothe HALFCHOKEposition.
CHOKE/FASTIDLELEVER
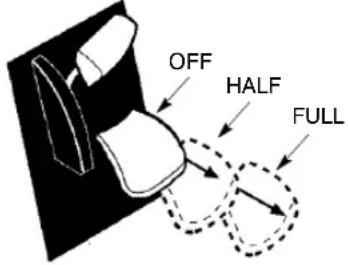
text_image
OFF HALF FULL- Pullthestarterropesharplywithyour righthanduntiltheenginestarts.
- Allowtheenginetorunforapproximately 30 seconds. Then, squeeze and release the thethrottle triggerto allow engine to return to idlespeed.
STARTINGAWARMENGINE
- MoveON/STOPswitchtotheONposition.
- Slowlypressprimerbulb6times.
- Tosetthefastidle, pullthechoke/fast ideleverouttothefulextent(tothefull chokeposition); thenpushthelever backintotheHALFCHOKEposition.
- Pullthestarterropesharplywithyour righthanduntiltheenginestarts.
- Squeezeandreleasethrottletriggerto allowenginetoreturntoidlespeed.
DIFFICULTSTARTING(orstartinga floodedengine)
Theenginemaybefloodedwithtoomuch fuelifithasnotstartedafter10pulls.Flooded enginescanbeclearedofexcessfuelby pushingthe choke/fastidle leverincompletely(totheOFFCHOKEposition)and thenfollowingthewarmenginestartingprocedurelistedabove.EnsuretheON/STOP switchisintheONposition.
Startingcouldrequirepullingthestarterrope handlemanytimesdependingonhowbadly the unit is flooded. If engine fails to start, refer totheTROUBLESHOOTINGTABLEorcall 1-800-554-6723.
CHAINBRAKE

WARNING: If the brake band is
worntoothinitmaybreakwhenthechain brakeistriggered.Withabrokenbrakeband, thechainbrakewillnotstopthechain.The chainbrakeshouldbereplacedbyanauthorizedservicedealerifanypartisworntoless than0.020" (0.5mm)thick.Repairsona chainbrakeshouldbemadebyanauthorizedservicedealer.Takeyourunittothe placeofpurchaseifpurchasedfromaservicingdealer,ortothenearestauthorized masterservicedealer.
- Thiswise equipped with a chain brake. The brake is designed to stop the chain if kickback occurs.
•Theinertia--activatedchainbrakeis activatedifthefronthandguard dispushed forward, either manually (by hand) or automatically(bysuddenmovement). - If the brake is already activated, it is disengaged by pulling the fronthand guard back toward the fronthandle as faras possible.
- Whencuttingwiththesaw, thechainbrake mustbedisengaged.
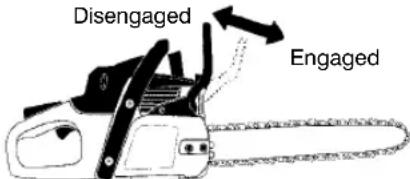
text_image
Disengaged EngagedBrakingfunctioncontrol
CAUTION: The chain brake must be checked several times daily. The engine mustberunningwhenperformingthisprocedure. Thisistheonlyinstancewhenthesaw shouldbeplacedonthegroundwiththeengine running.
Placethesawonfirmground.Griptherear handlewithyourrighthandandthefronthandlewithyourlefthand.Applyfullthrottleby fullydepressingthethrottletrigger.Activate thechainbrakebyturningyourleftwrist against the hand guard without releasing yourgriparoundthefronthandle.Thechain shouldstopimmediately.
Inertiaactivatingfunctioncontrol

WARNING: Whenperformingthe
following procedure, the engine must be turnedoff.
Gripthearhandlewithyourighthand thefronthandlewithyourlefthand. Holdthe chainsawapproximately14" (35cm)abovea stumporotherwoodensurface.Releaseyour griponthefronhandleandusetheweightof thesawtoletthetipoftheguidebarfallforward andcontactthestump.Whenthetipofthebar hitsthestump,thebrakeshouldactivate.
OPERATINGTIPS
- Checkchaintensionbeforefirstuse,after 1 minute of operation, and each time before you start the chainsaw. See CHAIN TENSION in the ASSEMBLY section.
• Cutwoodonly.Donotcutmetal,plastics, masonry,non-woodbuildingmaterials,etc. - Stopthesawifthechainstrikesaforeign object. Inspectthesawandrepairorreplace parts as necessary. If the chain jumpsofftheguidebar, inspectthechain fordamageddrivelinksbeforereinstalling. Burrsondrivelinks, whichpreventthem fromenteringthegrooveoftheguidebar, canberemovedwithaflatfile.
- Keepthechainoutofdirtandsand.Evena smallamountofdirtwilldullachain,increase thepossibilityofkickback,andrequirechain sharpeningorreplacement.
-
Practicecuttingafewsmallogsusingthe followingtechniquestogetthe"feel"ofusingyoursawbeforeyoubeginamajor sawingoperation.
-
Squeezethethrottleriggerandallowthe enginetoreachfullspeedbeforecutting.
- Begincuttingwith thesawframe againstthelog.
- Keeptheengineatfullspeedtheentire timeyouarecutting.
- Allowthechaintocutforyou.Exertonly lightdownwardpressure. Ifyouforce thecut,damagetothebar,chain,orenginecanresult.
- Releasethethrottletriggerassoonas thecutiscompleted,allowingtheenginetoidle. Ifyourunthesawatfull throttlewithouttacuttingload,unnecessarywearcanoccurtothechain,bar, andengine. Itisrecommendedthat theenginenotbeoperatedforlongerthan30secondsatfullthrottle.
- To avoid losing control when cut is complete, donotput pressure on sawatend of cut.
- Stoptheenginebeforesettingthesaw downaftercutting.
TREEFELLINGTECHNIQUES
WARNING:
Checkforbrokenor
dead branches which can fall while cutting causingseriousinjury. Donotcutnearbuildingsorelectricalwiresifyoudonotknowthe directionoftreefall,norcutatnightsinceyou will not be ale to see well, nor during bad weathersuchasrain,snow,orstrongwinds, etc. Ifthetreemakescontactwithanyutility line,theutilitycompanyshouldbenotifiedimmediately.
- Carefullyplanyoursawingoperationinadvance.
- Cleartheworkarea.Youneedacleararea allaroundthetreesoyoucanhavesecure footing.
- Thechainsawoperatorshouldkeepon theuphillsideoftheterrainasthetreeis likelytorollorslidedownhillafteritisfelled.
• Studythenaturalconditionsthatcancause thetreetofallinaparticulardirection.
Naturalconditionsthatcancauseatreeto fallinaparticulardirectioninclude:
• Thewinddirectionandspeed.
•Theleanofthetree.Theleanofatree mightnotbeapparentduetounevenor slopingterrain.Useaplumborleveltodeterminethedirectionoftreelean.
•Weightandbranchesononeside.
- Surroundingtreesandobstacles. Lookfordecayandrot.Ifthetrunkisrotted, itcansnapandfalltowardtheoperator. Checkforbrokenordeadbrancheswhich canfallonyouwhilecutting.
Makesurethereisenoughroomforthetreeto fall.Maintainadistanceof 2-1/2treelengths fromthenearestpersonorotherobjects.Enginenoisecandrownoutawarningcall.
Removedirt,stones,loosebark,nails,staples,andwirefromthetreewherecutsareto bemade.Planaclearretreatpathtotherear anddiagonaltothelineoffall.
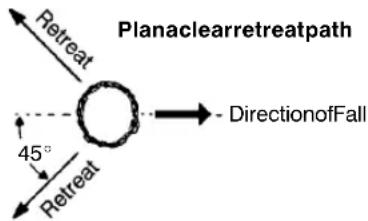
text_image
Planaclearretreatpath 45° Retreat Retreat DirectionofFallFELLINGLARGETREES
(6inches(15cm)indiameterorlarger) Thenotchmethodisusedtofellargetrees. Anotchiscutonthesideofthetreeinthede- sireddirectionoffall.Afterafellingcutis madeontheoppositesideoftree,thetree willtendtofallintothenotch.
NOTE: If the tree has large buttress roots, removethem before making then notch. If using sawtoremove buttress roots, keepsaw chain from contacting ground to prevent dulling of the chain.
NOTCHCUTANDFELLINGTHE TREE
- Makenotchcutbycuttingthetopofthe notchfirst.Cutthrough 1/3ofthediameter ofthetree.Nextcompletethenotchbycuttingthebottomofthenotch.Seeillustration.Oncethenotchiscutremovethe notchofwoodfromthetree.
Final(felling)cuthere,2inches (5cm)abovecenterofnotch.
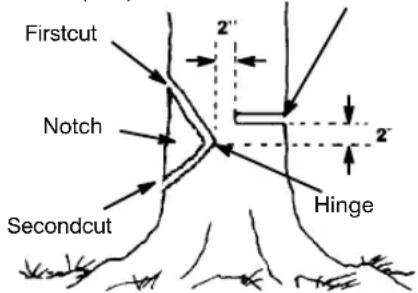
text_image
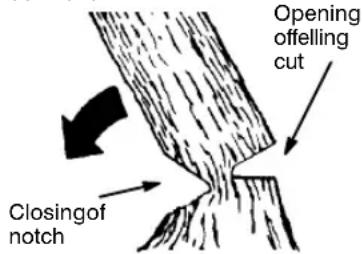
Firstcut Notch Secondcut Hinge 2' 2'• Afterremoving the wood from thenotch, makethefelling cut on the oppositeside of thenotch. This is done by making a cut about two inches (5cm) higher than the center of
thenotch. This will leave enough huncut wood between the felling cut and then not to form ahinge. This hing will help prevent the tree from falling in the wrong direction.
Hingeholdstreeonstumpandhelps controlfall
text_image
Opening offelling cut Closingof notchNOTE: Beforefellingcutiscomplete, use wedgestoopenthecutifnecessary to controlthedirectionoffall. To avoidkickback andchaindamage, use woodorplastic wedges, but never steel or iron wedges.
- Bealerttosignsthatthetreeisready to fall:crackingsounds,wideningofthefelling cut, or movement in the upper branches.
- Astreestartstofall, stopsaw, putitdown, andgetawayquicklyonyourplannedretreatpath.
- DONOTcutdownapartiallyfallentree withyoursaw.Beextremelycautiouswith partiallyfallentreesthatmaybepoorly supported.Whenatreedoesn'tfallcompletely,setthesawasideandpulldownthe treewithacablewinch,blockandtackle, ortractor.
CUTTINGAFALLENTREE (BUCKING)
Buckingisthetermusedforcuttingafallen treetothedesiredlogsize.
WARNING: Donotstandonthelog beingcut. Any portion can roll causing loss offooting and control. Donotstanddownhill of the log being cut.
IMPORTANTPOINTS
• Cutonlyonelogatatime.
- Cutshatteredwoodverycarefully;sharp piecesofwoodcouldbeflungtowardoperator.
- Useasawhorsetocutsmallogs. Never allowanotherpersontholdthelogwhile cuttingandneverholdthelogwithyourleg orfoot.
- Donotcutinanareawherelogs, limbs, androotsaretangledsuchasinablown downarea.Dragthelogsintoacleararea beforecuttingbypullingoutexposedand clearedlogsfirst.
TYPESOFCUTTINGUSEDFOR BUCKING
WARNING: Ifsawbecomes pinchedorhunginalog, don'ttrytoforceit out. Youcanlosecontrolofthesawresulting ininjury and ordamagetothesaw. Stop the saw, driveawedgeofplasticorwoodintothe cutuntilthesawcanberemovedeasily. Re-
startthesawandcarefullyreenterthecut.To avoidkickbackandchaindamage,donot useametalwedge.Donotattempttorestart yoursawwhenitispinchedorhunginalog.
Useawedgetoremovepinchedsaw
TurnsawOFFanduseaplasticor woodenwedgetoforcecutopen.
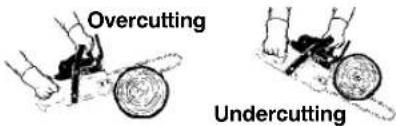
Overcutting begins on the top side of the log with the bottom of the was again sthe log. When overcutting uselight downwardward pressure.
text_image
Overcutting UndercuttingUndercuttinginvolvescuttingontheunder- sideofthelogwithtopofsawagainstthelog. Whenundercuttinguselightupwardpres- sure.Holdsawfirmlyandmaintaincontrol. Thesawwilltendtopushbacktowardyou.
WARNING: Neverturnsawupside downtoundecut. Thesawcannotbecontrolledinthisposition.
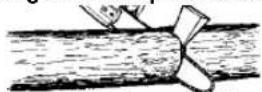
Alwaysmakeyourfirstcutonthecompressionsideofthelog. Thecompressionsideof thelogiswherethepressureofthelog's weightisconcentrated.
Firstcutoncompressionsideoflog
natural_image
Pure diagram of a pipe or channel with arrows indicating flow direction (no text or symbols)Secondcut
Secondcut
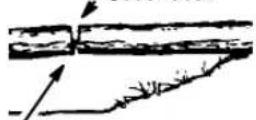
Firstcutoncompressionsideoflog
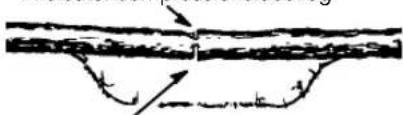
BUCKINGWITHOUTASUPPORT
- Overcut through 1/3 of the diameter of the log.
- Rollthelogoverandfinishwithasecond overcut.
- Watchforlogswithacompressionsideto preventthesawfrompinching.Seeillustrationsforcuttinglogswithacompres-sionside.
BUCKINGUSINGALOGOR SUPPORTSTAND
- Remember your first cut is always on the compressionside of the log. (Referto the illustrations below for your first and second cut)
- Yourfirstcutshouldextend 1/3ofthe diameterofthelog.
•Finishwithyoursecondcut.
UsingalogforsuppandtCut
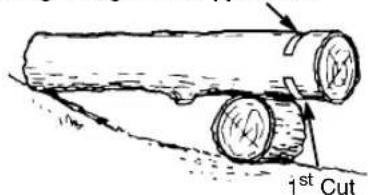
text_image
1st Cut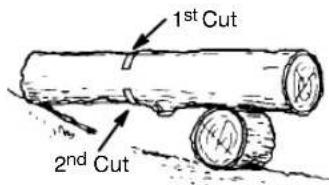
text_image
1st Cut 2nd Cut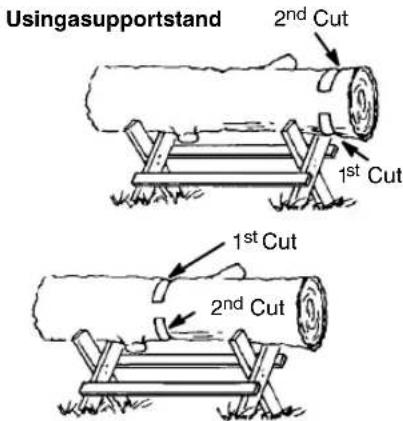
text_image
Usingasupportstand 2nd Cut 1st Cut 1st Cut 2nd CutLIMBINGANDPRUNING
WARNING: Bealertforandguard againstkickback.Donotallowthemoving chaintocontactanyotherbranchesorobjects atthenoseoftheguidebarwhenlimbingor pruning. Allowingsuchcontactcanresultin seriousinjury.
WARNING: Neverclimbintoatreto limborprune. Donotstandonladders, platforms, alog, orinanyposition which can cause youtolose your balance or control of the saw.
IMPORTANTPOINTS
• Work slowly, keeping both hands firmly grippedonthesaw. Maintain secure footing and balance.
- Watchoutforspringpoles. Springpolesare smallsizelimbswhichcancatchthesaw chainandwhiptowardyouorpullyouoffbalance.Useextremecautionwhencutting smallsizelimbsorslendermaterial.
- Bealertforspringback.Watchoutfor branchesthatarebentorunderpressure. Avoidbeingstruckbythebranchorthe sawwhenthetensioninthewoodfibersis released.
- Keepclearworkarea.Frequentlyclear branchesoutofthewaytoavoidtripping overthem.
LIMBING
- Alwaysslimbatreeafteritiscutdown. Only thencanlimbingbedonesafelyandproperly.
-Leavethelargerlimbsunderneaththefelled treetosupportthetreeasyouwork. - Startatthebaseofthefelledtreeandwork towardthetop,cuttingbranchesandlimbs. Removesmalllimbswithonecut.
- Keep the tree between you and the chain. Cut from the side of the tree opposite the branch you are cutting.
- Removelarger, supporting branches with the cutting techniques described in BUCKING WITHOUT SUPPORT.
•Alwaysuseanovercuttocutsmallandfree-lyhanginglimbs.Undercuttingcouldcause limbstofallandpinchthesaw.
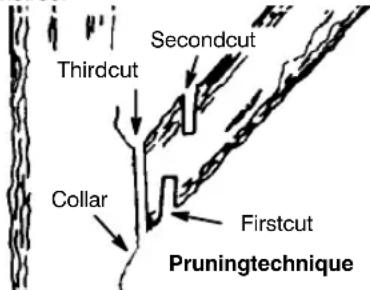
PRUNING

WARNING: Limitpruningtolimbs
shoulderheightorbelow.Donotcutoff branchesarehigherthanyourshoulder.Geta professionaltodothejob.
• Makeyourfirstcut 1/3ofthewaythroughthe bottomofthelimb.
- Nextmakea2ndcutallthewaythrough thelimb. Thencutathirdovercutleavinga 1to2inch(2.5to5cm)collarfromthetruck ofthetree.
text_image
Thirdcut Secondcut Collar Firstcut PruningtechniqueSERVICE

WARNING:
Disconnectthespark
plugbeforeperformingmaintenanceexcept forcarburetoradjustments.
Werecommendallserviceandadjustments notlistedinthismanualbeperformedbyan authorizedorMasterServiceDealer.

HELPFULTIP
IMPORTANT: Have all repairsotherthantherecommended maintenance describedintheinstruction manual performed byan authorizedservicedealer.
Ifanydealerotherthananauthorized servicedealerperformsworkonthe product,Poulanmaynotpayforrepairs underwarranty.Itisyourresponsibility tomaintainandperformgeneralmaintenance.
MAINTENANCESCHEDULE
Check:
Fuelmixturelevel... Beforeeachuse
Barlubrication ..... Beforeeachuse
Chaintension..... Beforeeachuse Chainsharpness.... Beforeeachuse
Fordamagedparts .. Beforeeachuse
Forloosecaps..... Beforeeachuse
Forloosefasteners... Beforeeachuse
Forlooseparts..... Beforeeachuse
InspectandClean:
Bar...... Beforeeachuse
Completesaw..... Aftereachuse
Airfilter.... Every5hours*
Chainbrake...... Every5hours*
Sparkarrestingscreen
andmuffler.... Every25hours*
Replace spark plug . Yearly
Replace fuel filter ... Yearly
*HoursofOperation--
Eachhourofoperationisapproximately 2tanksoffuel.
GENERALRECOMMENDATIONS
Thewarranty on this unit does not cover item sthathave beens subjected to operator abuse or negligence. Toreceive full value from the warranty, the operator must maintain unit as instructed in this manual. Various adjustments will need to be made periodically to properly maintain your unit.
- Once a year, replace the spark plug, air filter, and check guide bar and chain for wear. A new spark plug and air filter assures proper air-fuel mixture and helps you reinger un better and last longer.
CHECKFORDAMAGEDOR WORNPARTS
Contactanauthorizedservicedealerforreplacementofdamagedorwornparts.
NOTE: It is normal for a small amount of oil to appear under the saw after engine stops. Donot confusethis with aleaking oil tank.
- ON/STOPSwitch--EnsureON/STOP switchfunctionsproperlybymovingthe switchtotheSTOPposition.Makesureenginestops;thenrestartengineandcontinue.
- FuelTank--Donotusesawiffueltank showssignsofdamageorleaks. - OilTank--Donotusesawifoiltankshows signsofdamageorleaks.
CHECKFORLOOSE FASTENERSANDPARTS
•BarNuts
-Chain
•Muffler
•CylinderShield
•AirFilter
- HandleScrews
•VibrationMounts
•StarterHousing
- FrontHandGuard
CHECKCHAINSHARPNESS
Asharpchainmakeswoodchips. Adull chainmakesasawdustpowderandcuts slowly. See CHAINSHARPENING.
CHECKGUIDEBAR
Conditions which require guide bar maintenance:
- Sawcutstoonesideoratanangle.
- Sawhastobeforcedthroughthecut. - Inadequatesupplyofoilitobar/chain. Checktheconditionofguidebareachtime chainissharpened.Aworn guidebar will damagethechainandmakecuttingdifficult. Aftereachuse,ensureON/STOPswitchis intheSTOPposition,thencleanallsawdust fromtheguidebarandsprockethole.
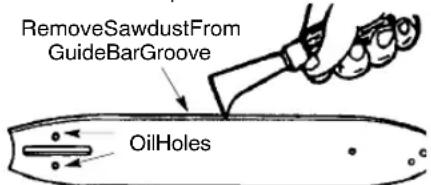
Tomaintainguidebar:
- Move ON/STOP switch to STOP.
- Loosen and remove bar nuts and clutch cover. Remove bar and chain from saw.
- Clean the oil holes and bar groove after each5hoursofoperation.
text_image
RemoveSawdustFrom GuideBarGroove OilHoles- Burringofguidebarrailsisanormal processofrailwear.Removetheseburrs withaflatfile.
- When railtopisuneven, use a flat file to store square edges and sides.

text_image
WornGroove FileRailEdges andSides Square CorrectGrooveReplace guide bar when the groove is worn, the guide bar is bent or cracked, or when excessheatingburringoftherailsoccurs,Ifireplacementisnecessary,useonlytheguidebar specifiedforyoursawintherepairpartslistor onthedecallocatedonthechainsaw.
CHECKFUELMIXTURELEVEL
- SeeFUELINGENGINEundertheOPERATIONsection.
LUBRICATION
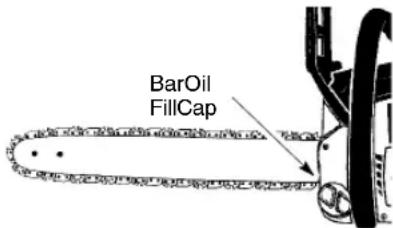
text_image
BarOil FillCap•SeeGUIDEBARANDCHAINOILunder theOPERATIONsection.
INSPECTANDCLEANUNITAND DECALS
- Aftereachuse, inspectcompleteunitfor looseordamagedparts.Cleantheunitand decalsusingadampclothwithamilldetergent.
•Wipeoffunitwithacleandrycloth.
CHECKCHAINBRAKE
SeeCHAINBRAKEintheOPERATION section.
CLEANAIRFILTER
CAUTION: Donotcleanfilteringasolineor otherflammablesolventtoavoidcreatinga firehazardorproducingharmfulevaporative emissions.
Cleaningtheairfilter:
Adirtyairfilterdecreasesthelifeandperformanceoftheengineandincreasesfuelconsumptionandharmfulemissions.Alwayscleanyourairfilterafter10tanksoffuelor5hours of operation, whichever comes first. Cleanmorefrequentlyindustyconditions.A usedairfiltercanneverbecompletely cleaned.Itisadvisabletoreplaceyourairfilterwithanewoneafterevery50hoursofoperation,orannually,whichevercomesfirst.
- Loosen3screwsoncylindercover.
- Removecylindercover.
- Removeairfiltercoverandairfilter.
- Cleantheairfilterusinghotsoapywater. Rinsewithcleancoolwater.Airdrycom-pletelybeforereinstalling.
- Reinstallairfilterandairfiltercover.
- Reinstall cylinder cover and 3 screws. Tightense securely.
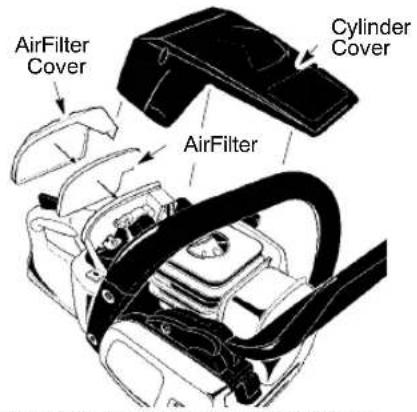
text_image
AirFilter Cover Cylinder Cover AirFilterINSPECTMUFFLERANDSPARK ARRESTINGSCREEN
Astheunitisused, carbondepositsbuildup onthemufflerandsparkarrestingscreen, andmustberemovedtoavoidcreatingafire hazardoraffectingengineperformance. Replacethsparkarrestingscreenifbreaks occur.
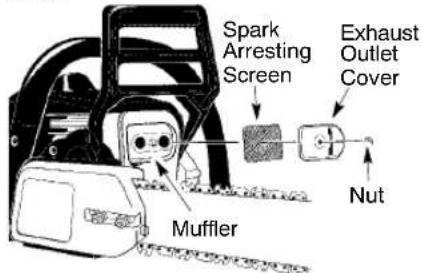
text_image
Spark Arresting Screen Exhaust Outlet Cover Nut MufflerCLEANINGTHESPARKARREST- INGSCREEN
Cleaningisrequiredevery25hoursofoperationorannually,whichevercomesfirst.
- Loosenandremovethenutfromtheex-haustoutletcover.
- Removetheexhaustouletcover.
- Removesparkarrestingscreen.Handle screencarefullytopreventdamage.
- Cleanthesparkarrestingscreengently withawirebrush. Replacescreenif breaksarefound.
- Replaceanybrokenorcrackedmuffler parts.
- Reinstallsparkarrestingscreen, exhaust outletcover, and nut. Tightennut securely.
REPLACESPARKPLUG
Thesparkplugshouldbereplacedeach yeartoensuretheenginestartseasierand runsbetter. Ignitiontimingisfixedandnon-adjustable.
NOTE: This sparkignition system complies with the Canadian standard CES-002.
- Loosen3screwsoncylindercover.
- Removethecylindercover.
3.Pulloffthesparkplugboot. - Removesparkplug from cylinder and discard.
- Replace with Champion RCJ-7Y spark plug and tightense securely with a 34 inch
(19mm)socketwrench.Sparkpluggap shouldbe0.025inch(0,6mm).
6.Reinstallthesparkplugboot.
- Reinstall the cylinder cover and 3 screws.Tightensecurely.
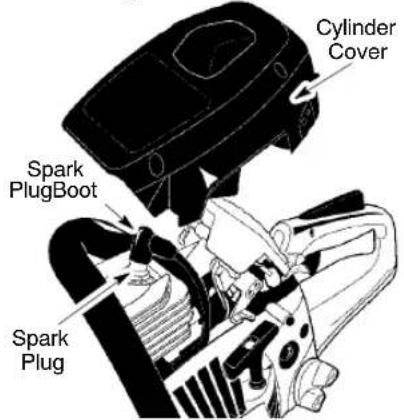
text_image
Cylinder Cover Spark PlugBoot Spark PlugREPLACEFUELFILTER
Toreplacefuelfilter,drainyourunitbyrun- ningitdryoffuel.Removefuelcapandits connectedretainerfromtank.Pullfilterfrom tankandremovefromline.Replaceandre- assemble.
CHAINADJUSTMENT
See CHAINTENSIONinASSEMBLYsection.
CHAINSHARPENING
WARNING: Improperchainsharpeningtechniquesand/ordepthgaugemaintenancewillincreasethechanceofkickback whichcanresultinserious injury.
WARNING: Wearprotective gloves when handling chain. The chain is sharp and can cut you even when it is not moving. Conditions which indicate the need for chain sharpening:
- Reductioninsizeofwoodchips. Thesize ofthewoodchipwilldecreaseasthechain getsdulleruntil itbecomesmorelikea powderthanachip. Notethatdeador rottedwoodwillnotproduceagoodchip.
• Sawcutstoonesideoratanangle
• Sawhastobeforcedthroughthecut.
Toolsrequired:
- 5/32inch(4mm)diameterroundfileand fileholder
- Flatfile
•Depthgaugetool
TOSHARPENCHAIN:
- MoveON/STOPswitchtotheSTOP position.
- Checkchainforpropertension. Adjust chaintension if necessary. See CHAIN TENSION section.
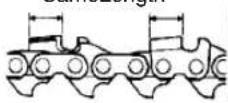
3.Sharpencutters.
- To sharpen the cutters, position the fileholderlevel(90°)sothatitrests on the top edges of the cutter and depthgauge. NOTE: Thechainhasbothleftand righthandcutters.
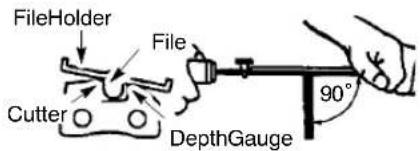
text_image
FileHolder File Cutter DepthGauge 90°- Align the 30° file holder marks parallelwiththebarandtothecenterofthe chain.
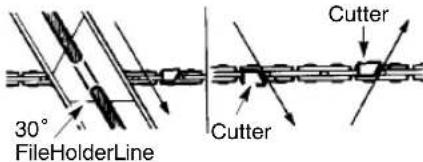
text_image
30° FileHolderLine Cutter Cutter- Sharpencuttersononesideofthe chainfirst.Filefromtheinsideofeach cuttertotheoutside.Then,turmthe chainsawaroundandrepeatheprocessfortheothersideofthechain.
- Fileontheforwardstrokeonly.Use2 or3strokespercuttingedge.
- Keepallcuttersthesamelength whenfiling.
- Fileenoughtoremoveanydamage tocuttingedges(sideplateandtop plateofcutter).
AllCutters
SameLength
RemoveDamage
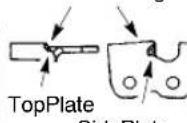
- Filechaintomeetthespecifications asshown.
text_image
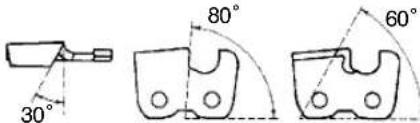
30° 80° 60°HookAngle
Right
TooMuchHook Angle SquaredO ff
Wrong
WARNING: Maintain the proper hook angle according to the manufacturer's specifications for the chain you are using. Improper hook angle will increase the chance of kickback which can result in serious injury. 4. Check and lower depth gauges.
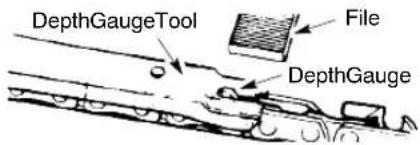
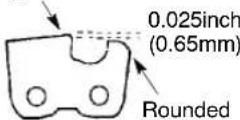
text_image
DepthGaugeTool File DepthGauge- Placegaugetooloncutter.
- If the depth gauge is higher than the depthgaugetool, fileitleveltothetopof the depthgaugetool.
- Maintain rounded front corner of depthgaugewithaflatfile. NOTE: The very top of the depth gauge should be flat with the front halfrounded off with a flat file.
If you require further assistance or are unsure about performing this procedure, contact your authorized service dealer or callour customer assistance help line at 1-800-554-6723.
CARBURETORADJUSTMENT

WARNING:Thechainwillbemov-
ingduringmostofthisprocedure.Wearyour protectiveequipmentandobserveallsafety precautions.Thechainmustnotmoveatidle speed.
Thecarburetorhasbeencarefullysetatthe factory. Adjustmentsmay benecessaryif younoticeanyofthefollowingconditions:
- Chain moves at idle. See IDLE SPEED-T adjusting procedure.
- Sawwillnotidle.SeeIDLESPEED-Tadjustingprocedure.
IdleSpeed-T
Allowenginetoidle.lfthechainmoves,idleis toofast.lftheenginestalls,idleistooslow.AdjustspeeduntilengineRuns withoutchain movement (idle too fast) or stalling (idle too slow).Theidlespeedscrewslocatedinthe areaabovetheprimerbulbandislabeledT.
• Turnidlescrew(T)clockwisetoincrease enginespeed.
- Turn idle screw (T) counterclockwise to decrease enginespeed.
If you require further assistance or are unsure about performing this procedure, contact your authorized service dealer or call our customer assistance help line at 1-800-554-6723.
COOLINGSYSTEM
Tokeeptheworkingtemperatureaslowas possiblethemachineisequippedwitha coolingsystem.
Thecoolingsystemconsistsof:
•Airintakeonthestarter
•Airguideplate
•Finsontheflywheel
•Coolingfinsonthecylinder
- Cylinder cover (directs cold air over the cylinder)
Cleanthecoolingsystemwithabrushafter eachuse, more often indemanding conditions. Adirtyor blocked coolingsystem results in the machine overheating which causes damagetopiston and cylinder.
STORAGE

WARNING: Perform the following
stepsaftereachuse:
- Allowtheenginetocool, and secure the unit before storing or transporting.
- Storechainsawandfuelinawellventilatedareawherefuelvaporscannotreach sparksoropenflamesfromwaterheaters, electricmotorsorswitches,furnaces,etc.
- Storechainsawwithallguardsinplace andpositionchainsawsothatanysharp objectcannotaccidentallycauseinjury.
- Storechainsawwelloutofthereachof children.
SEASONALSTORAGE
Prepareyourunitforstorageattheendofthe seasonorifitwillnotbeusedfor30daysor more.
If your chainsawistobestoredforaperiod of time:
•Cleansawthoroughlybeforestorage.
•Storeinacleandryarea.
- Lightlyoilexternalmetalsurfacesand guidebar.
- Oilthechainandwrapitinheavypaperor cloth.
FUELSYSTEM
UnderFUELINGENGINEintheOPERATIONsectionofthismanual,seemessage labeledIMPORTANTregardingtheuseof gasoholinyourchainsaw.
Fuelstabilizerisanacceptablealternative in minimizing the formation of fuel gum deposits during storage. Add stabilizertothegasoline in the fuel tank for fuel storage container.
Followthemixinstructionsfoundonstabilizer containers. Runengineatleast5minutes afteraddingstabilizer.
Poulan/WEEDEATER40:1,2-cycleengine oil(aircooled)isblendedwithfuelstabilizer. If you donotusethisoil, you can add a fuel stabilizertoy our fueltank.

HELPFULTIP
Duringstorageofyourgas/oilmixture,theoilwillseparatefromthegas. Werecommendthatyou shakethegascanweekly toinsureproperblendingof thegasandoil.
ENGINE
- Removesparkplugandpour1teaspoon of40:1,2-cycleengineoil(aircooled) throughthesparkplugopening.Slowly pullthestarterrope8to10timestodistributeoil.
- Replacesparkplugwithnewoneofrecommendedtypeandheatrange.
- Cleanairfilter.
- Checkentireunitforloosescrews, nuts, andbolts. Replaceanydamaged, broken, orwornparts.
- Atthebeginningofthenextseason,use onlyfreshfuelhavingthepropergasoline tooilratio.
OTHER
- Donotstoregasolinefromoneseasonto another.
- Replace your gasoline can if it start to rust.
TROUBLESHOOTINGTABLE

WARNING:Alwaysstopunitanddisconnectsparkplugbeforeperformingalloftherecommendedremediesbelowexceptremediesthatrequireoperationoftheunit.
| TROUBLECAUSEREMEDY | ||
| Enginewillnotstartorwillrunonlyafewsecondsafterstarting. | Ignitionswitchoff.Engineflooded.Fueltankempty.Sparkplugnotfiring.Fuelnotreachingcarburetor. | MoveignitionswitchtoON.See“DifficultStarting”inOperationSection.Filltankwithcorrectfuelmixture.Installnewsparkplug.Checkfordirtyfuelfilter;replace.Checkforkinkedorsplitfuelline;repairorreplace. |
| Enginewillnotidleproperly. | Idlespeedrequiresadjustment.Carburetorrequiresadjustment. | See“CarburetorAdjustment”intheServiceandAdjustmentsSection.Contactanaauthorizedservicedealer. |
| Enginewillnotaccelerate,lackspower,ordiesunderaload. | Airfilterdirty.Sparkplugfouled.Chainbrakeengaged.Carburetorrequiresadjustment. | Cleanorreplaceairfilter.Cleanorreplaceplugandregap.Disengagechainbrake.Contactanaauthorizedservicedealer. |
| Enginesmokesexcessively. | Toomuchoilmixedwithgasoline. | Emptyfueltankandrefillwithcorrectfuelmixture. |
| Chainmovesatidlespeed. | Idlespeedrequiresadjustment.Clutchrequiresrepair. | See“CarburetorAdjustment”intheServiceandAdjustmentsSection.Contactanaauthorizedservicedealer. |
LIMITEDWARRANTY
Poulan, a division of Husqvarna Consumer Outdoor Products N.A., Inc., warrant to the original consumer purchaser that each new Poulan brand gasoline chains saw a free from defects in material and workmanship and a reestorepair or replace under this warranty any defective gasoline chains saw as follows from the original date of purchase. 1YEAR--Parts and Labor, when used for household purposes.
60DAYS--PartsandLabor, when used for commercial, professional, or income-producing purposes.
30DAYS--PartsandLabor,ifusedforrental purposes.
Thiswarrantyisnottransferableanddoesnot coverdamageorliabilitycausedbyimproper handling,impropermaintenanceoralteration, ortheuseofaccessoriesand/orattachments notspecificallyrecommendedbyPoulanfor thischainsaw. Thiswarrantydoesnotcover tune--up,sparkplugs,filters,starterropes, chainsharpening,bars,chains,andotherparts whichwearandrequirereplacementwithreasonableuseduringthewarrantyperiod.This warranty does not cover predelivery setup, installationofguidebarandchain,andnormal adjustmentsexplainedintheinstructionmanual such as chain tension adjustments. This warrantydoesnotcovertransportationcosts. Intheeventyouhaveaclaimunderthiswarranty,youmustreturntheproducttoanauthorizedservicedealer. Shouldyouhaveanyunansweredquestions concerningthiswarranty,pleasecontact:
Poulan, adivisionofHusqvarna ConsumerOutdoorProductsN.A., Inc. 7349StatesvilleRoad Charlotte, NC28269 1--800--554--6723 InCanada, contact: Poulan 850MathesonBlvd.West Mississauga, OntarioL5V0B4 Givingthemodelnumber, serialnumber and date of purchase of your product and the name and address of the authorized dealer from whomit was purchased. THISWARRANTYGIVESYOUSPECIFIC LEGALRIGHTS, ANDYOUMAY HAVE OTHER RIGHTS WHICH VARY FROM STATETOSTATE. NOCLAIMSFORCONSEQUENTIALOR OTHERDAMAGES WILL BE ALLOWED, ANDTHERE ARE NOOTHER EXPRESS WARRANTIES EXCEPT THOSE EXPRESSLYSTIPULATED HEREIN. SOMESTATESDONOTALLOWLIMITATIONSONHOWLONGANIMPLIEDWARRANTYLASTSORTHEEXCLUSIONOR LIMITATIONS OF INCIDENTAL OR CONSEQUENTIAL DAMAGES, SO THE ABOVE LIMITATIONS OR EXCLUSION MAY NOT APPLY TO YOU. This is limited warranty within the meaning of that term as defined in the Magnuson--MossActof1975. The policy of Poulanistocontinuously improve its products. Therefore, Poulanreserve weather change, modify, or discontinue models, designs, specifications, and accessories of all products at any time with out notice or obligation to any purchaser.
U.S.EPA/CALIFORNIA/ENVIRONMENTCANADA EMISSIONCONTROLWARRANTYSTATEMENT
YOURWARRANTY RIGHTSANDOBLIGATIONS: The U.S. Environmental ProtectionAgency, CaliforniaAirResources Board, EnvironmentCanadaandPoulanare pleasedtoexplaintheemissionscontrolsystemwarrantyonyouryear2010andlatersmall off--roadengine.InCalifornia,allsmalloff--road enginesmustbedesigned,built,andequipped to meet the State's stringent anti-smog standards.Poulanmustwarranttheemission controlsystemonyoursmalloff--roadengine fortheperiodsoftimelistedbelowprovided therehasbeennoabuse,neglect,orimprop-ermaintenanceofyoursmalloff--roadengine. Your emission control system includes partssuchasthecarburetor,theignitionsystemandthefueltank.Whereawarrantable conditionexists,Poulanwillrepairyoursmall off--roadengineatnocosttoyou.Expenses coveredunderwarrantyincludediagnosis, partsandlabor.MANUFACTURER'SWARRANTYCOVERAGE:Ifanyemissionsrelatedpartonyourengine(aslistedunder EmissionsControlWarrantyPartsList)isde-
fectiveoradefectinthematerialsorworkmanshipoftheenginecausesthestfailureofsuchan emissionrelatedpart,thepartwillberepaired orreplaced by Poulan.OWNER'SWARRANTYRESPONSIBILITIES:Asthesmall off--roadengineowner,youareresponsible fortheperformanceoftherequiredmaintenancelistedinyourinstructionmanual.Poulanrecommendsthatyouretainallreceipts coveringmaintenanceonyoursmalloff--roadengine,butPoulancannotdenywarrantysolelyforthelackofreceiptsorforyour failure to ensure the performance of all scheduledmaintenance.Asthesmalloff--roadengineowner,youshouldbeawarethat Poulanmaydenyyouwarrantycoverageif yoursmalloff--roadengineorapartofithas failedduetoabuse,neglect,impropermaintenance,unapprovedmodifications,orthe useofpartsnotmadeorapprovedbythe originalequipmentmanufacturer.Youareresponsibleforpresentingyoursmalloff-road enginetoanPoulanauthorizedrepaircenter assoonasaproblemexists.Warrantyrepairs
shouldbecompletedinareasonableamount oftime,nottoexceed30days.Ifyouhaveany questionsregardingyourwarrantyrights andresponsibilities,youshouldcontactyour nearestauthorizedservicecenter,callPoulan at1--800--554--6723,orsende-mailcorrespondenceto emission.warranty@HCOP--emission.com.WARRANTYCOMMENCEMENTDATE:Thewarrantyperiodbegins onthedatethesmalloff--roadengineispurchased.LENGTHOFCOVERAGE:This warrantyshallbeforaperiodoftwoyears fromtheinitialdateofpurchase,oruntilthe endoftheproductwarranty(whicheveris longer).WHATISCOVERED:REPAIROR REPLACEMENTOFPARTS.RepairorreplacementofanywarrantedpartwillbeperformedatnochargetotheowneratanapprovedPoulanservicingcenter.Ifyouhave anyquestionsregardingyourwarrantyrights andresponsibilities,youshouldcontactyour nearestauthorizedservicecenter,callPoulan at1--800--554--6723,orsende-mailcorrespondenceto emission.warranty@HCOP--emission.com.WARRANTYPERIOD:Any warranted part which is not scheduled for replacement as required maintenance, or whichisscheduledonlyforregularinspection to theeffectof"repairorreplaceasnecessary"shallbewarrantedfor2years.Any warrantedpartwhichisscheduledforreplacement as required maintenance shall be warranted for the period of time up to the first scheduledreplacementpointforthatpart. DIAGNOSIS:Theownershallnot be chargedfordiagnosticlaborwhichleadsto the determination that a warranted part is defectiveifthediagnosticworkisperformedat anapprovedPoulanservicingcenter.
CONSEQUENTIAL DAMAGES: Poulan maybeliablefordamagestootherengine componentscausedbythefailureofawarrantedpartstillunderwarranty.WHATIS NOTCOVERED: All failurescaused by abuse, neglect, orimpropermaintenance are not covered. ADD--ONORMODIFIED PARTS: The use of add-on or modified parts can begrounds for disallowing warranty claim. Poulan is not liable to cover failures of warranted parts caused by the use of add-on or modified parts. HOW TO FILE A CLAIM: If you have any questions regarding your warranty rights and responsibilities, you should contact your nearest authorized service center, call Poulan at 1--800--554--6723, or send e-mail correspondenceto emission warranty @HCOP--emission.com. WHERE TO GETWARRANTYSERVICE: Warranty services or repairs shall be provided at all Poulan service centers. Call: 1--800-554--6723 or sende-mail correspondence to emission warranty @HCOP-emission.com. MAINTENANCE, REPLACEMENT AND REPAIR OF EMISSION RELATEDPARTS: Any Poulan approved replacement part used in the performance of any warranty maintenance or repair on emission related parts will be provided without charge to the owner if the part is under warranty. EMISSION CONTROL WARRANTY PARTS LIST: Carburetor, air filter (covered up tomaintenances schedule), ignition system: spark plug (covered up tomaintenances schedule), ignition module, muffler including catalyst (ifequipped), fuel tank. MAINTENANCE STATEMENT: The owner is responsible for the performance of all required maintenance as defined in the instruction manual.
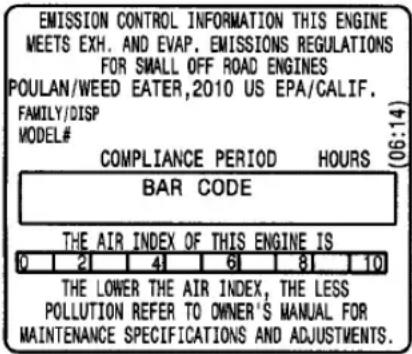
The information on the product label indicates which standard you are engine is certified. Example: (Year) EPA and/or CALIFORNIA.
text_image
EMISSION CONTROL INFORMATION THIS ENGINE MEETS EXH. AND EVAP. EMISSIONS REGULATIONS FOR SMALL OFF ROAD ENGINES POULAN/WEED EATER,2010 US EPA/CALIF. FAMILY/DISP MODEL# COMPLIANCE PERIOD HOURS (06:14) BAR CODE THE AIR INDEX OF THIS ENGINE IS 0 2 4 6 8 10 THE LOWER THE AIR INDEX, THE LESS POLLUTION REFER TO OWNER'S MANUAL FOR MAINTENANCE SPECIFICATIONS AND ADJUSTMENTS.Thisengine is certified to be emissions compliant for the following use:

Moderate(50hours)

Intermediate(125hours)

Extended(300hours)