Vanity Smart - Cellphone NGM - Free user manual and instructions
Find the device manual for free Vanity Smart NGM in PDF.

User questions about Vanity Smart NGM
0 question about this device. Answer the ones you know or ask your own.
Ask a new question about this device
Download the instructions for your Cellphone in PDF format for free! Find your manual Vanity Smart - NGM and take your electronic device back in hand. On this page are published all the documents necessary for the use of your device. Vanity Smart by NGM.
USER MANUAL Vanity Smart NGM
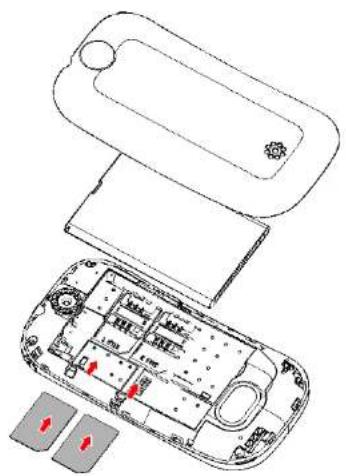
Installing the SIM card
The SIM card stores informaon such as your personal phone number, PIN code, carrier services numbers, contacts and other important details. Remove the back cover from the phone rst, sliding a thin object like the side of a credit card or your nail into the slit on the lower side of the phone to dislodge it from the chassis.
Both SIM cards must be inserted in the slots placed on the back side of the phone, with the golden contacts facing downwards. See the diagram below:
Installing the Memory card
The MicroSD card must be inserted, as for the SIM cards, into the back side of the phone, aer powering it o and removing the baery. A dedicated slot fort the memory card is placed in front of the SIM cards. Unlock the memory card slot by pushing the metal harness toward the "Unlock" posion, then open the harness and let the memory card slide in, with the golden contacts facing downwards. Then close and lock the harness.
See the diagram below:
natural_image
Exploded view diagram of a handheld device showing internal components and mounting points (no text or symbols)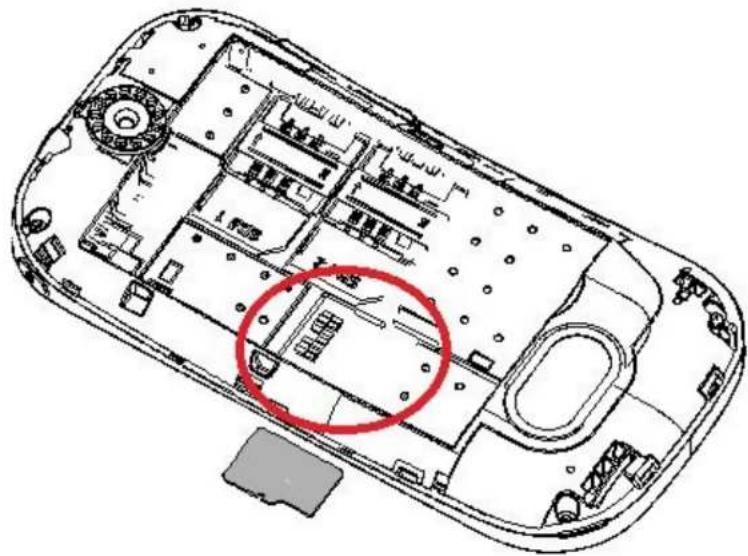
natural_image
Top-down schematic of a device casing with internal compartments and a red circle highlighting a specific area (no text or symbols present)Inserng the baery
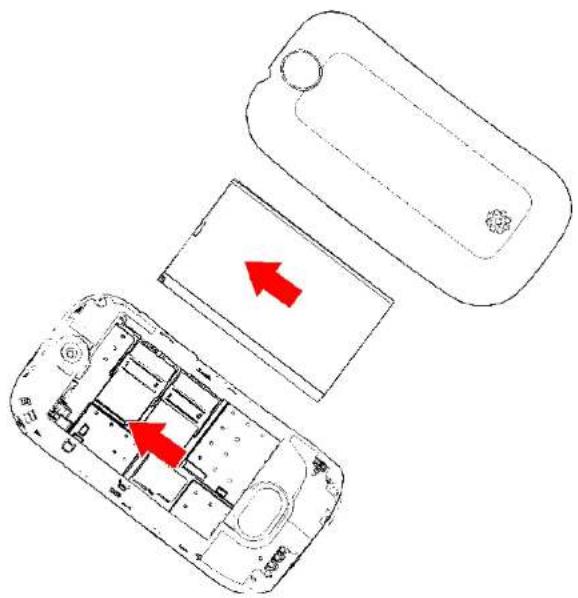
Your device is provided with a lithium-ion baery and is designed to be used exclusively with original NGM baeries and chargers. Baery must be inserted from the backside of the phone (see the diagram below). Align the baery contacts with the phone connector inside the dedicated slot, and let it slide down in posion. Once the baery is inserted, close the back cover by gently pushing it in posion through so pressure all along the border lines of the cover.
natural_image
Diagram showing three views of a mobile phone casing with internal compartments and red arrows indicating movement or flow (no text or symbols present)Charging the baery
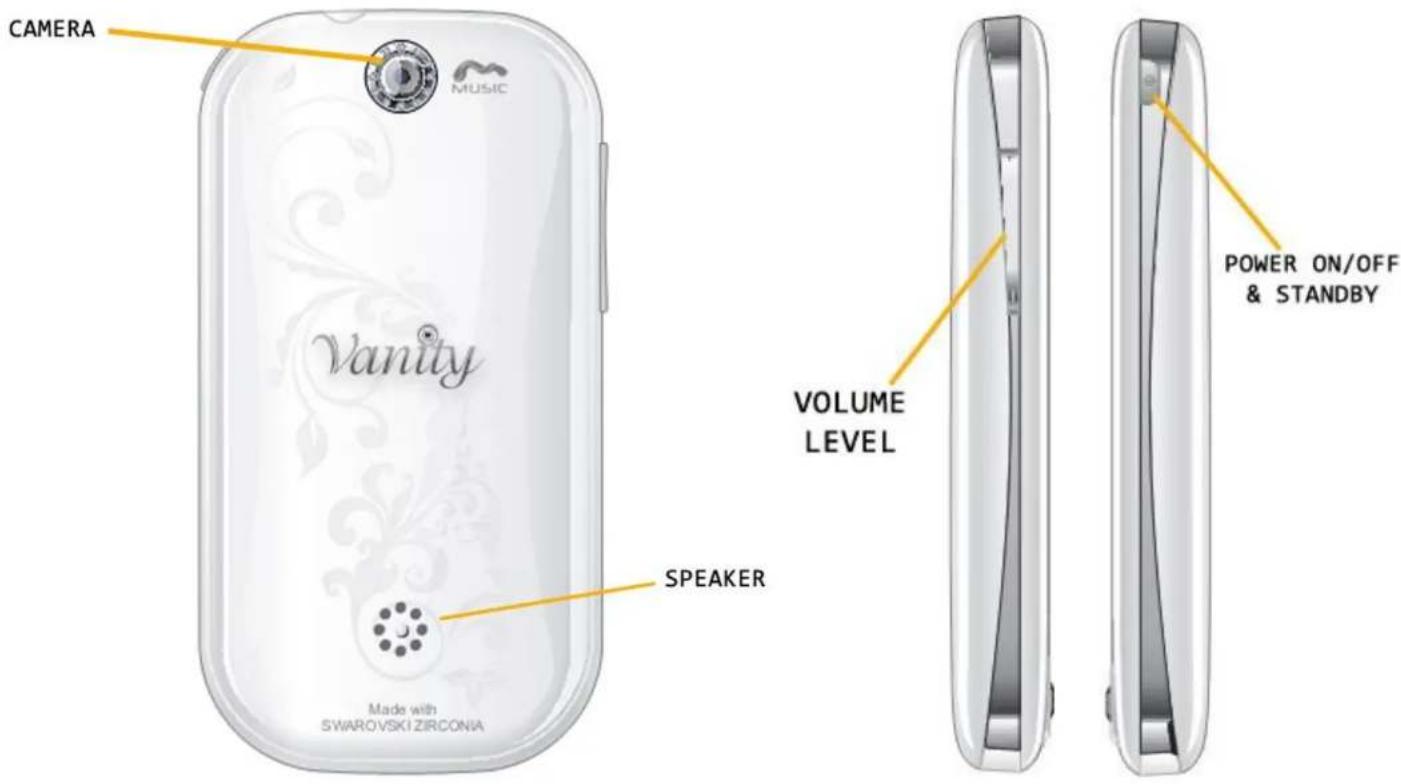
Please charge the baery completely before starng to use the device. Use the USB cable provided, connecng one end to the USB connector placed on the top side of the phone and the other end to the provided wall socket adaptor. While the baery is charging, a counter on screen will show the charging progress. Once charge is completed, the phone can be disconnected from the grid.

natural_image
Line drawing of a device with a USB cable and a switch, no text or symbols presentNote: use only the provided USB cable for charging the device. Please charge the baery indoors, in a dry and favorable environment. It's normal for the baery to get slightly warm during the charging process. The baery will not reach the full capacity until cycled several mes.
Warning: In order to ensure the correct functioning of the device and not to void the warranty, please use only original NGM chargers.
Baeries should not be disposed of as domesc garbage. Please follow your local disposal rules.
Main functions

Turn on, turn o and standby
Press and hold the Power key to turn on the phone. On the rst start, the phone will suggest some ps to get familiar with the Android™ system.
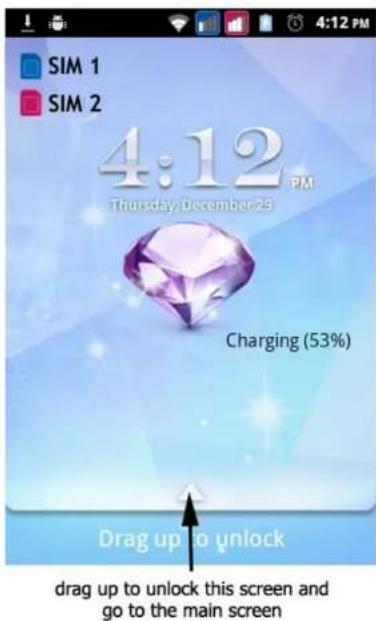
Press and hold the same Power key to turn the phone o. The Power On/O key also allows to enable Silent mode or Airplane mode. A short pressure enables the Standby mode (the screen is switched o) or lets you get back to the Standby screen (see below).
STANDBY SCREEN
Main screen
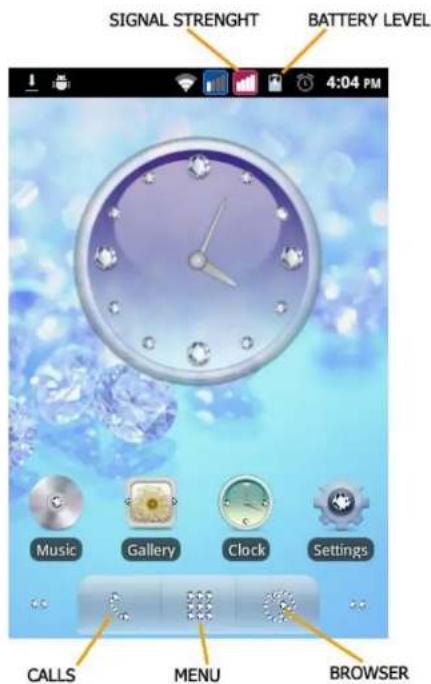
The Main screen is the starng point for all applicaons of your cell phone. Other two fully customizable screens are placed to the le and to the right of the central one. You can place shortcuts to your favorite applicaons by keeping them pressed in the Applicaon screen and moving where you want on the free space in the screens.
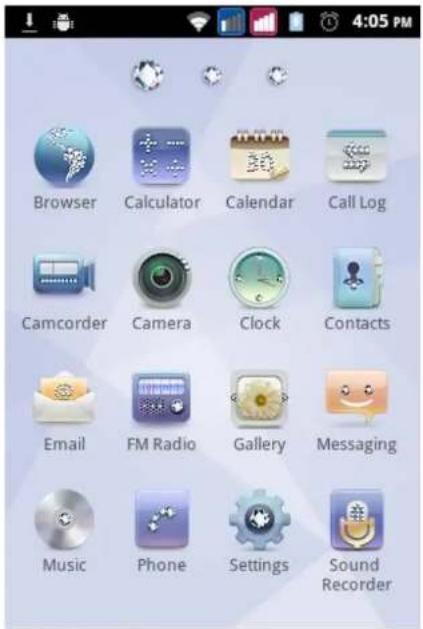
Main menu
Control the touch screen by tapping, tapping and holding, or dragging across it.
Select an applicaon from Main menu or scroll le or right to another menu screen. Press the Back key to return to the previous screen; press the Home key to return to the idle screen.
Managing a call
By default the Call management on your Dual SIM Android™ asks for which SIM to be used on each call. Otherwise a preferred SIM can be set. In this case the selected SIM is automatically used for calling.
To edit these sengs select Sengs > SIM management > Default SIM.
It is possible to associate a preferred SIM for each contact by selecng Sengs > SIM management > Contacts & SIM.
Phone call
- From Main screen, touch the Phone icon to open the Phone call screen. Enter a phone number using the virtual keypad.
- Select the SIM card you want to use by pressing the SIM1/SIM2 icons.
- To end the call, press the END key.
- Drag the green icon to the right to accept the call; drag the red icon to the le to reject it. Touch the Volume up/down buon to silence incoming calls.
Managing contacts
Adding new contacts
- From Main menu, select Contacts.
- Choose "+" then select the locaon where you want to save the new contact (Phone or SIM1/SIM2).
- Enter Name, Number and any other details (when saving to Phone).
- Conrm saving.
Adding new contacts from Call list
- From Main menu, select Call Log.
- Tap and hold on number you want to save (scrolling the list including Missed calls, Dialed calls and Received calls).
- Select Add new contact and choose to save a new contact or add the number to an existing one.
- Select the posion where you want to save the contact (SIM1/SIM2, Phone or a congured web account), and conrm.
Seng ringtones
Select a ringtone
- From Main menu, select Sengs > Audio proles.
- Select General and then select Phone ringtone.
- Select the desired ringtone from the list.
- It is possible to add a customized ringtone. From Music select an audio le, then open the context menu and
choose Use as ringtone. The audio le will now be added to the ringtone list.
Note: it's possible to use *mid,*wav or *mp3 les. The same procedure is of course applicable also to other proles contained in Audio proles menu.
Screen lock and shortcuts
Locking your screen
From the Main menu, select Sengs > Security > Set up screen lock. Select the preferred method for locking your phone screen (Paern, PIN or Password) and confirm.
Calls redial from call log
- From Main menu, select Call Log to access the Dialed / Received / Missed Calls list for both SIM cards.
- Tap onto the contact image (or the Android logo if no image is associated with the contact).
- If the contact has an associated SIM and if you have a default SIM, the call will be sent by this SIM. Otherwise you will have to choose the SIM.
How to enable or disable vibraon
To quickly disable calls and message ringtones, it is enough to hold the Volume “-” pressed from idle screen. Once the minimum volume level is reached, the phone will automatically switch to silent mode.
SIM cards conguraon
Disabling one of the two SIM card
- From Main menu, select Sengs > SIM management.
- Select the SIM card to disable (both SIM cards are enabled by default) by selecng the related checkbox.
Text input
Android™ input method
The default text input method of this phone is the Android ^™ input method. Android method is an advanced system for predicve text entry; when wring an SMS, this method predicts the word that you are typing, changing it with each keystroke.
Other main features are:
- Fixed wring: misspelled words are corrected while you are wring
o "Sloppy-Type" error correction: typing errors are corrected while you are typing
○ Word compleon: the inserted word is automatically completed
o Interpretaon of abbreviaons
○ Automac correcon of punctuaon
To change the text input sengs, select Sengs > Language & keyboard > Android keyboard.
Sending and reading messages
Sending SMS and MMS
- From Main Menu screen, select MESSAGING > Compose new message for quick access to text entry screen.
- Enter the rst leers of a contact name in the recipient eld to search a contact, or tap the upper right icon to insert more than one recipient at once.
- Enter text using the virtual Android™ keyboard. Once the message is ready, choose Send.
- Open the contestual menu and select Aach to include mulmedia aachments (The message will be converted in MMS).
- Choose from wich SIM send the message by tapping SIM1 or SIM2 key.
Connecvity
Android ^™ requires an acve data conncon. If not included in the SIM contract, data conncons will be charged in bill, so it is suggested to use WiFi to establish an internet conncon. To enable SIM data conncon select Sengs > SIM management > Data conncon.
Connecng to the Internet
You can connect to the internet using WiFi. To acvate it, select Sengs > Wireless & networks > Wi-Fi and enable. In order to set the WiFi and manage the known access point use Wi-Fi sengs. Please follow all the warnings and direcons given by authorized personal where the wireless devices are limited, like on planes or in hospitals. Switch to Flight mode in order to use only applicaons that don't use any network access.
Google Account
The Android™ main applicaons use the services provided by Google account, therefore an account is needed for these applicaons to work. These applicaons are:
- Contacts (Gmail contact synchronizaon)
○ Calendar (Gmail calendar synchronizaon)
○ Gmail (Gmail mails synchronizaon)
○ Gmaps (personal informaons and starred places access) - Gtalk (Instant Messaging by Google)
o Latude (GPS posion sharing)
○ Market (Also web-manageble)
Surng the web
Connecng to the Internet
From the Menu screen, choose Browser. The default browser for Android™ will be launched. Type the URL in the address bar to start the navigaon.
Thanks to the Gmail™ account synchronizaon, email management is easy and the e-mail download is automat. If you need to use another mail service provider, please congregate an account in the e-mail applicaon.
How to use Bluetooth
Connecng to a Bluetooth device
- Turn on the Bluetooth™ device to which you want to connect. Where necessary, refer to the document on of the device.
- From the Menu screen, choose Sengs > Wireless and networks.
- Turn Bluetooth on.
- Select Bluetooth sengs to automacally start the Bluetooth devices search.
- Select the device name to associate with, and then choose Associate. The phone will try to connect to the device, and eventually ask for the pairing code.
Using Android Market
Android Market™ is an online soware store developed by Google for Android devices. The "Market" applicaon is preinstalled on phone and allows users to search and download mobile apps published by third-party developers and uploaded onto the Android Market website. Users can also search and read detailed informaon about applicaons. Some of those Android applicaons are already preinstalled on this phone.
Rapid access opons
Nocaons panel
To open the Nocaon panel, tap the indicator icons area at the top of the screen and drag it down with your nger. To hide the panel, drag the boom of the list up. When using whatsoever applicaon, the Nocaon panel gives you access to a list of nocaons coming from each SIM, and allows you to quickly enable funcons like Wi-Fi, Bluetooth, GPS, Data conncon and Airplane mode, display and rotaon sengs.
Note: enabling the GPS funcon doesn't allow an automac GPS conncon of the phone; you rst need to establish a Bluetooth conncon between your mobile phone and an external GPS antenna (a dedicated applicaon is needed).
Accessing recent applicaons
When using whatsoever applicaon, press and hold the Home key (main screen) to view the applicaons you have accessed recently. Touching the corresponding icon, you will be brought back to the applicaon screen.
Context menu
When using any applicaon, press the Menu key to open a context menu referred to the same applicaon.
Copyright © 2012 NGM Italia
No part of this manual may be reproduced, distributed, translated, or transmied in any form or by any means, electronic or mechanical, including photocopying, recording, or storing in any informaon storage and retrieval system, without the prior written permission of NGM Italia.
The Android ^TM logo, Google Maps ^TM , Google Mail ^TM , YouTube ^TM , Android Market ^TM , and Google Talk ^TM are trademarks of Google, Inc. Bluetooth ^® is a registered trademark of the Bluetooth SIG, Inc. worldwide. Wi-Fi ^® and the Wi-Fi logo are registered trademarks of the Wi-Fi Alliance.