SB72 - Dishwasher Equator - Free user manual and instructions
Find the device manual for free SB72 Equator in PDF.

User questions about SB72 Equator
0 question about this device. Answer the ones you know or ask your own.
Ask a new question about this device
Download the instructions for your Dishwasher in PDF format for free! Find your manual SB72 - Equator and take your electronic device back in hand. On this page are published all the documents necessary for the use of your device. SB72 by Equator.
USER MANUAL SB72 Equator
natural_image
Simple geometric diagram of a circle with a horizontal line crossing through it (no text or symbols)EQUATOR®
Full-Size Dishwasher
Owner's Manual and Installati n Instructi ns
M dels: WB 72 / BB 72 / SB 72
WB 65 / BB 65 / SB 65
Table of Contents
Introduction 3
Important Safety Instructions 5
User Instructions
Dishwasher Component Identification 6
Control Panels 7
Wash Programs 7
Combination Detergent & Rinse Aid Dispenser 8
Upper Rack Height Adjustment 9
Loading the Dishwasher 9
Selecting a Wash Program 10
Starting the Dishwasher 10
End-of-Cycle & Unloading the Dishwasher 10
Care and Maintenance 11
Helpful Hints 12
Trouble-Shooting 13
Service and Repair 14
Warranty 15
Installation Instructions 16
Unpacking the Dishwasher 17
Preparation of the Cabinet 17
Preparation of the Dishwasher 18
Fitting a Decorative Door Panel 18
Electrical Connection 19
Water Connection 19
Drain Connection 20
Placement of Dishwasher into the Cabinet Opening 21
Adjustable Width Strips 21
Adjustable Kickplate 22
Final Installation 22
Congratulations on your new Equator dishwasher. In addition to its award winning design, this is a highly sophisticated engineered product that will give you many years of satisfaction. Please spend a few moments to read te Owners Manual. This will show you ways to best utilize your valuable purchase.
Here are 10 of the best reasons for buying your dishwasher
1. Energy, Water, Sewage and Detergent Savings.
Your dishwasher uses only about 5 gallons of water in a Normal load (compared with 11-14 gallons in regular dishwashers). The water saving also results in energy savings since there is less water to be heated. Less water requires less detergent to be used, and also results in a reduced sewage bill.
2. Water Heating to 162 F (72 C).
The water is heated to 162 F in the Pots and Pans wash. Hotter water breaks down the detergent better and provide for a better wash. At this temperature, the dishes are sterilized.
3. Upper Flexible Rack
The upper rack can be raised or lowered with a simple pull of the rack. This is a unique patent pending innovation that makes using full size plates in both upper and lower racks easy to do.
4. 1/2 Load Wash
With the press of a button, only the top rack can be used if required. The dishwasher can be run without waiting to be filled, and cuts down the use of a water that is used. When the upper rack is lowered, full size dinner plates can be washed. The silverware basket is designed to also fit in the top rack. This feature is ideal for small families that want to do their dishwashing in smaller loads.
5. Concealed Water Heater
The water heater has been concealed below the tub. This is especially useful when plastic items fall from the rack onto the tub floor. There is no risk of any burnt items from the heating element.
6. Internal leak detection
Your dishwasher is equipped with a mechanism that detects the slightest water leak within three drum, which automatically cuts off the water supply.
7. Extra quiet
Your dishwasher is extremely quiet and the noise level and the quietness has been measured at 38 dBA for acoustic pressure and 50 dBA for acoustic energy. This is due to the single piece molded door, fiberglass insulation and an additional rubber based inner lining on 5 sides of the dishwasher (excluding the bottom). In fact, you may need to put your ear to the dishwasher to hear it running! It is ideal for operating at night.
8. Six Wash optios
There are 6 wash options to cover all the requirements. These include Rinse & Hold, Pots and Pans, Normal, Economy, China/Crysta and Fast Wash (about 20 minutes)
9.3 level wash
In addition to the upper and lower spray arm, water is sprayed from a multi-directional sprinkler located at the top of the dishwasher. The 3 level wash system sprays water in 5 directions and provides for greater wash efficiency.
10. Rack features
The lower basket offers collapsible plate tines on the left side. This is ideal for washing pots and pans. All movable parts are marked in gray color.
The upper rack features movable supports and a knife holder. There is also a 4-position holder to support glasses of different sizes as well as bowls. There is also a convenient knife holder which offers safety in placing knives for washing.

Important Safety Instructions
WARNING- When using your dishwasher, follow these basic safety precautions to reduce risk of fire, electric shock and/or injury to person(s), including the following:
- Read all instructions before using the dishwasher.
- Use the dishwasher only for its intended function.
- Use only detergent or wetting agents recommended for use in a dishwasher and keep them out of reach of children.
-
When loading items to be washed:
-
Locate sharp items so that they are not likely to damage the door seal; and
- Load sharp knives with the handles up to reduce the risk of cut-type injuries.
- Do not wash plastic items unless they are marked »dishwasher safe» or the equivalent. For plastic items not so marked, check the manufacturer's recommendations.
- Do not touch the heating element during or immediately after use.
- Do not operate your dishwasher unless all enclosure panels are properly in place.
- Do not tamper with controls.
- Do not abuse, sit on, or stand on the door or dish rack of the dishwasher.
- To reduce the risk of injury, do not allow children to play in or on a dishwasher.
- Under certain conditions, hydrogen gas may be produced in a hot water system that has not been used for two weeks or more. HYDROGEN GAS IS EXPLOSIVE. If the hot water system has not been used for such a period, before using the dishwasher turn on all hot water faucets and let the water flow for several minutes. This will release any accumulated hydrogen gas. As the gas is flammable, do not smoke or use an open flame during this time.
- Remove the door to the washing compartment when removing an old dishwasher from service or discarding it.
SAVE THESE INSTRUCTIONS
GROUNDING INSTRUCTIONS
This appliance must be grounded. In the event of a malfunction or breakdown, grounding will reduce the risk of electric shock by providing a path of least resistance for electric current. This appliance is equipped with a cord having an equipment-grounding conductor and a grounding plug. The plug must be plugged into an appropriate outlet that is installed and grounded in accordance with all local codes and ordinances.
WARNING- Improper connection of the equipment-grounding conductor can result in a risk of electric shock. Check with a qualified electrician or service representative if you are in doubt whether the appliance is properly grounded. Do not modify the plug provided with the appliance; if it will not fit the outlet, have a proper outlet installed by a qualified electrician.
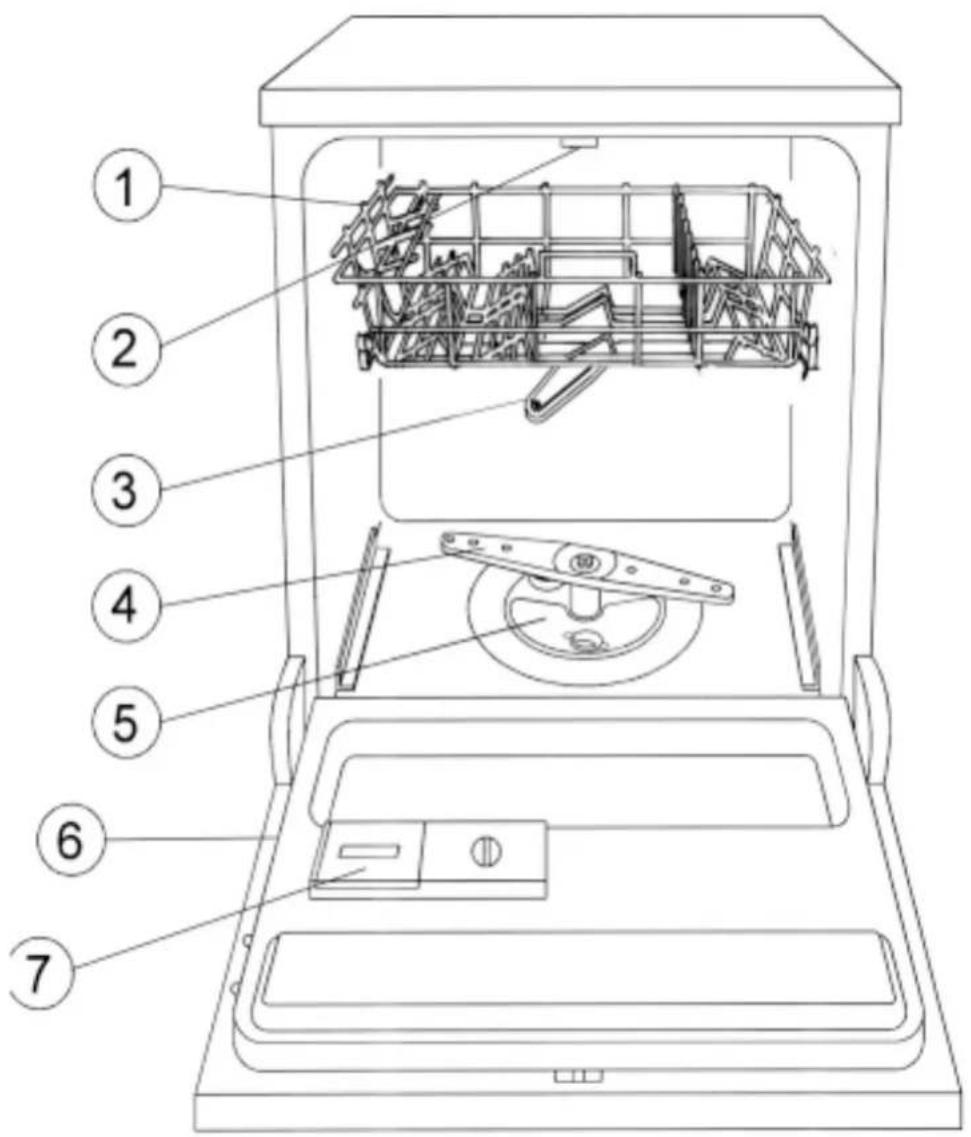
Dishwasher Component Identification
text_image
Technical diagram of a device with numbered components for identification- Upper Basket
- Top Spray Nozzle
- Upper Spary Arm
- Luwer Spary Arm
- Wash Filter Assembly
- Model / Serial and Rating Plate
- Combination Detergent & Rinse Aid Dispenser
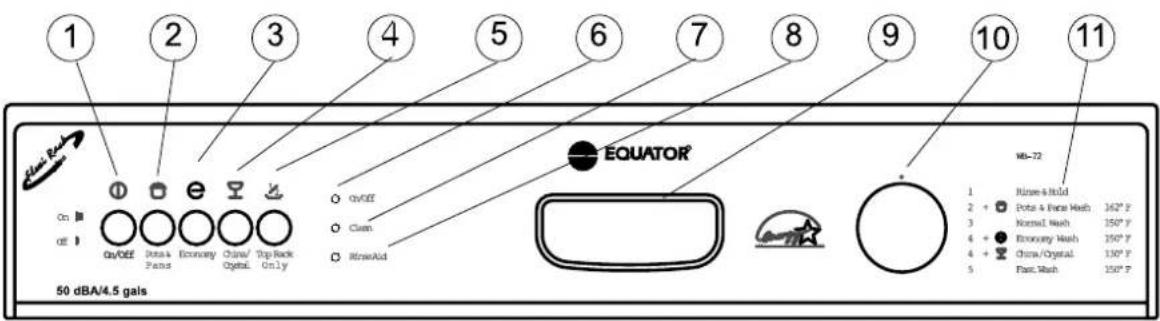
Control Panels
text_image
1 2 3 4 5 6 7 8 9 10 11 On off On/OFF Diss & Panama Economy China/ Optical Top Rack Only On/OFF Clean RimsAid EQUATOR® 50 dBA/4.5 gals MB-72 1 2 + 3 4 + 4 + 5 Rims & Hold Pots & Filter Wash 162° F Normal Wash 150° F Economy Wash 150° F China/Crystal 130° F Fast Wash 150° F- Power On/Off Button
- Pots & Pans Cycle Button
- Economy Button
- China/Crystal Button
- Top rack only Button
-
Power On/Off Indicator Light
-
Clean Dishes Indicator Light
- Rinse Aid Empty Indicator Light
- Door Release Mechanism
- Wash Program Guide
- Wash Program Selector Knob
| Program | Set Program Knob to: | & | Select Option Button: | Description: |
| Rinse & Hold | 1 | - | none | For rinsing dishes, glasses, and tableware that will not be immediately washed. |
| Pots & Pans Wash | 2 | + |  | For difficult to clean, heavily soiled pots, pans, casserole dishes, and regular tableware. 162°F |
| Normal Wash | 3 | - | none | For moderately soiled loads. 150°F |
| Economy Wash | 4 | + |  | For light to moderately soiled loads while minimizing energy consumption. 150°F |
| China/Crystal | 4 | + |  | For lightly soiled dishes and special glassware sensitive to high temperature washing. 130°F |
| Fast Wash | 5 | - | none | For lightly soiled dishes when cycle time is of concern. 150°F |
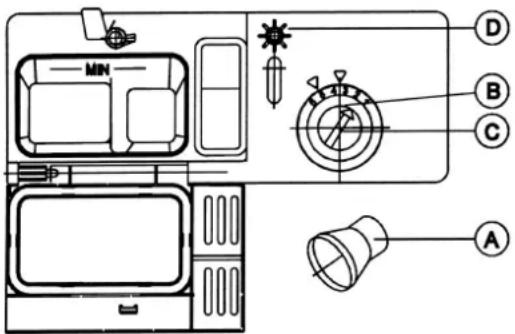
Combination Detergent & Rinse Aid Dispenser
text_image
Technical diagram of a vehicle air conditioner unit with labeled components and component labelsDetergent Dispenser
Fill the dispenser with detergent unless selecting a Rinse & Hold program. Gently close the lid. The detergent will be dispensed automatically during the wash cycle.
Selecting the Correct Amount of Detergent
Fill the large compartment of the dispenser with approximately ONE tablespoon of detergent for all programs.
When running Pots & Pans Wash also place an additional ONE tablespoons or so of detergent to the small compartment of the dispenser.
Remember, less than the recommended amount of detergent is required if the dishwasher is connected to a soft water supply.
Never sprinkle detergent directly onto tableware.
Always use a detergent made specifically for automatic dishwashers.
Rinse Aid Dispenser
Use Rinse Aid in the dishwasher to obtain the best possible drying result while eliminating water spots on your tableware and glassware. The automatic Rinse Aid Dispenser releases a measured quantity of Rinse Aid into the final Rinse segment of each wash program.
Filling the Rinse Aid Dispenser
To fill the liquid Rinse Aid dispenser, follow these steps:
- Open Dispenser «A».
- Pour the liquid into opening «B» and, without allowing it to overflow, fill the dispenser.
- Close the Dispenser.
Always wipe away any drops that may have spilled outside the dispenser.
Amount to use
For optimum performance, each wash program, except Rinse & Hold, requires a certain amount of Rinse Aid be dispensed. The dispenser is factory preset to automatically dispense 0.07 ounce of liquid per wash program. Depending on the quality of water, it may be necessary to adjust the amount dispensed.
To check whether or not the Rinse Aid dispense volume is properly set, examine your tableware and glassware following a completed wash program:
- Increase Setting, if there are dried water spots on the surface of these items.
- Decrease Setting, if there are traces of water on these items.
Adjusting Rinse Aid Dispense Setting
The dispenser has a CONTROL "C" which regulates the amount of Rinse Aid dispensed. Rotate the plug in the container to the position required to adjust the dosage. The numeric dosage setting corresponds directly to the volume of rinse aid dispensed. eg. When the control is pointing at the number "2" the dispenser will emit 0.07 ounce of rinse aid in the final rinse segment of each wash program.
Rinse Aid Liquid Level
There are two indicators to let you know when the Rinse Aid Dispenser requires filling:
- Control Panel Light Indicator - As a convenient reminder, an indicator light on the control panel will illuminate whenever the Rinse Aid Dispenser is empty and requires refilling.
- Transparent Sight-Glass - The Rinse Aid liquid level can also be viewed through the SIGHT GLASS "D". When the sight-glass is completely "○" CLEAR, the dispenser is empty. A DARK "●", sight-glass indicates there is still Rinse Aid in the dispenser.
Note: A full dispenser set to dispense level "2" should yield approximately 60 wash programs before refilling becomes necessary.
Buttons
When buttons are in the "IN" position, they are OFF. Push buttons out to activate functions.
Upper Rack Height Adjustment
For your convenience, the upper rack can be adjusted to two possible settings: High or Low.
HIGH Upper Rack Position: In this position, clearance is maximized for larger items to be placed in the Lower Rack.
LOW Upper Rack Position: In this position, increased height is made available for tall glassware and medium sized plates in the Upper Rack.
natural_image
Technical line drawing of a mechanical bracket assembly with rotational motion indicator (no text or symbols)
natural_image
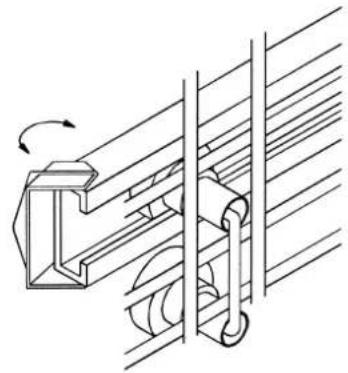
Technical line drawing of a mechanical assembly with rotating components (no text or symbols)Adjusting the Upper Rack (MANUALLY)
To change the position of the Upper Rack, follow these steps:
- Pull the Upper Rack out to its extended position.
- Twist the stoppers at the end of each runner to the "open" position.
- Pull the Upper Rack out further, removing it from the runners.
- Replace the Upper Rack onto the runners introducing the alternate set of rack rollers to the extended runners.
- Once the rollers are in place, turn each stopper to its original "closed" position.
Flexi-Rack
If your dishwasher is equipped with a flexi-rack upper basket simply hold baket handles lift and lower to either raise or lower basket.
Loading the Dishwasher
Dishwasher Capacity: 12 standard place settings.
Remove leftover, bones and insoluble substances, before placing into the dishwasher. You need not rinse the dishes prior to loading them into the dishwasher.
The dishwasher provides an extremely high quality of wash performance. In some cases, depending on severity, it may be necessary to pre-soak certain items that have burnt or baked-on food substances.
Position tableware according to the size, strength, and dirtiness of the pieces.
Less dirty and delicate pieces such as glassware, cups, dessert plates, china or crystal, are to be placed in the upper rack with the open ends facing down.
Dirtier and more resistant pieces such as dinner plates, pots, pans and serving dishes, are to be placed in the lower rack. For a better wash, try to leave a small amount of space between plates. When loading the lower rack, ensure that the pieces are secure in their position with the soiled surfaces facing down toward the lower spray arm.
Silverware & Cutlery: Place these items in the Silverware Basket located on the lower tray.
When all the dishes are in place, roll the upper & lower racks back into the machine. Check to make sure that the both the upper & lower spray arms move freely by spinning them lightly with your hand.
Half load
If your dishwasher has a 1/2 button you can wash just half a set of crockery (6 standard place settings) on the upper rack.
To do this:
- Select the wash program.
- Press the 1/2 button on the control panel.
- Place the crockery in the upper rack
Loading Diagrams
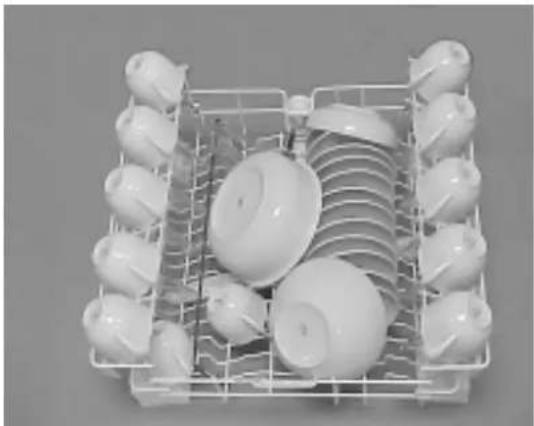
natural_image
Top-down view of a white plastic appliance rack with multiple circular components (no visible text or symbols)Loading Diagrams - Continued
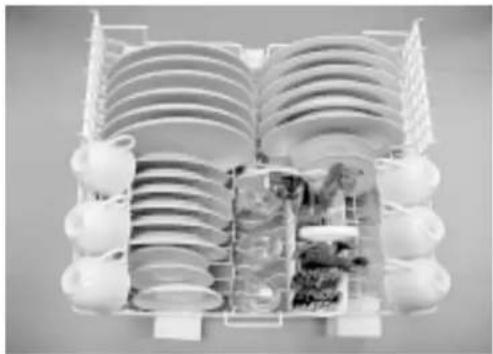
natural_image
3D architectural rendering of an open building with tiered seating and decorative wall panels (no text or symbols visible)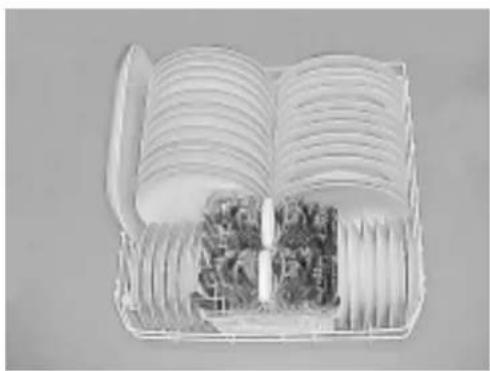
natural_image
Open plastic tray filled with food items, no visible text or symbols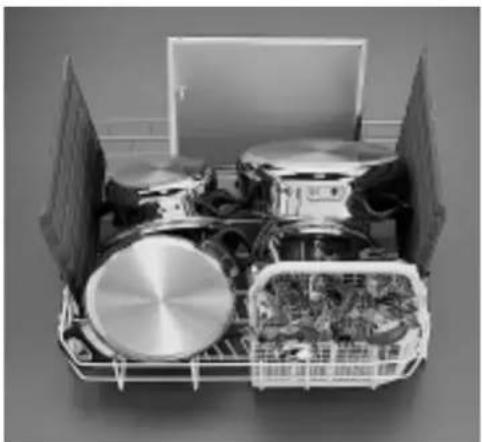
natural_image
Black-and-white photo of an open hard disk case containing various electronic components and wiring (no visible text or symbols)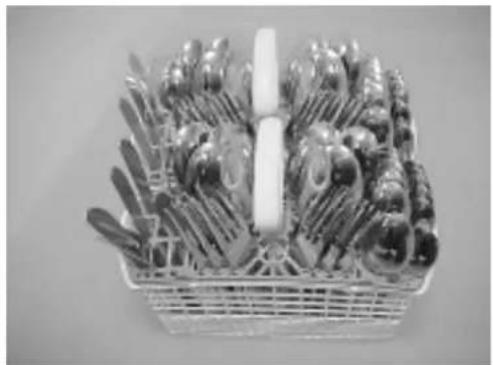
natural_image
Black-and-white photo of a shopping basket filled with various kitchen utensils (no text or labels visible)Selecting a Wash Program
To select the desired Wash Program, turn the Program Selector Knob clockwise until the mark coincides with the program required. NEVER TRY TO TURN THE CONTROL COUNTER - CLOCKWISE.
Additional function keys
Your dishwasher has a number of additional function keys, which have to be selected according to the WASH PROGRAM desired. Reference the Wash Program Guide on the dishwasher Control Panel, also listed on Page 3.
Starting the Dishwasher
When starting the dishwasher, carefully follow these steps:
- Check to make sure that the dishwasher is plugged-in and that there is power available to it.
- Check the water tap or faucet to ensure it is in the "ON" position.
- Check the Rinse Aid Dispenser Level indicator.
- Load the various glasses, plates, cookware and cutlery as previously described.
- Fill the Detergent Dispenser.
- Select the desired Wash Program to suit the load.
- Press the On/Off Button. The On/Off indicator light will illuminate and the selected wash program has begun.
Important - To open the door or interrupt the wash program at any time, always press the On/Off Button to the "Off" position first.
End-of-Cycle &
Unloading the Dishwasher
When the Program Knob reaches the Stop "0" position and the «Ready» indicator light on the control panel illuminates, the selected wash program is complete.
Press the On/Off Button.
Turn off the water and unplug the dishwasher.
Emptying the Dishwasher
We recommend that you wait until the dishes are dry before removing them.
By opening the door slightly and allowing to stand a moment following the end of program, the final drying process will be accelerated.
Open the door completely and remove the dishes.
Empty the lower rack first, preventing spillage of any residual water trapped in deep wells of cups or on more difficult to dry plastic items loaded in the upper rack.
The silverware/cutlery basket is easily removed from the lower basket for convenience in unloading.
Care and Maintenance
Important - Disconnect the electrical supply to the dishwasher before performing any maintenance or cleaning.
Wash Filter
Check the wash water filter, located in the base of the tank, regularly to ensure it is clear of debris. Cleaning is easily accomplished by removing the filter as an assembly and holding it under running water.

natural_image
Line drawing of a hand holding a tool with a ruler and circular components (no text or symbols)
natural_image
Line drawing of a hand using a handheld tool to clean or inspect a cylindrical object (no text or symbols)Removal & Cleaning - Unlock the circular filter assembly from the bottom of the tank by rotating counter-clockwise and lifting on its handle. No further disassembly is necessary.
Clean all three filters under running water. Use a hard brush, if necessary, to loosen difficult to remove deposits.
Replace filters after cleaning.
Important - it is essential that all filters are clean for the dishwasher to function properly.
Spray Arms- The upper and lower spray arms should be checked for blockage or obstruction if ever a decline in wash performance is noticed.

natural_image
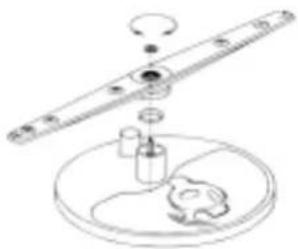
Exploded view diagram of a mechanical assembly (no text or labels)Upper Spray Arm:
- Slide the upper basket out from inside the dishwasher.
- Undo the round nut located in the middle of the spray arm.
- Remove the spray arm, by holding in the middle and pulling down.
- Wash out any debris or food deposits from the holes in the spray arm under running water.
- Replace in reverse order.
natural_image
Diagram of a mechanical assembly with a rotating shaft and two components, no text or symbols presentLower Spray Arm:
- Remove the lower basket from the dishwasher.
- Remove the round ring nut at the center of the spray arm.
- Pull the spray arm out by grasping the center of the spray arm and lifting.
- Wash out any debris or food deposits from the holes in the spray arm under running water.
- Replace in reverse order.
Stainless Steel Care - Periodically wipe the tank and door of your dishwasher with a damp cloth. Never use metal scouring pads such as Brillo® or S. O. S.® as they will scratch the stainless parts and/or leave particles that will rust.
Problem with: Possible Cause/Cure:
| Too much foam in the wash solution | The detergent dosage should be decreased. Detergent in use must be designated for an automatic dishwasher. |
| White spots, streaks or film on dishware | Check for correct dosage of detergent. Ensure Rinse Aid dispenser is not empty, consider increasing dosage. See section regarding Rinse Aid dispenser. If present, check properly functioning household water softener. |
| Tarnishing/ rusting of stainless steel | Do not leave covered with salt or acid foodstuffs. Use Rinse & Hold program, if wash program not started immediately after loading. Do not wash in direct contact with silver-place in separate sections of the cutlery basket. Do not leave in a damp dishwasher for long periods - drying by hand is best. Check household water softener is functioning correctly. |
| Tarnishing of silverware | Do not leave covered with salt or acid foodstuffs. Use Rinse & Hold program if wash program not started immediately after loading. Do not allow undissolved detergent to come into contact with silver,otherwise black spots occur. Keep silver separate from other metals. Wash with a good detergent containing tarnish inhibitor. Check household water softener is functioning correctly. |
| Tarnishing of aluminum | Usually caused by hot water - tarnish is not injurious in any way, but is unsightly. If your preference is to wash such items in the dishwasher versus by hand, remove these items before the final hot rinse has begun. |
| Colored aluminum Color can be removed by | hot alkali. These items not recommended for washing in an automatic dishwasher. |
| Crystal glass, Glasses & other glassware | Stack carefully to avoid rubbing and jabbing. Excessively softened water can damage glass. Check household water softener is functioning correctly. Susceptible to damage by hot water check suitability for use in a dishwasher. |
| Glaze decorations Some items especially antiqu | ues, are not safe in a dishwasher. Wash a sample piece of suspect ware for a few weeks to check suitability. Short washing cycles and lower temperatures will help minimize problems and keep decorations brighter. |
| Handles Some glued on handles will not be safe | at high temperatures. Bone, wood or plastic can be susceptible to hot water. Test one piece by washing for a few weeks.Pieces of cutlery produced from two types of metal are susceptible to electrolytic corrosion. Knives produced with stainless steel blades and silver handles can corrode if left in the dishwasher. |
| Plastics | Thermosetting plastics can dull or crack in hot water. Thermoplastics can melt. Special care may be needed. Most plastic items will not dry well due to the nature of the material. Some hand drying may be necessary. |
Trouble-Shooting
Before calling the Equator Service Center 1-800-776-3832, the following fault finding list could assist you in resolving the problem on your own and/or prevent a non-warranted service visit.
Symptoms Possible Cure
| Dishwasher does not run Check: | Fuse or circuit breaker.Power is on at wall socket.Power switch is pressed to «On» position.The door is fully closed. |
| Dishwasher leaks around door seal Check: | Dishwasher has been installed square and flush into the cabinetry.Dishwasher is level. |
| Water will not drain Check: | Is there a kink or any undue stress on the drain hose?Straighten hose and/or clean out.Are the wash filters blocked? See Care and Maintenance section.Is there blockage at the air gap or waste disposal unit? CallService Center for info. on how to check. |
| Too much noise during the program | Check load to ensure items are secure in the baskets. See loading instructions. Check spray arms to ensure their full rotated motion is not obstructed by the load. Ensure dishwasher is level and installed properly, as either could produce noisy operation.Contact the Service Center to obtain assistance in identifying problem and possible cause(s). Field service referrals available for units or failures not within the manufacturer warranty. |
| Wash results are not perfect 1. Have you used sufficient detergent?2. Have you chosen the correct program?3. Have you loaded the machine correctly?4. Are the spray arm holes clear from obstruction or their rotation inhibited by the load?5. Are the filters clean and have they been fitted correctly?6. Is the drain hose kinked or stressed? | |
| After drying there are still water drops on the inside or the dishwasher and/or on the wash load. | Is the Rinse Aid reservoir filled with a suitable rinse additive and set at the proper dosage volume?Has the lower basket been unloaded first?Do your cups/mugs etc. have large wells on their bases which collect and hold water?Are the cups/mugs etc. loaded upside down and in the correct position in the top basket?Is there a large quantity of plastic items being washed in the respective load? |
To save you time and money please have the following information ready in case you have to call for service:
Name of the dealer from which you pur chased the appliance.
Model number (shown on the rating plate).
The serial number (shown on the rating plate) ----
Date of purchase
You should also retain the original purchase receipt to support any claim made under the warranty. (We suggest you staple the receipt to this page).
If service is r required, contact the:
Equator Service Center
P.O. Box 234
101 3rd Street
Kentwood, L.A. 70444
Telephone: (504) 514.7525
(800) 776.3538
Fax: (504) 229-3379
e-mail: service@equatorappliances.com
| Warranty This Equator appliance is guaranteed against faulty material or workmanship for one full year from the original pur chase date. | |
| Warranty Scope This warranty covers products purchased for home use in the fifty United States and Canada. The warranty does not cover product when used commercially. It is extended to any succeeding owner for the remaining duration of the original pur chaser's warranty period. | |
| Exclusions This warranty does not cover damage caused to the appliance by misuse, accident, abuse, incor rect installation and/or operation, failure to follow operating instructions, and nor mal wear and tear.In addition, it does not cover damage incur red during transit or damage caused by or resulting from repair or adjustment work carried out by any other than Equator or our Authorized Service Agent. | |
| Consequential Damage | The warrantor is not responsible for any consequential damage. SOME ST ATES DO NOT ALLOW THE EXCLUSION OF CONSEQUENTIAL DAMAGE, SO THE ABOVE EXCLUSION MA Y NOT APPLY TO YOU. |
| Implied Warranties/ State Law | ANY IMPLIED WARRANTY ARRANTIES, INCLUDING THE IMPLIED WARRANTY OF MERCHANT ABILITY AND FITNESS FOR PURPOSE, IMPOSED ON THE SALE ARE LIMITED TO ONE YEAR FROM THE DATE OF ORIGINAL PURCHASE. SOME ST ATES DO NOT ALLOW LIMITATIONS ON THE DURATION OF IMPLIED WARRANTY. THIS WARRANTY GIVE YOU SPECIFIC LEGAL RIGHTS, AND YOU MA Y ALSO HA VE OTHER RIGHTS WHICH VARY FROM STATE TO STATE. |
Contents
Page
Unpacking the Dishwasher 17
Preparation of the Cabinet 17
Preparation of the Dishwasher 18
Fitting a Decorative Door Panel 18
Electrical Connection 19
Water Connection 19
Drain Connection 20
Placement of Dishwasher into the Cabinet Opening 21
Adjustable Width Strips 21
Adjustable Kickplate 22
Final Installation 22
IMPORTANT: If at any time during the installation you encounter difficulty or a problem with the dishwasher is noted, please contact the Service Center immediately for reporting and possible immediate resolution.
SAVE THESE INSTRUCTIONS
GROUNDING INSTRUCTIONS
This appliance must be grounded. In the event of a malfunction or breakdown, grounding will reduce the risk of electric shock by providing a path of least resistance for electric current. This appliance is equipped with a cord having an equipment-grounding conductor and a grounding plug. The plug must be plugged into an appropriate outlet that is installed and grounded in accordance with all local codes and ordinances.
WARNING - Improper connection of the equipment-grounding conductor can result in a risk of electric shock. Check with a qualified electrician or service representative if you are in doubt whether the appliance is properly grounded. Do not modify the plug provided with the appliance; if it will not fit the outlet, have a proper outlet installed by a qualified electrician.
Installation Instructions
Important - Take care when handling the dishwasher to avoid potential injury due to possibly exposed sharp edges.
Unpack the Dishwasher
- Remove carton and any internal packaging material from within the dishwasher.
- Unclip the power cord, fill and drain hoses from the rear.
- Carefully lay dishwasher on its back taking care not to damage hoses or power cord and remove the wooden pallet by removing the 4 screws in the base.
- Open the dishwasher door and remove the two screws securing the press-board top panel.
Preparation of the Cabinet
• See below for dimensions of cabinet opening and dishwasher.
- Connection points for electrical, water and drain lines must be situated in an adjacent cabinet for easy access and within dimensional specifications.
- The floor within the cabinet opening must be at the same height as the floor surface in the surrounding room area.

text_image
W D H 22.7/8" 32 1/4" 34 1/2" 4" 23 1/2" 6.5/8" 20 7/8" 3 3/4"Cabinet Opening Dimensions
Width 23 5/8" min. to 24" max.
Depth 22" min.
Height 32 3/8" min. to 34 5/8" max.
Connections
Electrical: Locate power outlet within 3' of the cabinet partition adjacent to the dishwasher. Water: Locate water shut-off valve within 2' of the cabinet partition adjacent to the dishwasher. Drain: Locate the drain line connection point within 1' of the cabinet partition adjacent to the dishwasher.
Preparation of the Dishwasher
Fitting the Adjustable Feet
• The dishwasher comes pre-fitted with adjustable feet.
- Adjust the feet as needed to:
- Obtain the desired overall machine height.
- Properly level the dishwasher.
Important: The dishwasher must be completely level in its finally installed position for proper door sealing and dishwasher operation.
Fitting a Decorative Door Panel
To enhance the appearance of the dishwasher, a decorative door panel can be installed within the existing outer door frame.
The acceptable dimensions of a locally sourced insert panel are:
Width: 23 1/8"
Height: 23 1/2"
Thickness: 1/8" max.

text_image
23 1/8" 23 1/2"Procedure:
- Remove the door frame from the dishwasher by loosening the screws as shown in the illustration.
- Prepare the panel according to the measurements given.
- Position the panel you have chosen and tighten the screws back into the frames.
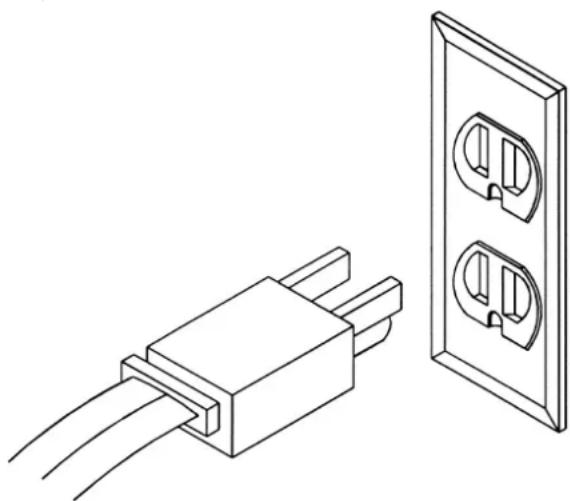
Electrical Connection
- The dishwasher requires a dedicated grounded electrical supply rated at 120 VAC, 15 amps, 60Hz.
- The dishwasher is pre-fitted with a flexible power supply cord with a three-prong, grounding-type plug to connect to a grounded outlet.
- The power-supply receptacle for the dishwasher must be installed in a cabinet or on a wall adjacent to the undercounter space in which the appliance is to be installed.
- Provide an opening, not to exceed a maximum 1-1/2" (38 mm) diameter, through the cabinet partition for the attachment plug and cord to pass through.
- Suitably treat the edges of the specified opening as follows:
- Wood cabinet: Edges must be smooth and rounded.
- Metal cabinet: Order special grommet, the Service Center.
• Take care when installing or removing the dishwasher to avoid possible damage to the power-supply cord.
natural_image
Technical line drawing of a two-pin electrical connector next to a wall-mounted socket (no text or symbols)Water Connection
- The dishwasher is pre-fitted with a direction-adjustable high-pressure water supply hose that has 3/4" NPT internal pipe threads.
- For your convenience, supplied with the dishwasher is a 3/8" comp. x 3/4" NPT brass fitting that adapts the hose connector to a standard 3/8" compression fitting common to most household dishwasher water supply shut-off valves. As an alternative the hose can be connected directly to a locally sourced 3/4" NPT male brass connector available in most hardware stores.
- Adjust the direction of the hose and its connection as it exits the rear of the machine based on the installation requirements.
Important: Ensure the hose connector on the rear of the dishwasher is fully tightened before installing.

text_image
Shut - off Valve Washer 3/8" Comp. x 3/4" BSP OR Water Supply Hose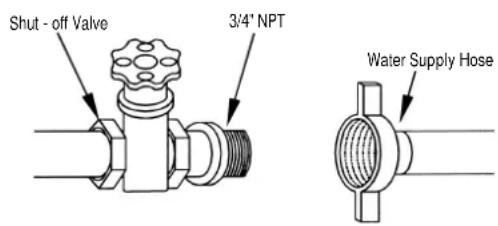
text_image
Shut - off Valve 3/4" NPT Water Supply HoseDrain Connection
- Connect the pre-fitted drain hose to either a garbage disposal, drain line spigot or an air gap as may be required by any prevailing plumbing codes.
- If necessary, the drain hose may be extended with a material capable of withstanding exposure to heated water or detergent. Always maintain a minimum 5/8" inside diameter. Do not exceed 9" maximum distance of drain line.
-
The drain hose must be looped to the underside of the countertop and then back down to its point of drain connection within the following specifications:
-
The minimum height of the drain line connection is 20" above the floor height.
-
The maximum height of the drain line shall not exceed 35" above the floor height.
-
A formed drain hose mounting bracket is supplied with the dishwasher for your convenience.
• Reference illustrations for further detail. - If installing with a new garbage disposal, ensure the knockout has been removed before attaching drain line.
With an Air Gap
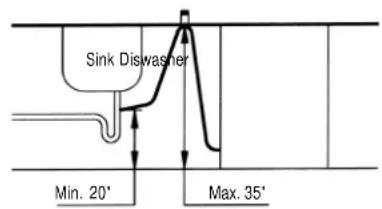
text_image
Sink Diswasher Min. 20' Max. 35'
text_image
Sink Diswasher Garbage Disposal Unit Min. 20' Max. 35'Without an Air Gap

text_image
Sink Diswasher Min. 20° Max. 35°
text_image
Sink Diswasher Garbage Disposal Unit Min. 20' Max. 35'Placement of the Dishwasher in the Cabinet Opening
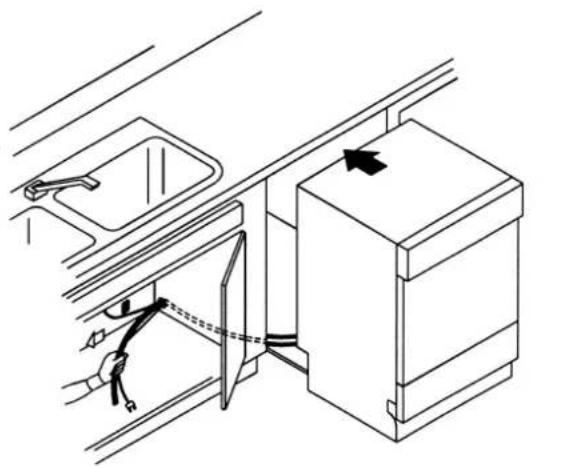
• After following all previous instructions regarding both cabinet and dishwasher preparation, the machine can now be carefully slid into the cabinet opening.
- Place dishwasher in front of the opening.
- Route power cord, drain line and routing hose through the necessary cut-outs in the cabinet opening.
- Carefully move the dishwasher into the cabinet opening while pulling the connection lines (power, drain & water) through the cut-outs of the cabinet side panel.
- Position the dishwasher such that it is properly centered in the opening and in correct alignment with the adjacent cabinet facias.
- Once properly positioned, secure the dishwasher to the underside of the countertop with wood screws through the flange holes located at the top front of the dishwasher.
Important: To ensure proper door sealing and operation the following conditions must be met:
- The machine is properly leveled (front-to-rear and side-to-side).
- The door panel is plumb to the cabinet facia.
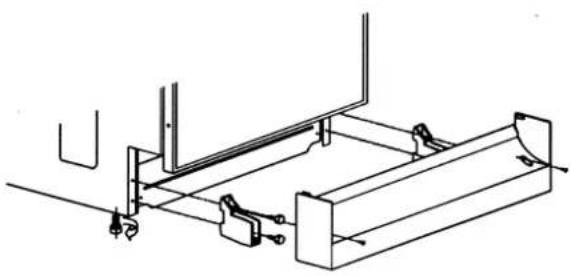
Adjustable Width Strips
Optional adjustable width strips (2) are provided with each dishwasher for mounting to the front of the stainless steel dishwasher tank. The strips are intended to extending the overall width of the dishwasher over exposed areas that may exist if the cabinet cut-out width is excessive.
With the screws provided, attach the width strips to the front vertical edges of the dishwasher tank as illustrated. Adjust the strips to minimize or eliminate exposed area.
natural_image
Line drawing of a kitchen appliance with a hand holding a tool, showing internal components and a hanging box (no text or symbols)
natural_image
Diagram of a gym machine with an inset showing a lever mechanism (no text or symbols present)
text_image
Left Side Trim Screws Right Side TrimAdjustable Kickplate
The adjustable kickplate can now be installed to cover the front feet and the exposed area beneath the dishwasher.
Remove the plastic filler panel as illustrated for better access.
natural_image
Technical line drawing of a mechanical assembly with no visible text or symbolsTo lower the kickplate into position slide the kickplate vertically via the mounting slots to cover the dishwasher feet.
Replace the plastic filler panel.
Final Installation
Connect the power cord, water and drain lines as previously described.
Open the water supply faucet to the full «On» position.
Inspect all connections for any possible water leaks.
Test dishwasher operation by selecting and starting the Rinse & Hold Program. Pay close attention to make sure the machine functions properly and that all connections are secure.
Profile of dishwasher with plastic filer panel removed
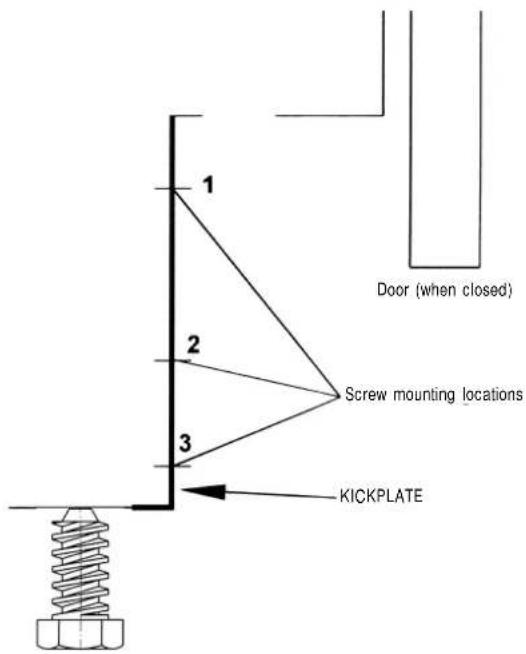
text_image
1 2 3 Screw mounting locations KICKPLATE Door (when closed)IMPORTANT: If you encounter difficulty or a problem is noted with the dishwasher, please contact the Equator Service Center immediately 1-800-776-3832 for reporting and possible immediate resolution.
CORPORATE OFFICE
EQUATOR CORPORATION
Equat r Plaza
2801 W Sam H ust n Pkwy N
H ust n, TX 77043
T II Free: (800) 935-1955
Ph ne: (713) 464-3422
Fax: (713) 464-2151
web: www.equat r nline.c m
e-mail: mail@equat r nline.c m
SERVICE & SUPPORT
Service: (800) 776-3538 / service@equat ra liances.c m
Parts: (888) 483-9627 / arts@equat ra liances.c m
Tech Su rt: (888) 935-1565 / tech@equat ra liances.c m