
PSI1165G - Cooker Profilo - Free user manual and instructions
Find the device manual for free PSI1165G Profilo in PDF.


| Product Type | Freestanding Cooker |
| Brand | Profilo |
| Model | PSI1165G |
| Oven Type | Electric Fan Oven |
| Hob Type | Gas Hob with 4 Burners |
| Oven Capacity | 65 Liters |
| Dimensions (W x H x D) | 60 cm x 85 cm x 60 cm |
| Weight | Approx. 50 kg |
| Power Supply | 220-240 V, 50/60 Hz |
| Gas Supply | G20/G25 Natural Gas (propane convertible) |
| Energy Efficiency Class | A |
| Oven Functions | Conventional, Fan, Grill, Defrost, Light |
| Grill Power | 2.0 kW |
| Hob Burner Power | Triple Ring: 3.3 kW, Normal: 1.8 kW, Auxiliary: 1.0 kW |
| Oven Temperature Range | 50°C - 250°C |
| Timer | Digital Timer with Auto Off |
| Safety Features | Child Lock, Flame Failure Device (Gas Hob), Thermostatic Oven Control |
| Cleaning | Enamel Oven Interior, Removable Oven Door |
| Spare Parts Availability | Burners, Oven Heating Elements, Thermostats, Door Gaskets Available |
| Repairability Index | 8/10 (Easily Replaceable Components) |
| Warranty | 2 Years Standard |
| Included Accessories | Oven Grill Grid, Baking Tray, LPG Conversion Kit |
Frequently Asked Questions - PSI1165G Profilo
User questions about PSI1165G Profilo
0 question about this device. Answer the ones you know or ask your own.
Ask a new question about this device
Download the instructions for your Cooker in PDF format for free! Find your manual PSI1165G - Profilo and take your electronic device back in hand. On this page are published all the documents necessary for the use of your device. PSI1165G by Profilo.
USER MANUAL PSI1165G Profilo
natural_image
Black and white photo of a PROFiLO 2400W air iron with visible branding and mounting marks (no text-heavy elements)TR KULLANIM KILAVUZU
BUHARLI ÜTÜ
3-7
EN USER MANUAL
STEAM IRON
8-12


TR
Congratulations on your choice of our appliance, and welcome among the users of PROFiLO products.
In order to achieve best possible results we recommend using exclusively original PROFiLO accessories. They have been specially designed for this product.
We urge that you read this user's manual carefully. Special attention needs to be paid to the safety precautions. Please save this manual so it can be referred to in the future use of the product.
Important safety and proper handling instructions
Always keep these basic safety instruction during ironing:

DANGER! / WARNING! Health hazard
- The iron must be used and rested on a stable surface.
- The plug must be removed from the socket-outlet before the water reservoir is filled with water.
- If the supply cord is damaged, it must be replaced by the manufacturer, its service agent or similarly qualified persons in order to avoid a hazard.
- The filling aperture must not be opened during use.
- This appliance can be used by children aged from 8 years and above and persons with reduced physical, sensory or mental capabilities or lack of experience and knowledge if they have been given supervision or instruction concerning use of the appliance in a safe way and understand the hazards involved. Children shall not play with the appliance. Cleaning and user maintenance shall not be made by children without supervision.
- Keep the iron and its cord out of reach of children less than 8 years of age when it is energized or cooling down.
- The iron is not to be used if it has been dropped, if there are visible signs of damage or if it is leaking.
• Empty the tank after each usage. - If any part of the iron is damaged, it must be replaced by the manufacturer or its service agent or similarly qualified person in order to avoid a hazard.
- It can be refurbished by qualified staff only. Improper refurbishment can cause serious hazard for the user. In case of any defects, please contact service desk.
- Do not use the appliance when it is damaged or performs abnormally.
- Do not touch the iron rest during or just after ironing. It is hot!
• Do not touch the surfaces marked
with symbol △ during or just after ironing. It is hot (Please refer to the following figure 1 and figure 2).
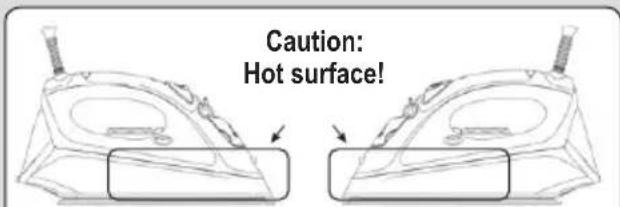
Figure 1: Right side
Figure 2: Left side
- The appliance generates high temperature. Use it carefully and warn other users against possible hazard.
- Keep special care when ironing in presence of children. Do not allow to touch the iron during ironing.
- Do not allow children to perform cleaning and user maintenance when they are without supervision.
- Never iron and clothes or fabrics that are being worn by human or pets.
- Never direct the steam to human or pets.
- The iron must not be left unattended while it is connected to the supply mains.

CAUTION!
Not observance can result in damage to possessions
Remove any protective films or stickers from the sole plate and the cabinet.
Unwind and straighten the power cord before usage.
Fill the water using included vessel for water.
Keep the power cord away from the soleplate.
Make sure that the voltage on the rating plate corresponds to that of your power grid.
Always connect the iron to a suitable mains supply outletm (AC only), with grounding, which voltage complies with the voltage indicated on the appliance nameplate.
Do not use an extension power cord set without grounding!
Do not add perfume, vinegar or other chemical liquids into the water tank; they can damage the appliance seriously.
Do not immerse the appliance in water or any other liquid.
Do not wrap the power cord around the unit for storage until it has cooled down completely.
Do not attempt to open the cabinet or dismantle any parts from the appliance.
The appliance is not intended to be operated by means of an external timer or separate remote-control system.
If you do not use the iron, even for short time, switch it off, turning Temperature Dial in anti-clockwise direction to „MIN”.
If you are not going to use the iron even for a short period of time, turn off the steam function by setting the steam control to position.
Use "SELF CLEANING" function at least once a month.

SUGGESTION
Information on the product and suggestions for its use
The iron is intended for domestic usage only and you can use it solely according to herewith manual.
Hints for ironing
① Sort out the articles to be ironed according to the type of fabric. This will minimize the frequency of temperature adjustment for different garments.
② Test ironing a small area on the backside or inside the garment if you are unsure about the type of fabric. Start with a low temperature and increase gradually.
③ Wait for about three minutes before ironing heat sensitive fabrics. Temperature adjustment needs certain time to reach the required level no matter it is higher or lower.
④ Delicate fabrics such as silk, wool, velour, etc. are best ironed with an ironing cloth to prevent shine marks.
⑤ You may need a few times of press to activate the spray, burst and vertically burst function.
⑥ Read the garment labels and follow the manufacturer's ironing instructions which are often shown by symbols similar to the following:
| Temperature settings | ||
 | AcetateElastics | PolyamidePolypropylen |
 | CuproPolyesterProteinsSilk | TriacetateViscoseWool |
 | CottonLinen | |
Technical data
The iron technical parameters are included at the name plate. The iron is I class appliance, equipped with supplying cord and plug with grounding.
PROFiLO iron meets the requirements of effective standards. This device complies with Commission Regulation (EC) no. 1275/2008 on eco-design requirements.
The appliance meets the requirements of the following directives:
- Electrical equipment designed for use within specific voltage limits (LVD) - 2006/95/EC.
- Electro-Magnetic Compatibility (EMC) - 2004/108/EC.
The product is marked with CE symbol on the name plate.
Features
1 Steam Control
2 Steam Burst Button
3 Spray Button
4 Self-Clean Button
5 Temperature Indicator
6 Temperature Dial

7 Water Tank Cover
8 Spray Nozzle
9 Bend Protector
10 Power Cord
11 Auto-Off Light
12 Heater Light (red)
13 Water Cup
14 Soleplate
Before first use
① Unwind and straighten the Power Cord.
② Fill the tank with water. See the "FILLING THE IRON WATER" section.
③ Plug in the unit.
First use
① Proceed as described in the "Before first use" section.
② Turn the Temperature Dial clockwise to „●●●”.
③ The Heater Light will come on.

light will go off once the require temperature is reached.
④ Set the Steam Control to position.
⑤ Place the iron in horizontal position or press the steam burst button. Steam will come out of the holes in the soleplate.
The iron is ready for use.
⑥ Begin first time ironing with an old towel.

iron will stop steaming once the water tank is empty.
Ironing

ays follow the ironing instructions on garment's care label.
FILLING THE IRON WITH WATER
Unplug the unit.
① Set the Steam Control to position and lift the Water Tank Cover.
② Fill the tank with water using the supplied cup.

best ironing results, it is recommended to use fresh demineralised or distilled water.

not use chemically descaled water or any other liquids.

er exceed the 'Max' level marked side of the water tank.
③ Close the Water Tank Cover.
DRY IRONING
① Proceed as described in the "Before First Use" section.
② Set the Steam Control to position.
③ Turn the Temperature Dial to „●“, „●●“ or „●●●”.
④ The Heater Light will come on.

light will go off once the required temperature is reached.
The iron is ready for use.
STEAM IRONING
① Proceed as described in the "Before first use" section.
② Turn the Temperature Dial to „●●” or „●●●”.

optimum steam quality, do not set the Temperature Dial to „•” position for steam ironing.
③ The Heater Light will come on.

light will go off once the required temperature is reached.
The iron is ready for use.
④ Use the Steam Control to set the required amount of steam.
SPRAYING

s function can be used any time without affecting any other settings.
① Fill the water tank. See the "FILLING THE IRON WITH WATER" section.
② Aim the nozzle at the garment.
③ Press the Spray Button.

ay be necessary to press the spray button a few times to start spraying.
the STEAM BURST
This function ensures extra amount of steam to remove stubborn wrinkles (creases) from the ironed fabrics.
① Proceed as described in "Before first use" section.
② Turn the Temperature Dial to „●●” or „●●●”.
③ The Heater Light will come on.

light will go off once the required temperature is reached.
The iron is ready for use.
④ Press the Steam Burst Button – steam will burst from the holes of the soleplate.
⑤ For stubborn wrinkles, wait a few seconds and press Steam Burst button again.

st wrinkles can be removed within three presses.

may be necessary to press the Steam Burst Button a few times to engage this function.

optimum steam quality, do not p Steam Burst Button more than three times after the heater light goes off.
STEAM BURST IN VERTICAL POSITION
This function provides extra amount of steam for removing creases from delicate fabrics in hanging position (hanging curtains or other hanging fabrics).

steam generated by the iron has high temperature. Never use the appliance for ironing clothes or fabrics while they are being worn by people or pets. Never aim the steam at people or pets.
① Proceed as described in the "Before First Use" section.
② Turn the Temperature Dial to „●●●”.
③ The Heater Light will come on.

light will go off once the required temperature is reached.
The iron is ready for use.
④ Hold the iron between 15 and 30 centimetres away from the garment.
⑤ Press the Steam Burst Button - steam will shoot from the holes of the soleplate.
⑥ For Stubborn wrinkles, wait a few seconds before pressing the Steam Burst Button again.

st wrinkles can be removed within presses.

ay be necessary to press the Steam Burst Button several times to start this function.

optimum steam quality, do not Steam Burst Button more than three a row.

en ironing delicate fabrics (synthetics, silk, velvet etc.), keep the iron a few away from the garment to prevent damage.
ENDING THE IRONING
① Turn the Temperature Dial counter-clockwise to "MIN" position. The will turn off.
② Set the steam control to position.
③ Unplug the unit.
④ Empty the water tank. See „Emptying The Water Tank”.
⑤ When the iron has cooled completely, store it vertically in a safe place.
Emptying The Water Tank

Set the Steam Control to position.
The plug the unit.
① Hold the iron upside down and shake it gently to remove the remaining water.
② When the soleplate is still hot, press the Steam Burst Button to drain the water tank.
③ Press the Spray Button to release any remaining water. Before storing the iron, make sure the Steam Control is set to position.
very
Additional Functions
ANTI SCALE SYSTEM
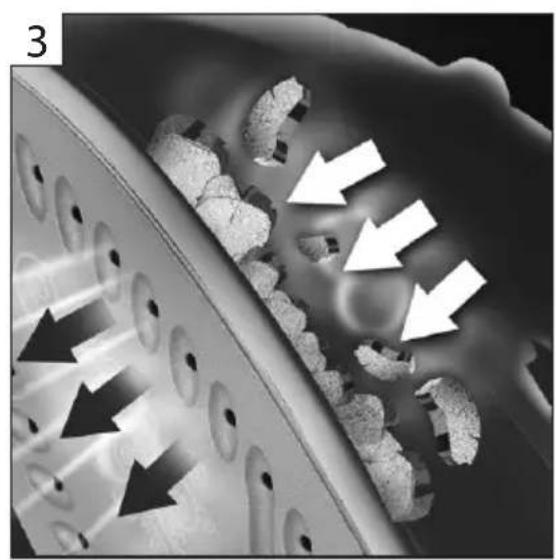
The appliance has a build-in anti-limescale container. It is designed to reduce the build-up of limescale which occurs during steam ironing.

build-in anti-scale cartridge prolongs the service life of the iron. Howe not completely stop the natural pro limescale build-up.
SELF CLEANING
This function provides for removal of scale and mineral built-up in the Steam Chamber. The performance of the iron largely depends on the water hardness and the frequency of performing the self-cleaning process. It is recommended to perform self-cleaning at least once a month or more regularly.
three Proceed as described in the "Before First Use" section.
② Turn the Temperature Dial to „●●●“.
③ The Heater Light will come on.

light will go off once the required temperature is reached.
s the s in The iron is ready for use.
④ Wait for one more cycle. The light will go on and off.
⑤ Turn the Temperature Dial counter-clockwise to 'MIN' position.
centimetres Unplug the unit.
⑦ Hold the iron horizontally over a sink.
⑧ Press and hold the Self-Cleaning Button.
⑨ Steam and boiling water will flow out of the holes on the soleplate, washing away the scales and minerals accumulated inside the steam chamber.
⑩ Sway the iron gently until the water tank is empty.
⑪ Release the Self-Cleaning Button when self cleaning is complete.
⑫ Place the iron on a flat and level surface and allow it to cool down completely.
⑬ Wipe the soleplate with a cold damp cloth.

water flowing out of the soleplate is very hot. Take extra care when performing the self-clean operation.
ANTI DRIP
The anti-drip system is designed to prevent water leaking from the soleplate when the iron is not sufficiently hot. When engaged, the anti drip system may produce a clicking sound, particularly during heat-up or when the iron is cooling down. This is normal and indicates that the system is working correctly.
AUTO OFF
The iron has an auto-off feature in vertical and horizontal position which activates automatically when the appliance is plugged in and left unattended.
① The iron will shut-off automatically after about 30 seconds of inactivity if left on its soleplate (in horizontal position) and after about 8 minutes in vertical position.
② The Auto-Off Light will pulse (flash) which indicates that the iron is in the automatic shot-off mode.
③ Move the unit to continue ironing. The iron will go back to the previous settings and will heat-up again.

iron will revert to the previous each time it is used (moved). The heat-up for about 60 seconds up temperature set with the temperature dial.
settings iron will to the
Cleaning And Maintenance
Unplug the appliance.
Before cleaning, allow the iron to cool completely.
Use a soft cloth and mild detergent for cleaning the iron.
For cleaning the housing, do not use abrasive cleaning agents such as emulsions, creams, pastes, etc. They may remove graphic symbols, such as scales, markings, warning signs, etc.
Never use sharp or rough objects to remove the deposits from the soleplate.
Never use any abrasive, vinegar or descaling agents to clean the soleplate.
Ecology – environment protection
Each user can protect the natural environment. It is neither difficult nor expensive.
In order to do it: put the cardboard packing into recycling paper container; put the polyethylene (PE) bags into container for plastic.
When worn out, dispose the appliance to particular disposal centre, because of the dangerous elements of this appliance, which can be hazardous for natural environment.

Do not dispose the appliance with the municipal waste!
The manufacturer/importer does not accept any liability for any damages resulting from unintended use or improper handling. The manufacturer/importer reserves his rights to modify the product any time in order to adjust it to law regulations, norms, directives, or due to construction, trade, aesthetic or other reasons, without notifying in advance.
natural_image
Abstract graphic of a magnifying glass with arrows pointing outward, symbolizing financial or business analysis (no text or symbols present)
natural_image
Close-up of a mechanical component with arrows indicating flow or movement, no visible text or symbols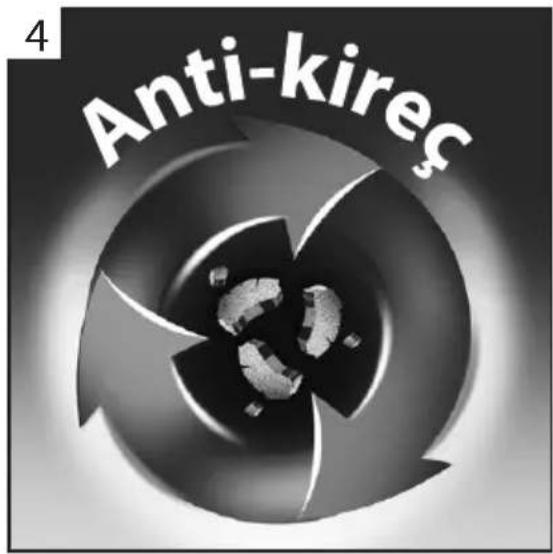
EN 1. Reinforced PRO-STEAM iron soleplate
2. Automatic switch-off function
3. Self-clean function
4. Anti-calcium system preventing the build up of limescale

- TR
- Important safety and proper handling instructions
- DANGER! / WARNING! Health hazard
- CAUTION!
- Not observance can result in damage to possessions
- SUGGESTION
- Information on the product and suggestions for its use
- Hints for ironing
- Technical data
- Features
- Before first use
- First use
- Ironing
- FILLING THE IRON WITH WATER
- DRY IRONING
- STEAM IRONING
- SPRAYING
- the STEAM BURST
- STEAM BURST IN VERTICAL POSITION
- ENDING THE IRONING
- Emptying The Water Tank
- Additional Functions
- ANTI SCALE SYSTEM
- SELF CLEANING
- ANTI DRIP
- AUTO OFF
- Cleaning And Maintenance
- Ecology – environment protection
Brand : Profilo
Model : PSI1165G
Category : Cooker