HE568S - Range hood WHIRLPOOL - Free user manual and instructions
Find the device manual for free HE568S WHIRLPOOL in PDF.

User questions about HE568S WHIRLPOOL
0 question about this device. Answer the ones you know or ask your own.
Ask a new question about this device
Download the instructions for your Range hood in PDF format for free! Find your manual HE568S - WHIRLPOOL and take your electronic device back in hand. On this page are published all the documents necessary for the use of your device. HE568S by WHIRLPOOL.
USER MANUAL HE568S WHIRLPOOL
Range Hood Installation / User Manual
抽油煙機使用說明書
Model : HC338S / HC768S / HC638S HE568S / HE438S
Warning 1
Before using the hood & Installation.... 2
Procedure 3
Mounting method 4
Hood Operation 5 - 11
Maintenance, Cleaning & Hood measurement.... 12
Others & Specifications.... 13
Wiring diagram 14 - 15
警告.... 16
安裝前檢查 & 安裝守則.... 17
安裝注意事項.... 18
吊掛方式 19
功能簡介 20 - 26
保養與清潔 & 油機尺寸.... 27
For safety purpose, you should read the instructions carefully before using the appliance for the first time. Save the instruction for future reference.
The appliance is designed for domestic use and may only be installed and operated in accordance with these instructions for use.
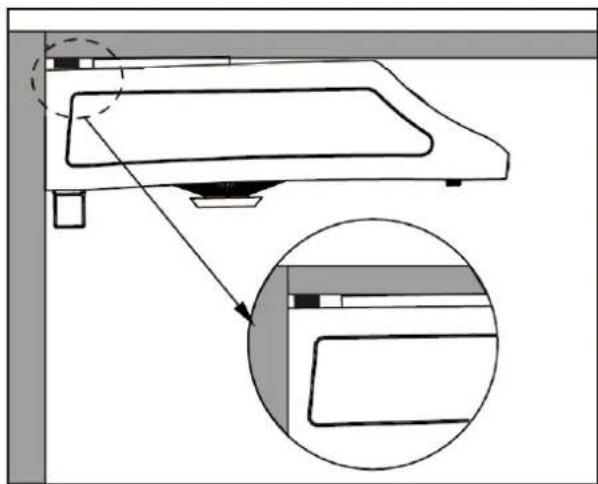
** Remove the protection film outside the hood before installation.
- Please follow the instruction in this user manual.
- Unplug the power before doing maintenance job on the hood.
- Wear rubber gloves when doing maintenance job on the hood.
- Do not spray the hood with water directly.
- When using the hood with flammable gas, please keep a good air flow in the kitchen to avoid hazard.
- Do not burn directly under the range hood.
-
Do not share duct with other flammable gas pipes.
-
Children shall not play with the appliance. Cleaning and user maintenance shall not be made by children without supervision.
-
There is a fire risk if cleaning is not carried out in accordance with the instructions.
-
Do not flambe under the range hood.
-
CAUTION: Accessible parts may become hot when using with cooking appliances.
-
The air must not be discharged into a flue that is used for exhausting fumes from appliances burning gas or other fuels.
-
Regulations concerning the discharged of air have to be fulfilled.
-
If the supply cord is damaged, do not operate the appliance, it must be replaced by the manufacturer, its service agent or similarly qualified persons in order to avoid a hazard.
-
The appliances is not to be used by persons (including children), with reduced physical, sensory or mental capabilities, or lack of experience and knowledge, unless they have been given supervision or instruction.
-
Children being supervised not to play with the appliance.
-
Disconnect the power supply before cleaning, repairing, replacing light bulb or dismantling the hood.
-
The appliance should be positioned 65 – 75 cm above the cooking range.
-
The hood must be earthed.
-
There should be adequate ventilation in the room when the range hood is used along with appliance the burn gas.
-
To prevent fire hazard in case of oil build-up, the turbine impellers and other easily-soiled parts must be cleaned at least twice a month.
BEFORE USING THE HOOD
- Packing materials (plastic bags, polystyrene, etc.) must be kept out of children's reach, as they are potentially dangerous.
- Installation must be carried out by a qualified technician.
- Check the voltage on the rating plate which should correspond to the voltage in your home.
- Connect the power and switch on the motors and lighting system to check the operation.
- Check the following accessories before installation:
a. Exhaust duct adapter (6" to 6" x 1 pc, 6" to 5" x 1 pc)
b. Detachable oil cup x 1 pc, oil dish x 2 pcs
c. Light bulb x 1 pc, water jug x 1 pc (water jug only for HC338S/HC768S/HC638S)
d. Warranty card x 1 pc, instruction manual x 1 pc
e. Hardware package x 1 set
(M6 x 1" wooden screw x 6 pcs + washer x 6 pcs + 3/16"x1/4" screw x 4 pcs + round rubber stand x 2 pcs)
INSTALLATION
1. Location
- Air turbulence is from window/door may reduce the effectiveness of hood. To suggest close window/door before using hood.
- The smoke has to rise up to 25 cm to be within the range of suction efficiency.
2. Position
- The installation height is measured vertically from center of fan grille of hood to the top of the stove.
- The minimum installation height should not be less than 650 mm and the recommended height is 700±50 mm.
■ Avoid left-right or front-dropped inclination.
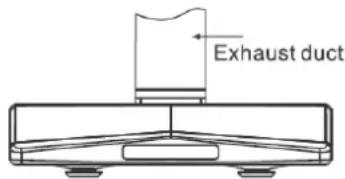
3. Exhaust duct
- 6-inch diameter exhaust duct is recommended to use in order to maximize suction efficiency. In case of 5-inch exhaust duct, an adapter as enclosed in the packaging can be used.
Before installing the hood, please apply fast drying glue to the collar and securely attach it to the top of the cooker hood's vent lid. Install the cooker hood and exhaust duct to the plastic collar and seal with fast drying glue.

natural_image
Interior view of a modern kitchen with built-in cabinets and overhead appliances (no text or symbols)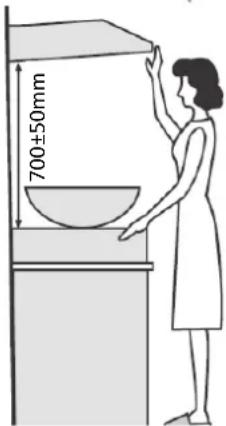
PROCEDURE
- Find a suitable installation position of hood which should be next to a window and can be cut to let the exhaust duct pass through.
- If the exhaust duct has to pass through the wall, particular attention must be paid to the structure of the wall as steel reinforcement may be embedded.
- Mark the location of exhaust outlet hole, the cut/drill the hole with care.
- Fix the position of hood and mark the position of the two hanging hooks.
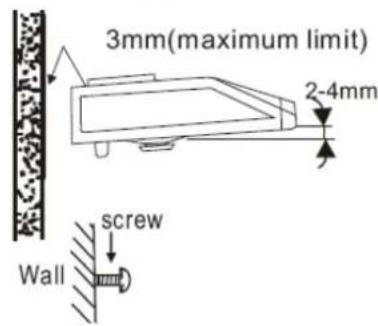
- Drive 2 steel nails into the selected wall with 3 mm (maximum) space leave behind for hanging the hood.
- Adjust the hanging hoods on both sides of the hood and hang the hood on the steel nails, and then adjust the hood from side to side and from front and back to a horizontal position.
- Follow the instruction print on the enclosed exhaust duct adapter and connect the exhaust duct adapter to the hood and window/wall 5-inch or 6-inch duct can be used.
- Fasten the hanging bracket to the wall by screws from the fixed holes to avoid of being hanged up by accident.
- To ensure drainage performance, hood shall be installed with slope (2 - 4 mm) as shown in figure. Note: And rubber cushion (at rear housing) MUST NOT be removed, otherwise appliance will be operated unstable/noisy and water leakage.
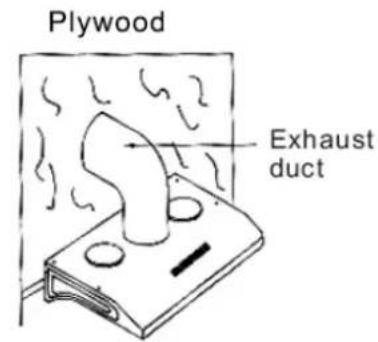
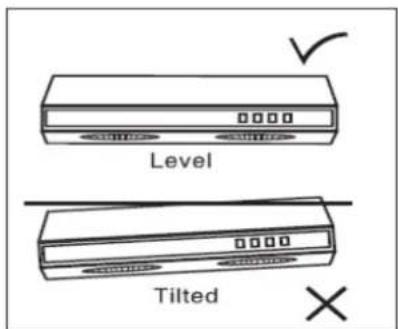
Keeps the hood in level to avoid the oil leaking from oil cup.
Drill a hole for the air tube Drive 2 steel nails in, on the upper corner of the both side of the hood

natural_image
Illustration of three children painting a wall-mounted object with a sun symbol (no text or labels)Adjust the hang hood and prepare to install
MOUNTING METHOD
1. Rear mounting (2 brackets are pre-installed)
Use 2 screws and 2 washers to secure the hood to the wall (see FIG.1).
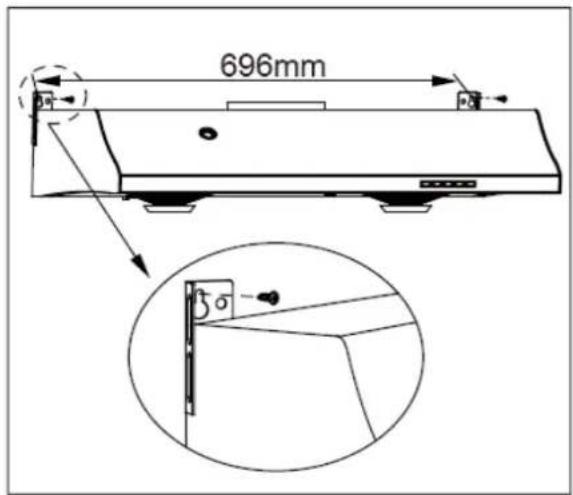
FIG.1
2. Top mounting
Use 4 wooden screws and 4 washers to secure the hood to the bottom of the cabinet. Lift hood onto screws located on cabinet bottom and lock into place. Make sure all 4 key-holes cover the screws. Tighten each screw to secure hood to cabinet (see FIG.2).
Stick the two round rubber stands on the sides of hood's top (see FIG.3).
(Note: Make sure all 4 key-holes cover the screws and each screw was tightened. Otherwise, there will be potential risk of machine fall down.)
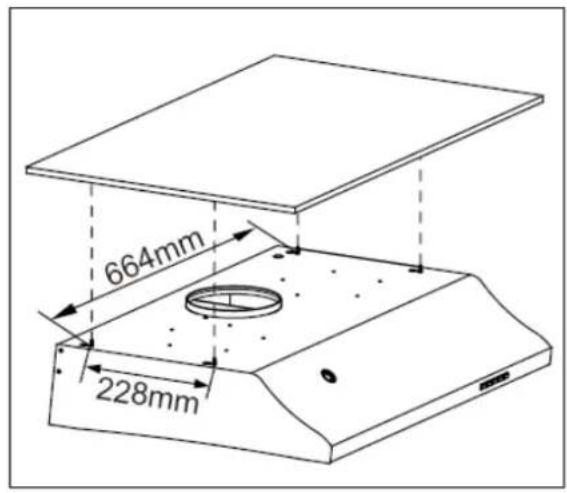
FIG.2
F
natural_image
Technical diagram of a mechanical assembly with an inset close-up showing a component detail (no text or symbols present)FIG.3
HOOD OPERATION
Auto clean and Easy dismantle 2 in 1 cookerhood Model : HC338
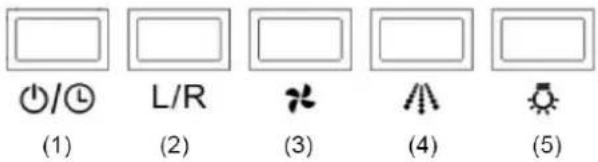
(1) Fans On/Off and Delay-off Power Function
- Turn on and off fans.
- When auto clean or delay off is enabled, press this button to cancel.
Delay Off Function
- With the fans on or off, press and hold this button for 3 seconds. The 5 minutes delay off timer will start with one beep sound and the fans will start according to the last memorized speed.
- The fans and light will automatically turn off after 5 minutes delay off with two beep sounds.
(2) Change the Left and Right Fan
- Press this button to change left and right fan, L&R > L > R.
- When auto clean is enabled, this button cannot functioned.
- When the delay off is enabled, still can change the left and right fan.
(3) Change the Fan Speed
- Press this button to change the high and low speed.
- When the fans are off or the auto clean is enabled, this button cannot functioned.
- When the delay off is enabled, still can change the fan speed.
(4) Auto Clean
- No matter fans are on or off, press this button to enable the auto clean.
- The hood shall be cleaned by using hood cleaner/detergent. Please do not use abrasive cleaner/detergent which will damage the machine.
- Cleaning Steps:
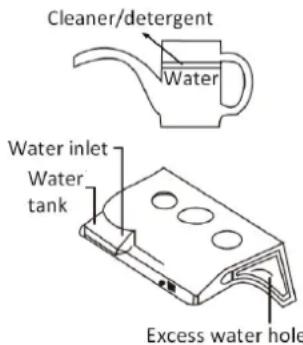
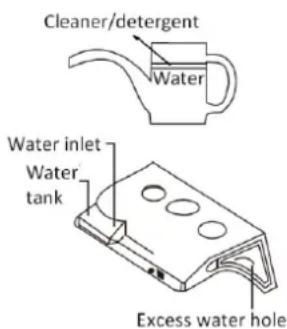
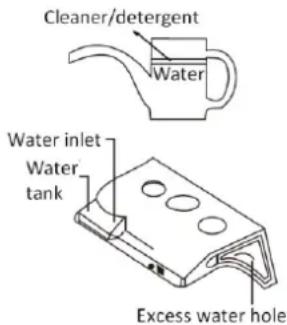
a. Mix the cleaner/detergent and water by pouring them to the marked level of the provided water jug. (the cleaner/detergent : water = 1:12). Pour the cleaner/detergent mixture in the water inlet as shown in the picture.
b. If the cleaner/detergent mixture comes out from the excess water hole down into the oil cup, it means that inside water tank is full and no more shall be poured into the water tank.
c. Press the Auto Clean ( ) button to start with one beep sound. The fans will change to low speed for 3
seconds, and then the water pump will operate for 10 seconds. Then fans change to high speed and start cleaning for 25 seconds. The auto clean process will end with two beep sounds.
d. Dirty oil/water will be flowed into the oil cup.
- When auto clean is enabled, press On/Off ( ⏻/➊) button to cancel at anytime.
- During auto clean process, please refill with water and press auto clean ( ) button to continue the process in case inadequate water.
(5) Light
- Press this button to turn on and off light.
- The light can be operated independently; it only will turn off automatically after 5 minutes delay off.
HOOD OPERATION
Auto clean and Easy dismantle 2 in 1 cookerhood Model : HC768
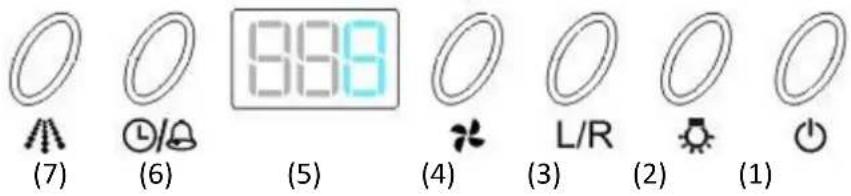

(1) Power On/Off
- Press once On/Off ( ) button, the appliance will be in stand-by mode.
- Press once again, the appliance will be turned off with all function stopped, except the light bulb is an independent control.
(2) Light
- Press this button to turn on and off light.
- The light can be operated independently; it only will turn off automatically after delay off process is completed.
(3) Change the left and right fan
- Press On/Off ( ) button to go into stand-by mode before pressing this button to change the L/R fans.
- Press this button to change left and right fan, -3->-3 > 3-, if fan speed 3 is operating.
- When the auto clean is enabled, this button cannot functioned.
- When the delay off or alarm is enabled, still can change the left and right fan.
(4) Fan: Change the fan speed
- Press On/Off ( ) button to go into stand-by mode before pressing this button to change the fan speed.
- For 1^st time use, the default fan speed is 3 with both fans running at the same time.
- Fan speed will change from -3->-2->-1->-3-, if turn on both fans.
Fan speed will change from -3 > -2 > -1 > -3, if only turn on left fan.
Fan speed will change from 3->2->1->3-, if only turn on right fan.
- When the auto clean is enabled, this button cannot functioned.
- When the delay off or alarm is enabled, still can change the fan speed.
(5) Display: below is list of each digital display
| Display | Meaning | Display | Meaning |
| -3- | left and right fan both at 3 speed | dL | Delay Off |
| -2 | left fan at 2 speed | AL | Alarm |
| 1- | right fan at 1 speed | C | Clean |
| 3.45 | 3 hours and 45 minutes | L | low water level |
| --- | hood is at stand-by mode | CR | 15 hours clean reminder |
HOOD OPERATION
(6) Delay Off / Alarm
- Delay off
- Press this button once to enable delay off.
- The default fan speed is 3. The 2^nd time usage will follow the last memorized fan speed.
- The default time is 5 minutes. The 2^nd time usage will follow the last memorized time.
- The delay off process will start with one beep sound and end by two beep sound with light turn off as well
- Time set for delay off will be range from 1 min to 10 hrs. Press Fan (+) button to increase time and L/R (-) button to decrease time.
- Alarm
- Press this button twice to enable alarm function.
- The default time is 1 min. The 2^nd time usage will follow the last memorized time.
- The alarm function will start with one beep sound. When time is up, the display will illuminates "0.00" with 15 times beep sound. Press any button to stop the beep sound, the display of "0.00" will be disappeared, and then resume the original operating status. Or simply press the On/Off ( ) button to turn off the machine.
-
Time set for alarm will be range from 1 min to 10 hrs. Press Fan (+) button to increase time and L/R (-) button to decrease time
-
Delay off or Alarm cannot be enabled at the same time.
- When delay off or alarm function is enabled, auto clean cannot functioned.
(7) Auto Clean
- When fans are on or off, press this button to enable the auto clean.
- The hood shall be cleaned by using hood cleaner/detergent. Please do not use abrasive cleaner/detergent which will damage the machine.
- Cleaning Steps:
a. Mix the cleaner/detergent and water by pouring them to the marked level of the provided water jug. (the cleaner/detergent : water = 1:12). Pour the cleaner/detergent mixture in the water inlet as shown in the picture.
b. If the cleaner/detergent mixture comes out from the excess water hole down into the oil cup, it means that inside water tank is full and no more shall be poured into the water tank.
c. Press the Auto Clean ( ) button to start with one beep sound. The fans will change to low speed for 3 seconds, and then the water pump will operate for 10 seconds. Then fans change to high speed and start cleaning for 25 seconds. The auto clean process will end with two beep sounds. d. Dirty oil/water will be flowed into the oil cup.
- When auto clean is enabled, press On/Off ( ⏻ ) button to cancel at anytime.
- If the water level is low, the hood will have beep sound and with display indication. Refill with water and press Auto Clean ( ) button to continue cleaning process.
- After operation of 15 hours, there will be clean reminder shown on display every time when you turn off the machine. The reminder display disappear when you enable the auto clean function or pressing On/Off ( ) button for 3 seconds.
HOOD OPERATION
Auto clean and Easy dismantle 2 in 1 cookerhood
Model : HC638

(7)
(6)
(5)
(4)
(3)
(2)
(1)
(1) Power On/Off
- Press once On/Off ( ) button, the appliance will be in stand-by mode.
- Press once again, the appliance will be turned off with all function stopped, except the light bulb is an independent control.
(2) Light
- Press this button to turn on and off light.
- The light can be operated independently; it only will turn off automatically after delay off process is completed.
(3) Change the left and right fan
- Press On/Off ( ) button to go into stand-by mode before pressing this button to change the L/R fans.
- Press this button to change left and right fan, -3- > -3 > 3-, if fan speed 3 is operating.
- When the auto clean is enabled, this button cannot functioned.
- When the delay off is enabled, still can change the left and right fan.
(4) Fan: Change the fan speed
- Press On/Off ( ) button to go into stand-by mode before pressing this button to change the fan speed.
- For 1 ^st time use, the default fan speed is 3 with both fans running at the same time.
- Fan speed will change from -3->-2->-1->-3-, if turn on both fans.
Fan speed will change from -3 > -2 > -1 > -3, if only turn on left fan.
Fan speed will change from 3->2->1->3-, if only turn on right fan.
- When the auto clean is enabled, this button cannot functioned.
- When the delay off is enabled, still can change the fan speed.
(5) Display: below is list of each digital display
| Display | Meaning | Display | Meaning |
| -3- | left and right fan both at 3 speed | dL | Delay Off |
| -2 | left fan at 2 speed | C | Clean |
| 3.45 | 3 hours and 45 minutes | L | low water level |
| --- | hood is at stand-by mode | CR | 15 hours clean reminder |
HOOD OPERATION
(6) Delay Off
- Press this button once to enable delay off.
- The default fan speed is 3. The 2nd time usage will follow the last memorized fan speed.
- The default time is 5 minutes. The 2nd time usage will follow the last memorized time.
- The delay off process will start with one beep sound and end by two beep sound with light turn off as well
- Time set for delay off will be range from 1 min to 10 hrs. Press Fan (+) button to increase time and L/R (-) button to decrease time.
- When delay off function is enabled, auto clean cannot functioned.
(7) Auto Clean
- When fans are on or off, press this button to enable the auto clean.
- The hood shall be cleaned by using hood cleaner/detergent. Please do not use abrasive cleaner/detergent which will damage the machine.
- Cleaning Steps:
a. Mix the cleaner/detergent and water by pouring them to the marked level of the provided water jug. (the cleaner/detergent : water = 1:12). Pour the cleaner/detergent mixture in the water inlet as shown in the picture.
b. If the cleaner/detergent mixture comes out from the excess water hole down into the oil cup, it means that inside water tank is full and no more shall be poured into the water tank.
c. Press the Auto Clean ( ) button to start with one beep sound. The fans will change to low speed for 3 seconds, and then the water pump will operate for 10 seconds. Then fans change to high speed and start cleaning for 25 seconds. The auto clean process will end with two beep sounds.
d. Dirty oil/water will be flowed into the oil cup.
- When auto clean is enabled, press On/Off ( ⏻ ) button to cancel at anytime.
- If the water level is low, the hood will have beep sound and with display indication. Refill with water and press Auto Clean ( ) button to continue cleaning process.
- After operation of 15 hours, there will be clean reminder shown on display every time when you turn off the machine. The reminder display disappear when you enable the auto clean function or pressing On/Off ( ⏻ ) button for 3 seconds.
HOOD OPERATION
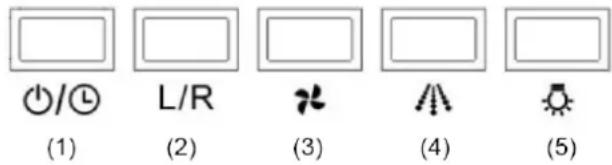
Easy dismantle cookerhood
Model : HE568

(1)
(2)
(3)

(4)

(5)
(6)
(1) Display: below is list of each digital display
| Display | Meaning | Display | Meaning |
| 3.45 | 3 hours and 45 minutes | 0.00 | Time is up |
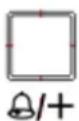
(2) Alarm / up
- When hood is off, press this button to activate the alarm function and set the time. You can increase the setting time of alarm. Press and hold this button to increase faster. After setting, the display will blink 3 seconds if not press any more, and then goes into count down. During blinking, it cannot cancel the alarm operation.
- The default time is 1 min. The 2^nd time usage will follow the last memorized time.
- The alarm function will start with one beep sound. When time is up, the display will illuminates "0.00" with 15 times beep sound. You can press or to stop the beep sound, the display of "0.00" will be disappeared.
- Time set for alarm will be range from 1 min to 10 hrs.
- During count down, press this button to cancel the alarm function at any time and the display will be disappeared.
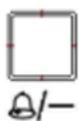
(3) Alarm /down
- When hood is off, press this button to activate the alarm function and set the time. You can decrease the setting time of alarm. Press and hold this button to decrease faster. After setting, the display will blink 3 seconds if not press any more, and then goes into count down. During blinking, it cannot cancel the alarm operation.
- The default time is 1 min. The 2^nd time usage will follow the last memorized time.
- The alarm function will start with one beep sound. When time is up, the display will illuminates “0.00” with 15 times beep sound. You can press 📄/+ or 📄/− to stop the beep sound, the display of “0.00” will be disappeared.
- Time set for alarm will be range from 1 min to 10 hrs.
- During count down, press this button to cancel the alarm function at any time and the display will be disappeared.
- Press (|) to turn on the left fan at low speed. Press (| |) to turn on the left fan at high speed. Press (o) to turn off the left fan.
- Press (|) to turn on the right fan at low speed. Press (| |) to turn on the right fan at high speed. Press (o) to turn off the right fan.
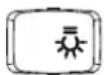
(6) Light
- Press 📋 to turn on and off the light.
HOOD OPERATION
Easy dismantle cookerhood
Model : HE438

(1)

(2)
(3)
(1) Left fan control
- Press (|) to turn on the left fan at low speed. Press (| |) to turn on the left fan at high speed. Press (o) to turn off the left fan.
- Press (|) to turn on the right fan at low speed. Press (| |) to turn on the right fan at high speed. Press (o) to turn off the right fan.
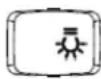
(3) Light
- Press to turn on and off the light.
MAINTENANCE & CLEANING
- Always disconnect from power supply before cleaning.
- Clean both exterior and interior of the hood long lasting.
- Fan protection grille can be detached for cleaning by removing the screws with a screwdriver. It must be reinstalled after cleaned.
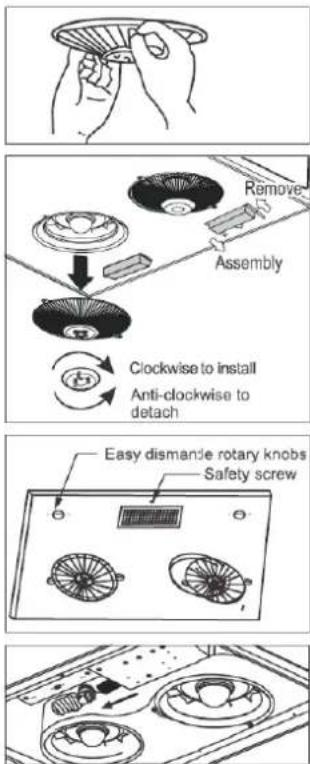
- Oil dish on the grille can also be detached for cleaning by turning the dish anti-clockwise.
- The oil cup in the centre of the hood for holding grease can be detached and cleaned regularly.
- Make a habit to turn on the hood before using stove to avoid high heat in the kitchen.
- The two easy dismantle rotary knobs are set bottom panel, please turn them anti-clockwise to “--” then loosen safety screw to dismount the bottom panel. It is easy to clean and repair.
To turn easy dismantle rotary knobs to “|” and fasten the safety screw to set bottom panel back. - Please must disconnect power before installing light bulb. To refer Item 7 to dismount bottom panel and then fasten/loosen light bulb with socket.
Note: Only replace no more than 14W light bulb. And light bulb MUST be equipped with international safety mark.
HOOD MEASUREMENT
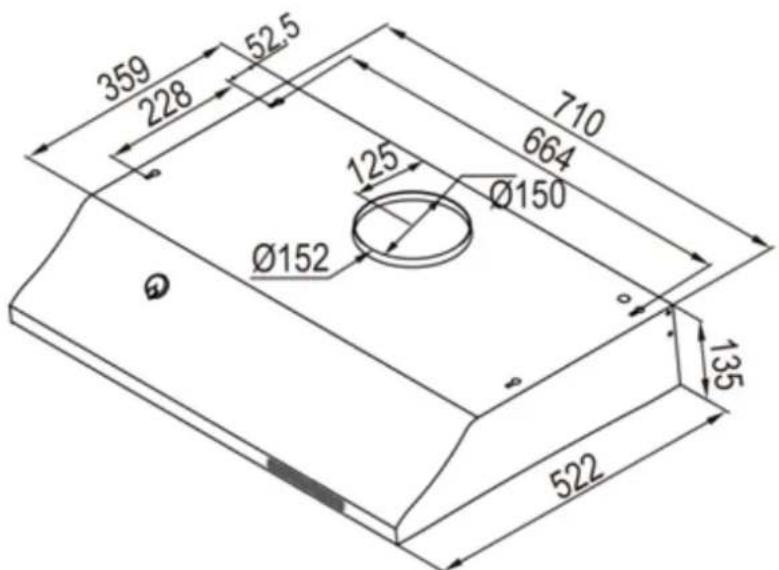
Unit: mm
OTHERS
- Repair service including replacement of main cord should only be carried out by manufacturer, it service agent or a qualified technician. It is dangerous for anyone other than the above mentioned people to perform repair service.
- Hazardous smoke/fume generated from burning Town gas/L.P.gas or/and cooking must be discharged outside the kitchen through the exhaust pipe.
- Air ventilation inside kitchen must be maintained in good condition when using the hood.
- It is dangerous if cleaning is not carried out in accordance with the instructions specified in this user manual.
- Do not directly flame the range hood.
- During installation, power supply must be disconnected.
- Rubber cushion (at rear housing) MUST NOT be removed, otherwise appliance will be operated unstable/noisy and water leakage.
| Specifications | |||
| Model | HC338S/HC768S/HC638S | HE568S | HE438S |
| Net Weight | 14 KGs | 13 KGs | 12.5 KGs |
| Gross Weight | 16 KGs | 15 KGs | 14.5 KGs |
| Hood Size | W 710 x D 522 x H 135 mm | ||
| Packing Size | W 840 x D 630 x H 246 mm | ||
| Voltage | 220-240V / 50Hz | ||
| Light Bulb | Max. 14W energy saving bulb | ||
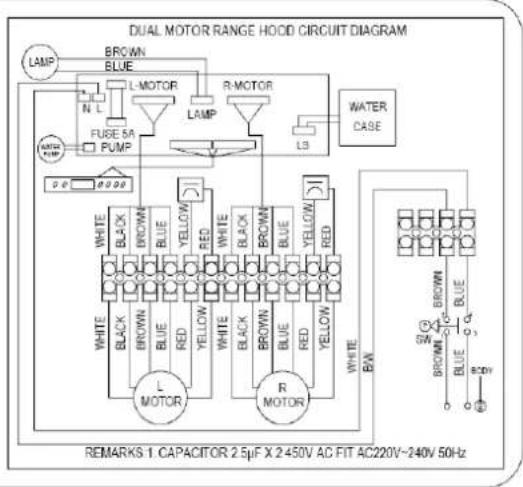
Wiring Diagram

Model:HC338S
Voltage 220V-240VAC 50Hz
Power consumption
Total: 171W
Lamp: 14W Max.
Fan: 157W
Serial No.
Date of mfr.


Model:HC768S
Voltage 220V-240VAC 50Hz
Power consumption
Total: 171W
Lamp: 14W Max.
Fan: 157W
Serial No.
Date of mfr.

Model:HC638S
Voltage 220V-240VAC 50Hz
Power consumption
Total: 171W
Lamp: 14W Max.
Fan: 157W
Serial No.
Date of mfr.
Wiring Diagram

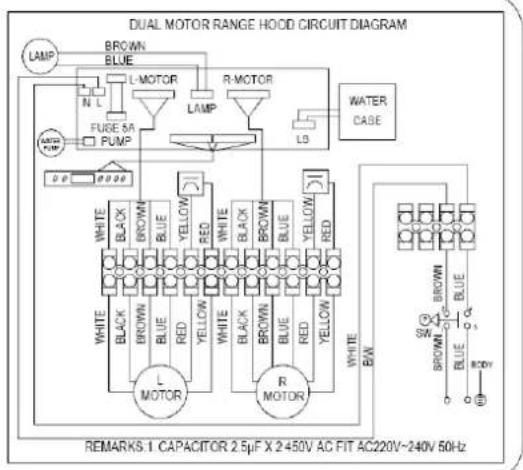
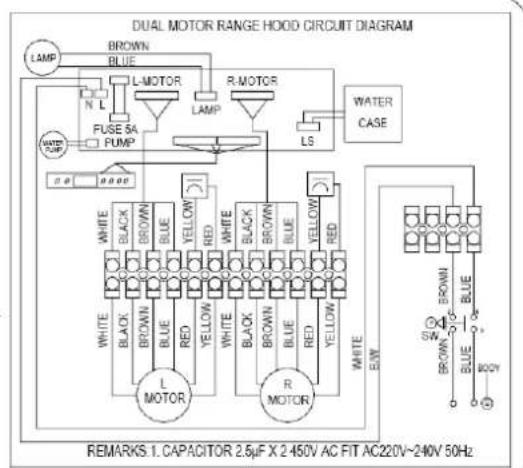
Model:HE568S
Voltage 220V-240VAC 50Hz
Power consumption
Total: 171W
Lamp: 14W Max.
Fan: 157W
Serial No.
Date of mfr.
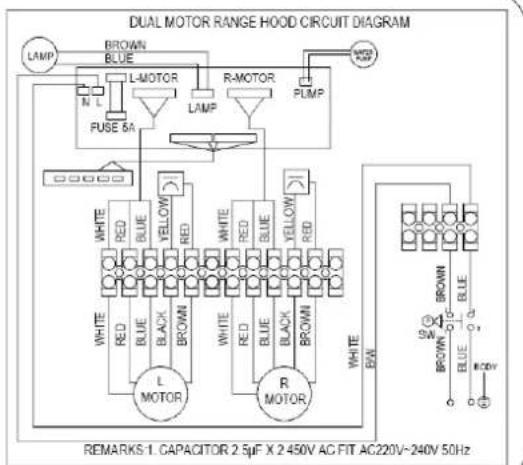
DUAL MOTOR RANGE HOOD CIRCUIT DIAGRAM

natural_image
Interior view of a modern kitchen with built-in cabinets and overhead appliances (no text or symbols)2. 安装高度和機體位置
圖二
natural_image
Diagram of a computer monitor with an inset close-up showing the screen area (no text or symbols present)圖三
功能簡介
自動清洗及易拆式二合一油煙機
機型 : HC338
(1) 風扇開關和延遲關機功能開關
natural_image
Line drawing of two hands holding a circular object, possibly a fan or tray (no text or symbols)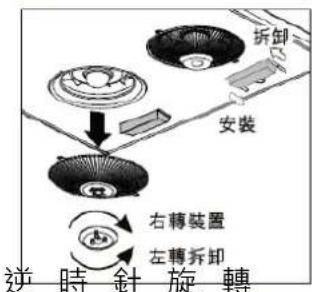
| Total: | 171W |
| Lamp: | 14W Max. |
| Fan: | 157W |
Serial No.
Date of mfr.
flowchart
graph TD
    A["LAMP"] --> B["BROWN BLUE"]
    B --> C["L-MOTOR"]
    C --> D["R-MOTOR"]
    D --> E["PUMP"]
    E --> F["Ground"]
    G["PUSE 5A"] --> H["White"]
    G --> I["Red"]
    G --> J["Blue"]
    G --> K["Black"]
    G --> L["BROWN"]
    M["L MOTOR"] --> N["White"]
    M --> O["Red"]
    M --> P["Blue"]
    M --> Q["Black"]
    M --> R["BROWN"]
    S["R MOTOR"] --> T["White"]
    S --> U["Red"]
    S --> V["Blue"]
    S --> W["Black"]
    S --> X["BROWN"]
    Y["REMARKS: CAPACITOR 2.5μF X 2.450V AC FIT AC220V~240V 50Hz"]

Model:HC768S
Voltage 220V-240VAC 50Hz
Power consumption
| Total: | 171W |
| Lamp: | 14W Max. |
| Fan: | 157W |
Serial No.
Date of mfr.
flowchart
graph TD
    A["LAMP"] --> B["BROWN"]
    A --> C["BLUE"]
    B --> D["L-MOTOR"]
    C --> E["R-MOTOR"]
    D --> F["LAMP"]
    E --> G["R-MOTOR"]
    F --> H["L3"]
    G --> I["WATER CASE"]
    J["FUGE 5A PUMP"] --> K["0-2000"]
    L["WHITE"] --> M["BLACK"]
    L --> N["BROWN"]
    L --> O["BLUE"]
    L --> P["RED"]
    Q["WHITE"] --> R["BLACK"]
    Q --> S["BROWN"]
    Q --> T["BLUE"]
    U["WHITE"] --> V["BLACK"]
    U --> W["BROWN"]
    U --> X["BLUE"]
    Y["WHITE"] --> Z["BLACK"]
    Y --> AA["BROWN"]
    Y --> AB["BLUE"]
    AC["WHITE"] --> AD["R-MOTOR"]
    AE["WHITE"] --> AF["BW"]
    AG["BROWN"] --> AH["SW"]
    AI["BROWN"] --> AJ["O"]
    AK["BLUE"] --> AL["BODY"]
    AM["AC220V~240V 50Hz"] --> AN["REMARKS:1 CAPACITOR 2.5μF X 2-450V AC FIT AC220V~240V 50Hz"]

Model:HC638S
Voltage 220V-240VAC 50Hz
Power consumption
| Total: | 171W |
| Lamp: | 14W Max |
| Fan: | 157W |
Serial No.
Date of mfr.
線路圖

Model:HE568S
Voltage 220V-240VAC 50Hz
Power consumption
Total: 171W
Lamp: 14W Max.
Fan: 157W
Serial No.
Date of mfr.
DUAL MOTOR RANGE HOOD CIRCUIT DIAGRAM
REMARKS:1. CAPACITOR 2.5μF X 2450V AC FIT AC220V-240V 50Hz

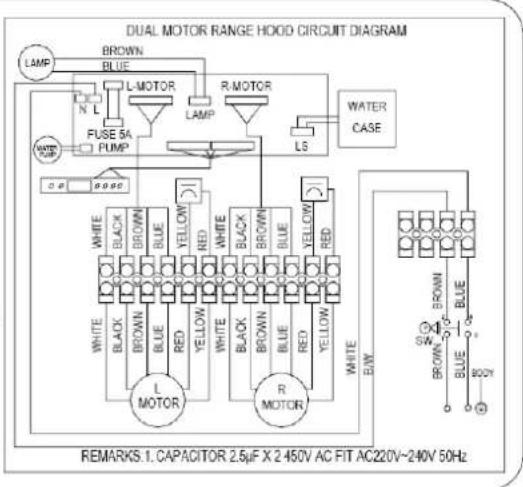
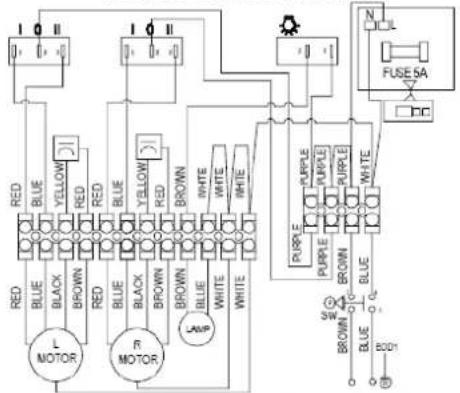
Model:HE438S
Voltage 220V-240VAC 50Hz
Power consumption
Total: 171W
Lamp: 14W Max.
Fan: 157W
Serial No.
Date of mfr.
DUAL MOTOR RANGE HOOD CIRCUIT DIAGRAM
flowchart
graph TD
    A["Red LED"] --> B["MOTOR"]
    C["Blue LED"] --> B
    D["Black LED"] --> B
    E["Brown LED"] --> B
    F["Red LED"] --> G["MOTOR"]
    H["Blue LED"] --> G
    I["Yellow LED"] --> G
    J["Red LED"] --> K["MOTOR"]
    L["Blue LED"] --> K
    M["Black LED"] --> K
    N["Brown LED"] --> K
    O["Brown LED"] --> P["LAMP"]
    Q["White LED"] --> P
    R["White LED"] --> P
    S["Purple LED"] --> T["MOTOR"]
    U["Purple LED"] --> T
    V["Purple LED"] --> T
    W["Purple LED"] --> T
    X["Purple LED"] --> T
    Y["Purple LED"] --> T
    Z["Purple LED"] --> T
    AA["Purple LED"] --> T
    AB["Purple LED"] --> T
    AC["Purple LED"] --> T
    AD["Purple LED"] --> T
    AE["Purple LED"] --> T
    AF["Purple LED"] --> T
    AG["Purple LED"] --> T
    AH["Purple LED"] --> T
    AI["Purple LED"] --> T
    AJ["Purple LED"] --> T
    AK["Purple LED"] --> T
    AL["Purple LED"] --> T
    AM["Purple LED"] --> T
    AN["Purple LED"] --> T
    AO["Purple LED"] --> T
    AP["Purple LED"] --> T
    AQ["Purple LED"] --> T
    AR["Purple LED"] --> T
    AS["Purple LED"] --> T
REMARKS:1. CAPACITOR 2.5μF X 2450V AC FIT AC220V\~240V 50Hz