USER MANUAL PS-5105 DOLMAR
Read and understand this Manual. Always follow safety precautions in the Owner's and Safety Manual. Improper use can cause serious injury!
The engine exhaust from this product contains chemicals known to the State of California to cause cancer, birth defects or other reproductive harm. Preserve this Manual carefully!
ATTENTION!
DOLMAR warrant to the initial retail purchaser and each subsequent owner, that this utility equipment was designed, built, and equipped to conform at the time of initial sale to all applicable regulations of the U.S. Environmental Protection Agency (EPA), and that the engine is free of defects in materials and workmanship which would cause this engine to fail to conform with EPA regulations during its warranty period.
For the components listed under PARTS COVERED, the service dealer authorized by DOLMAR will, at no cost to you, make the necessary diagnosis, repair, or replacement necessary to ensure that the engine complies with applicable U.S. EPA regulations.
EMISSION COMPONENT DEFECT WARRANTY PERIOD
The warranty period for this engine begins on the date of sale to the initial purchaser and continues for a period of 2 years.
PARTS COVERED
Listed below are the parts covered by the Emission Components Defect Warranty. Some of the parts listed below may require scheduled maintenance and are warranted up to the first scheduled replacement point for that part.
Fuel Metering System
Carburetor and internal parts
Fuel filter, if applicable
Throttle stopper, if applicable
Choke System, if applicable
Air Induction System
Pre filter, if exist
Air filter, Air filter case, Intake manifold
Ignition System
Spark plug
Flywheel Magneto
Ignition Coil
Miscellaneous Items Used in Above Systems
Fuel hoses, clamps and sealing gaskets
OBTAINING WARRANTY SERVICE
To obtain warranty service, take your engine to the nearest DOLMAR service Center authorized by DOLMAR. Bring your sales receipts indicating date of purchase for this engine. The dealer of service authorized by DOLMAR will perform the necessary repairs or adjustments within a reasonable amount of time and furnish you with a copy of the repair order. All parts and accessories replaced under this warranty become the property of DOLMAR.
WHAT IS NOT COVERED
- Conditions resulting from tampering, misuse, improper adjustment (unless they were made by the service dealer authorized by DOLMAR during a warranty repair), alteration, accident, failure to use the recommended fuel and oil, or not performing required maintenance services.
- The replacement parts used for required maintenance services.
- Consequential damages such as loss of time, inconvenience, loss of use of the engine or equipment, etc.
- Diagnosis and inspection charges that do not result in warranty-eligible service being performed.
Any non-authorized replacement part, or malfunction of authorized parts due to use of non-authorized parts.
OWNER'S WARRANTY RESPONSIBILITIES
As the engine owner, you are responsible for the performance of the required maintenance listed in your owner's manual. DOLMAR recommends that you retain all receipts covering maintenance on your engine, but DOLMAR cannot deny warranty solely for the lack of receipts or for your failure to ensure the performance of all scheduled maintenance. As the engine owner, you should however be aware that DOLMAR may deny warranty coverage if your engine or a part has failed due to abuse, neglect, improper maintenance or unapproved modifications.
You are responsible for presenting your engine to the nearest service dealer authorized by DOLMAR when a problem exists.
If you have any questions regarding your warranty rights and responsibilities, you should contact the DOLMAR Warranty service Department at 1-888-OPE-PART for the information.
THINGS YOU SHOULD KNOW ABOUT THE EMISSION CONTROL SYSTEM WARRANTY:
MAINTENANCE AND REPAIRS
You are responsible for the proper maintenance of the engine. You should keep all receipts and maintenance records covering the performance of regular maintenance in the event questions arise. These receipts and maintenance records should be transferred to each subsequent owner of the engine. DOLMAR reserves the right to deny warranty coverage if the engine has not been properly maintained. Warranty claims will not be denied, however, solely because of the lack of required maintenance or failure to keep maintenance records.
MAINTENANCE, REPLACEMENT OR REPAIR OF EMISSION CONTROL DEVICES AND SYSTEMS MAY BE PERFORMED BY ANY REPAIR ESTABLISHMENT OR INDIVIDUAL; HOWEVER, WARRANTY REPAIRS MUST BE PERFORMED BY A SERVICE DEALER AUTHORIZED BY DOLMAR. THE USE OF PARTS THAT ARE NOT EQUIVALENT IN PERFORMANCE AND DURABILITIES TO AUTHORIZED PARTS MAY IMPAIR THE EFFECTIVENESS OF THE EMISSION CONTROL SYSTEM AND MAY HAVE A BEARING ON THE OUTCOME OF A WARRANTY CLAIM.
If other than the parts authorized by DOLMAR are used for maintenance replacements or for the repair of components affecting emission control, you should assure yourself that such parts are warranted by their manufacturer to be equivalent to the parts authorized by DOLMAR in their performance and durability.
HOW TO MAKE A CLAIM
All repair qualifying under this limited warranty must be performed by a service dealer authorized by DOLMAR. In the event that any emission-related part is found to be defective during the warranty period, you shall notify DOLMAR Warranty Service Department at 1-888-OPE-PART and you will be advised of the appropriate warranty service dealer or service providers where the warranty repair can be performed.
WARNING!
Careless or improper use of this product can cause serious or even fatal injury.
Before operating a chain saw or other DOLMAR products it is important that you read, fully understand and carefully follow the instructions outlined in this owners manual. Kickback may cause severe or fatal injury and is one of many potential dangers in operating a chain saw. Kickback and other safety related precautions are described in detail within this owners manual. Additional owners manuals are available from DOLMAR POWER PRODUCTS, PO Box 5007, Alpharetta, GA, 30005-5007, USA, Telephone 1-888-OPE-PART.
This product complies with:
American National Standard Institute
Canadian Standards Association
B 175.1-2000 chain saw safety standard.
Z62.1-03 chain saw safety standard.
Z62.3-04 chain saw kickback standard.
Society of Automotive Engineers
SAEJ 335-Jun 95 „Multiposition small engine exhaust system fire ignition suppression"
With the purchase of this chain saw you have chosen a German quality product. Important instructions for the assembly and operation of this saw are given in this manual. For your own safety, we ask you to read the accident prevention instructions very carefully before putting your chain saw into operation, as incorrect handling can, despite all precautions, lead to accidents. With a little care and attention you will have good service and lasting satisfaction from this first-rate product.

PS-460, PS-510, PS-5105, PS-5105 H
Contents
Page
Delivery inventory 4
Symbols 4
Safety precautions. 5-16
Denomination of components. 17
Technical data. 18
Mounting the guide bar and saw chain. 19-20
Checking the chain tension 21
Rettightening the saw chain 21
Chain brake 21
Engaging the chain brake. 21
Fuel/Refuelling. 22-23
Chain lubrication. 24
Starting the engine 25
Stopping the engine 25
Checking the chain brake 26
Working in winter 26
Adjusting the carburetor 27
Contents
Page
Sharpening the saw chain 28-29
Cleaning the brake band and sprocket interior..... 30
Cleaning the guide bar 30
Replacing the saw chain. 31
Cleaning the air filter 32
Replacing the spark plug 33
Checking the muffler screws 33
Replacing the starter cable. 34
Replacing the return spring 34
Replacing the starter spring. 34
Mounting the fan housing 34
Cleaning the cylinder area. 35
Replacing the fuel filter 35
Replacing / cleaning the spark arrester screen..... 35
Instructions for daily and periodic maintenance .... 36
Service, spare parts and guarantee 36-37
Troubleshooting 37
Extract from the spare parts list. 38-39
The PS-460, PS-510, PS-5105 and PS-5105 H will be delivered in a protective cardboard box to prevent transport damage. Cardboard is a basic raw material and is consequently reusable or suitable for recycling (waste paper recycling).

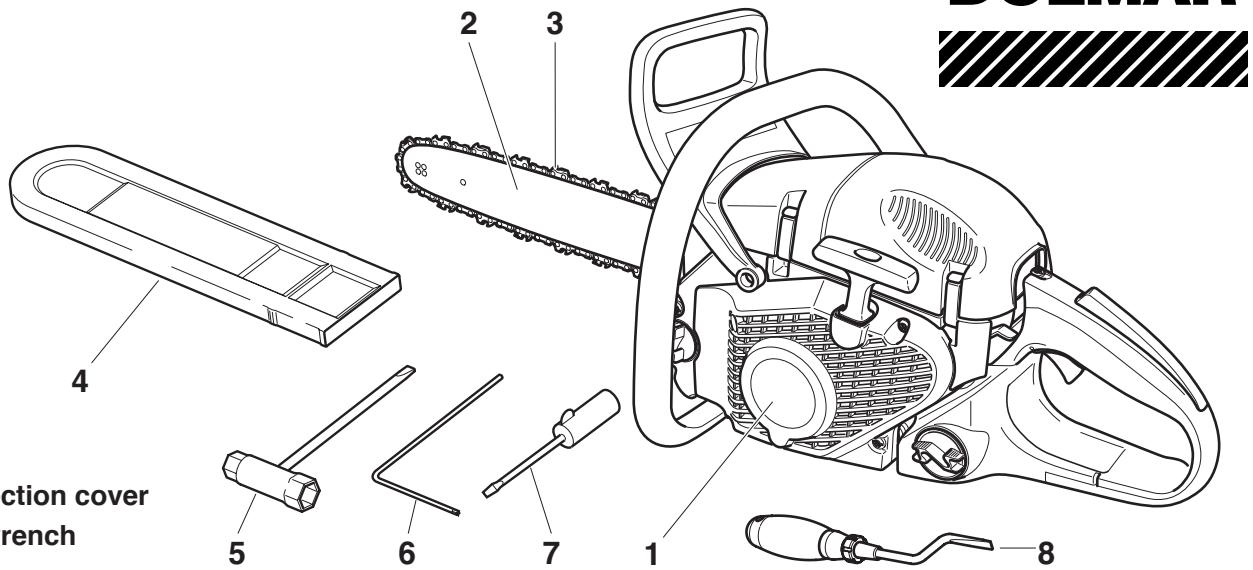
7 Screw driver for carburetor adjustment
1 Chain saw
2 Guide bar
3 Saw chain
4 Chain protection cover
5 Universal wrench
6 Wrench
8 Cylinder ribs cleaner
(only in delivery for model PS-5105, PS-5105 H)
9 Owner's and Safety Manual (not shown)
In case one of the parts listed should not be included in the delivery inventory, please consult your sales agent.
Symbols
You will notice the following symbols on the chain saw and in the Owner's and Safety Manual:






Read instruction manual and follow the warning- and safety precautions!
Particular care and caution!
Forbidden!
Wear protective helmet, eye and ear protection!
Wear protective gloves!
No smoking!
No open fire!
Stop engine!
Start engine
Combination switch Choke, Start/Stop (I/O)
Safety position




s O


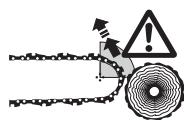
Caution, kickback!
Chain brake
Fuel and oil mixture
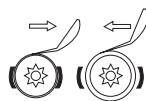
Normal / Winter operation
Grip heating
Carburetor adjustment
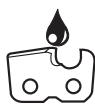
Chain oil fill/oil pump
Saw chain oil adjustment screw
First aid
Do not touch hot surfaces!
Recycling
Further symbols see page 6.
Safety precautions for chain saw operators
While operating the chain saw please observe the following rules:
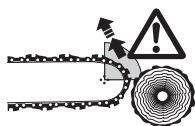
a) Contact of the guide bar nose with any object should be avoided.
b) Tip contact may cause the guide bar to move suddenly upward and backward, which may cause serious or fatal injury.
c) Always operate the chain saw with both hands.
WARNING!
Read and follow all safety precautions in the owner's manual. Failure to follow instructions could result in serious injury. It is recommended to lend the chain saw only to people who are experienced in working with chain saws. Always hand over the Owner's and Safety Manual.
WARNING!
This chain saw is capable of severe kickback that could result in serious injury to the operator. Do not operate this chain saw unless you have extraordinary cutting needs and experience in and special training for dealing with kickback. Chain saws with significantly reduced kickback potential are available.
WARNING!
Kickback may occur when the nose or tip of the guide bar touches an object, or when the wood closes in and pinches the saw chain in the cut. This contact may abruptly stop the saw chain and in some cases may cause a lightning fast reverse reaction, kicking the guide bar up and back towards the user, or push the guide bar back towards the operator. Kickback may cause you to lose control of the saw.
As a chain saw user, you can take several steps to reduce the risk of a kickback and potential injury.
A. With a basic understanding of kickback, you can reduce or eliminate the element of surprise. It is a sudden surprise that contributes to accidents.
B. Keep a good firm grip on the saw with both hands, your right hand on the rear grip and your left hand on the tubular handle, when the engine is running. Use a firm grip with thumbs and fingers encircling the chain saw handles. A firm grip can neutralize kickback and help you maintain control of the saw. Don't let go!
C. Make sure that the area in which you are cutting is free from obstructions. Do not let the nose of the guide bar contact the log, branch, or any other obstructions which could be hit while you are operating the saw.
D. Do not overreach or cut above shoulder height.
E. Follow manufacturer's sharpening and maintenance instructions for the saw chain.
F. Only use replacement bars and chains specified by the manufacturer or the equivalent.
Additional safety precautions
The following additional safety precautions must be observed by all users of chain saws:
- Do not operate a chain saw when you are fatigued.
- Use safety footwear; snug-fitting clothing; protective gloves; and eye, hearing, and head protection devices.
- Use caution when handling fuel. Move the chain saw at least 10 feet (3 m) from the fueling point before starting the engine.
- Do not allow other persons to be near the chain saw when starting or cutting with the chain saw. Keep bystanders and animals out of the work area.
- Do not start cutting until you have a clear work area, secure footing, and a planned retreat path from the falling tree.
- Keep all parts of your body away from the saw chain when the engine is running.
- Before you start the engine, make sure that the saw chain is not contacting anything.
- Carry the chain saw with the engine stopped, the guide bar and saw chain to the rear, and the muffler away from your body.
- Do not operate a chain saw that is damaged, is improperly adjusted, or is not completely and securely assembled. Be sure that the saw chain stops moving when the throttle control trigger is released.
- Shut off the engine before setting it down.
- Use extreme caution when cutting small size brush and saplings because slender material may catch the saw chain and be whipped toward you or pull you off balance.
- When cutting a limb that is under tension be alert for springback so that you will not be struck when the tension on the wood fibers is released.
- Keep the handles dry, clean, and free of oil or fuel mixture.
- Operate the chain saw only in well-ventilated areas.
- Do not operate a chain saw in a tree unless you have been specifically trained to do so.
- All chain saw service, other than the items listed in the owner's manual maintenance instructions, should be performed by DOLMAR. (For example, if improper tools are used to remove the flywheel or if an improper tool is used to hold the flywheel in order to remove the clutch structural damage to the flywheel could occur and could subsequently cause the flywheel to burst.)
- When transporting your chain saw, use the chain protection cover.
- Low kickback bars and low kickback chains are designed to reduce the risk of kickback injury. Ask your DOLMAR dealer about these devices.
General Safety Precautions
The use of any chain saw may be hazardous. At full throttle chain speed can reach 45 mph (20 m/s). It is important that you read; fully understand and observe the following safety precautions and warnings. Read the Owner's Manual and the safety instructions periodically.
WARNING!
Reactive forces, including kickback, can be dangerous. Careless or improper use of any chain saw may cause serious or fatal injury.
Have your DOLMAR dealer show you how to operate your chain saw. Observe all applicable local safety regulations, standards and ordinances.
WARNING!
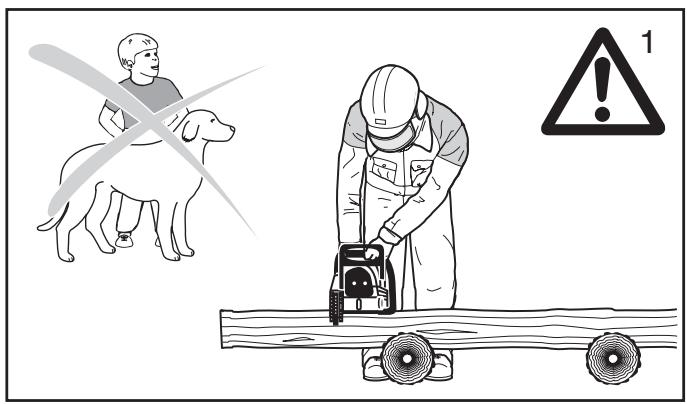
Minors should never be allowed to use a chain saw.
Bystanders, especially children and animals should not be allowed in the area where a chain saw is in use (fig. 1).
Never let the saw run unattended.
Store it in a locked place away from children. Fill the fuel tank to 7/8 th full (see storing the saw).
Do not lend your chain saw without this Owner's and Safety Manual. Be sure that anyone using your saw understands the information given.
Proper use of a chain saw involves
- the operator
- the saw
- the use of the saw.
Discription of symbols used on chain saws:

CSA Standards
Class 1A
Z62.1-03
Z62.3-04
ANSI Standard
SAE Standard
B175.1-2000
SAE J335
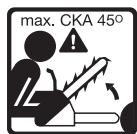
Maximum Computed Kickback Angle (CKA)* without using the chain brake when using the recommended bar and chain combinations (In this example the CKA is 45° ).
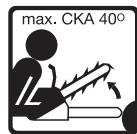
MaximumComputed Kickback Angle (CKA)* with using the chain brake when using the recommended bar and chain combinations (In this example the CKA is 40° ).
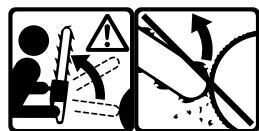
Contact of the guide bar tip with any object should be avoided! Tip contact may cause the guide bar to move suddenly upward and backward, which may cause serious injury!
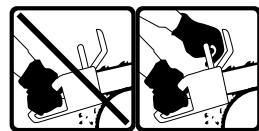
Always use two hands when operating the chain saw!
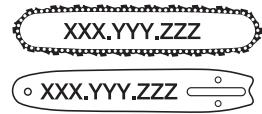
Reduced Kickback Bar and Chain combination that has been evaluated with the power head to achieve kickback protection (according to ANSI and CSA standards).
- The Computed Kickback Angle is a calculated value from energies measured on a test bench. It is not the angle of the guide bar moved upward in case of a KICKBACK.
The operator
Physical Condition
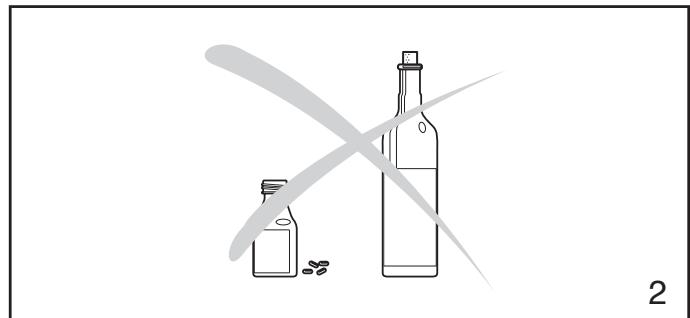
You must be in good physical condition and mental health and not under the influence of any substance (drugs, alcohol), which might impair vision, dexterity or judgment.
WARNING!
Prolonged use of chain saws exposing the operator to vibrations may produce Whitefinger disease (Raynaud's phenomenon). This phenomenon reduces the hand's ability to feel and regulate temperature, produces numbness and burning sensations and may cause nerve and circulation damage and tissue necrosis.
All DOLMAR saws are therefore provided with an antivibration system which is essential for those using chain saws on a regular or sustained basis. Antivibration systems do not guarantee that you will not sustain Whitefinger diseasesase, however, they reduce this danger considerably. Nevertheless, continual and regular users should observe their hands and fingers and in case of any abnormal symptoms, seek medical advice immediately.
Proper clothing
Clothing must be sturdy and snug-fitting, but allow complete freedom of movement. Avoid loose-fitting jackets, scarfs, neckties, jewelry, flared or cuffed pants, or anything that could become entangled with the saw or brush. Wear overalls or jeans with a reinforced cutting resistant insert (fig. 3).
Protect your hands with gloves when handling saw and saw chain. Heavy-duty, nonslip gloves improve your grip and protect your hands.
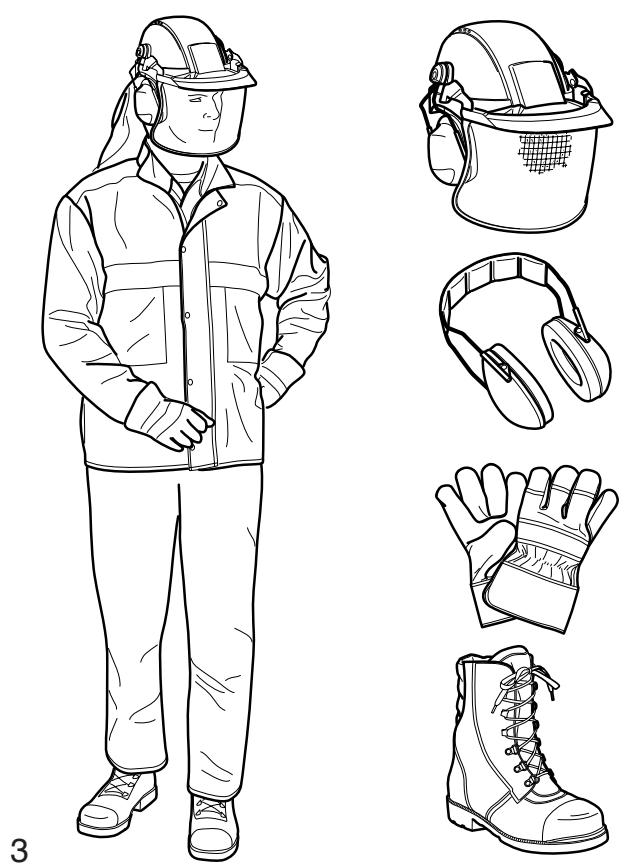
Good footing is most important in chain saw work. Wear sturdy boots with nonslip soles. Steel-toed safety boots are recommended.
Proper eye protection is a must. Non-fogging, vented goggles and a face screen is recommended. Their use reduces the risk of eye and facial injury.
Wear an approved safety hard hat to protect your head. Chain saw noise may damage your hearing. Always wear noise protection equipment (ear plugs or ear muffs) to protect your hearing.
Continual and regular users should have their hearing checked regularly.

Wear protective helmet, eye and ear protection!
The saw
Parts of the chain saw: illustrations and description of parts see page 17.
WARNING!
Never modify a chain saw in any way. Only attachments supplied by DOLMAR or expressly approved by DOLMAR for use with the specific saw are authorized.
WARNING!
Bow guide bars substantially increase the potential for kickback and severe or fatal injury due to the greater kickback zone of the bow design. Bow guide bars are not recommended for use on DOLMAR chain saws nor are they approved by the ANSI B 175.1-2000 chain saw safety standard.
The use of the saw
Transporting the chain saw
WARNING!
Always stop the engine before putting a chain saw down or carrying it. Carrying a chain saw with the engine running is extremely dangerous. Accidental acceleration of the engine can cause the chain to rotate.
Avoid touching the hot muffler.
4
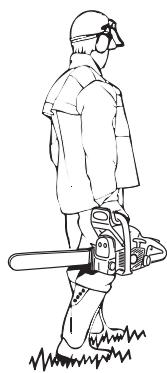
By hand: When carrying your saw by hand, the engine must be stopped and the saw must be in the proper position.
The chain protection cover should be over the chain and the guide bar must point backwards. When carrying your saw the bar should be behind you (fig. 4).
By vehicle: When transporting in a vehicle, keep chain and bar covered with the chain guard. Properly secure your saw to prevent turnover, fuel spillage and damage to the saw. Make sure the saw in not exposed to heat or sparks.
Chain saw operating instructions
For assembly follow the procedure in the appropriate section "Mounting Guide Bar and Chain" of this manual. DOLMAR chain, guide bar and sprocket must match each other (see the appropriate section in this manual).
WARNING!
Proper tension of the chain is extremely important. In order to avoid false setting the tensioning procedure must be followed as described in this manual. Always make sure the hexagonal nut(s) for the sprocket guard is (are) tightened securely after tensioning the chain. Check chain tension once more after having tightened the nuts and thereafter at regular intervals (always before starting to work). If the chain becomes loose while cutting, shut off the engine and then tighten. Never try to tighten the chain while the engine is running!
Fueling
Your DOLMAR saw uses on oil-gasoline mixture for fuel (see chapter "Fuel" of this manual).
WARNING!
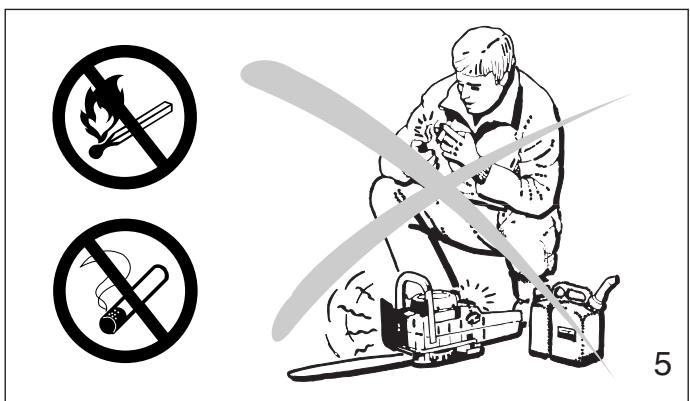
Gasoline is an extremely flammable fuel. Use extreme caution when handling gasoline or fuel mix. Do not smoke or bring any sparks or flame near the fuel (fig. 5).


Fueling instructions
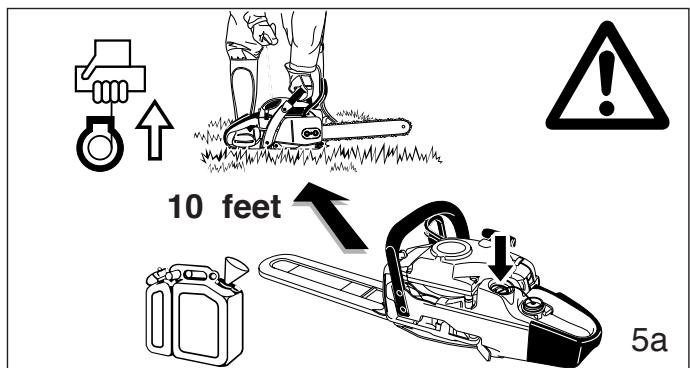
Fuel your chain saw in well ventilated areas or outdoors. Always shut off the engine and allow it to cool before refueling. Select bare ground for fueling and move the chain saw at least 10 feet (3 m) from fueling spot before starting the engine (fig. 5a).
Wipe off any spilled fuel before starting your saw and check for leakage.
Check for fuel leakage while refueling and during operation. If fuel or oil leakage is found, do not start or run the engine until leak is fixed and spilled fuel has been wiped away. Clothing with fuel on it has to be changed immediately (this is a danger to your life!).
Avoid skin contact with fuel. Never loosen or remove the cap of the fuel tank while the engine is running.
Starting
Do not drop start. This method is very dangerous because you may lose control of the saw (fig. 6).
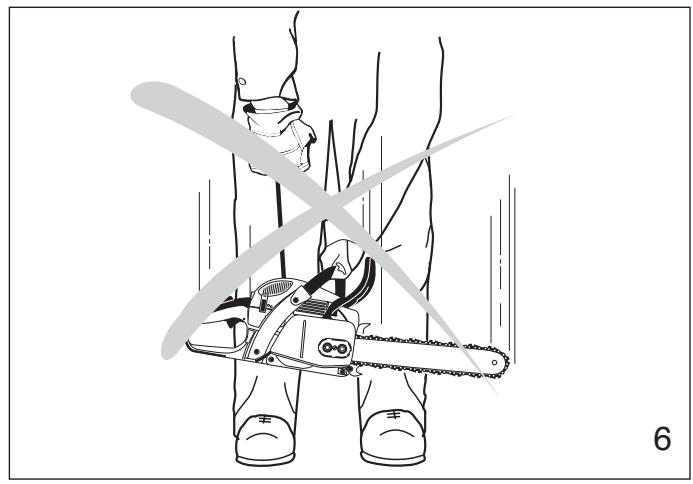
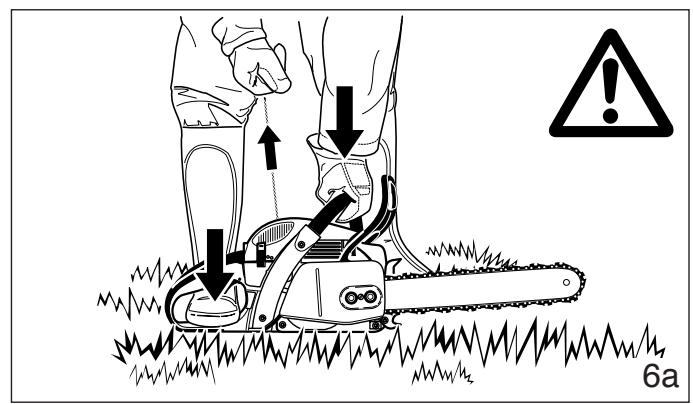
Place the chain saw on firm ground or other solid surface in an open area. Maintain a good balance and secure footing. Place your right foot through the rear handle opening and firmly grasp the front handle with your left hand (fig. 6a).
Be absolutely sure that guide bar and chain are clear of you or all other obstructions and objects, including the ground, because when the engine starts in semithrottle position, engine speed will be fast enough for the clutch to engage the sprocket and turn the chain which may cause a kickback.
Never attempt to start the saw when the guide bar is in a cut or kerf.
When you pull the starter grip, don't wrap the starter rope around your hands. Do not allow the grip to snap back, but guide the starter rope slowly back to permit the rope to rewind properly. Failure to follow this procedure may result in injury to hand or fingers and may damage the starter mechanism.
Important adjustments
WARNING!
At correct idle speed, chain should not turn. For directions to adjust idle speed, see the appropriate section of this instruction manual.
Do not use a saw with incorrect idle speed adjustment. Adjust the idle speed yourself according to the appropriate section of this manual.
Have your DOLMAR dealer check your saw and make proper adjustments or repairs.
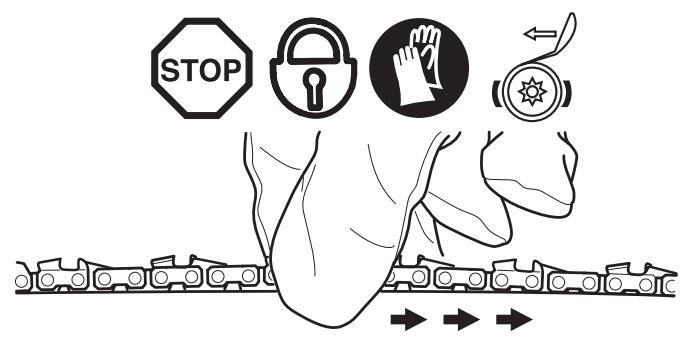
Check the saw chain tension frequently, especially just after installing a new chain. New chains may stretch more during their initial use. A properly adjusted saw chain can be pulled freely around the guide bar by hand without sagging. Always stop the engine and wear gloves when checking or adjusting the chain tension.
Working conditions
Operate your chain saw only outdoors. Operate the saw under good visibility and daylight conditions only.
WARNING!
Take extreme care in wet and freezing weather (rain, snow, ice). Put off the work when the weather is windy, stormy or rainfall is heavy. Clear the area where you are working.
WARNING!
Avoid stumbling on obstacles such as stumps, roots or rocks and watch out for holes or ditches. Be extremely cautious when working on slopes or uneven ground. There is increased danger of slipping on freshly debarked logs.
Cutting instructions
Always hold the saw firmly with both hands when the engine is running. Place your left hand on the tubular handle and your right hand on grip and throttle lever. Left-handers should follow these instructions too.
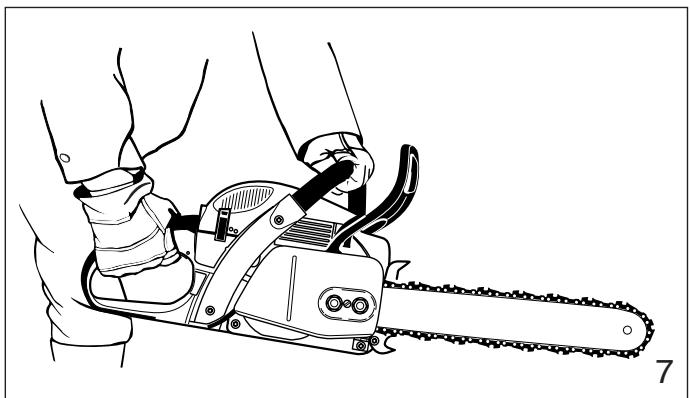
Wrap your fingers tightly around the handles, keeping the handles cradled between your thumb and forefinger (fig. 7). With your hands in this position, you can best oppose and absorb the push, pull and kickback forces of your saw without having it slip out of your grip (see section of reactive forces). Make sure your chain saw handle and grip are in good condition and free of moisture, pitch, oil or grease.
Always start a cut with the chain running at full speed and the spike bar in contact with the wood.
WARNING!
Never use the saw with one hand. You cannot control reactive forces (see pages 10 to 12) and may lose control of the saw.
WARNING!
Do not operate your chain saw in semi-throttle position. Cutting in this position does not permit the operator proper control of the saw or chain speed.
WARNING!
Never come too close to a rotating chain with your hands or body.
WARNING!
Do not cut any material other than wood or wooden objects.
Use your chain saw for cutting only. It is not designed for prying or shoveling away limbs, roots or other objects.
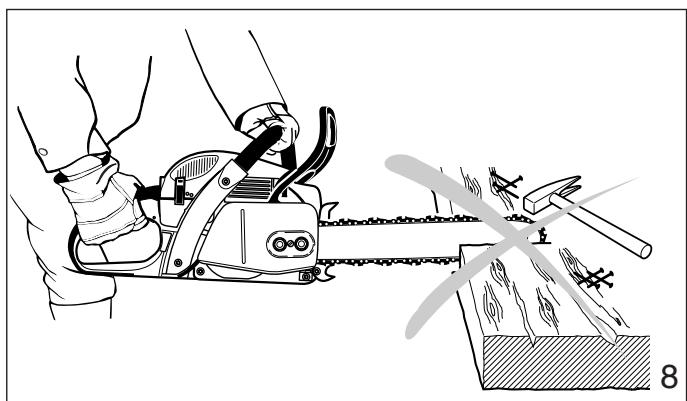
When sawing, make sure that the saw chain does not touch any foreign materials such as rocks, nails and the like (fig. 8). Such objects may be flung off, damage the saw chain or cause the saw to kickback.
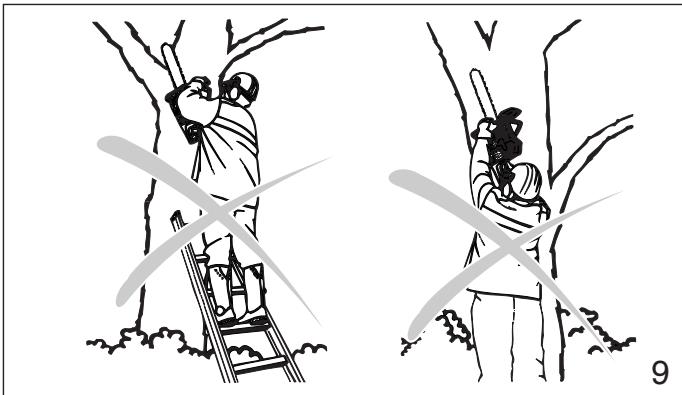
In order to keep control of your saw, always maintain a firm foothold. Never work on a ladder, in a tree or on any other insecure support. Never use the saw above shoulder height (fig. 9).
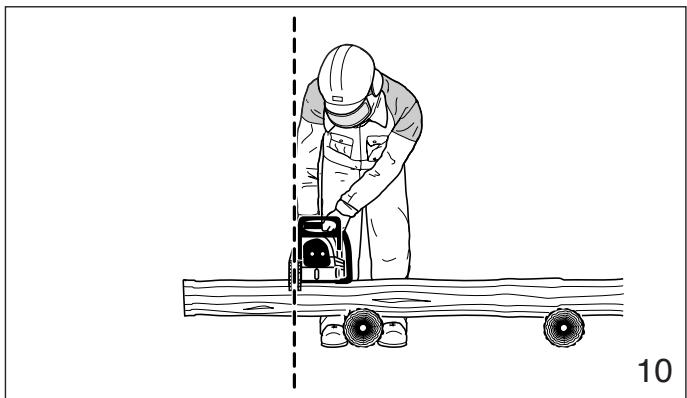
Position the chain saw in such a way that your body is clear of the cutting attachment whenever the engine is running (fig. 10).
Don't put pressure on the saw when reaching the end of a cut. The pressure may cause the bar and rotating chain to pop out of the cut or kerf, go out of control and strike the operator or some other object. If the rotating chain strikes some other object a reactive force (see pages 11 to 13) may cause the chain to strike the operator.
Reactive forces during the cut, including kickback
WARNING!
Reactive forces, that may occur during any cut are kickback, pushback and pull-in. Reactive forces can be dangerous! In any chain saw, the powerful force used to cut wood can be reversed (and work against the operator).
If the rotating chain is suddenly stopped by contact with any solid object like a log or branch or is pinched, the reactive forces instantly occur. These reactive forces may result in loss of control which may, in turn, cause serious or fatal injury. An understanding of the causes of these reactive forces may help you avoid loss of control.
The most common reactive forces are
- kickback,
- pushback,
- pull-in.
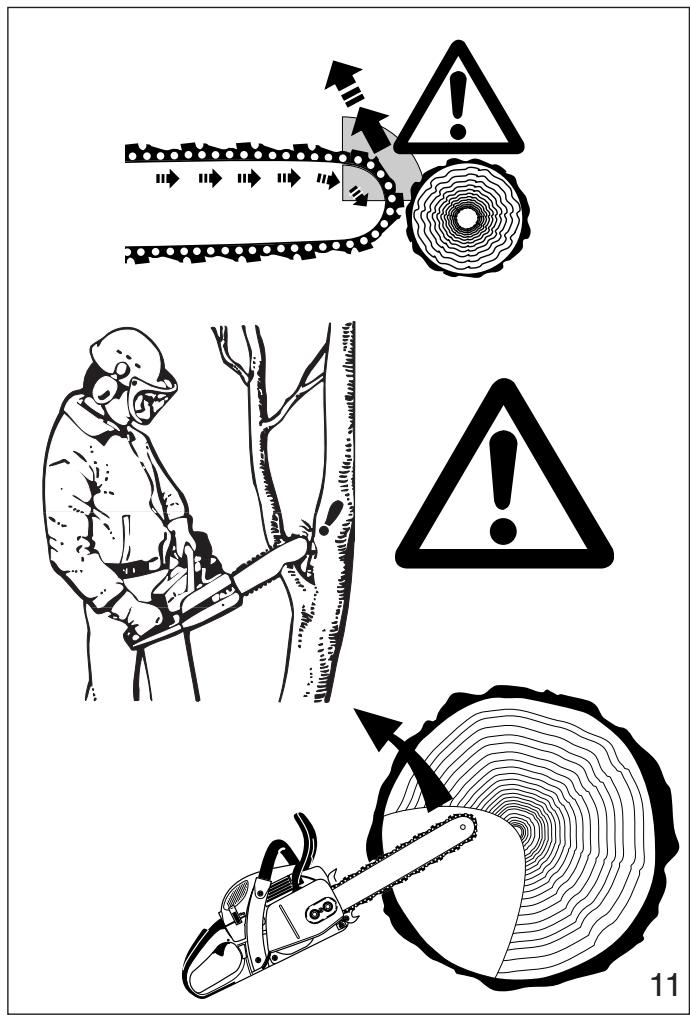
Kickback:
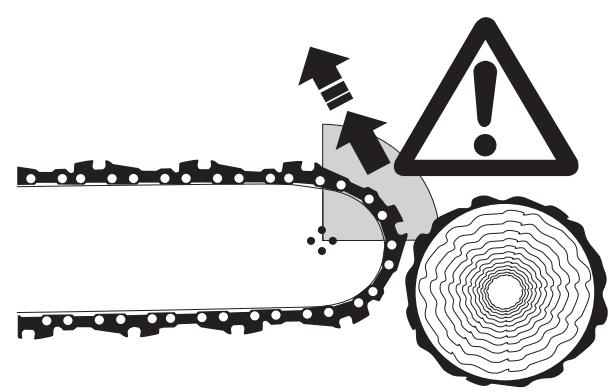
Kickback occurs when the upper quadrant of the bar nose contacts a solid object in the wood or is pinched (fig. 11). The reaction of the cutting force of the chain causes a rotational force of the chain saw in the direction opposite to the chain movement, mainly in the plane of the bar. This may fling the bar in an uncontrolled arc towards the operator.
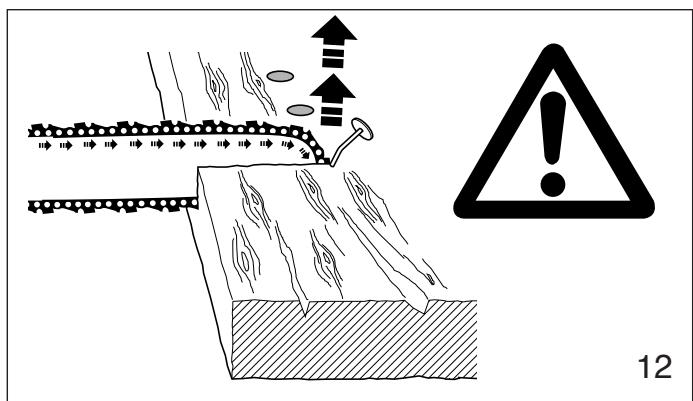
This reaction can occur in a fraction of a second and under some circumstances, cause the guide bar and chain to strike the operator with enough force to cause severe or fatal injury. It may also occur during limbing. It also occurs when the nose of the guide bar is pinched unexpectedly, unintentionally contacts solid material in the wood (fig.12) or is incorrectly used to begin a plunge or boring cut.
The greater the force of the kickback reaction, the more difficult it becomes for the operator to control the saw.
Many factors influence the occurrence and force of the kickback reaction. The type of bar and saw chain you use is a factor in the force of the kickback reaction.
Kickback force increase with the rate of impact.
Kickback is most pronounced in the upper quadrant of the bar nose.
DOLMAR chain types are designed to reduce kickback forces.
The depth gauges:
Improper lowering of the depth gauges also increases the risk of a kickback.
Saw chain cutter sharpness:
WARNING!
A dull improperly sharpened chain may increase the risk of kickback. Always cut with a properly sharpened chain.
Devices for reducing the risk of kickback injury
DOLMAR have developed a special chain brake to reduce the risk of kickbacks.
This chain brake increases the safety factor on the job, e.g. when the saw suddenly bucks upwards the chain stops rotating within a fraction of a second. A deflection guard on the disengaging lever of the chain brake and a scoop rear handle ensure that the operator's hands are fully protected at all times.
Kickback tendency increases as the radius or size of the guide bar nose increases. DOLMAR have developed guide bars with small nose radius, to reduce the kickback tendency.
WARNING!
No chain brake prevents kickback.
These brakes are designed only to stop the chain, if activated.
To ensure a proper operation of the chain brake, it must be properly maintained. Furthermore, there must be a sufficient distance between the operator and the bar to ensure that the chain brake has sufficient time to activate and stop the chain before potential contact with the operator.
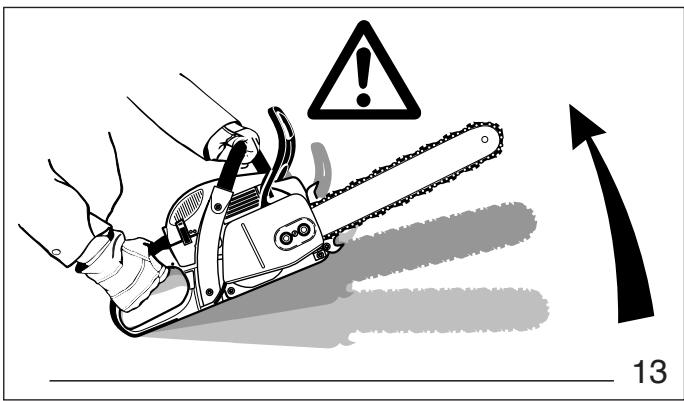
To avoid kickback
The best protection from personal-injury that may result from kickback is to avoid kickback situations:
- Hold the chain saw firmly with both hands and maintain a secure grip.
- Be aware of the location of the guide bar nose at all times.
- Never bring the nose of the guide bar in contact with any object. Do not cut limbs with the nose of the guide bar. Be especially careful with small, tough limbs, small size brush and saplings which may easily catch the chain.
- Don't overreach.
- Don't cut above shoulder height.
- Begin cutting and continue at full throttle.
- Cut only one log at a time.
- Use extreme caution when re-entering a previous cut.
- Do not attempt plunge cuts (see page 14) if you are not experienced with these cutting techniques.
- Be alert for shifting of the log or other forces that may cause the cut to close and pinch the chain.
- Maintain saw chain properly. Cut with a correctly sharpened, properly tensioned chain at all times.
- Stand to the side of the cutting path of the chain saw.
Pushback:
Pushback occurs when the chain on the top of the bar is suddenly stopped when it is pinched, caught or encounters a foreign object in the wood. The reaction of the chain drives the saw straight back toward the operator causing loss of saw control. Pushback frequently occurs when the top of the bar is used for cutting (fig. 14).
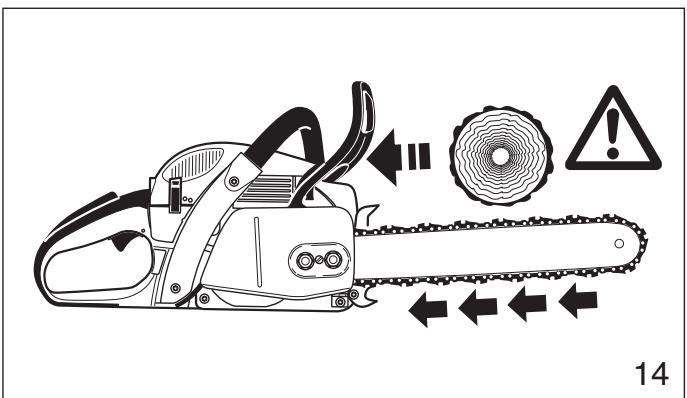
To avoid pushback
- Be alert to forces or situations that may cause material to pinch the top of the chain.
- Do not cut more than one log at a time.
- Do not twist the saw when withdrawing the bar from a plunge cut or under buck cut (figures 25 to 27 and 33, pages 14 and 16), because the chain can pinch.
Pull-in:
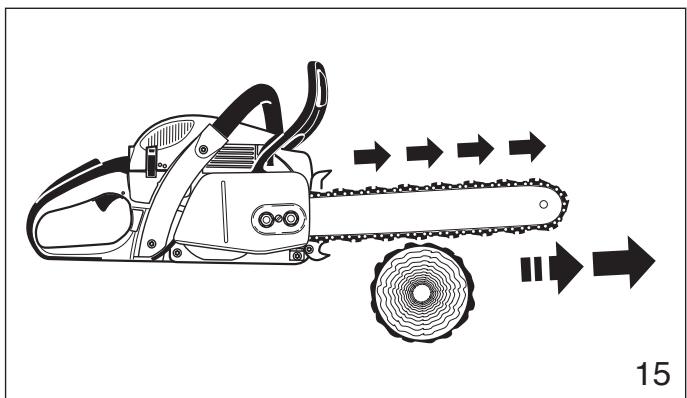
Pull-in occurs when the chain on the bottom of the bar is suddenly stopped. The chain on the bottom of the bar stops when it is pinched, caught or encounters a foreign object in the wood (see fig. 15). The reaction of the chain pulls the saw forward, causing the operator to lose control.
Pull-in frequently occurs when the spike bar of the saw is not held securely against the tree or limb and when the chain is not rotating at full speed before it contacts the wood.
WARNING!
Use extreme caution when cutting small size brush and saplings which may easily catch the chain and pull you off balance.
To avoid pull-in
- Always start a cut with the chain rotating at full speed and the spike bar in contact with the wood.
- Pull-in may also be prevented by using plastic wedges to open the kerf or cut.
Cutting techniques
Felling
Felling is cutting down a tree.
Before felling a tree, consider carefully all conditions which may affect the direction of fall, including:
The intended direction of the fall.
The neutral lean of the tree.
Any unusually heavy limb structure.
Surrounding trees and obstacles.
The wind direction and speed.
WARNING!
Always observe the general condition of the tree. Look for decay and rot in the trunk. If it is rotted inside, it could snap and fall toward the operator while being cut.
Also look for broken or dead branches which could vibrate loose and fall on the operator. When felling on a slope, the operator should stand on the up-hill side.
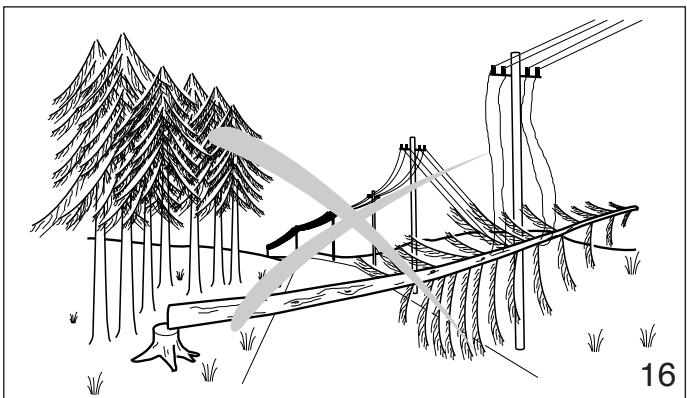
When felling in the vicinity of roads, railways and power lines, etc., take extra precautions (see fig. 16). Inform the police, utility company or railway authority before beginning to cut.
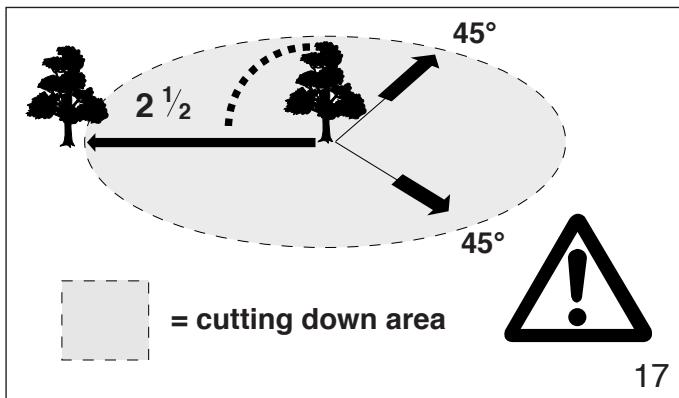
When felling, maintain a distance of at least 2 1/2 tree lengths from the nearest person (see fig. 17).
Note:
The noise of your engine may drown any warning call.
Felling instructions:
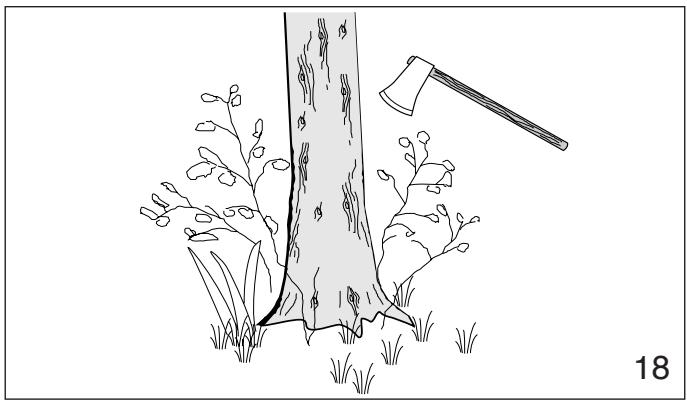
First clear the tree base and work area from interfering limbs and brush and clean its lower portion an axe (see fig. 18).
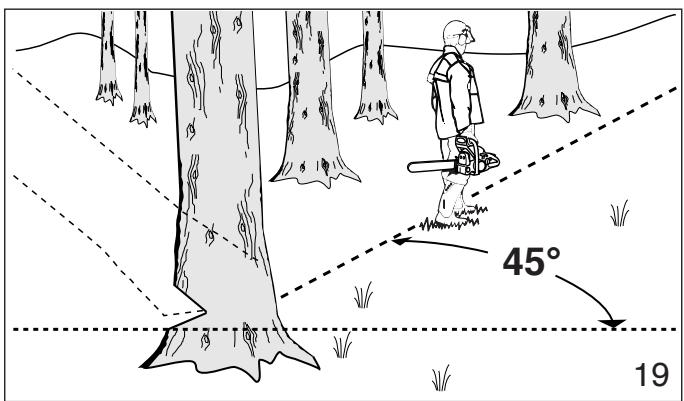
Then, establish a path of escape and remove all obstacles. This path should be opposite to the planned direction of the fall of the tree and at a 45° angle (fig. 19). An alternate path must also be selected. Place all tools and equipment a safe distance away from the tree, but not on the escape path.
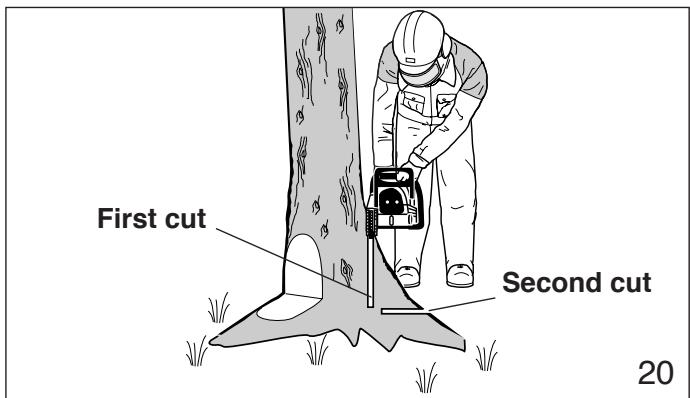
If the tree has large buttress roots, cut into the largest buttresses vertically first (horizontally next) and remove (fig. 20).
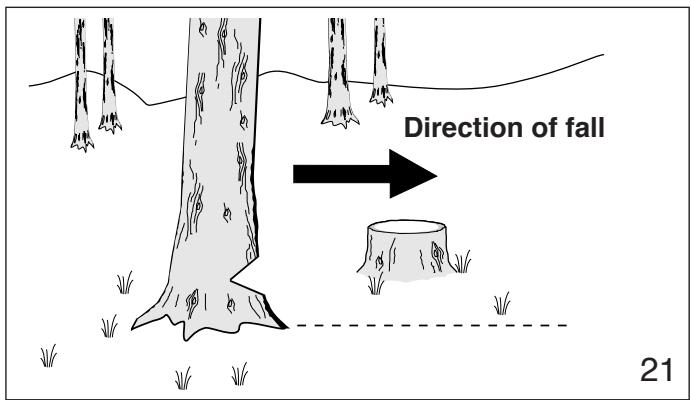
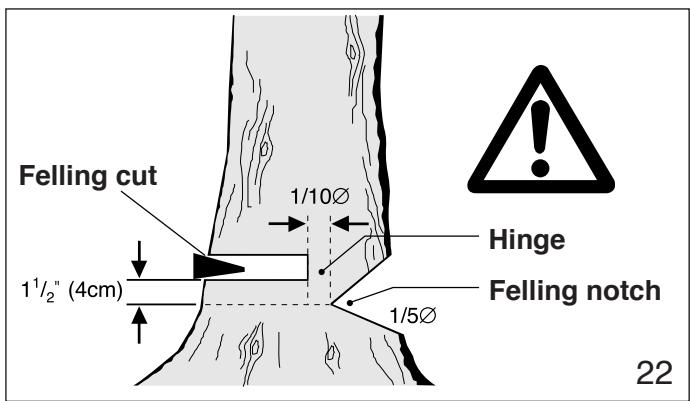
Then, determine the placement of the felling notch (fig. 21). The felling notch when properly placed determines the direction in which the tree will fall. It is made perpendicular to the line of fall and should be as close to the ground as possible. Cut the felling notch to a depth of about one-fifth to one-fourth of the trunk diameter (fig. 22). It should be in no case higher than it is deep. Make the felling notch very carefully.
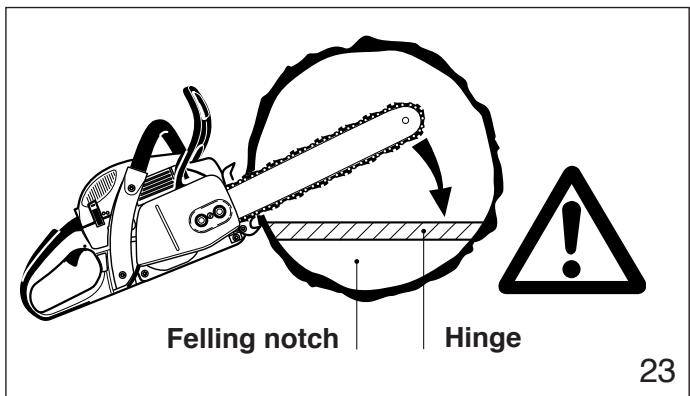
Begin the felling cut slightly higher than the felling notch and on the opposite side of the tree (fig. 22). Then cut horizontally through towards the felling notch. Apply the chain saw with its spikes directly behind the uncut portion of wood and cut toward the notch (fig. 23). Leave approximately 1/10 of the tree diameter uncut! This is the hinge (fig. 23). Do not cut through the hinge because you could lose control of the direction of the fall. Drive wedges into the felling cut where necessary to control the direction of the fall. Wedges should be of wood, light alloy or plastic - never of steel, which can cause kickback and damage to the chain.
Always keep to the side of the falling tree. When the tree starts to fall, shut off the engine, withdraw the bar and walk away on the pre-planned escape path. Watch out for falling limbs.
WARNING!
Be extremely careful with partially fallen trees which are poorly supported.
When the tree hangs or for some other reason does not fall completely, set the saw aside and pull the tree down with a cable winch, block and tackle or tractor. If you try to cut it down with your saw, you may be injured.
Sectioning Method
WARNING!
Felling a tree that has a diameter greater than the length of the guide bar requires use of either the sectioning or plunge-cut method. These methods are extremely dangerous because they involve the use of the nose of the guide bar and can result in kickback. Only properly trained professionals should attempt these techniques.
24
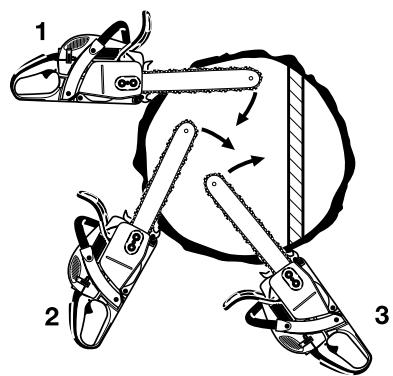
For the sectioning method (fig. 24) make the first cut with the guide bar fanning in toward the hinge. Then, using the bumper spike as a pivot, reposition the saw for the next cut. Avoid repositioning the saw more than necessary. When repositioning for the next cut, keep the guide bar fully engaged in the kerf to keep the felling cut straight. If the saw begins to pinch, insert a wedge to open the cut. On the last cut, do not cut the hinge.
Plunge-Cut Method
Timber having a diameter more than twice the length of the guide bar requaires the use of the plunge-cut method before making the felling cut.
First, cut a large, wide notch. Make a plunge cut in the center of the notch.
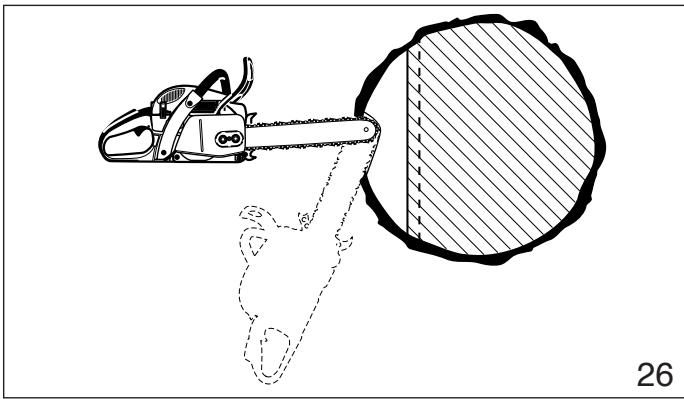
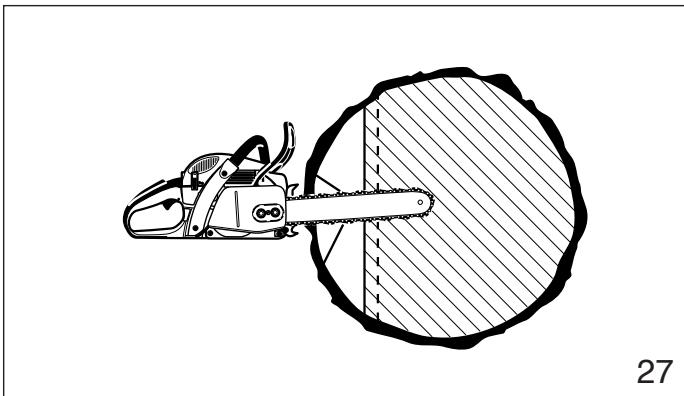
The plunge cut is made with the guide bar nose. Begin the plunge cut by applying the lower portion of the guide bar nose to the tree at an angle (fig. 25). Cut until depth of the kerf is about the same as the width of the guide bar (fig. 26). Next, align the saw in the direction
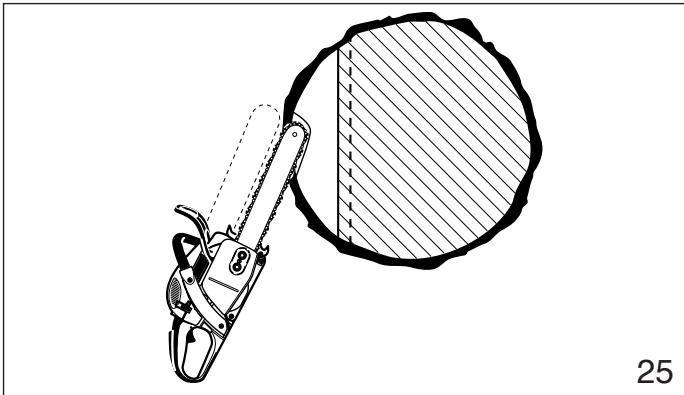
in which the recess is to be cut. With the saw at full throttle, insert the guide bar in the trunk (fig. 27).
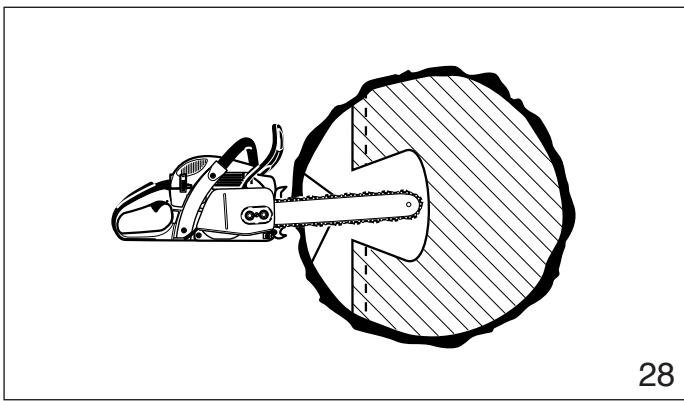
Enlarge the plunge cut as shown in illustration (fig. 28)
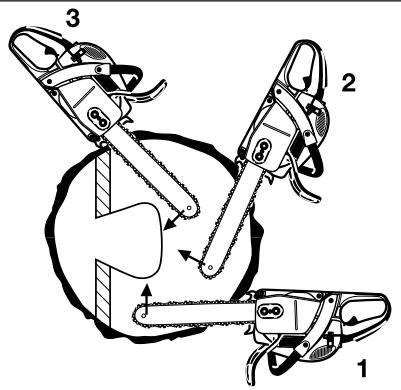
29
WARNING!
There is an extreme danger of kickback at this point. Extra caution must be taken to maintain control of the saw. To make the felling cut, follow the sectioning method described previously (fig. 29). If you are inexperienced with a chain saw plunge-cutting should not be attempted. Seek the help of a professional.
Limbing
Limbing is removing the branches from a fallen tree.
WARNING!
There is an extreme danger of kickback during the limbing operation. Do not work with the nose of the bar. Be extremely cautious and avoid contacting the log or other limbs with the nose of the guide bar. Do not stand on a log while limbing it - you may slip or the log may roll.
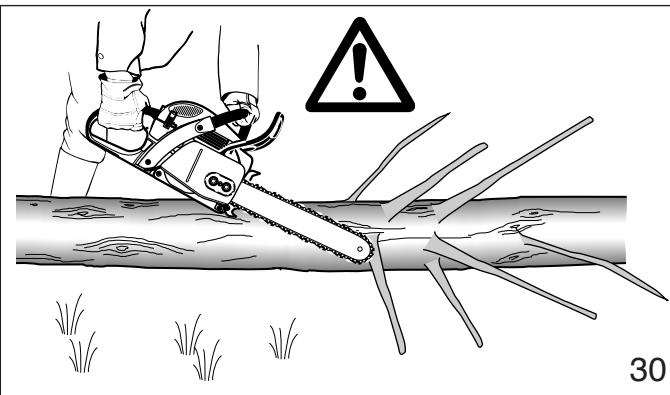
30
Start limbing by leaving the lower limbs to support the log off the ground (fig. 30). Always cut from the top of the limb. Do not underbuck freely hanging limbs. A pinch may result or the limb may fall, causing loss of control. If a pinch occurs, stop the engine and remove the saw, by lifting the limb.
WARNING!
Be extremely cautious when cutting limbs under tension. The limbs could spring back toward the operator and cause loss of control of the saw or injury to the operator.
Bucking
Bucking is cutting a log into sections.
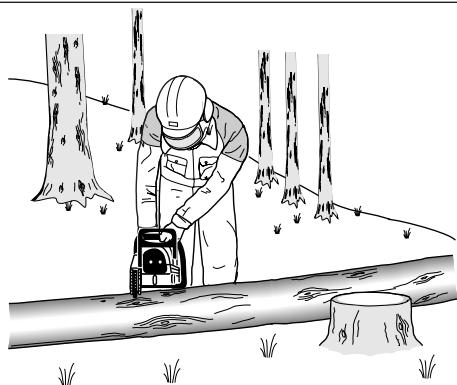
31
WARNING!
- When bucking, do not stand on the log. Make sure the log will not roll down-hill. If on a slope, stand on the up-hill side of the log (see fig. 31). Watch out for rolling logs.
WARNING!
- Cut only one log at a time.
WARNING!
- Shattered wood should be cut very carefully. Sharp slivers of wood may be caught and flung in the direction of the operator of the saw.
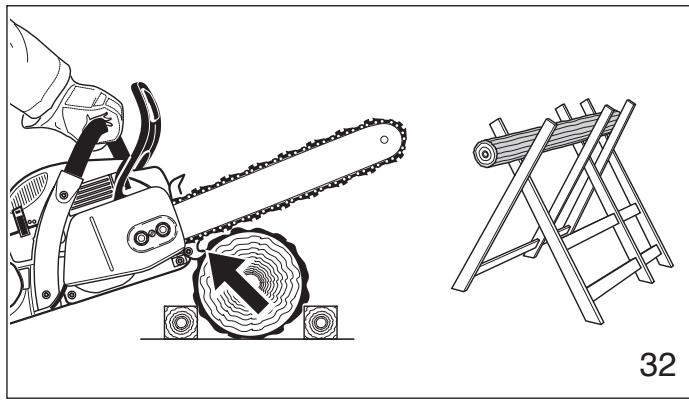
WARNING!
- When cutting small logs, use a sawhorse (fig. 32). Never permit another person to hold the log. Never hold the log with your leg or foot.
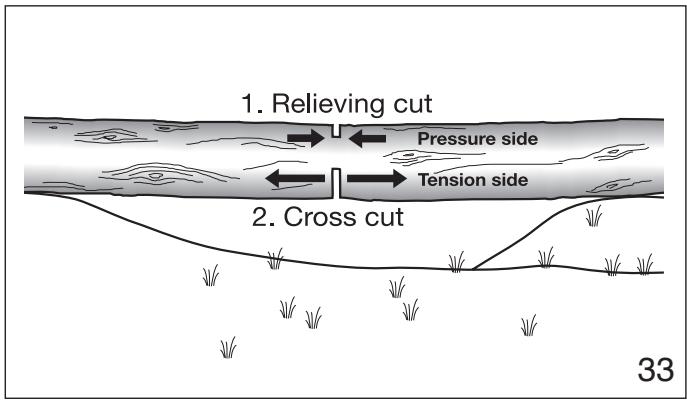
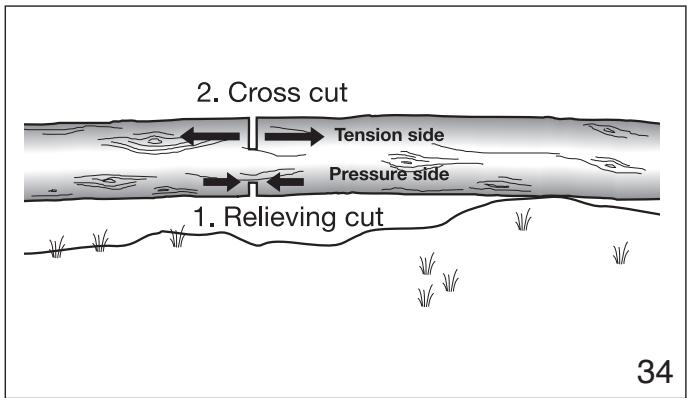
WARNING!
- Logs under strain require special attention to prevent the saw from pinching. The first cut is made on the compression side to relieve the stress on the log (see fig. 33, 34). The bucking cut is then made as shown. If the saw pinches, stop the engine and remove it from the log.
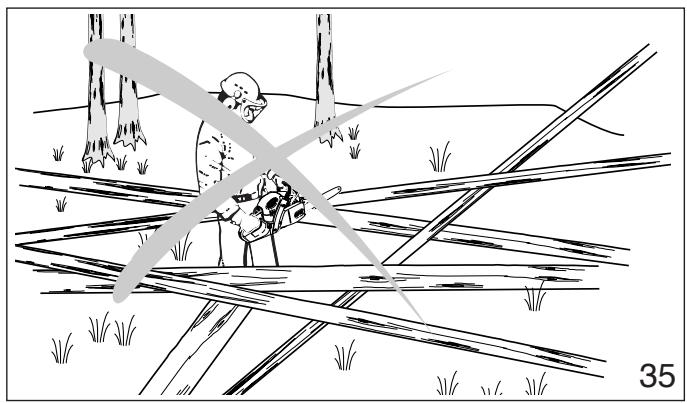
WARNING!
- Only properly trained professionals should work in an area where the logs, limbs and roots are tangled (i.e. a blowdown area, fig. 35). Working in blowdown areas is extremely hazardous.
WARNING!
- Drag the logs into a clear area before cutting. Pull out exposed and cleared logs first.
Maintenance and Repair
Never operate a chain saw that is damaged, improperly adjusted or not completely or securely assembled. Follow the maintenance and repair instructions in the appropriate section of this manual.
WARNING!
Always stop the engine and make sure that the chain is stopped before commencing any maintenance or repair work or cleaning the saw. Allow the chain saw to cool off before doing any maintenance work (burn hazard)! Chain saws with catalytic converter take longer to cool down!
Do not attempt any maintenance or repair work not described in this manual. Have such work performed by your DOLMAR service shop only.
Maintaining and storing the saw
Keep the chain, bar and sprocket clean and lubricated; replace worn sprockets or chains.
Keep the chain sharp. You can spot a dull chain when easy-to-cut wood becomes hard to cut and burn marks appear on the wood.
Keep the chain at proper tension. Tighten all nuts, bolts and screws except the carburetor adjustment screws after each use.
Keep spark plug and wire connection tight and clean.
Store saws in a high or locked place, away from children.
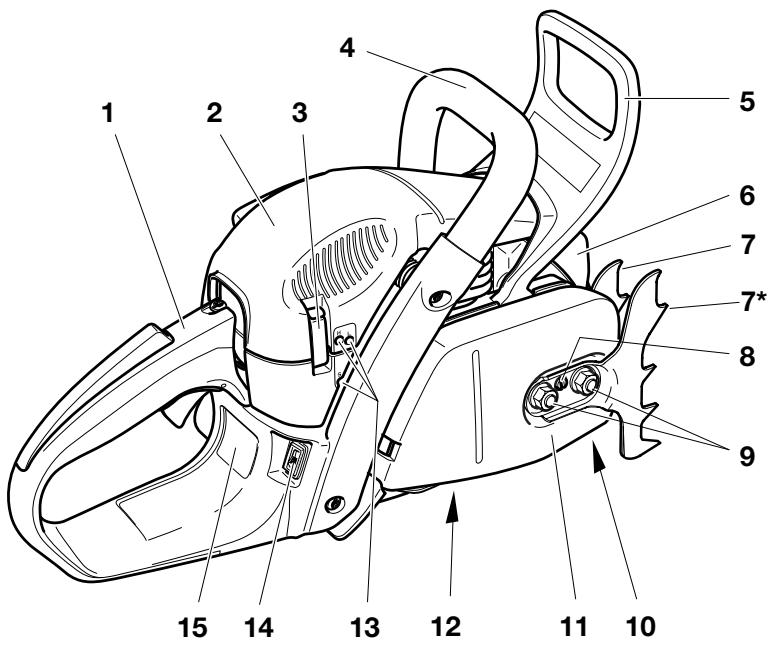
(*) Only in delivery for model PS-510, PS-5105, PS-5105 H
Identification plate
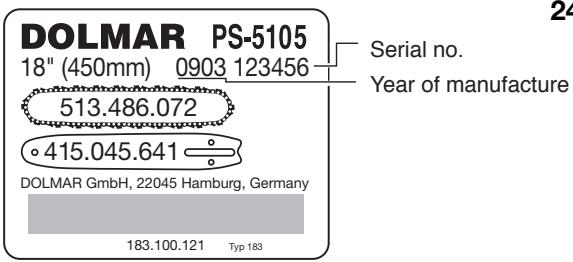
Indicate when ordering spare parts!
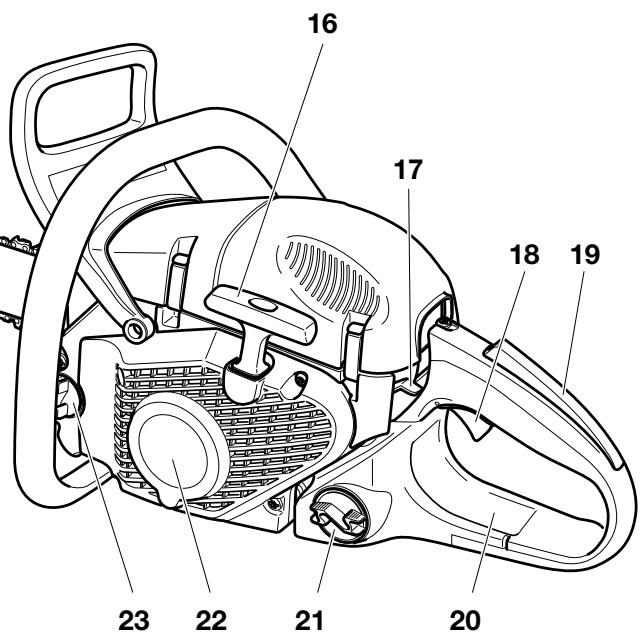
1 Handle
2 Filter cover
3 Filter hood clip
4 Tubular handle
5 Hand guard (release for chain brake)
6 Muffler with spark arrester screen
7 Spike bar (toothed stop for holding saw steady against wood)
8 Chain tensioning screw
9 Retaining nuts
10 Chain catch
11 Sprocket guard
12 Adjusting screw for oil pump (bottom side)
13 Adjusting screws for carburetor
14 Switch for grip heating (special equipment only on PS-5105 H)
15 Identification plate
16 Starter grip
17 Combination switch (Choke / Start / Stop)
18 Throttle lever
19 Safety locking button
20 Rear hand guard
21 Fuel tank cap
22 Fan housing with starting assembly
23 Oil tank cap
24 Guide bar
25 Chain (Blade)
Technical data
| Technical data | PS-460 | PS-510 | PS-5105 / H |
| Stroke volume | cu. in (cm3) | 2.8 (45.6) | 3.1 (50.0) | 3.1 (50.0) |
| Bore | inch (mm) | 1.69 (43) | 1.77 (45) | 1.77 (45) |
| Stroke | inch (mm) | 1.24 (31.4) | 1.24 (31.44) | 1.24 (31.44) |
| Max. power at speed | hp / rpm | 2.9 / 10,000 | 3.3 / 10,000 | 3.9 / 10,000 |
| Max. torque at speed | Nm / rpm | 2.7 / 7,000 | 2.9 / 7,000 | 3.1 / 7,000 |
| Max. engine speed with bar and chain | rpm | 13,500 | 13,500 | 14,500 |
| Idling speed | rpm | 2,500 | 2,500 | 2,500 |
| Coupling speed | rpm | 3,900 | 3,900 | 3,900 |
| Sound Pressure Level at the operator's ear
at full load according to ANSI B 175.1 | db(A) | 103.2 | 103.9 | 103.9 |
| Sound Pressure Level at the bystander's position
(50 ft/15 m distance) according to ANSI B 175.1 | db(A) | 76.2 | 76.2 | 76.2 |
| Carburetor | Type | diaphragm carburator with limiter caps |
| Ignition system | Type | electronic ignition system |
| Spark plug | Type | NGK BPMR 7A |
| or spark plug | Type | BOSCH WSR-6F |
| Electrode gap | inch (mm) | .020 (0.5) |
| Fuel consumption at max. load per ISO 7293 | kg/h | 1.1 | 1.2 | 1.3 |
| Specific consumption at max. load per ISO 7293 | g/kWh | 500 | 480 | 450 |
| Fuel tank capacity | floz | 15.9 |
| Chain oil tank capacity | floz | 9.1 |
| Mixture ratio (fuel/two-stroke oil) | | |
| - when using DOLMAR High Performance oil | | 50:1 |
| - when using other synthetic oils | | 50:1 (oil quality must be JASO FC or ISO EGD) |
| Chain brake | | engages manually or in case of kickback |
| Sprocket pitch | inch | .325 or 3/8 |
| Number of teeth | Z | 7 |
| Chain type | | see the Extract from the spare-parts list |
| Pitch / gauge | inch | .325 / 0.050 or 3/8 / 0.050 |
| Guide bar, length of a cut | inch | 16 / 18 |
| Guide-bar type | | see the Extract from the spare-parts list |
| Weight (fuel tank empty, without chain, guide bar and accessories) | lbs | 12.1 | 12.1 | 11.2 |
WARNING:
This chain saw is capable of severe kickback that could result in serious injury to the user. Do not operate this chain saw unless you have extraordinary cutting needs and experience and specialized training for dealing with kickback. Chain saws with significantly reduced kickback potential are available.




Before doing any work on the guide bar or chain, always switch off the engine and pull the plug cap off the spark plug (see "Replacing the spark plug"). Always wear protective gloves!
CAUTION:
Start the chain saw only after having assembled it completely and inspected.
A
B
Mounting the guide bar and saw chain
Use the universal wrench delivered with the chain saw for the following work.
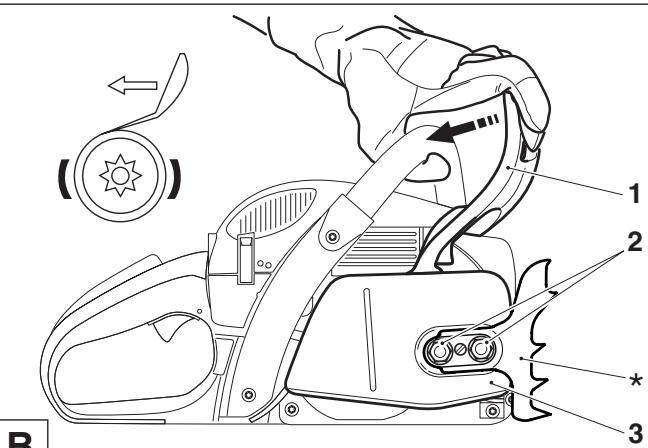
Put the chain saw on a stable surface and carry out the following steps for mounting the guide bar and saw chain:
Release the chain brake by pulling the hand guard (1) in direction of arrow.
Unscrew retaining nuts (2).
Remove the spike bar (*) . Note: Only in delivery for model PS-510, PS-5105 and PS-5105 H.
Pull off the sprocket guard (3).
C
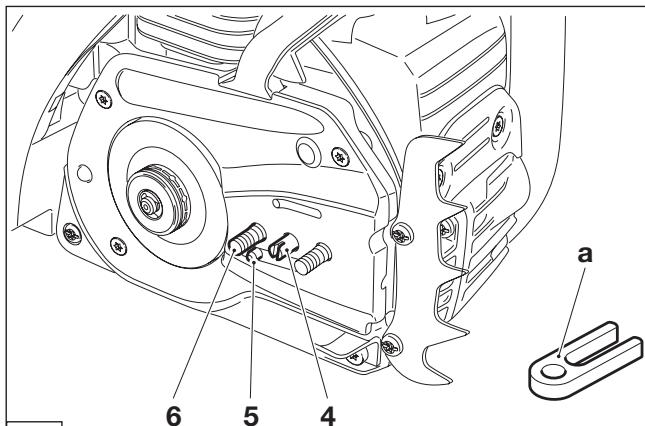
Remove the plastic transport cover (a) and dispose of properly. Turn chain tensioning screw (4) to the left (counter-clockwise) until the pin (5) of the chain tensioner is underneath the threaded pin (6).
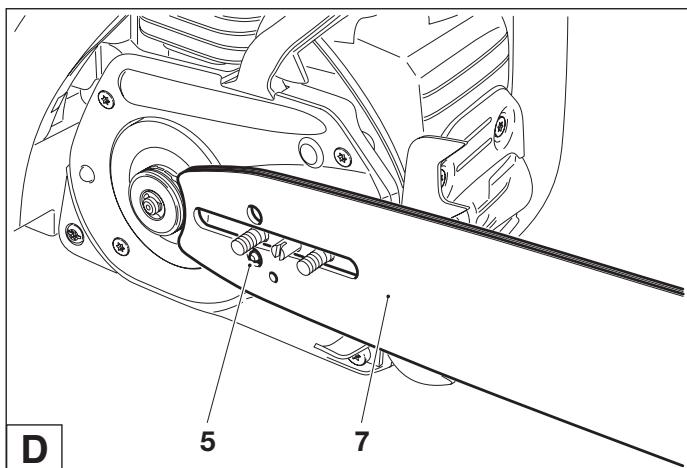
Put on the guide bar (7). Make sure that the pin (5) of the chain tensioner engages in the hole in the guide bar.
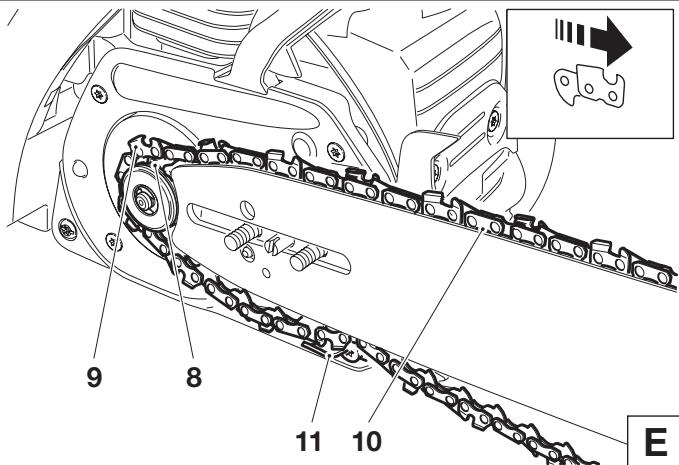
Lift the chain (9) over the sprocket (8).
CAUTION:
Do not insert the chain between the chain sprocket and the disc.
Guide the chain from above about halfway into the groove (10) on the guide bar.
Place the chain over the chain catch (11) on the bottom.
CAUTION:
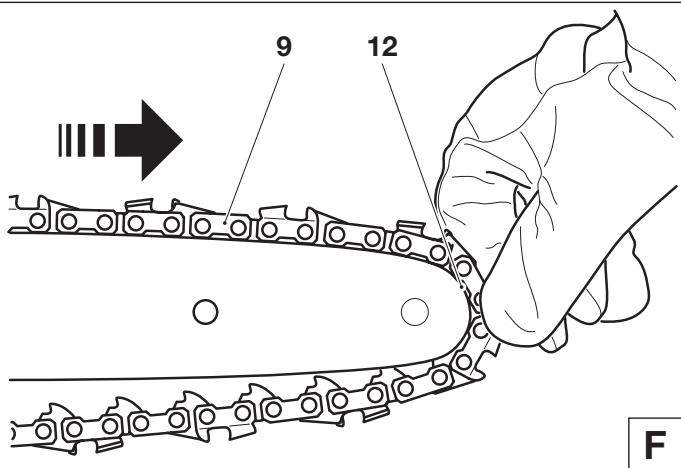
Note that the cutting edges along the top of the chain must point in the direction of the arrow!
Pull the chain (9) around the sprocket nose (12) of the guide bar in the direction of the arrow.
Replace the sprocket guard (3).
Replace the spike bar (*)
Tighten the nuts (2) only hand-tight to begin with.

Tightening the saw chain
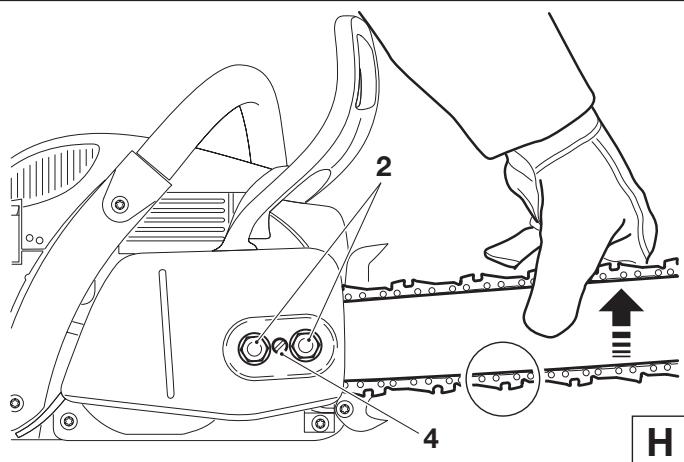
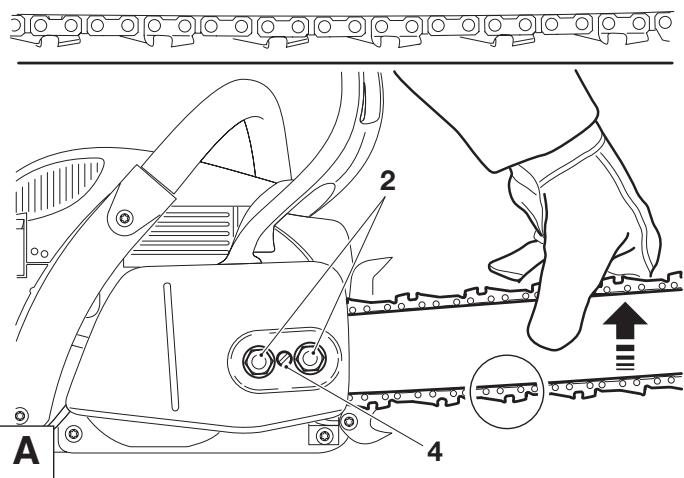
Turn the chain tensioning screw (4) to the right (clockwise) until the saw chain catches in the groove on the lower side of the guide bar (see circle).
Slightly lift the end of the guide bar and turn the chain adjusting screw (4) to the right (clockwise) until the chain rests against the bottom side of the guide bar.
While still holding up the tip of the guide bar, tighten the retaining nuts (2) with the universal wrench.
Checking the chain tension
The tension of the chain is correct if the chain rests against the bottom side of the guide bar and can still be easily turned by hand.
While doing so the chain brake must be released.
Check the chain tension frequently - new chains tend to get longer during use!
When checking the chain tension the engine must be switched off.
NOTE:
It is recommended to use 2-3 chains alternatively.
In order to guarantee uniform wear of the guide bar the bar should be turned over whenever replacing the chain.
Retightening the saw chain
Loosen the nuts (2) about one turn with the universal wrench. Raise the tip of the guide bar a little and turn the chain tensioning screw (4) to the right (clockwise) until the saw chain is again up against the bottom edge of the guide bar (see circle).
While keeping the tip of the guide bar raised, tighten the nuts (2) again with the universal wrench.
Chain brake
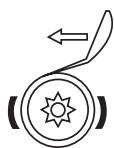
The PS-460, PS-510, PS-5105 and PS-5105 H comes with an inertia chain brake as standard equipment. If kickback occurs due to contact of the guide-bar tip with wood (see SAFETY PRECAUTIONS, page 10), the chain brake will stop the chain through inertia if the kickback is sufficiently strong.
The chain will stop within a fraction of a second.
The chain brake is installed to block the saw chain before starting it and to stop it immediately in case of an emergency.
IMPORTANT: NEVER run the saw with the chain brake activated (except for testing, see "Testing chain brake")! Doing so can very quickly cause extensive engine damage!
ALWAYS release the chain brake before starting the work!
B
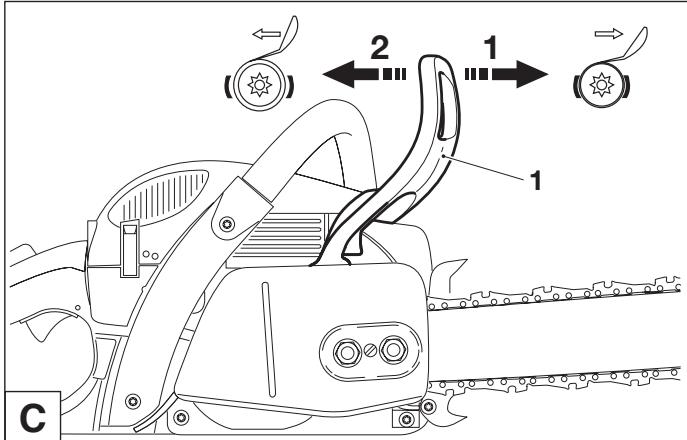
Engaging the chain brake (braking)
If the kickback is strong enough the sudden acceleration of the guide bar combined with the inertia of the hand guard (1) will automatically actuate the chain brake.
To engage the chain brake manually, simply push the hand guard (1) forward (towards the tip of the saw) with your left hand (arrow 1).
Releasing the chain brake
Pull the hand guard (1) towards you (arrow 2) until you feel it catch. The brake is now released.
Fuel
CAUTION:
This saw is powered by petroleum products (gasoline (petrol) and oil).
Be especially careful when handling gasoline (petrol).
Do not smoke. Keep tool well away from open flames, spark, or fire (explosion hazard).
Fuel mixture
This tool is powered by a high-performance air-cooled two-stroke engine. It runs on a mixture of gasoline and two-stroke engine oil.
The engine is designed for unleaded regular gasoline with a min. octane value of 87 ( + ) / 2 . In case no such fuel is available, you can use fuel with a higher octane value. This will not affect the engine.
In order to obtain an optimum engine output and to protect your health and the environment use unleaded fuel only.
To lubricate the engine, use a synthetic oil for two-stroke air-cooled engines (quality grade: JASO FC or ISO EGD), which has to be added to the fuel. The engine has been designed for use of DOLMAR High Performance two-stroke engine oil and a mixture ratio of ONLY 50:1 to protect the environment. In addition, a long service life and reliable operation with a minimum emission of exhaust gases are ensured. DOLMAR High Performance two-stroke engine oil is available in the following sizes:
2.6 oz order number 986 100 100
6.4 oz order number 986 100 101
In case DOLMAR High Performance two-stroke engine oil is not available, it is recommended to use a mixture ratio of 50:1 with other synthetic two-stroke engine oils, as otherwise optimum operation of the engine cannot be guaranteed.
The correct mixture ratio:
50:1 when using DOLMAR High Performance two-stroke engine oil, i. e. mix 50 parts gasoline with 1 part oil.
50:1 when using other synthetic two-stroke engine oils (quality grade JASO FC or ISO EGD), i. e. mix 50 parts gasoline with 1 part oil.
NOTE:
For preparing the fuel-oil mixture first mix the entire oil quantity with half of the fuel required, then add the remaining fuel. Thoroughly shake the mixture before filling it into the chain saw tank.
It is not wise to add more engine oil than specified to ensure safe operation. This will only result in a higher production of


| Gasoline | 50:1
huile DOLMAR | 50:1
autre huile |
| 1.0 Us-gal. (3.7 l)
2.5 Us-gal. (9.4 l)
5.0 Us-gal. (18.9 l) | 2.6 floz. (75 cm3)
6.4 floz. (189 cm3)
12.8 floz. (378 cm3) |
combustion residues which will pollute the environment and clog the exhaust channel in the cylinder as well as the muffler. In addition, fuel consumption will rise and performance will decrease.
The Storage of Fuel
Fuels have a limited storage life. Fuel and fuel mixtures age through evaporation, especially at high temperatures. Aged fuel and fuel mixtures can cause starting problems and damage the engine.Purchase only that amount of fuel, which will be consumed over the next few months. At high temperatures, once fuel has been mixed it should be used up in 6-8 weeks.
Use only approved and marked containers for transport and storage. Store fuel only in dry, cool and secure locations!
Mineral oil products degrease your skin. If your skin comes in contact with these substances repeatedly and for an extended period of time, it will desiccate. Various skin deseases may result. In addition, allergic reactions are known to occur.
Eyes can be irritated by contact with oil. If oil comes into your eyes, immediately wash them with clear water.
If your eyes are still irritated, see a doctor immediately!
D
Chain oil
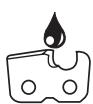
Use an oil with adhesive additive for lubricating the chain and guide bar. The adhesive additive prevents the oil from being flung off the chain too quickly.
We recommend the use of chain oil which is bio-degradable in order to protect the environment. The use of bio-degradable oil may even be required by local regulations.
The chain oil BIOTOP sold by DOLMAR is made of special vegetable oils and is 100% bio-degradable. BIOTOP has been granted the "blue angel" (Blauer Umweltschutz-Engel) for being particularly environment-friendly (RAL UZ 48).

BIOTOP chain oil is available in the following sizes:
1 order number 980 008 210
5 order number 980 008 211
20 I order number 980 008 213
Bio-degradable oil is stable only for a limited period of time. It should be used within 2 years from the date of manufacture (printed on the container).
Important note on bio-degradable chain oils
If you are not planning to use the saw again for an extended period of time, empty the oil tank and put in a small amount of regular engine oil (SAE 30), and then run the saw for a time. This is necessary to flush out all remaining bio-degradable oil from the oil tank, oil-feed system, chain and guide bar, as many such oils tend to leave sticky residues over time, which can cause damage to the oil pump or other parts.
The next time you use the saw, fill the tank with BIOTOP chain oil again. In case of damage caused by using waste oil or inappropriate chain oil the product guarantee will be null and void.
Your salesman will inform you about the use of chain oil.

A
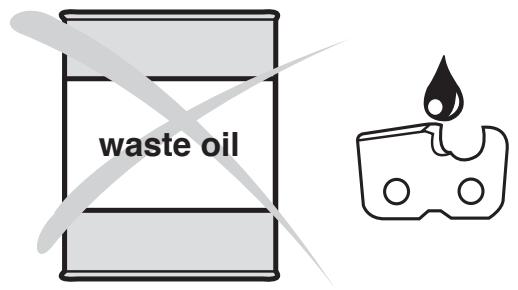
NEVER USE WASTE OIL
Waste oil is very dangerous for the environment.
Waste oil contains high amounts of carcinogenic substances.
Residues in waste oil result in a high degree of wear and tear at the oil pump and the sawing device.
In case of damage caused by using waste oil or inappropriate chain oil the product guarantee will be null and void.
Your salesman will inform you about the use of chain oil.
Mineral oil products degrease your skin. If your skin comes in contact with these substances repeatedly and for an extended period of time, it will desiccate. Various skin deseases may result. In addition, allergic reactions are known to occur.
Eyes can be irritated by contact with oil. If oil comes into your eyes, immediately wash them with clear water.
If your eyes are still irritated, see a doctor immediately!
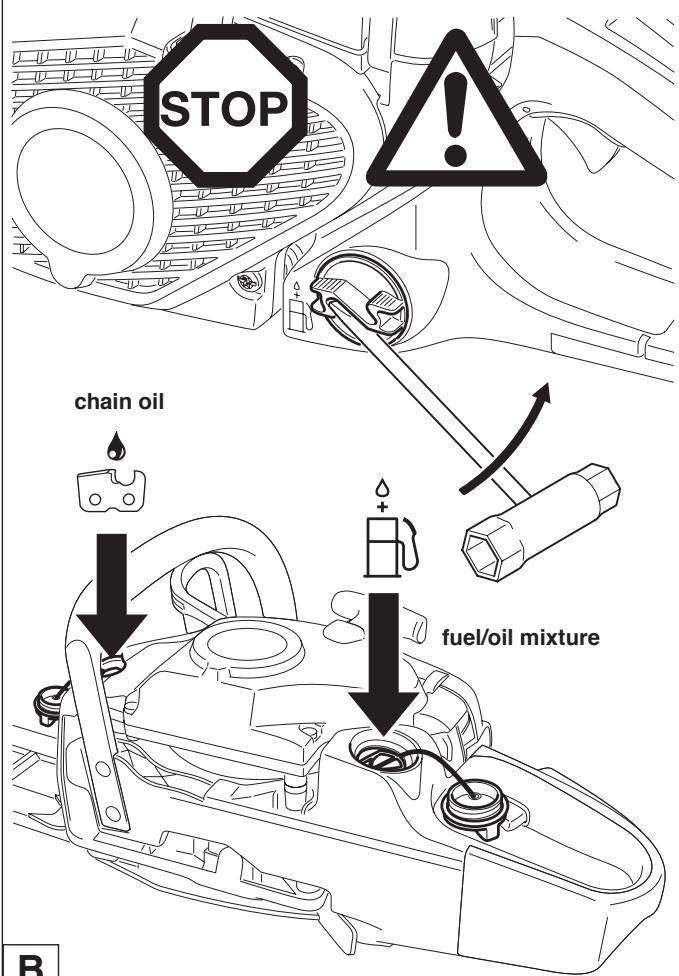
B

Refuelling

FOLLOW THE SAFETY PRECAUTIONS!
Be careful and cautious when handling fuels.
The engine must be switched off!
Thoroughly clean the area around the caps, to prevent dirt from getting into the fuel or oil tank.
Unscrew the tank cap (use the universal wrench if necessary, see illustration) and fill tank with fuel mixture or saw chain oil up to the bottom edge of the filling neck. Be careful not to spill fuel or chain oil! Be careful not to spill fuel or chain oil!
Screw on the tank cap by hand all the way.
After refuelling, clean screw cap, tank and check for leukages.
Lubricating the chain

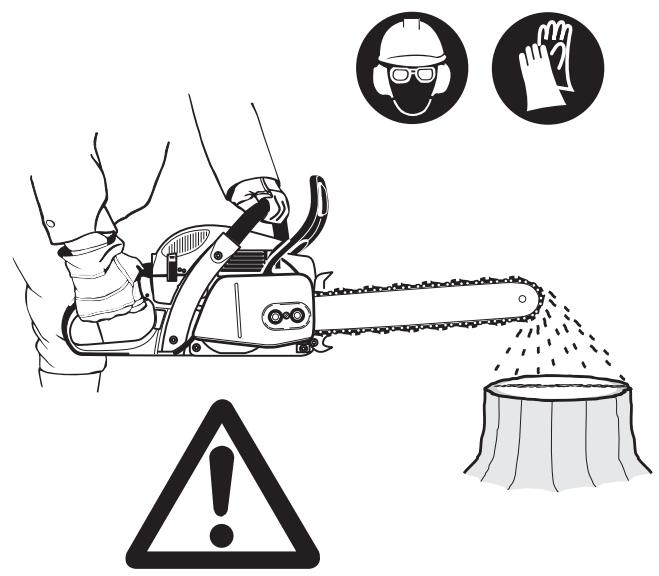
During operation there must always be sufficient chain oil in the chain-oil tank to provide good chain lubrication. One filling is sufficient for about one half-hour of continuous operation. During this procedure check whether there is enough the chain oil in the tank and refill if necessary. Do this only with the engine turned off! Screw on the tank cap by hand all the way.
Checking the chain lubrication
Never work with the chain saw without adequate sufficient chain lubrication. Otherwise the service life of the chain and guide bar will be reduced. Before starting work check the oil level in the tank and the oil feed.
Check the oil feed rate as described below:
Start the chain saw (see „Starting the engine").
Hold the running chain saw by middle engine speed approx. 6'' (15 cm) above a trunk or the ground (use an appropriate base).
If the lubrication is sufficient, you will see a light oil trace because oil will be flung off the sawing device. Pay attention to the direction the wind is blowing and avoid unnecessary exposure to the oil spray!
Note:
After the saw has been turned off it is normal for residual chain oil to drip from the oil feed system, the guide bar and the chain for a time. This does not constitute a defect!
Place the saw on a suitable surface.
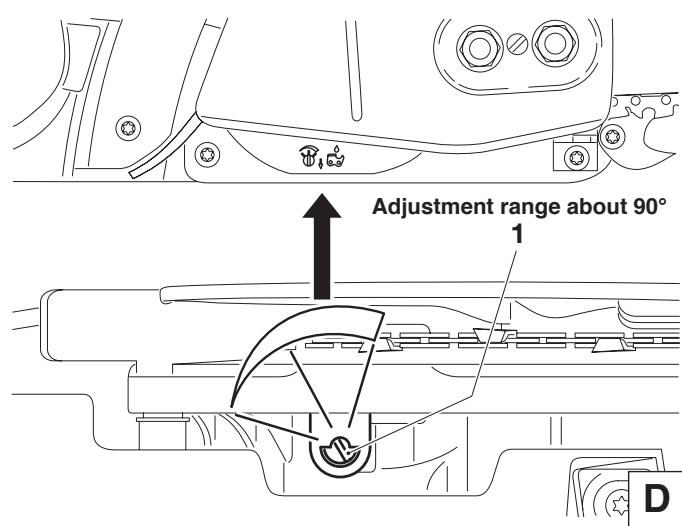
Adjusting the chain lubrication
The engine must be switched off.
You can adjust the oil pump feed rate with the adjusting screw (1). The adjusting screw is on the bottom side of the housing. The oil pump comes factory-set to a medium feed rate.
To adjust the supply rate, use a small screwdriver to turn the adjusting screw:
to the right for a faster
to the left for a slower
oil feed rate.
Pick one of the three settings depending on the length of the guide bar.
While working make sure there is enough chain oil in the tank. If necessary, add oil.

To ensure troublefree operation of the oil pump the oil guide groove at the crank case (2) and the oil inlet bore in the guide bar (3) must be cleaned regularly.
Note:
After the saw has been turned off it is normal for residual chain oil to drip from the oil feed system, the guide bar and the chain for a time. This does not constitute a defect!
Place the saw on a suitable surface.
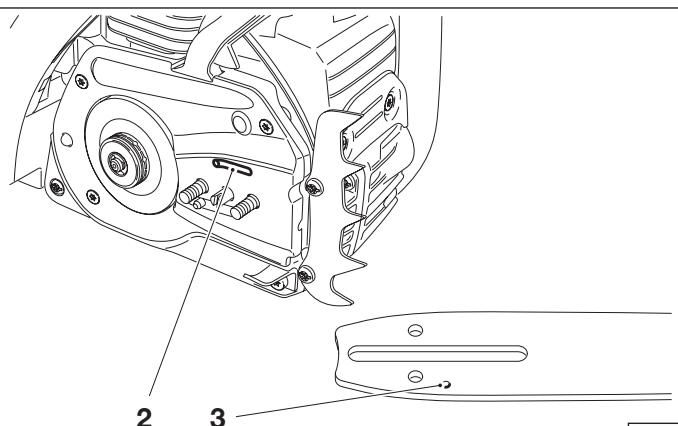
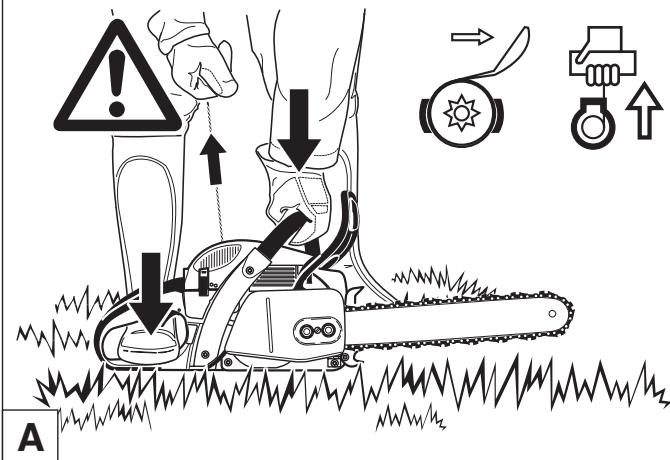
Starting the engine
Do not start the chain saw until after it is completely assembled and checked!
Move at least 10 feet (3 m) away from the place where the chain saw was fuelled.
Make sure you have a secure footing, and place the saw on the ground in such a way that the guide bar and chain are not near anything.
Actuate the chain brake (block it).
Hold the front handle firmly with one hand and press the saw against the ground.
Hold the down rear handguard with your right foot as shown.


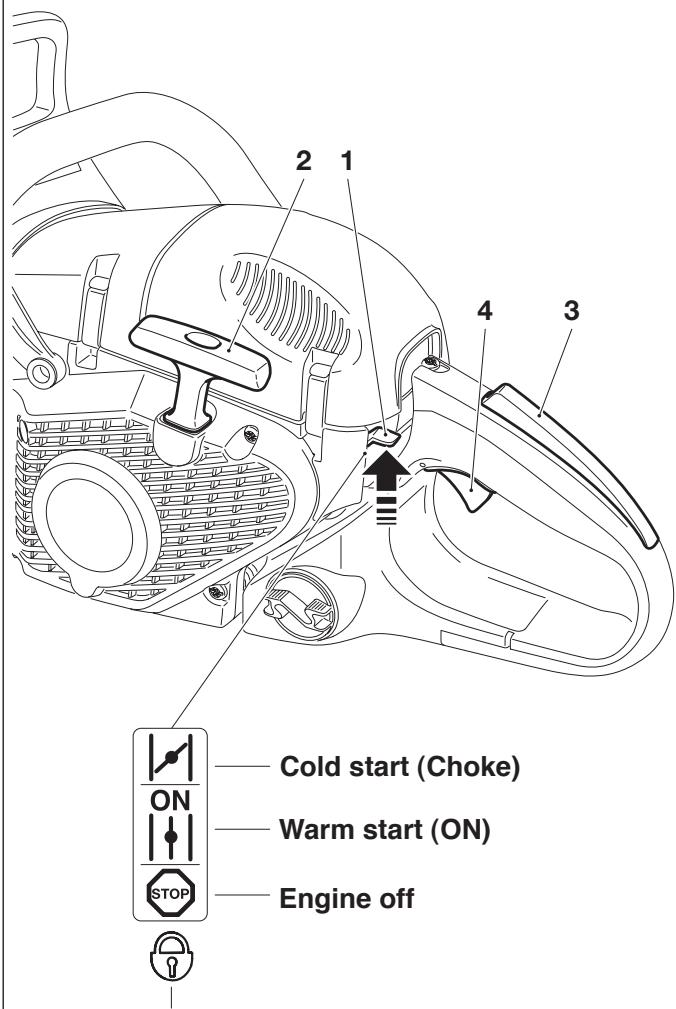
Combination switch in safety position
(ignition current cut off, necessary for all maintenance, repair, and installation work)
Cold starting:
Move the combination switch (1) up (choke position). This also actuates the half-throttle lock.
Pull the starter cable (2) out slowly until you feel resistance (the piston is now just before top dead center).
Now pull it quickly and powerfully until you hear the first audible ignition.
CAUTION: Do not pull the starter cable more than about 50 cm/20" out, and let it back in slowly by hand.
Move the combination switch (1) to the central "ON" position. Pull the starter cable again, quickly and firmly. As soon as the engine is running, grasp the rear handle (the safety lock button (3) is actuated by the palm of the hand) and press the throttle trigger (4).
The half-throttle lock will disengage and the engine will now idle.
CAUTION: The engine must be put in idle immediately after starting. If this is not done, the clutch can be damaged.
Now disengage the chain brake.
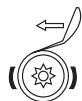
Warm starting:
As described above for cold starting, but before starting push the combination switch (1) up (Choke position) and
then right away back to the middle "ON" position. This is only to engage the half-throttle lock. If the engine doesn't start after 2 or 3 pulls, repeat the entire starting procedure as described for cold starting.
Stopping the engine
Depress the combination switch STOP (1).
NOTE: After being pressed down, the combination switch will revert to the ON position again. The engine is switched off, but can be turned on again without moving the combination switch.
IMPORTANT: To cut off the ignition current, push the combination switch all the way down past the resistance point to the safety position ( 9 ).
Checking the chain brake
The chain brake must be checked before every use of the saw!
Start the engine as described above (have a secure footing, place the chain saw on the ground so that the chain and guide bar are not near anything).
Hold the front handle firmly, with your other hand on the rear grip.
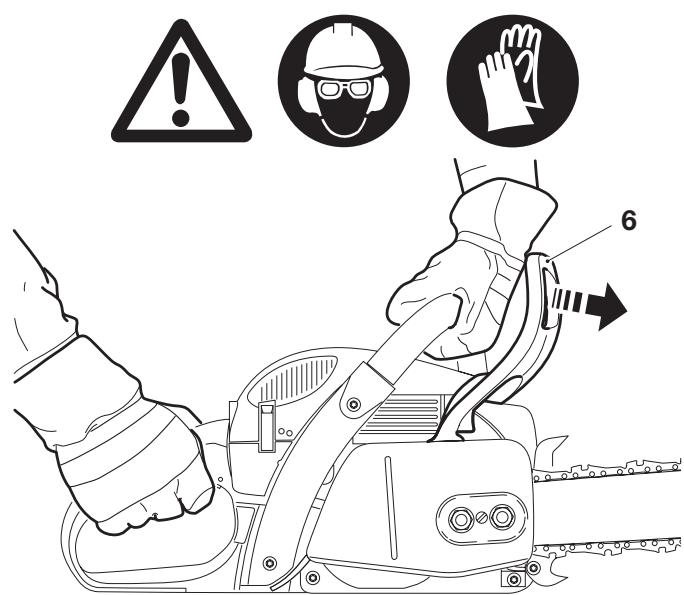
Let the engine run at medium speed and push the handguard (6) in the direction of the arrow using the back of your hand, until the chain brake engages. The chain should now stop immediately.
Bring the engine back to idle and release the chain brake.
Caution: If the chain does not stop immediately in this test, turn off the engine immediately. Do NOT use the chain saw in this condition! Contact a DOLMAR service center.
C
Working in winter
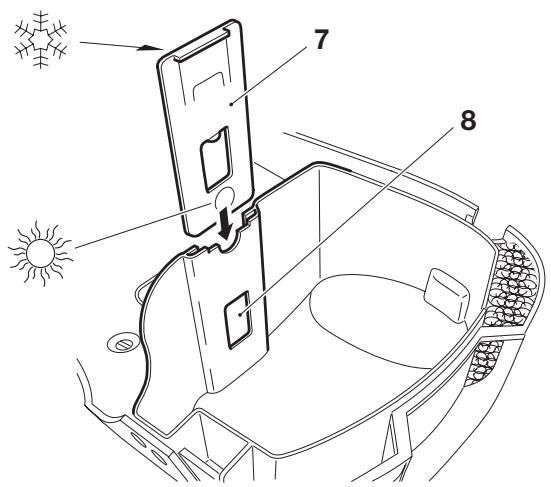
In order to prevent carburetor icing in conditions of low temperature combined with high humidity, and below +5°C (40°F) in order to get up to operating temperature faster, heated air can be taken from the cylinder.
Remove the cover (see "Cleaning the air filter").
Remove the insert (7) and insert it as shown for winter operation.
If the temperature is above +5°C ( 40°F ) the engine needs to induct cold air. If this is not done, the cylinder and piston can be damaged!
For temperatures above +5°C (40°F) turn the insert 180° so that after it is inserted the induction opening (8) is closed.
Put the cover back on.
Note: When working in snow, the insert (7) can be replaced by a special insert with nylon screen, which prevents snow from getting in. It is available as an accessory, part no. 957 173 250.


Symbol on top when inserted - Normal operation
Symbol on top when inserted - Winter operation
D
Grip heating (special equipment only for PS-5105 H)
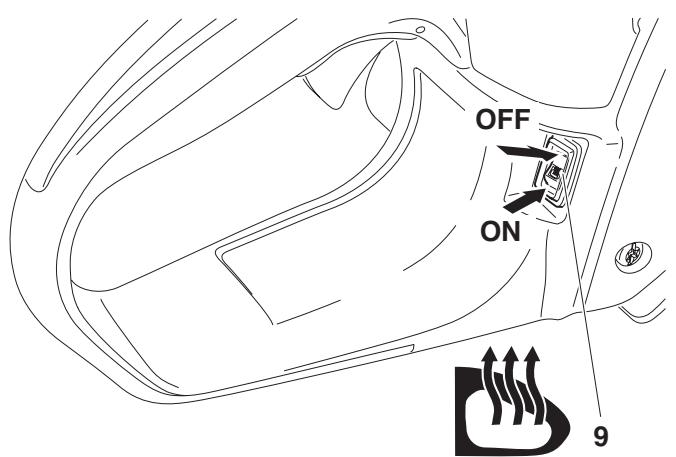
The electric grip heating is switched on and off with switch (9).
On: Move switch down
Off: Move switch up
E
Adjusting the carburetor
CAUTION:
Do not adjust the carburetor until the machine has been completely assembled and checked! Do not adjust the carburetor without a tachometer!
Carburetor adjustment is necessary for optimum engine performance, for safer and more economical operation. Adjust the carburetor only with the engine warm, a clean air filter, and properly installed cutting tool.
Carburetor adjustment may be done only by a DOLMAR service center. Improper adjustment can cause damage to the engine.
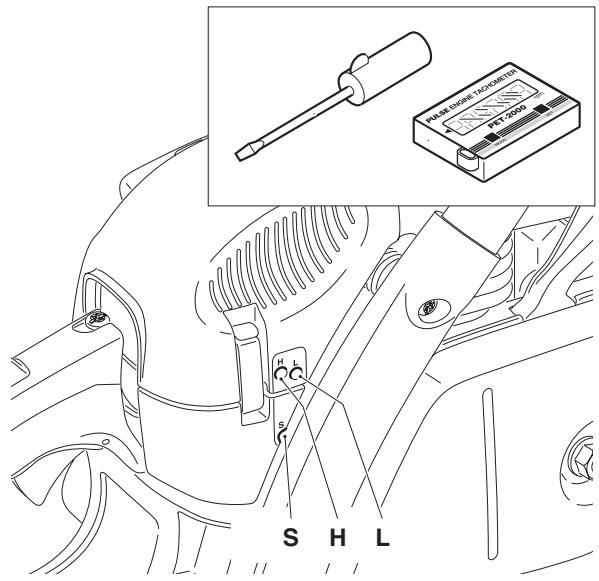
In order to comply with new emissions legislation, limits have been placed on the carburetor adjusting screws (H) and (L).
This limitation (to about 180 degrees) prevents an excessively rich mixture. This in turn ensures compliance with emissions rules as well as optimum engine performance and economical fuel consumption.
You will need a tachometer (part No. 950 233 210) for optimum adjustment. Exceeding the maximum permissible speed can lead to overheating and under-lubricating, and damage to the engine!
Factory setting of adjusting screws (H) and (L): Turned out almost all the way (counterclockwise).
Use a screwdriver (blade width 4 mm, part No. 944 340 001) to adjust the screws.
For proper adjustment, proceed as follows:
Checking adjusting screw (H)

Before starting the engine make sure that adjusting screw (H) is turned out counterclockwise until it reaches a noticeable stop. The limitations do not prevent excessively lean running!
- Start engine and let it warm up (3-5 minutes)
- Set idle
- Check acceleration
- Set maximum permissible speed
-
Check idle speed
-
Set idle

Set the idle speed per the technical specifications.
Turning the adjusting screw (S) in (clockwise) increases the idle speed. Turning it out (counter-clockwise) lowers the idle speed. The cutting tool must not rotate!
- Check acceleration

When the throttle is pressed, the engine should go smoothly from idle to high speed.
Turn adjusting screw (L) out (counterclockwise) in small increments until acceleration is good.



- Set maximum permissible speed
Set the maximum speed by minimal adjustments of the adjusting screw (H) in accordance with the technical specifications. Turning the adjusting screw (H) clockwise increases the speed. Never exceed the maximum permissible speed!
For units with electronic engine speed limitation: No tachometer is necessary to determine the maximum permissible speed, since exceeding this speed will result in clearly audible ignition misses!
- Check idle speed

Check the idle speed after setting the top speed (the cutting tool must not rotate!).
Repeat the adjustment procedure starting at Step 2, until the engine runs with the correct idle speed, good acceleration, and maximum permissible speed.
MAINTENANCE
Sharpening the saw chain
CAUTION: Before doing any work on the guide bar or chain, always switch off the engine and pull the plug cap off the spark plug (see "Replacing the spark plug"). Always wear protective gloves!
The chain needs sharpening when:
The sawdust produced when sawing damp wood looks like wood flour.
The chain penetrates the wood only under great pressure.
The cutting edge is visibly damaged.
The saw is pulled to the left or right when sawing. This is caused by uneven sharpening of the chain.
Important: Sharpen frequently, but without removing too much metal!
Generally, 2 or 3 strokes of the file will be enough.
Have the chain sharpened at a service center when you have already sharpened it yourself several times.




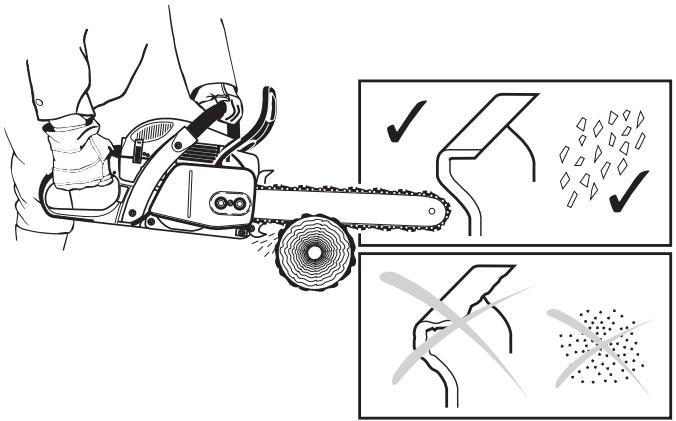
Proper sharpening:
CAUTION: Use only chains and guide bars designed for this saw (see the Extract from the spare-parts list)!
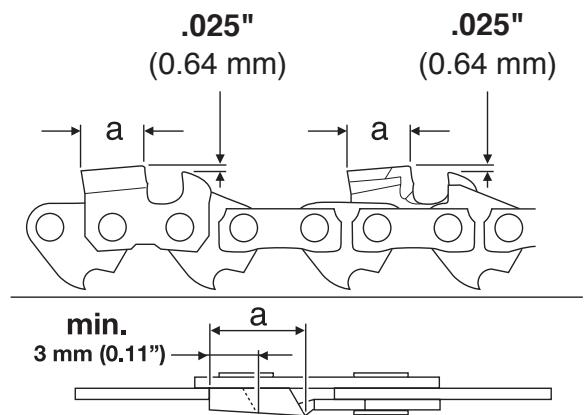
All cutters must be of the same length (dimension a). Cutters with different lengths result in rough running of the chain and can cause cracks in the chain.
The minimum cutter length: 0.11" (3 mm). Do not reshape the chain when the minimum cutter length has been reached; at this point, the chain must be replaced (see the Extract from the spare-parts list and "Replacing the saw chain").
The depth of the cut is determined by the difference in height between the depth limiter (round nose) and the cutting edge.
The best results are obtained with a depth-limiter depth of .025" (0.64 mm).
CAUTION: Excessive depth increases the risk of kickback!
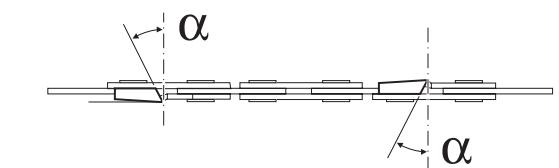
The sharpening angle (α) must be identical for all cutters!
25° for chain type 486, 496
The teeth will have the proper angle (β) automatically if the proper round file is used.
60° for chain type 486, 496
Different angles result in a roughly, irregularly running chain, increase wear and tear and cause chain beakage.
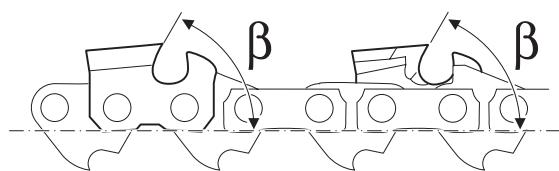

Chain typ
486
496
Files and how to work with them
Use a special saw chain round file for sharpening. Standard round files are unsuitable. For the order number, see "Accessories".
Type 486: Use 11 / 64'' (4,5 mm) dia. round saw-chain file.
Type 496: Use 7 / 32'' (5,5 mm) dia. round saw-chain file.
The file should cut only when pushed forwards (arrow). Lift the file when leading it backwards.
First sharpen the shortest cutter. The length of this cutter is then the standard for all other cutters of the chain.
New saw teeth must be filed to the exact same shape as the used teeth, including on their running surfaces.
File depending on chain type (10° to the guide bar).
D
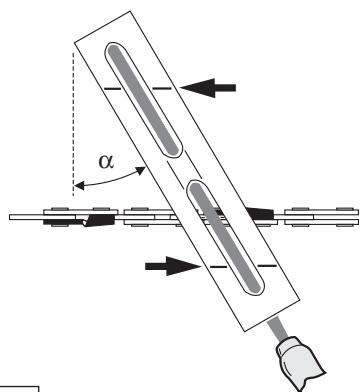
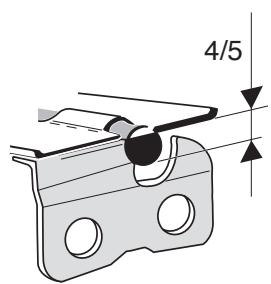
A file holder makes file guidance easier. It is marked for the correct sharpening angle of:
$$
\alpha = 2 5 ^ {\circ}
$$
(keep the marks parallel with the chain when filing, see illustration) and limits the cut depth to the correct 4/5 of the file diameter. See "Accessories" for the order number.
E
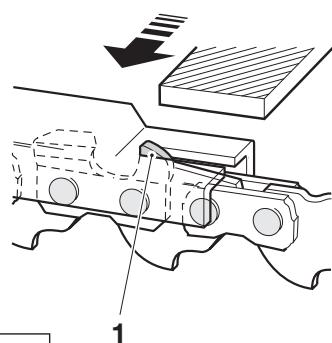
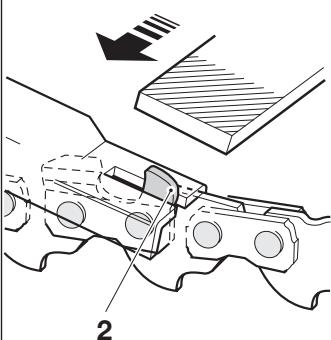
After having sharpened the chain, the height of the depth limiter must be checked by means of a chain gauge. See "Accessories" for the order number.
Correct even the smallest excess height with a special flat file (1). See "Accessories" for the order number.
Round off the front of the depth limiter (2).
F
Cleaning the brake band and sprocket interior
CAUTION: Before doing any work on the guide bar or chain, always switch off the engine and pull the plug cap off the spark plug (see "Replacing the spark plug"). Always wear protective gloves!
CAUTION: Start the chain saw only after having assembled it completely and inspected.
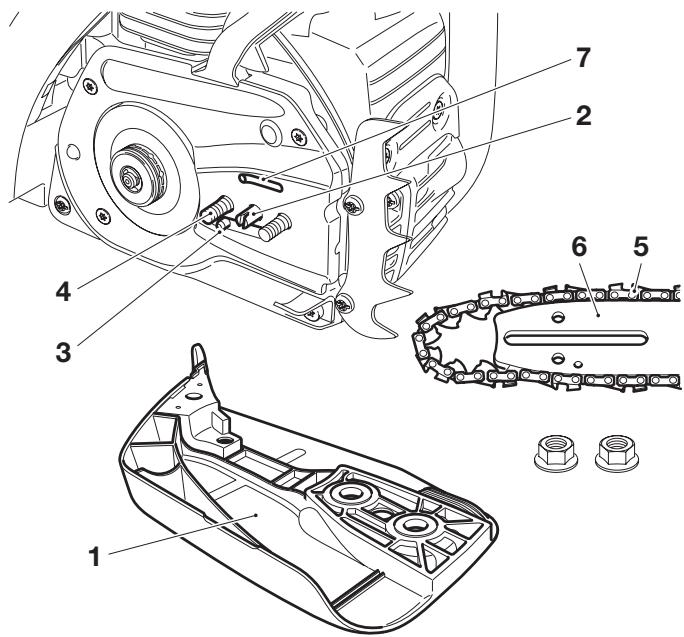
Remove the sprocket guard (1) (See "PUTTING INTO OPERATION" figs. B) and clean the interior with a brush.
Turn the chain tensioning screw (2) to the left (counter-clockwise) until pin (3) of the chain tensioner is underneath the threaded pin (4).
Remove the chain (5) and guide bar (6).
NOTE:
Make sure there are no residues or foreign matter remaining in the oil guide groove (7) or on the chain tensioner (3).
For replacing the guide bar, chain, and sprocket see "PUTTING INTO OPERATION".
NOTE:
The chain brake is a very important safety device and like any other component subject to normal wear and tear.
Regular inspection and maintenance are important for your own safety and must be done by a DOLMAR service center.





DOLMAR
SERVICE
A
Cleaning the guide bar
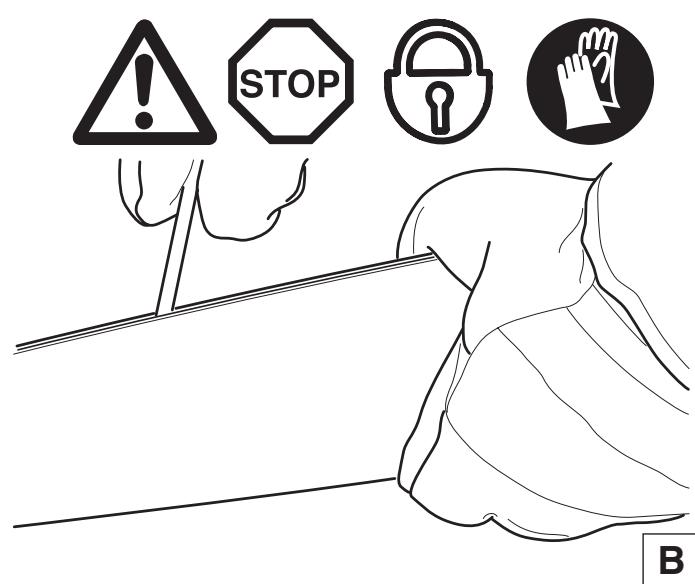
CAUTION: Protective gloves must be worn.
Regularly inspect the bearing surfaces of the guide bar for damage, and clean them with a suitable tool.
Replacing the saw chain
CAUTION: Use only chains and guide bars designed for this saw (see the Extract from the spare-parts list)!
When changing chain types, always make sure to use the right sprocket (12). It may be necessary to change the sprocket.
IMPORTANT: If the chain type is changed from .325" to 3/8", the chip deflector must be modified. See under ,Instructions for changing the chain type."




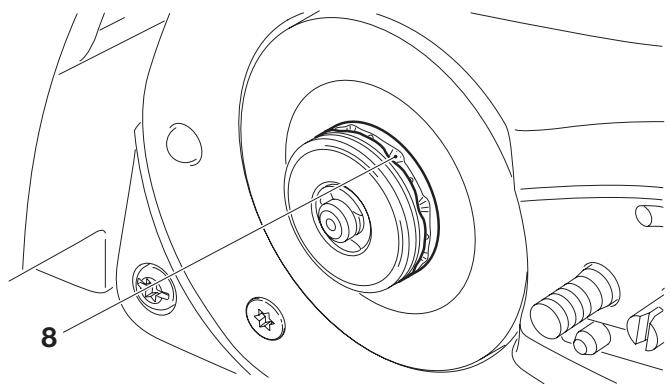
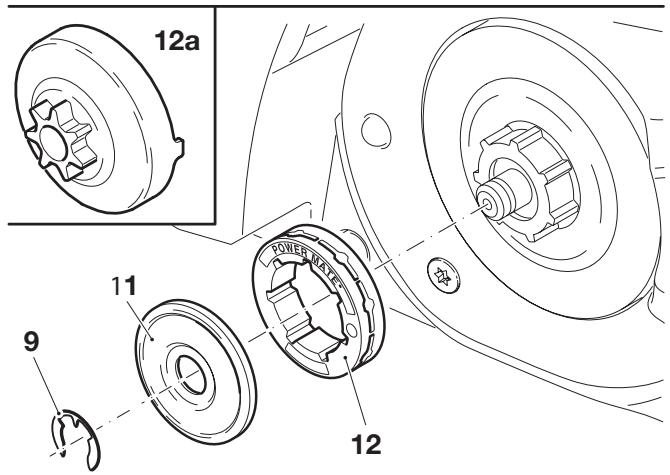
Check the sprocket before mounting a new chain.
Worn out sprockets (8) may damage the new chain and must therefore be replaced.
Remove the sprocket guard (See "PUTTING INTO OPERATION" figs. B).
Remove the chain and guide bar.
Remove circlip (9).
CAUTION: The circlip will pop out of the groove. When removing it, hold your thumb against it to prevent it from popping off.
Remove thrust washer (11).
Replace the old sprocket (8) with a new one (12) (for the order number see "Extract from the spare parts list").
Note: On the PS-460 and PS-510 the chain sprocket is permanently attached to the clutch drum (12a) (for the order number see "Extract from the spare parts list").
Put on a new sprocket or complete clutch drum, the thrust washer, and a new circlip (9) (for the order number see "Extract from the spare parts list").
For replacing the guide bar, chain, and sprocket see "PUTTING INTO OPERATION A-H".
NOTE:
Don't use a new chain on a worn chain sprocket. By the time 2 chains have worn, the sprocket has become worn out, so it should be replaced at least at every second chain replacement. To distribute the chain oil evenly, run a new chain at half-throttle for a few minutes before use.
New chains stretch, so check the chain tension frequently (see "Checking the chain tension").
Likewise, replace the clutch drum at every second chain sprokket replacement.
Instructions for changing the chain type

Always wear protective gloves!
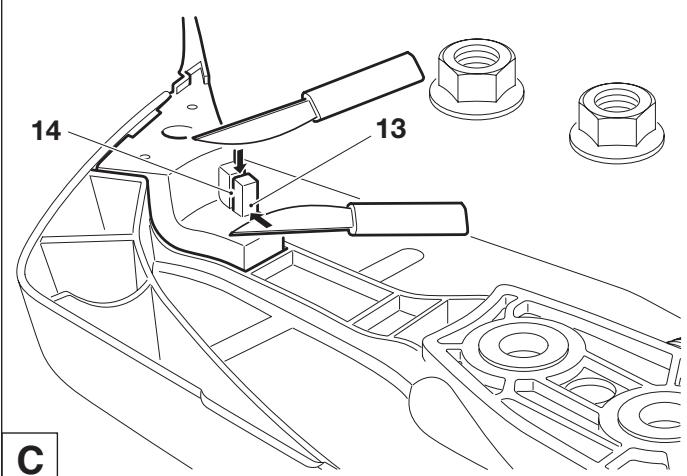
- Before using a 3/8" saw chain, be sure to first cut out the marked section of the chip deflector (13)!
- To do this, first cut along the marking (14) with a sharp knife and then cut across to remove the piece.
NOTE:
If switching to chain type .325" it will be necessary to install a newchip deflector (see „Extract from the spare parts list" for the part number).
Cleaning the air filter


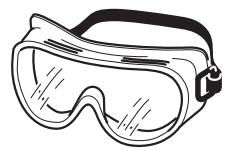
CAUTION: To prevent eye injury, always wear eye protection when cleaning the filter with compressed air!
Do not use fuel to clean the air filter.
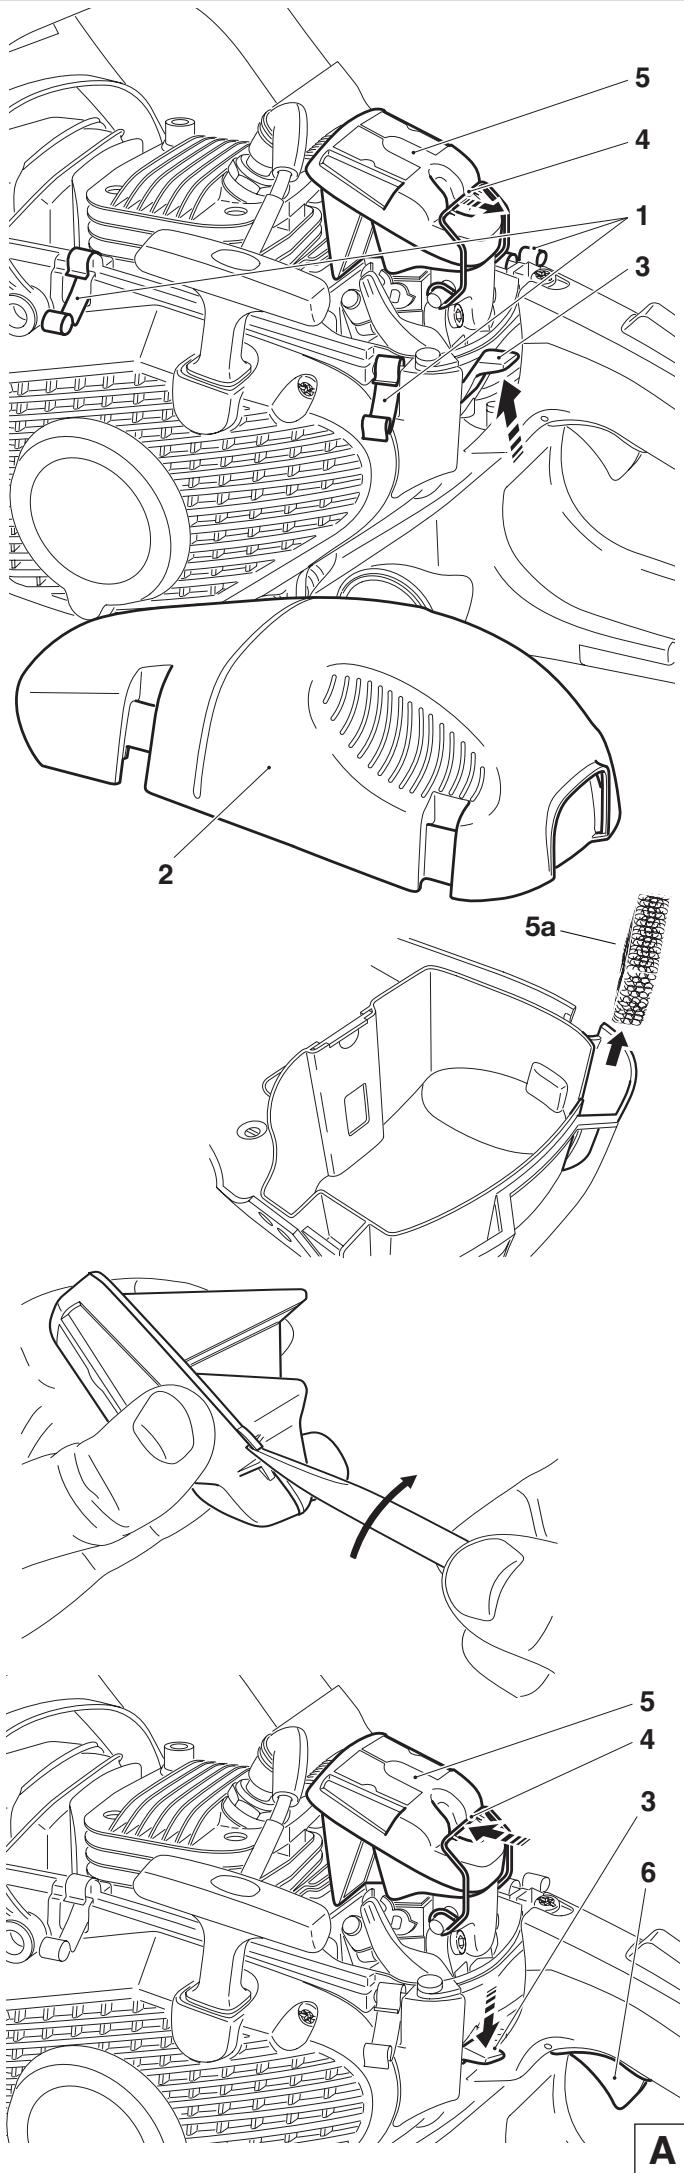
Disengage the cover clasp (1) with the universal wrench and take off the cover (2).
Push up the combination switch (3) (Choke position) to prevent dirt particles from falling into the carburetor.
Unhook the clasp (4) in the direction of the arrow with a finger or the universal wrench.
Pull the air filter (5) up and out.
Take the pre-filter (5a) out of the cover (2).
IMPORTANT: Cover the intake opening with a clean cloth to prevent dirt particles from getting into the carburetor.
Choosing the right filter: The fleece filter is for use in dry or dusty conditions. The nylon filter (available as accessory) is for use in damp conditions. The pre-filter keeps out sawdust, and prevents powder snow from getting in when working in winter.
Pry apart the top and bottom of the air filter as shown in Figure.
Cleaning the fleece filter: Carefully tap out dust or carefully blow out dust from the inside with compressed air. Do not brush the fleece, as this will force dirt particles into the fabric. If the filter is very dirty, it can be washed in lukewarm water with regular dishwashing detergent. Note that the fleece filter does not need to be cleaned until there is a noticeable loss of power. If cleaning the filter does not bring an improvement in performance, it is time to replace it.
Cleaning the nylon filter: Use a soft brush or blow out dirt from the inside with compressed air. If the filter is very dirty, it can be washed in lukewarm water with regular dishwashing detergent. Clean frequently (several times a day) when working in very dusty or dirty conditions. Full engine power is possible only with a clean air filter!
Cleaning the pre-filter: When the pre-filter becomes dirty, wash it in lukewarm soapy water using standard dishwashing liquid.
Let the air filter dry completely.
Put the top and bottom sections back together.
Place the pre-filter back in the cover.
Before assembling the air filter, check the choke flap for any dirt particles. If there are any, remove them with a brush.
CAUTION: If the air filter becomes damaged, replace immediately! Pieces of cloth or large dirt particles can destroy the engine!
Insert the air filter (5) and press the clasp (4) in the direction of the arrow until it engages.
Move the combination switch (3) down and press the throttle (6) once all the way, to deactivate the half-throttle lock.
Put the cover (2) back on and affix it with the cover clasps (1).
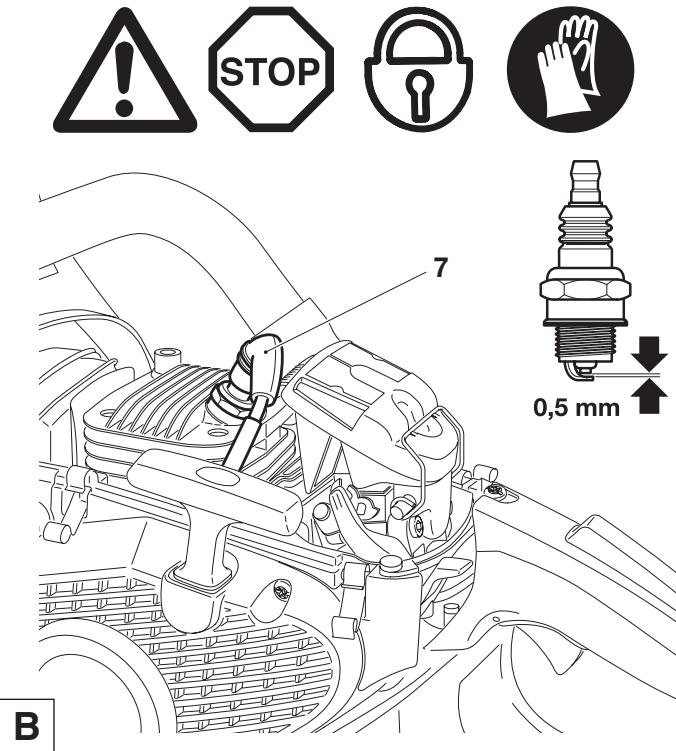
Replacing the spark plug
CAUTION:
Do not touch the spark plug or plug cap if the engine is running (high voltage).
Switch off the engine before starting any maintenance work. A hot engine can cause burns. Wear protective gloves!
The spark plug must be replaced in case of damage to the insulator, electrode erosion (burn) or if the electrodes are very dirty or oily.
Remove the filter cover (see "Cleaning the air filter").
Pull the plug cap (7) off the spark plug. Use only the combination wrench supplied with the saw to remove the spark plug.
Electrode gap
The electrode gap must be .020" (0.5 mm).
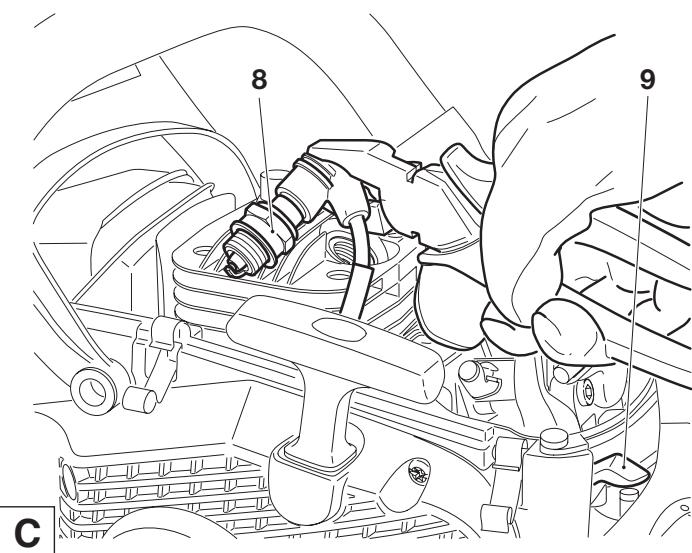
Checking the ignition spark

With the spark plug removed and the spark plug cap firmly seated, use insulated pliers to hold the spark plug (8) against the cylinder (not the spark plug hole).
Put combination switch (9) in the ON position.
Pull the starter cable hard.
If the function is correct, an ignition spark must be visible near the electrodes.
CAUTION: Use only the following spark plugs: NGK BPMR 7A or BOSCH WSR 6F.
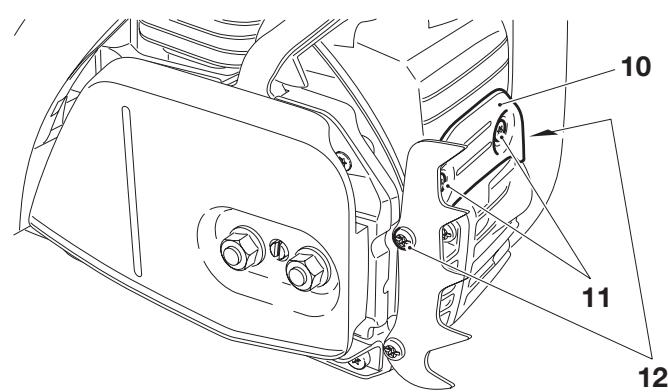
Checking the muffler screws

Remove the retaining plate (10) by unscrewing screws (11, short) and (12, long).
The muffler screws are now accessible through the blind holes and can be checked for tight fit. If they are loose, hand-tighten them (Important - do not overtighten!).
Replacing the starter cable/Replacing the return spring pack/Replacing the starter spring
Unscrew four screws (1).
Remove fan housing (2).
Remove the air guide (3) from the fan housing.
CAREFUL! Injury hazard! Do not unscrew screw (7) if the return spring is under tension.
If the starter cable is to be replaced although it is not broken, it will be necessary to first de-tension the cable drum return spring (13).
To do this, use the grip to pull the cable all the way out of the fan housing.
Hold the cable drum with one hand, and with the other push the cable into the space (14).
Carefully let the drum turn until the return spring is no longer under tension.
Unscrew screw (7) and remove the driver (8) and spring (6).
Carefully remove the cable drum.
Remove any cable pieces.
Thread a new cable (dia. 0.14" (3.5 mm), length 43.3" (1100 mm)) as shown in the illustration (don't forget the washer (10)) and knot both ends as shown.
Pull knot (11) into the cable drum (5).
Pull knot (12) into the starter grip (9).
Put the drum on its spindle and turn it slightly until the return spring engages.
Place the spring (6) in the driver (8) and place them together in the cable drum (5) while turning slightly counter-clockwise. Insert screw (7) and tighten.
Guide the cable into the slot (14) on the cable drum and turn the drum with the cable clockwise three times.
Hold the cable drum with your left hand and with your right hand untwist the cable, pull it tight and hold it.
Carefully release the cable drum. The spring will wind the cable around the drum.
Repeat the procedure once. The starter grip should now stand straight up on the fan housing.
NOTE: With the cable pulled all the way out, it must still be possible to turn the pulley another 1/4 turn against the return spring.
CAUTION: Danger of injury! Secure the cable grip when pulled out! It will whip back if the cable pulley is released by accident.
Replacing the return spring pack
Disassemble the fan housing and cable drum (see above).
CAREFUL! Injury hazard! The return spring can pop out! Always wear eye protection and protective gloves!
Lightly tap the fan housing on a wooden surface with the entire surface of the hollow side, and hold it down. Now lift the fan housing carefully and in small steps. This will allow the return spring pack (13), which should now have fallen out, to relax in a controlled manner if the return spring has popped out of the plastic pack.
Carefully insert a new return spring cassette and press down until it engages.
Place the cable drum on it and turn it slightly until the return spring engages.
Install the spring (6) and driver (8) and screw on tight with screw (7).
Tension the spring (see above).
Replacing the starter spring
NOTE: If the spring (6) in the Featherlight-Starting system is broken, more effort will be required to start the engine and you will notice some resistance when pulling the starter cable. If you notice this, check the spring (6) and replace if necessary.




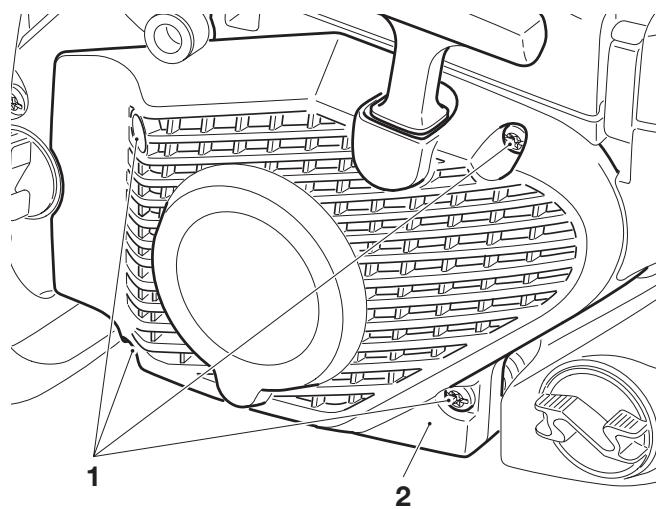
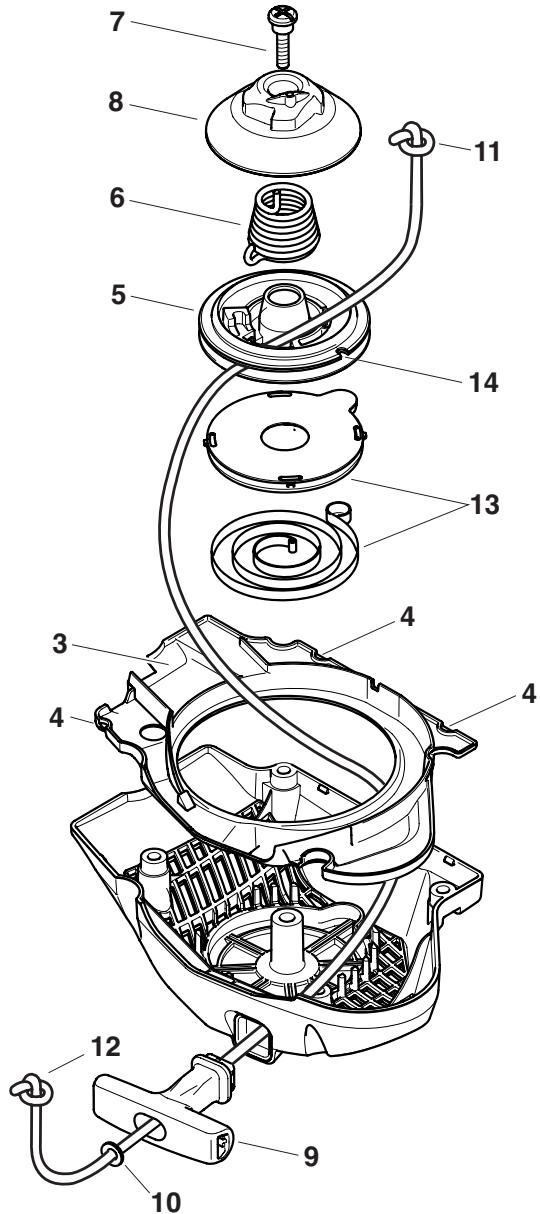
Mounting the fan housing
Insert the air guide (3) in the fan housing so that the three recesses (4) engage.
Position the fan housing against the housing, press against it lightly and pull the starter grip until the starter engages.
Tighten screws (1).
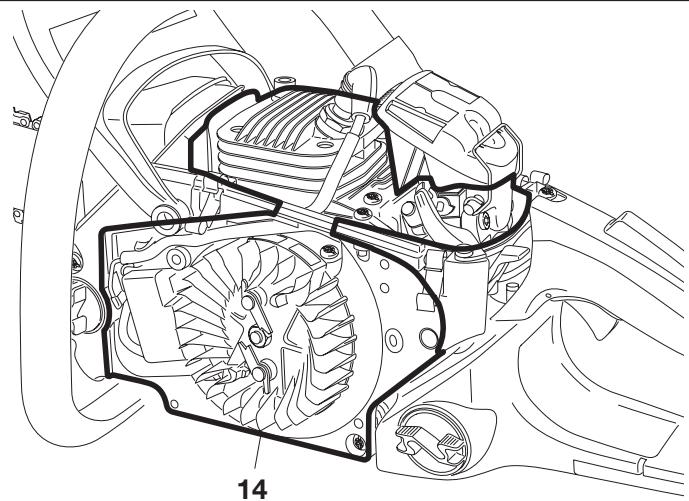
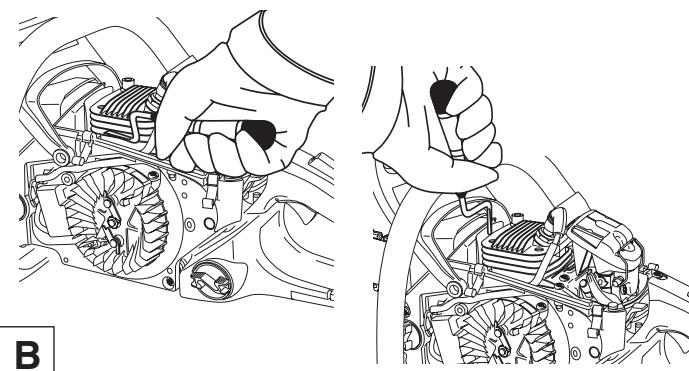
Cleaning the cylinder area




After prolonged use, dirt and sawdust can build up on the cylinder and cause the engine to overheat. The cylinder fin cleaner helps remove deposits between the cylinder fins and between the cylinder and the mounting plate.
Remove cover.
Remove the fan housing.
CAUTION: To prevent eye injury, always wear eye protection when cleaning the filter with compressed air!
The entire area (14) can now be brushed clean or cleaned with compressed air.
A bottle brush can come in handy for cleaning out the cylinder ribs.
With the cylinder ribs cleaner (only in delivery for model PS-5105, PS-5105 H), clean out the area between the cylinder ribs and between the cylinder and the mounting plate.
Do not use force. Be careful not to damage the short-circuit wire and the ignition wire.
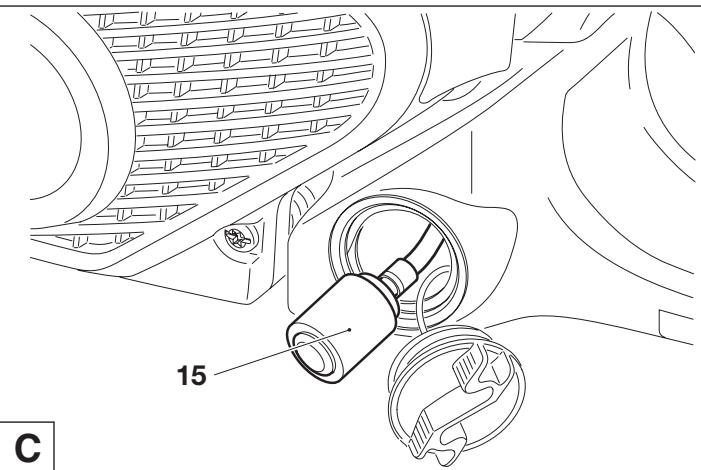
Replacing the fuel filter



The felt filter (15) of the fuel filter can become clogged. It is recommended to replace the fuel filter once every three months in order to ensure unimpeded fuel flow to the carburetor.
To remove the fuel filter for replacement, pull it out through the tank filler neck using a piece of wire bent at one end to form a hook.
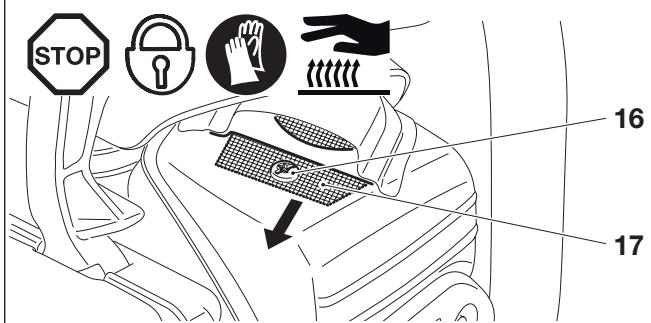
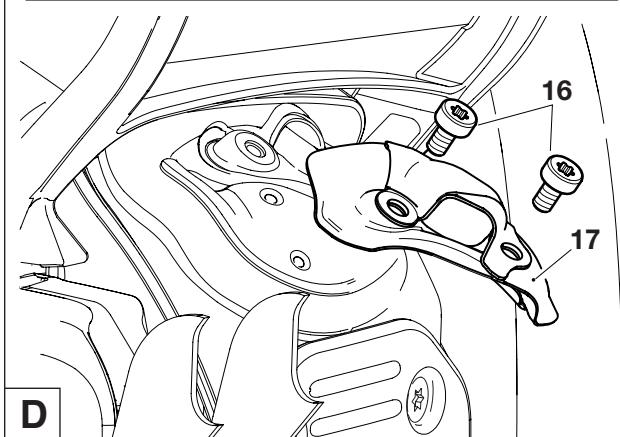
Replacing/cleaning the spark arrester screen
The spark arrester screen should be checked and cleaned regularly. Loosen the screw (16) and remove the spark arrester screen (17).
Caution: Do not use sharp or pointed objects for screen cleaning. Damaged or misformed screen wires may result.
Reassembly the spark arrester screen and tighten the screw.
Replacing/cleaning the spark arrester screen Models with catalytic converter
The spark arrester screen should be checked and cleaned regularly. Loosen the two screws (16) and remove the spark arrester screen (17).
Caution: Do not use sharp or pointed objects for screen cleaning. Damaged or misformed screen wires may result.
Reassembly the spark arrester screen and tighten the two screws.
Information on the catalytic converter: The catalytic converter reduces the pollutant content of the exhaust.
Instructions for periodic maintenance
To ensure long life, prevent damage and ensure the full functioning of the safety features the following maintenance must be performed regularly. Guarantee claims can be recognized only if this work is performed regularly and properly. Failure to perform the prescribed maintenance work can lead to accidents!
The user of the chain saw must not perform maintenance work which is not described in the instruction manual. All such work must be carried out by a DOLMAR service center.
Page
| General | Chain saw
Saw chain
Chain brake
Guide bar
Starter cable | Clean exterior, check for damage. In case of damage, have repaired by a qualified service center immediately
Sharpen regulatory, replace in good time
Have inspected regularly at an authorized service center
Turn over to ensure even wear of bearing surfaces
Replace in good time
Check for damage. Replace if damaged. | 28-29
21, 30
34 |
| Before each start | Saw chain
Guide bar
Chain lubrication
Chain brake
Combination switch,
Safety locking button,
Throttle lever
Fuel/oil tank
cap | Inspect for damage and sharpness
Check chain tension
Check for damage
Functional check
Functional check
Functional check
Functional check
Check for tightness and lekages | 28-29
21
24
26
25 |
| Every day | Air filter
Guide bar
Guide bar support
Idle speed | Clean (several times daily if necessary)
Check for damage, clean oil intake bore
Clean, in particular the oil guide groove
Check (chain must not run) | 32
30
24, 30
27 |
| Every week | Fan housing
Cylinder area
Spark plug
Muffler
Spark arrester screen
Chain guide
Screws and nuts | Clean to maintain good cooling air flow.
Clean to maintain good cooling air flow.
Check and replace if necessary
Check tightness of mounting, Check screws
Clean or replace if necessary
Check
Check their condition and that they are firmly secured. | 17, 35
35
33
33
35
20 |
| Every 3 months | Fuel filter
Fuel, oil tanks | Replace
Clean | 35 |
| Annually | Chain saw | Check at an authorized service center | |
| Storage | Chain saw
Guide bar/chain
Fuel, oil tanks
Carburetor | Clean exterior, check for damage. In case of damage, have repaired by a qualified service center immediately
Demount, clean and oil slightly
Clean the guide groove of the guide bar
Empty and clean
Run empty | 30 |
Service, spare parts and guarantee
Maintenance and repair
The maintenance and repair of modern engines as well as all safety devices require qualified technical training and a special workshop equipped with special tools and testing devices.
Any work not described in this Manual may be performed only by a DOLMAR service center.
The DOLMAR service centers have all the necessary equipment and skilled and experienced personnel, who can work out cost-effective solutions and advise you in all matters.
Repair attempts by third parties or unauthorized persons will void all warranty claims.
Please contact your nearest service center.
Spare parts
Reliable long-term operation, as well as the safety of your chain saw, depend among other things on the quality of the spare parts used. Use only original DOLMAR parts, marked

Only original spare parts and accessories guarantee the highest quality in material, dimensions, function and safety.
Original spare parts and accessories can be obtained from your local dealer. He will also have the spare part lists to determine the required spare part numbers, and will be constantly informed about the latest improvements and spare part innovations.
Please bear in mind that if parts other than original DOLMAR spare parts are used, this will automatically invalidate the DOLMAR product guarantee.
Guarantee
DOLMAR guarantees the highest quality and will therefore reimburse all costs for repair by replacement of damaged parts resulting from material or production faults occurring within the guarantee period after purchase. Please note that in some countries particular guarantee conditions may exist. If you have any questions, please contact your salesman, who is responsible for the guarantee of the product.
Please note that we cannot accept any responsibility for damage caused by:
- Disregard of the instruction manual.
Non-performance of the required maintenance and cleaning.
Incorrect carburetor adjustment.
Normal wear and tear.
- Obvious overloading due to permanent exceeding of the upper performance limits.
Use of guide bars and chains which have not been approved.
Use of guide bar and chain lengths which have not been approved.
Use of force, improper use, misuse or accidents.
- Damage from overheating due to dirt on the fan housing.
Work on the chain saw by unskilled persons or inappropriate repairs.
Use of unsuitable spare parts or parts which are not original DOLMAR parts, insofar as they have caused the damage.
Use of unsuitable or old oil.
- Damage related to conditions arising from lease or rent contracts.
- Damages caused by disregarding loose outer bolted connections.
Cleaning, servicing and adjustment work is not covered by the guarantee. All repairs covered by the guarantee must be performed by a DOLMAR service center.
Troubleshooting
| Malfunction | System | Observation | Cause |
| Chain does not run | Chain brake | Engine runs | Chain brake actuated. |
| Engine does not start or only with difficulty | Ignition system | Ignition spark | Malfunction in fuel supply system, compression system, mechanical malfunction. Switch on STOP, fault or short-circuit in the wiring, plug cap or spark plug defective. |
| Fuel supply | No ignition spark |
| Compression system | Fuel tank is filled | Choke in wrong position, carburetor defective, fuel filter dirty, fuel line bent or interrupted. |
| Inside | Cylinder base packing ring defective, radial shaft packings defective, cylinder or piston rings defective |
| Mechanical malfunction | Outside | Spark plug does not seal. |
| Starter does not engage | Spring in starter broken, broken parts inside the engine. |
| Warm start difficulties | Carburetor | Fuel tank is filled Ignition spark | Wrong carburetor adjustment. |
| Engine starts, but dies immediately | Fuel supply | Fuel tank is filled | Wrong idling adjustment, fuel filter or carburetor dirty. Tank venting defective, fuel line interrupted, cable defective, STOP switch defective. |
| Insufficient power | Several systems may be involved simultaneously | Engine is idling | Air filter dirty, wrong carburetor adjust-ment, muffler clogged, exhaust channel in cylin-der clogged, spark arrester screen clogged. |
| No chain lubrication | Oil tank/pump | No oil on the chain | Oil tank empty. Oil guide groove dirty. Oil-pump adjusting screw incorrectly adjusted. |
Use only original DOLMAR parts. For repairs and
replacement of other parts, see your DOLMAR service center.
PS-460, PS-510,
PS-5105, PS-5105 H
DOLMAR

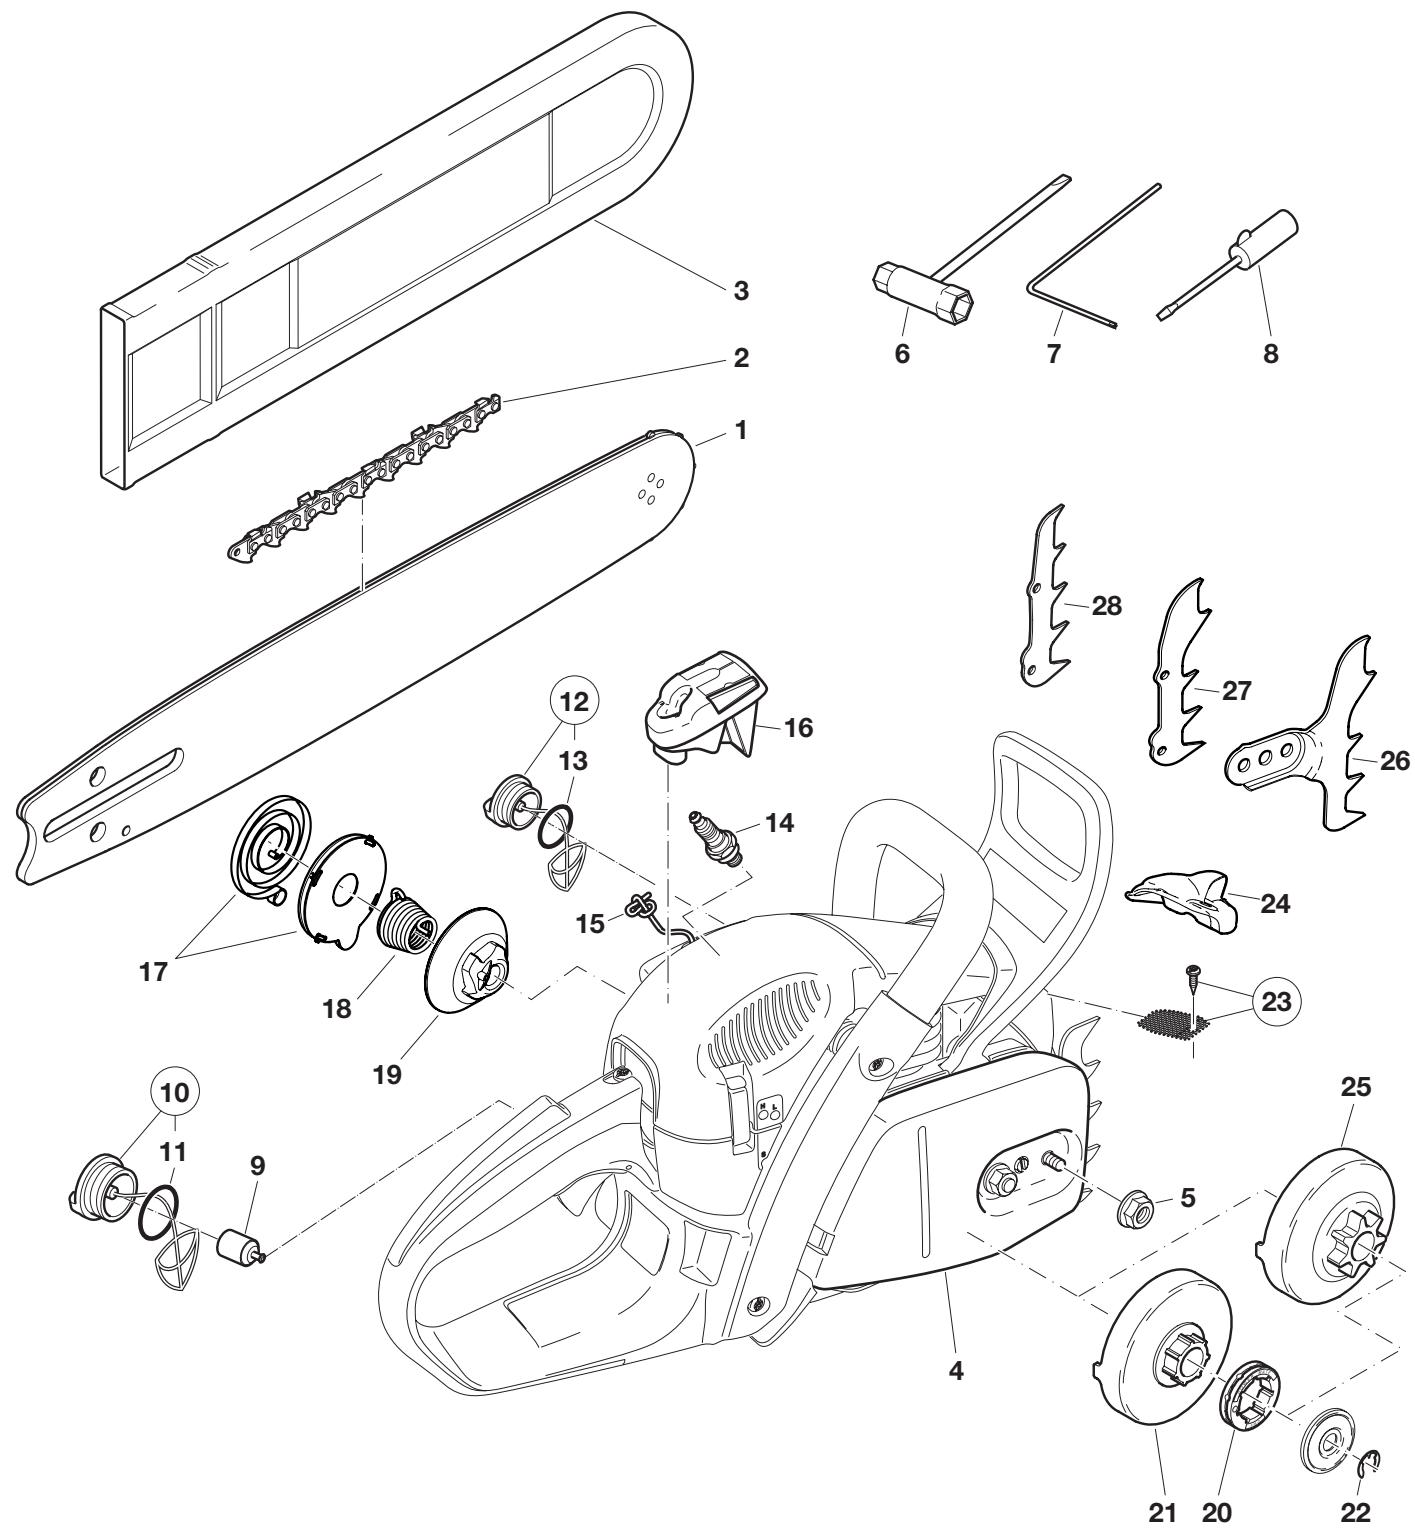
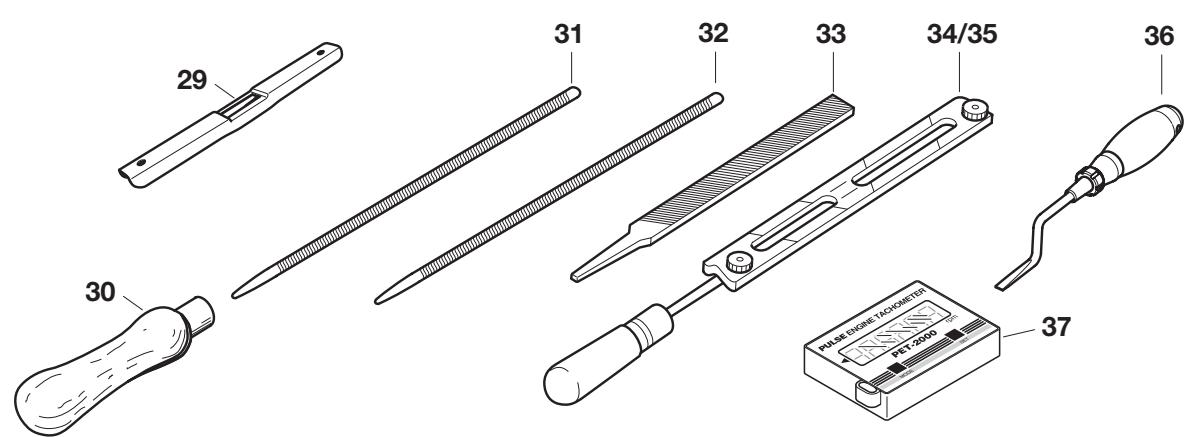
Pos.DOLMAR-No.Qty. Denomination
1 415040641 1 Sprocket nose bar .325", 16"
415045641 1 Sprocket nose bar .325", 18"
2 513486066 1 Saw chain .325" for 16" 513486072 1 Saw chain .325" for 18"
1 411 909 660 1 Sprocket nose bar 3 / 8" , 18"
2 513 496 064 1 Saw chain 3 / 8" for 18"
3 952010140 1 Chain protector for 16"
952020150 1 Chain protector for 18"
4 1 Sprocket guard, cpl.
5 2 Hexagonal nut M8
6 941 719 131 1 Universal wrench SW 19/13
7 940 827 000 1 Offset screwdriver
8 944340001 1 Carburetor screwdriver
9 010114010 1 Fuel filter
10 181 114 202 1 Fuel tank cap, cpl.
11 963229036 1 O-Ring 29,3x3,6 mm
12 170 114 061 1 Oil tank cap, cpl.
13 963 225 030 1 O-Ring 25× 3 mm
14 965 603 021 1 Spark plug
15 181 164 020 1 Starter cable 3,5x1100 mm
16 181 173 240 1 Air filter (nylon)
16 181 173 190 1 Air filter (fleece)
17 181 163 050 1 Return spring pack, complete
18 181 163 080 1 Spring
19 181 163 090 1 Driver
20 026 224 010 1 Sprocket 3 / 8" ,7-tooth 181 224 040 1 Sprocket .325",7-tooth
21 181 223 060 1 Clutch drum
22 927408000 1 Circlip
23 181 174 250 1 Spark collector, cpl.
24 181 174 470 1 Spark collector, cpl. (for models with catalyst)
25 181 223 310 1 Clutch drum cpl. .325", 7-tooth 181 223 320 1 Clutch drum cpl. .3/8", 7-tooth
26 181 250 030 1 Spike bar
27 181 250 020 1 Spike bar
28 181 250 011 1 Spike bar
Accessories (not delivered with the chain saw)
29 953 100 090 1 Chain gauge
30 953 004 010 1 File handle
31 953003100 1 Round file, dia. 11 / 64 , (4,5 mm)
32 953003040 1 Round file, dia. 7 / 32 , (5,5 mm)
33 953003060 1 Flat file
34 953030020 1 File holder 11/64"
35 953009000 1 File holder 7/32"
36 944 500 795 1 Cylinder ribs cleaner
37 950233210 1 Tachometer
- 949000035 1 Combined can (for 5l fuel, 2.5l chain oil)
EMISSIONS COMPONENT DEFECT WARRANTY COVERAGE