Grand Memo II - Mobile Phone ZTE - Free user manual and instructions
Find the device manual for free Grand Memo II ZTE in PDF.

| Product Type | Smartphone |
| Brand | ZTE |
| Model | Grand Memo II |
| Dimensions (H x W x D) | 155 x 77 x 9 mm |
| Weight | 165 g |
| Display | 5.5-inch IPS LCD, 720 x 1280 pixels |
| Processor | Quad-core 1.2 GHz Cortex-A7 |
| RAM | 2 GB |
| Internal Storage | 16 GB (expandable via microSD up to 32 GB) |
| Rear Camera | 13 MP, autofocus, LED flash |
| Front Camera | 5 MP |
| Battery | 3000 mAh, removable Li-Ion |
| Operating System | Android 4.4 KitKat |
| Connectivity | 4G LTE, Wi-Fi 802.11 b/g/n, Bluetooth 4.0, GPS |
| SIM | Dual SIM (Micro-SIM, dual stand-by) |
| Sensors | Accelerometer, proximity, compass |
| Security | Pattern, PIN, password |
| Maintenance & Cleaning | Wipe with a soft, dry cloth; avoid water and harsh chemicals |
| Repairability | Battery and SIM card replaceable; other repairs by authorized service centers |
| Spare Parts Availability | Contact ZTE service centers for genuine parts |
Frequently Asked Questions - Grand Memo II ZTE
User questions about Grand Memo II ZTE
0 question about this device. Answer the ones you know or ask your own.
Ask a new question about this device
Download the instructions for your Mobile Phone in PDF format for free! Find your manual Grand Memo II - ZTE and take your electronic device back in hand. On this page are published all the documents necessary for the use of your device. Grand Memo II by ZTE.
USER MANUAL Grand Memo II ZTE
ZTE GRAND Memo II
ZTE Grand™ Memo II Quick Start Guide
LEGAL INFORMATION
Copyright © 2015 ZTE CORPORATION.
All rights reserved.
No part of this publication may be quoted, reproduced, translated or used in any form or by any means, electronic or mechanical, including photocopying and microfilm, without the prior written permission of ZTE Corporation.
Notice
ZTE Corporation reserves the right to make modifications on print errors or update specifications in this guide without prior notice. We offer self-service for our smart terminal device users. Please visit the ZTE official website (at www.ztedevice.com) for more information on self-service and supported product models. Information on the website takes precedence.
Disclaimer
ZTE Corporation expressly disclaims any liability for faults and damages caused by unauthorized modifications of the software.
Images and screenshots used in this guide may differ from the actual product. Content in this guide may differ from the actual product or software.
Trademarks
ZTE and the ZTE logos are trademarks of ZTE Corporation.
Google and Android are trademarks of Google, Inc. The Bluetooth® trademark and logos are owned by the Bluetooth SIG, Inc. and any use of such trademarks by ZTE Corporation is under license.

microSDHC logo is a trademark of SD-3C,
LLC.
Manufactured under license from Dolby
Laboratories. Dolby and the double-D symbol are trademarks of Dolby Laboratories.
Qualcomm® snapdragon

Qualcomm® Snapdragon™ processors are products of Qualcomm Technologies, Inc.
Qualcomm and Snapdragon are trademarks of Qualcomm Incorporated, registered in the United States and other countries. Used with permission. Other trademarks and trade names are the property of their respective owners.
Version No.: R1.0
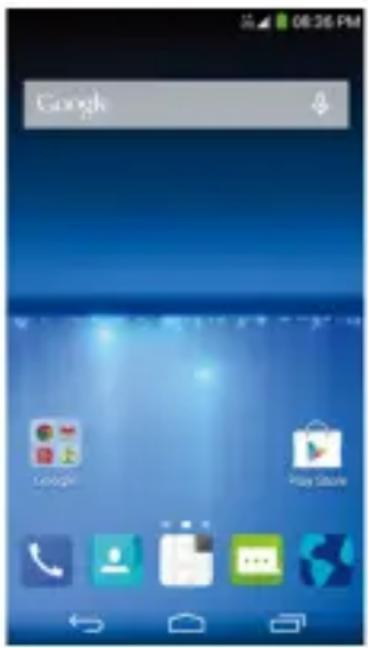
Getting to Know Your Phone
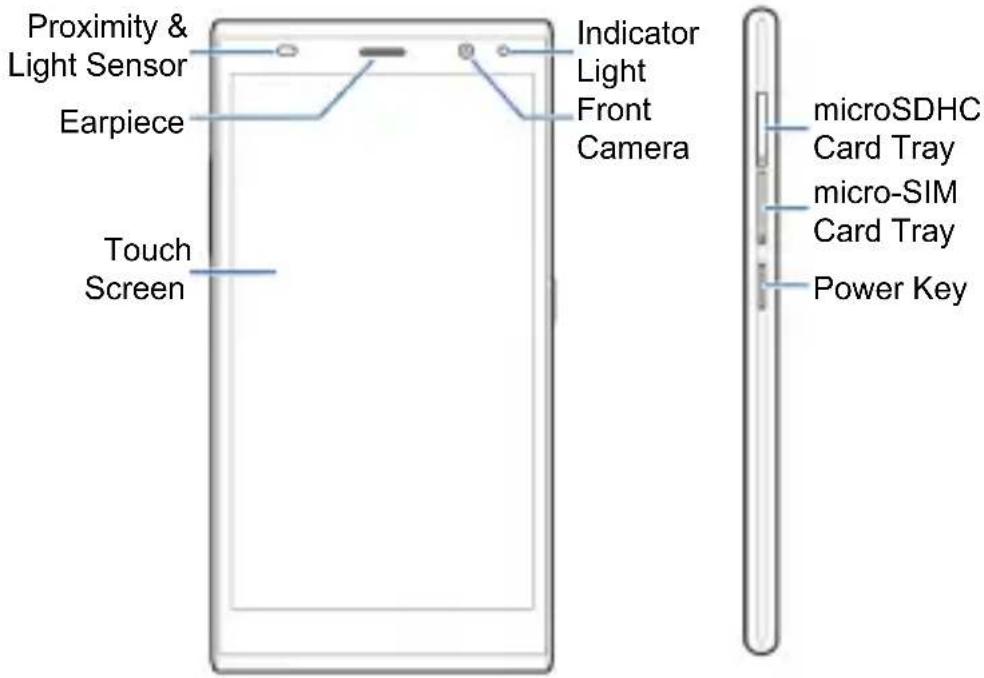

On-screen Keys

(Home)
- Touch to return to the home screen from any application or screen.
- Drag to Google to open Google Search or to go through the Internet.

(Back)
Touch to go to the previous screen.

(Recent Apps)
Touch to see recently used applications.
Setting Up Your Phone
You'll need to set up your phone before you can explore all its great features.
Installing the micro-SIM Card
Turn off your phone before installing or removing the micro-SIM card.
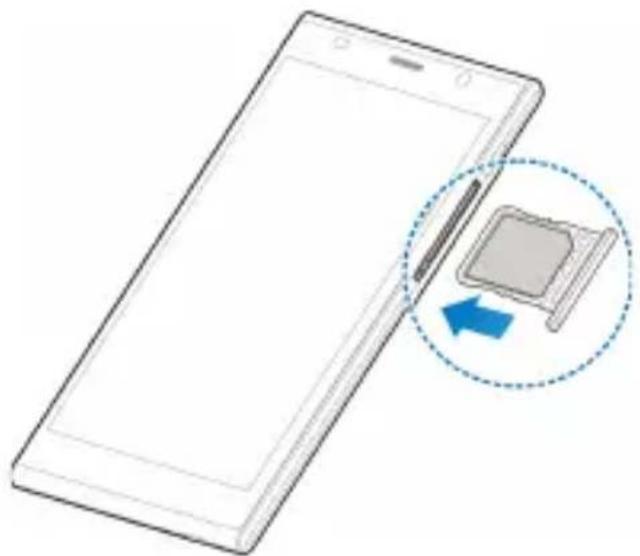
- Insert the tray eject tool or the end of a small paper clip into the hole beside the micro-SIM card tray (next to the Power Key).
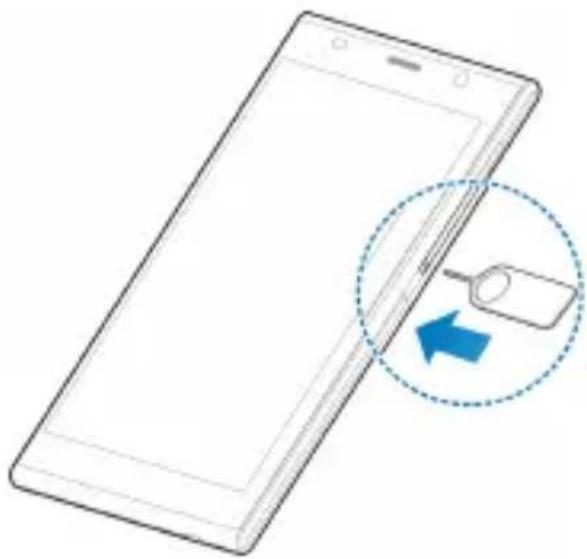
natural_image
Illustration of a smartphone with a magnifying glass icon and blue arrow indicating download or export (no text or symbols)Pull out the micro-SIM card tray and place the micro-SIM card (contacts facing down) on the tray as shown. Then carefully install the tray back.
natural_image
Illustration of a smartphone with an inset showing a square device being placed on its screen (no text or symbols present)
WARNING!
To avoid damage to the phone, do not use any other kind of SIM card or any non-standard micro-SIM card cut from a SIM card. Your service provider will supply your SIM card.
Installing the microSDHC™ Card (Not Included)
The microSDHC card can be installed and removed while the phone is turned on.
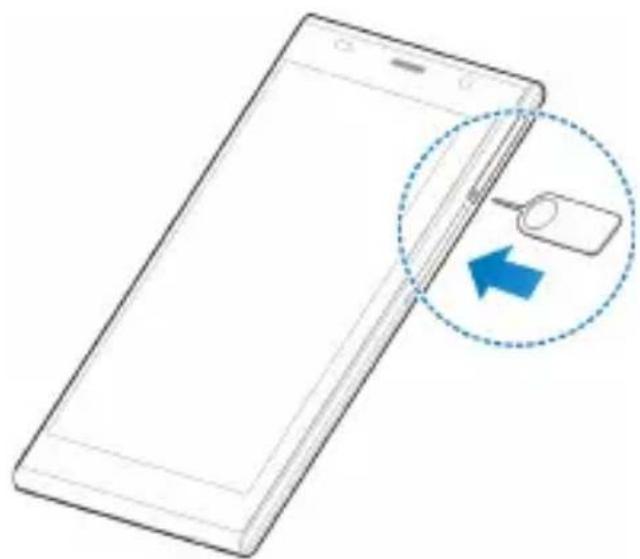
- Insert the tray eject tool or the end of a small paper clip into the hole beside the microSDHC card tray (the upper one).
natural_image
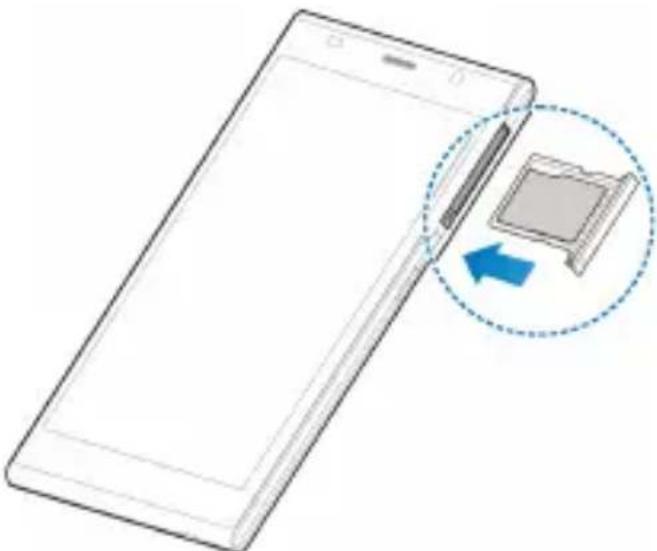
Line drawing of a smartphone with a magnified inset showing a blue arrow pointing to a device (no text or symbols present)- Pull out the microSDHC card tray and place the microSDHC card (contacts facing down) on the tray as shown. Then carefully install the tray back.
natural_image
Illustration of a smartphone with a close-up of its screen showing a computer icon, no text or symbols present.
NOTE:
Some applications may require a microSDHC card to work normally or may store certain data on it. Therefore, it is recommended that you keep a microSDHC card installed and not remove or replace it randomly.
Charging the Battery
Your phone's battery should have enough power for the phone to turn on, find a signal, and make a few calls. You should fully charge the battery as soon as possible.
If the battery is extremely low, you may be unable to power on the phone even when it is being charged. In this case, try again after charging the phone for at least 10 minutes.
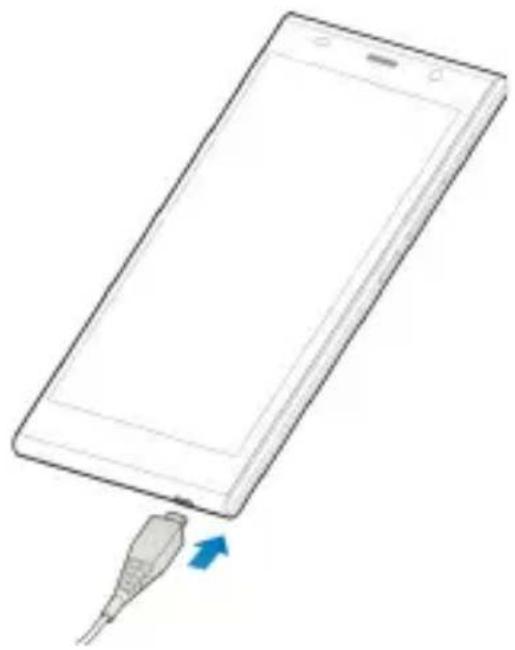
- Connect the adapter to the charging jack. Ensure that the adapter is inserted with the correct orientation. Do not force the connector into the charging jack.
natural_image
Line drawing of a smartphone with a USB cable inserted, showing the cable being inserted (no text or symbols present)-
Connect the charger to a standard AC wall outlet.
-
Disconnect the charger when the battery is fully charged.

WARNING!
Use only ZTE-approved chargers and cables. The use of unapproved accessories could damage your phone.

CAUTION:
Do not change the built-in rechargeable battery in your phone by yourself.
Touch Screen and Navigation
Your phone features a capacitive touch screen, so you can gently touch, quickly swipe, or pinch with two fingers to navigate.
- Lightly touch the buttons, icons, or applications on the screen with your fingertip.
- Touch and hold your finger on an item to see available options.
- Quickly flick the screen to scroll up, down, left or right.
- Pinch with two fingers or double-tap the screen to zoom in on a web page, a gallery image, or a map.
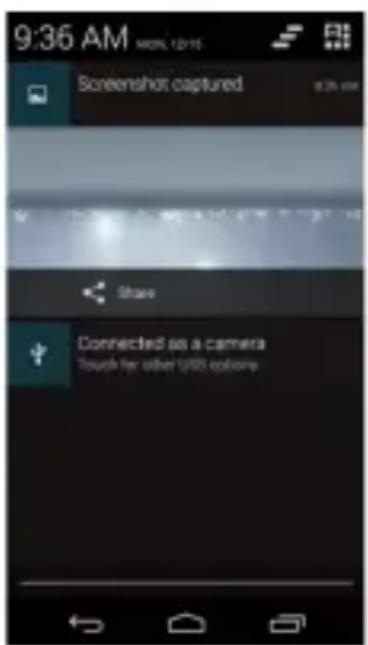
- The status bar across the top of the screen calls, calendar reminders, etc.
- Touch and flick the bar down to see more details.
Flick up or touch close the bar.

• : Find all your applications.
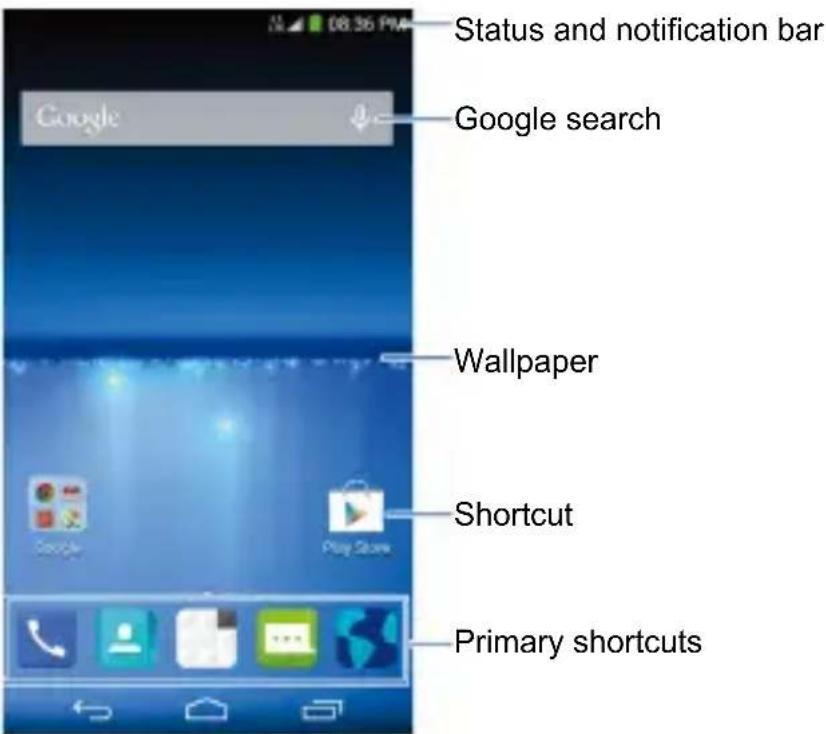
Customizing Home Screens
Add shortcuts, widgets, and folders or change wallpapers and home screen transition effects to make the phone your own.
Do one of the following, depending on the change you want to make.
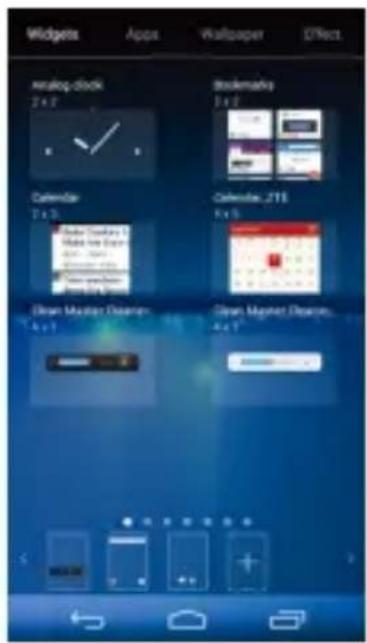
- To add a widget, shortcut, or application shortcut, touch and hold an empty place on the home screen, touch Widgets or Apps, and then touch and hold an item and drag it to a home screen thumbnail at the bottom.
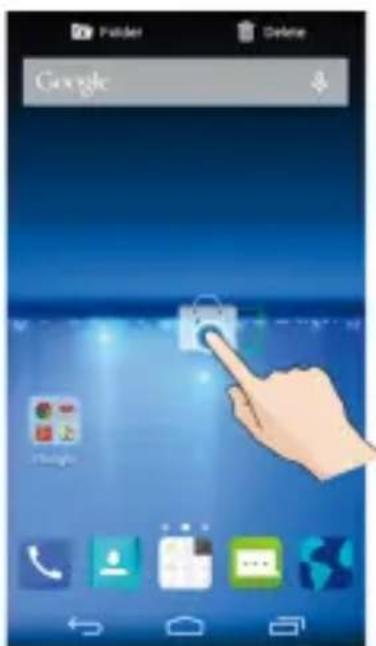
- To sort shortcuts into folders, touch and hold a shortcut icon on the home screen and drag it to
• To move a widget, shortcut, or folder on the home screen, touch and hold it and drag it to a new location. To delete it, touch and hold it and drag it to

- To change home screen or lock screen wallpaper, touch and hold an empty place on the home screen, touch Wallpaper and then select form Wallpaper for home screen or Wallpaper for lock screen.
- To set the home screen transition effect, touch and hold an empty place on the home screen, touch Effect and then choose one.
- From the home screen, pinch or spread two fingers on the screen. Then you can touch + on the blank screen to create new home screens; touch x on the corner of a screen to delete it; touch on the bottom of a screen to set it as the main home screen; touch and hold a screen and drag it to adjust its place.
Calling and Voicemail
Call friends and family and check voicemails in just a few simple steps.
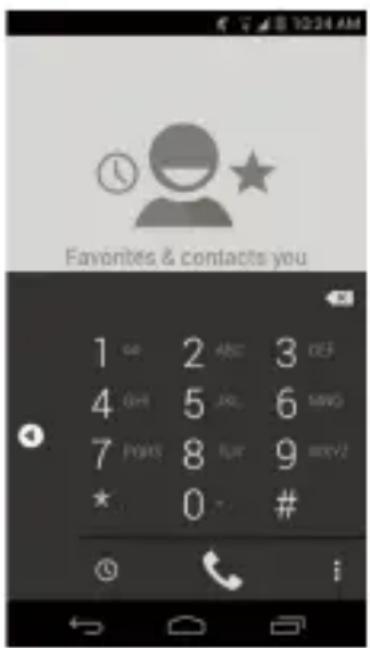
Making a Call
-
From the home screen, touch
-
Touch 📋 to open the dialer.
-
Dial the number you want to call and touch to place the call.
Checking Voicemail

- From the home screen, touch
- Touch ☐ to open the dialer.
- Touch and hold the 1 Key.
- Follow the voice prompts to listen to your voice messages.
Text and Multimedia Messaging
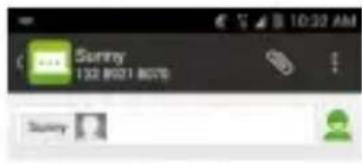
Send messages to other mobile phones and to email addresses to communicate privately and quickly.
-
From the home screen, touch
-
Touch .
-
Enter the recipient's number or begin typing the contact's name. Touch the name to select corresponding number.
-
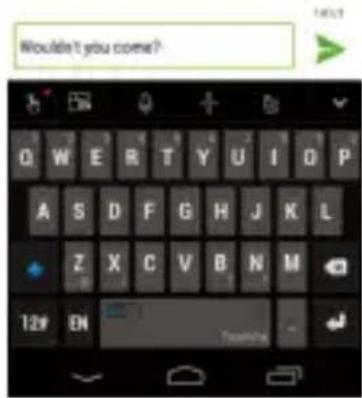
Touch the Type message field and type your message.
▶ Touch to insert Quick Text, a smiley, or a contact.
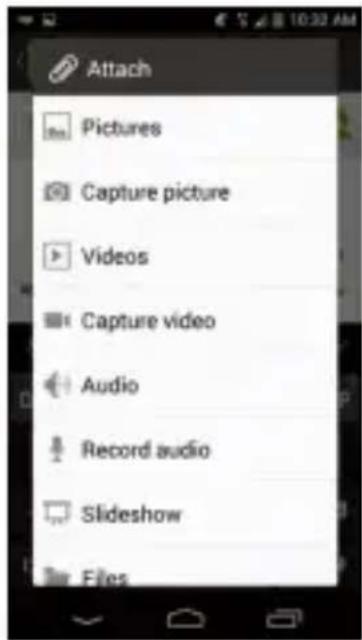
▶ To send an MMS, touch and touch an attachment type.
- Touch ➤ to send your message.
Please don't text and drive.
Setting Up Email Accounts
Setting Up Gmail
- Touch in the home screen and select Gmail.
NOTE:
If another Gmail account is already set up, touch the Menu Key > Settings > ADD ACCOUNT.
-
Touch Existing to sign in to your existing Google Account. If you have no Google Accounts, touch New to create one.
-
Follow the instructions on the screen to set up the account.
Setting Up Email
- Touch in the home screen and select Email.
NOTE:
If another email account is already set up, touch the Menu Key > Settings > ADD ACCOUNT.
-
Enter the email address and password.
-
Touch Next and follow the onscreen instructions.
Setting Up an Exchange ActiveSync® Account
- Touch in the home screen and select Email.
NOTE:
If another email account is already set up, touch the Menu Key > Settings > ADD ACCOUNT.
- Enter the email address and password.
- Touch Manual setup > Exchange.
- If necessary, edit Dom a in\ Use rna m e, Password, and Server information.
- Read the onscreen activation disclaimer and, if prompted, touch Next.
- If prompted, touch OK to allow the server to remotely control some of your phone's security features.
- Configure the settings on the screen, such as Days to sync, and then touch Next.
- If prompted, touch Activate to activate the Email app as a device administrator.
- Identify your new account with a unique name and then touch Next.
Contact your server administrator for more help.
Google® Play Store Apps
There are tens of thousands of games and applications in the Google® Play Store for you to download and install in a few easy steps. Before you begin, ensure that you are signed into your Google Account.
- From the home screen, touch >
The first time you launch Play Store, touch Accept to agree to Google Play Terms of Service.
- Find the apps you need either by category or by touching
- Touch the app to see more information about it.
▶ For free apps, touch INSTALL.
▶ For paid apps, touch the price.
- Read the application access requirements and touch ACCEPT to download and install the app.
CAUTION:
Once installed, some apps can access many functions or a significant amount of your personal data. The Play Store will show you what the app can access. Touch Accept & download (free apps) or Accept & buy (paid apps) to proceed, or touch the Back Key to cancel.
- Your phone will download and install the app automatically. You can check the progress by flicking down the status bar.
The app is successfully installed when the icon appears in the status bar. To access the app from the home screen, touch .

NOTE:
You need a Google Wallet™ account to purchase paid apps.
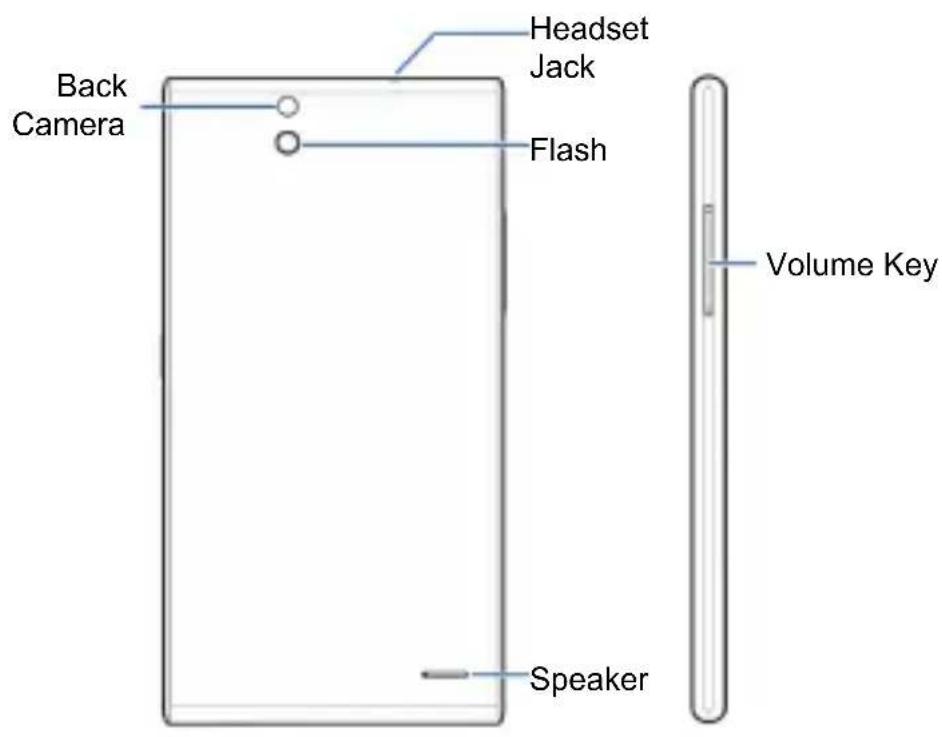
Camera and Video

natural_image
Scenic view of a lakeside path lined with yellow and red flower beds, surrounded by trees and distant hills (no text or symbols visible)Take pictures and record videos right from your phone with the camera and camcorder and
then share them with friends and family.
-
From the home screen, touch > and rotate the phone to a horizontal position.
-
Adjust camera settings, such as flash and scene mode, by touching the buttons on the left side of the viewfinder. Touch Auto, Pro and Fun to choose different modes. Pinch or spread on the screen or press the Volume Key to zoom in or zoom out. Touch the area where you want the camera to focus.
-
Touch to take a picture.
-
When you're finished, touch the thumbail image in the upper right corner of the screen to view your picture.
-
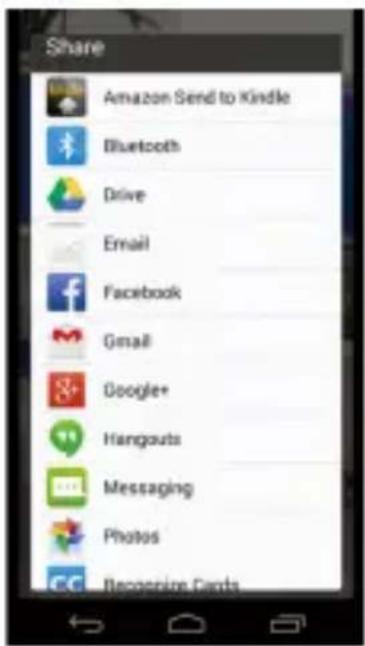
Touch Share. You can post the picture on Twitter, Facebook, Amazon Kindle®
-
Google+, Photos, Drive, Recognize Cards or you can send it through messaging, Hangouts, Email, G mail ^TM , Wi-Fi Direct, or Bluetooth ^® and other apps.

NOTE:
Touch to start recording video and touch to stop. While the recording is in progress, you can touch to save the frame as a separate photo.
Changing Language
You can change the language of your phone's buttons and menus.
- From the home screen, touch

Language & input > Language.
- Touch the language you want to use.
Product Safety Information
 | Don’t make or receive handheld calls while driving. Never text while driving. |
 | Don’t use at gas stations. |
 | Keep your phone at least 10 mm away from your ear or body while making calls. |
 | Your phone may produce a bright or flashing light. |
 | Small parts may cause choking. |
 | Do not dispose of your phone in fire. |
 | Your phone can produce a loud sound. |
 | To prevent possible hearing damage, do not listen at high volume levels for long periods. |
 | Avoid contact with anything magnetic. |
 | Avoid extreme temperatures. |
 | Keep away from pacemakers and other electronic medical devices. |
 | Avoid contact with liquid. Keep your phone dry. |
 | Turn off when asked to in hospitals and medical facilities. |
 | Don’t take your phone apart. |
 | Turn off when told to in aircrafts and airports. |
 | Only use approved accessories. |
 | Turn off when near explosive materials or liquids. |
 | Don’t rely on your phone for emergency communications. |
Radio Frequency (RF) Energy
This device meets the government's requirements for exposure to radio waves.
This device is designed and manufactured not to exceed the emission limits for exposure to radio frequency (RF) energy set by the Federal Communications Commission of the U.S Government:
The exposure standard for wireless mobile devices employs a unit of measurement known as the Specific Absorption Rate, or SAR. The SAR limit set by the FCC is 1.6 W/kg. Tests for SAR are conducted using standard operating positions accepted by the FCC with the device transmitting at its highest certified power level in all tested frequency bands. Although the SAR is determined at the highest certified power level, the actual SAR level of the device while operating can be well below the maximum value. This is because the device is designed to operate at multiple power levels so as to use only the poser required to reach the network. In general, the closer you are to a wireless base station antenna, the lower the power output.
The highest SAR value for the device as reported to the FCC when tested for use at the ear is 0.16 W/kg and when worn on the body, as described in this user guide, is 1.17 W/kg (Body-worn measurements differ among device models, depending upon available enhancements and FCC requirements.)
While there may be differences between the SAR levels of various devices and at various positions, they all meet the government requirement.
The FCC has granted an Equipment Authorization for this device with all reported SAR levels evaluated as in compliance with the FCC RF exposure guidelines. SAR information on this device is on file with the FCC and can be found under the Display Grant section of http://www.fcc.
gov/oet/ea/fccid/ after searching on:
FCC ID: SRQ-Z980L
For body worn operation, this device has been tested and meets the FCC RF exposure guidelines for use with an accessory that contains no metal and the positions the handset a minimum of 1.0 cm from the body. Use of other enhancements may not ensure compliance with FCC RF exposure guide lines. If you do not use a body -worn accessory and are not holding the device at the ear, position the handset a minimum of 1.0 cm from your body when the device is switched on.
ZTE Grand™ Memo II Guía rápida
INFORMACIÓN LEGAL
Copyright © 2015 ZTE CORPORATION.
natural_image
Illustration of a smartphone with a magnifying glass icon and blue arrow indicating download or export (no text or symbols)natural_image
Illustration of a smartphone with a close-up of its screen showing a computer icon, no text or symbols present.
¡ADVERTENCIA!
natural_image
Illustration of a smartphone with a magnified inset showing a blue arrow pointing to a device (no text or symbols present)natural_image
Illustration of a smartphone with a close-up of its screen showing a chip, no text or symbols present.
NOTA:
natural_image
Line drawing of a smartphone with a USB cable inserted, showing a blue arrow indicating the cable's direction (no text or symbols present)natural_image
Scenic landscape with a paved path, colorful flower beds, and distant shoreline under overcast sky (no text or symbols visible)For warranty service information, please call the following telephone number: 1-877-817-1759. Or go to our website : www.zteusa.com