Motion Ceiling Alarm Inc Remote - Motion detector Proper - Free user manual and instructions
Find the device manual for free Motion Ceiling Alarm Inc Remote Proper in PDF.

| Product Type | Motion Detector |
| Brand | Proper |
| Model | Motion Ceiling Alarm Inc Remote |
| Mounting Type | Ceiling |
| Detection Range | Up to 12 meters (40 feet) |
| Detection Angle | 360 degrees |
| Power Supply | 2x AA batteries (not included) |
| Wireless Connectivity | 433 MHz RF remote control |
| Alarm Type | Built-in siren (up to 105 dB) |
| Dimensions | 12.5 cm x 12.5 cm x 4 cm (5" x 5" x 1.6") |
| Weight | 0.18 kg (6.3 oz) |
| Operating Temperature | -10°C to 50°C (14°F to 122°F) |
| Humidity Range | Up to 85% non-condensing |
| Detection Method | Passive infrared (PIR) |
| Remote Control Range | Up to 100 meters (330 feet) in open area |
| Alarm Duration | Adjustable: 10 seconds to 3 minutes |
| Low Battery Indicator | Yes (LED flash) |
| Tamper Protection | Yes (tamper switch) |
| Installation | DIY with screws and anchors (included) |
| Compliance | CE, RoHS |
Frequently Asked Questions - Motion Ceiling Alarm Inc Remote Proper
User questions about Motion Ceiling Alarm Inc Remote Proper
0 question about this device. Answer the ones you know or ask your own.
Ask a new question about this device
Download the instructions for your Motion detector in PDF format for free! Find your manual Motion Ceiling Alarm Inc Remote - Proper and take your electronic device back in hand. On this page are published all the documents necessary for the use of your device. Motion Ceiling Alarm Inc Remote by Proper.
USER MANUAL Motion Ceiling Alarm Inc Remote Proper
natural_image
Two white electronic devices, one with a digital display and the other a circular device with red LED and signal waves (no visible text or symbols)With it's 'smoke alarm' design, this alarm unit will detect motion over a 360° surface area, perfect for anywhere around the home or business.

Proper Care
E: care@proper.co.uk T: 0844 980 7000

Visit Us
www.proper.co.uk
About the Alarm
Package Contents
- PIR Alarm Unit Mounting bracket
- Remote Control
- Instructions
IMPORTANT – READ BEFORE INSTALLING
- Do not expose any part of the alarm unit to any sudden shocks (such as being dropped or struck).
- Do not install the passive infrared (PIR) alarm unit within detection range of any device which emit heat or cold, such as air conditioners, refrigerators, ovens, heaters, microwaves or other electronic equipment which generates heat.
- Do not install the PIR sensor in direct sunlight.
- Use only alkaline batteries.
- Do not install outdoors.
- Replace the batteries in the unit every six months.
- Test the alarm periodically (every 1 – 2 months) to ensure it is working properly.
- This alarm cannot offer complete protection for your home or business – it is simply an alarm system.
How it works
The PIR sensor is a passive infrared motion sensor, meaning it detects infrared radiation rather than projecting it (unlike a security camera with infrared night vision, which is active infrared). All objects emit this infrared radiation (we commonly call it “heat”) and the infrared sensor looks for any of this radiation, which moves. The passive sensor is not infallible – in particular, it cannot detect objects/people which are the same temperature as their background. So a human being moving about on an extremely hot day might go unnoticed. Also, a security camera with active infrared night vision in the same vicinity as the infrared sensor may give false alarms (particularly if it is a moving PTZ system).
Setting up the Alarm
Low Battery Indicator
When the batteries in the alarm unit are running out, the LED on the front of the alarm unit will flash slowly (more slowly than during the arming delay). If the LED starts flashing in this way, change the batteries immediately.
Replacing Batteries
The batteries in the alarm unit should be replaced very six months. If you're using the sensor in chime mode and get a lot of visitors, you may need to change them more often. On the other hand, if you use the PIR in alarm mode, don't arm it often and use high quality batteries, you may not need to replace them as often.
- Remove the sensor from its mounting bracket.
- On the rear side of the sensor, locate the battery compartment.
- Remove batteries
- Insert three fresh AA batteries. Do not mix battery types, and do not use rechargeable batteries.
Re-Pairing the Remote
If you find that the remote control isn't operating properly, this indicates that the remote control might need to be paired up again with the alarm unit. This is most likely to happen when the batteries are changed in the alarm unit - the temporary lack of power clears the sensor's memory.
- Remove the alarm unit from the mounting bracket.
- Locate and push the button on the rear of the unit labeled "LEARN". The button is recessed, so you'll need a thin screwdriver or similar to push it.
- The LED on the front of the alarm unit will flash slowly, indicating that the sensor is in Learning Mode.
- Press any button on the remote control. The alarm unit will beep to confirm the pairing worked.
Operating the Ceiling PIR Alarm
Alarm/Chime Mode
The switch to select the mode the sensor operates can be found on the side of the remote control, as shown to the left. Alarm Mode: When the sensor detects movement whilst the unit is in alarm mode, it will not activate immediately. There is a thirty seconds delay, to allow you to use the remote control to disarm the sensor before it goes off. If the alarm unit is not disarmed within this thirty seconds delay, then the alarm will sound at full volume. The alarm can still be disarmed whilst the alarm is sounding by pressing the disarm button on the remote control.
Chime Mode: When the sensor detects movement when in chime mode, it will sound a chime instantly. There is no entry delay nor exit delay. After the chime sounds, there is a short (a few seconds) delay before it can be sounded again to prevent is sounding constantly if, for example, someone were to be standing in the detection range.
Arming and Disarming the Alarm
To arm the system, simply press ARM on the remote control. The system will arm into whichever mode is currently selected on the remote control.
To disarm the system, press the DISARM button. The DISARM button will disarm the alarm unit whether it is in Chime Mode or Alarm Mode.
Entry and Exit Delays
Once you've armed the alarm unit, it will enter the arming delay. This period consists of forty-five seconds, during which time the LED on the front face of the alarm unit will flash. After the arming delay has elapsed, the alarm unit will beep once, indicating that it is armed. Should the alarm be tripped (that is, it detects something) it will not sound instantly. Rather, there is a further thirty seconds delay, to give you time to disarm the system before the siren sounds.
Detection Area
The PIR sensor has a 360 degree detection field horizontally, and slightly more than 100 degrees vertically. The diagram below shows an average detection pattern under typical circumstances.
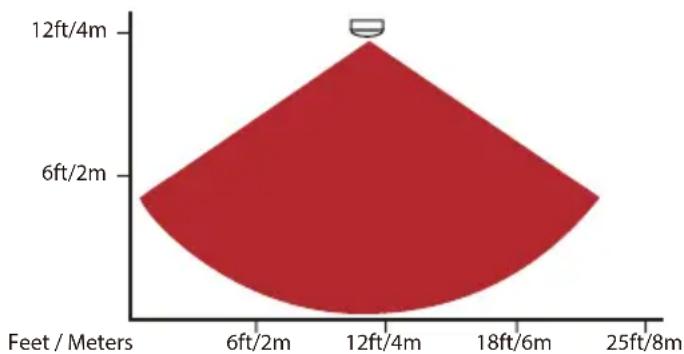
radar
| Depth (Feet/Meters) | Value | |---|---| | 6ft/2m | 6 | | 12ft/4m | 12 | | 18ft/6m | 6 | | 25ft/8m | 6 |The effective detection area does depend on the height of the ceiling that the alarm unit is mounted on. As a general rule, the effective detection radius when mounted on a ceiling of average height is approximately 9ft/3m.
You can test the functionality of the motion sensor as well as the detection area by setting up the sensor, setting it to chime mode and then moving about in the area you want to protect. It will chime each time it detects movement, allowing you to obtain an accurate impression of it's field of view.
Note that the effective detection range may change in different environmental conditions, particularly during very hot periods.
Important:
- Any obstructions in the environment will reduce the sensors effectiveness. It can't see through walls! Even a thin sheet of glass will significantly impair the range of the sensor, as glass blocks more infrared radiation than visible light.
- Small animals (such as dogs, cats or similar) can trigger the PIR sensors. Therefore, we suggest that the PIR sensors are not suited to areas where pets are kept.
- The remote control uses infrared light to communicate with the alarm unit. For the easiest day-to-day operation of the alarm, mount the alarm unit in a location which allows the remote control a clear line of sight from the position you'd like to disarm it from.
Installation Instructions
Mounting
To mount the PIR alarm unit, you'll need the following tools:
- A screwdriver
• A drill (for hardwood or masonry)
The PIR alarm unit should be mounted on a ceiling between 6ft/2m and 9ft/3m high for maximum coverage and reliability.
Do not mount the PIR on a ceiling higher than 4m, as the sensor's range will not reach the ground, and will not be able to detect the heat of a single human body reliably. You could conceivably mount the alarm unit on a wall. The alarm would still work, though the field of view isn't particularly suited to this application. Under most circumstances, a more focused PIR sensor designed to be wall mounted would be more appropriate for that purpose.
To mount the alarm unit
The PIR sensor mounts in much the same way as a cordless smoke alarm. A circular bracket is attached to the ceiling by screws, and then the main alarm unit is attached to this bracket.
- First attach the mounting bracket to a ceiling, using the supplied screws. If mounting on to hardwood, you may need to drill guide holes. If mounting onto masonry (brick, concrete and so on) you'll need a drill with a masonry drill bit, and use the wall plugs included with the alarm unit.
- Push the alarm unit onto the mounting bracket. Turn clockwise to secure in place.
Technical Specifications
Power Requirements: 3 x Alkaline AA Batteries (4.5V DC)
Modes: 2 (Alarm and Chime)
PIR Detection Range > 3m (Typical – varies by environment)
PIR Detection Area 360° horizontal, 110° vertical (approx)
CHIME MODE
Chime Volume > 90dB
Chime Duration 2s
Re-trigger Delay 5s
ALARM MODE
Mode of Operation Remote control (included)
Siren Volume > 110dB
Siren Duration 30s
Entry Delay 30s
Exit Delay 45s
Re-trigger Delay 5s
REMOTE CONTROL
Power Requirements 1 x CR2032 Button Cell (3V DC)
Remote Distance > 20ft / 6m
Remote Angle 60° (approx)
For queries about any of the products in our security range, please contact the Proper Care team
Proper Care
E: care@proper.co.uk T: 0844 980 7000