TMR-121EC - NAS TRENDNET - Free user manual and instructions
Find the device manual for free TMR-121EC TRENDNET in PDF.

| Product Type | Network Attached Storage (NAS) |
| Model | TMR-121EC |
| Brand | TRENDnet |
| Dimensions (W x D x H) | Approx. 200 x 130 x 50 mm |
| Weight | Approx. 1.2 kg |
| Power Supply | 12V DC, 2A adapter (included) |
| Supported Drive Bays | 1 bay (3.5" SATA HDD/SSD) |
| Network Interface | 1 x Gigabit Ethernet (RJ-45) |
| USB Ports | 2 x USB 2.0 (for expansion or backup) |
| File System Support | EXT4, FAT32, NTFS (via USB) |
| RAID Support | None (single disk) |
| Operating System Compatibility | Windows, macOS, Linux |
| Cooling | Passive (fanless) or small fan |
| Package Contents | NAS unit, power adapter, Ethernet cable, quick install guide |
| Maintenance | Keep device in a cool, dry place; clean casing with dry cloth; ensure adequate ventilation. |
| Security | Administrator password, network share permissions, optional HTTPS access |
| Spare Parts and Repairability | Power adapter and HDD are replaceable; no user-serviceable internal parts; contact support for repairs. |
| General Information | Entry-level single-bay NAS for home or small office file sharing, remote access, and backup. |
Frequently Asked Questions - TMR-121EC TRENDNET
User questions about TMR-121EC TRENDNET
0 question about this device. Answer the ones you know or ask your own.
Ask a new question about this device
Download the instructions for your NAS in PDF format for free! Find your manual TMR-121EC - TRENDNET and take your electronic device back in hand. On this page are published all the documents necessary for the use of your device. TMR-121EC by TRENDNET.
USER MANUAL TMR-121EC TRENDNET
- Before You Start 1
- How to Install 3
Troubleshooting 5
natural_image
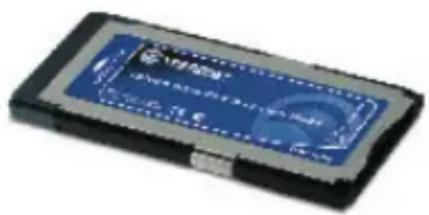
Close-up of a blue and black electronic device with a circular label (no visible text or symbols on the body)Package Contents
• TMR-121EC
• Quick Installation Guide
System Requirements
• Express Card /34 or Express Card/54 slot
• CPU: 300Mhz or above / 800Mhz or above (Windows Vista)
• Memory: 256MB RAM or above / 512MB RAM or above (Windows Vis
• Windows 2000/XP(32-/64-bit)/Vista(32-/64-bit), Mac OS X (10.1 \~ 10
• Supported Memory Cards
Connect Directly
| XD-Picture Type-M/Type-H (XD) v.1.2B |
| Memory Stick (MS) v. 1.0 |
| MemoryStick Pro (MS Pro) v. 1.0 |
| Secure Digital (SD) v1.0/1.1/2.0/ SDHC (class 6) |
| Micro Secure Digital (MMC, MMC Plus) v. 4.1 |
Connect with Adapter
| MemoryStick Duo (MS Duo) v. 1.0 |
| MemoryStick Pro Duo (MS Pro Duo) v. 1.0 |
| ReSize MultiMediaCard (RS MMC) v. 3.31 |
| MultiMediaCard Mobile (MMC Mobile) v. 4.1. |
| MultiMediaCard Micro (MMC Micro) v. 4.1 |
| Mini Secure Digital ( Mini DS) v.1.0/1.1 |
| Micro Secure Digital (Micro SD, T-Flash) v. 1.0 |
Application
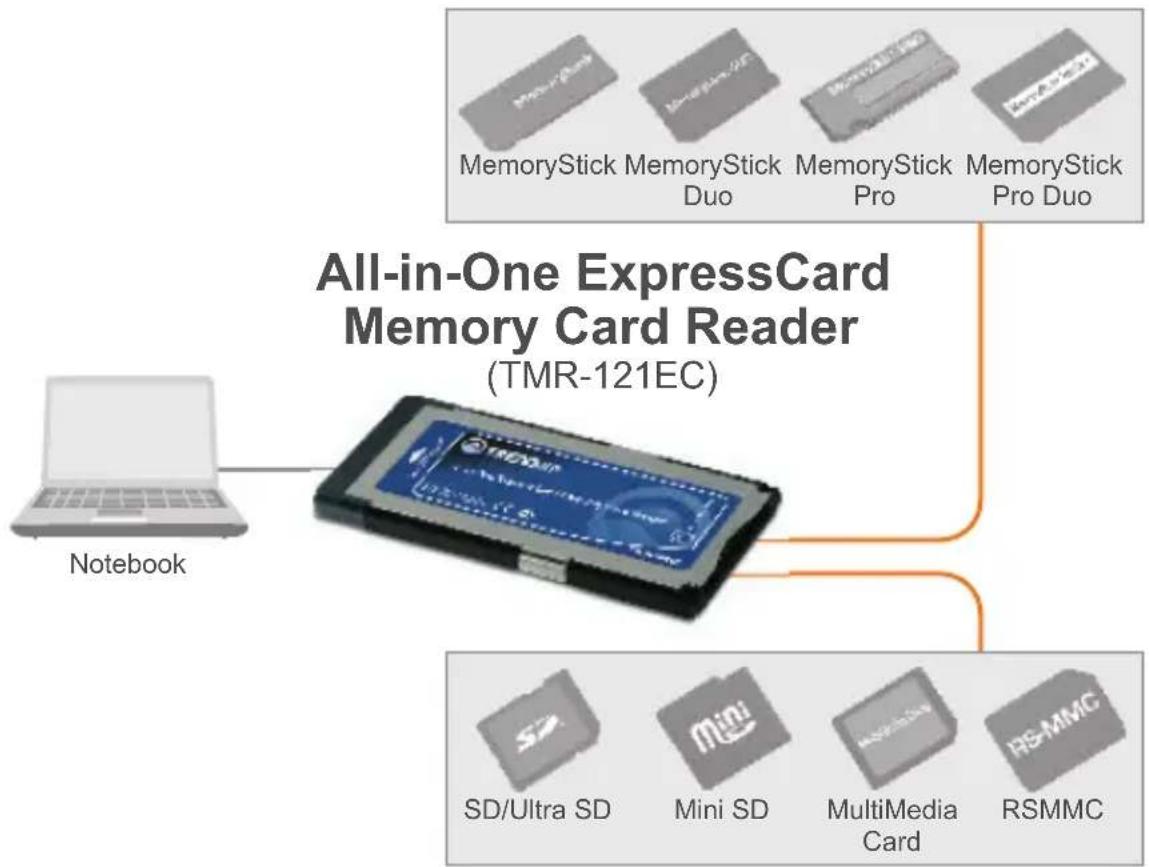
flowchart
graph TD
    A["All-in-One ExpressCard Memory Card Reader (TMR-121EC)"] --> B["MemoryStick Duo"]
    A --> C["MemoryStick Pro"]
    A --> D["MemoryStick Pro Duo"]
    B --> E["Notebook"]
    C --> E
    D --> E
    E --> F["SD/Ultra SD"]
    E --> G["Mini SD"]
    E --> H["MultiMedia Card"]
    E --> I["RSMMC"]
2. How to Install
Note: For installation instructions for Mac OS X (10.1\~10.5), please refer to question 1 in the Troubleshooting section.
- Turn on your notebook PC and wait until the Windows desktop appears.
- Insert Express Card firmly into free Express Card slot of your notebook PC.
- Drivers will install automatically.
- Double-click My Computer or Computer (Windows Vista) and verify the Removable Disk icon appears.
- Connect your memory card to the appropriate slot on the card reader.
natural_image
Front view of a blank laptop computer with no visible text or symbols on the screen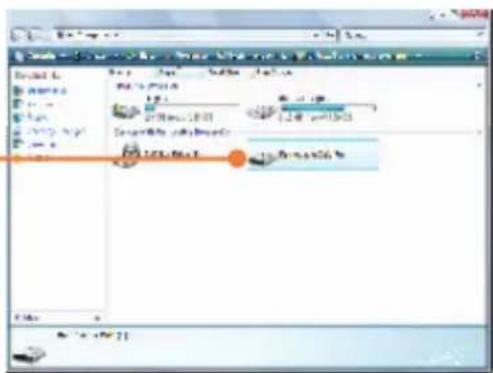
-
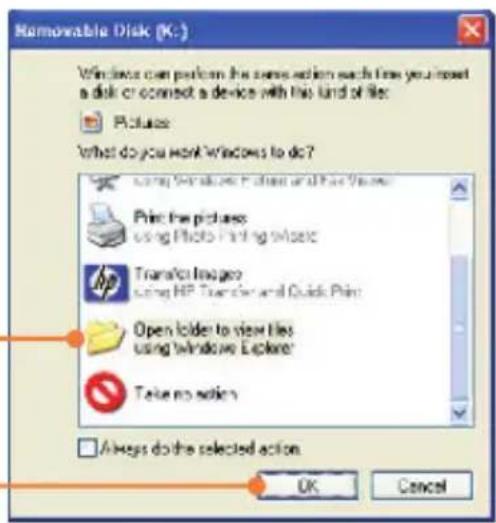
Click Open folder to view files using Windows Explorer.
-
Click OK (Windows 2000/XP only).
Register Your Product
To ensure the highest level of customer service and support, please take a moment to register your product Online at: www.TRENDnet.com/register
Thank you for choosing TRENDnet
Q1: How do I install on my Macintosh?
A1: First, verify that your Macintosh is running Mac OS X (10.1\~10.5). Other versions of Mac OS are not supported. Second, turn on your notebook PC. Third, insert the TMR-121EC firmly into an available ExpressCard slot. Drivers will install automatically. Fourth, insert your memory card to the TMR-121EC. Fifth, the memory card will appear as a removable media device icon (the name and appearance of each icon depends on the type of memory card).
Q2: Can I connect or disconnect the TMR-121EC while the computer is on?
A2: Yes, you can connect or disconnect the TMR-121EC because it is Plug-and-Play and hot-pluggable.
Q3: I am unable to insert my memory card into the TMR-121EC. What should I do?
A3: First, make sure that you are using a supported memory card (see section 1). Second, insert XD-Picture cards with gold contacts facing up. Insert all other memory cards with the gold contacts facing down. Third, an adapter is required for the following memory cards: MS Duo, MS Pro Duo, RS MMC, MMC Mobile, MMC Micro, Mini DS, and Micro SD.
Q4: After successful installation of the TMR-121EC, I inserted my memory card into the slot and it is not working? What should I do?
A4: Make-121e6e memory card is properly inserted in the
If you have any questions regarding the TMR-121EC Memory Card Reader/Writer, please refer to the User's Guide included on the Utility & Driver CD-ROM or contact TRENDnet's Technical Support Department..
Certifications
This equipment has been tested and found to comply with FCC and CE Rules.
Operation is subject to the following two conditions:
(1) This device may not cause harmful interference.
(2) This device must accept any interference received. Including interference that may cause undesired operation.


Waste electrical and electronic products must not be disposed of with household waste. Please recycle where facilities exist. Check with you Local Authority or Retailer for recycling advice.
NOTE: THE MANUFACTURER IS NOT RESPONSIBLE FOR ANY RADIO OR TV INTERFERENCE CAUSED BY UNAUTHORIZED MODIFICATIONS TO THIS EQUIPMENT. SUCH MODIFICATIONS COULD VOID THE USER'S AUTHORITY TO OPERATE THE EQUIPMENT.
ADVERTENCIA
Product Warranty Registration
Please take a moment to register your product online. Go to TRENDnet's website at http://www.trendnet.com/register
TRENDNET®
20675 Manhattan Place
Torrance, CA 90501
USA