PEX56KIM - Router StarTech.com - Free user manual and instructions
Find the device manual for free PEX56KIM StarTech.com in PDF.

User questions about PEX56KIM StarTech.com
0 question about this device. Answer the ones you know or ask your own.
Ask a new question about this device
Download the instructions for your Router in PDF format for free! Find your manual PEX56KIM - StarTech.com and take your electronic device back in hand. On this page are published all the documents necessary for the use of your device. PEX56KIM by StarTech.com.
USER MANUAL PEX56KIM StarTech.com
PCI Express V.92 56K Internal Data/Fax Modem
PEX56KIM

natural_image
Green PCI EPU card with network ports and external components (no visible text or symbols)*actual product may vary from photos
For the most up-to-date information, please visit: www.startech.com
FCC Compliance Statement
This equipment has been tested and found to comply with the limits for a Class B digital device, pursuant to part 15 of the FCC Rules. These limits are designed to provide reasonable protection against harmful interference in a residential installation. This equipment generates, uses and can radiate radio frequency energy and, if not installed and used in accordance with the instructions, may cause harmful interference to radio communications. However, there is no guarantee that interference will not occur in a particular installation. If this equipment does cause harmful interference to radio or television reception, which can be determined by turning the equipment off and on, the user is encouraged to try to correct the interference by one or more of the following measures:
• Reorient or relocate the receiving antenna.
- Increase the separation between the equipment and receiver.
- Consult the dealer or an experienced radio/TV technician for help.
- Connect the equipment into an outlet on a circuit different from that to which the receiver is connected.
FCC Part 68 Statement
This equipment complies with Part 68 of the FCC rules and the requirements adopted by the ACTA. On the bottom of this equipment is a label that contains, among other information, a product identifier in the format US:AAAEQ##TXXXX. If requested, this number must be provided to the telephone company.
This equipment uses the following Universal Service Order Code (USOC) jacks: RJ11C.
A plug and jack used to connect this equipment to the premises wiring and telephone network must comply with the applicable FCC Part 68 rules and requirements adopted by the ACTA. A compliant telephone cord and modular plug is provided with this product. It is designed to be connected to a compatible modular jack that is also compliant. See installation instructions for details.
The REN is used to determine the number of devices that may be connected to a telephone line. Excessive RENs on a telephone line may result in the devices not ringing in response to an incoming call. In most but not all areas, the sum of RENs should not exceed five (5.0). To be certain of the number of devices that may be connected to a line, as determined by the total RENs, contact the local telephone company. The REN for this product is part of the product identifier that has the format US:AAAEQ##TXXXX. The digits represented by ## are the REN without a decimal point (e.g., 03 is a REN of 0.3). If this equipment causes harm to the telephone network, the telephone company will notify you in advance that temporary discontinuance of service may be required. But if advance notice isn't practical, the telephone company will notify the customer as soon as possible. Also, you will be advised of your right to file a complaint with the FCC if you believe it is necessary.
The telephone company may make changes in its facilities, equipment, operations or procedures that could affect the operation of the equipment. If this happens the telephone company will
provide advance notice in order for you to make necessary modifications to maintain uninterrupted service.
If trouble is experienced with this equipment, for repair or warranty information, please contact StarTech.com at 1-800-265-1844. If the equipment is causing harm to the telephone network, the telephone company may request that you disconnect the equipment until the problem is resolved.
There are no serviceable parts in this equipment.
Connection to party line service is subject to state tariffs. Contact the state public utility commission, public service commission or corporation commission for information.
If your home has specially wired alarm equipment connected to the telephone line, ensure the installation of this equipment does not disable your alarm equipment.
If you have questions about what will disable alarm equipment, consult your telephone company or a qualified installer.
US: STAMM02BPEX56KIM
Industry Canada CS03 Statement
This product meets the applicable Industry Canada technical specifications. / Le présent matériel est conforme aux specifications techniques applicables d'Industrie Canada.
Use of Trademarks, Registered Trademarks, and other Protected Names and Symbols
This manual may make reference to trademarks, registered trademarks, and other protected names and/or symbols of third-party companies not related in any way to StarTech.com. Where they occur these references are for illustrative purposes only and do not represent an endorsement of a product or service by StarTech.com, or an endorsement of the product(s) to which this manual applies by the third-party company in question. Regardless of any direct acknowledgement elsewhere in the body of this document, StarTech.com hereby acknowledges that all trademarks, registered trademarks, service marks, and other protected names and/or symbols contained in this manual and related documents are the property of their respective holders.
Table of Contents
Introduction......2
Packaging Contents 2
System Requirements....2
Installation 2
Hardware Installation 2
Driver Installation....3
Verifying Installation....6
Specifications....7
Technical Support 8
Warranty Information......8
Introduction
Packaging Contents
- 1 x PCI Express Modem
- 1 x RJ11 Cable
- 1 x Low-Profile Bracket
- 1 x Driver CD
• 1 x Instruction Manual
System Requirements
• Available PCI Express slot
Installation
Hardware Installation
WARNING! PCI Express cards, like all computer equipment, can be severely damaged by static electricity. Be sure that you are properly grounded before opening your computer case or touching your PCI Express card. StarTech.com recommends that you wear an anti-static strap when installing any computer component. If an anti-static strap is unavailable, discharge yourself of any static electricity build-up by touching a large grounded metal surface (such as the computer case) for several seconds. Also be careful to handle the card by its edges and not the gold connectors.
- Turn your computer off and any peripherals connected to the computer (i.e. Printers, external hard drives, etc.). Unplug the power cable from the rear of the power supply on the back of the computer and disconnect all peripheral devices.
- Remove the cover from the computer case. See documentation for your computer system for details.
- Locate an open PCI Express slot and remove the metal cover plate on the rear of the computer case (Refer to documentation for your computer system for details.). Note that this card will work in PCI Express slots of additional lanes (i.e. x4, x8 or x16 slots).
- Insert the card into the open PCI Express slot and fasten the bracket to the rear of the case.
NOTE: If installing the card into a low profile desktop system, replacing the preinstalled standard profile bracket with the included low profile (half height) installation bracket may be necessary.
-
Place the cover back onto the computer case.
-
Insert the power cable into the socket on the power supply and reconnect all other connectors removed in Step 1.
-
Connect a standard telephone cable (included) from the "Line" port on the card to the telephone outlet on the wall. If you wish to also have a telephone connected to this outlet, connect the telephone to the "Phone" port on the card.
NOTE: Telephone pass through works even if computer is powered off.
Driver Installation
Windows® 8 / 7 / Vista / Server 2008 R2
Note: The modem may auto-install using native drivers, however it is recommended to use the procedure below to update to the latest version.
-
Upon starting Windows, if the Found New Hardware dialog appears on the screen, cancel/close the window and insert the included Driver CD into the computer's CD/DVD drive.
-
Open the Device Manager by right-clicking on Computer, and then select Manage. In the new Computer Management window, select Device Manager from the left window panel (For Windows 8, open the Control Panel and select Device Manager).
-
Expand the Modems section, right-click on the newly detected "PCIe CX9S610 Soft Modem" device and select Update Driver Software, which will start the Update Driver Software Wizard.

text_image
Computer Manage File Action View Help Computer Management (Local) System Tools Task Scheduler Event Viewer Shared Folders Local Users and Groups Performance Device Manager Storage Disk Management Services and Applications Optiplex-790 Audio inputs and outputs Computer Disk drives Display adapters DVD/CD-ROM drives Human Interface Devices IDE ATA/ATAPI controllers Keyboards Mice and other pointing devices Modems PCIe CX95610 Soft Modem-
On the How do you want to search for driver software? window, click Browse my computer for driver software, then Let me pick from a list of device drivers on my computer.
-
From the next screen labeled Select your device's type from the list below, select Show All Devices (should be highlighted by default), and then click Next.
Note: This screen does not appear on all systems, move on to the next step if this does not apply.
-
On the Select the Device Driver you want to install for this hardware screen, click the Have Disk button.
-
Click Browse from the Install from Disk dialog box that pops up.
-
From the Locate File dialog window that opens, navigate to "D:\PCI-E FAX MODEM", then double-click the appropriate 32 or 64-bit OS folder for the system you are using.
-
Select the file "PRANCMxx.inf" in the folder and click the Open button.

text_image
Locate File Look in: Win7-64 Name Date modified T PRANCMwK 10/26/2009 7:38 PM Se File name: PRANCMwKinf Open Files of type: Setup information (*.inf) Cancel-
Click the OK button on the Install From Disk dialog box which will close the window.
-
Once back at the Select the Device Driver you want to install for this hardware screen, click Next and then Close once the driver has installed.
Windows XP
Note: The modem may auto-install using native drivers, however it is recommended to use the procedure below to update to the latest version.
-
Upon starting Windows, if the Found New Hardware dialog appears on the screen, cancel/close the window and insert the included Driver CD into the computer's CD/DVD drive.
-
Open the Device Manager by right-clicking on My Computer, and then select Manage. In the new Computer Management window, select Device Manager from the left window panel.
-
Expand the Modems section, right-click on the newly detected "PCIe CX9S610 Soft Modem" device and select Update Driver, which will start the Hardware Update Wizard.
-
On the main Hardware Update Wizard window, select Install from a list or specific location (Advanced), then click Next.
-
On the next screen, select Don't search, I will choose the driver to install and click Next.
-
From the next screen labeled Hardware Type, select Show All Devices (should be highlighted by default), and then click Next.
Note: This screen does not appear on all systems, move on to the next step if this does not apply.
-
On the Select the Device Driver you want to install for this hardware screen, click the Have Disk button.
-
Click Browse from the Install from Disk dialog box that pops up.
-
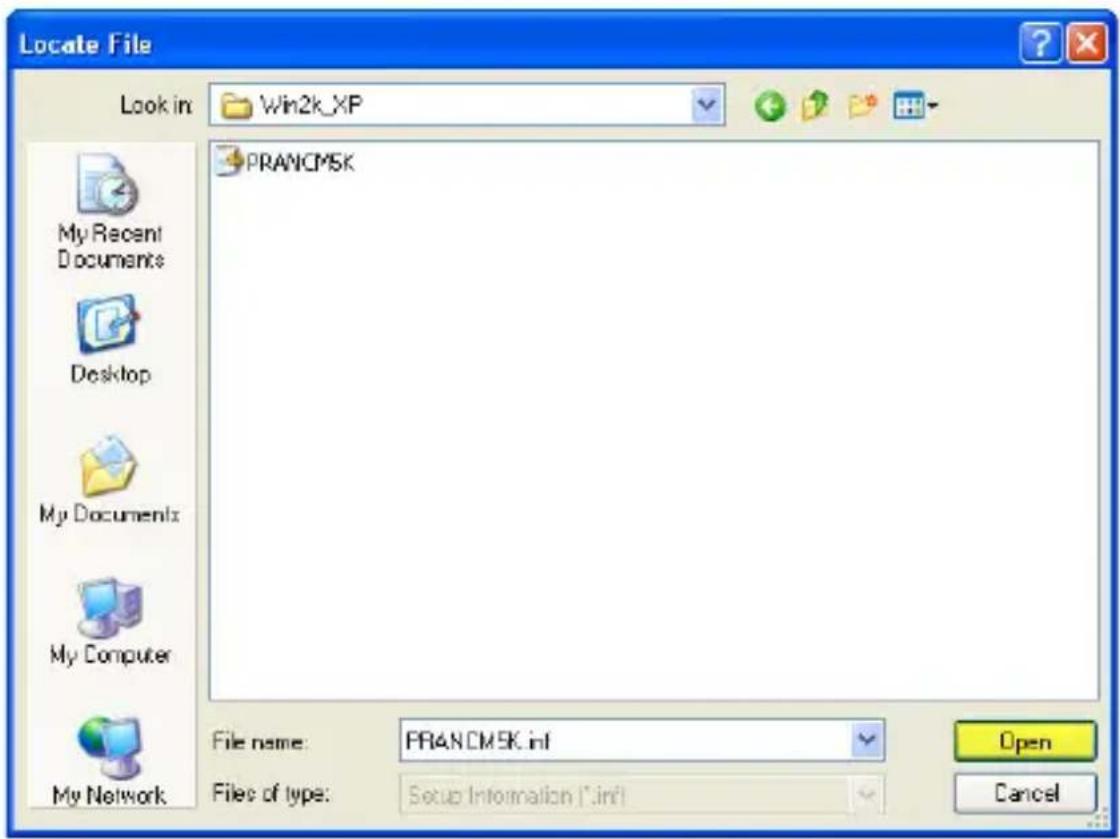
From the Locate File dialog window that opens, navigate to "D:\PCI-E FAX MODEM\Win2k_XP" or "\WinXP64" as appropriate for the system you are using.
-
Select the file "PRANCMxx.inf" and click the Open button.
text_image
Locate File Look in: Win2k_XP My Recent Documents Desktop My Documents My Computer My Network PRANCMS5K File name: PRANCMS5K.inf Files of type: Setup Information (*.inf) Open CancelVerifying Installation
Windows
-
Open the Device Manager by right-clicking on Computer, and then select Manage. In the new Computer Management window, select Device Manager from the left window panel (For Windows 8, open the Control Panel and select Device Manager).
-
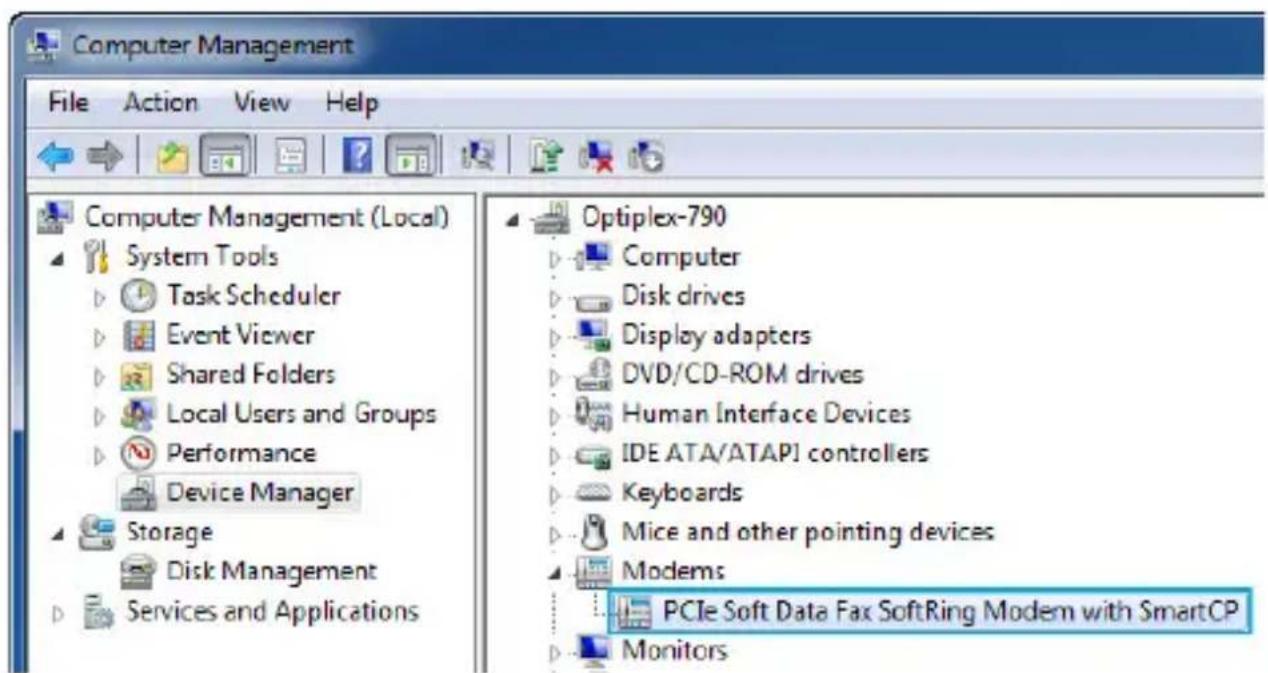
Expand the "Modems" section. On a successful install, you should following devices in the list with no exclamation points or question marks.
text_image
Computer Management File Action View Help Computer Management (Local) System Tools Task Scheduler Event Viewer Shared Folders Local Users and Groups Performance Device Manager Storage Disk Management Services and Applications Optiplex-790 Computer Disk drives Display adapters DVD/CD-ROM drives Human Interface Devices IDE ATA/ATAPI controllers Keyboards Mice and other pointing devices Modems PCIe Soft Data Fax SoftRing Modem with SmartCP MonitorsSpecifications
| Bus Type PCI Express | |
| Card Type Standard Profile (LP bracket incl.) | |
| Chipset ID Conexant - CX95610 | |
| Port Style Integrated on Card | |
| Ports 2 | |
| Connector Type(s) 1x PCI Express x1 Male | |
| External Port(s) 2x RJ-11 Female | |
| Maximum Data Transfer Rate | 56 Kbps Down48 Kbps Up14.4 Kbps Fax |
| Modulation | Modem Modulation: ITU-T V.92, V.90, V.34, V.32bis, V.32, V.22bis, V.22, V.23, V.21Fax Modulation: ITU-T V.17, V.29, V.27 Ter, and V.21 channel 2Data Compression: V.44 |
| Dimensions (L x W x H) 60 x 19 x 67 mm | |
| Weight 1.3 oz [37 g] | |
| Humidity 10-90% RH | |
| Operating Temperature 0°C to 40°C (32°F to 104°F) | |
| Storage Temperature -40°C to 70°C (-40°F to 158°F) | |
| Compatible Operating Systems | Windows® 8 (32/64bit), 7 (32/64), Vista(32/64), XP(32/64)Windows® Server 2008 R2, 2003(32/64) |
Technical Support
StarTech.com's lifetime technical support is an integral part of our commitment to provide industry-leading solutions. If you ever need help with your product, visit www.startech.com/support and access our comprehensive selection of online tools, documentation, and downloads.
For the latest drivers/software, please visit www.startech.com/downloads
Warranty Information
This product is backed by a two year warranty.
In addition, StarTech.com warrants its products against defects in materials and workmanship for the periods noted, following the initial date of purchase. During this period, the products may be returned for repair, or replacement with equivalent products at our discretion. The warranty covers parts and labor costs only. StarTech.com does not warrant its products from defects or damages arising from misuse, abuse, alteration, or normal wear and tear.
Limitation of Liability
In no event shall the liability of StarTech.com Ltd. and StarTech.com USA LLP (or their officers, directors, employees or agents) for any damages (whether direct or indirect, special, punitive, incidental, consequential, or otherwise), loss of profits, loss of business, or any pecuniary loss, arising out of or related to the use of the product exceed the actual price paid for the product. Some states do not allow the exclusion or limitation of incidental or consequential damages. If such laws apply, the limitations or exclusions contained in this statement may not apply to you.
Hard-to-find made easy. At StarTech.com, that isn't a slogan. It's a promise.
StarTech.com is your one-stop source for every connectivity part you need. From the latest technology to legacy products — and all the parts that bridge the old and new — we can help you find the parts that connect your solutions.
We make it easy to locate the parts, and we quickly deliver them wherever they need to go. Just talk to one of our tech advisors or visit our website. You'll be connected to the products you need in no time.
Visit www.startech.com for complete information on all StarTech.com products and to access exclusive resources and time-saving tools.
StarTech.com is an ISO 9001 Registered manufacturer of connectivity and technology parts. StarTech.com was founded in 1985 and has operations in the United States, Canada, the United Kingdom and Taiwan servicing a worldwide market.