DL3 external hard drive - External hard drive Origin Storage - Free user manual and instructions
Find the device manual for free DL3 external hard drive Origin Storage in PDF.

User questions about DL3 external hard drive Origin Storage
0 question about this device. Answer the ones you know or ask your own.
Ask a new question about this device
Download the instructions for your External hard drive in PDF format for free! Find your manual DL3 external hard drive - Origin Storage and take your electronic device back in hand. On this page are published all the documents necessary for the use of your device. DL3 external hard drive by Origin Storage.
USER MANUAL DL3 external hard drive Origin Storage
6 First time setup
9 Admin password
11 User password
13 Main screen
14 Disconnecting your DL3
Basics
15 Administrator controls
16 System menu
18 User options
19 Self-destruct mode
Advanced
21 RFID authentication
24 Virtual CD partition
Troubleshoot
26 Forgotten password
27 Initialize & format your drive
Miscellaneous
32 Linux configuration
34 Frequently asked questions
34 Contact support team
At a Glance
INTRODUCTION
Congratulations on your purchase of the DataLocker DL3™ Encrypted Hard Drive. This user manual is intended to help you configure your device. Because we are constantly updating our products, the images and text in this manual may vary slightly from the images and text displayed by your DataLocker DL3™. These changes are minor and should not affect the ease of setup adversely.
Updated software and documentation are freely available for download at our website:
Visit www.datalocker.com | Go to support → downloads
The DataLocker DL3™ stands alone as the only external hard drive equipped with a patented, on board, LCD touch screen. This feature allows the user to conveniently perform all processes directly through the LCD Interface, making it truly 100% platform independent.
Although the DataLocker DL3™ is extremely user friendly, it is recommended that you review this guide to ensure that you become fully acquainted with the DataLocker DL3™ and all of its features.
To register your product, please visit our website and fill out the online form under the Support tab to complete the product registration.
ABOUT THE DL3
The DataLocker DL3™ has a minimum power requirement of 5 Volts and 1A of current that is drawn from the USB port. The DataLocker DL3™ utilizes 256-bit AES encryption operating in XTS mode to fully encrypt your drive's contents.
The DataLocker DL3 ^TM comes preformatted with Windows NTFS file system. All major file systems are supported (HFS, NTFS, EXT, FAT).
If you require a different file system, please consult your operating system for initialization and formatting instructions.
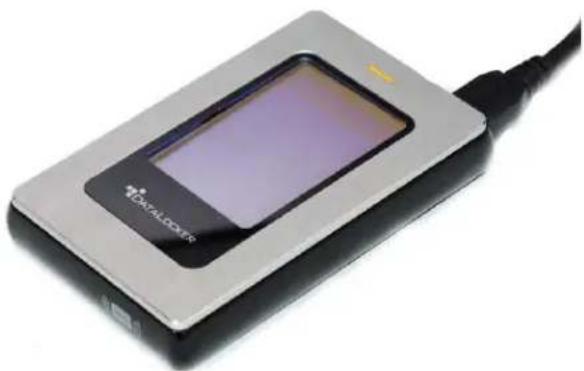
natural_image
Exterior view of a handheld electronic device with a screen and cable (no visible text or symbols)For more information on initializing and formatting your DL3, skip to page 27.
Getting Started
FIRST TIME SETUP
This section will guide you through the necessary steps to set up the DL3 drive for the first time around. It is highly recommended that you set a new administrator password using alphanumeric characters.
Step 1: Connect the DL3 to your computer with the included USB cable.
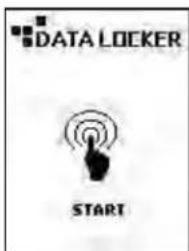
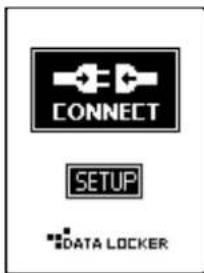
Step 2: At the startup screen press [START].
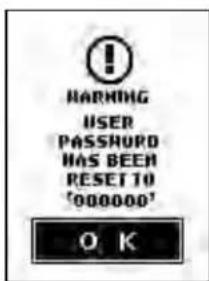
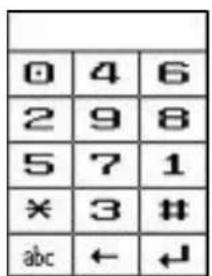
Step 3: Enter the default password 000000.
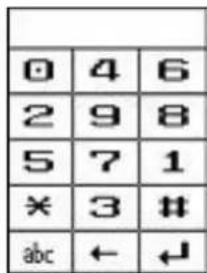
Then press the [←] symbol.
| 0 | 4 | 6 |
| 2 | 9 | 8 |
| 5 | 7 | 1 |
| * | 3 | # |
| abc | ← | ↓ |
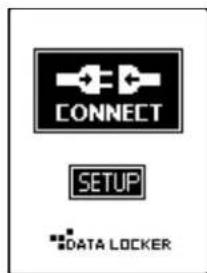
Step 4: Press the [SETUP] button on the touch screen. If it is not selected within 3 seconds, the DataLocker DL3™ will connect to the computer automatically.
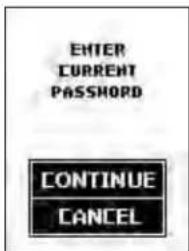
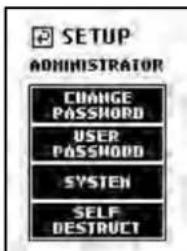
Step 5: At the setup menu press the [CHANGE PASSWORD] button.
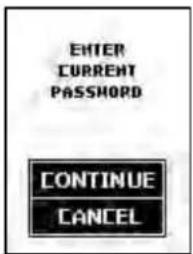
Step 6: Press the [CONTINUE] button, and then enter in the current password, which is 000000. Please follow the onscreen instructions to set your new password. It is recommended that you use a combination of both alpha and numeric characters for your password.
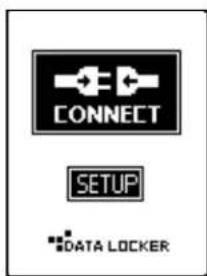
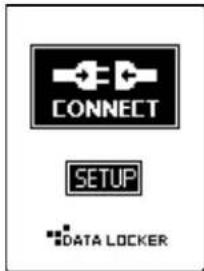
Step 7: After the new password has been set. You may set other options or go back to the CONNECT menu by pressing the button located at the top left hand corner next to SETUP. Then press the [CONNECT] button to start using the DL3 drive.
WARNING: A lost or forgotten password cannot be reset or recovered without losing all of the stored data.
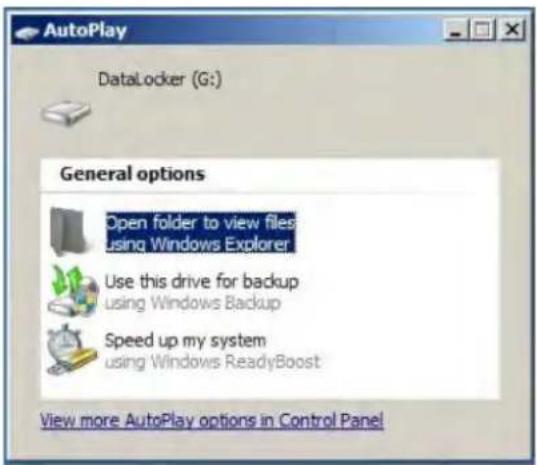
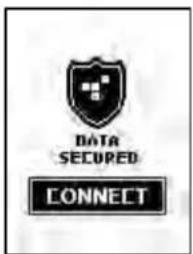
After you press the [CONNECT] button on the DL3 drive, it will begin connecting to the computer. By default, Windows will show an AutoPlay dialog once the drive has successfully connected.
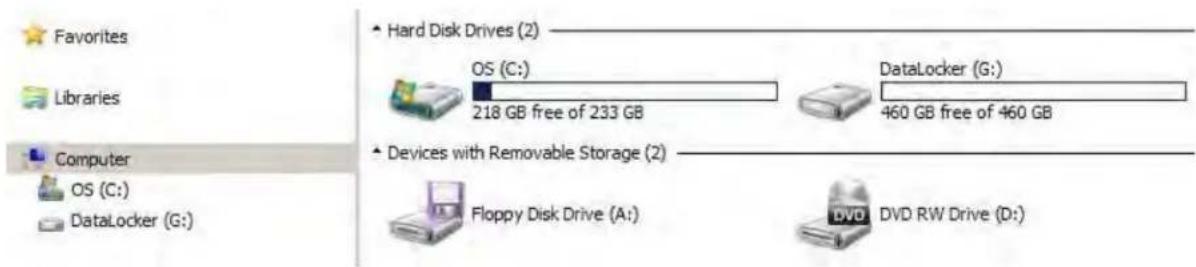
In Windows Explorer you will now see a new drive called "DataLocker" listed in the Hard Disk Drives section. A new drive letter will be automatically assigned to this drive. You may now start using the DL3 drive!
ADMIN PASSWORD
The process of changing the Administrator password is identical to the setup process. It is highly recommended that you set a new administrator password using alphanumeric characters.
Step 1: Power on your DL3 by plugging it in to your computer. If the drive is already connected, press the [DISCONNECT] button and then press the [CONNECT] button on the next screen.

Step 2: Once at the keypad screen, enter the admin password. If the password has not been changed, enter the default password, 000000, and press the [◀] symbol.
Step 3: Press the [SETUP] button on the touch screen. If the [SETUP] button is not selected within 3 seconds, the DataLocker DL3™ will automatically connect to the host computer.
Step 4: At the setup menu press the [CHANGE PASSWORD] button.
Step 5: Press the [CONTINUE] button and then enter in the current password, which is 000000. Please follow the onscreen instructions to set your new password. It is recommended that you use a combination of both alpha and numeric characters for your password.
Step 6: After the new password has been set You may set other options, or save and go back to the CONNECT menu by pressing the button located at the top left hand corner next to SETUP. Then press the [CONNECT] button to start using the DL3 drive.
WARNING: A lost or forgotten password cannot be reset or recovered without losing all the stored data. If you disable the Self Destruct function, you risk being permanently locked out of your device without the option of resetting the DL3 back to its factory state.
USER PASSWORD
The DL3 supports the creation of a user password. The user will have access to all data on the drive; however, the user will not be able to access certain administrative options and controls.
Note: You must change the default administrator password before creating a user password.
Step 1: Power on your DL3 by plugging it in to your computer. If the drive is already connected, press the [DISCONNECT] button and then press the [CONNECT] button on the next screen.

Step 2: Once at the keypad screen, enter the admin password. If the password has not been changed, enter the default

Password, 000000, and press the [←] symbol.
Step 3: Press the [SETUP] button on the touch screen. If the [SETUP] button is not selected within 3 seconds, the DataLocker DL3™ will
automatically connect to the host computer.
Step 4: At the setup menu press the [USER PASSWORD] button.

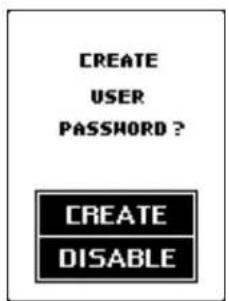
Step 5: Press the [CREATE] button. A user with the default password of 000000 is now created.
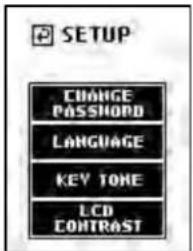
Step 6: The user should then re-login with the default user password of 000000 and change the default password to personal password. The user password change process is identical to changing the administrator's password. The user's setup menu is limited to [CHANGE PASSWORD], [LANGUAGE], [KEY TONE] and [LCD CONTRAST] settings.
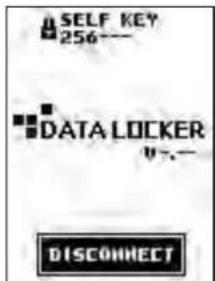
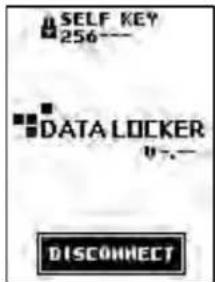
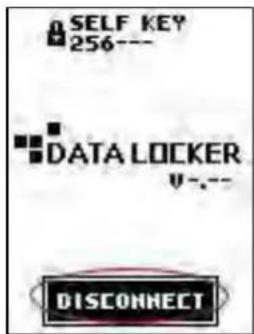
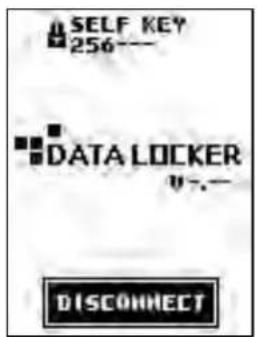
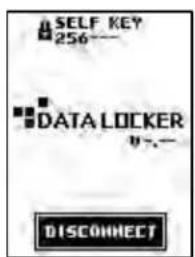
The connected status screen on your DL3 drive displays useful information.
Indicates that the DL3 drive has a USER PASSWORD enabled.
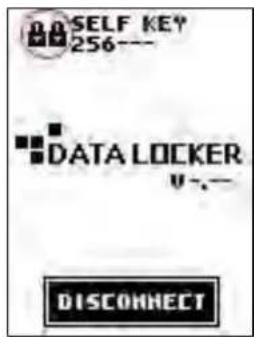
Indicates that the DL3 drive's USER PASSWORD is disabled.
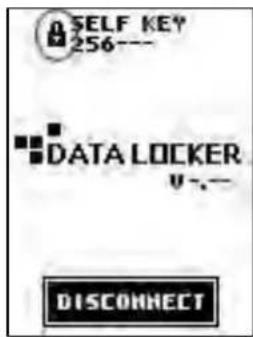
Displays the current firmware installed on the DL3 drive.
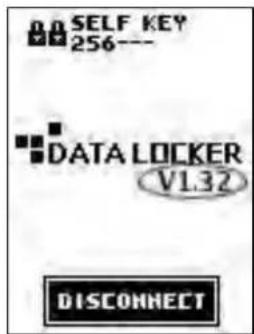
Disconnects the DL3 drive from the computer.
To prevent data loss or damage to disk, ensure the DL3 drive has been properly ejected from the operating system before pressing this button.
DISCONNECTING YOUR DL3
One way to prevent loss or corrupted data is to properly eject the DL3 drive. It is best practice to use your operating system's Safely Remove Hardware or Eject function before you power down or detach the DataLocker DL3™ from the host system.
This will also help prevent damage to the disk.
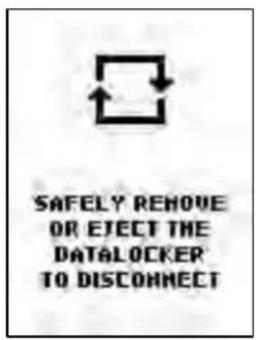
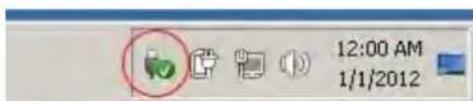
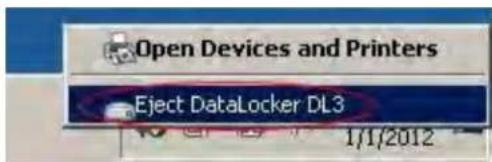
WINDOWS USERS
- Right click the Safely Remove Hardware icon located on the lower right hand corner of the Windows taskbar.
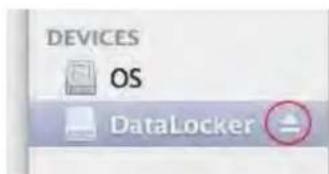
MAC USERS
- Click the eject button that corresponds with the DataLocker DL3™ on your MAC operating system.
- Once the popup menu has appeared, click the correct drive to safely eject the DL3 from Windows.
- Once the drive has been ejected from your MAC operating system, press [DISCONNECT] on the DL3 drive.
Basics
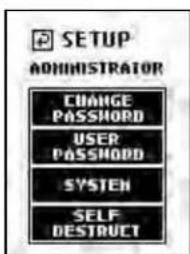
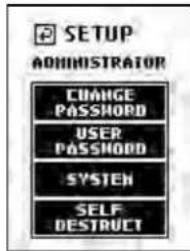
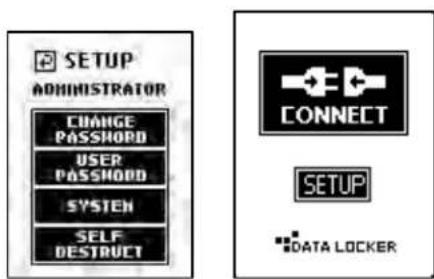
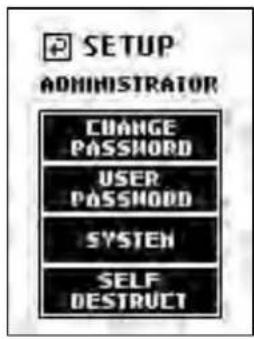
ADMINISTRATOR CONTROLS

Previous Menu / Save Settings Button

Used to go back to previous menu and save the current settings.
Change Password
Used to set the administrator password.
User Password
Used to create a user password.
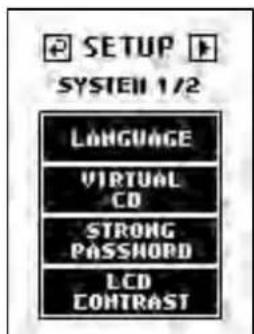
System
Enter the System Menu (see next page).
Self Destruct
If enabled, the Self Destruct function can deter brute force password attacks. The number of failed password attempts is adjustable from 10 to 30 tries.
Once the defined number of failed password attempts is reached, all data on the DL3 drive will be irrecoverably destroyed. For more information about this feature, please read the SELF DESTRUCT section.
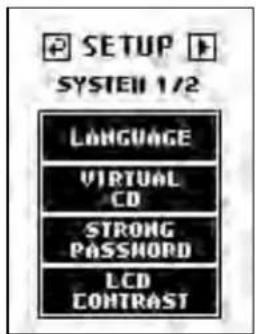
Previous Menu / Save Settings Button

Used to go back to previous menu and save the current settings.
Next Menu Button
Used to go to the next screen.
Language
Set the menu language. Supported languages are:
- English
- French
- German
- Spanish
Virtual
The DL3 supports the creation of an UNENCRYPTED Read Only partition, which is recognized as a CD-ROM. The Virtual CD is created by using the VCD Utility that is available on our website.
Click here to download.
Strong Password
The DL3 allows the administrator to enforce strong password rules for authentication. With the Strong
Password feature enabled, all passwords must meet the following requirements:
- Password must be 8 characters long or greater. The minimum password length is adjustable from 8 to 32 characters.
- Sequential passwords such as "12345678", "98765432", "ABCDEFGH", "HGFEDCBA"
are prohibited.
-
Repeating passwords such as "11111111", "9999999", "AAAAAAAA", "BBBBBBBB" are prohibited.
-
The password must contain both numeric and alpha characters.
LCD Contrast
Adjust the LCD screen's contrast.

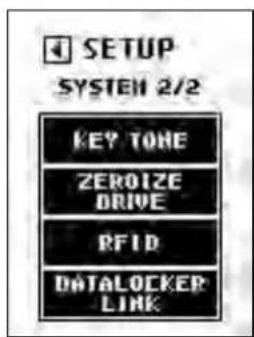
Previous Menu Button
Used to go back to previous menu and save the current settings.
Key Tone
Turn the keypad tone ON or OFF.
Zeroize Drive
Initiates the destruction of all encryption keys and user passwords, making the data on the drive irretrievable. The DL3 will be reset to the original factory state. The DL3 will need to be reinitialized and formatted in order for it to be redeployed.
RFID
Enters the optional RFID Authentication module setup menu.
Data Locker Link
Enable the DL Link remote management system. This program can be downloaded for free on the Download page. Click here.

Previous Menu / Save Settings Button

Used to go back to previous menu and save the current settings.
Change Password
Used to set the administrator password.
Language
Set the menu language. Supported languages are:
- English
- French
- German
- Spanish
Key Tone
Turn the keypad tone ON or OFF.
LCD Contrast
Adjust the LCD screen's contrast.
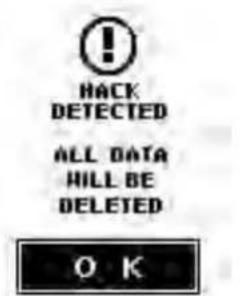
The Self Destruct feature is designed to defend against brute force password hacks. The DL3 performs this by zeroizing all of the device's encryption keys once the appointed number of failed login attempts is reached.
Once the encryption key is deleted, your data is no longer recoverable. Powering off the unit does NOT reset the unsuccessful password attempts counter. The password attempts counter will only reset after a successful password attempt. Use this feature with caution.

- If enabled, the Self Destruct function can determine brute force password attacks. The number of password attempts is adjustable from 10 to 30 tries.
Once the defined number of failed password attempts is reached, all data on the DL3 drive will be irrecoverably destroyed.
-
The DL3 drive is designed to automatically power off after the first 5 tries. You will have to unplug and reconnect the DL3 drive to reattempt the connection process.
-
If you are within the final 3 tries you will be alerted with a "Hack Detected" warning.

HARNING
SELF DESTRUCT
HILL BEGIN
WITH NEXT
FOILED LOGIN!
OK
-
After many unsuccessful attempts you will see the "Self Destruct Will Begin" warning. If the next attempt fails, the Self Destruct function will destroy all data on the DL3 drive. This process is instantaneous and all data will be wiped.
-
The DL3 drive will emit a steady alert tone and will not stop until you unplug the USB cable from the computer. The drive will have to be reinitialized and formatted to work with your operating system.
Advanced
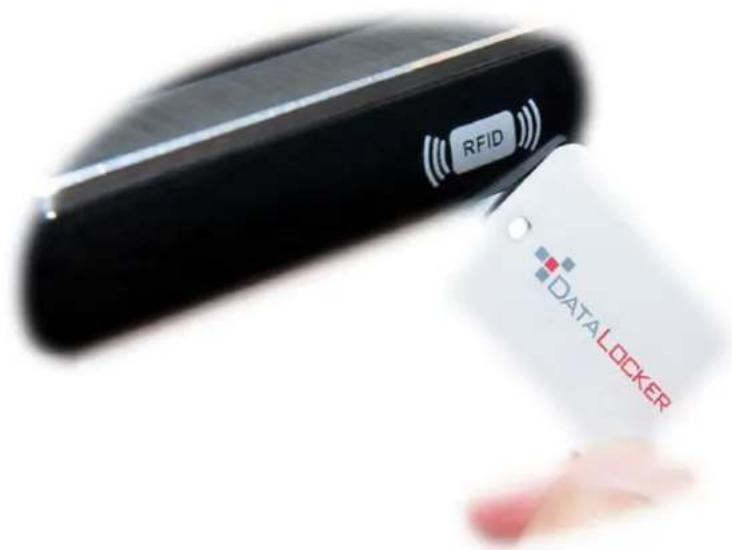
RFID AUTHENTICATION
The DL3 features an optional RFID module for a ^nd layer of authentication. A maximum of 3 RFID tags can be registered on each DL3 drive. RFID models of the DL3 come with 2 RFID tags. If you would like to pair your own tag, the DL3 RFID module supports ISO 14443A and ISO 15693 with a frequency of 13.56 MHz.
Step 1: If the drive is currently connected, press the [DISCONNECT] button and then press the [CONNECT] button on the next screen. Otherwise, connect the DL3 drive to your computer.
Step 2: Once at the keypad screen, enter the administrator password. If the password has not been changed, enter the default password 000000 and press the [←] symbol.
Step 3: Press the [SETUP] button or the touch screen. If the [SETUP] button is not selected within 3 seconds, the DataLocker DL3™ will automatically connect to the host computer.

Step 4: At the setup menu press the [SYSTEM] button.
Step 5: Press the button to display the [SYSTEM 2/2] screen.
Step 6: At the next menu screen, press the [RFID] button.
Step 7: At the setup RFID screen, press [ADD RFID TAG] button.
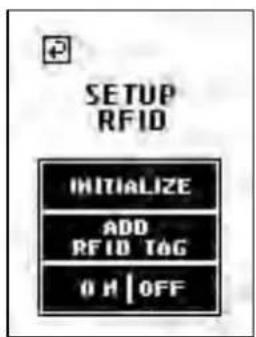
Step 8: Place the supplied RFID tag near the bottom right hand corner of the DL3 until you hear a "beep" tone.
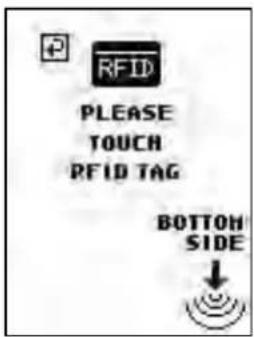
Step 9: After registering, the RFID tag value will be displayed. Please make note of the RFID tag ID incase the tag is lost or damaged.
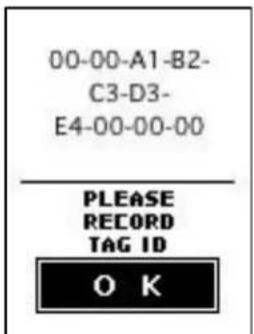
You have now successfully registered a RFID tag and the RFID function is enabled.
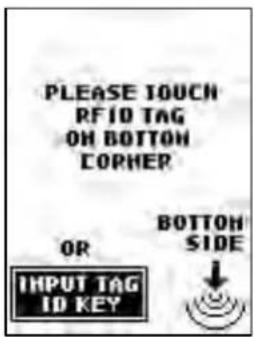
The next time you reconnect the DL3 drive, you are required to use the RFID tag to authenticate before entering the password.
The DL3 drive supports a feature called "Virtual CDs" or VCD. This allows the DL3 drive to emulate a physical CD-ROM drive using ISO images. A VCD is a drive partition, which is recognized by your operating system as a physical Read Only drive with its own unique drive letter. A VCD is "Read Only" and can only be overwritten with the VCD Utility. VCDs are commonly used to store virtual machines, documentation, and executable programs.
Step 1: Download the VCD Uploader utility. Click here.
Step 2: While in the Administrator Setup menu on the DL3 drive, go to the "SYSTEM" and then "VIRTUAL CD." Then choose "ENABLE". Once this feature is enabled, exit out of the Administrator Setup menu and choose "CONNECT" on the DL3 drive.
Step 3: On a Windows 7/Vista/XP computer, extract the DL3VCDUploader.zip file and open the extracted exe file to run the VCD Uploader utility.
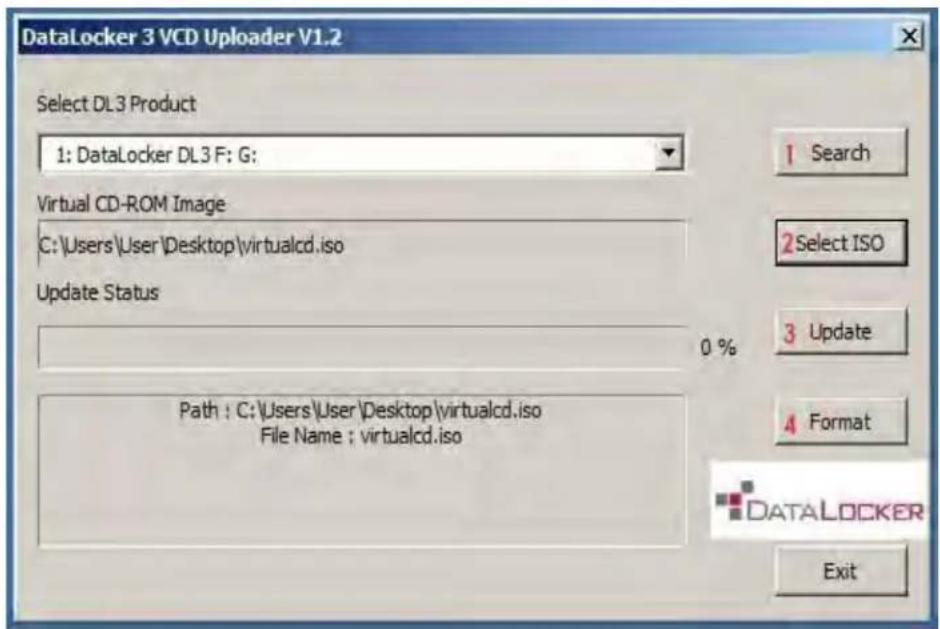
1 Search Click the Search button to detect the connected DL3 drive to which you will upload the ISO image.
2 Select ISO Click the Select ISO button to select the ISO image you would like to upload to the DL3 drive.
3 Update Then click the Update button to upload the ISO image to the DL3 drive. This will finalize the steps to mount an ISO image on the DL3. If successful, Windows will display Drive Autoplay dialog window.
4 Format You should only click the Format button if you wish to clear the Virtual CD partition. This function will not destroy your DL3 drive contents. To mount a different ISO image file, formatting the Virtual CD is not required. Simply select a different ISO image and then select the Update function.
Note:
- The DL3 will only support ISO images up to 4.7GB in size.
- The new Virtual CD partition will NOT be encrypted; however, it will be "Read Only" and accessible only after entering the correct User or administrator password.
- For instructions on creating an ISO disk image, please consult your operating system instructions.
Troubleshoot
FORGOTTEN PASSWORD
Passwords are stored at the device level only, meaning that there is NO way to retrieve a lost or forgotten password. This is to ensure that access to the DL3 is restricted to the owner of the device. DataLocker does not store any passwords or carry a master password for it would compromise the security of the drive and its contents. All DataLocker products are zero knowledge encryption solutions.

natural_image
Red shield icon with a white question mark, no text or symbols presentIt is the responsibility of the user to remember the device's password. If you are locked out of your device, you can regain access by initiating the self-destruct feature by entering the wrong passcode beyond the allowed number of failed login attempts; however, be advised that initiating self-destruct will erase all of the data on your device.
INITIALIZING AND FORMATTING YOUR DL3
On occasion - for example, after self-destructing your DL3 - you will need to initialize and reformat the drive to make it usable again.
How to Initialize your Drive
1 Touch start screen.
-
Press Yes.
-
Press Yes.


START
NEW DRIVE DETECTED PLEASE CONFIRM
-
Press Continue.
-
Press Yes.
-
Hit screen 16 times.

DELETE ALL DRIVE DATA

CONFIRM TO DELETE ALL DRIVE DATA

GENERATE HEH AES KEY
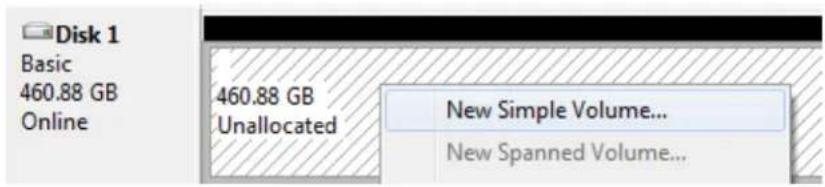
You will now have to format your drive. The instructions to format your drive will vary depending on your OS.
Windows
1 Right click My Computer and press Manage
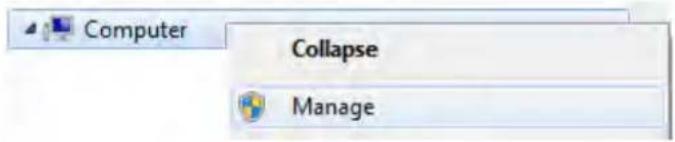
2 Then press Disk Management
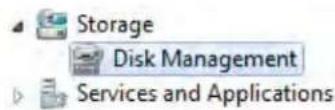
3 Right click the unformatted disk and select New Simple Volume
4 Press Next
5 Press Next
6 Pick a letter, and then click Next
7 Rename the volume label, and then press Next
Format Partition
To store data on this partition, you must format it first.
Choose whether you want to format this volume, and if so, what settings you want to use.
Do not format this volume
Format this volume with the following settings:
File system:
NTFS
Allocation unit size:
Default
Volume label:
DataLocker
√ Perform a quick format
Enable file and folder compression

8 Review, and then press Finish
9 The status of your formatted disk should be Healthy (Primary Partition)
Disk 1
Basic
460.88 GB
Online
DataLocker (E:)
460.87 GB NTFS
Healthy (Primary Partition)
10 Your DL3 should now appear under My Computer

Computer

Local Disk (C:)

DataLocker (E:)
Mac
1 Go to Applications under your Finder.

2 Go to Utilities and then open Disk Utility.

Utilities

Disk Utility
3 Select your unformatted DL3 disk.

4 Rename your disk label.

5 Press Erase.
Are you sure you want to erase the disk "DLI DataLocker DL3 Media"?
Erasing a disk deletes all data on all its partitions.
This disk is unformatted.
Cancel
Erase
6 Your formatted DL3 should now appear under Devices.
DEVICES

DataLocker

Click on the links for a video walkthrough on formatting your DL3.
Format your DL3 - Windows
Format your DL3 - Mac
Miscellaneous
LINUX COMPATIBILITY AND CONFIGURATION
The DL3 is platform independent, capable of being run with 100% compatibility on most systems. For optimal Linux or Unix based system compatibility, we recommend using at least the Linux 2.6.31 Kernel (released 9 September 2009), which implemented the xHCI specification for USB3.0. Although older versions should work, they might run in USB 2.0 mode, which can be significantly slower.
You can check your kernel version by typing the following command in the terminal:
# uname -r
Because there are so many distribution versions of linux, we cannot guarantee that every version of every operating system has been tested. The following distributions have been tested and found working with ext4 file system formatting:
• Red Hat Enterprise Linux 6.5
- CentOS 6.5
- Debian 7.4
- Ubuntu 13.10
- Ubuntu 14.04
In most newer distributions the drive should automatically mount. To format the drive, first enter terminal, then list detected hard disks using
# fdisk -l | grep '^Disk'
Your configuration may vary. For this example, we'll assume the disk is at /dev/sdb
You will then type...
#fdisk /dev/sdb
Follow the instructions in fdisk to create a new partition.
Finally you'll use the mkfs command to format the disk for Linux. Here, we use ext4.
# mkfs.ext4 /dev/sdb1
If you want to rename the drive, use the e2label command.
# e2label /dev/sdb1 /DataLocker
FREQUENTLY ASKED QUESTIONS
If you still have questions after reviewing the user guide, please consult our FAQ page at the DataLocker website.
http://support.datalocker.com/
Contact the Support Team
If you have any unresolved issues with the DL3, give us a call or go to our website to chat with a real DataLocker representative.
Phone: (913) 310-9088
Web: datalocker.com
If you would like to contact us outside of our business hours (8:30AM – 5:30PM CST), visit our support page to post your question, and we will get back to you as soon as possible.
Support Site: support.datalocker.com/