DN-16062 - Security Camera Digitus - Free user manual and instructions
Find the device manual for free DN-16062 Digitus in PDF.

User questions about DN-16062 Digitus
0 question about this device. Answer the ones you know or ask your own.
Ask a new question about this device
Download the instructions for your Security Camera in PDF format for free! Find your manual DN-16062 - Digitus and take your electronic device back in hand. On this page are published all the documents necessary for the use of your device. DN-16062 by Digitus.
USER MANUAL DN-16062 Digitus
All lead-free products offered by the company comply with the requirements of the European law on the Restriction of Hazardous Substances (RoHS) directive, which means our manufacture processes and products are strictly “lead-free” and without the hazardous substances cited in the directive.

The crossed-out wheeled bin mark symbolizes that within the European Union the product must be collected separately at the product end-of-life. This applies to your product and any peripherals marked with this symbol. Do not dispose of these products as unsorted municipal waste. Contact your local dealer for procedures for recycling this equipment.
Trademark Acknowledgements
iPhone® is the registered trademark of Apple Inc.
BlackBerry® and related trademarks, names and logos are the property of Research In Motion Limited and are registered and/or used in the U.S. and countries around the world. Used under license from Research In Motion Limited.
Android ^™ is a trademark of Google Inc. Use of this trademark is subject to Google Permissions.
Microsoft, Windows, Internet Explorer, Mozilla Firefox, Google Chrome, Safari, QuickTime, Windows Mobile & Symbian mentioned in this document are the registered trademarks of their respective holders.
Disclaimer
We reserve the right to revise or remove any content in this manual at any time. We do not warrant or assume any legal liability or responsibility for the accuracy, completeness, or usefulness of this manual. The content of this manual is subject to change without notice.
MPEG4 Licensing
THIS PRODUCT IS LICENSED UNDER THE MPEG4 VISUAL PATENT PORTFOLIO LICENSE FOR THE PERSONAL AND NON-COMMERCIAL USE OF A CONSUMER FOR (i) ENCODING VIDEO IN COMPLIANCE WITH THE MPEG4 VISUAL STANDARD ("MPEG-4 VIDEO") AND/OR (ii) DECODING MPEG4 VIDEO THAT WAS ENCODED BY A CONSUMER ENGAGED IN A PERSONAL AND NON-COMMERCIAL ACTIVITY AND/OR WAS OBTAINED FROM A VIDEO PROVIDER LICENSED BY MPEG LA TO PROVIDE MPEG4 VIDEO. NO LICENSE IS GRANTED OR SHALL BE IMPLIED FOR ANY OTHER USE. ADDITIONAL INFORMATION INCLUDING THAT RELATING TO PROMOTIONAL INTERNAL AND COMMERCIAL USES AND LICENSING MAY BE OBTAINED FROM MPEG LA, LLC. SEE HTTP://WWW.MPEGLA.COM.
GPL Licensing

This product contains codes which are developed by Third-Party-Companies and which are subject to the GNU General Public License ("GPL") or the GNU Lesser Public License ("LGPL").
The GPL Code used in this product is released without warranty and is subject to the copyright of the corresponding author.
Further source codes which are subject to the GPL-licenses are available upon request.
We are pleased to provide our modifications to the Linux Kernel, as well as a few new commands, and some tools to get you into the code. The codes are provided on the FTP site, and please download them from the following site or you can refer to your distributor.
TABLE OF CONTENTS
1. OVERVIEW .... 1
1.1 Product features .... 1
1.2 Package content....1
1.3 Product Overview .... 1
1.4 Rear Panel 2
1.5 Status Indicator 2
2. BEFORE USING YOUR NETWORK CAMERA....3
3. ACCESSING THE CAMERA VIA VIDEO VIEWER....4
3.1 Installing Video Viewer 4
3.2 Accessing the camera....4
3.3 Control panel overview 5
3.3.1 Simplified version (Default) 5
3.3.2 Full function version....6
3.3.3 Main button overview 6
3.4 Frequently-used functions .... 7
3.4.1 Record 7
3.4.2 Playback 7
3.4.3 Firmware upgrade 8
3.4.4 E-Map 8
4. CAMERA CONFIGURATIONS VIA WEB BROWSER....13
4.1 Accessing the camera.... 13
4.2 Control panel overview 13
4.3 Face tracking configurations....15
4.4 Digital PTZ (DPTZ) operations 15
4.5 System configuration menu....17
4.6 Network 18
4.6.1 Network....18
4.6.2 DDNS 18
4.6.3 SNTP 18
4.6.4 FTP 18
4.6.5 MAIL 19
4.6.6 SMS 19
4.6.8 Filter 20
4.6.9 UPnP 20
4.7 Camera 21
4.7.1 Camera 21
4.7.2 Preset 22
4.7.3 Cruise 22
4.7.4 Color 23
4.7.5 Time 24
4.7.6 LED 24
4.7.7 Digital Smart Zoom 25
4.7.8 Face Tracking 25
4.8 General 26
4.8.1 General 26
4.8.2 Server Log 26
4.8.3 Online 26
4.8.4 Account 27
4.8.5 Trigger....28
4.8.8 Upgrade 29
APPENDIX 1 PRODUCT SPECIFICATIONS....30
APPENDIX 2 API ID APPLICATION FOR SMS MESSAGING....31
APPENDIX 3 BIT RATE TABLE FOR REFERENCE....33
1. OVERVIEW
1.1 Product features
● Powerful Remote Surveillance on Multiple Mobile Platforms
-- For mobile device platforms, iPad®, iPod®, iPhone®, BlackBerry®, Nokia® Symbian, Windows® Mobile & Android™ (with their built-in web browsers or EagleEyes)
-- For web browsers, Internet Explorer®, Mozilla Firefox®, Mac® Safari®, Google Chrome™ and Opera
-- For operating systems, Windows & Mac
-- For multiple device control, our CMS software, Video Viewer, is provided for free
● 1.3 Megapixel live MOS sensor
● HD 720p quality, allowing users to notice minor details more easily
● Multiple video streams selectable: H.264 / MPEG4 / MJPEG
● Motion detection and event notification functions
● Digital pan / tilt / zoom for more details checking
● White LED application to illuminate the scene manually, automatically, or scheduled by a timer
● Face tracking function for human face detection and tracking
● Microphone built-in for audio recording
● ONVIF standard supported to simplify system integration
1.2 Package content
Network camera
Camera Bracket
□ Installation Guide
Adapter
| CD-ROM disc (including user manuals & CMS software "Video Viewer")
1.3 Product Overview
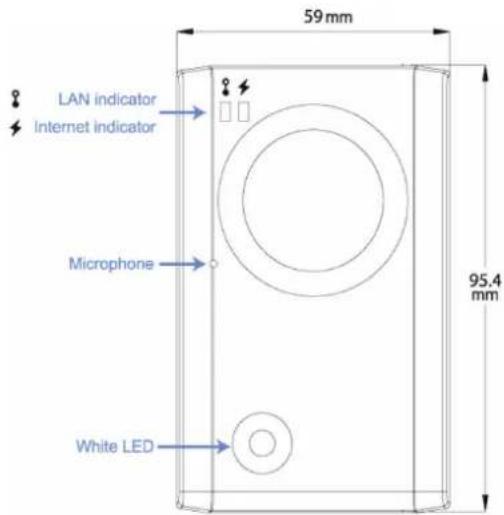
text_image
59 mm LAN indicator Internet indicator Microphone White LED 95.4 mmFront Side
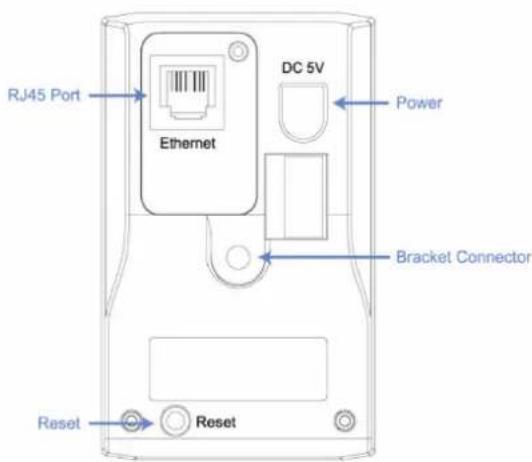
text_image
RJ45 Port Ethernet DC 5V Power Bracket Connector Reset ResetRear Side
1.4 Rear Panel
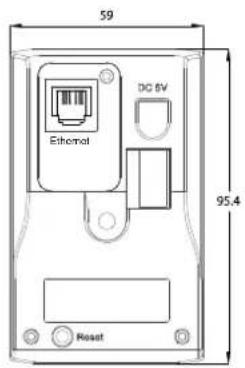
text_image
59 DC 6V Ethemat 95.4 Reset| Ethernet: | Connect your network cable. |
| DC 5V: Connect the supplied regulated power supply. | |
| Reset: With the power connected, press to reset all parameters, including the IP address to factory default settings.The camera will reboot after default reset. Please do not disconnect your camera during the reset process. | |
1.5 Status Indicator
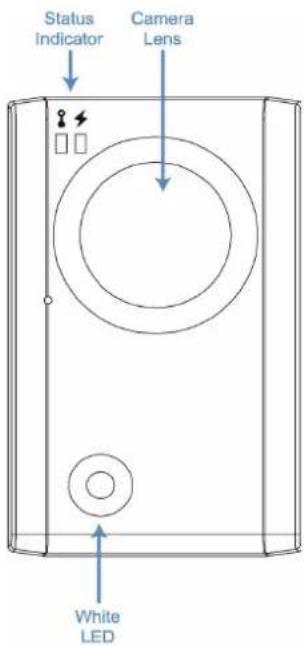
text_image
Status Indicator Camera Lens White LED| ICON | LAN connection status Internet connection status | |
| System Status | ||
| During powering on Always on Always on | ||
| Reset default●○○○○○○○○○ | Blinking (on 250 ms, off 250 ms) | Always off |
| Upgrade | Blinking (on 250 ms, off 250 ms)●○○○○○○○○○○○○○○○○○○○○○○○○○○○○○○○○○○○○○○○○○○○○○○○○○○○○○○○○○○○○○○○○○○○○○○○○○○○○○○○○○○○○○○○○○○○○○○○○○○○○ ○○○○○○○○○○○○○○○○○○○○○○○○○○○○○○○○○○○○○○○○○○○○○○○○○○○○○○○○○○○○○○○○○○○○○○○○○○○○○○○○○○○○○○○○○○○○○○○○○○○○-○○○○○○○○○○○○○○○○○○○○○○○○○○○○○○○○○○○○○○○○○○○○○○○○○○○○○○○○○○○○○○○○○○○○○○○○○○○○○○○○○○○○○○○○○○○○○○○○○○○ | |
| Connection Status | ||
| LAN connected Always on -- | ||
| LAN disconnected | Blinking (on 100 ms, off 500 ms)●○○○○○○○○○ | -- |
| Internet connected -- Always on | ||
| Internet disconnected | -- | Blinking (on 100 ms, off 500 ms)●○○○○○○○○○ |
* LED blinking frequency - ● LED on / ○ LED off
2. BEFORE USING YOUR NETWORK CAMERA
This network camera can be accessed via our supplied CMS software "Video Viewer", the web browser (such as "Microsoft Internet Explorer" or "Mozilla Firefox"), and smart phones with our self-developed program "EagleEyes" installed depending on different using situations.
Note: For details about accessing network cameras via smart phones, please refer to http://www.eagleeyescctv.com.
Before using the network camera, make sure:
1) You have installed the supplied CMS software, "Video Viewer", or a web browser.
2) You have configured the network settings, and the network connection is fine.
For Video Viewer installation, please refer to "3.1 Installing Video Viewer" at page 4.
For network configurations, please refer to your installation guide.
To check or configure up to 16 surveillance devices simultaneously with the record function, please use "Video Viewer".
For details about using Video Viewer, please refer to "3. ACCESSING THE CAMERA VIA VIDEO VIEWER" at page 4, and "4. CAMERA CONFIGURATION" at page 13.
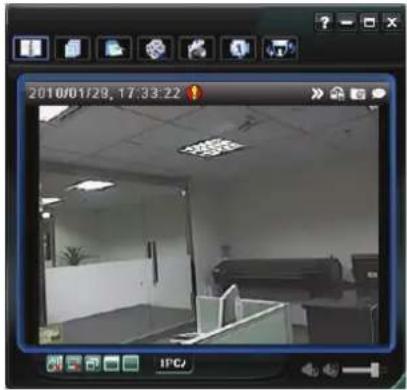
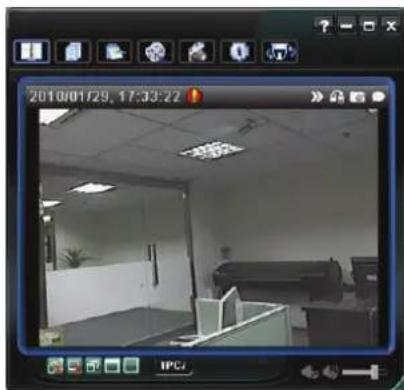
text_image
2010/01/29, 17:33:22 IPCJTo check or configure this network camera only, it's recommended to use the web browser "Microsoft Internet Explorer" or "Mozilla Firefox".
For details about using the web browser, please refer to "4. CAMERA CONFIGURATION" at page 13.
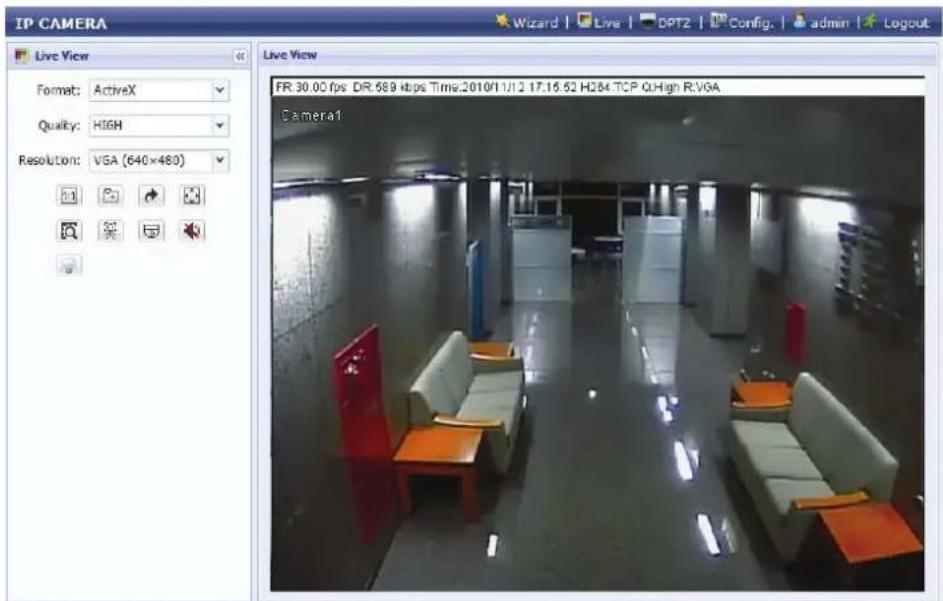
text_image
IP CAMERA Live View Format: ActiveX Quality: HIGH Resolution: VGA (640×480) Live View FR: 30.00 fps DR: 589 kbps Time:2010/11/12 17:15:52 H284 TCP Q:High R:VGA Camera13. ACCESSING THE CAMERA VIA VIDEO VIEWER
3.1 Installing Video Viewer
Step1: Place the supplied CD into your CD-ROM or DVD-ROM drive. The program will be automatically run.
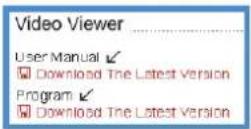
Step2: Click "Program" in the "Video Viewer" section to install Video Viewer, or click "Download The Latest Version" under "Program" to download the latest version of Video Viewer from the Internet (if your PC is connected to Internet).
Step3: Follow the on-screen instructions to finish the installation. When the installation is completed, a shortcut icon "💡" will be placed on your PC desktop.
3.2 Accessing the camera
Step1: Double-click "☐" on your PC desktop to open Video Viewer. By defaults, the "Address Book" panel will be displayed on the right side of the control panel.
Step2: In "Address Book", click "☐" to key in the IP address, user name, password, and port number of the camera you intend to connect.
OR
Click 🔒 → "→" to search the available IP address(es) of other camera(s) under the same domain as your PC's IP address. The found address(es) will be listed, and can be added into the address book by clicking "→".
Step3: Double-click the IP address you just added into the address book to log in. The live view is displayed in the Video Viewer.
natural_image
Interior view of an office with cubicles and ceiling fixtures (no visible text or symbols)3.3 Control panel overview
Two control panels are available and can be switched depending on your using habit.
3.3.1 Simplified version (Default)
text_image
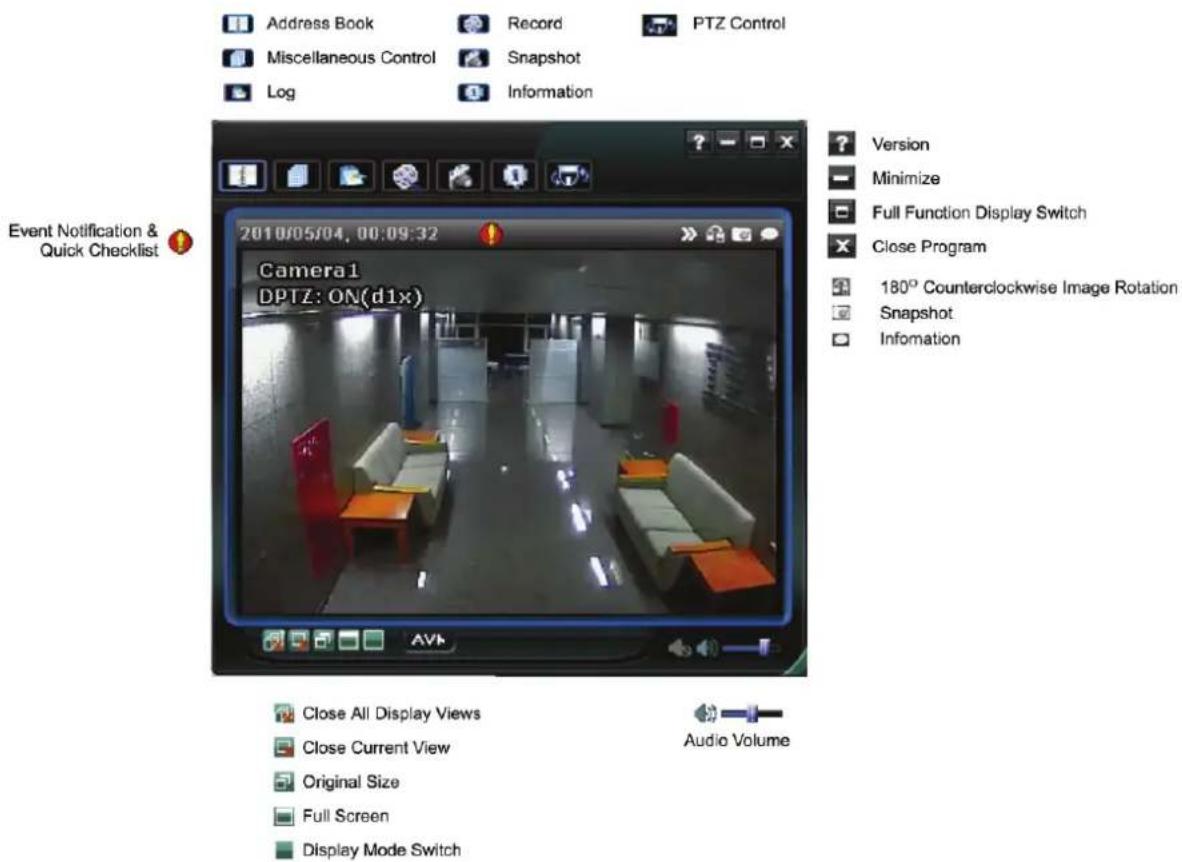
Address Book Miscellaneous Control Log Record Snapshot Information PTZ Control Event Notification & Quick Checklist 2010/05/04, 00:09:32 Camera1 DPTZ: ON(d1x) Version Minimize Full Function Display Switch Close Program 180° Counterclockwise Image Rotation Snapshot Information Close All Display Views Close Current View Original Size Full Screen Display Mode Switch Audio Volume3.3.2 Full function version
text_image
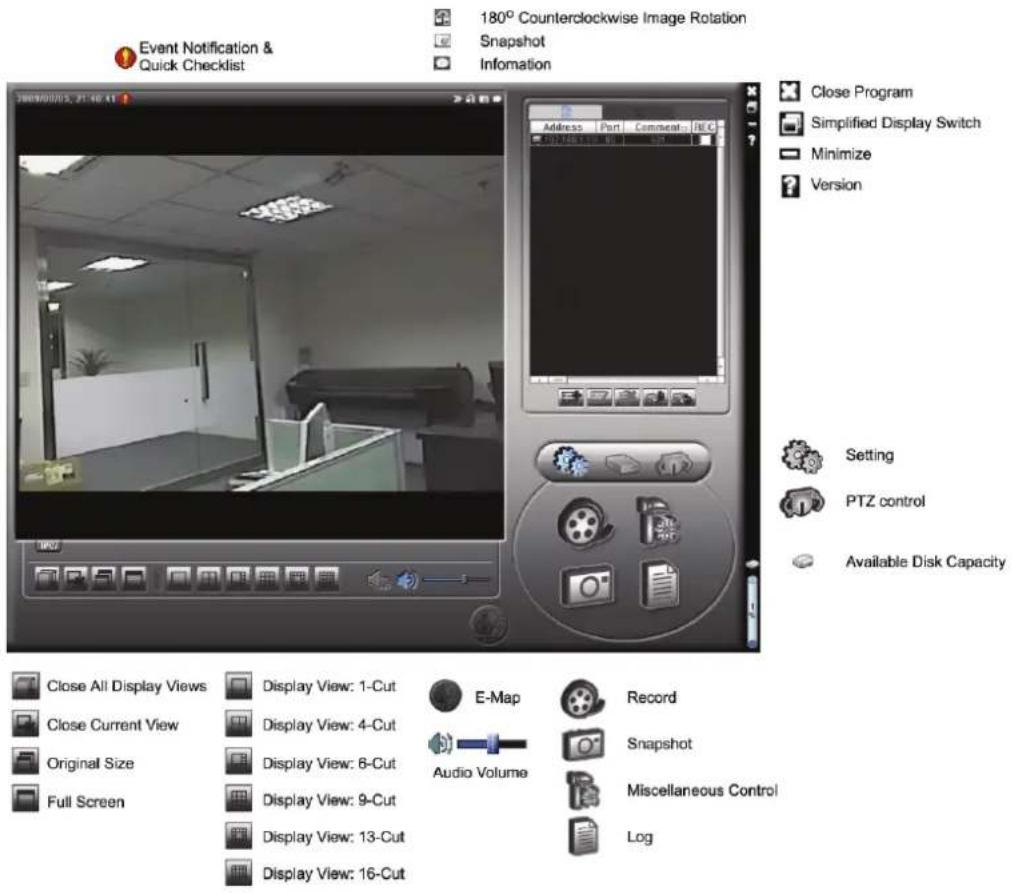
Event Notification & Quick Checklist 180° Counterclockwise Image Rotation Snapshot Information Close Program Simplified Display Switch Minimize Version Setting PTZ control Available Disk Capacity Close All Display Views Display View: 1-Cut E-Map Record Close Current View Display View: 4-Cut Audio Volume Original Size Display View: 6-Cut Audio Volume Full Screen Display View: 9-Cut Display View: 13-Cut Display View: 16-Cut Audio Volume Snapshot Miscellaneous Control Log3.3.3 Main button overview
| Button | Function Description | |||
| Simplified Full Function | ||||
 | [read] | Address Book | Click to show the predefined IP address(es). You can add, remove or search the IP address to log in the DVR remotely. | |
 | Miscellaneous Control |  | Remote Config | |
| [GBHW] | Record Setting | |||
 | Custom Setting | |||
 |  | Log | Click to view all event and recording logs, search the desired log(s) by date, or playback the recording of the selected log. | |
| [control] |  | Record / Record Stop | Click to start / stop the manual recording.The record button will be disabled when the reserved disk capacity set in "Record Setting" is larger than the current disk capacity. For details, please refer to "3.4.1 Record" at page 7. | |
| [control] | [read] | Snapshot | Click to take a snapshot of the current view. The snapshot will be saved in the path you specified in "Record Setting". | |
| [control] | Information Click to show the current network connection details. | |||
| [control] | PTZ Control Click to enter the DPTZ control panel. | |||
3.4 Frequently-used functions
3.4.1 Record
To record remotely, click "☐" or "☐" → "☐" to go to the "Record Setting" page.
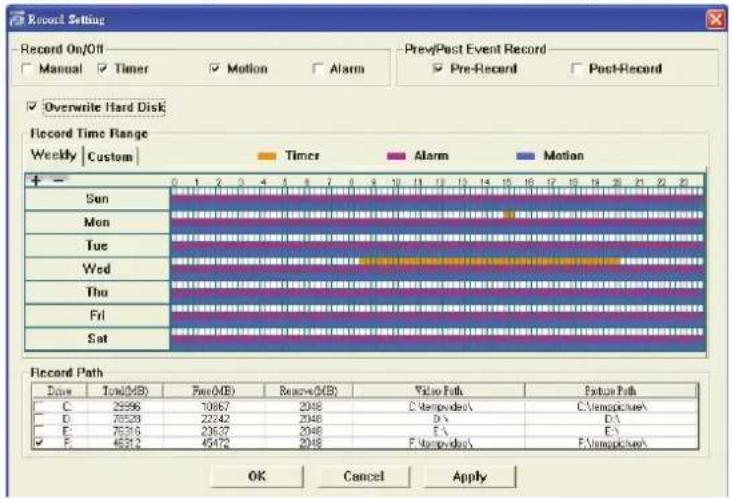
text_image
Record Setting Record On/Off Manual Timer Motion Alarm Overwrite Hard Disk PrevPost Event Record Pre-Record Post-Record Record Time Range Weekly Custom Timer Alarm Motion + - Sun Mon Tue Wed Thu Fri Sat Record Path Date Total(MB) Free(MB) Remove(MB) Video Path Failure Path C 25986 10867 2048 D:\tempodec\ C:\tempocitech\ D 26528 22242 2048 D:\ E 26316 23637 2048 E:\ F 45212 45472 2048 F:\tempodec\ E:\tempocitech\ OK Cancel ApplyIn the "Record Setting" page, you can set the following items:
- Record type
• Pre- / post-event record time (0\~10 seconds) - Record time setting
- Record path
Note: The record function will be disabled when the reserved disk capacity in "Reserved(MB)" is larger than the current disk capacity in "Free(MB)".
When "Manual" is checked, click "OK" or "OR" on the main control panel to start the manual recording immediately, and the recordings will be saved in the location specified in "Record Path".
When "Motion" and / or "Alarm" are checked, the recording function will be enabled for any motion or alarm event, and the recordings will be saved in the location specified in "Record Path".
3.4.2 Playback
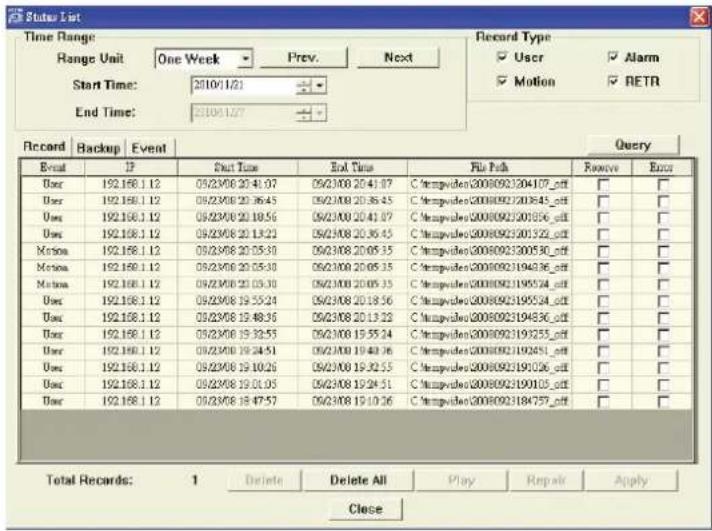
To play a recording, click “” or “”, and select the “Record” tab. A list of all the recordings will be shown by defaults, and you can also sort out the logs you want to speed up the search time.
text_image
Status List Time Range: Range Unit One Week Prev. Next Start Time: 2010/1/21 End Time: 2010/1/27 Record Type User Alarm Motion RETR Record Backup Event Query Event IP Start Time End Time File Path Remove Exit User 192.168.1.12 03/23/08 20:41:07 09/23/08 20:41:07 C:\tempwides\20080923204107_cff User 192.168.1.12 09/23/08 20:36:45 09/23/08 20:36:45 C:\tempwides\20080923203645_cff User 192.168.1.12 09/23/08 20:19:56 09/23/08 20:41:07 C:\tempwides\20080923201856_cff User 192.168.1.12 09/23/08 20:13:22 09/23/08 20:36:45 C:\tempwides\20080923201322_cff Notes 192.168.1.12 09/23/08 20:05:30 09/23/08 20:05:35 C:\tempwides\20080923200530_cff Notes 192.168.1.12 09/23/08 20:05:30 09/23/08 20:05:35 C:\tempwides\20080923194336_cff Notes 192.168.1.12 09/23/08 20:05:30 09/23/08 20:05:35 C:\tempwides\20080923199554_cff User 192.168.1.12 09/23/08 19:55:24 09/23/08 20:18:56 C:\tempwides\20080923199554_cff User 192.168.1.12 09/23/08 19:48:36 09/23/08 20:13:22 C:\tempwides\2008092319436_cff User 192.168.1.12 09/23/08 19:35:55 09/23/08 19:55:24 C:\tempwides\20080923191255_cff User 192.168.1.12 09/23/08 19:24:51 09/23/08 19:43:36 C:\tempwides\20080923193451_cff User 192.168.1.12 09/23/08 19:10:26 09/23/08 19:32:55 C:\tempwides\20080923191036_cff User 192.168.1.12 09/23/08 19:01:05 09/23/08 19:24:51 C:\tempwides\20080923190105_cff User 192.168.1.12 09/23/08 18:47:57 09/23/08 19:10:36 C:\tempwides\20080923184757_cff Total Records: 1 Delete Delete All Play Repair Apply Close3.4.3 Firmware upgrade
This function is used when users need to upgrade the network camera for function scalability.
Note: Before using this function, make sure you have the correct upgrade files provided by your installer or distributor.
Step1: Click 📄 and select the IP address of your network camera in the address book.
Step2: Click "to show the upgrade page, "Update Server".
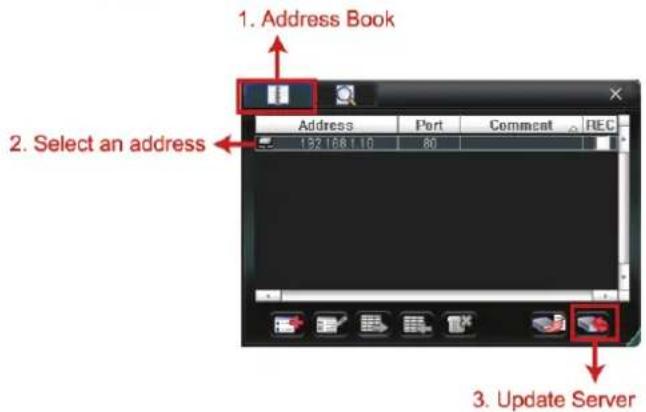
text_image
1. Address Book 2. Select an address 3. Update ServerStep3: Click "Add" to browse to the upgrade files.

text_image
Upload Server(192.168.110) Current version: 1W29-1W11-1W09-1W03 Firmware Add Remove D:\Applmg_8M.bin D:\fboot.bin D:\kernel.bin D:\xml.bin Upgrade Firmware Configure File System Backup: ... BackupStep4: Click "Upgrade Firmware" to start firmware upgrade.
Note: It takes a few minutes to finish the upgrade process. Do not disconnect the power during firmware upgrade, or the upgrade may be failed. The camera will reboot after the upgrade.
Step5: Select the IP address of the camera and click "back" again to check if the firmware is upgraded.
3.4.4 E-Map
Video Viewer is also a Central Management System (CMS) software, which allows network device control & management for up to 16 devices simultaneously.
Note: Before using this function, make sure Video Viewer is connected to all the devices (up to 16) you want to monitor.
E-Map is ONLY available when the control panel is switch to the full function version.
How to add an E-Map group
STEP1: In the simplified version, click “☐” to switch the control panel to the full function version, and click “●” to enter the E-Map page as follows.
Note: To know where the buttons are, please refer to "3.3.1 Simplified version (Default) at page 5, and "3.3.2 Full function version" at page 6.
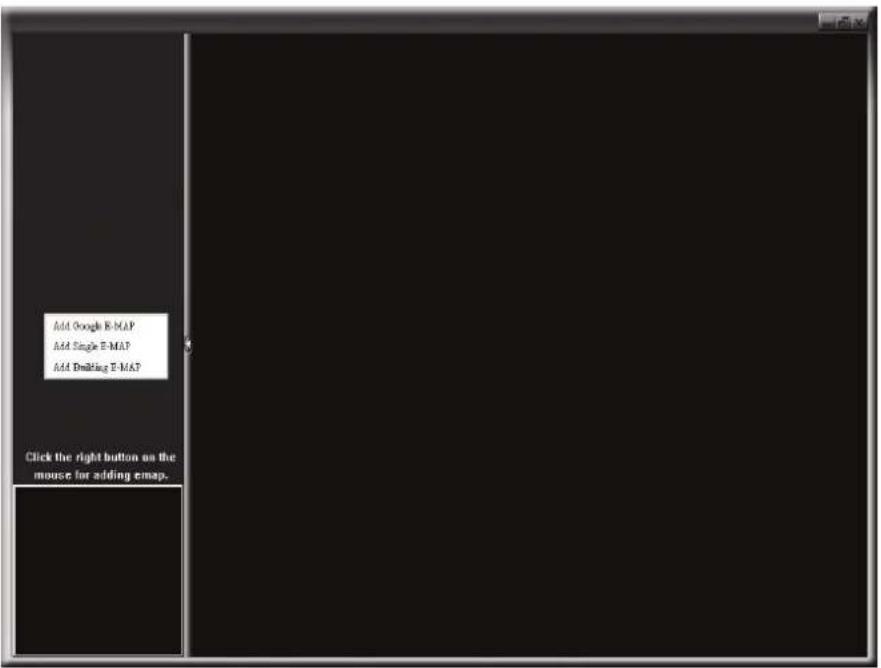
text_image
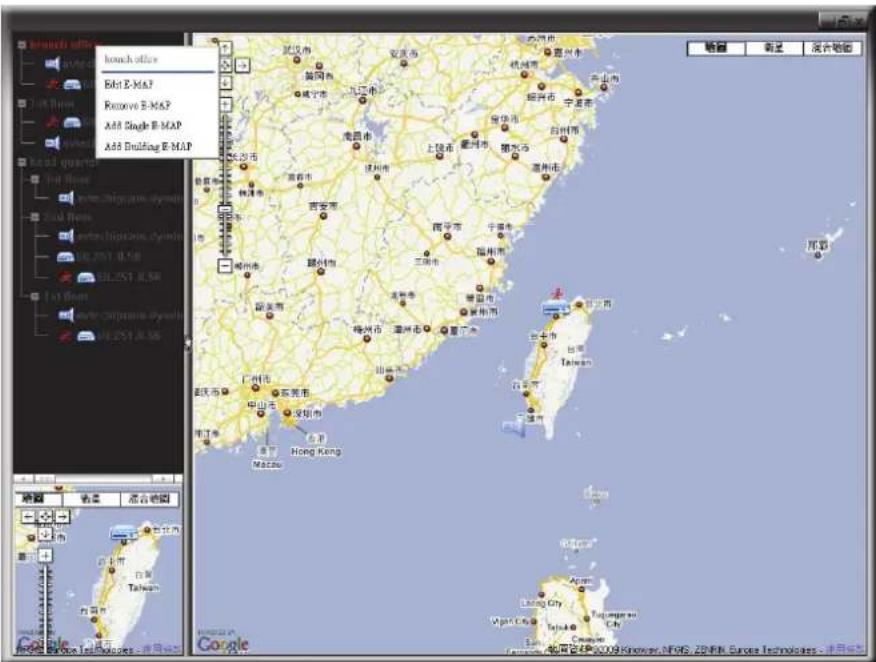
Add Google E-MAP Add Single E-MAP Add Drafting E-MAP Click the right button on the mouse for adding email.STEP2: Right-click to show the shortcut menu on the top-left panel, and select the E-Map group you want to add. There are three E-Map groups you can add: Google E-MAP, Single E-MAP, and Building E-MAP.

text_image
2 Locate: Search Apply 1 Name: branch office Name: 60.251 8.56 60.251 8.56 #sc-ampcam ayvindns 3 地圖 衡量 混合地圖 地圖 4 Remove Remove All 地圖 3 Google 納國資料: BUCS, Kinhoe, NFGS, ZENPHL Europe Technoliques.How to add a Google E-Map group:
1 Enter the name of this Google E-Map group.
② Enter a specific address or landmark, and click "Search". OR
Move to the map and drag to the location you want.
3 Click and drag the IP address to where it's located in the current level.
4 Click "Apply" to save and finish.
text_image
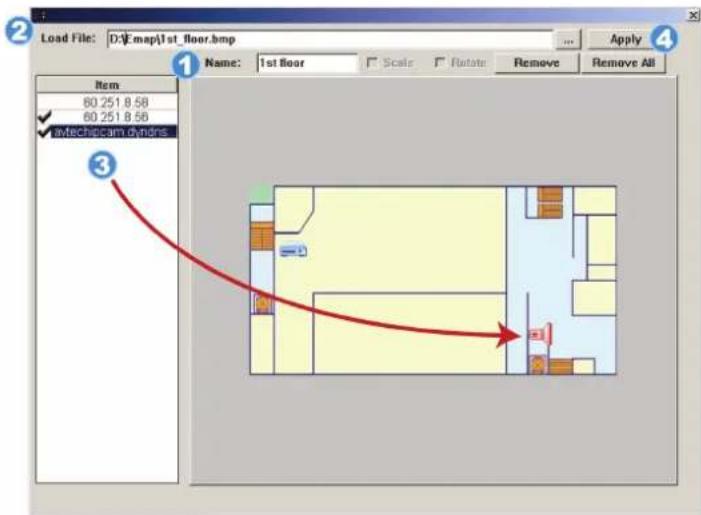
Load File: D:\E.map\1st_floor.bmp Apply 1 Name: 1st floor Scale Rotate Remove Remove All Item 80.251 8.58 60.251 8.58 #wechecam.dyndns 3How to add a single E-Map group:
1 Enter the name of this single E-Map group.
2 Click “...” to browse the map file in BMP or JPEG.
3 Click and drag the IP address to where it's located in the current level.
4 Click "Apply" to save and finish.
text_image
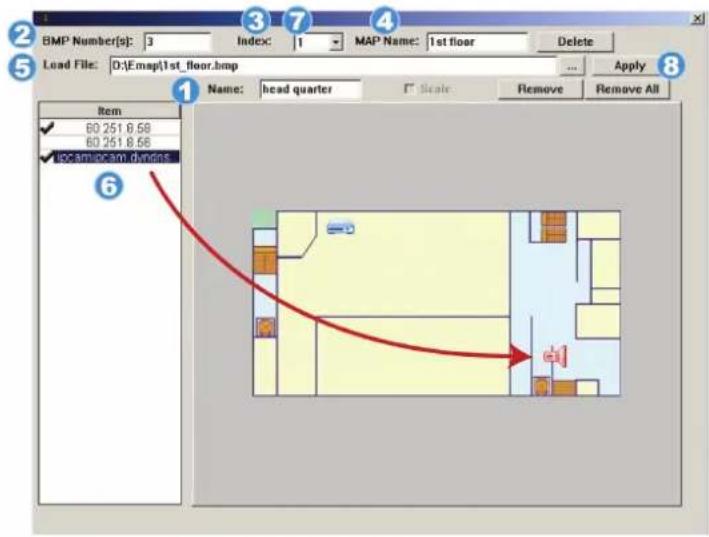
BMP Number(s): 3 Index: 1 MAP Name: 1st floor Delete Load File: 0:\Emp\1st_floor.bmp Apply 1 Item ✓ 60 251 8.68 80 251 8.68 ✓ LoadName: 0.mmp.frm.dwgns Name: head quarter F dicate Remove Remove All 6How to add a building E-Map group:
1 Enter the name of this building E-Map group.
② Enter the total levels of this building.
3 Select the level of the building from the drop-down list.
4 Enter the name of the level.
5 Click “...” to browse the map file in BMP or JPEG.
6 Click and drag the IP address to where it's located in the current level.
7 Go back to STEP 3 to select other level of the building, and repeat from STEP 3 to 6 until the setup for all levels are finished.
8 Click "Apply" to save and finish.
STEP3: When the E-Map group is created, you will see the tree on the top-left panel, showing all the devices you've added to this group.
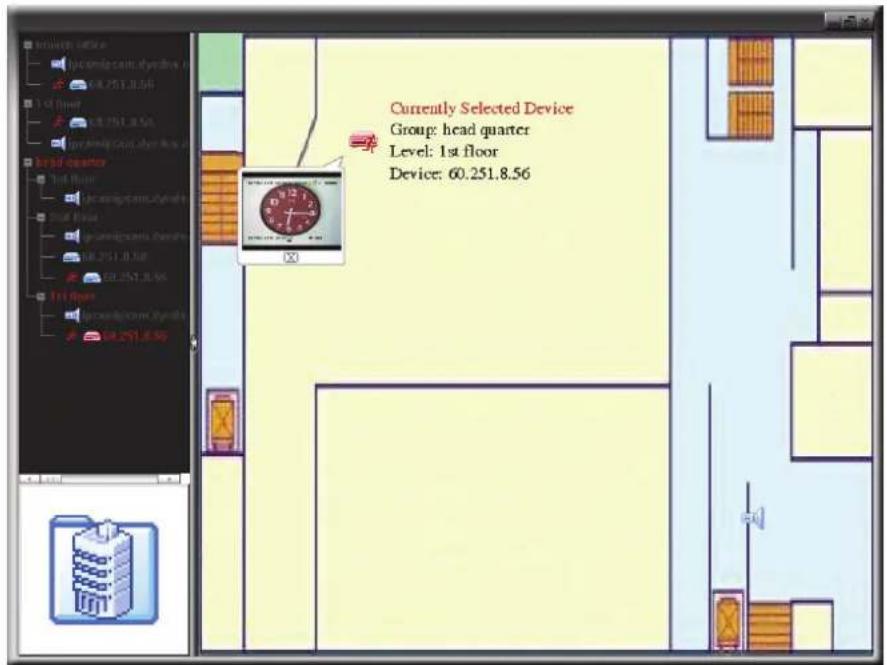
text_image
Currently Selected Device Group: head quarter Level: 1st floor Device: 60.251.8.56| Icon | Description |
| The connected device is camera. When it's selected, it will become red. | |
| The connected device is DVR. When it's selected, it will become red. | |
| For any motion or alarm event, it will appear on the screen to catch your attention.To know what's happening quickly, double-click the device icon on the E-Map to show the live view. |
How to edit / remove an existing E-Map group
For Google E-Map Group
Right-click on the group name to show the shortcut menu list, and select "Edit E-MAP" or "Remove E-MAP" as needed.
You can also add a single E-Map group (Add Single E-MAP) or Building E-Map group (Add Building E-MAP) into the existing Google E-Map group.
text_image
houch office Edit E-MAP Remove E-MAP Add Single E-MAP Add Building E-MAP head quarter Red House Add shipping company Add shipping company Add 2017.0.58 Add 2017.0.58 Add 2017.0.58 Google Google Google Google Google Google Google Google Google Google Google Google Google Google Google Google Google Google Google Google Google Google Google Google Google Google Google Google Google Google Google Google Google Google Google Google Google Google Google Google Google Google Google Google Google Google Google Google Google Google GoogleFor Single E-Map Group
Right-click on the group name to show the shortcut menu list, and select "Edit E-MAP" or "Remove E-MAP" as needed.
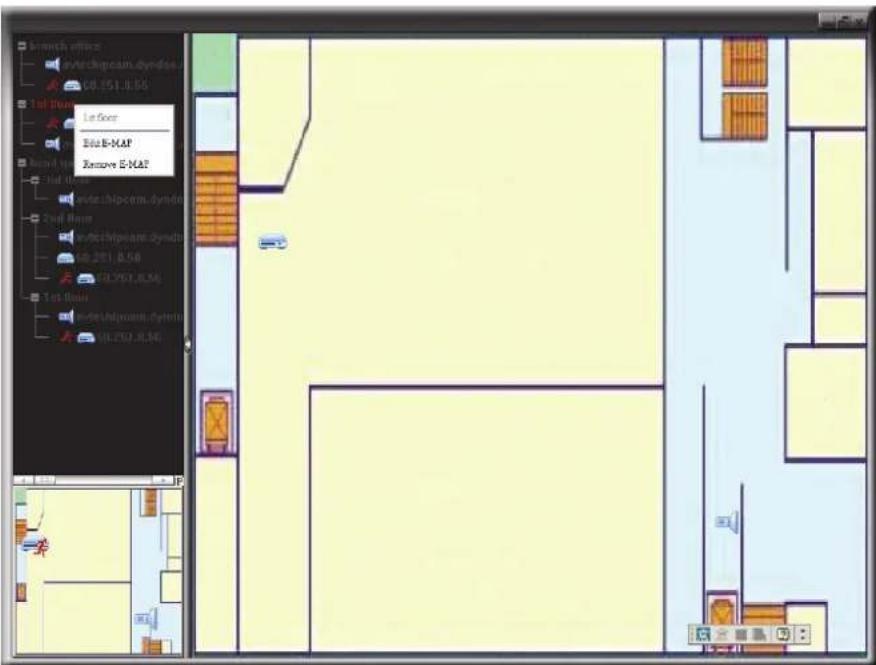
text_image
Inchex office EnterChipcam.Dyndes 00.151.8.56 1st Floor Left Floor Edit B-MAP Remove E-MAP EnterChipcam.Dyndes 2nd Floor EnterChipcam.Dyndes 00.271.8.56 EnterChipcam.Dyndes 00.271.8.56 1st Floor EnterChipcam.Dyndes 00.271.8.56For Building E-Map Group
Right-click on the group name to show the shortcut menu list, and select "Edit Building E-MAP" or "Remove E-MAP" as needed.
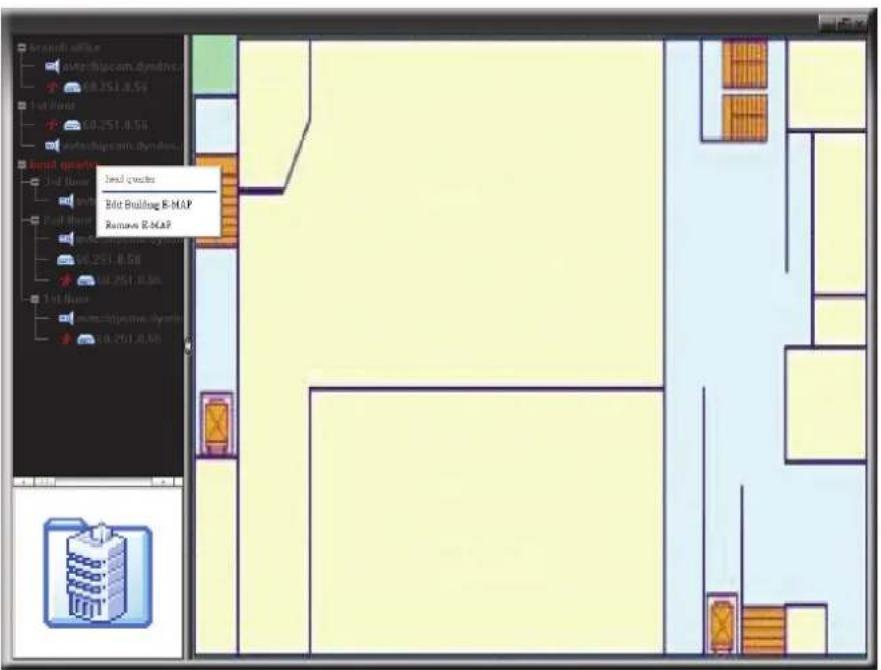
text_image
Brand# office Build#com.dryndlr 68.251.0.5% 1st Floor 60.251.0.5% Build#com.dryndlr Board quarters 1st Floor Build 1st Floor Build Building E-MAP Remove E-MAP 68.251.0.5% 68.251.0.5% 1st Floor Build-Byd#m-Byd#m 68.251.0.5%4. CAMERA CONFIGURATIONS VIA WEB BROWSER
Users can also access the network camera via a web browser, such as Microsoft Internet Explorer, Mozilla Firefox, Google Chrome and Safari.
Note: It's recommended to consult with your installer before changing system configurations.
Note: You need to be the supervisor to enter the system configuration page. If not, please re-log into the camera with the supervisor user level.
However, the web browser is only available for single device access. If users want to access more than two devices through one interface, it's recommended to use our supplied CMS software, Video Viewer. For details, please refer to "3. ACCESSING THE CAMERA VIA VIDEO VIEWER" at page 4.
Before using the network camera, make sure you have configured the network settings and have the IP address, user name and password used for accessing the camera in hand. If not, please refer to the installation guide.
4.1 Accessing the camera
Step1: Open your web browser, and key in http://ipaddress:portnum in the URL address box.
For example, for IP address 60.121.46.236 and port No. 888, please key in "http://60.121.46.236:888" into the URL address box, and press "Enter".
Step2: In the login page, key in the user name and password, and enter the security code from the image below if any. Then, click "LOGIN".
Step3: The wizard is then started.
- To skip the wizard and directly access the camera live view, click "Close".
- To directly access the camera live view without starting the wizard for the login next time, check "Do not start wizard at login".
Step4: When the login is successful, the live view is shown.
4.2 Control panel overview
Note: The buttons available depend on the web browser you're using, and the user level used to log in.
text_image
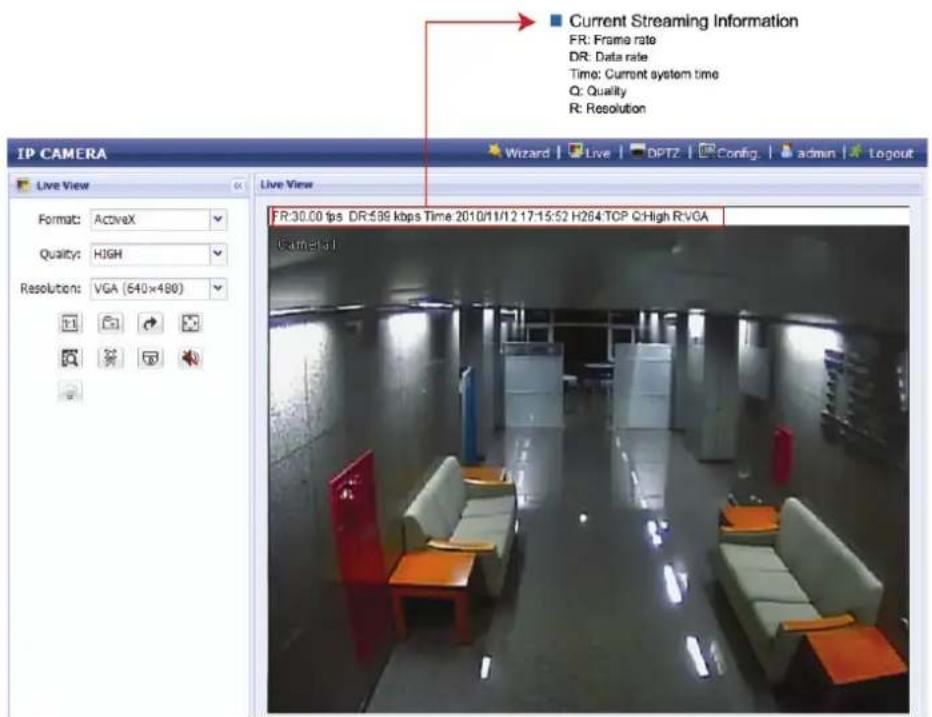
Current Streaming Information FR: Frame rate DR: Data rate Time: Current system time Q: Quality R: Resolution IP CAMERA Live View Format: ActiveX Quality: HIGH Resolution: VGA (640x480) Live View FR:30.00 fps DR:589 kbps Time 2010/11/12 17:15:52 H264 TCP C:High R:VGA Camera:1| Function | Icon | User Level | Description |
| Configuration Page: Supervisor / Power User | |||
| Live | [76CE] | Switch to the live view page. | |
| DPTZ | [1×4E2] | Switch to the DPTZ configuration page.For details, please refer to "4.4 Digital PTZ (DPTZ) operations" at page 15. | |
| Config. | [07V4] | Switch to the system configuration page, and the functions available for "Supervisor" and "Power User" are different.For details, please refer to "4.5 System configuration menu" at page 17. | |
| Format -- Supervisor / Power User / Normal User / Guest | Select the web transmission format from the drop-down list:■ ActiveX■ QuickTimeFor users using Mozilla Firefox or Google Chrome, only "QuickTime" is selectable.QuickTime is Apple Inc.'s multimedia software. You need to have QuickTime installed in your operating system before selecting "QuickTime". When it is selected, you will be promoted to enter the user name and password to access the camera. | ||
| Quality -- Supervisor / Power User / Normal | Click & drag the slider to select the video quality:BASIC / NORMAL / HIGH / BEST. | ||
| Resolution -- Supervisor / Power User / Normal | Select the image resolution from the drop list:■ SXGA (1280 x 1024) ■ SXVGA (1280 x 960)■ 720P (1280 x 720) ■ VGA (640 x 480)■ QVGA (320 x 240) | ||
| Live View Size: | Supervisor / Power User / Normal User | ||
| Normal Size | [2×33] | The current live view size is the same as the selected resolution. | |
| Fit to screen | [4&46] | Resize the selected resolution to fit into the live view size.This icon appears only when the selected resolution is larger than the current live view size. | |
| Scale | [4&48] | Click and hold the movable square on the left bottom corner of the live view to moveThis icon appears only when the selected resolution is larger than the current live view size. | |
| CIF Resize | [4×76] | Resize the QVGA resolution to fit into the live view size.This icon appears only when the selected resolution is QVGA (CIF) than the current live view size. | |
| Snapshot | [6C72] | Supervisor / Power User / Normal User | Click to take a snapshot of the current view, and save to the location specified in "Config." → "Camera" → "Camera" → "Snapshot Path". |
| Flip | [6C76] | Supervisor / Power User / Normal User | Click to rotate the image 180^0 counterclockwise when necessary. |
| Full Screen | [2W26] | Supervisor / Power User / Normal User | Click to display the image in full screen.To exit the full screen mode, press "Esc" on your keyboard. |
| Smart Zoom | [7V42] | Supervisor / Power User / Normal User | Click to activate the digital smart zoom function. |
| Face Tracking | [10W40] | Supervisor / Power User / Normal User | Click to enable the face tracking function.Note: This function is disabled when the stream format is set to "Multi-Mode". |
| DPTZ | [67A8] | Supervisor / Power User / Normal User | Click to enable digital PTZ functions. |
| Audio On / Off | [4F72] | Supervisor / Power User / Normal User | Click to switch the audio on / off. |
| White LED | [6C82] | Supervisor / Power User / Normal User | Click to enable the white LED.Before enabling the white LED, make sure you've already adjusted the brightness of the light to the level you need in "Config." → "Camera" → "LED".Note: The LED will also be enabled when you've scheduled it to be activated in "Config." → "Camera" → "LED". |
**Face Tracking, DPTZ & Smart Zoom can't be activated simultaneously.
4.3 Face tracking configurations
Face tracking is used to especially zoom in on the intruder's face, easy for everyone to identify.
Note: When this function is enabled, DPTZ, Smart Zoom, and optical zoom are not allowed to use.
Note: Face tracking is not supported when the stream format is set to Multi-Mode, and this menu will not be shown in the configuration page.
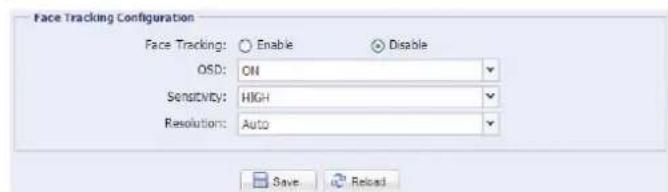
text_image
Face Tracking Configuration Face Tracking: ○ Enable ○ Disable OSD: ON Sensitivity: HIGH Resolution: Auto Save CancelSTEP1: Click "Config." → "Camera" → "Face Tracking" to enter the configuration page.
STEP2: Select and set as described below:
| ITEM DESCRIPTION | |
| Face Tracking | Select "Enable" to activate or "Disable" to deactivate this function. |
| OSD | Select "ON" to display the following status messages on the live view:FACE STANDBY: This function is activated and ready to use. |
| FACE TRACKING: This function is tracking. | |
| FACE ZOOM IN / OUT: This function is zooming on the face for tracking / zooming out when the tracking object leaves the surveillance area. | |
| Sensitivity | Set the tracking sensitivity from HIGH / MEDIUM / LOW. |
| Resolution | Set the resolution for face tracking from Auto / VGA / QVGA. |
STEP3: When all the configurations are done, click "Save" to save your changes, and click "Live" on the top to return to the live view.
4.4 Digital PTZ (DPTZ) operations
This fixed network camera type has PTZ capability, i.e. digital PTZ (hereafter called "DPTZ"), for wide area monitoring.
Note: When this function is enabled, Face Tracking, Smart Zoom, and optical zoom are not allowed to use.
STEP1: Click "DPTZ" to show the DPTZ control panel.
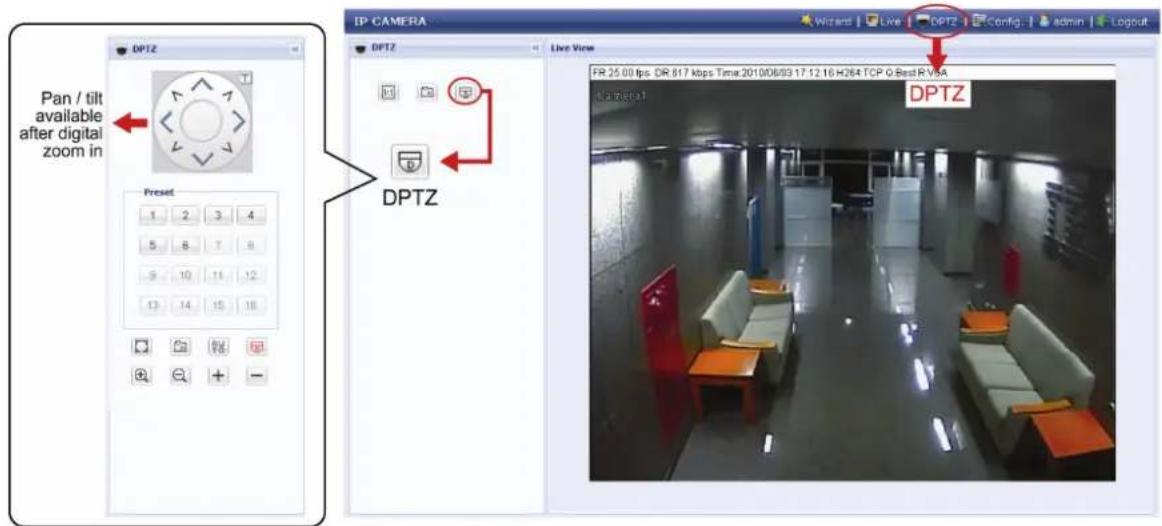
text_image
Pan / tilt available after digital zoom in DPTZ Preset 1 2 3 4 5 6 7 8 9 10 11 12 13 14 15 16 DPTZ IP CAMERA Live View Wizards | Live | DPTZ | Config. | admin | Logout FR 25.00 fps DR 817 kbps Time:2010/08/03 17:12:16 H264 TCP Q Best R VSA DPTZ Lar media1STEP2: Select the functions when needed:
| ICON FUNCTION DESCRIPTION | ||
| Fit to screen /Restore to original size | There are several monitor resolutions available. When the selected resolution is out of your current live view support, a part of your surveillance area might get covered on the screen, and you need to manually move on the screen to check the covered part. | |
| This is used to scale the selected resolution to fit in the current live view size. | ||
| This is used to restore the scaled live view resolution to its original size. | ||
| Take snapshots | Click to take a snapshot of the current view, and save to the location specified in “Config.” → “Camera” → “Camera” → “Snapshot Path”. | |
| Enable Auto mode | Click to activate the auto mode of the camera. The auto mode could be “Sequence” or “Auto Pan” specified in “Config.” → “Camera” → “Cruise” → “Active Mode”.Note: This function is available only when DPTZ is enabled.Sequence: Move to several preset points accordingly and regularly specified in “Config.” → “Camera” → “Cruise” → “Active Mode” → “Sequence”.Note: Preset points are set in “Config.” → “Camera” → “Preset”. | |
| Auto Pan: Pan automatically and horizontally. | ||
| Enable DPTZ | Click to activate the digital PTZ function. When this function is enabled, the following operations are available:■ Auto mode■ Move up / down / left / right after digital zoom-in. | |
| Zoom in / out | Click to zoom in / out the image. | |
| Max. zoom in / out | Click to zoom in / out the image. | |
4.5 System configuration menu
Click "Config." to enter the configuration page.
Note: You need to be "Supervisor" or "Power User" to enter the system configuration page, and the functions available for these two user levels are different. If you're not either of these two user levels, please re-log into the camera with one of them.
The functions are categorized into three menus: Network, Camera and General.
■ For details about "Network", please refer to "4.6 Network" at page 18.
■ For details about "Camera", please refer to "4.7 Camera" at page 21.
■ For details about "General", please refer to "4.8 General" at page 26.
| Main Menu Sub-Menu Reference | ||
| Network Network | Configure network settings. | |
| DDNS Enter DDNS | information when the network type is PPPOE or DHCP. | |
| SNTP Synchronize | your camera time with the networked computer systems. | |
| FTP | Enter the FTP information for event notifications when "FTP" is chosen in "General" → "Trigger". | |
| Enter Email information for event notifications when "Email" is chosen in "General" → "Trigger". | ||
| SMS | Enter text messaging information for SMS notifications when "SMS" is chosen in "General" → "Trigger". | |
| Filter | Choose to permit or block the IP address(es) which can access this camera. | |
| UpnP | Allow this camera to be detected among devices within the same network area for easy and quick usage. | |
| Camera | Camera | 1. Set the camera title.2. Specify the snapshot path.3. Select the streaming settings based on your network environment. |
| Preset Set the preset points for the DPTZ function. | ||
| Color | Cruise | Set the cruise mode when the auto mode is enabled: Sequence or Auto Pan. |
| Adjust the color performance. | ||
| Time | Set daylight saving time and the current time. | |
| LED | 1. Set the activation of the LED to be manual or automatic.2. Adjust the brightness of white LED light.3. Set the schedule to enable LED. | |
| Digital Smart Zoom | Set the sensitivity and standby interval. | |
| Face Tracking | Hidden only when the steam format is set to "Multi-Mode". Configure the parameters for face tracking. | |
| General | General | 1. Select the language of the web browser.2. Check the MAC address of the camera.3. Lock camera access after the specified time. |
| Server Log | Available for Supervisor only.Check the system event logs. | |
| Online | Available for Supervisor only.Check the current online user(s). | |
| Account | Available for Supervisor only.1. Create a new user account with different access privilege.2. Modify or delete an existing user account. | |
| Trigger | 1. Enable / disable face and motion detection.2. Set the motion detection area.3. Select the event notification method. | |
| Upgrade | Available for Supervisor only.Check the current firmware version and upgrade. | |
4.6 Network
4.6.1 Network
You can set the network configuration of the network camera depending on your network type. For details, please refer to your installation guide.

text_image
Network Configuration IP Type: Static IP FPPoE DHCP Server IP: 192.168.1.10 Gateway: 60.250.165.97 Net Mask: 255.255.255.0 Port: 80 DNS1: 168.05.1.1 DNS2: 0.0.0.0 MAC Address: 00:0a:53:16:8c cd4.6.2 DDNS
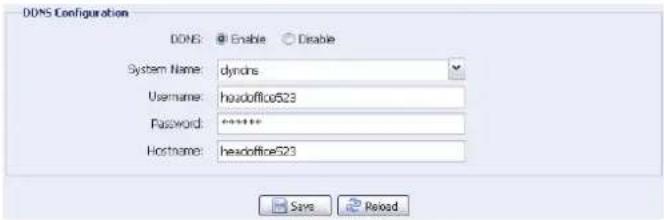
Select "On" when the selected network type in "Network" is "PPPOE" or "DHCP". For details, please refer to the installation guide.
text_image
DDNS Configuration DDNS: @ Enable Disable System Name: dyndrs Username: headoffice523 Password: ****** Hostname: headoffice523 Says Reload4.6.3 SNTP
SNTP (Simple Network Time Protocol) is used to synchronize your camera time with the networked computer systems.
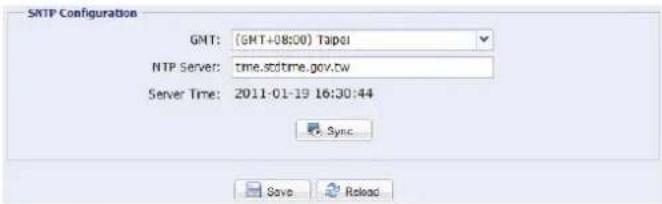
text_image
SMTP Configuration GMT: (GMT+08:00) Taipei NTP Server: tme.scttime.gov.tw Server Time: 2011-01-19 16:30:44 Sync... Save Reload| Function Description | |
| GMT Once users choose the time zone, the network camera will adjust the local area time of the system automatically. | |
| NTP Server Simply use the default SNTP server (For example, tock.stdtime.gov.tw) or change to another server with which users are familiar. | |
| Sync Click and the network camera will synchronize the time with the network time. | |
4.6.4 FTP
Enter the detailed FTP information and click "Save" to confirm. The information you set here will be applied when "FTP" is selected in "General" → "Trigger".

text_image
FTP Configuration Username: manager Password: 11****# Server: 102.168.2.32 Port: 21 Directory: upload Save Test FTP Reload4.6.5 MAIL
Enter the detailed e-mail information and click "Save" to confirm. The information you set here will be applied when "Email" is selected in "General" > "Trigger".
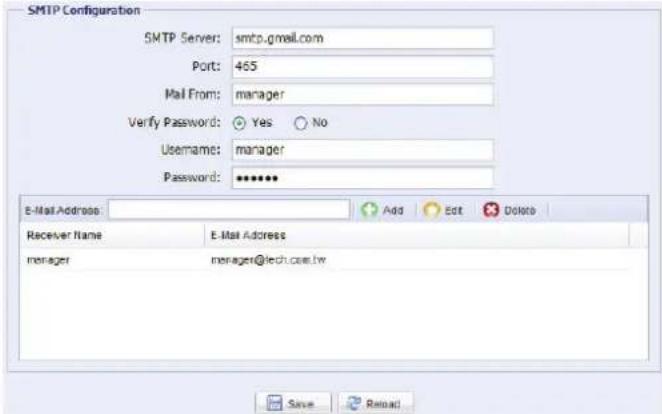
text_image
SMTP Configuration SMTP Server: smtp.gmail.com Port: 465 Mail From: manager Verify Password: Yes No Username: manager Password: ****** E-Mail Address: Add Edit Delete Receiver Name E-Mail Address manager manager@tech.com.tw Save ReloadFunction Description
| SMTP Server Enter the SMTP server address provided from your e-mail system supplier. | |
| Port Enter the port number provided from your e-mail system supplier. If this column is left blank, the e-mail server will use port 25 to send e-mails. | |
| Mail From Enter the entire mail address to ensure e-mails will not be blocked by SMTP. | |
| Verify Password Some mail servers are required to verify the password. Please enter the "user name" and "password". | |
| E-Mail Address List Add the e-mail address(s) of the assigned recipient(s). |
4.6.6 SMS
Note: Before using this function, you need to apply an API ID from the mobile messaging company, Clickatell, and you will be charged starting from the 11 ^th message. For details, please refer to "APPENDIX 2 API ID APPLICATION FOR SMS MESSAGING" at page 31.
Enter the detailed information needed for text messaging, and click "Save" to confirm. The information you set here will be applied when "SMS" is selected in "General" → "Trigger".
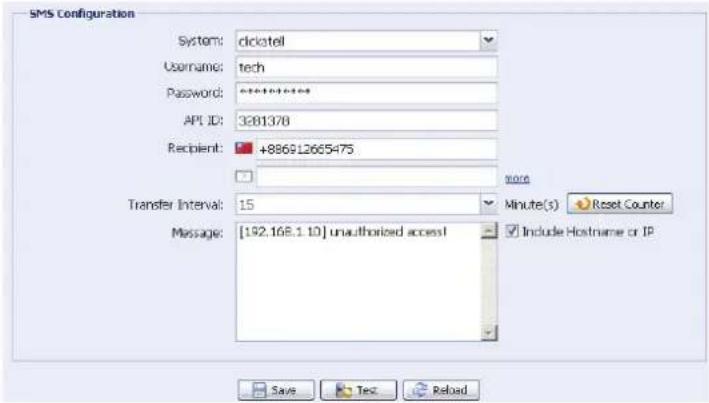
text_image
SMS Configuration System: dicketell Username: tech Password: 581016164 API ID: 3881378 Recipient: +886912665475 Transfer Interval: 15 Message: [192.168.1.10] unauthorized access! Minute(s) Reset Counter Include Hostname or IP Save Test Reload| Function Description |
| System The text messaging service provider is Clickatell. |
| User name / Password Enter the account user name and password you created in Clickatell. |
| API ID Enter the API ID you applied from Clickatell. |
| Recipient Click “Add” to enter the phone number, including the country code, to receive the text message. Five sets of phone numbers are allowed. |
| Transfer Interval Set the interval time in minutes between two-message sending.The options are 0, 15, 30 & 60. |
| Reset Counter Click to restart the text messaging, and the SMS will be sent after the specified time interval since you click this button. |
| Message Enter the text content (up to 70 characters) you want to send with the text message. |
| Test SMS To know whether your SMS setting is correct, click this button to immediately send a SMS to your phone.Note: This testing is not free and you will be charged for SMS sending base on your local rate. |
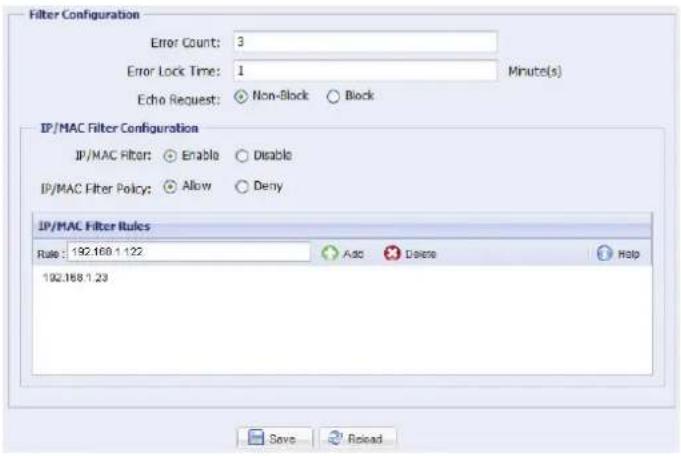
4.6.8 Filter
Choose to permit or block the IP address(es) which can access this camera, and click "Save" to confirm.
text_image
Filter Configuration Error Count: 3 Error Lock Time: 1 Minute(s) Echo Request: Non-Block Block IP/MAC Filter Configuration IP/MAC Filter: Enable Disable IP/MAC Filter Policy: Allow Deny IP/MAC Filter Rules Rate: 192.168.1.122 Add Delete Help 192.168.1.23 Save RepeatFunction Description
■ Filter Configuration
| Error Count Set the maximum count for login failure. When the maximum count is reached, the IP address trying to access the network camera will be locked. | |
| Error Lock Time | Set the lock time in minutes when the maximum count of error login for an IP address is reached. |
| Echo Request | Select "Non-Block" to allow other users to use the ping command to detect the IP address of your network camera, or "Block" to deny the ping command request. |
| ■ IP/MAC Filter Configuration | |
| IP/MAC Filter | Choose to enable or disable the filter function. |
| IP/MAC Filter Policy | If "Enable" is selected, choose whether you want to permit (Allow) or block (Deny) the IP address list below. |
| ■ IP/MAC Filter Rules | |
| Rule | To add an item to the IP address list, key in the IP address in "Rule", and click "Add".To remove an existing item in the IP address list, click the item you want to remove, and click "Delete". |
4.6.9 UPnP
"UPnP" stands for "Universal Plug and Play", which allows devices to connect seamlessly in the home and corporate environments and simplify installation of computer components.
Check "Enable" to allow the network camera to be detected among devices within the same network area, and set the identification name of the camera in "Friendly name".
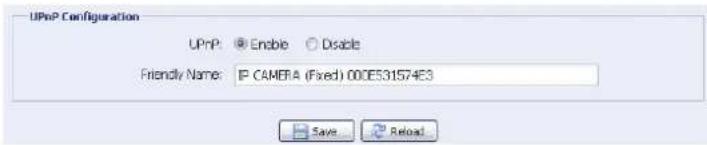
text_image
UPnP Configuration UPnP: Endible Disable Friendly Name: IP CAMERA (Fixed) 000E531574E3 Save ReloadWhen this function is activated, the other PC within the same domain as this camera will be able to search this camera in "Network Neighbor" with the identification name set in "Friendly name". Double-click it to quickly open the web browser for camera access.
4.7 Camera
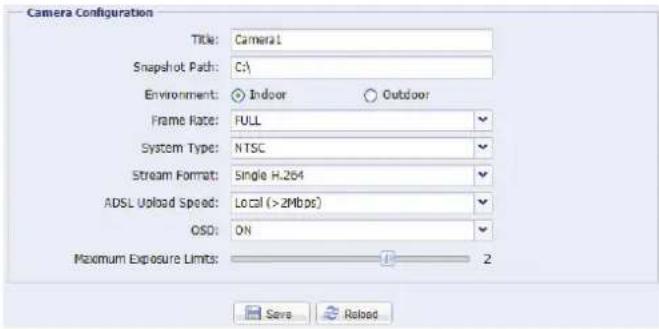
4.7.1 Camera
Adjust the camera parameters if necessary.
text_image
Camera Configuration TITLE: Camera1 Snapshot Path: C:\ Environment: Indoor Outdoor Frame Rate: FULL System Type: NTSC Stream Format: Single H.264 ADSL Upload Speed: Local (>2Mbps) OSD: ON Maximum Exposure Limits: 1 2 Save Reload| Item Description | |
| Title Enter the title for the camera with up to 15 alphabetic characters. | |
| Snapshot Path Specify the location to save the snapshot pictures. | |
| Environment Select the current environment for the camera to automatically adjust itself to produce the images suitable for the selected environment. | |
| Frame Rate The frame rate allowed to each viewer can be adjusted to adapt to the bandwidth on the network.Set the desired image frequency to the maximum (FULL) or to a specified frame rate (1/2; 1/3; 1/4; 1/5; 1/10; 1/15).The actual frame rate depends on the actual network connection, and may be lower than the specified one. | |
| System Type It shows the current system type: NTSC or PAL. | |
| Stream Format Select the stream format to Single H.264 / Single MPEG-4 / Single Motion JPEG / Multi-Mode.Note:1. Motion detection is not supported when the stream format is set to Motion JPEG.2. Face tracking is not supported when the stream format is set to Multi-Mode. | |
| ADSL Upload Speed | Select your Internet upload speed, and the system will automatically adjust your data flow.The options are: Local (>2Mbps) / 2M (2000Kbps) / 1M (1000Kbps) / 640Kbps / 512 Kbps / 256Kbps / 128 Kbps / 64Kbps |
| OSD | Select "ON" to show the camera title on the live view, or "OFF" to hide the camera title. |
| Maximum Exposure Limits | This function is used to extend the exposure time for clearer images when the light is not sufficient.Select 1 ~ 3 to extend the exposure time based on your current light condition. The larger the value, the longer the exposure time, and the less the fps.0 means function off. |
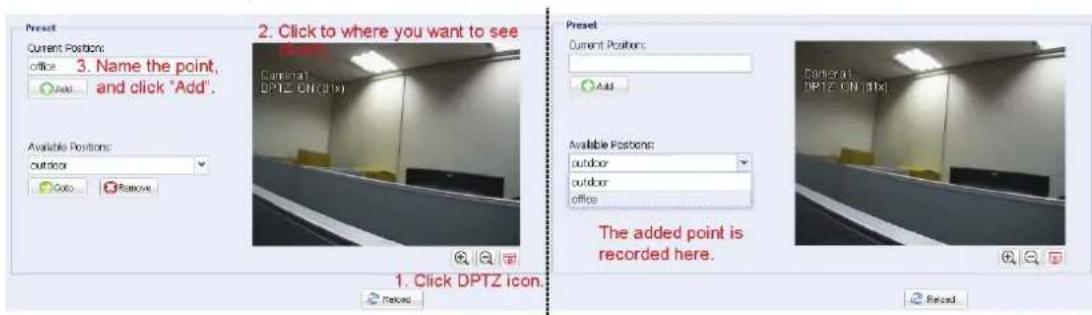
Note: Before using this function, make sure the DPTZ function is enabled.
You can set new preset points (up to 16) or check existing points here.
How to set a new preset point
Step1: Click DPTZ icon.
Step2: Click to where you want to see, and you'll get a 5x zoom-in image. To slightly zoom out, draw a square from the bottom right to top left, and you'll get a 3x image. Draw the square again and you'll return to the original size.
Step3: In "Current Position", give a name to this point, and click "Add".
text_image
2. Click to where you want to see Current Positions: office 3. Name the point, and click "Add". Available Positions: Outdoor Auto Remove 1. Click DPTZ icon. Preset Current Positions: Add Available Positions: outdoor outdoor office The added point is recorded here. 1. Click DPTZ icon. Reset ResetHow to check an existing preset point
In "Available Positions", select the name of the point you want to check from the drop-down list, and click "Goto".
You will see the camera view on the right side moving to the point it's recorded.
How to delete an existing preset point
In "Available Positions", select the name of the point you want to check from the drop-down list, and click "Remove".
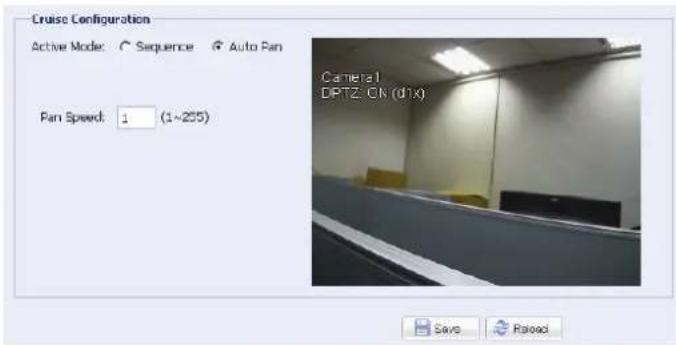
4.7.3 Cruise
Note: Before using this function, make sure you have finished setting several preset points.
Here defines how the auto mode of the camera is going to work when is selected: Sequence or Auto Pan.
Auto Pan
When "Auto Pan" is selected here and is clicked on the DPTZ page, the camera will start panning in the 5x zoom-in ratio.
text_image
Cruise Configuration Active Mode: Sequence Auto Pan Pan Speed: 1 (1~255) Camera1 DPTZ GN (d1x) Save RaisedSequence
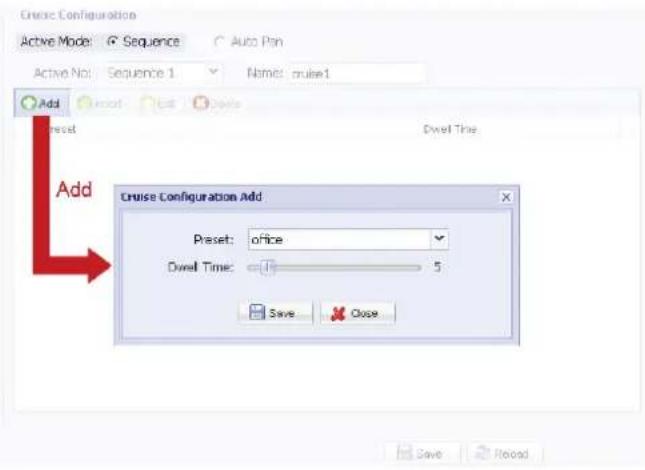
When "Sequence" is selected here and is clicked on the live view page, the camera will start patrolling each preset point defined in "Sequence".
Step1: Click "Add" to choose a preset point from the drop-down list, and select the duration to stay at this point from 1 \~ 60 minutes.
Then, click "Save" to confirm.
text_image
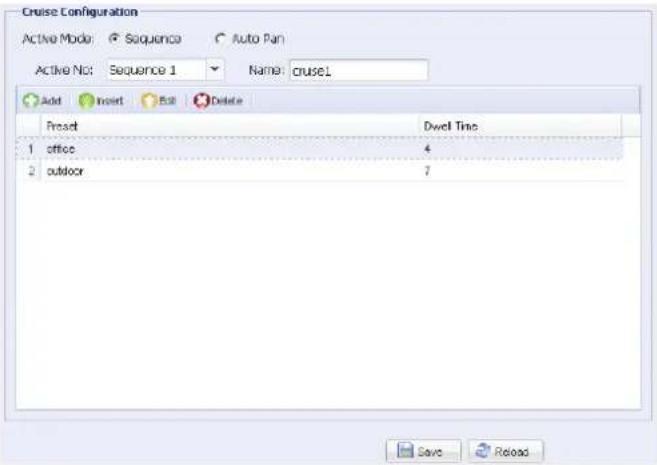
Cruise Configuration Active Mode: Sequence Auto Plan Active Not: Sequence 1 Namc: mule1 Add Reset Dwell Time Add Cruise Configuration Add Preset: office Dwell Time: 5 Save Close Save RecordStep2: Click "Add" again to add more preset points. When all the points are added, click "Save" to confirm.
text_image
Cruise Configuration Active Mode: Sequence Auto Pan Active No: Sequence 1 Name: cruise1 Add Insert Edit Delete Reset Dwell Time 1 office 4 2 outdoor 7 Save Reload4.7.4 Color
Adjust the color performance from Brightness, Contract, Hue and Saturation. Click and drag the slider to preview the color change on the right side of this page and adjust the image color.
To restore the default values, click "Back to Default".
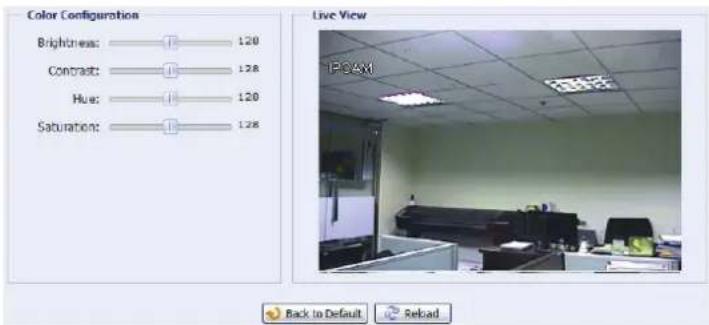
text_image
Color Configuration Brightness: 120 Contrast: 128 Hue: 120 Saturation: 128 Live View IPCAM Back to Default Reload4.7.5 Time
Set daylight saving time and the current time, and click "Save" to confirm.
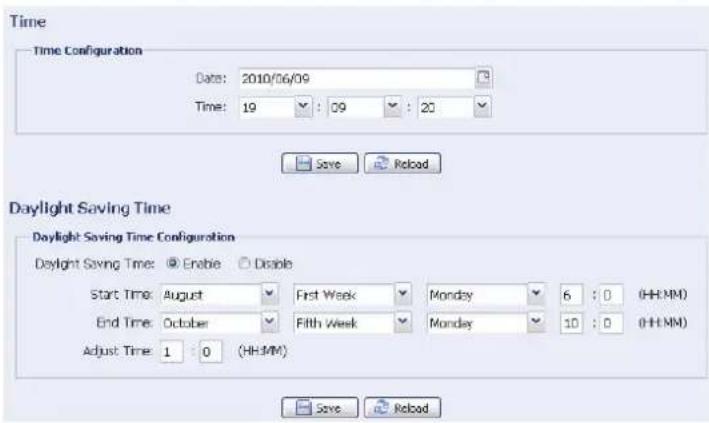
text_image
Time Time Configuration Date: 2010/06/09 Time: 19 : 09 : 20 Save Reload Daylight Saving Time Daylight Saving Time Configuration Daylight Saving Time: Enable Disable Start Time: August First Week Monday 6 : 0 (HH:MM) End Time: October Fifth Week Monday 10 : 0 (HH:MM) Adjust Time: 1 : 0 (HH:MM) Save ReloadFunction Description
■ Time Configuration
| Date | Set the current date. |
| Time | Set the current time. |
| ■ Daylight Saving Time Configuration | |
| Daylight Saving Time | Specify whether to use daylight saving time (Enable / Disable). |
| If this function is enabled, set the time period (Start Time / End Time), and adjust the daylight saving time in hours (Adjust Time). | |
4.7.6 LED
In "LED Configuration":
To allow the LED to be activated manually, select "Yes" in "Manual Enable".
To set the LED to be activated automatically when the light condition gets dark, select "Yes" in "Auto Enable", and set the sensitivity for the camera to determine how dark the LED should be activated. There are three options: HIGH / MEDIUM / LOW.
To adjust the brightness level of the LED, drag the slider from left to right in "Light".
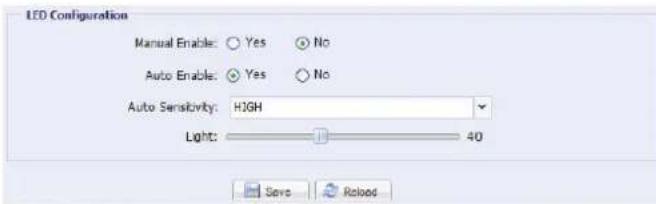
text_image
LED Configuration Manual Enable: Yes No Auto Enable: Yes No Auto Sensitivity: HIGH Light: 40 Save ReloadNote: When you adjust the brightness level of the LED light, please drag the slider from the very left, and slightly move to the right to find the suitable light brightness.
Note: When the brightness level is adjusted to 100%, the system will enable the brightness of 100% for 3 minutes, reduce to 50% for 1 minute, and return to 100% for 3 minutes, etc. This is to protect and extend the lifetime of the white LED.
To schedule the white LED to be enabled, go to "LED Timer Configuration", select "Yes" in "Enable", and set the time to enable the LED. Each square equals 30 minutes.
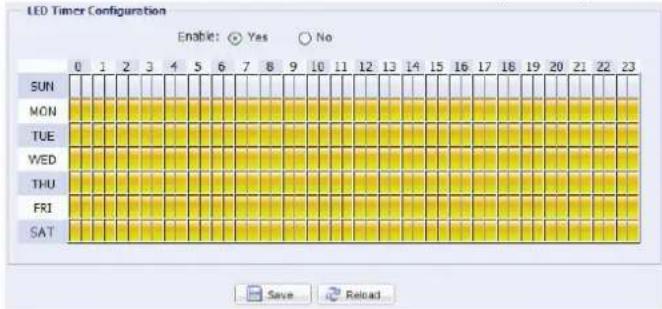
text_image
LED Timer Configuration Enable: Yes No 0 1 2 3 4 5 6 7 8 9 10 11 12 13 14 15 16 17 18 19 20 21 22 23 SUN MON TUE WED THU FRI SAT Save Reload4.7.7 Digital Smart Zoom

text_image
Digital Smart Zoom Configuration Smart Zooms Enable Disable Detection Sensitivity: HIGH Stand-by Interval: Short Save Release| Column Description | |
| Smart Zoom To switch this function on or off, select “Enable” or “Disable”.Or, it’s also available to click ☑ to enable / disable this function on the live view panel. | |
| Detection Select to set a specific detection area for this function. | |
| Sensitivity Select the digital smart zoom sensitivity (HIGH / MEDIUM / LOW) | |
| Stand-by Interval Select the stand-by interval (Short / Normal / Long). |
4.7.8 Face Tracking
Configure the parameters for face tracking.
Note: Face tracking is not supported when the stream format is set to Multi-Mode, and will not be shown in the configuration page.
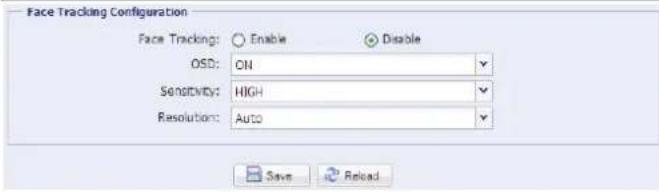
text_image
Face Tracking Configuration Face Tracking: Enable Disable OSD: ON Sensitivity: HIGH Resolution: Auto Save Reload| Function Description | |
| Face Tracking | Select “Enable” to activate or “Disable” to deactivate this function. |
| OSD | Select “ON” to display the following status messages on the live view:FACE STANDBY: This function is activated and ready to use. |
| FACE TRACKING: This function is detecting. | |
| FACE ZOOM IN / OUT: This function is zooming on the face for tracking / zooming out when the tracking object leaves the surveillance area. | |
| Sensitivity | Set the tracking sensitivity from HIGH / MEDIUM / LOW. |
| Resolution | Set the resolution for face tracking from Auto / VGA / QVGA. |
4.8 General
4.8.1 General
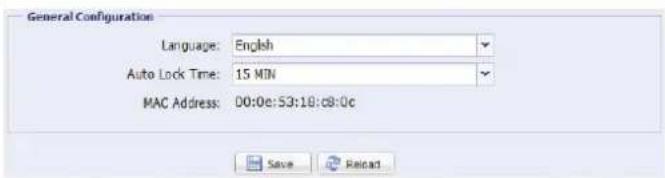
In "General", you can select the UI language to English or Chinese, and check the MAC address of your camera.
To lock camera access when it's not used after the specified time, select "5 MIN", "15 MIN" or "30 MIN" from the drop-down list of "Auto Lock Time", or select "NEVER" to disable this function.
Note: When the camera access is locked after the specified time, to resume camera access, please enter the password.
text_image
General Configuration Language: English Auto Lock Time: 15 MIN MAC Address: 00:0c:53:18:c8:0c Save Reland4.8.2 Server Log
Note: This function is available only for "Supervisor".
To quickly search the system logs you want by event type, click "Prev. Page" or "Next Page" to find the logs you want, or check the event type(s) and click "Reload" to start searching.
To clear all system event logs, click "Clear All".

text_image
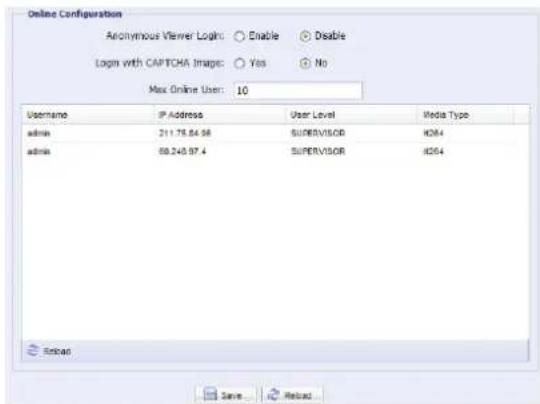
Server Log List No. Event Time Result 1 Remote Login 20180506 23:35:04 admin 2 Remote Login 20180506 23:33:03 admin 3 Remote Login 20180506 23:31:06 admin 4 Remote Login 20180506 23:29:01 admin 5 Remote Login 20180506 23:24:57 admin 6 Remote Login 20180506 23:24:11 admin 7 Remote Login 20180506 23:22:19 admin 8 Remote Login 20180506 23:22:16 admin 9 Remote Login 20180506 23:21:58 admin 10 Remote Login 20180506 23:21:57 admin 11 Remote Login 20180506 23:21:51 admin 12 Remote Login 20180506 23:21:46 admin Play Page Next Page Found Clean All Power On Remote Login Reset Default E-Mail FTP DONS PPPCE DHCP SNTP Update4.8.3 Online
Note: This function is available only for "Supervisor".
You can check the current online user(s) with respective online information. To refresh the list, click "Reload".
To allow anonymous login, select "Enable" in "Anonymous Viewer Login".
To disable image code verification at login, select "No" in "Login with CAPTCHA Image".
text_image
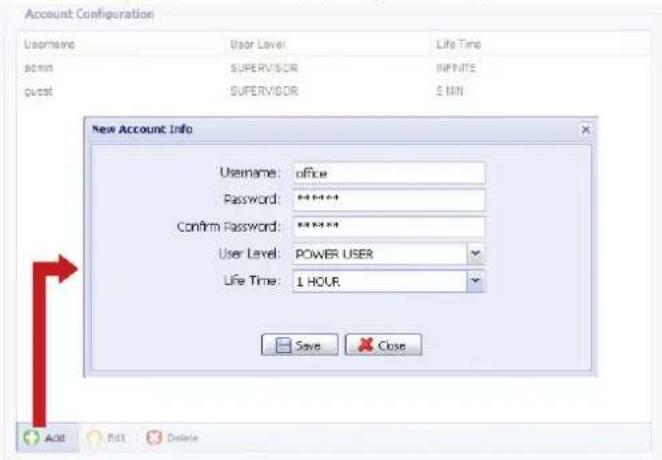
Online Configuration Anonymous Viewer Login: ○ Enable ○ Disable Login with CAPTCHA Image: ○ Yes ○ No Max Online User: 10 Username IP Address User Level Media Type admin 211.75.64.98 SUPERVISOR IDC4 admin 88.245.97.4 SUPERVISOR IDC4 Send Save... Reload4.8.4 Account
Note: This function is available only for "Supervisor".
You can create a new account with different user access privilege, or delete or modify an existing account setting.
How to create a new account
Step1: Click "New", and fill in the following columns.
text_image
Account Configuration Username user Level Life Time admin SUPERVISOR INFINITE guest SUPERVISOR 5 MIN New Account Info Username: office Password: ****** Confirm Password: ****** User Level: POWER USER Life Time: 1 HOUR. Save Close Add Add Delete| Column Description | |
| User Name | Set a user name that will be used for camera access. The user name allows up to 16 alphanumeric characters. |
| Password | Set the password that will be used for remote login. The password allows up to 16 alphanumeric characters. |
| Confirm Password Enter the password again to confirm. | |
| User Level Set the security level of an account to give the permission to control different functions.There are four user levels: SUPERVISOR, POWER USER, NORMAL USER and GUEST. | |
| Life Time Select how long this account is allowed to stay online(1 MIN / 5 MIN / 10 MIN / 1 HOUR / 1 DAY / INFINITE) | |
Step2: Then, click "Save" to save your setting and create a new account.
How to modify or delete an existing account
Step1: Select the account you want to modify or delete.
Step2: To modify the account, click "Edit" to change the settings, and click "Save". To remove the account, click "Delete".
Note: It's not allowed to remove an account when there's only one account in the account list.
4.8.5 Trigger
You can set the motion or face detection and select the notification function.
Note: Motion detection is not supported when the stream format is Motion JPEG.
Note: Face detection is not supported when the stream format is set to Multi-Mode.

text_image
Trigger Configuration Trigger Motion: ○ Enable ○ Disable Detection Face Detection: ○ Enable ○ Disable Trigger Duration: 5 Sec. Trigger Method: ✓ FTP □ Mail □ SMS Record Time: 3 Sec.◆ Trigger Setting
In this section, you can select to enable or disable motion & face detection.
Item Description
Motion Select to enable or disable the motion detection function.
• Motion Detection Area Setting
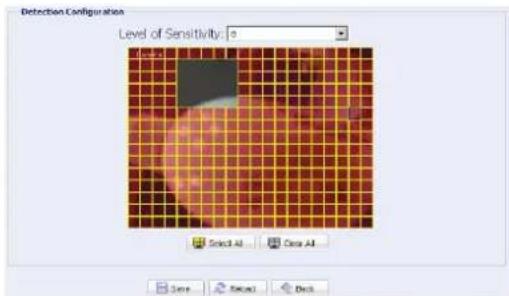
When "Enable" is selected, click "Detection" to enter the motion detection area setting page as follows:
text_image
Detection Configuration Level of Sensitivity: 10 Select All Clear All Save Reset BackLevel of Sensitivity:
Set the detection sensitivity from 0 \~ 9.
Area Setting:
Set the motion detection area by selecting the area grids with your mouse. Pink grids represent the area that is not being detected while the transparent grids are the area under detection. You can set multiple areas under detection.
Click "Clear All" to set the whole area undetected.
Click "Select All" to set the whole area under detection.
Trigger Duration Set the duration time for trigger recording (5 / 10 / 20 / 40 seconds).
◆ Notification Setting
In this section, you can select to enable E-mail / FTP / SMS notification when a motion event happens.
| Item Description | |
| Method · Email | When this option is checked, the network camera will upload the captured video clip to the assigned e-mail address(s) once motion recording happened.· FTPWhen this option is checked, the network camera will upload the captured video clip to the specified FTP site once motion recording happened.· SMSWhen this option is checked, the network camera will send a text message to the specified mobile phone number once a motion or face detection event occurs. For details, please refer to “4.6.6 SMS” at page 19. |
| Trigger Duration Set the duration when a motion or face detection event occurs (5 / 10 / 20 / 40 seconds). | |
| Record Time | Set the record time of the notification video clip (1 ~ 5 seconds). |
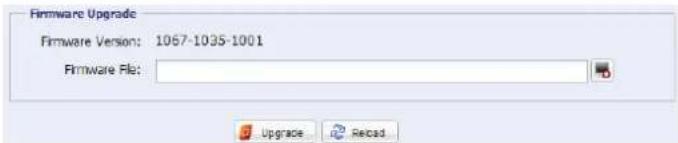
4.8.8 Upgrade
Note: This function is available only for "Supervisor".
This function is used when users need to upgrade the network camera for function scalability.
Note: Before using this function, make sure you have the correct upgrade files provided by your installer or distributor.
Note: For system upgrade from a web browser, it only supports upgrading one file at a time. To upgrade all files, you need to start from Step1 again when one file is upgraded.
If you want to upgrade all files at a time, please use our supplied CMS software, Video Viewer. For details, please refer to "3.4.3 Firmware upgrade" at 8.
Step1: Click "→" to browse to where you save the upgrade files, and select one of them.
text_image
Firmware Upgrade Firmware Version: 1057-1035-1001 Firmware File: Upgrade RecadStep2: Click "Upgrade" to start system upgrading.
Note: It takes a few minutes to finish the upgrade process. Do not disconnect the power during firmware upgrade, or the upgrade may be failed. The camera will reboot after the upgrade.
APPENDIX 1 PRODUCT SPECIFICATIONS
| ■ Network | |
| Network Compression H.264 / MPEG4 / MJPEG | |
| Multiple Video Streaming(Encode Modes, IPS, Resolution) | 3 (H.264, MJPEG, MPEG4) |
| LAN Port YES | |
| LAN Speed 10/100 Based-T Ethernet | |
| Supported Protocols | DDNS, PPPoE, DHCP, NTP, SNTP, TCP/IP,ICMP, SMTP, FTP, HTTP, RTP, RTSP, UPnP |
| Frame Rate NTSC:30, PAL:25 | |
| Number of Online Users 10 | |
| Security Multiple user access levels with password | |
| Web management | (1) Web browsers, such as Internet Explorer, Mozilla Firefox,Google Chrome, & Safari for single device access, or(2) Free CMS software, Video Viewer, for up to 16 networkcameras control simultaneously |
| ■ Camera | |
| Image Sensor 1/3" Live MOS image sensor | |
| Video Resolution SXGA, SXVGA, 720P, VGA, QVGA | |
| Min Illumination 0.1 Lux / F1.5, 0 Lux (LED ON) | |
| Shutter Speed 1 / 60 (1/50) to 1 / 100,000 sec. | |
| S/N Ratio | More than 48dB (AGC off) |
| Lens | f4.0mm / F1.5 |
| Viewing Angle | 75° |
| White LED | YES |
| White Balance | ATW |
| IRIS Mode | AES |
| Microphone | YES |
| Power Source (±10%) | 5V / 1.2A |
| Operating Temperature | -0°C~40°C |
| ■ Others | |
| Mobile Surveillance | iPad, iPod, iPhone, BlackBerry, Windows Mobile, Symbian & Android |
| RTC (real-time clock) | YES |
| ONVIF Compatible | YES |
| Motion Detection | YES |
| Digital Pan / Tilt / Zoom | YES |
| Face Tracking | YES |
| Event Notification | FTP / Email / SMS |
| Minimum Web Browsing Requirements | Pentium 4 CPU 1.3 GHz or higher, or equivalent AMD256 MB RAMAGP graphics card, Direct Draw, 32MB RAMWindows 7, Vista & XP, DirectX 9.0 or laterInternet Explorer 7.x or later |
** The specifications are subject to change without notice.
** Dimensional tolerance: ± 5mm
APPENDIX 2 API ID APPLICATION FOR SMS MESSAGING
To allow the camera automatically sending a text message when an event happens, you need to apply an API ID from Clickatell, one mobile messaging company, first.
Note: The SMS messaging is not totally free. You will be charged starting from the 11 ^th message.
Please follow the steps below for application.
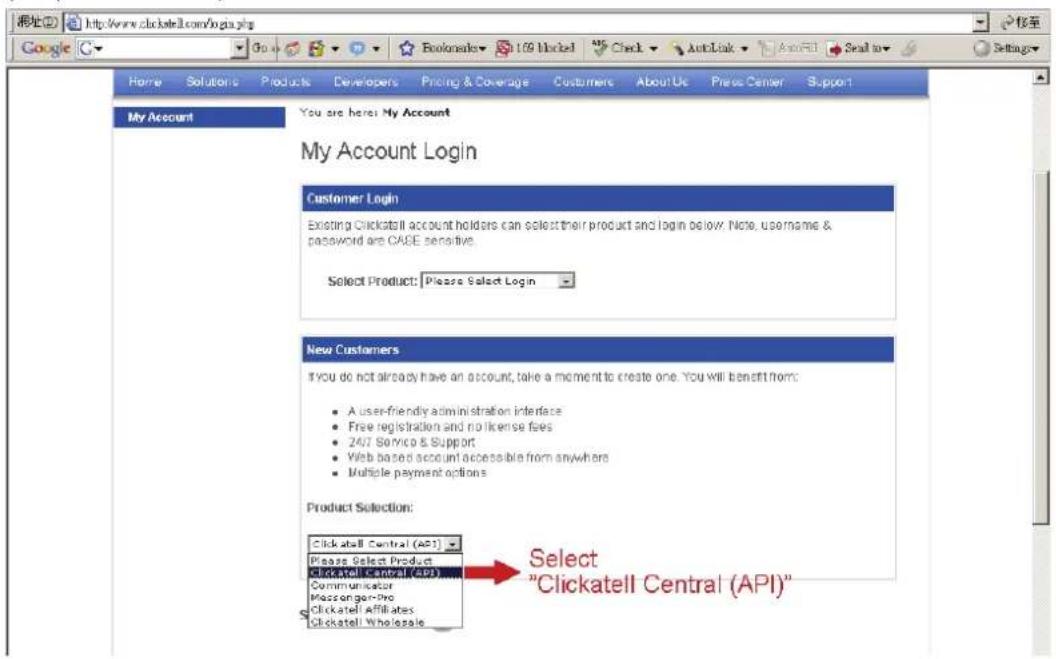
Step1: Go to http://www.clickatell.com/login.php. In "New Customers", select "Clickatell Central (API)" from the drop-down list.
text_image
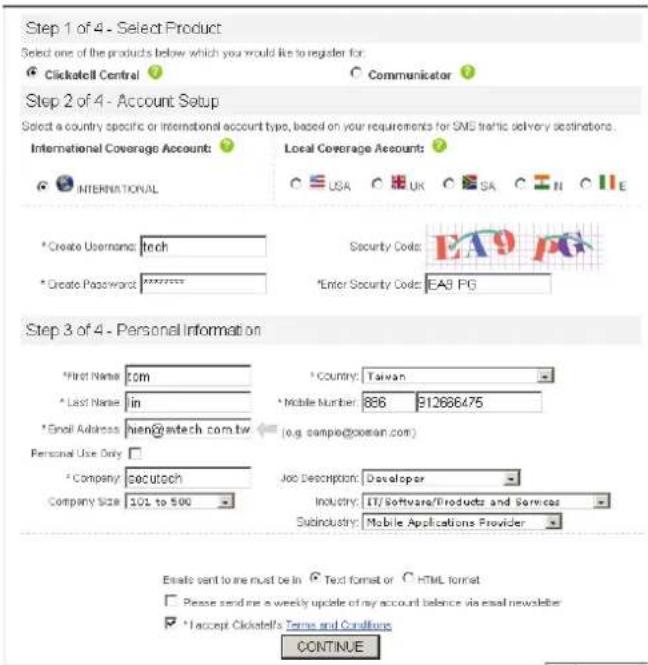
http://www.clicktell.com/login.php Google C Home Solutions Products Developers Pricing & Coverage Customers About Us Press Center Support My Account You are here! My Account My Account Login Customer Login Existing Clickatell account holders can select their product and login below. Note, username & password are CASE sensitive. Select Product: Please Select Login New Customers If you do not already have an account, take a moment to create one. You will benefit from: • A user-friendly administration interface • Free registration and no license fees • 24/7 Service & Support • Web based account accessible from anywhere • Multiple payment options Product Selection: Clickatell Central (API) Please Select Product Clickatell Central (API) Communicator Messenger-Pro Clickatell Affiliates Clickatell Wholesale Select "Clickatell Central (API)"Step2: Fill in your information to create an account, and click "CONTINUE".
Note: Note down the user name and password, and the mobile phone number you specified here for SMS notification setting later.
text_image
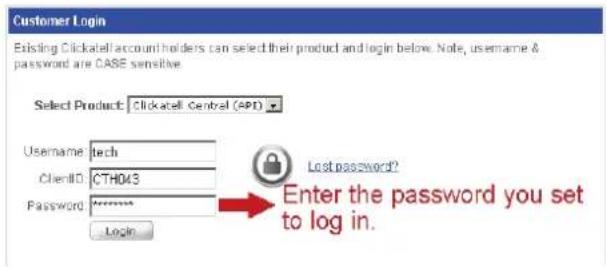
Step 1 of 4 - Select Product Select one of the products below which you would like to register for: Clickateell Central Communicator Step 2 of 4 - Account Setup Select a country specific or international account type, based on your requirements for SMS traffic delivery destinations. International Coverage Account: Local Coverage Account: INTERNATIONAL USA UK SA H E * Create Username: tech Security Code: EAD PG * Create Password: ******** * Enter Security Code: EAS PG Step 3 of 4 - Personal Information * First Name: com * Last Name: in * Email Address: hien@eotech.com.tw * Company: socutech Company Size: 101 to 500 * Country: Taiwan * Mobile Number: 886 912666475 (o.g. campie@coeman.com) Personal Use Only: * Company: socutech Job Description: Developer Industry: IT/Software/Products and Services Subindustry: Mobile Applications Provider Email sent to me must be in Text format or HTML format Please send me a weekly update of my account balance via email newsletter * Accept Clickateell's Terms and Conditions CONTINUEStep2: When the account is created, the system will automatically send an Email to your specified Email address and ask you to activate your account. Click the link in the Email to complete account activation, and enter the login page as follows. Enter the password you set, and click "Login".
My Account Login
text_image
Customer Login Existing Clickatell account holders can select their product and login below. Note, username & password are CASE sensitive Select Product: Clickatell Central (API) Username tech ClientID CTH043 Password ******** Login Last password? Enter the password you set to log in.Step3: Enter the mobile phone number (including your country code) you want the text message to be sent, and click "SEND ACTIVATION CODE". The system will send an activation code to that number for verification.
Check if you receive a text message from Clickatell.

text_image
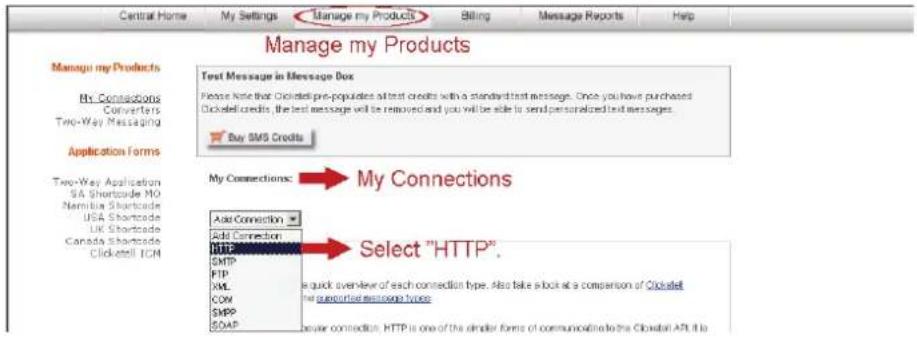
Verify your Mobile Number For country reasons you are required to enter your mobile phone number. non-test SMS messages. Enter your mobile phone number including your country code. Your activation code will be sent to: 886312666475 SEND ACTIVATION CODE If this is not your numbers, please relapse your mobile number in the box above and click the "Based activation on Code" button. Enter your activation code here. VERIFY NOWStep4: Go back to Clickatell, and click the tab "Manage my Products". Then, select "HTTP" from the drop-down list "My Connections".
text_image
Central Home My Settings Manage my Products Billing Message Reports Help Manage my Products Manage my Products My Connections Converters Two-Way Messaging Test Message in Message Box Please Note that Clickshell pre-popules at test credits with a standard test message. Once you have purchased Clickshell credits, the test message will be removed and you will be able to send personalized test messages. Buy SMS Credits Application Forms Two-Way Application SA Shortcode MO Namibia Shortcode USA Shortcode UK Shortcode Canada Shortcode Clickshell ICM My Connections: → My Connections Ask Connection Add Connection HTTP SMTP FTP XML COM SMTPP SOAP Select "HTTP". e quick overview of each connection type. Also take a look at a comparison of Clickshell for concurrent message types. Water connection. HTTP is one of the similar forms of communicating to the Clobell API it isStep5: In "Add HTTP API", enter a descriptive name for this service, and make sure the dial prefix is correct and callback type is "HTTP GET". Then, click "Submit".
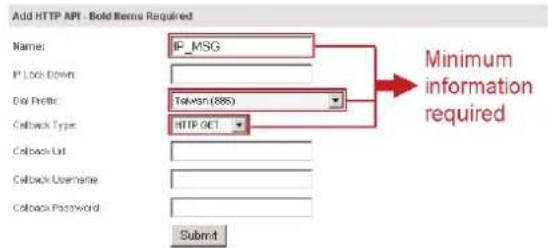
text_image
Add HTTP API - Bold Items Required Name: IP_MSG P Lock Down Dist Traffic Taiwan (885) Callback Type HTTP GET Submit Minimum information requiredStep5: You will get an API ID as follows.
Note: Note down the API ID for SMS notification setting later.
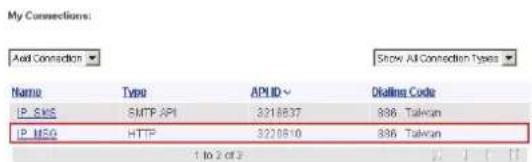
text_image
My Connections: Aid Connection Show All Connection Times Name Type APMID Disling Code IP_### SMTP_API 3218837 936_Taiwan IP_MISO HTTP 3220810 936_Taiwan 1 to 2 of 3APPENDIX 3 BIT RATE TABLE FOR REFERENCE
The data below is for reference only.
The bit rates listed here may vary depending on the resolution, image quality & frame rate you choose, the complexity of your monitoring area, and how often the moving objects show in your monitoring area.
Testing Environment
■ Place: Office Entrance
■ Network translation: H.264
■ Camera type: Megapixel camera
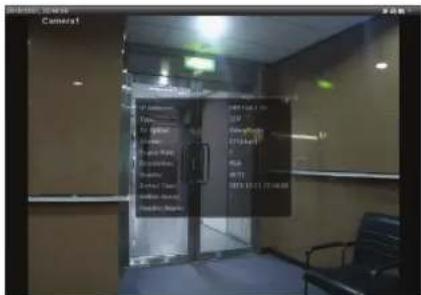
text_image
Photo of an office interior with a large digital display showing text and data, including a timestamp and user information.
text_image
Camera1 SPT2: ON (01x)Static: No one coming in and out Dynamic: One or two people coming in and out
| Resolution Quality Frame Rate | (Dynamic) kbps | (Static) kbps | ||
| SXGA | Best | FULL | 3253 | |
| High | 2375 | 2160 | ||
| Normal | 1571 | 1266 | ||
| Basic | 1465 | 873 | ||
| VGA | Best | 2010 | 1261 | |
| High | 1042 | 1034 | ||
| Normal | 685 | |||
| Basic | 457 | 350 | ||
| QVGA | Best | 646 | ||
| High | 482 | |||
| Normal | 302 | |||
| Basic | 168 | 161 | ||
| SXGA | Best | 1/4 | 1163 | 1076 |
| High | 989 | |||
| Normal | 855 | |||
| Basic | 719 | 443 | ||
| VGA | Best | 789 | 571 | |
| High | 451 | |||
| Normal | 349 | |||
| Basic | 217 | 165 | ||
| QVGA | Best | 269 | ||
| High | 182 | |||
| Normal | 164 | |||
| Basic | 97 | |||
| SXGA | Best | 1/15 | 581 | |
| High | 405 | |||
| Normal | 487 | |||
| Basic | 337 | |||
| VGA | Best | 358 | ||
| High | 201 | |||
| Normal | 180 | |||
| Basic | 92 | 15 | ||
| QVGA | Best | 111 | 84 | |
| High | 99 | |||
| Normal | 97 | |||
| Basic | 58 | 42 | ||