
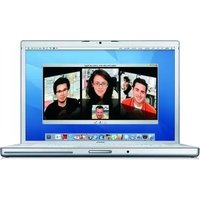
MC516T/A - Laptop APPLE - Free user manual and instructions
Find the device manual for free MC516T/A APPLE in PDF.


| Product Type | MacBook laptop |
| Model Number | MC516T/A |
| Display | 13.3-inch glossy widescreen |
| Processor | Intel Core 2 Duo |
| Memory | 2 GB (minimum) 1066 MHz DDR3 SDRAM, expandable to 4 GB |
| Storage | 2.5-inch Serial ATA hard disk drive (upgradeable) |
| Optical Drive | Slot-loading SuperDrive (DVD±R DL/DVD±RW/CD-RW) |
| Graphics | NVIDIA GeForce 320M integrated graphics |
| Wireless | AirPort Extreme (802.11a/b/g/n); Bluetooth 2.1+EDR |
| Ports | MagSafe power, Gigabit Ethernet, Mini DisplayPort, 2x USB 2.0, audio out, security slot |
| Camera | Built-in iSight video camera with indicator light |
| Battery | Built-in 60W‑hour lithium‑polymer; up to 10 hours wireless web (estimated) |
| Power Adapter | 60W MagSafe Power Adapter |
| Weight | Approximately 2.96 lbs (1.35 kg) |
| Dimensions | 13.00 x 9.12 x 1.08 inches (33.0 x 23.2 x 2.74 cm) |
| Operating System | Mac OS X Snow Leopard (10.6) |
Frequently Asked Questions - MC516T/A APPLE
User questions about MC516T/A APPLE
0 question about this device. Answer the ones you know or ask your own.
Ask a new question about this device
Download the instructions for your Laptop in PDF format for free! Find your manual MC516T/A - APPLE and take your electronic device back in hand. On this page are published all the documents necessary for the use of your device. MC516T/A by APPLE.
USER MANUAL MC516T/A APPLE
Congratulations, you and your MacBook were made for each other.
Say hello to your MacBook.
www.apple.com/macbook

Finder
Browse your files like you browse your music with Cover Flow.
Mac Help


Built-in iSight camera and iChat
Video chat with friends and family anywhere in the world.
Mac Help
isight

natural_image
Abstract icon showing three blue human silhouettes with a video call icon, no text or symbols present

Manage all your email accounts in one place.
Mac Help


iCal and Address Book
Keep your schedule and your contacts in sync.
Mac Help

Mac OS X Snow Leopard
www.apple.com/macosx

Time Machine
Automatically back up and restore your files.
Mac Help

time machine

Quick Look
Instantly preview your files.
Mac Help

quick look

Spotlight
Find anything on your Mac.
Mac Help

spotlight

Safari
Experience the web with the fastest browser in the world.
Mac Help

safari
iLife
www.apple.com/ilife

iPhoto
Organize and search your photos by faces, places, or events.
iPhoto Help

photos

iMovie
Make a great-looking movie in minutes or edit your masterpiece.
iMovie Help

movie
GarageBand
Learn to play. Start a jam session. Record and mix your own song.
GarageBand Help

record

iWeb
Create custom websites and publish them anywhere with a click.
iWeb Help

website
Contents
Chapter 1: Ready, Set Up, Go
9 What's in the Box
9 Setting Up Your MacBook
16 Putting Your MacBook to Sleep or Shutting It Down
Chapter 2: Life with Your MacBook
20 Basic Features of Your MacBook
22 Keyboard Features of Your MacBook
24 Ports on Your MacBook
26 Using the Multi-Touch Trackpad
30 Using the MacBook Battery
31 Getting Answers
Chapter 3: Boost Your MacBook
37 Replacing the Hard Disk Drive
46 Installing Additional Memory
50 Making Sure Your MacBook Recognizes the New Memory
Chapter 4: Problem, Meet Solution
53 Problems That Prevent You from Using Your MacBook
57 Using Apple Hardware Test
58 Problems with Your Internet Connection
60 Problems with AirPort Extreme Wireless Communication
61 Keeping Your Software Up to Date
62 Reinstalling the Software That Came with Your MacBook
64 Learning More, Service, and Support
66 Locating Your Product Serial Number
Chapter 5: Last, but Not Least
68 Important Safety Information
71 Important Handling Information
74 Understanding Ergonomics
76 Apple and the Environment
Looking for Something?
84 Index
1
Ready, Set Up, Go
www.apple.com/macbook
Mac Help
Migration Assistant
Your MacBook is designed so that you can set it up quickly and start using it right away. If you have never used a MacBook or are new to Mac computers, read this chapter for help getting started.
Important: Read all the installation instructions (and the safety information starting on page 67) carefully before you first use your computer.
If you're an experienced user, you may already know enough to get started. Make sure you look over the information in Chapter 2, "Life with Your MacBook," to find out about the new features of this MacBook.
Many answers to questions can be found on your computer in Mac Help. For information about using Mac Help, see “Getting Answers” on page 31. Apple may release new versions and updates to its system software, so the images shown in this book may be slightly different from what you see onscreen.
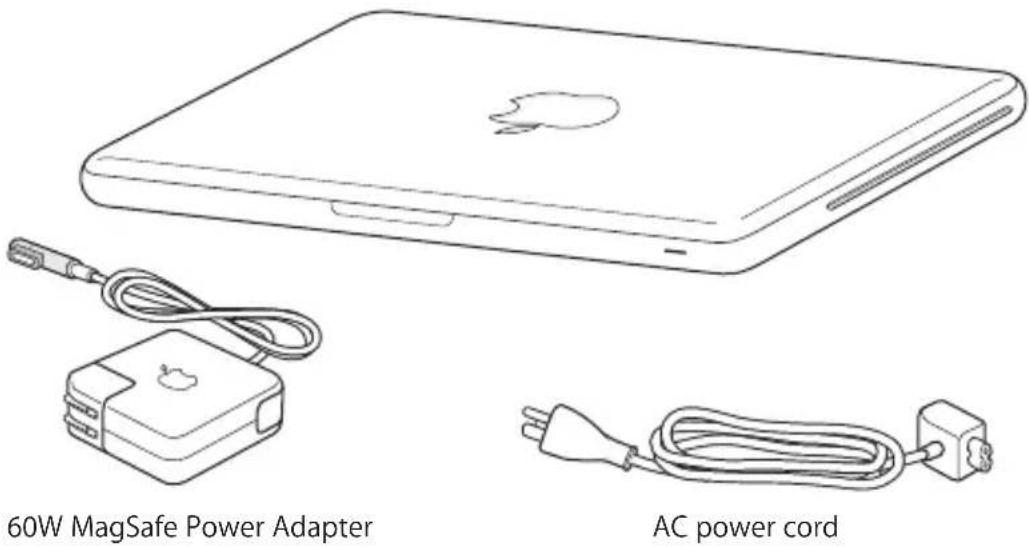
What's in the Box
Setting Up Your MacBook
Your MacBook is designed so that you can set it up quickly and start using it right away. The following pages take you through the setup process, including these tasks:
- Plugging in the 60W MagSafe Power Adapter
- Connecting cables and accessing a network
- Turning on your MacBook and using the trackpad
- Configuring a user account and other settings using Setup Assistant
- Setting up the Mac OS X desktop and preferences
Important: Remove the protective film around the 60W MagSafe Power Adapter before setting up your MacBook.
Step 1: Plug in the 60W MagSafe Power Adapter to provide power to the MacBook and charge the battery.
Make sure the AC plug is fully inserted into the power adapter and the electrical prongs on your AC plug are in their completely extended position. Insert the AC plug of your power adapter into a power outlet and the MagSafe connector into the MagSafe power port. As the MagSafe connector gets close to the port, you'll feel a magnetic pull drawing it in.

To extend the reach of your power adapter, replace the AC plug with the AC power cord. Pull the AC plug up to remove it from the adapter, and then attach the included AC power cord to the adapter, making sure it's seated firmly.
When disconnecting the power adapter from an outlet or from the computer, pull the plug, not the cord.
When you connect the power adapter to your MacBook, an indicator light on the MagSafe connector starts to glow. An amber light indicates that the battery is charging. A green light indicates that the battery is fully charged. If you don't see a light, make sure the connector is seated properly and the power adapter is plugged in.
Step 2: Connect to a wireless or wired network.
- To use a wireless network with the built-in AirPort Extreme technology, make sure the wireless base station is turned on and that you know the name of the network. After you turn on your MacBook, Setup Assistant guides you through the connection process. For troubleshooting tips, see page 60.
- To use a wired connection, connect one end of an Ethernet cable to your MacBook and the other end to a cable modem, DSL modem, or network.

Step 3: Press the power (⏻) button briefly to turn on your MacBook.
You hear a tone when you turn on the computer.

It takes the computer a few moments to start up. After it starts up, Setup Assistant opens automatically.
If your computer doesn't turn on, see "If your MacBook doesn't turn on or start up" on page 55.
Step 4: Configure your MacBook with Setup Assistant.
The first time you turn on your MacBook, Setup Assistant starts. Setup Assistant helps you enter your Internet and email information and set up a user account on your MacBook. If you already have a Mac, Setup Assistant can help you automatically transfer files, applications, and other information from your previous Mac using an Ethernet or wireless connection. See the next section, “Migrating Information to Your MacBook,” for more information.
If you don't intend to keep or use your other Mac, it's best to deauthorize it from playing music, videos, or audiobooks that you've purchased from the iTunes Store. Deauthorizing a computer prevents any songs, videos, or audiobooks you've purchased from being played by someone else and frees up another authorization for use. For information about deauthorizing, choose iTunes Help from the Help menu in iTunes.
Migrating Information to Your MacBook
You can follow the prompts in Setup Assistant to migrate existing user accounts, files, applications, and other information from another Mac computer. You can do this with one of the following methods:
- Using an Ethernet cable connected directly to both computers, or connecting both computers to the same network
- Wirelessly—directly between the computers, or with both computers on the same wireless network
Before migrating, use Software Update on your other Mac. The other Mac should have one of these versions of Mac OS X software—either Mac OS X v10.4.11 or Mac OS X v10.5.6 (or later).
You can choose the items (user accounts, documents, movies, music, photos, and so on) that you want to migrate to your MacBook.
Important: Don't use the other Mac for anything else until the migration is complete.
If you don't use Setup Assistant to transfer information when you first start up, you can do it later using Migration Assistant. If the connection is terminated during migration, you can resume the migration at a later time using Migration Assistant on your MacBook and your other Mac. Go to the Applications folder, open Utilities, and double-click Migration Assistant.
Step 5: Customize the Mac OS X desktop and set preferences.

Finder icon System Preferences iconDock
You can quickly make the desktop look the way you want using System Preferences. Choose Apple ( Apple ) > System Preferences from the menu bar. As you get to know your computer, explore System Preferences, your command center for most settings on your MacBook. For more information, open Mac Help and search for “System Preferences” or for the specific preference you want to change.
Putting Your MacBook to Sleep or Shutting It Down
When you finish working with your MacBook, you can put it to sleep or shut it down.
Putting Your MacBook to Sleep
If you'll be away from your MacBook for only a short time, put it to sleep. When the computer is in sleep, you can quickly wake it and bypass the startup process.
To put your MacBook to sleep, do one of the following:
- Close the display.
- Choose Apple ( Apple ) > Sleep from the menu bar.
- Press the power (⏻) button and click Sleep in the dialog that appears.
- Choose Apple ( Apple ) > System Preferences, click Energy Saver, and set a sleep timer.
NOTICE: Wait a few seconds until the sleep indicator light starts pulsing (indicating that the computer is in sleep and the hard disk has stopped spinning) before you move your MacBook. Moving your computer while the hard disk is spinning can damage it, causing loss of data or the inability to start up from the hard disk.
To wake your MacBook:
If the display is closed, simply open it to wake your MacBook.
If the display is already open, press the power (⏻) button or any key on the keyboard.
When your MacBook wakes from sleep, your applications, documents, and computer settings are exactly as you left them.
Shutting Down Your MacBook
If you aren't going to use your MacBook for a day or two, it's best to shut it down. The sleep indicator light goes on briefly during the shutdown process.
To shut down your MacBook, do one of the following:
- Choose Apple ( Apple ) > Shut Down from the menu bar.
- Press the power (⏻) button and click Shut Down in the dialog that appears.
If you plan to store your MacBook for an extended period of time, see page 73 for information about how to prevent the battery from draining completely.
2
Life with Your MacBook
www.apple.com/macosx
Mac Help
Mac OS X
Basic Features of Your MacBook

| Built-in iSight camera and camera indicator lightVideoconference with others using iChat AV, take pictures with Photo Booth, or capture video with iMovie. The indicator light glows when the iSight camera is operating. | |
| Built-in microphoneCapture sounds with the microphone (located above and to the left of the Esc key on your keyboard), or talk with friends live over broadband using the included iChat AV application. | |
| Built-in stereo speakersListen to music, movies, games, and other multimedia files. | |
| TrackpadClick or double-click anywhere on the trackpad. Touch the trackpad with one or more fingers to move the pointer and use Multi-Touch gestures (described on page 26). | |
| Built-in batteryUse battery power when you're away from a power outlet. | |
| Sleep indicator lightA white light pulses when the MacBook is in sleep. | |
| Slot-loading SuperDriveYour optical drive can read and write to standard-size CD and DVD discs. | |
| (1) | Power buttonTurn your MacBook on or off, or put it to sleep. |
Keyboard Features of Your MacBook
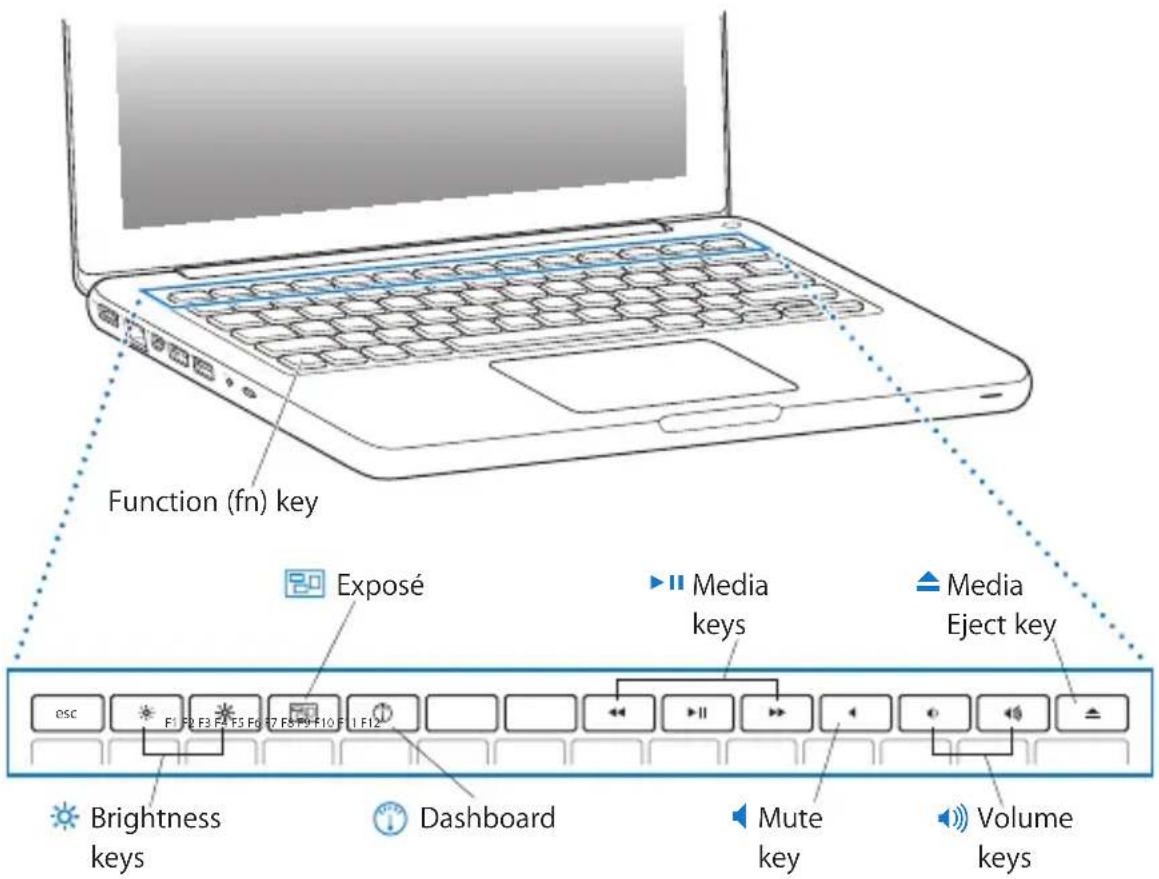
| Function (fn) keyHold down this key to activate customized actions assigned to the function keys(F1 to F12). To learn how to customize function keys, choose Help > Mac Help fromthe menu bar and search for “function keys.” | |
| Brightness keys (F1, F2)Increase (*) or decrease (*) the brightness of the screen. | |
| Exposé key (F3)Open Exposé for quick access to all your open windows. | |
| Dashboard key (F4)Open Dashboard to access your widgets. | |
| Media keys (F7, F8, F9)Rewind (◀◀), play or pause (▶II), or fast-forward (▶) a song, movie, or slideshow. | |
| Mute key (F10)Mute the sound coming from the built-in speakers or audio out port. | |
| Volume keys (F11, F12)Increase (◀◀) or decrease (◀) the volume of the sound coming from the built-in speakersor audio out port. | |
| Media Eject keyHold down this key to eject a disc that’s not in use. You can also eject a disc by draggingits desktop icon to the Trash. |
Ports on Your MacBook

| --- | MagSafe power portPlug in the included 60W MagSafe Power Adapter to recharge the MacBook battery. |
| <•> | Gigabit Ethernet portConnect to a high-speed Ethernet network, a DSL or cable modem, or another computer.The Ethernet port automatically detects Ethernet devices and doesn’t require an Ethernet crossover cable. |
| |□| | Mini DisplayPortConnect to an external display or projection system that uses a DVI or VGA connector.You can purchase adapters for supported video formats. |
| ψ | Two USB (Universal Serial Bus) 2.0 portsConnect an iPod, iPhone, mouse, keyboard, printer, disk drive, digital camera, joystick, modem, and more to your MacBook. |
| Audio out portConnect external speakers, headphones (including iPhone), or digital audio equipment.To use a line-level microphone or analog audio equipment, specify audio line in functionality using Sound preferences. For more information, see page 56. | |
| Security slotAttach a lock and cable (available separately) to prevent theft. |
| === | MagSafe power portPlug in the included 60W MagSafe Power Adapter to recharge the MacBook battery. |
| <••> | Gigabit Ethernet portConnect to a high-speed Ethernet network, a DSL or cable modem, or another computer.The Ethernet port automatically detects Ethernet devices and doesn’t require an Ethernet crossover cable. |
| |□| | Mini DisplayPortConnect to an external display or projection system that uses a DVI or VGA connector.You can purchase adapters for supported video formats. |
| ψ | Two USB (Universal Serial Bus) 2.0 portsConnect an iPod, iPhone, mouse, keyboard, printer, disk drive, digital camera, joystick, modem, and more to your MacBook. |
| ∩ | Audio out portConnect external speakers, headphones (including iPhone), or digital audio equipment.To use a line-level microphone or analog audio equipment, specify audio line in functionality using Sound preferences. For more information, see page 56. |
| Security slotAttach a lock and cable (available separately) to prevent theft. |
Note: Adapters and other accessories are sold separately at www.apple.com/store or your local Apple Retail Store.
Using the Multi-Touch Trackpad
Use the trackpad to move the cursor and to perform a variety of Multi-Touch gestures. Unlike typical trackpads, the entire MacBook trackpad is a button, and you can click anywhere on the trackpad. To enable Multi-Touch gestures, view instructional videos of the gestures, and set other trackpad options, choose Apple ( Apple ) > System Preferences, and then click Trackpad.
Here are ways to use your MacBook trackpad:
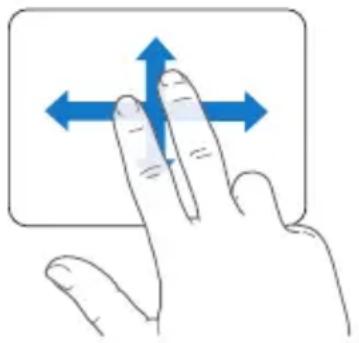
- Two-finger scrolling lets you drag to scroll quickly up, down, or sideways in the active window. This option is on by default. You can also set the option to scroll with or without momentum. If you scroll with momentum, the screen continues to scroll a little longer after you lift your fingers from the trackpad, which is helpful for navigating long documents and lists.
natural_image
Hand pressing a button with three blue arrows indicating left, right, and bottom (no text or symbols)- Secondary clicking or "right-clicking" lets you access shortcut menu commands.
- To set up two-finger secondary-clicking anywhere on the trackpad, select Secondary Click under the Two Fingers option in Trackpad preferences.

natural_image
Line drawing of a hand pressing a button on a rectangular device (no text or symbols)- To set up a one-finger secondary-click zone in the bottom left or right corner of the trackpad, select Secondary Click under the One Finger option in Trackpad preferences.

natural_image
Simple diagram with two blue squares inside a rounded rectangle (no text or symbols)Secondary click zone
Note: You can also secondary click by holding down the Control key while you click.
The following trackpad gestures work in certain applications. When you perform these gestures, slide your fingers lightly on the surface of the trackpad. For more information, see Trackpad preferences or choose Help > Mac Help and search for "trackpad."
- Two-finger pinching lets you zoom in or out on PDFs, images, photos, and more.

natural_image
Hand holding a square object with two blue arrows pointing upward (no text or symbols)
natural_image
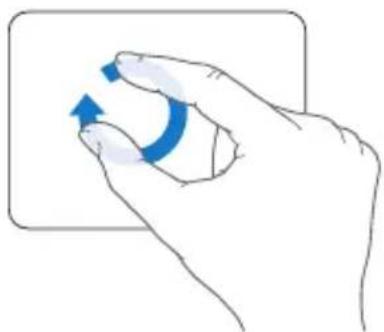
Hand holding a square object with two blue arrows pointing to it, no text or symbols present- Two-finger rotating lets you rotate photos, pages, and more.
natural_image
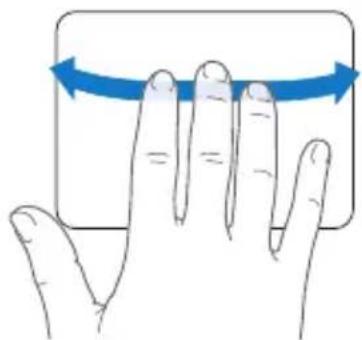
Hand holding a curved object with blue arrows indicating rotation or movement (no text or symbols)- Three-finger swiping lets you rapidly page through documents, move to the previous or next photo, and more.
natural_image
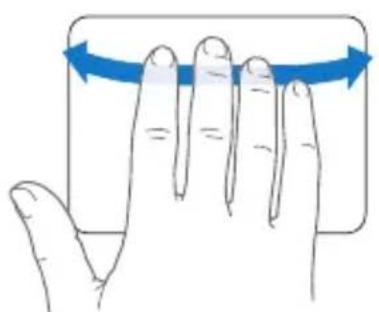
Illustration of a hand pressing a button with a blue curved arrow indicating rotation (no text or symbols)- Four-finger swiping works in the Finder and all applications. Swiping four fingers to the left or right activates Application Switcher so you can cycle through open applications. Swiping four fingers up or down causes Exposé to show the desktop or display all open windows.
natural_image
Illustration of a hand pressing a button with a blue curved arrow indicating rotation (no text or symbols)
natural_image
Illustration of a hand holding a blue upward arrow-shaped object, no text or symbols presentTo enable or disable any of the gestures, choose Apple ( Apple ) > System Preferences, and then click Trackpad. Click the checkboxes to turn the gestures on or off.
Using the MacBook Battery
When the MagSafe power adapter isn't connected, your MacBook draws power from its built-in battery. The length of time that you can run your MacBook varies, depending on the applications you use and the external devices connected to your MacBook.
Turning off features such as AirPort Extreme or Bluetooth® wireless technology and reducing screen brightness can help conserve battery charge—for example, when you're traveling by air. Many of your system preferences are automatically set to optimize battery life.
If the battery runs low while you're working, connect your power adapter and let the battery recharge. You can check the amount of battery charge left by viewing the Battery (◀) status icon in the menu bar. The battery charge level displayed is based on the amount of power left in the battery with the applications, peripheral devices, and system settings you're currently using. To conserve battery power, close applications and disconnect peripheral devices not in use, and adjust your Energy Saver settings.
For more information about battery conservation and performance tips, go to www.apple.com/batteries/notebooks.html.
Charging the Battery
When the power adapter that came with your MacBook is connected, the battery recharges whether the computer is on, off, or in sleep. The battery recharges more quickly, however, when the computer is off or in sleep.
The battery in your MacBook can be replaced only by an Apple Authorized Service Provider or an Apple Retail Store.
Getting Answers
Much more information about using your MacBook is available in Mac Help on your computer and on the Internet at www.apple.com/support/macbook.
To get Mac Help:
1 Click the Finder icon in the Dock (the bar of icons along the edge of the screen).

2 Click the Help menu in the menu bar and do one of the following:
a Type a question or term in the Search field, and select a topic from the list of results or select Show All Results to see all topics.
b Choose Mac Help to open the Mac Help window, where you can click links or type a search question.
More Information
For more information about using your MacBook, see the following:
To learn about See
| Installing memory Chapter 3, “Boost Your MacBook” on page 35. | |
| Troubleshooting your MacBook if you have a problem | Chapter 4, “Problem, Meet Solution” on page 51. |
| Finding service and support for your MacBook | “Learning More, Service, and Support” on page 64. Or see the Apple Support website at www.apple.com/support/macbook. |
| Using Mac OS X The Mac OS X website at www.apple.com/macosx. Or search for “Mac OS X” in Mac Help. | |
| Moving from a PC to a Mac “Why you’ll love a Mac” at www.apple.com/getamac/whymac. | |
| Using iLife applications The iLife website at www.apple.com/ilife. Or open an iLife application, open Help for the application, and then type a question in the search field. | |
| Changing system preferences System Preferences by choosing Apple ( 🍻) > System Preferences. Or search for “system preferences” in Mac Help. | |
| Using your trackpad Open System Preferences and click Trackpad. | |
| Using your keyboard Mac Help and search for “keyboard.” | |
| Using the iSight camera Mac Help and search for “iSight.” | |
| Using AirPort Extreme wireless technology | The AirPort Support page at www.apple.com/support/airport. Or open Mac Help and search for “AirPort.” |
| To learn about See | |
| Using Bluetooth wireless technology | The Bluetooth Support page at www.apple.com/support/bluetooth. Or open the Bluetooth File Exchange application, located in the Utilities folder within the Applications folder, and choose Help > Bluetooth Help. |
| Caring for the battery Mac Help and search for "battery." | |
| Connecting a printer Mac Help and search for "printing." | |
| USB connections Mac Help and search for "USB." | |
| Connecting to the Internet Mac Help and search for "Internet." | |
| Connecting an external display Mac Help and search for "display port." | |
| Front Row Mac Help and search for "Front Row." | |
| Burning a CD or DVD Mac Help and search for "burn disc." | |
| Specifications The Specifications page at www.apple.com/support/specs.Or open System Profiler by choosing Apple ( Apple ) > About This Mac from the menu bar, and then click More Info. | |
| Apple news, free downloads, and online catalogs of software and hardware | The Apple website at www.apple.com. |
| Instructions, technical support, and manuals for Apple products | The Apple Support website at www.apple.com/support. |
3
Boost Your MacBook
www.apple.com/store
Mac Help

RAM
This chapter provides information and instructions for upgrading the hard drive and installing additional memory in your MacBook.
WARNING: Apple recommends that you have an Apple-certified technician install replacement drives and memory. Consult the service and support information that came with your computer for information about how to contact Apple for service. If you attempt to install a replacement drive or memory and you damage your equipment, such damage is not covered by the limited warranty on your computer.
The battery in your MacBook is not user-replaceable. If you think your battery needs to be replaced, contact an Apple Retail Store or an Apple Authorized Service Provider.
Replacing the Hard Disk Drive
You can upgrade the hard disk drive in your MacBook. The hard disk drive is located next to the built-in battery when you open the back of your MacBook. The replacement drive must be a 2.5-inch drive with a Serial ATA (SATA) connector.
Important: Apple recommends that you back up the data on your hard disk drive before removing and replacing it. Apple is not responsible for any lost data.
To replace the hard disk drive in your MacBook:
1 Shut down your MacBook. Disconnect the power adapter, Ethernet cable, USB cables, security lock, and any other cables connected to the MacBook to prevent damaging the computer.
WARNING: The internal components of your MacBook can be warm. If you have been using your MacBook, wait 10 minutes after shutting down to let the internal components cool before continuing.
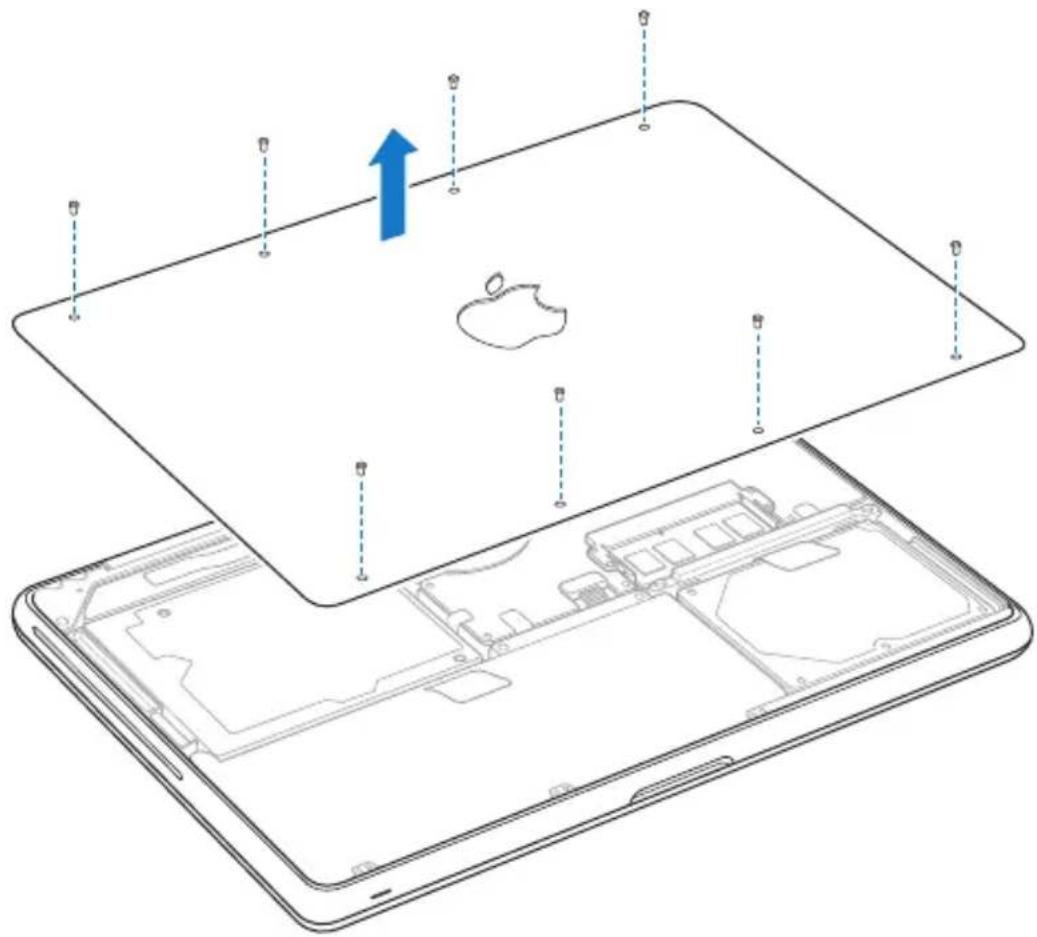
2 Turn over your MacBook and remove the eight (8) screws that secure the bottom case. Lift off the case from the hinged side, and place it aside.
38 Chapter 3 Boost Your MacBook
Important: When you remove the bottom case, you expose sensitive internal components. Avoid touching anything other than the hard drive assembly when you remove or add a hard disk drive.
3 Touch a metal surface inside the computer to discharge any static electricity from your body.

natural_image
Line drawing of a hand inserting a component into a tablet device (no text or symbols)4 Locate the bracket at the top of the drive. Use a Phillips screwdriver to loosen the two captive screws that hold the bracket in place. Put the bracket aside in a safe place.
5 Using the pull tab, gently lift the drive out of the bay.
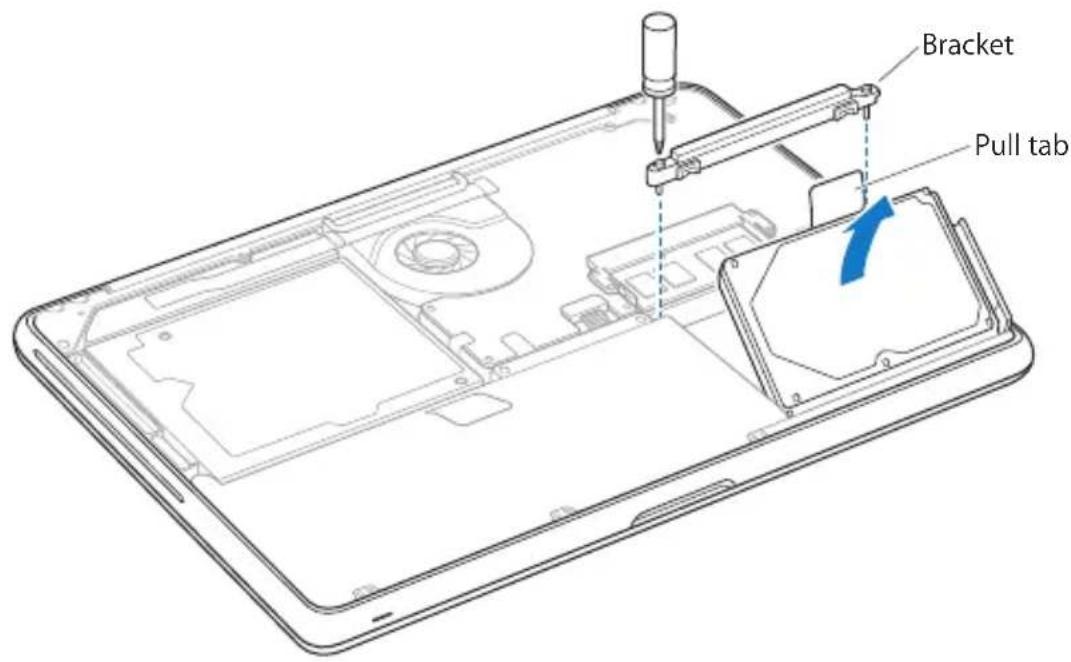
6 Hold the drive by its sides and gently pull the connector on the right side of the drive to disconnect it. Don't press the drive between your fingers, and avoid touching the circuitry on the underside of the drive.

The connector is attached to a cable and remains in the hard disk drive bay.
Important: There are four (4) mounting screws on the sides of your hard disk drive. If your replacement drive doesn't include mounting screws, remove the ones from your old drive and mount them on the replacement drive before you install it.

7 Attach the connector to the right side of the replacement drive.
8 Insert the replacement drive at an angle, making sure the mounting screws are seated properly.

natural_image
Technical line drawing of a tablet device showing internal components and a screwdriver inserted (no text or symbols)9 Replace the bracket and tighten the screws.
10 Replace the bottom case. Grasp the case in the middle of each side, and push down first with one thumb and then the other to lock the snaps on the inside of the case.

natural_image
Line drawing of a tablet device with an Apple logo on the cover and two blue arrows indicating directional movement (no text or symbols)11 Replace and tighten the eight screws you removed in step 2.
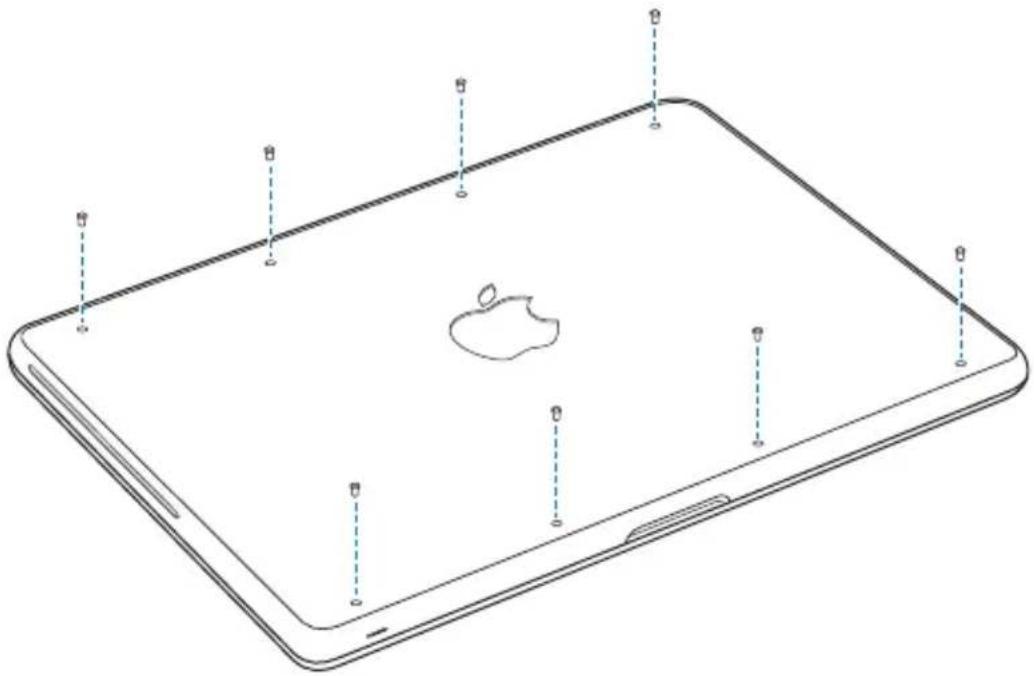
For information about installing Mac OS X and bundled applications, see "Reinstalling the Software That Came with Your MacBook" on page 62.
Installing Additional Memory
Your computer has two memory slots that you access by removing the bottom case. Your MacBook comes with a minimum of 2 gigabytes (GB) of 1066 MHz Double Data Rate (DDR3) Synchronous Dynamic Random-Access Memory (SDRAM) installed. Both memory slots can accept an SDRAM module that meets the following specifications:
- Double Data Rate Small Outline Dual Inline Memory Module (DDR3) format
- 30 mm (1.18 inches)
•204-pin - 1 GB or 2 GB
•PC3-8500 DDR3 SO-DIMM 1066 MHz Type RAM
You can add two 2 GB memory modules for a maximum of 4 GB of memory. For best performance, fill both memory slots and install an identical memory module in each slot.
To install memory in your MacBook:
1 Follow steps 1 through 3 beginning on page 37.
Important: When you remove the bottom case, you expose sensitive internal components. Avoid touching anything other than the memory assembly when you remove or add memory.
2 Push the levers on the sides of the memory module in an outward direction to release the module from the memory card slot.
The memory pops up at an angle. Before removing it, make sure you see the half-circle notches. If you don't, try pushing the levers outward again.

3 Hold the memory module by its notches and remove it from the slot.
4 Remove the other memory module.
Important: Hold the memory modules by their edges, and do not touch the gold connectors.
5 Insert the new memory module in the slot:
a Align the notch on the gold edge of the module with the notch in the lower memory slot.
b Tilt the card and push the memory into the slot.
c Use two fingers with firm, even pressure to push down on the memory module. You should hear a click when the memory is inserted correctly.
d Repeat to install an additional memory module in the top slot. Press down on the module to make sure it is level.

6 Follow the instructions for replacing the bottom case in steps 10 and 11 on page 44 and page 45.
Making Sure Your MacBook Recognizes the New Memory
After installing additional memory in your MacBook, check whether the computer recognizes the new memory.
To check the computer's memory:
1 Start up your MacBook.
2 When you see the Mac OS X desktop, choose Apple (✗) > About This Mac.
For a detailed breakdown of the memory installed in your computer, open System Profiler by clicking More Info, and then click Memory.
If your MacBook doesn't recognize the memory or doesn't start up correctly, confirm that the memory you installed is compatible with your MacBook and that it's installed correctly.
4
Problem, Meet Solution
www.apple.com/support
Mac Help
help
Occasionally, you may have problems while working with your MacBook. Read on for troubleshooting tips to try when you have a problem. You can also find more troubleshooting information in Mac Help and on the MacBook Support website at www.apple.com/support/macbook.
If you experience a problem with your MacBook, there is usually a simple and quick solution. Think about the conditions that led up to the problem. Making a note of things you did before the problem occurred will help you narrow down possible causes and find the answers you need. Things to note include:
- The applications you were using when the problem occurred. Problems that occur only with a specific application might indicate that the application is not compatible with the version of the Mac OS installed on your computer.
- Any new software that you installed, especially software that added items to the System folder.
- Any hardware that you installed, such as additional memory or a peripheral.
Problems That Prevent You from Using Your MacBook
If your MacBook doesn't respond or the pointer doesn't move
On rare occasions, an application might "freeze" on the screen. Mac OS X provides a way to quit a frozen application without restarting your computer.
To force an application to quit:
1 Press Command (⌘)-Option-Esc or choose Apple (💡) > Force Quit from the menu bar. The Force Quit Applications dialog appears with the application selected.
2 Click Force Quit.
The application quits, leaving all other applications open.
If you need to, you can also restart the Finder from this dialog.
Next, save your work in any open applications and restart the computer to make sure the problem is entirely cleared up.
If the problem occurs frequently, choose Help > Mac Help from the menu bar at the top of the screen. Search for the word "freeze" to get help for instances when the computer freezes or doesn't respond.
If the problem occurs only when you use a particular application, check with the application's manufacturer to see if it's compatible with your computer. To get support and contact information for the software that came with your MacBook, go to www.apple.com/guide.
If you know an application is compatible, you might need to reinstall your computer's system software. See "Reinstalling the Software That Came with Your MacBook" on page 62.
If your MacBook freezes during startup, or you see a flashing question mark, or the screen is dark and the sleep indicator light is glowing steadily (not in sleep)
The flashing question mark usually means that the computer can't find the system software on the hard disk or any disks attached to the computer.
Wait a few seconds. If the computer doesn't start up, shut it down by holding down the power (⏻) button for about 8 to 10 seconds. Disconnect all external peripherals and try restarting by pressing the power (⏻) button while holding down the Option key. When your computer starts up, click the hard disk icon, and then click the right arrow. After the computer starts up, open System Preferences and click Startup Disk. Select a local Mac OS X System folder.
- If that doesn't work, try using Disk Utility to repair the disk:
- Insert the Mac OS X Install DVD into your computer.
- Restart your computer and hold down the C key as it starts up.
- When prompted, choose your preferred language.
- When the next screen appears, choose Disk Utility from the Utilities menu in the menu bar. When Disk Utility opens, follow the instructions in the First Aid pane to see if Disk Utility can repair the disk.
If using Disk Utility doesn't help, you might need to reinstall your computer's system software. See "Reinstalling the Software That Came with Your MacBook" on page 62.
If your MacBook doesn't turn on or start up
Try the following suggestions in order until your computer turns on:
- Make sure the power adapter is plugged into the computer and into a functioning power outlet. Be sure to use the 60W MagSafe Power Adapter that came with your MacBook. If the power adapter stops charging and you don't see the indicator light on the power adapter turn on when you plug in the power cord, try unplugging and replugging the power cord to reseat it.
- If the indicator light on the MagSafe connector is amber, the battery might need to be recharged. Keep the power adapter connected and charge the battery with the computer off. A green light indicates that the battery is fully charged.
- If the problem persists, reset the MacBook power manager (while still preserving your files) by pressing the left Shift key, left Option (alt) key, left Control key, and the power (⏻) button simultaneously for five seconds until the computer restarts.
- If you recently installed additional memory, make sure that it is correctly installed and that it is compatible with your computer. See whether removing it and reinstalling the old memory allows the computer to start up (see page 46).
- Press the power (⏻) button and immediately hold down the Command (⌘), Option, P, and R keys simultaneously until you hear the startup sound a second time. This resets the parameter RAM (PRAM).
- If you still can't start up your MacBook, see "Learning More, Service, and Support" on page 64 for information about contacting Apple for service.
If the screen suddenly goes black or your MacBook freezes
Try restarting your MacBook.
1 Unplug any devices that are connected to your MacBook, except the power adapter.
2 Press the power (⏻) button to restart the system.
3 Let the battery charge to at least 10 percent before plugging in any external devices and resuming your work.
To see how much the battery has charged, look at the Battery (→) status icon in the menu bar.
The screen might also darken if you have energy saver features set for the battery.
If an audio device plugged into the audio port isn't working
Unplug the audio device. Choose Apple ( Apple ) > System Preferences, and open Sound preferences. In the Input pane, specify whether you want the port to be used for Sound Input or Sound Output. Plug the audio device back in.
Note: If you run Windows on your MacBook, the port will support only audio output.
If you forget your password
You can reset your administrator password and passwords for all other accounts.
1 Insert the Mac OS X Install DVD. Then restart your computer and hold down the C key as it starts up.
2 When prompted, choose your preferred language.
3 When the next screen appears, choose Reset Password from the Utilities menu in the menu bar. Follow the onscreen instructions.
If you have trouble ejecting a disc
- Quit any applications that might be using the disc and try again.
- If this doesn't work, restart the computer while holding down the trackpad.
Using Apple Hardware Test
If you suspect a problem with the MacBook hardware, you can use the Apple Hardware Test application to help determine if there is a problem with one of the computer's components, such as the memory or processor.
To use Apple Hardware Test:
1 Disconnect all external devices from your computer except the power adapter. If you have an Ethernet cable connected, disconnect it.
2 Restart your MacBook and hold down the D key as it starts up.
3 When the Apple Hardware Test chooser screen appears, select the language for your location.
4 Press the Return key or click the right arrow button.
5 When the Apple Hardware Test main screen appears (after about 45 seconds), follow the onscreen instructions.
6 If Apple Hardware Test detects a problem, it displays an error code. Make a note of the error code before pursuing support options. If Apple Hardware Test doesn't detect a hardware failure, the problem may be software related.
If this procedure doesn't work, you can use Apple Hardware Test from the Applications Install DVD that came with your computer. For more information, see the Apple Hardware Test Read Me file on the Applications Install DVD.
Problems with Your Internet Connection
Your MacBook has the Setup Assistant application to help walk you through setting up an Internet connection. Open System Preferences and click Network. Click the "Assist me" button to open Network Setup Assistant.
If you have trouble with your Internet connection, you can try the steps in this section starting with Network Diagnostics.
To use Network Diagnostics:
1 Choose Apple ( Apple ) > System Preferences.
2 Click Network and then click "Assist me."
3 Click Diagnostics to open Network Diagnostics.
4 Follow the onscreen instructions.
If Network Diagnostics can't resolve the problem, there may be a problem with the Internet service provider (ISP) you are trying to connect to, with an external device you are using to connect to your ISP, or with the server you are trying to access. You can try the following steps.
Cable Modem, DSL, and LAN Internet Connections
Make sure all modem cables are firmly plugged in, including the modem power cord, the cable from the modem to the computer, and the cable from the modem to the wall jack. Also check the cables and power supplies for Ethernet hubs and routers.
Turn the modem off and on to reset the modem hardware
Turn off your DSL or cable modem for a few minutes, and then turn it back on.
Some ISPs recommend that you unplug the modem's power cord. If your modem has a reset button, you can press it either before or after you turn the power off and on.
Important: Instructions that refer to modems do not apply to LAN users. LAN users might have hubs, switches, routers, or connection pods that DSL and cable modem users do not have. LAN users should contact their network administrator rather than an ISP.
PPPoE Connections
If you are unable to connect to your Internet service provider using PPPoE (Point to Point Protocol over Ethernet), make sure you have entered the correct information in Network preferences.
To check PPPoE settings:
1 Choose Apple ( Apple ) > System Preferences.
2 Click Network. Click Add (+) at the bottom of the network connection services list, and choose PPPoE from the Interface pop-up menu.
3 Choose an interface for the PPPoE service from the Ethernet pop-up menu. Choose Ethernet if you are connecting to a wired network, or AirPort if you are connecting to a wireless network.
4 Enter the information you received from your service provider, such as the account name, password, and PPPoE service name (if your service provider requires it).
5 Click Apply to make the settings active.
Network Connections
Make sure the Ethernet cable is plugged into your MacBook and into the network. Check the cables and power supplies to your Ethernet hubs and routers.
If you have two or more computers sharing an Internet connection, be sure that your network is set up properly. You need to know if your ISP provides only one IP address or if it provides multiple IP addresses, one for each computer.
If only one IP address is provided, then you must have a router capable of sharing the connection, also known as network address translation (NAT) or "IP masquerading." For setup information, check the documentation provided with your router or ask the person who set up your network. You can use an AirPort base station to share one IP address among multiple computers. For information about using an AirPort base station, check Mac Help or visit the Apple AirPort website at www.apple.com/support/airport.
If you can't resolve the issue using these steps, contact your ISP or network administrator.
Problems with AirPort Extreme Wireless Communication
If you have trouble using AirPort Extreme wireless communication:
- Make sure the computer or network you are trying to connect to is running and has a wireless access point.
- Make sure you have properly configured the software according to the instructions that came with your base station or access point.
- Make sure you are within antenna range of the other computer or the network's access point. Nearby electronic devices or metal structures can interfere with wireless communication and reduce this range. Repositioning or rotating the computer might improve reception.
- Check the AirPort (💡) status icon in the menu bar. Up to four bars appear, indicating signal strength. If the signal strength is weak, try changing your location.
- See AirPort Help (choose Help > Mac Help, and then choose Library > AirPort Help from the menu bar). Also see the instructions that came with the wireless device for more information.
Keeping Your Software Up to Date
You can connect to the Internet and automatically download and install the latest free software versions, drivers, and other enhancements from Apple.
When you are connected to the Internet, Software Update checks to see if any updates are available for your computer. You can set your MacBook to check for updates periodically, and then you can download and install updated software.
To check for updated software:
1 Choose Apple ( Apple ) > System Preferences.
2 Click the Software Update icon and follow the onscreen instructions.
- For more information, search for "Software Update" in Mac Help.
- For the latest information about Mac OS X, go to www.apple.com/macosx.
Reinstalling the Software That Came with Your MacBook
Use the software installation discs that came with your computer to reinstall Mac OS X and any applications that came with your computer. Don't attempt to install an earlier version of Mac OS X on your MacBook.
Important: Apple recommends that you back up the data on your hard disk before restoring software. Apple is not responsible for any lost data.
Installing Mac OS X
You can reinstall Mac OS X and applications such as Address Book, iChat, iCal, Mail, or Safari.
To install Mac OS X:
1 Back up your essential files.
2 Make sure your power adapter is connected and plugged in.
3 Insert the Mac OS X Install DVD that came with your computer.
4 Double-click Install Mac OS X.
5 Follow the onscreen instructions. In the pane where you are prompted to select a disk, select your current Mac OS X hard disk (in most cases, it will be the only one available).
6 To control which parts of Mac OS X are installed, click Customize, and then select the parts you want to install. Click the disclosure triangle next to Applications to select the checkboxes for any applications you want to install.
7 Click install to start the installation.
8 When the installation is complete, click Restart to restart your computer.
9 Follow the prompts in Setup Assistant to set up your new user account.
If you want to erase and install, make sure you back up your user data before you start. Use Disk Utility on your Mac OS X Install DVD to erase your hard drive. For information about Disk Utility and its options, see Mac Help, or open Disk Utility (Applications > Utilities > Disk Utility) and choose Help > Disk Utility Help. You can also review detailed instructions in the following Kbase article: http://support.apple.com/kb/HT3910
Installing iLife Applications
You can reinstall the iLife applications that came with your computer if you accidentally delete them, or after you perform an erase and install.
To install the iLife applications that came with your computer:
1 Make sure your power adapter is connected and plugged in.
2 Insert the Applications Install DVD that came with your computer.
3 Follow the onscreen instructions. In the Installation Type pane, click Customize.
4 Click the disclosure triangle next to Bundled Applications, select the checkboxes next to the applications you want to install, and then click Install.
5 When the installation is complete, click Close.
Learning More, Service, and Support
Your MacBook does not have any user-serviceable parts, except the hard drive and the memory. If you need service, contact Apple or take your MacBook to an Apple Authorized Service Provider. You can find more information about the MacBook through online resources, onscreen help, System Profiler, or Apple Hardware Test.
Online Resources
For online service and support information, go to www.apple.com/support. Choose your country from the pop-up menu. You can search the AppleCare Knowledge Base, check for software updates, or get help from Apple's discussion forums.
Onscreen Help
You can look for answers to your questions, as well as instructions and troubleshooting information, in Mac Help. Choose Help > Mac Help.
System Profiler
To get information about your MacBook, use System Profiler. It shows you what hardware and software is installed, the serial number and operating system version, how much memory is installed, and more. To open System Profiler, choose Apple ( Apple ) > About This Mac from the menu bar and then click More Info.
AppleCare Service and Support
Your MacBook comes with 90 days of technical support and one year of hardware repair warranty coverage at an Apple Retail Store or an Apple-authorized repair center, such as an Apple Authorized Service Provider. You can extend your coverage by purchasing the AppleCare Protection Plan. For information, go to www.apple.com/support/products or the website for your country listed below.
If you need assistance, AppleCare telephone support representatives can help you with installing and opening applications, and basic troubleshooting. Call the support center number nearest you (the first 90 days are complimentary). Have the purchase date and your MacBook serial number ready when you call.
Note: Your 90 days of complimentary telephone support begins on the date of purchase. Telephone fees may apply.
| Country Phone | Website |
| United States 1-800-275-2273 www.apple.com/support | |
| Australia (61) 1-300-321-456 www.apple.com/au/support | |
| Canada (English) (French) | 1-800-263-3394 www.apple.com/ca/supportwww.apple.com/ca/fr/support |
| Ireland (353) 1850 946 191 www.apple.com/ie/support | |
| New Zealand 00800-7666-7666 www.apple.com/nz/support | |
| United Kingdom | (44) 0844 209 0611 www.apple.com/uk/support |
Telephone numbers are subject to change, and local and national telephone rates may apply. A complete list is available on the web:
www.apple.com/support/contact/phone_contacts.html
Locating Your Product Serial Number
Use one of these methods to find your MacBook serial number:
- Turn over your MacBook. The serial number is etched into the bottom case.

- Choose Apple ( Apple ) > About This Mac, and then click the version number beneath the words "Mac OS X" to cycle through the Mac OS X version number, the build version, and the serial number.
- Click the Finder icon and open /Applications/Utilities/System Profiler. Click Hardware in the Contents pane.
5
Last, but Not Least
www.apple.com/environment
Mac Help
ergonomics
For your safety and that of your equipment, follow these rules for handling and cleaning your MacBook and for working more comfortably. Keep these instructions handy for reference by you and others.
WARNING: Incorrect storage or use of your computer may void the manufacturer's warranty.
Important Safety Information
WARNING: Failure to follow these safety instructions could result in fire, electric shock, or other injury or damage.
Built-in battery Do not remove the battery from your MacBook. The battery should be replaced only by an Apple Authorized Service Provider. Discontinue use of your MacBook if it is dropped or appears crushed, bent, deformed, or damaged. Do not expose the computer to temperatures above 212^ F or 100^ C.
Proper handling Set up your MacBook on a stable work surface that allows for adequate air circulation under and around the computer. Do not operate your MacBook on a pillow or other soft material, as the material can block the airflow vents. Never place anything over the keyboard when operating your MacBook. Never push objects into the ventilation openings.
The bottom of your MacBook may become very warm during normal use. If your MacBook is on your lap and gets uncomfortably warm, remove it from your lap and place it on a stable work surface.
Water and wet locations Keep your MacBook away from sources of liquid, such as drinks, washbasins, bathtubs, shower stalls, and so on. Protect your MacBook from dampness or wet weather, such as rain, snow, and fog.
60W MagSafe Power Adapter Make sure the AC plug or AC power cord is fully inserted into the power adapter before plugging the adapter into a power outlet. Use only the power adapter that came with your MacBook, or an Apple-authorized power adapter that is compatible with this product. The power adapter may become very warm during normal use. Always put the power adapter directly into a power outlet, or place it on the floor in a well-ventilated location.
Disconnect the power adapter and disconnect any other cables if any of the following conditions exist:
- You want to add memory or upgrade the hard disk drive.
- You want to clean the case (use only the recommended procedure described on page 73).
- The power cord or plug becomes frayed or otherwise damaged.
- Your MacBook or power adapter is exposed to rain, excessive moisture, or liquid spilled into the case.
- Your MacBook or power adapter has been dropped, the case has been damaged, or you suspect that service or repair is required.
The MagSafe power port contains a magnet that can erase data on a credit card, iPod, or other device. To preserve your data, do not place these or other magnetically sensitive material or devices within 1 inch (25 mm) of this port.
If debris gets into the MagSafe power port, remove it gently with a dry cotton swab.
MagSafe power specifications:
•Frequency: 50 to 60 Hz, single phase
•Line Voltage: 100 to 240 V
•Output Voltage: 16.5 V DC, 3.65 A
Hearing damage Permanent hearing loss may occur if earbuds or headphones are used at high volume. You can adapt over time to a higher volume of sound that may sound normal but can be damaging to your hearing. If you experience ringing in your ears or muffled speech, stop listening and have your hearing checked. The louder the volume, the less time is required before your hearing could be affected. Hearing experts suggest that to protect your hearing:
- Limit the amount of time you use earbuds or headphones at high volume.
- Avoid turning up the volume to block out noisy surroundings.
- Turn the volume down if you can't hear people speaking near you.
High-risk activities This computer is not intended for use in the operation of nuclear facilities, aircraft navigation or communications systems, air traffic control systems, or for any other uses where the failure of the computer could lead to death, personal injury, or severe environmental damage.
Laser Information for Optical Disc Drives
WARNING: Making adjustments or performing procedures other than those specified in your equipment's manual may result in hazardous radiation exposure.
The optical disc drive in your computer contains a laser that is safe in normal use but that may be harmful to your eyes if disassembled. For your safety, have this equipment serviced only by an Apple Authorized Service Provider.
Important Handling Information
NOTICE: Failure to follow these handling instructions could result in damage to your MacBook or other property.
Operating environment Operating your MacBook outside these ranges may affect performance:
- Operating temperature: 50^ to 95^ (10° to 35°C)
- Storage temperature: -4^ to 113^ F (-20° to 45°C)
- Relative humidity: 5% to 90% (noncondensing)
- Operating altitude: 0 to 10,000 feet (0 to 3048 meters)
Turning on your MacBook Never turn on your MacBook unless all of its internal and external parts are in place. Operating the computer when parts are missing may be dangerous and may damage your computer.
Carrying your MacBook If you carry your MacBook in a bag or briefcase, make sure that there are no loose items (such as paper clips or coins) that could accidentally get inside the computer through vent openings or the optical drive slot or get stuck inside a port. Also, keep magnetically sensitive items away from the MagSafe power port.
Using connectors and ports Never force a connector into a port. When connecting a device, make sure the port is free of debris, that the connector matches the port, and that you have positioned the connector correctly in relation to the port.
Using the optical drive The SuperDrive in your MacBook supports standard 12 cm (4.7 inch) discs. Irregularly shaped discs or discs smaller than 12 cm (4.7 inches) are not supported.
Handling glass parts Your MacBook contains glass components, including the display and trackpad. If they are damaged, don't use your MacBook until it has been repaired by an Apple Authorized Service Provider.
Storing your MacBook If you are going to store your MacBook for an extended period of time, keep it in a cool location (ideally, 71°F or 22°C) and discharge the battery to 50 percent or less. When storing your MacBook for longer than five months, discharge the battery to approximately 50 percent. To maintain the capacity of the battery, recharge the battery to 50 percent every six months or so.
Cleaning your MacBook When cleaning the outside of your MacBook and its components, first shut down your MacBook and unplug the power adapter. Then use a damp, soft, lint-free cloth to clean the computer's exterior. Avoid getting moisture in any openings. Do not spray liquid directly on the computer. Do not use aerosol sprays, solvents, or abrasives that might damage the finish.
Cleaning the MacBook screen To clean the MacBook screen, first shut down your MacBook and unplug the power adapter. Then dampen a clean cloth with just water and wipe the screen. Do not spray liquid directly on the screen.
Understanding Ergonomics
Here are some tips for setting up a healthy work environment.
Keyboard and Trackpad
When you use the keyboard and trackpad, your shoulders should be relaxed. Your upper arm and forearm should form an angle that is slightly greater than a right angle, with your wrist and hand in roughly a straight line.
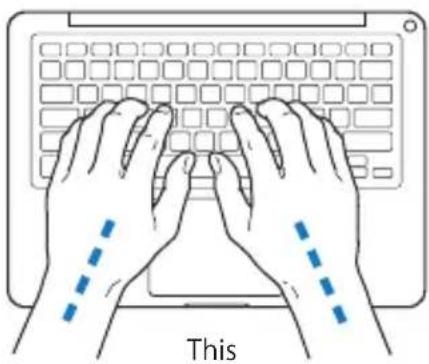
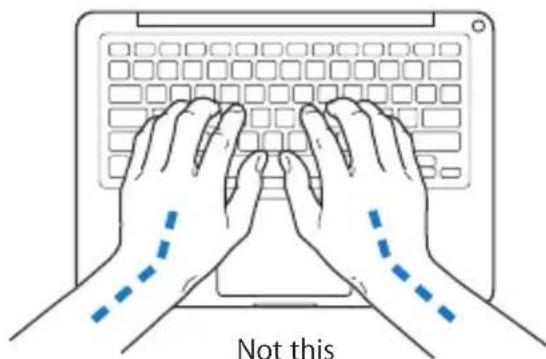
Use a light touch when typing or using the trackpad and keep your hands and fingers relaxed. Avoid rolling your thumbs under your palms.


Change hand positions often to avoid fatigue. Some computer users might develop discomfort in their hands, wrists, or arms after intensive work without breaks. If you begin to develop chronic pain or discomfort in your hands, wrists, or arms, consult a qualified health specialist.
External Mouse
If you use an external mouse, position the mouse at the same height as the keyboard and within comfortable reach.
Chair
An adjustable chair that provides firm, comfortable support is best. Adjust the height of the chair so your thighs are horizontal and your feet are flat on the floor. The back of the chair should support your lower back (lumbar region). Follow the manufacturer's instructions for adjusting the backrest to fit your body properly.
You might have to raise your chair so that your forearms and hands are at the proper angle to the keyboard. If this makes it impossible to rest your feet flat on the floor, you can use a footrest with adjustable height and tilt to make up for any gap between the floor and your feet. Or you can lower the desktop to eliminate the need for a footrest. Another option is to use a desk with a keyboard tray that's lower than the regular work surface.
Built-in Display
Adjust the angle of the display to optimize viewing in your environment. Do not force the display if you meet resistance. The display is not meant to open past 135 degrees.
You can adjust the brightness of the screen when you take the computer from one work location to another, or if the lighting in your work area changes.
More information about ergonomics is available on the web:
www.apple.com/about/ergonomics
Apple and the Environment
Apple Inc. recognizes its responsibility to minimize the environmental impacts of its operations and products.
More information is available on the web:
www.apple.com/environment
Regulatory Compliance Information
FCC Compliance Statement
This device complies with part 15 of the FCC rules. Operation is subject to the following two conditions: (1) This device may not cause harmful interference, and (2) this device must accept any interference received, including interference that may cause undesired operation. See instructions if interference to radio or television reception is suspected.
Radio and Television Interference
This computer equipment generates, uses, and can radiate radio-frequency energy. If it is not installed and used properly—that is, in strict accordance with Apple's instructions—it may cause interference with radio and television reception.
This equipment has been tested and found to comply with the limits for a Class B digital device in accordance with the specifications in Part 15 of FCC rules. These specifications are designed to provide reasonable protection against such interference in a residential installation. However, there is no guarantee that interference will not occur in a particular installation.
You can determine whether your computer system is causing interference by turning it off. If the interference stops, it was probably caused by the computer or one of the peripheral devices. If your computer system does cause interference to radio or television reception, try to correct the interference by using one or more of the following measures:
- Turn the television or radio antenna until the interference stops.
- Move the computer to one side or the other of the television or radio.
- Move the computer farther away from the television or radio.
- Plug the computer in to an outlet that is on a different circuit from the television or radio. (That is, make certain the computer and the television or radio are on circuits controlled by different circuit breakers or fuses.)
If necessary, consult an Apple Authorized Service Provider or Apple. See the service and support information that came with your Apple product. Or consult an experienced radio/television technician for additional suggestions.
Important: Changes or modifications to this product not authorized by Apple Inc. could void the EMC compliance and negate your authority to operate the product.
This product has demonstrated EMC compliance under conditions that included the use of compliant peripheral devices and shielded cables (including Ethernet network cables) between system components. It is important that you use compliant peripheral devices and shielded cables between system components to reduce the possibility of causing interference to radios, television sets, and other electronic devices.
Responsible party (contact for FCC matters only):
Apple Inc. Corporate Compliance
1 Infinite Loop, MS 26-A
Cupertino, CA 95014
Wireless Radio Use
This device is restricted to indoor use when operating in the 5.15 to 5.25 GHz frequency band.
Exposure to Radio Frequency Energy
The radiated output power of the AirPort Extreme technology is below the FCC radio frequency exposure limits. Nevertheless, it is advised to use the wireless equipment in such a manner that the potential for human contact during normal operation is minimized.
FCC Bluetooth Wireless Compliance
The antenna used with this transmitter must not be colocated or operated in conjunction with any other antenna or transmitter subject to the conditions of the FCC Grant.
Bluetooth Industry Canada Statement
This Class B device meets all requirements of the Canadian interference-causing equipment regulations.
Industry Canada Statement
Complies with the Canadian ICES-003 Class B specifications. Cet appareil numérique de la classe B est conforme à la norme NMB-003 du Canada. This device complies with RSS 210 of Industry Canada.
Bluetooth Europe—EU Declaration of Conformity
This wireless device complies with the R&TTE Directive.
Europe—EU Declaration of Conformity
The equipment complies with the RF Exposure Requirement 1999/519/EC, Council Recommendation of 12 July 1999 on the limitation of exposure of the general public to electromagnetic fields (0 Hz to 300 GHz).
Hereby, Apple Inc. declares that this 802.11a/b/g/n Mini-PCIe card is in compliance with the R&TTE Directive.
Complies with European Low Voltage and EMC Directives. See: www.apple.com/euro/compliance
Korea Warning Statements
Singapore Wireless Certification
Complies with IDA Standards DB00063
Russia

ME67
Taiwan Wireless Statements
無線設備的警告聲明
Taiwan Class B Statement
Class B 設備的警告聲明
NIL
VCCI Class B Statement
情報処理装置等電波障害自主規制について
When connecting your MacBook to the phone line using an external USB modem, refer to the telecommunications agency information in the documentation that came with your modem.
ENERGY STAR® Compliance

As an ENERGY STAR ^® partner, Apple has determined that standard configurations of this product meet the ENERGY STAR ^® guidelines for energy efficiency. The ENERGY STAR ^® program is a partnership with electronic equipment manufacturers to promote energy-efficient products. Reducing energy consumption of products saves money and helps conserve valuable resources.
This computer is shipped with power management enabled with the computer set to sleep after 10 minutes of user inactivity. To wake your computer, click the mouse or trackpad button or press any key on the keyboard.
For more information about ENERGY STAR ^® , visit: www.energystar.gov
Turkey
Disposal and Recycling Information

This symbol indicates that your product must be disposed of properly according to local laws and regulations. Because the backlight lamp in this product contains mercury, the product must be disposed of separately from household waste. When your product reaches its end of life, contact Apple or your local authorities to learn about recycling options.
For information about Apple's recycling program, go to www.apple.com/environment/recycling.
European Union—Disposal Information:

The symbol above means that according to local laws and regulations your product should be disposed of separately from household waste. When this product reaches its end of life, take it to a collection point designated by local authorities. Some collection points accept products for free. The separate collection and recycling of your product at the time of disposal will help conserve natural resources and ensure that it is recycled in a manner that protects human health and the environment.
Battery Disposal Information
Dispose of batteries according to your local environmental laws and guidelines.
Looking for Something?
Index
A
AC plug 10
AC power adapter. See power adapter
AC power cord 10
adapter, power. See power adapter
administrator password, resetting 56
AirPort Extreme connecting wirelessly 11 troubleshooting 60
AppleCare 64
Apple Hardware Test 57
application freeze 53
applications Front Row 33
iChat AV 21
iLife 32
Photo Booth 21
audio out port 25
B
battery
location 21
performance 30
blinking question mark 54
brightness controls 23
built-in battery. See battery
built-in speakers 21
button, power 12, 21
C
cable modem 11
camera. See iSight video camera
carrying your computer 72
changing
desktop 16
password 56
System Preferences 16
checking memory 50
cleaning
the screen 73
your computer 73
computer
disposal 80
freezes 54
putting to sleep 16
shutting down 17
turning on 12
waking 17
won't turn on 55
connecting to a network 11
Control-click 27
controls
brightness 23
media 23
volume 23
See also keys
cord, AC power 10
D
Dashboard key 23
desktop, customizing 16
discs
ejecting 57
software installation 62
supported sizes 72
display
cleaning 73
external 25
See also screen
disposing of your computer 80
Dock 31
downloading software 61
drive, SuperDrive 21
DSL modem 11
E
ejecting a disc, troubleshooting 57
Energy Saver preferences 30
environmental impact 76
ergonomics 74
Ethernet
connecting to 11
port 25
Exposé key 23
external display port 25
F
F1 to F12 function keys 23
Fast-forward key 23
flashing question mark 54
Force Quit 53
four-finger swiping 29
Front Row application 33
function (fn) key 23
G
gestures, trackpad 26
H
hand positions 74
hard disk drive
removing and replacing 37
specifications 37
headphone port. See audio out port
Help, finding answers 31, 52
|
iChat AV application 21
iLife applications 32
installation instructions
hard disk drive 37
memory 46
overview 8
Internet, connecting to 11
iSight video camera 21
K
keyboard
ergonomics 74
features 22
See also keys
keys
Dashboard 23
Exposé 23
function 23
Media 23
Media Eject 23
mute 23
screen brightness 23
volume 23
L
light, sleep indicator 21
M
Mac Help 31
Mac OS X website 32
MagSafe power adapter. See power adapter
MagSafe power port 25
Media Eject key 23
media keys 23
memory
checking 50
installing 46
specifications 46
mercury 80
microphone 21
migrating information 14
Migration Assistant 14
Mini DisplayPort 25
modem 11
mouse
connecting to USB port 25
ergonomics 75
See also trackpad
Multi-Touch gestures 26
mute key 23
N
network connections 11, 59
Network Diagnostics 58
Network Setup Assistant 58
0
online resources 64
optical disc drive
safety 71
optical drive
location 21
P
paging through documents
using trackpad 29
password, resetting 56
pinching to zoom 28
Play/pause key 23
plug, AC 10
power adapter
port 25
safety tips 69
using 10
power button 12, 21
problems. See troubleshooting
putting your computer to sleep 16
Q
question mark, flashing 54
R
RAM. See memory
resetting your password 56
Rewind key 23
right-clicking 27
rotating objects using trackpad 28
S
safety
general instructions 68
handling information 71
power adapter 69
screen
goes black 56
setting brightness 23
See also display
scrolling with two fingers 26
SDRAM specifications 46
secondary clicking 27
secondary-click zone 27
security slot 25
Serial ATA (SATA) hard drive 37
serial number, locating 66
service and support 64
Setup Assistant 13
shutting down your computer 17
sleep mode
indicator light 21
putting computer to sleep 16
software
installation discs 62
updating 61
Software Update preferences 61
speakers 21
specifications
computer 33
hard disk drive 37
memory 46
SSD drive. See hard disk drive
stopping
an application 53
the computer 17
storing your computer 73
SuperDrive
location 21
supported disc sizes 72
support, technical 64
swiping to move quickly through documents 29
System Preferences
changing 16
customizing desktop 16
Energy Saver 30
Software Update 61
System Profiler 64
T
technical support 64
three-finger swiping 29
trackpad
gestures 26
location 21
troubleshooting
AirPort 60
AppleCare 64
computer freezes 54
computer won't turn on 55
ejecting a disc 57
hardware problems 57
pointer won't move 53
screen goes black 56
service and support 64
using Mac Help 31,64
turning on your computer 12
two-finger pinching 28
two-finger rotating 28
two-finger scrolling 26
typing position 74
U
updating software 61
USB
connections 33
ports 25
V
video
camera indicator light 21
Mini DisplayPort 25
volume keys 23
W
waking your computer 17
Z
zooming using the
trackpad 28
Apple Inc.
© 2010 Apple Inc. All rights reserved.
Under the copyright laws, this manual may not be copied, in whole or in part, without the written consent of Apple.
Every effort has been made to ensure that the information in this manual is accurate. Apple is not responsible for printing or clerical errors.
Apple
1 Infinite Loop
Cupertino, CA 95014
408-996-1010
www.apple.com
Apple, the Apple logo, AirPort, AirPort Extreme, Cover Flow, Exposé, FileVault, GarageBand, iCal, iChat, iLife, iMovie, iPhone, iPhoto, iPod, iSight, iTunes, Mac, MacBook, Macintosh, Mac OS, MagSafe, Photo Booth, Safari, Snow Leopard, Spotlight, SuperDrive, and Time Machine are trademarks of Apple Inc., registered in the U.S. and other countries.
Finder, iWeb, and Multi-Touch are trademarks of Apple Inc.
AppleCare, Apple Store, and iTunes Store are service marks of Apple Inc., registered in the U.S. and other countries.
ENERGY STAR ^® is a U.S. registered trademark.
Intel, Intel Core, and Xeon are trademarks of Intel Corp. in the U.S. and other countries.
The Bluetooth® word mark and logos are registered trademarks owned by Bluetooth SIG, Inc. and any use of such marks by Apple Inc. is under license.
Other company and product names mentioned herein are trademarks of their respective companies. Mention of third-party products is for informational purposes only and constitutes neither an endorsement nor a recommendation. Apple assumes no responsibility with regard to the performance or use of these products.
Manufactured under license from Dolby Laboratories. "Dolby," "Pro Logic," and the double-D symbol are trademarks of Dolby Laboratories. Confidential Unpublished Works, © 1992–1997 Dolby Laboratories, Inc. All rights reserved.
Simultaneously published in the United States and Canada.



- Say hello to your MacBook.
- Finder
- Built-in iSight camera and iChat
- iCal and Address Book
- Mac OS X Snow Leopard
- Time Machine
- Quick Look
- Spotlight
- Safari
- iLife
- iPhoto
- iMovie
- GarageBand
- iWeb
- Contents
- Chapter 1: Ready, Set Up, Go
- Chapter 2: Life with Your MacBook
- Chapter 3: Boost Your MacBook
- Chapter 4: Problem, Meet Solution
- Chapter 5: Last, but Not Least
- Looking for Something?
- 1
- Ready, Set Up, Go
- What's in the Box
- Setting Up Your MacBook
- Step 1: Plug in the 60W MagSafe Power Adapter to provide power to the MacBook and charge the battery.
- Step 2: Connect to a wireless or wired network.
- Step 3: Press the power (⏻) button briefly to turn on your MacBook.
- Step 4: Configure your MacBook with Setup Assistant.
- Migrating Information to Your MacBook
- Putting Your MacBook to Sleep or Shutting It Down
- Putting Your MacBook to Sleep
- To put your MacBook to sleep, do one of the following:
- To wake your MacBook:
- Shutting Down Your MacBook
- To shut down your MacBook, do one of the following:
- 2
- Life with Your MacBook
- Using the Multi-Touch Trackpad
- Using the MacBook Battery
- Charging the Battery
- Getting Answers
- To get Mac Help:
- More Information
- 3
- Boost Your MacBook
- Replacing the Hard Disk Drive
- To replace the hard disk drive in your MacBook:
- Chapter 3 Boost Your MacBook
- Installing Additional Memory
- To install memory in your MacBook:
- Making Sure Your MacBook Recognizes the New Memory
- To check the computer's memory:
- 4
- Problem, Meet Solution
- Problems That Prevent You from Using Your MacBook
- If your MacBook doesn't turn on or start up
- If the screen suddenly goes black or your MacBook freezes
- If an audio device plugged into the audio port isn't working
- If you forget your password
- If you have trouble ejecting a disc
- Using Apple Hardware Test
- To use Apple Hardware Test:
- Problems with Your Internet Connection
- To use Network Diagnostics:
- Cable Modem, DSL, and LAN Internet Connections
- Turn the modem off and on to reset the modem hardware
- PPPoE Connections
- To check PPPoE settings:
- Network Connections
- Problems with AirPort Extreme Wireless Communication
- Keeping Your Software Up to Date
- To check for updated software:
- Reinstalling the Software That Came with Your MacBook
- Installing Mac OS X
- To install Mac OS X:
- Installing iLife Applications
- To install the iLife applications that came with your computer:
- Learning More, Service, and Support
- Online Resources
- Onscreen Help
- System Profiler
- AppleCare Service and Support
- Locating Your Product Serial Number
- 5
- Last, but Not Least
- Important Safety Information
- MagSafe power specifications:
- Laser Information for Optical Disc Drives
- Important Handling Information
- Understanding Ergonomics
- Keyboard and Trackpad
- External Mouse
- Chair
- Built-in Display
- Apple and the Environment
- Regulatory Compliance Information
- FCC Compliance Statement
- Radio and Television Interference
- Wireless Radio Use
- Exposure to Radio Frequency Energy
- FCC Bluetooth Wireless Compliance
- Bluetooth Industry Canada Statement
- Industry Canada Statement
- Bluetooth Europe—EU Declaration of Conformity
- Europe—EU Declaration of Conformity
- Korea Warning Statements
- Singapore Wireless Certification
- Taiwan Wireless Statements
- 無線設備的警告聲明
- Taiwan Class B Statement
- VCCI Class B Statement
- ENERGY STAR® Compliance
- Turkey
- Disposal and Recycling Information
- Battery Disposal Information
- Index
- A
- B
- C
- D
- E
- F
- G
- H
- |
- K
- L
- M
- N
- 0
- P
- Q
- R
- S
- T
- U
- V
- W
- Z
- Apple Inc.
- Apple
Brand : APPLE
Model : MC516T/A
Category : Laptop