FS26LDEBKPA - Electric bike Kogan - Free user manual and instructions
Find the device manual for free FS26LDEBKPA Kogan in PDF.

User questions about FS26LDEBKPA Kogan
0 question about this device. Answer the ones you know or ask your own.
Ask a new question about this device
Download the instructions for your Electric bike in PDF format for free! Find your manual FS26LDEBKPA - Kogan and take your electronic device back in hand. On this page are published all the documents necessary for the use of your device. FS26LDEBKPA by Kogan.
USER MANUAL FS26LDEBKPA Kogan
natural_image
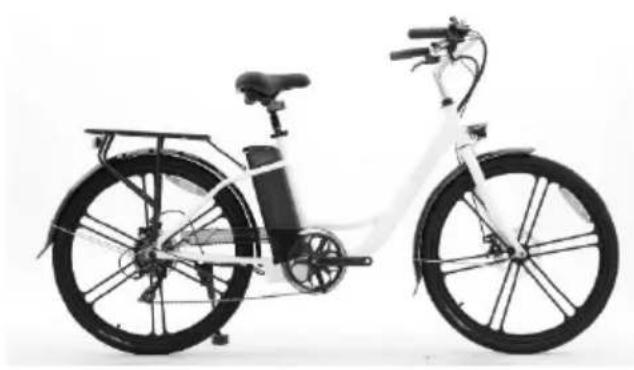
White electric bicycle with a woven basket and black body, shown in side profile against white background (no text or symbols visible)FORTIS 26" CITY BREEZE+ LADIES ELECTRIC BIKE
FS26LDEBKPA
Safety & Warnings 3
Overview 6
Assembly 7
Before First Use 12
Operation 14
Charging 16
Cleaning & Care 18
Troubleshooting 19
SAFETY & WARNINGS
Electric Assisted Bike Regulations
The EN 15194 EU standard or EPAC (Electric Power Assisted Cycle) conforms to the following characteristics for electric power assisted bikes:
- Motor assistance only starts when the cyclist pedals.
- The assistance cuts out as soon as the cyclist stops pedalling.
- The assistance cuts out as soon as the speed exceeds 25km/h.
Adherence to this standard enables the use of the electric bikes in the same conditions as any other bicycle, particularly on bicycle paths and bicycle-specific lanes.
Recommendation before First Ride
- Before first use, double-check the function of all the parts of your electric bike. If you have any doubts or if you detect a problem, contact Kogan.com for further support assistance.
- If you lend your bicycle to a third party, give them this user guide with the bicycle and ensure that they read it before the first ride.
- Respect local, state and national road traffic regulations.
- For your safety, it is highly recommended that you wear a certified helmet. Ensure you are always following local helmet laws while operating the bicycle.
- When used during heavy rain, snow, in slippery conditions or in the case of low visibility, be careful and adjust your speed.
- At night, ensure the bicycle headlights are activated while operating.
- Trying to repair anything that implies removing technical or electrical components is strongly advised against. If maintenance or repair is necessary, contact Kogan.com for support assistance.
- The manufacturer declines any responsibility due to overloading or items that are not correctly attached to the baggage rack.
- Using high pressured water jets to clean the bike is strongly advised against.
- Check the battery level before each use. Ensure the battery is fully charged prior to first use.
- In order to extend battery performance and lifespan, do not commence operation when the battery is only half-charged.
- The battery life will vary depending on where you ride it (inclines will reduce power rapidly) and how you ride (assistance mode chosen). The greater the assistance used, the more you'll use the battery and the shorter it will last. This bike is fitted with gears; remember to use them accordingly relative to riding conditions in order to extend battery life. The amount of weight carried will also have an impact on battery lifespan. Extreme low temperatures can also impact battery lifespan.
- It is recommended that you charge the battery at least every 2 months when the bike is not used; during winter, for example.
- Store the battery in a dry place after having completely recharged it. Avoid extreme temperatures (both low and high) as they can damage the battery. Optimal operating range: -10°C to 35°C.
Cleaning and Maintenance
- Use a damp cloth with neutral detergent to clean the bike frame. Do not use any detergents or cleaning liquids liable to deteriorate the frame or components.
- Use a dedicated bicycle cleaner or hot soapy water to clean your bike and its components, such as wheels, hubs, rims, brakes and pedals. Rinse well with clean water before use.
- Do not use high pressure water jets to clean your bike, especially on the electrical components (such as the battery), as this may result in short circuiting or system malfunctions.
- All the components and parts of your bicycle are subject to normal wear and fatigue.
- Keep a close eye on any change in the shape or colour of a component or traces of oxidation (rust) on your bicycle. If this occurs, do not use the product until the component has been replaced.
Warning
- Do not ride after consuming alcohol or drugs (prescribed or not), or while under the affects of medication which might make you drowsy.
- Do not ride while you feel unwell, nor after consuming alcohol or drugs. This product has the potential to endanger yourself and others if not operated responsibly.
- Pedal-assisted bicycles are not designed for 2 or more people. Do not ride carry passengers as these bicycles are not designed to carry the additional load of a second rider.
- Do not put batteries in normal waste bins. Dispose of used batteries in a certified recycling facility.
- Do not over-lubricate; if oil contacts the wheel rim, brake pads or brake disks, this will result in loss of braking performance and an increase in stopping distances. This could potentially cause loss of control, accidents, and injury.
Transport
It is highly recommended that you do not overload your pedal-assisted bicycle, as this may damage the electrical components or cause malfunctions, such as overheating of the battery or the motor. Do not store the battery in excessively hot or cold places.
• Maximum transport weight on the bicycle must not exceed 90kg.
- Regularly check battery brackets and mountings.
• Always wear a helmet when riding your pedal-assisted bicycle.
- Do not carry anything on the rack that might hide lights or reflectors.
- Front basket is not included with this bike.
- If a rack is not already fitted to your bicycle, please do not attempt to fit one yourself.
OVERVIEW

text_image
Handle grips Bell Handlebars Handlebar stem Headlight Control pad Brake lever Seatpost clamp Bike frame Rack Battery Rear sprocket Rear derailleur Rear wheel Chain Pedals Crankset Fork Front brakes Front wheelTools Supplied

natural_image
Simple line drawing of a mechanical tool or bracket with hexagonal holes (no text or symbols)Multifunction Wrench
natural_image
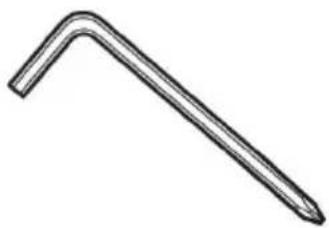
Simple line drawing of a bent tool or rod (no text or symbols)6mm Allen & Phillips Head Key

natural_image
Simple L-shaped line drawing with no text or symbols3mm, 4mm & 5mm Allen Key (x3)
ASSEMBLY
Stem & Handlebar Assembly
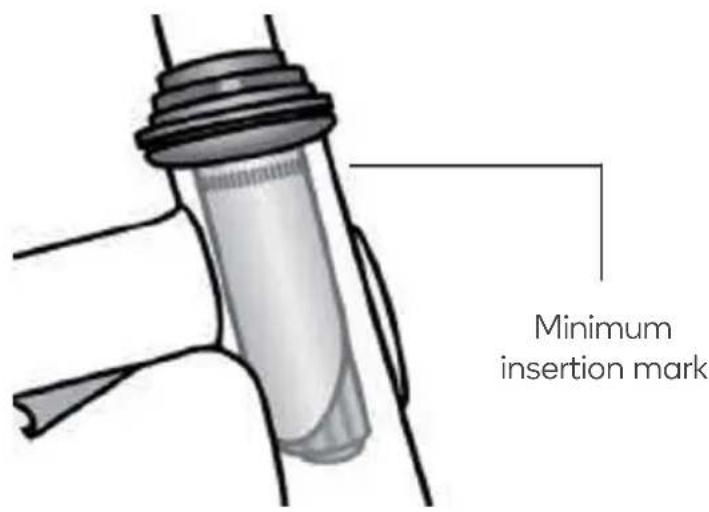
WARNING: To prevent steering system damage and possible loss of control, the stem must be inserted enough so that the minimum insertion marks are completely covered (Figure 1).
text_image
Minimum insertion markFigure 1
Remove the plastic shipping cap from the bottom of the stem; insert the stem and handlebar assembly into the fork, making sure the stem wedge is loose.
Ensure the cables are not tangled and track smoothly on either side of the stem. The stem should be pointing towards the front of the bike, aligned with the front tire.
Tighten the stem bolt with an Allen wrench (Figure 2)

natural_image
Close-up of a bicycle with black handlebars and a small screen on top (no visible text or symbols)Figure 2
Wheel Mounting
- Make sure the brakes are loose enough to allow the wheel to pass through the brake pads easily. If not already loose, disconnect the front brake by detaching the cable guide from the carrier.
- Place wheel into fork dropouts (Figure 3a)
- Install retaining washers with raised lip pointed towards the fork and insert into the small hole of the fork blade.
- Install axle nut and securely tighten (Figures 3a and 3b).
- Make sure the wheel is centred between the fork blades. Spin the wheel to make sure that it is centred and clears the brake shoes. Tighten the brakes if necessary.
- If the wheel is out of alignment you will need to true the wheel; when spinning the wheel and notice the gaps between the brake pads are not consistently the same, the wheel needs truing. See a qualified bike technician to true wheels.

text_image
Axle nut Axle Hub Retaining washer Fork dropout Cone nutsFigure 3a
Figure 3b
Brake Adjustment
Note: When the front wheel is installed properly, the disc brake rotor should be centered between the brake pads, recheck the disc brake is installed well in the following steps. DO NOT pull on the lever before the wheel is installed. It may cause the brake pads to bind together making it is difficult to separate them without the proper tools and expertise.
- With the front wheel installed, the disc brake rotor should be centered between the brake pads, and securely fastened to the wheel. Use a 4, 5, or 6mm Allen Key to check the rotor mounting bolts to ensure that none of the bolts are loose.
-
Ensure that the mounting bolts on the disc brake are evenly tightened. If not, the disc brakes will be out of alignment with the rotor and you will not be able to brake efficiently or safely.
-
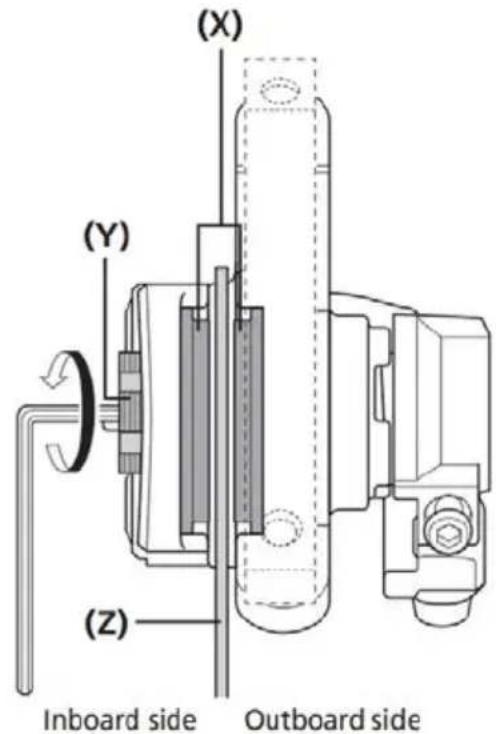
Adjust the brake: Loosen the pad adjustment screw (Y) by turning it counter clockwise one or two clicks. This operation creates appropriate clearance between the brake pad (X) and disc brake rotor on the inboard side. Check that both clearances between the disc brake rotor (Z) and brake pads are equal: inboard side = outboard side (Figure 4).
text_image
(X) (Y) (Z) Inboard side Outboard sideFigure 4
- To test the function of the front brake, lift the front of the bike and spin the wheel. The wheel should not rub on the brake pads. Next, squeeze the brake lever and take note of the brake pads contacting the brake rotor. The pads should contact the rotor on both sides at the same time. Finally, hold the brake lever firm and try to move the bike forward. The brake should hold well enough to keep the wheel from moving.
Repeat these steps for the rear wheel.
Installing Front Fender & Light
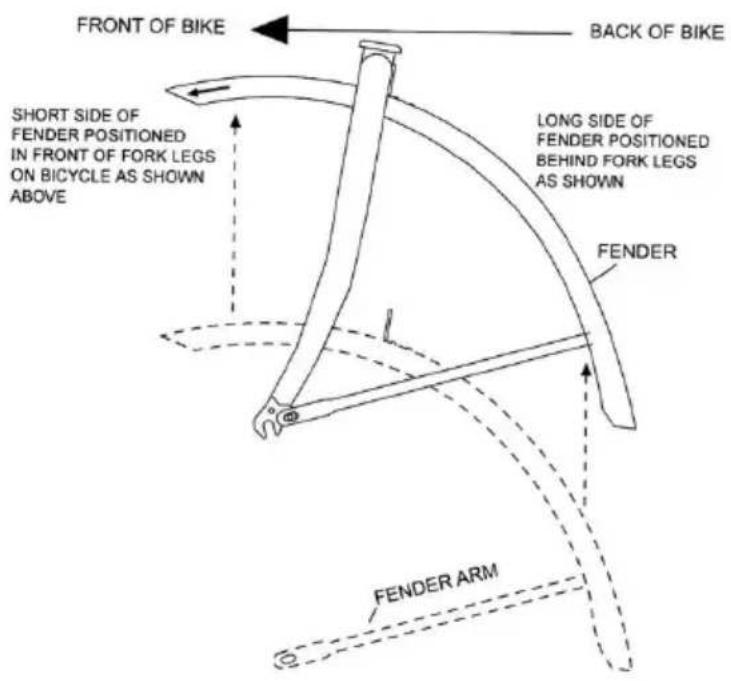
- Install the preassembled fender to fork legs facing forward with fender bracket positioned behind the fork (Figure 5).
- Slide a washer onto the mounting bolt and insert through fork and fender bracket. Place the other washer and front light onto the mounting bolt and secure the mounting nut as shown (Figure 6).
-
Attach fender arms (align the fender arm holes with the mounting holes on the fork end) then insert the mounting bolts through the fender arm holes to secure the bolts into the fork holes.
-
Attach the front wheel with retaining washer in place and tighten the axle nuts securely.
text_image
FRONT OF BIKE BACK OF BIKE SHORT SIDE OF FENDER POSITIONED IN FRONT OF FORK LEGS ON BICYCLE AS SHOWN ABOVE LONG SIDE OF FENDER POSITIONED BEHIND FORK LEGS AS SHOWN FENDER FENDER ARMFigure 5

text_image
FRONT LIGHT MOUNTING BOLT WASHER WASHER MOUNTING NUT FORK LEG MOUNTING HOLES FENDER ARM MOUNTING BOLTFigure 6
Seat Assembly
- Insert the seat stem into the frame (see Figure 7a and 7b).
- Pull the quick-release lever free and insert the seat-post to the minimal insertion marker indicated on the seat-post.
- Insert at least to the minimal indication on the seat stem using rotary movements. You can use grease to help assembly.
- Tighten the quick-release clamp and then fold the lever to closed position. Minimal torque specifications are 19.5Nm.
natural_image
Black-and-white photo of a modern electric bicycle with a white body and black frame (no visible text or symbols)Figure 7a

natural_image
Close-up of a black bicycle seat with a spring support (no text or symbols visible)Figure 7b
Attaching the pedals
Install the pedal marked "L" on the left crank and tighten, then install the pedal marked "R" on the right crank and tighten.
Note: Damage will occur if pedals are not correctly and firmly attached.

text_image
Pedals (Marked R on the right side, Marked L on the left side)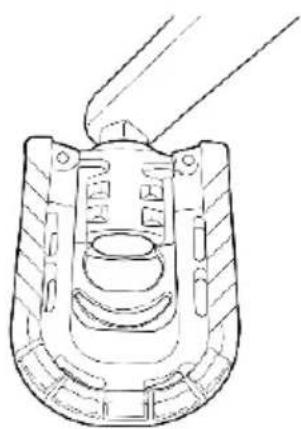
natural_image
Technical line drawing of a mechanical component with no visible text or symbolsBEFORE FIRST USE
Recommendations and Component Control before Use
Before using your bicycle for the first time, you must check that all adjustments have been correctly made.
- Check that the front and rear brakes work, check brake pads for wear.
- Check the cables and sheaths and that the hydraulic system functions correctly.
Wheels and Tires
- Check tires are inflated to the pressure indicated (either in Bar or Psi) on the tire sidewall.
- Check that the tires are in good condition and are free from cuts or bulges.
- Check the state of wheel rims and ensure that spokes are correctly tightened.
- Check that the wheels are correctly fitted to the bicycle, either by a quick-release system or nuts.
WARNING: If a wheel rim or spokes are damaged, immediately replace the wheel.
Steering
- Check that the handlebar and stem are correctly tightened and that they are in line with the wheel and the fork.
- Check that the steering clamp is correctly tightened and adjusted in the right direction.
Frame and Fork
Check that the frame shows no signs of fatigue or damage and that the fork works correctly.
Chain
- Make sure that the chain is at the correct tension.
- Make sure that it is clean, rust free and properly oiled. Use adapted lubrication for use in extreme weather conditions.
Seat and Seat-post
Make sure that seat and seat-post are correctly tightened and positioned.
Bearings
- Check that all bearings are properly adjusted and apply lubricant if needed.
- Ensure they are not too loose, and that they have not seized up.
- Check steering bearings, wheel bearings, pedal bearings and bottom bracket bearings.
Crank set and Pedals
Make sure that the pedals are correctly tightened and that the teeth of the crank set do not show any unusual wear.
Accessories
- Check front and rear lights; also check that bell is working.
- Ensure that the reflectors are not hidden or obstructed.
- Check that the battery is correctly fitted and secured.
• Make sure that the rider wears a helmet.
TorqueSpecifications
- The handlebar is fitted to a stem. The height of some stems can be adjusted. If you must dismantle the handlebar or turn it to transport the bicycle, please make sure that you correctly reassemble and centre the handlebars; check the position by placing your hands on the grips to find the best position. Make sure all bolts are correctly tightened. Once handlebar and stem are assembled, make sure that the brake and derailleur sheaths are free. Recommended torque specification: 13-14Nm. Recommended torque specification for the rear rack is 16Nm.
- You can adjust the angle of the stem by adjusting the bolt located under the stem using an Allen key. Once you have found the desired angle, tighten the stem to the headset. Recommended torque specifications are 18-20Nm.
- If you remove nut fitted wheels, make sure that when you replace them you respect a minimal recommended torque specification of 30Nm for the rear wheel and 25Nm for the front wheel.
OPERATION
Presentation and Electrical Start-Up
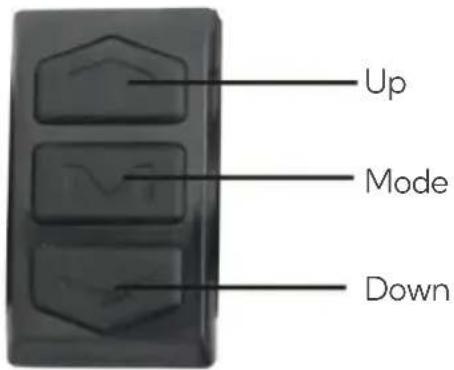
text_image
Up Mode DownELECTRONIC PAD LAYOUT
Up: More assistance
Down: Less assistance
Mode: On/Off Mode
Starting System
- Hold Up button for 3 seconds to turn on the light, hold for another 3 seconds to turn off the light
- Press the Mode button for 5 seconds to start the system
- Press the Mode button again for 5 seconds to shut the system off
LCD Screen Setup and Assistance Level
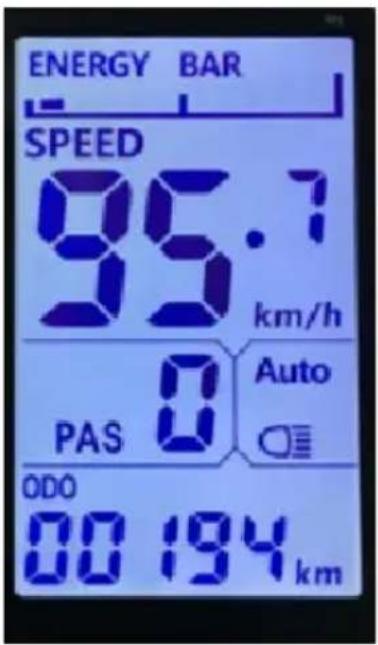
text_image
ENERGY BAR SPEED 95.7 km/h PAS 0 Auto ODO 00 194 km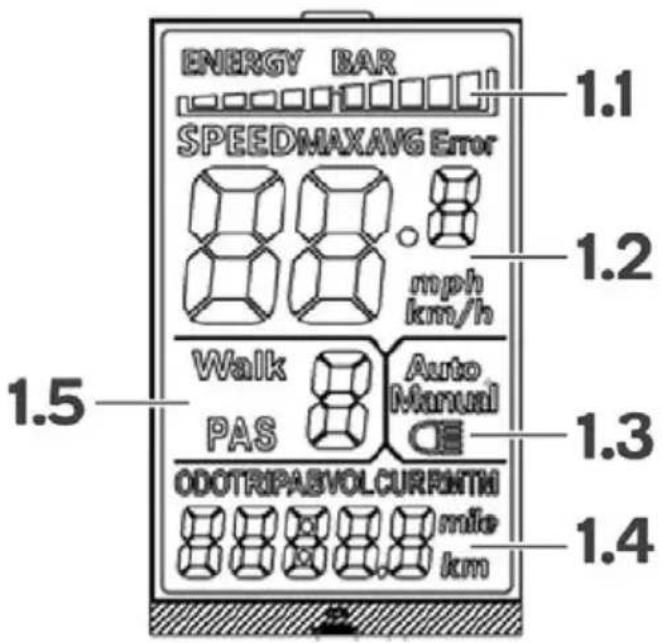
text_image
ENERGY BAR SPEEDMAXAVG Error mph km/h Walk PAS Auto Manual ODOTRIPAEVOLCURRINTH mile km 1.1 1.2 1.3 1.4 1.5| 1.1 |  | Front Light |
| 1.2 |  | Battery Level |
| 1.3 |  | Multi-Function Display AreaUpon start-up, press the Mode button to switch between:ODO (total mileage)TRIP (single mileage)TM (running time)VOL (digital voltage)MAX (maximum speed), andAVG (average speed) interface cycles. |
| 1.4 |  | Speed Display AreaCurrent Speed: SPEED, unit: MPH, KM/HThe meter will calculate the true speed based on the wheel diameter and signal data (the hall of the motor also needs to set the number of magnetic steel). |
| 1.5 |  | Power Status Display AreaAssistant gearing adjustment:Max assistant level 5, the default is 0Short press the Up button to assist +1Short press the Down button to assist -1 |
| Walk | 6KM/H E-assistant tag: When the vehicle is stationary, long press the Down button to enter the 6KM/h walk mode and long press the Down button again to exit the 6KM/h walk mode. |
Rear Tail Light
Remove the insulating paper from the rear tail light, the power supply is now on. Press the BLACK button in the middle of the light to turn the light on. Pressing the button again will make the light flash. Pressing the button a third will turn the light off.
CHARGING
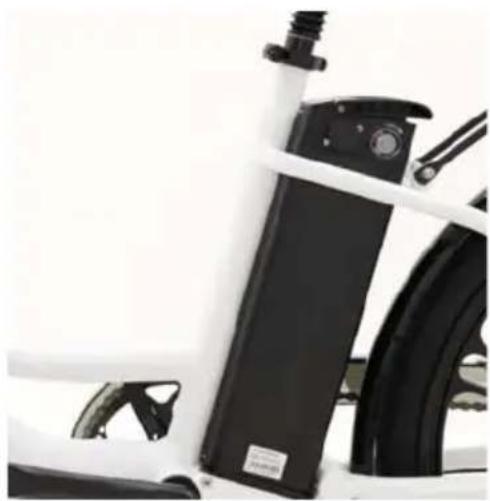
Battery Installation and Locking
Install: Press the button under the seat and fold the seat forward. Align the slot on the bottom of the battery with the track on the bike frame, then slide the battery into position, as shown below. Insert the key and turn it clockwise twice to the ON position then fold the seat back into position. The bike is now ready for use.
Lock: Turn the key clockwise to the OFF position. Remove the key to lock the battery.
natural_image
Close-up of a white bicycle seat with black battery cover and visible tire (no text or symbols)
natural_image
Close-up of a black and white mechanical device with a circular dial and handle, mounted on a white cylindrical base (no visible text or symbols)Battery Charging
Removing the Battery: Press the button under the seat and fold the seat forward. Turn the key counter clockwise to the UNLOCK position. Using the handle pull the battery upwards and remove it from the bike frame.
Charging: Open the dust cover on the charging port of the battery. Plug the charger into the battery charging port ensuring it is firmly in place. Plug the charger into an electrical outlet and turn it on. The indicator light on the charger will change from GREEN to RED, indicating the battery is charging. When the battery is fully charged, the indicator light will change from RED to GREEN. After charging, unplug the charger from the power outlet first, then disconnect charger from the battery and replace the dust cover.
Note: Ensure that the charging plug is securely in place at all times in order to prevent any water ingress on the battery.
Checking the Power Level: Insert the key into the battery and turn it clockwise to the ON position. Press the power indicator button located on the top of the battery to check the battery power level.
| Indicator | Battery Status |
| 3 lights on | Battery level is full |
| 2 lights on | Battery level is sufficient, consider charging |
| 1 light RED, 2 lights are dim | Battery level is low and must be charged |

natural_image
Black electronic device with attached power strip and cable, placed on tiled floor (no visible text or symbols)CLEANING & CARE
Lubrication
Only use specific bicycle lubricants.
Pedals A few drops every 6 months on the axle.
Chain Spray the whole surface every 6 months.
Bottom bracket Every 6 months, please check with your authorised dealer.
Motor Every year, please check with your authorised dealer.
Tips
- Never modify your bicycle with non-certified parts.
• Never ride in deep water.
- Do not use for jumps or stunts (apart from downhill or enduro bicycles).
- Avoid long distance rides when it is raining.
- Keep both hands on the handlebar when riding.
- Avoid sudden braking.
- Be careful when riding through puddles and shallow bodies of water.
• Thoroughly check the bicycle before each ride.
- Avoid leaving your bicycle in heavy rain or snow.
- It is highly recommended to have your bike serviced by an authorised dealer at least once a year or every 1000km.
- Check your brake cables, sheaths and brake pads. Lubricate all transmission components, chain and derailleur with a suitable product.
- If the rear tire has a puncture, remember that if you must remove it, it is attached to the motor, so make sure to disconnect the cable (Figure 8).
- When you reach 5000km or 100 charge cycles, a service alert will show for 4 seconds when you start the system, indicating that it is time to plan a service.

natural_image
Close-up of bicycle wheel and cable structure inside a circular frame (no text or symbols visible)Figure 8
TROUBLESHOOTING
| Error Code | Meaning | Troubleshooting |
| E02 | Brake failure | The brake is in a power-off state. Check whether the left and right brake levers are reset. Check if the fault disappears after opening the junction box and unplugging the power-off switch. Contact Kogan.com for support if problem persists. |
| E06 | Battery under-voltage | The battery is Low and the fault code disappears after the battery is fully charged. |
| E07 | Motor failure | The motor is faulty. Check whether the connector of the motor's waterproof cable is loose. Contact Kogan.com for support if problem persists. |
| E09 | Controller failure | The controller is damaged and the controller needs to be replaced. After opening the junction box to replace the controller, the fault is eliminated and the fault code disappears. Contact Kogan.com for support if problem persists. |
| E10 | Communication receiving failure | The communication receiving line between the LCD display and the controller is blocked. Open the junction box; check whether the connectors of the LCD display and the controller are firm. Reconnect the plug and restart. Contact Kogan.com for support if problem persists. |
| E11 | Communication sending failure | The communication sending line between the LCD display and the controller is blocked. Open the junction box, check whether the connectors of the LCD display and the controller are firm. Reconnect the plug and restart. Contact Kogan.com for support if problem persists. |
| E12 | BMS communication failure | The communication sending and receiving Line between the LCD display and the controller are blocked. Open the junction box, check whether the connectors of the LCD display and the controller are firm. Reconnect the plug and restart. Contact Kogan.com for support if problem persists. |
| E13 | Headlight failure | The front light is damaged or the connector has poor contact. Open the junction box, unplug and reinsert it. Contact Kogan.com for support if problem persists. |
Need more information?
We hope that this user guide has given you the assistance needed for a simple set-up.
For the most up-to-date guide for your product, as well as any additional assistance you may require, head online to help.kogan.com
kogan.com