IB-RP406 - Hard Drive Enclosure Icy Box - Free user manual and instructions
Find the device manual for free IB-RP406 Icy Box in PDF.

User questions about IB-RP406 Icy Box
0 question about this device. Answer the ones you know or ask your own.
Ask a new question about this device
Download the instructions for your Hard Drive Enclosure in PDF format for free! Find your manual IB-RP406 - Icy Box and take your electronic device back in hand. On this page are published all the documents necessary for the use of your device. IB-RP406 by Icy Box.
USER MANUAL IB-RP406 Icy Box
natural_image
Simple line drawing of a 3D cube with visible edges and faces (no text or symbols)ICY BOX®
Quick installation guide IB-RP406
Protective case for Raspberry Pi® 2 and 3
natural_image
3D cutaway view of a multi-tiered server or chassis with visible internal components and circuit boards (no text or symbols)Safety information
Please read carefully the following information to prevent injuries, damage to material and device as well as data loss:
Warning levels
Signal words and safety codes indicate the warning level and provide immediate information in terms of the probability of occurrence as well as the type and severity of the consequences if the measures to prevent hazards are not complied with.

DANGER
Warns of a directly hazardous situation causing death or serious injury.

WARNING
Warns of a potentially hazardous situation that may cause death or serious injury.

CAUTION
Warns of a potentially hazardous situation that may cause minor injury.
IMPORTANT
Warns of a potential situation that may cause material or environmental damage and disrupt operative processes.
1. Risk of electrical shock

WARNING
Contact with parts conducting electricity
Risk of death by electrical shock
- Read the operating instructions prior to use
• Make sure the device has been de-energised prior to working on it - Do not remove contact protection panels
- Avoid contact with conducting parts
- Do not bring plug contacts in contact with pointed and metal objects
• Use in intended environments only - Operate the device using a power unit meeting the specifications of the type plate only!
- Keep the device/power unit away from humidity, liquid, vapour and dust
- Do not modify the device
• Do not connect the device during thunderstorms - Approach specialist retailers if you require repairs
2. Hazards during assembly (if intended)

CAUTION
Sharp components
Potential injuries to fingers or hands during assembly (if intended)
- Read the operating instructions prior to assembly
- Avoid coming into contact with sharp edges or pointed components
• Do not force components together
- Use suitable tools
• Use potentially enclosed accessories and tools only
3. Hazards caused by a development of heat
IMPORTANT
Insufficient device/power unit ventilation
Overheating and failure of the device/power unit
• Prevent externally heating up components and ensure an exchange of air
- Do not cover the fan outlet and passive cooling elements
- Avoid direct sunlight on the device/power unit
• Guarantee sufficient ambient air for the device/power unit
- Do not place objects on the device/power unit
Safety information
4. Hazards caused by very small parts and packaging

WARNING
Risk of suffocation
Risk of death by suffocation or swallowing
- Keep small parts and accessories away from children
- Store/dispose of plastic bags and packaging in an area that is inaccessible to children
- Do not hand over small parts and packaging to children
5. Potential data loss
IMPORTANT
Data lost during commissioning
Potentially irreversible data loss
• Always comply with the information in the operating instructions/Manual
• Exclusively use the product once the specifications have been met
• Back up data prior to commissioning
• Back up data prior to connecting new hardware
• Use accessories enclosed with the product
6. Cleaning the device
IMPORTANT
Harmful cleaning agents
Scratches, discolouration, damage caused by moisture or short circuit in the device
- Disconnect the device prior to cleaning
- Aggressive or intense cleaning agents and solvents are unsuitable
• Make sure there is no residual moisture after cleaning
• We recommend cleaning devices using a dry, anti-static cloth
7. Disposing of the device
IMPORTANT
Environmental pollution, unsuitable for recycling
Potential environmental pollution caused by components, recycling circle interrupted
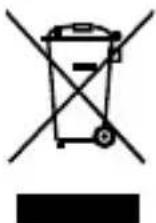
This icon on product and packaging indicates that this product must not be disposed of as part of domestic waste. In compliance with the Waste Electrical and Electronic Equipment Directive (WEEE) this electrical device and potentially included batteries must not be disposed of in conventional, domestic waste or recycling waste. If you would like to dispose of this product and potentially included batteries, please return it to the retailer or your local waste disposal and recycling point.
If you have any questions, please do not hesitate to contact our support at support@raidsonic.de or visit our website at www.raidsonic.de.
Sicherheitshinweise
Important product information
Dear customer, please note the following information about the main boards which are supported by this device!
The device has been developed for:
- Compatible with: Raspberry Pi ^ 1 Model B+, Pi ^ 2 Model B, Pi ^ 3 Model A+/B/B+, Pi ^ Zero/Zero W, Asus Tinker Board / Tinker Board S
- Single board computers are not included
Package content:
1× IB-RP406
4x 40 mm cooling fans
4x sets of heat sinks
4x sets of screws, standoffs and screw nuts
4x footpad stickers
1x screw driver
1x quick installation guide
(Raspberry Pi ^® not included)
4bay stackable cluster case for Raspberry Pi® 2 and 3
Keep your Raspberry Pi® computers safe and sound in this 4bay enclosure with clear acrylic lids. We designed this case in exigent design, easy to assemble and perfect for any use. It supports four 40 ~mm cooling fans (included), which can improve the performances of each single board computer inside.
Key features
- Protective solution designed specifically for the Raspberry Pi® 2 and 3 B/B+
- Stackable design for cluster or other demands which can divide to 1, 2, 3 or 4 cases
- Group multiple Raspberry Pi ^ boards with by stacking them with the four featured cases
- Acrylic clear case covers, so you can still see your Pi ^ s and all status LEDs
• Each acrylic top cover supports the installation of a 40 mm cooling fan (four times included)
• Self-adhesive heat sinks for the most important chipsets included
- Can prevent the Raspberry Pi ^ from slowness caused by high temperature
- Innovative enclosure design allows easy access to all ports like power, video, audio, USB, LAN, microSD card and GPIO, camera CSI and display DSI
Quick installation guide IB-RP406
Assembly
- Please follow the drawing to assemble the appropriated board(s) to the IB-RP406.
- The heat sinks can be placed to the main chip sets on the board accordingly to their sizes.
Please remove the foil before stick them to the PCB.
- Alternatively, or in addition you can use up to four 40 mm fans (included) at the top cover of each case.
text_image
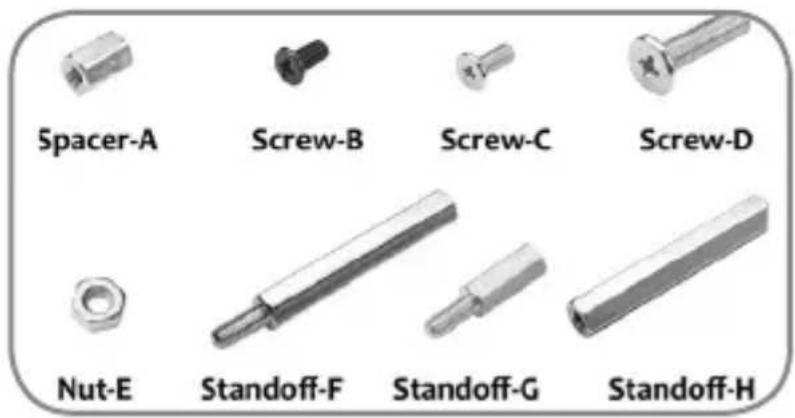
Spacer-A Screw-B Screw-C Screw-D Nut-E Standoff-F Standoff-G Standoff-H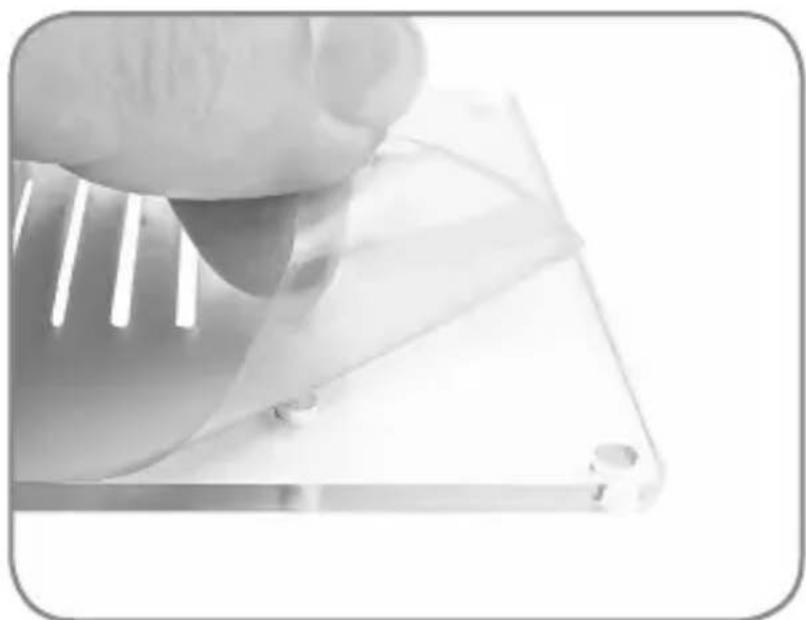
natural_image
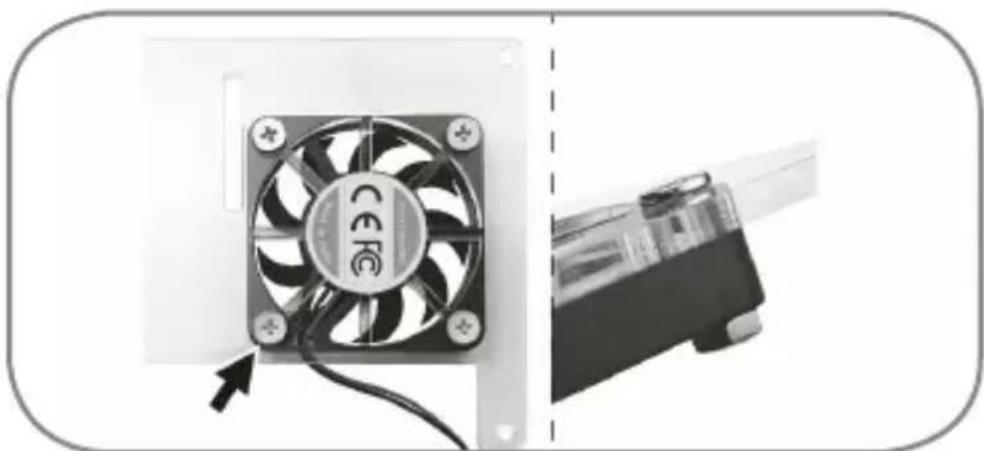
Close-up of a hand holding a transparent plastic sheet with small circular indentations (no text or symbols visible)- Please remove the protective film on the acrylics
Quick installation guide IB-RP406
natural_image
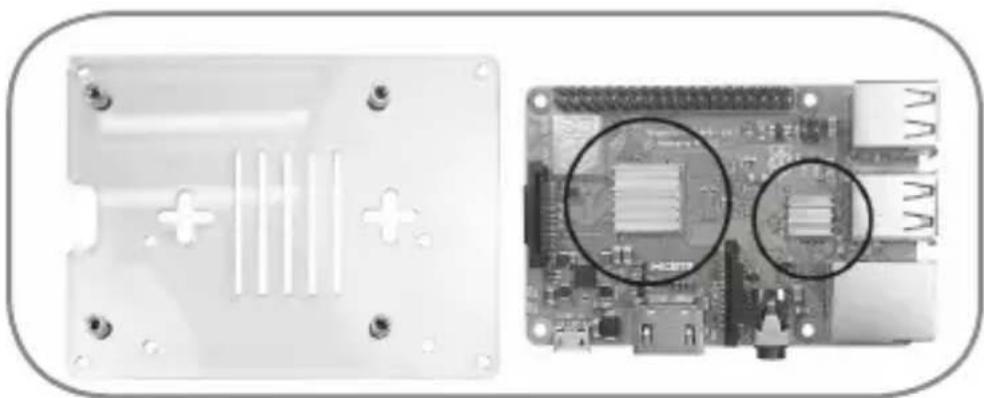
Two views of an Arduino PiC board: one showing a transparent plastic case with internal circuit lines, the other showing a close-up of its internal components (no text or symbols visible)- Stick the two heatsinks on the CPU and IC of your Raspberry Pi®
natural_image
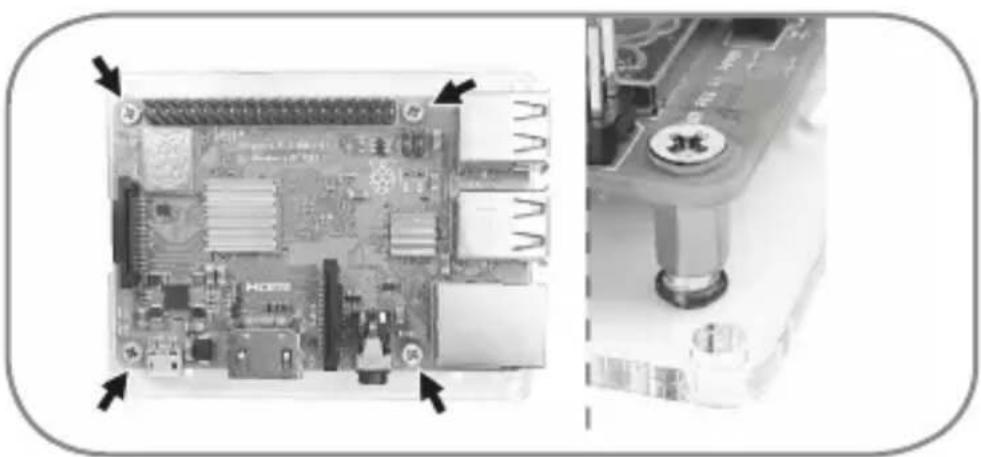
Close-up of a Raspberry Pi board with visible internal components and mounting bracket (no text or symbols)- Fasten the spacers-A to the corresponding Raspberry Pi ^ screw holes position on the bottom acrylic with black screws-B. Fasten your Raspberry Pi ^ to the bottom acrylic with silver screws-C.
natural_image
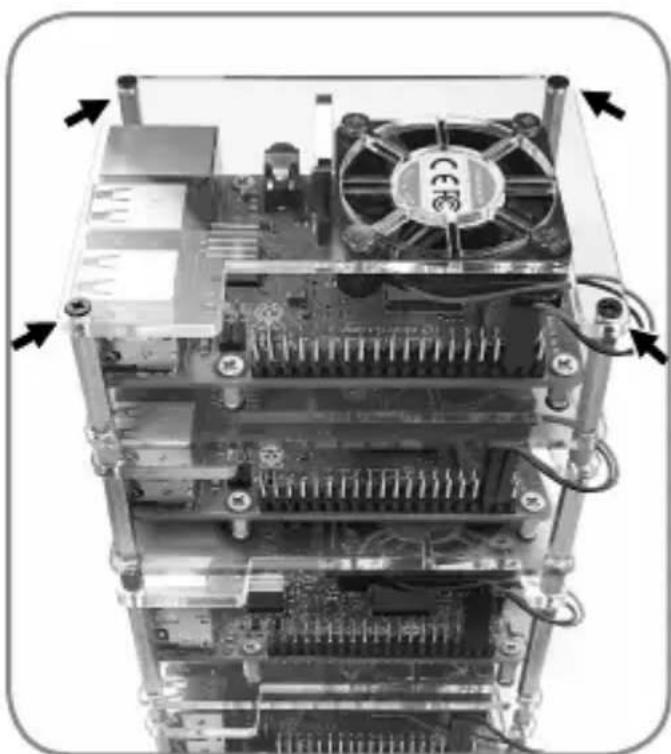
Close-up of a CPU fan with visible cooling effect and cable, next to a computer monitor (no text or symbols)- Fasten the fan to the top acrylic with silver screws-D and nuts-E.
Quick installation guide IB-RP406

text_image
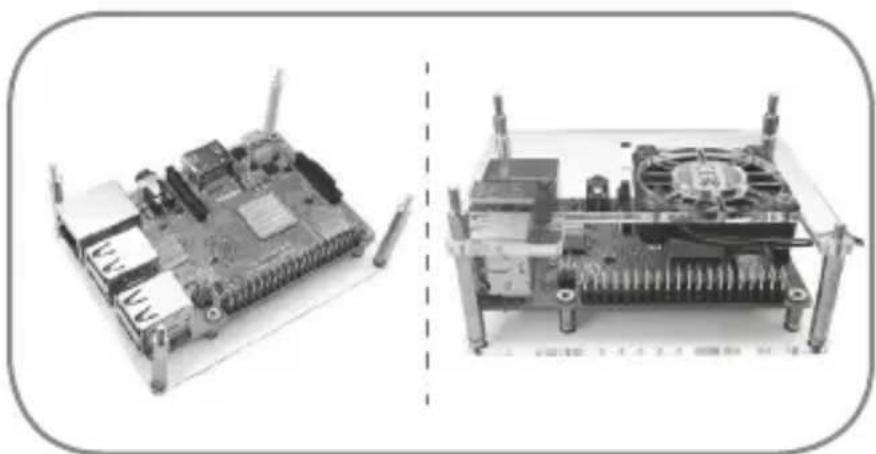
x 4 pcs x 4 pcs- Repeat step 4 to step 5 four times for all four layers
natural_image
Two views of an Arduino Pi connected to a CPU socket and heatsink, showing internal components (no text or symbols visible)-
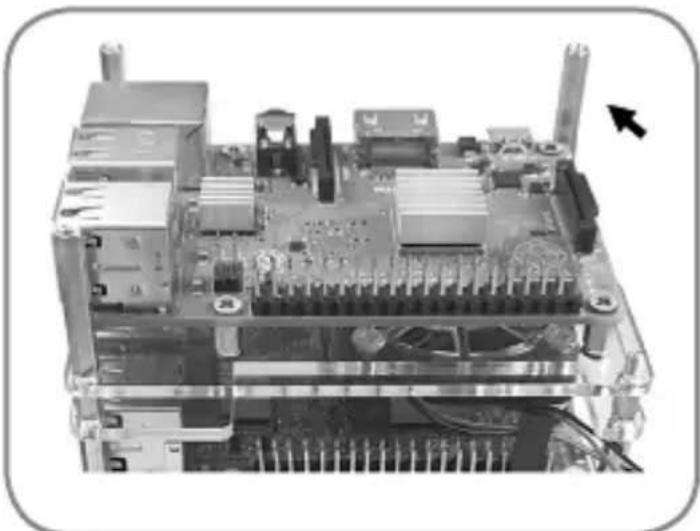
Fasten the standoffs-F to the bottom acrylic with black screws-B.
-
Install top acrylic by putting the standoffs-F into the top acrylic screw holes and fixing with standoffs-G.
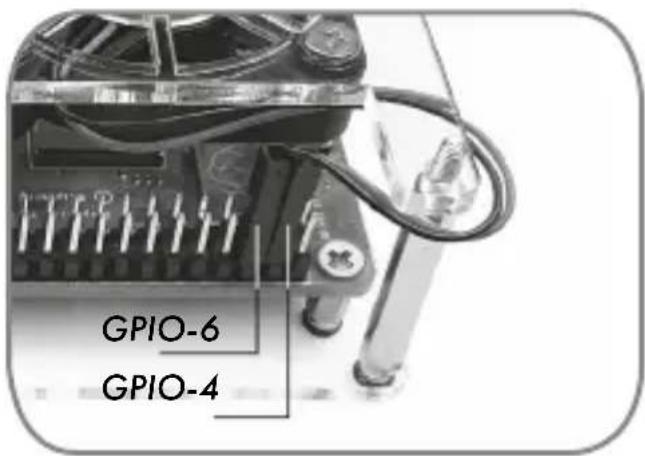
text_image
GPIO-6 GPIO-4- Install the red fan pin on the GPIO-4 (5V)
Install the black fan pin on the GIO-6 (GND)
Quick installation guide IB-RP406
natural_image
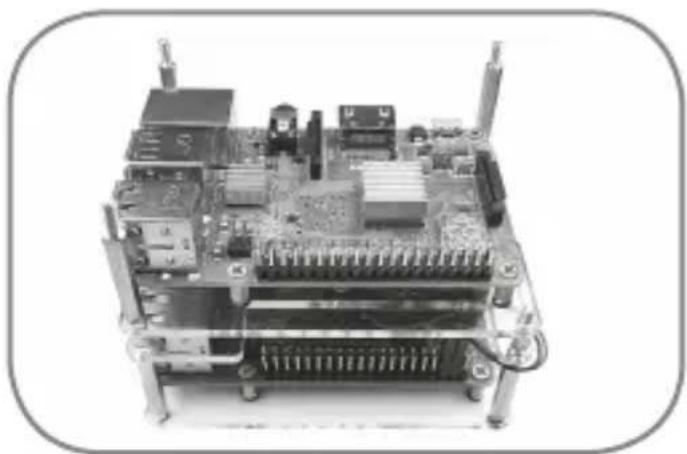
Close-up of an electronic circuit board with various components and connectors (no visible text or symbols)- To build the second layer, install the bottom acrylic of the second layer on standoffs-G of the first layer and fasten it with standoffs-F.
natural_image
Close-up of an electronic circuit board with visible cooling fans and internal components (no text or symbols)- Install top acrylic by putting the standoffs-F into the top acrylic screw holes and fixing it with standoffs-G.
natural_image
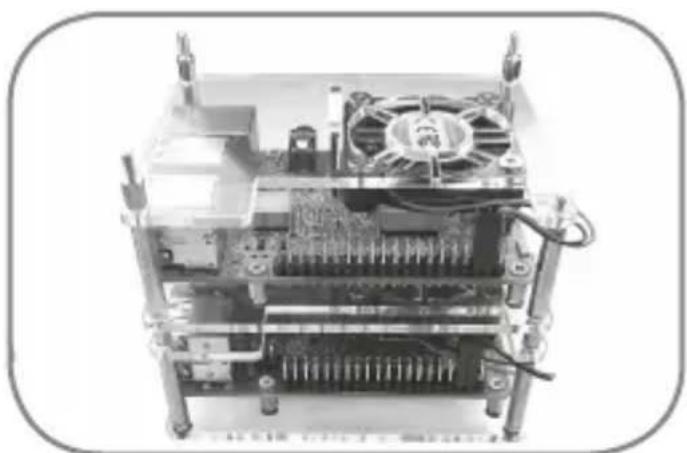
Stacked electronic circuit board with visible CPU and cooling fan (no text or symbols)- Repeat those steps for the third layer.
Quick installation guide IB-RP406
natural_image
Interior view of an electronic circuit board with cooling fans and heat sinks (no visible text or symbols)- To build the forth (or last) layer, install the bottom acrylic of the last layer on the standoffs-G of the third layer and fasten it with standoffs-H.
natural_image
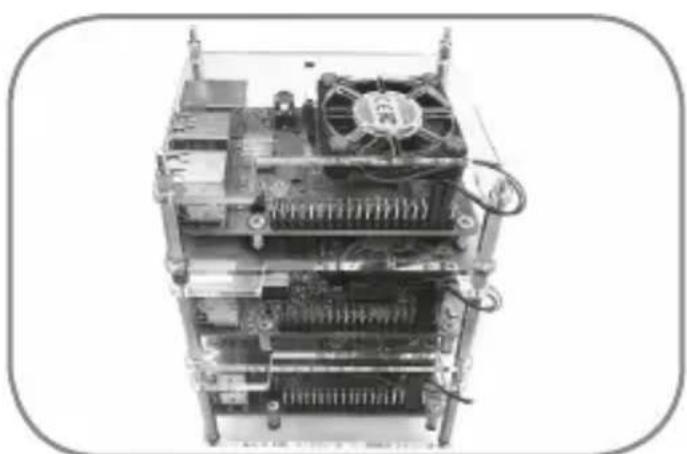
Internal view of an electronic device showing CPU socket, motherboard, and fan (no text or symbols visible)- Put the top acrylic on standoffs-H and fasten with black screws-B.
natural_image
Close-up of a hand holding a transparent plastic sheet with a small inset showing a droplet (no text or symbols visible)natural_image
Two views of an Arduino PiC board: one showing a plastic enclosure with internal circuit lines, the other showing a close-up of its internal components (no text or symbols visible)natural_image
Close-up of a Raspberry Pi board with visible ports and connectors, shown from two angles (no text or symbols)natural_image
Close-up of a CPU fan with visible cooling effect and cable, next to a partially assembled device (no text or symbols)natural_image
Two views of an electronic circuit board with visible components and connectors, shown from different angles (no text or symbols)text_image
GPIO-6 GPIO-4natural_image
Close-up of an electronic circuit board with visible components and connectors (no text or symbols)natural_image
Interior view of an electronic device showing CPU socket, heatsink, and cooling unit (no visible text or symbols)natural_image
Top-down view of a multi-tiered computer chassis with visible CPU socket, heatsink, and fan (no text or symbols)natural_image
Close-up of an electronic circuit board with visible components and wiring (no text or symbols)natural_image
Internal view of an electronic device showing CPU socket, heatsink, and fan (no text or symbols visible)natural_image
Simple line drawing of a 3D cube with visible edges and diagonals (no text or symbols)ICY BOX®
CE
© Copyright 2019 by RaidSonic Technology GmbH. All Rights Reserved
The information contained in this manual is believed to be accurate and reliable. RaidSonic Technology GmbH assumes no responsibility for any errors contained in this manual. RaidSonic Technology GmbH reserves the right to make changes in the specifications and/or design of the above mentioned product without prior notice. Raspberry Pi® is a trademark of the Raspberry Pi Foundation. The diagrams contained in this manual may also not fully represent the product that you are using and are there for illustration purposes only. RaidSonic Technology GmbH assumes no responsibility for any differences between the product mentioned in this manual and the product you may have.