
Earforce Seven Marvel - Headphones TURTLE BEACH - Free user manual and instructions
Find the device manual for free Earforce Seven Marvel TURTLE BEACH in PDF.

| Product Type | Amplified Gaming Headset |
| Brand | Turtle Beach |
| Model | Ear Force Marvel Seven (Limited Edition) |
| Compatibility | Xbox 360, PS3, PC, Mac, Mobile Devices (PS Vita, tablets, smartphones) |
| Speaker Size | 50mm |
| Speaker Core | Neodymium Magnets |
| Impedance | 32Ω |
| Frequency Response | 20Hz - 20kHz |
| Amplifier | Stereo In-Line Amplifier |
| Output Power | 27mW per channel at 16Ω |
| Earcup Style | Around-Ear (Circumaural) |
| Cushion Material | Foam with Fabric Mesh |
| Headband Design | Metal with Foam and Fabric/Leather Cushion |
| Acoustic Design | Closed-Back |
| Sound Pressure Level | 120dB at 1kHz |
| Total Harmonic Distortion | <0.1% |
| Microphone | Detachable Boom Mic with Variable Mic Monitor |
| Controls | Independent Game and Chat Volume, Treble/Bass Boost, Mic Mute Switch (High/Low/Phone/Mute), Chat Boost Indicator |
| Connectivity | USB (Power and Chat), 3.5mm Audio, Xbox 360 Talkback Cable, Auxiliary Input for Mobile |
| Power Source | USB Powered (No Batteries Required) |
| Cables Included | Headset Breakaway Cable, Mobile Adapter Cable (with In-Line Mic), 3.5mm 4-Pole Auxiliary Cable, RCA Splitter Cable, Xbox 360 Talkback Cable |
| Special Features | Dynamic Chat Boost, Mobile Phone Integration, Interchangeable Speaker Plates |
| Package Contents | Headset, In-Line Amplifier, Detachable Boom Mic, Cables (as listed), Turtle Beach Stickers, Quick Start Guide, Limited Edition Thor Speaker Plates |
| Weight | Approximately 300g (estimated) |
| Warranty | 1 Year Limited Warranty |
| Cleaning and Maintenance | Wipe with a dry cloth. Do not use liquids or abrasive cleaners. Store in a dry place. |
| Safety | Avoid prolonged use at high volume to prevent hearing damage. Use only with compatible devices. |
| Spare Parts and Repairability | Earpads, cables, and speaker plates available at turtlebeach.com. Contact support for repairs. |
| General Information | Designed for amplified gaming audio with independent game and chat mix. Compatible with multiple platforms. Limited Marvel edition with Thor plates. |
Frequently Asked Questions - Earforce Seven Marvel TURTLE BEACH
User questions about Earforce Seven Marvel TURTLE BEACH
0 question about this device. Answer the ones you know or ask your own.
Ask a new question about this device
Download the instructions for your Headphones in PDF format for free! Find your manual Earforce Seven Marvel - TURTLE BEACH and take your electronic device back in hand. On this page are published all the documents necessary for the use of your device. Earforce Seven Marvel by TURTLE BEACH.
USER MANUAL Earforce Seven Marvel TURTLE BEACH
LIMITED EDITION PREMIUM AMPLIFIED GAMING HEADSET
WIRED
For: Xbox 360® | PS3™ | PC
Mac® I Mobile
MARVEL
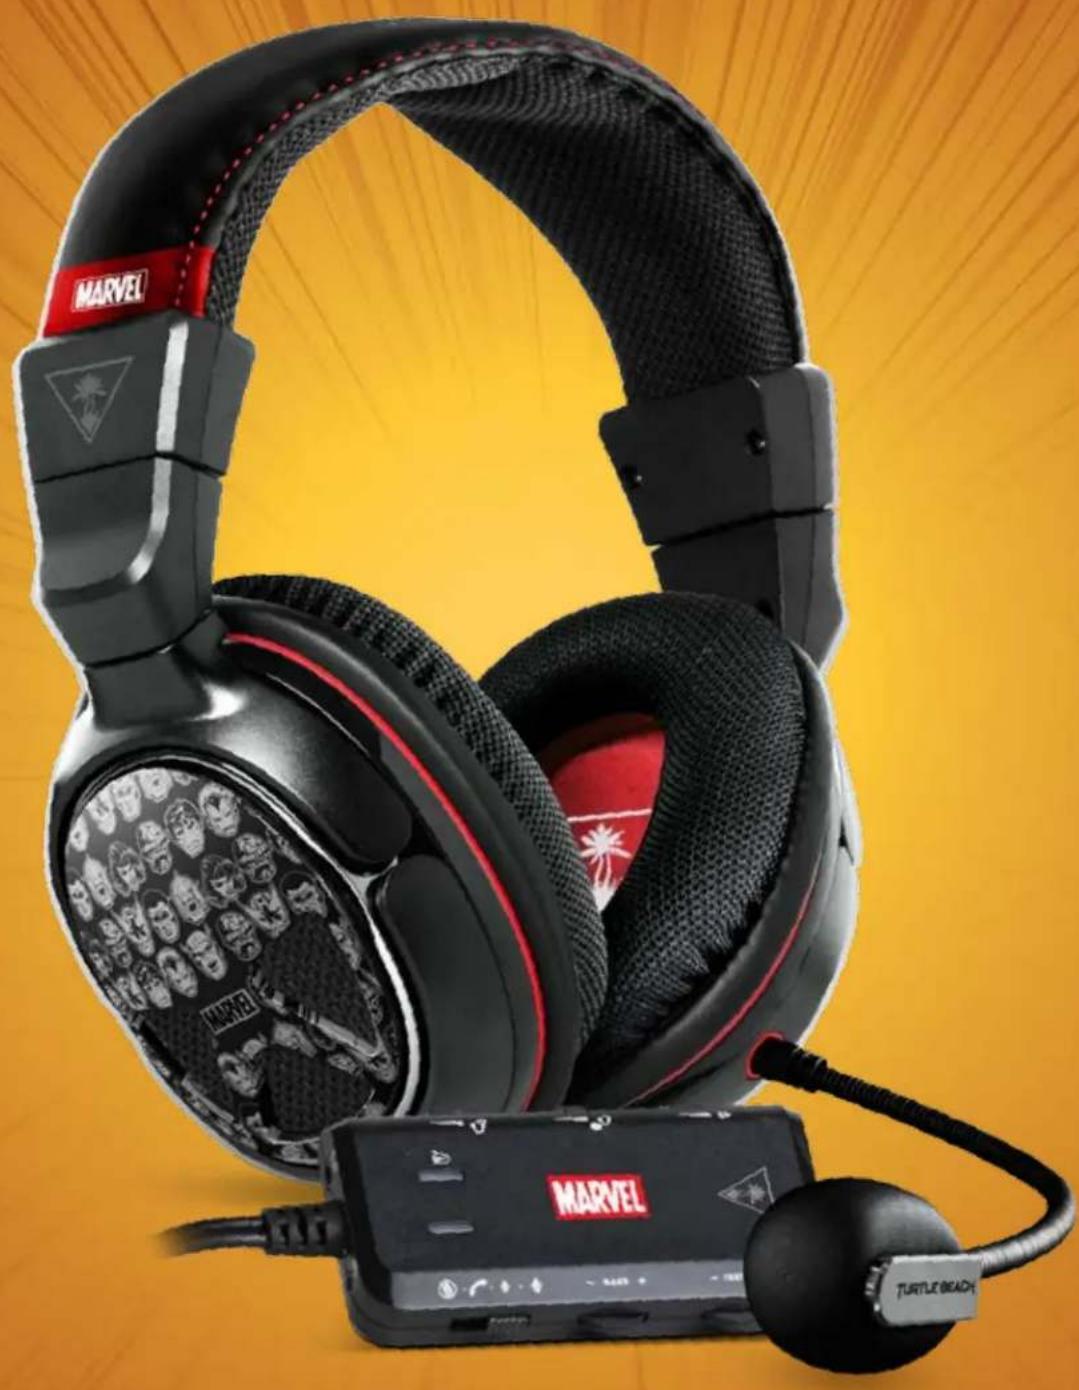
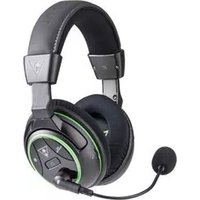
natural_image
Exterior view of a Marvel 3D headboard with headlamp and Turkay logo, set against a yellow starry background (no text or symbols on main subject)Congratulations on your purchase of Ear Force MARVEL SEVEN Headset from Turtle Beach. Compatible with PS3™, Xbox 360®, PC and Mac® computers, tablets, PS Vita™, and mobile devices. The MARVEL SEVEN, delivers superior, clear sound over Play Station Network (PSN), Xbox Live or on line PC/Mac gaming.
For our Knowledgebase and Technical Support Contact info please visit: http://www.turtlebeach.com/support
Table of Contents
Package Contents P4
Features P5
Amplifier Features P6
Basic Hardware Setup P7
PS3 Setup (HDMI) P8
PS3 Setup (RCA) P9
PS3 System Settings Configuration P10
Xbox 360 Setup - All Models P11
Xbox 360 Setup (HDMI) P12
Xbox 360 Setup (RCA) P13
Xbox 360 E Setup (HDMI) P14
Xbox 360 System Settings Configuration P15
PC/Mac Setup P16
PC System Settings Configuration P17
Mac System Settings Configuration P18
Mobile Device Setup with the In-Line Amplifier P19
Mobile Device Setup without the In-Line Amplifier P21
Speaker plates / Troubleshooting P22
Specifications P23
Compliance / Conf P24
Warranty P26
Package Contents
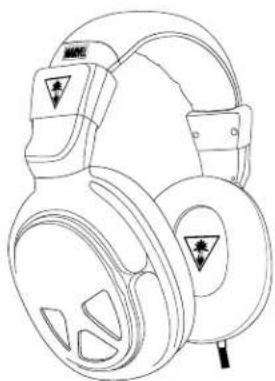
natural_image
Line drawing of a pair of electronic headsets with warning symbols (no text or labels)Ear Force® MARVEL SEVEN Headset
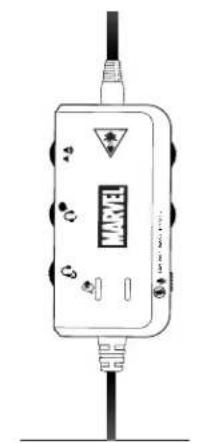
natural_image
Line drawing of a handheld electronic device with indicator lights and ports (no text or symbols)In-Line Amplifier
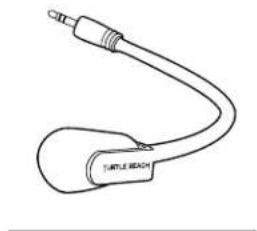
natural_image
Line drawing of a turtle beach device with a handle and connector (no text or symbols)Detachable Boom Mic

natural_image
Diagram of two types of audio/video cables with no text or symbolsXbox 360 Talkback Cable
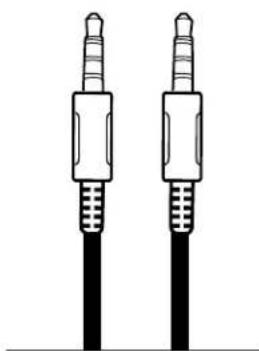
natural_image
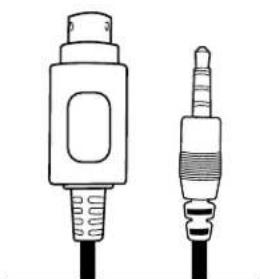
Two identical black and white line-drawn connectors with threaded leads, no text or symbols present.3.5mm, 4-Pole Auxiliary Cable
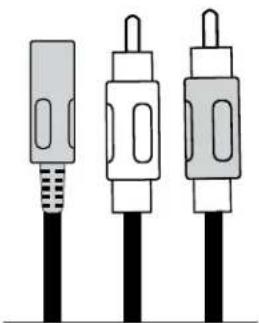
natural_image
Three identical electrical connectors with black and gray body designs, no text or symbols visibleRCA Splitter Cable
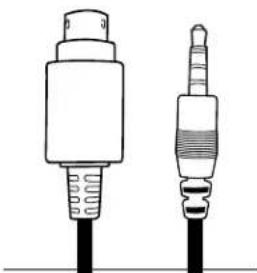
natural_image
Illustration of two types of audio/video cables with no text or symbolsHeadset Breakaway Cable
natural_image
Illustration of two different types of audio/video connectors (no text or symbols present)Mobile Adapter Cable Turtle Beach StickersMARVEL SEVEN Quick Start Guide


Limited Edition Thor Plates
Features
- Independent Game and Chat: Separate volume controls for your Game and Chat paths.
- Powerful In-Line Amp: Mix in Game, Chat, Mic, Music and answer a phone call all through the InLine Amp.
- Bass and Treble Boost: Tune bass and treble levels to add depth and realism
- Superb Sound: Get better sound from online music, video and communications services.
· Dynamic Chat Boost™: Automatically raises the volume of chat during intense, explosive game situations. - Variable Mic Monitor: Hear your own voice in the headset to avoid shouting.
- Removable Boom Mic.: Use the Mobile Adapter Cable with in-line mic as an alternative when on the go.
- Mobile Phone Integration: Connect to the InLine Amp to mix music or take phone calls while playing.
- USB Powered: No AC adapters or batteries required.

natural_image
Illustration of a Marvel DC connector with cable and connector (no text or symbols on the device itself)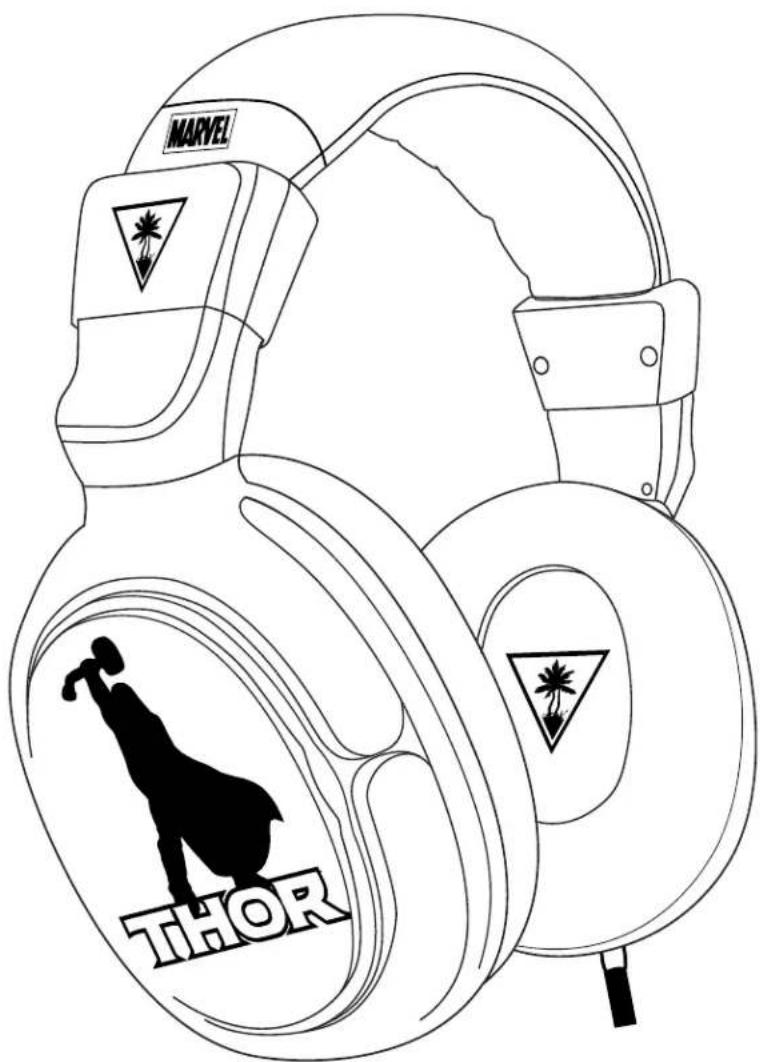
Go to Table of Contents

Amplifier Features
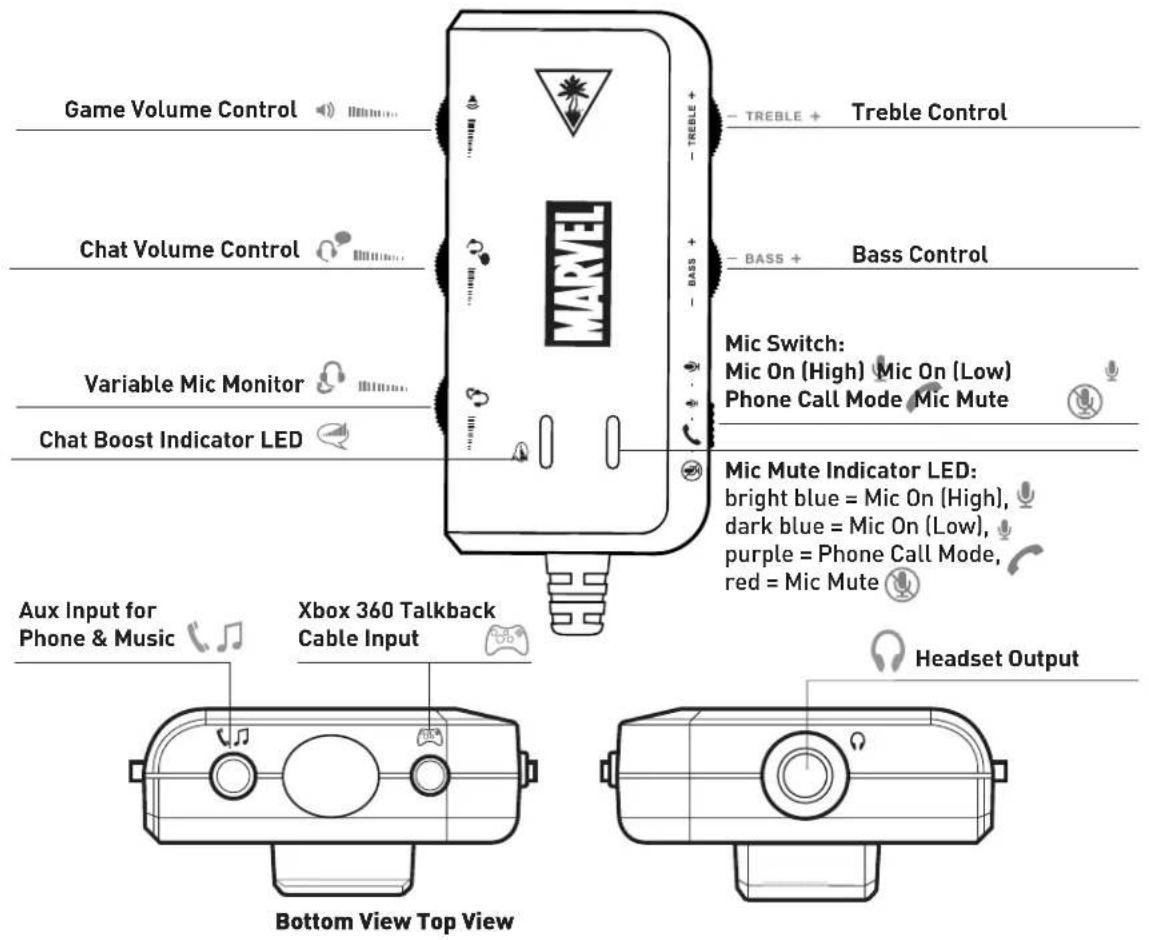
- Game Volume Control: Adjusts the incoming sound level from the 3.5mm connection.
- Treble/Bass Controls: Adjusts treble and bass levels of incoming sound from the 3.5mm connection.
- Chat Control: Adjusts volume of incoming chat through USB or Xbox 360 chat input
- Variable Mic Monitor: Adjusts the sound level of your voice in the headset
-
Mic Switch & Mic Mute Indicator LED:
-
Mic on (High) (Bright Blue): Your voice is louder to other people.
- Mic on (Low) (Dim Blue): Your voice is lower to other people.
- Phone Mode (Purple): Routes mic to phone.*
-
Mute (Red): Mutes your voice to all parties
-
Chat Boost Indicator: When game volume increases; chat volume increases automatically. The Blue LED indicates the Chat Boost activating. (Brighter when louder, dimmer when softer)
- Aux Input for Phone & Music: Connect your mobile device while gaming using the Auxiliary Cable.
- Xbox Chat Input: Connect your Xbox 360 Controller for chat using the Xbox 360 Talkback Cable
- Headset Jack: Connect your MARVEL SEVEN headset using the Headset Breakaway Cable or the Mobile Adapter Cable.
*Note: Phone mode must be switched on in order to talk on the phone while gaming.
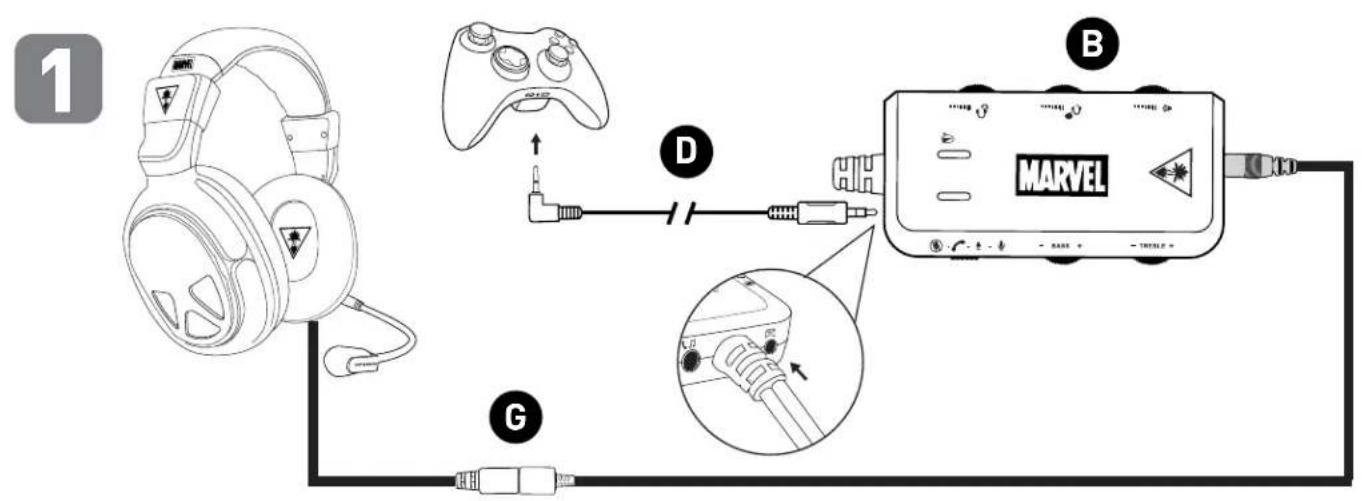
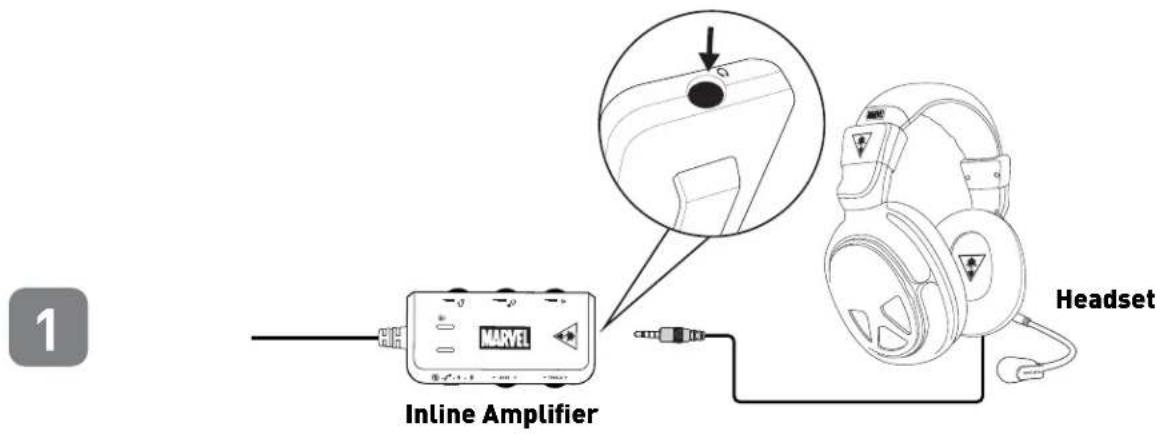
Basic Hardware Setup
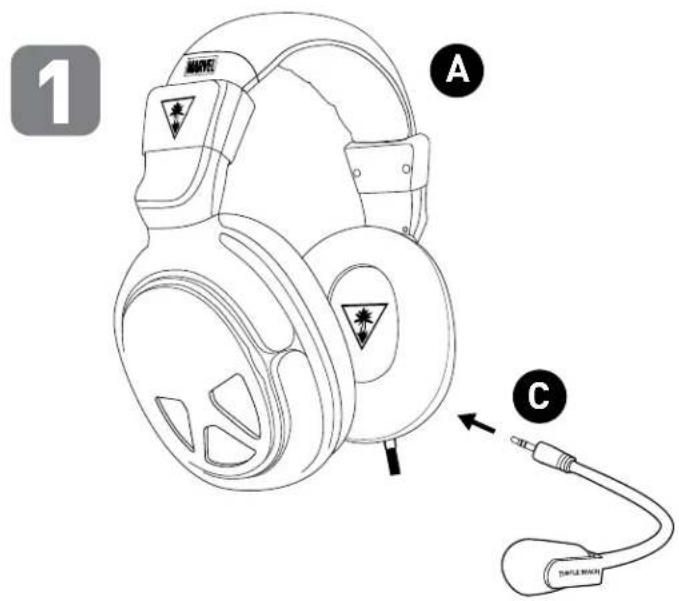
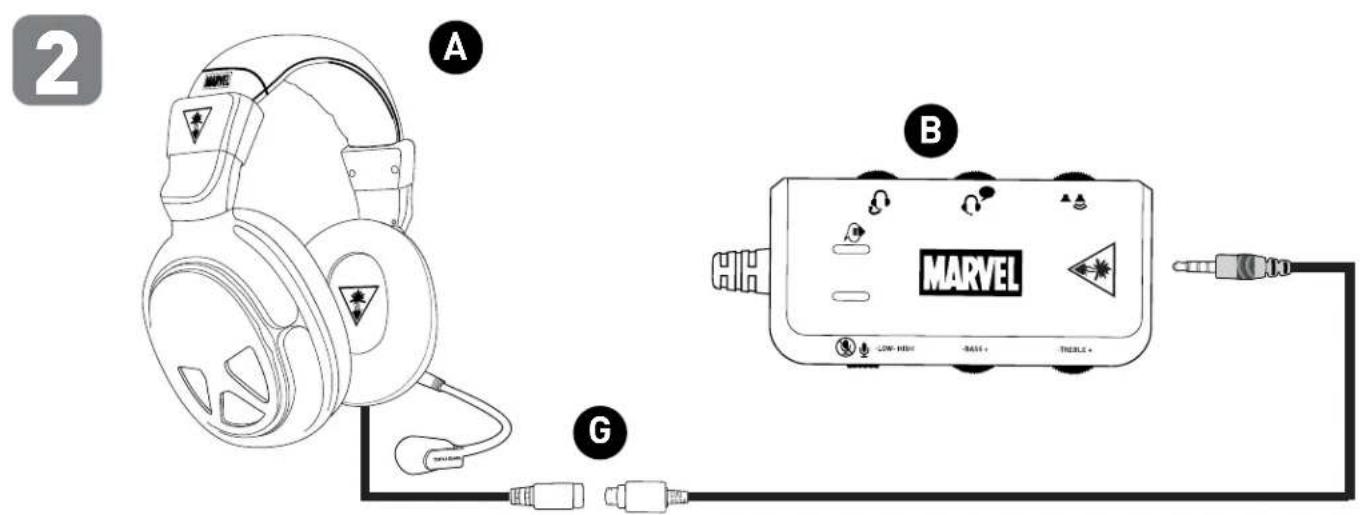
note: When connecting the boom mic, make sure that the keying is lined up correctly. Do not force the boom mic into the slot.
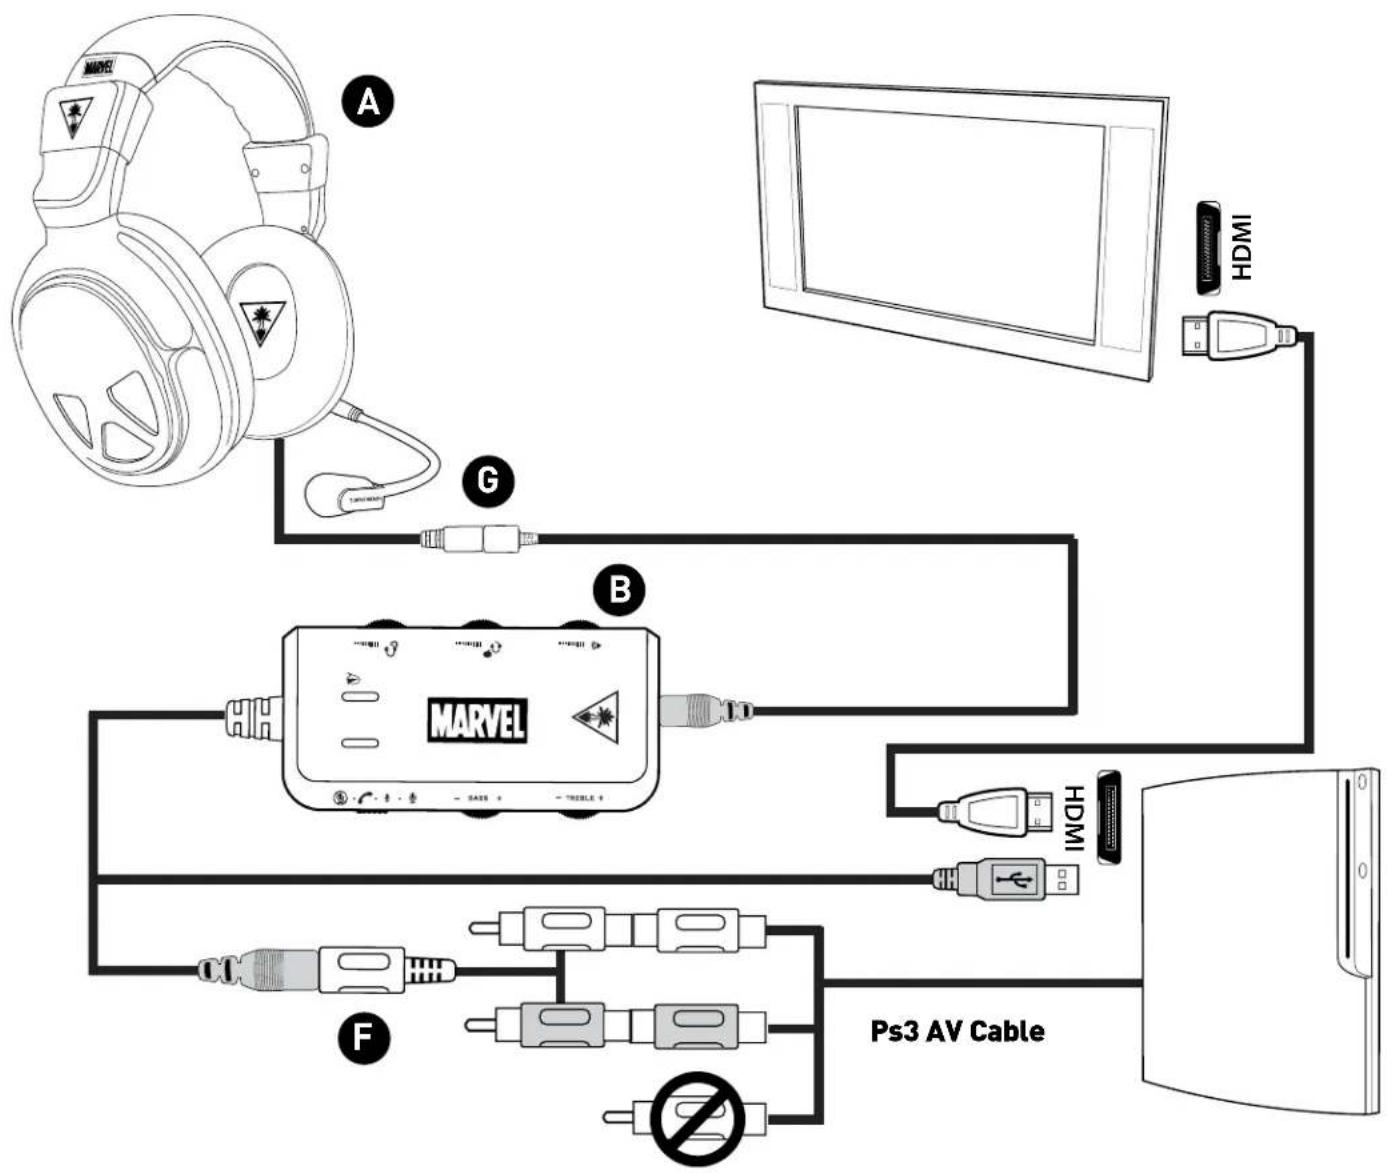
PS3 Setup (HDMI)
flowchart
graph TD
    A["MCU"] -->|A| B["MPD"]
    B --> C["PS3 AV Cable"]
    C --> D["HDMI"]
    D --> E["PC"]
    F["HCMS"] --> G["Switch"]
    G --> H["Switch"]
    H --> I["Switch"]
    I --> J["Switch"]
    J --> K["Switch"]
    K --> L["Switch"]
    L --> M["Switch"]
    M --> N["Switch"]
    N --> O["Switch"]
    O --> P["Switch"]
    P --> Q["Switch"]
    Q --> R["Switch"]
    R --> S["Switch"]
    S --> T["Switch"]
    T --> U["Switch"]
    U --> V["Switch"]
    V --> W["Switch"]
    W --> X["Switch"]
    X --> Y["Switch"]
    Y --> Z["Switch"]
    Z --> AA["Switch"]
    AA --> AB["Switch"]
    AB --> AC["Switch"]
    AC --> AD["Switch"]
    AD --> AE["Switch"]
    AE --> AF["Switch"]
    AF --> AG["Switch"]
    AG --> AH["Switch"]
    AH --> AI["Switch"]
    AI --> AJ["Switch"]
    AJ --> AK["Switch"]
    AK --> AL["Switch"]
    AL --> AM["Switch"]
    AM --> AN["Switch"]
    AN --> AO["Switch"]
    AO --> AP["Switch"]
    AP --> AQ["Switch"]
    AQ --> AR["Switch"]
The PS3 AV Cable is included with your console.
PS3 Setup (RCA)
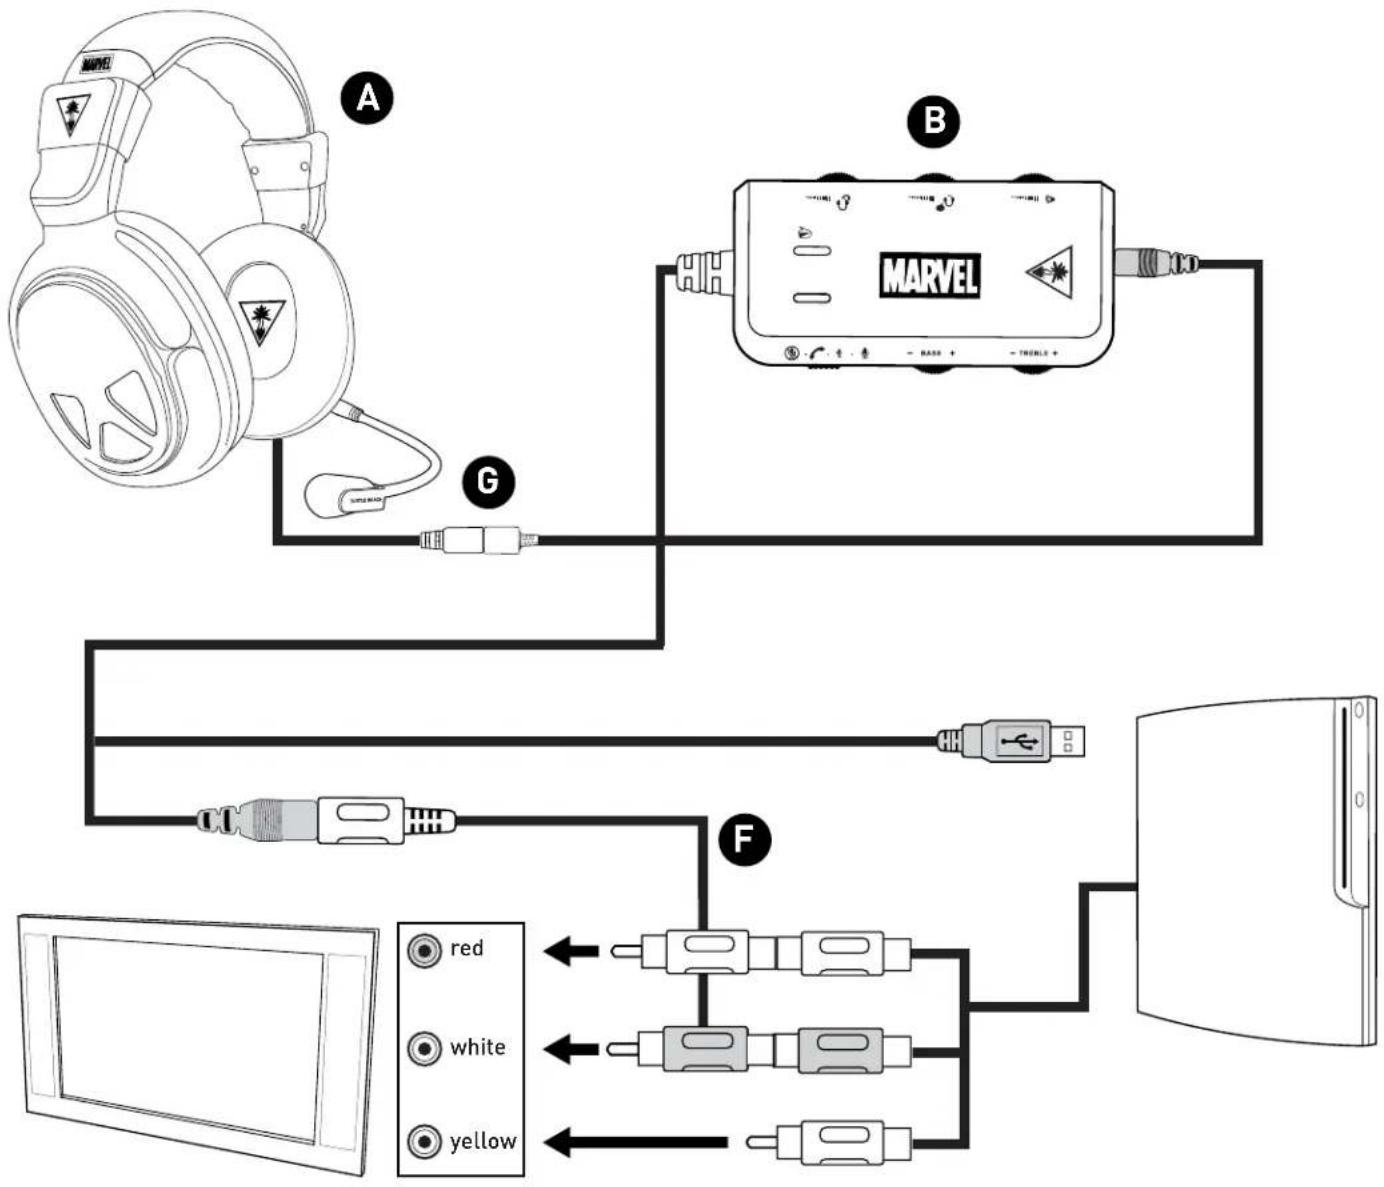
The PS3 AV Cable is included with your console.
PS3 System Settings Configuration
PS3 Audio Output Setup
![0 12/14 12:15 PM Audio Output Settings Audio Multi-Output On Sets to output audio through multiple connectors simultaneously. Audio output to connectors that are not selected in [Audio Output Settings] is downscaled to 2 Ch.](/content/2026/06/1175620/images/e91dbb8bb681add817f346947659b3ed9979d55f2b6822e3d96c5ef5d540965b.jpg)
In the PS3 menu, select Settings → Sound Settings → Audio Multi-output.
PS3 Chat Setup
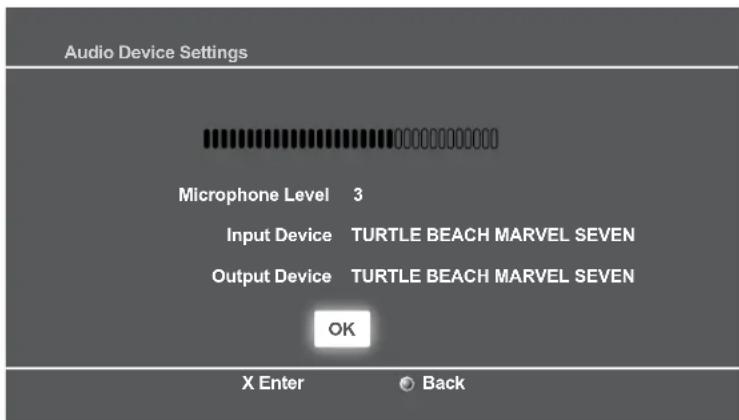
- In the PS3 menu, select Settings → Accessory Settings → Audio Device Settings → Input Device → Turtle Beach MARVEL SEVEN.
- In the PS3 menu, select Settings → Accessory Settings → Audio Device Settings → Output Device → Turtle Beach MARVEL SEVEN.
Xbox 360 Setup - All Models
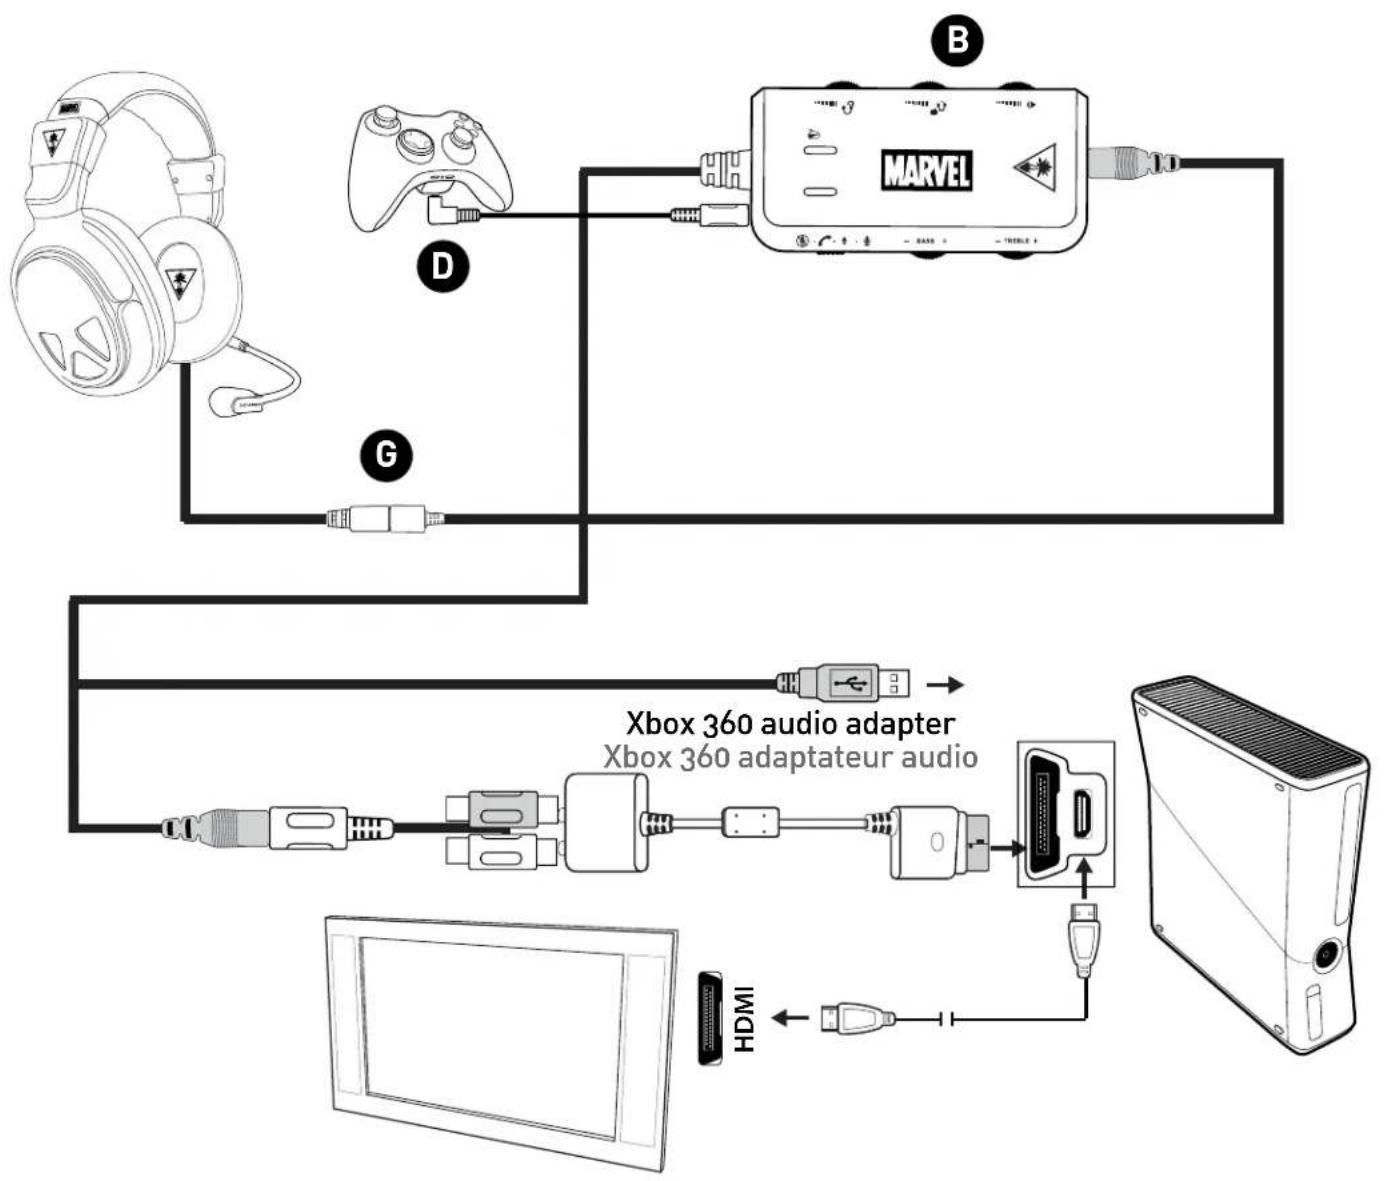
Xbox 360 Setup (HDMI)
flowchart
graph TD
    A["MCU"] --> B["MPAR"]
    B --> C["Xbox 360 audio adapter"]
    C --> D["MPA"]
    D --> E["HDMI"]
    style A fill:#f9f,stroke:#333
    style B fill:#ccf,stroke:#333
    style C fill:#cfc,stroke:#333
    style D fill:#fcc,stroke:#333
    style E fill:#cff,stroke:#333
*For best performance, use with official Microsoft Xbox 360 products. **Some Xbox 360 models require an Xbox 360 Audio Adapter Cable for audio output when used with an HDMI connection (available from turtlebeach.com). note: Note: If your HDMI TV has red/white AUDIO OUT RCA jacks, you can use them to feed the sound from your TV to your MARVEL SEVEN headset. (AUDIO IN jacks will not send sound to your headset. AUDIO OUT is required.
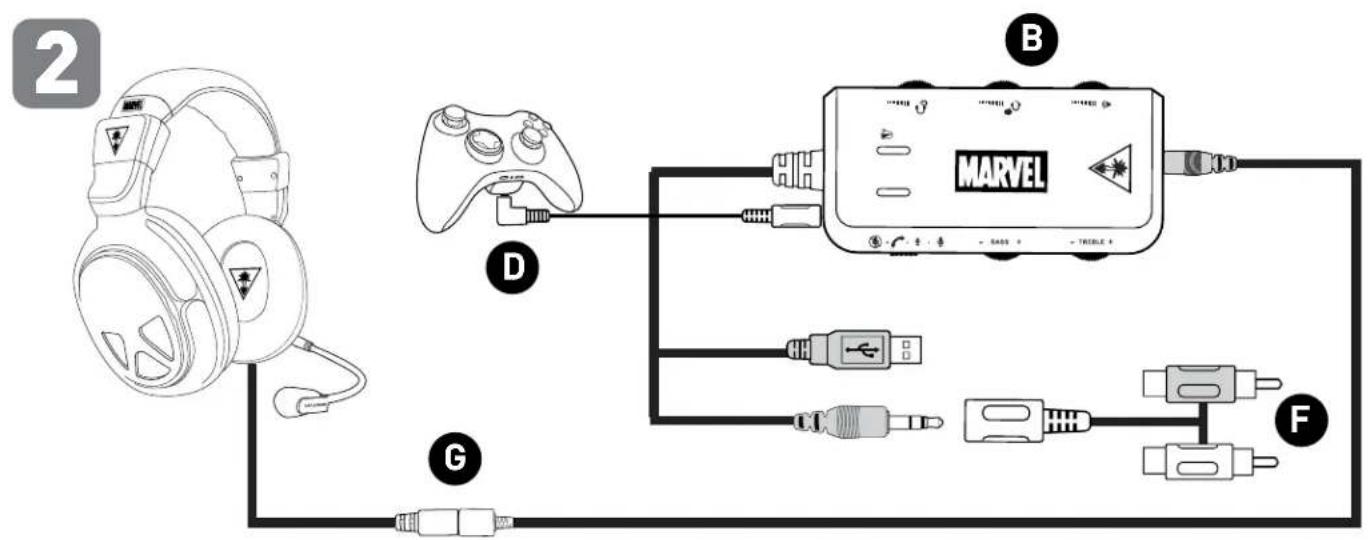
Xbox 360 Setup (RCA)
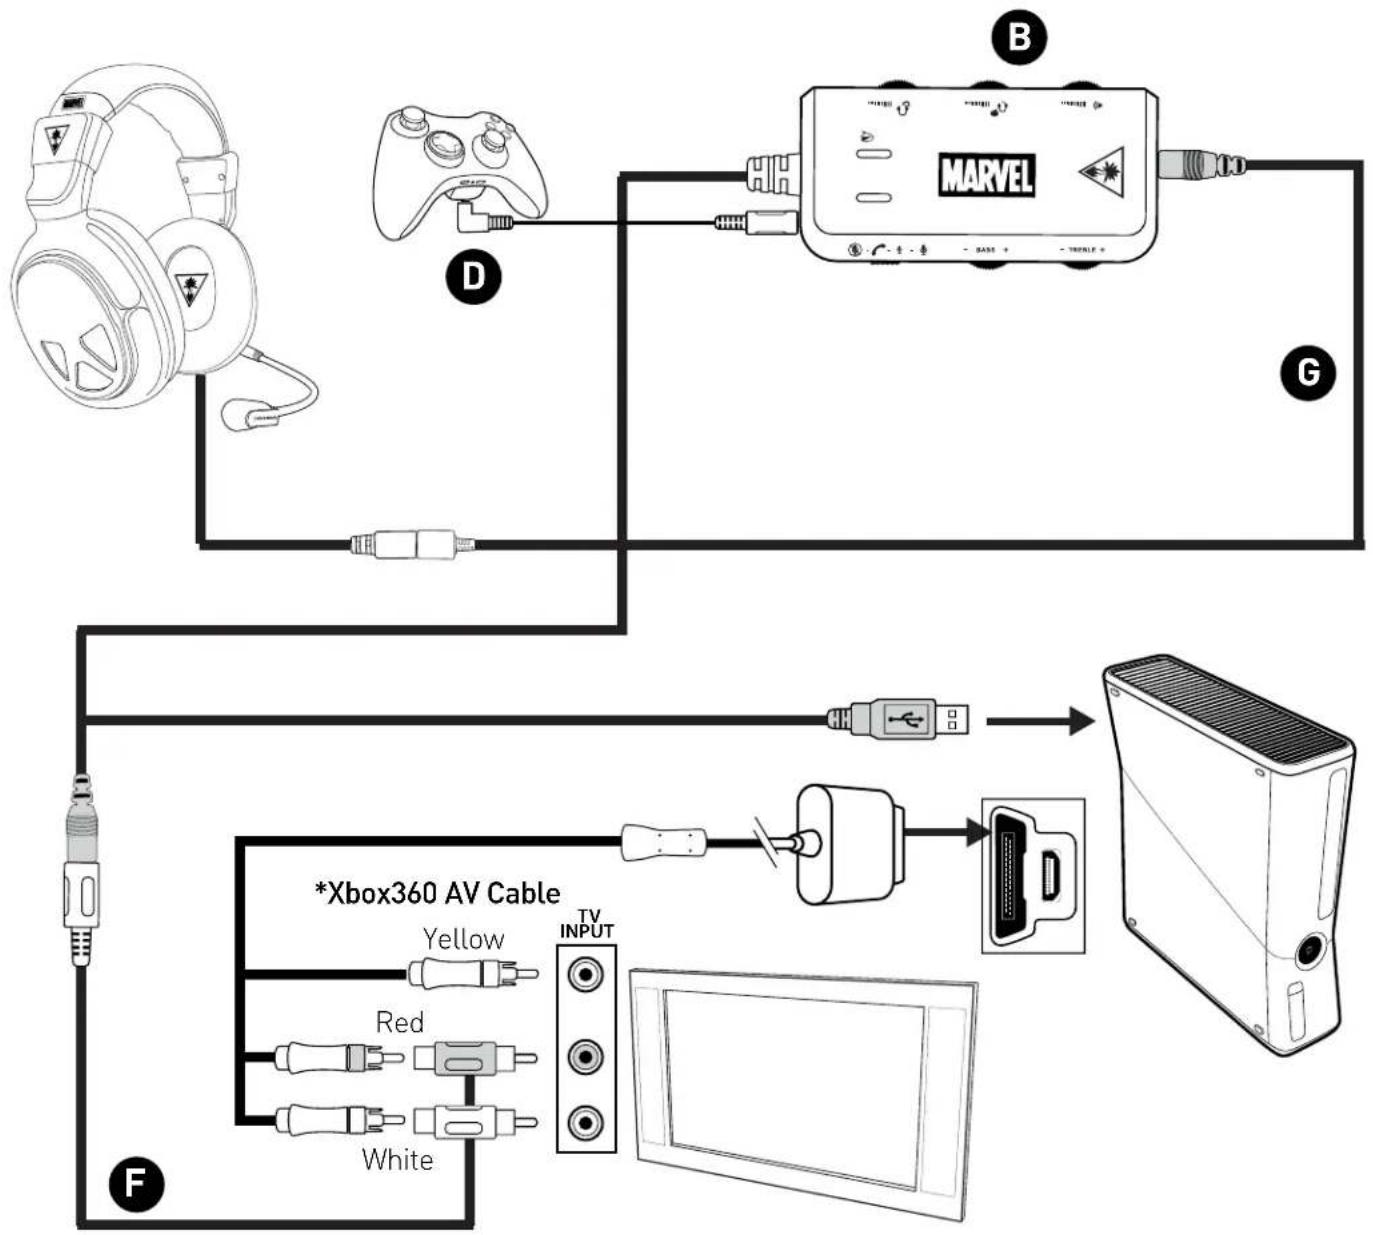
flowchart
graph TD
    A["Headphones"] --> B["Game Controller"]
    B --> C["Marvel Display"]
    C --> D["MC"]
    D --> E["Power Hub"]
    E --> F["Xbox360 AV Cable"]
    F --> G["TV INPUT"]
    G --> H["Computer"]
*The Xbox360 AV Cable is included with your console.
Xbox 360 E Setup (HDMI)
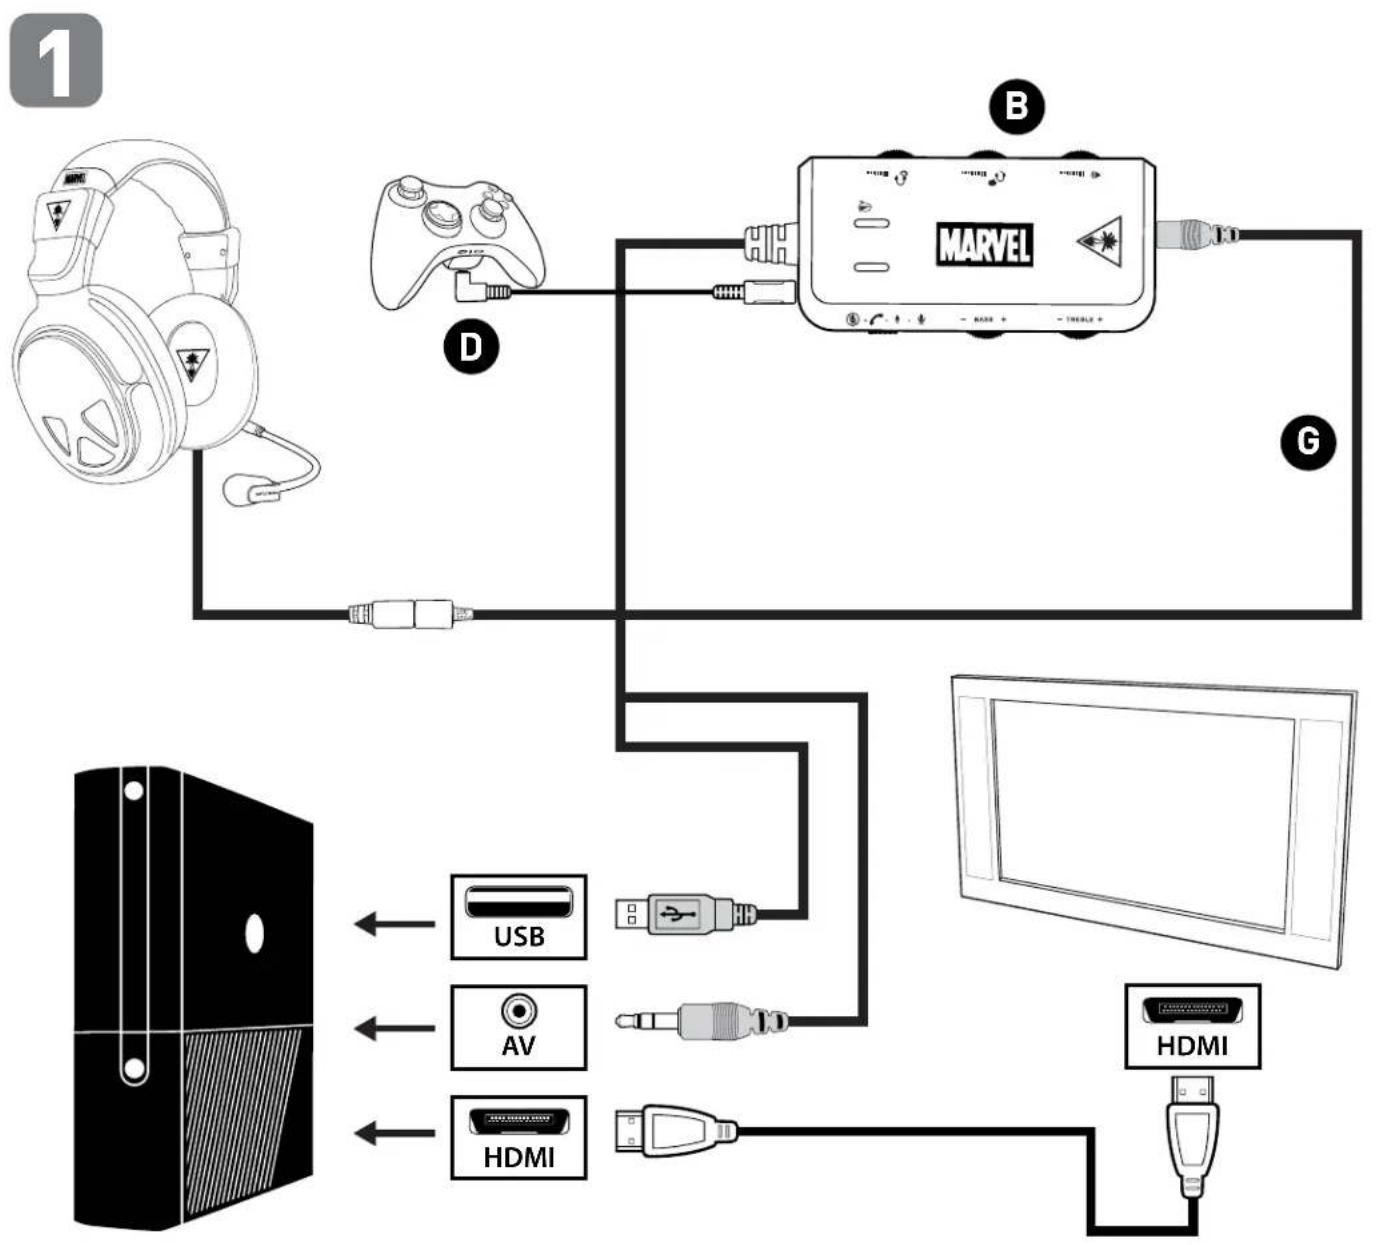
flowchart
graph TD
    A["Game Controller"] -->|USB| B["Computer"]
    A -->|AV| C["Monitor"]
    A -->|HDMI| D["Hardware"]
    B -->|HDMI| E["Device"]
    C -->|HDMI| F["Device"]
    D -->|HDMI| G["Device"]
    style A fill:#f9f,stroke:#333
    style B fill:#ccf,stroke:#333
    style C fill:#cfc,stroke:#333
    style D fill:#fcc,stroke:#333
    style E fill:#ffc,stroke:#333
    style F fill:#fcc,stroke:#333
    style G fill:#ffc,stroke:#333
Xbox 360 System Settings Configuration
Xbox 360 Configuration
Voice
Voice Volume 10
Game Volume 10
□ Mute Kinect
Voice Output
● Play Through Headset
Play Through Speakers
Play Through Both
- Press Xbox Guide button on your controller, select Settings → Preferences → Voice.
- Voice Volume = 10.
- Game Volume = 10.
- Voice Output = Play through headset.
PC/Mac Setup
When used as a PC/Mac gaming headset, the MARVEL SEVEN functions as both a USB Stereo Headset and an Amplified Stereo Headset.
The In-Line Amplifier's black 3.5mm plug is used for sending the stereo game signal from the computer sound card to the MARVEL SEVEN amplifier, allowing game audio, music and other sounds to be heard from the computer.
Use the USB Turtle Beach MARVEL SEVEN Chat path for chat platforms like Skype, Ventrilo, TeamSpeak, Yahoo! Messenger, etc. Note: Both the USB and 3.5mm should always be connected. Set system volume to maximum and then adjust volume using the InLine Amp.
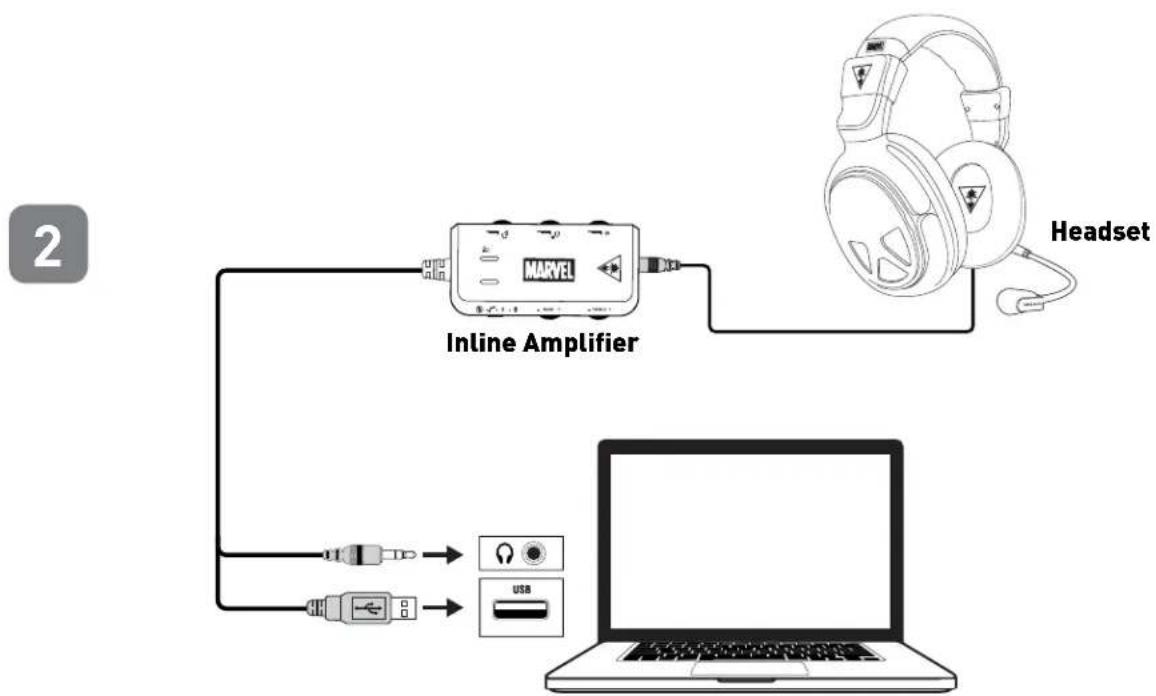
flowchart
graph TD
    A["MCU"] -->|Headset| B["Laptop"]
    C["Headset with headphones"] -->|Headset| B
    D["USB Interface"] --> E["USB"]
*The first time the MARVEL SEVEN is connected some drivers will be automatically installed. Wait for these drivers to install before moving onto the system settings configuration.
PC System Settings Configuration
PLEASE NOTE: Depending on your OS Version, the screens may differ but the steps will remain the same.
- Right-click the speaker icon in your task bar and select "Playback Devices"

- Right-click on "Speakers" and select "Set as Default Device". Next, right-click on "TURTLE BEACH MARVEL SEVEN" and select "Set as Default Communication Device".
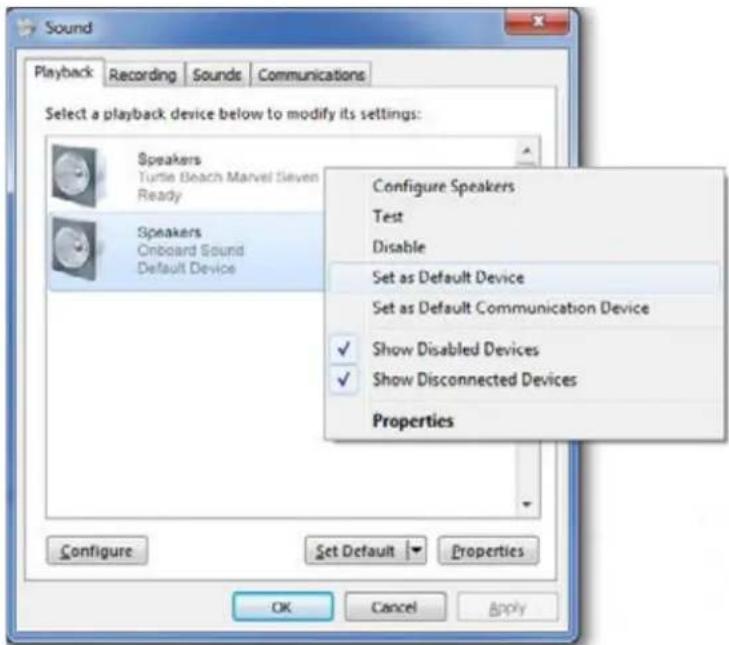
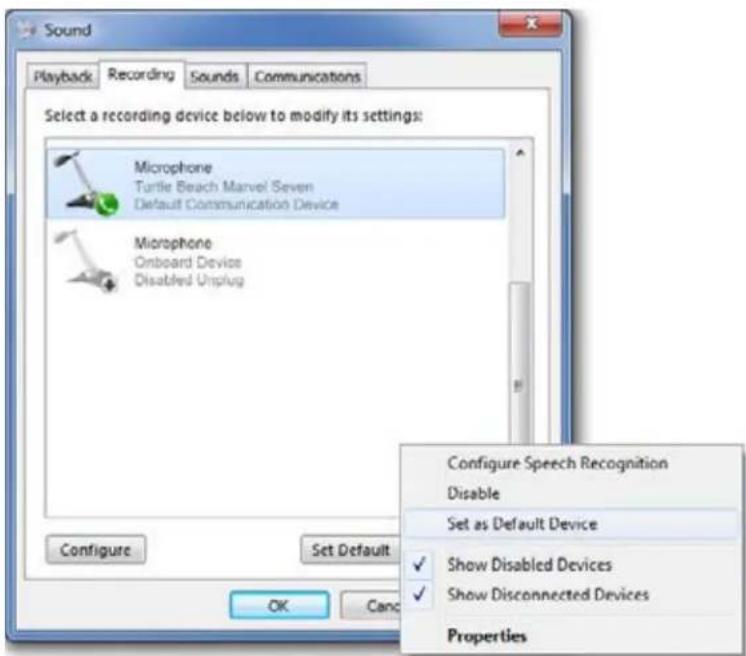
-
Click on the "Recording Tab", then right-click "TURTLE BEACH MARVEL SEVEN" and select "Set as Default Device". If you speak into the mic you should see green bars on the right move.
-
Click on the "OK" button at the bottom of the window to exit.
Note: In order to maintain independent volume controls for chat and game, please make sure to set "TURTLE BEACH MARVEL SEVEN" as both the recording and playback device in the audio setting for your voice chat application.
Mac System Settings Configuration
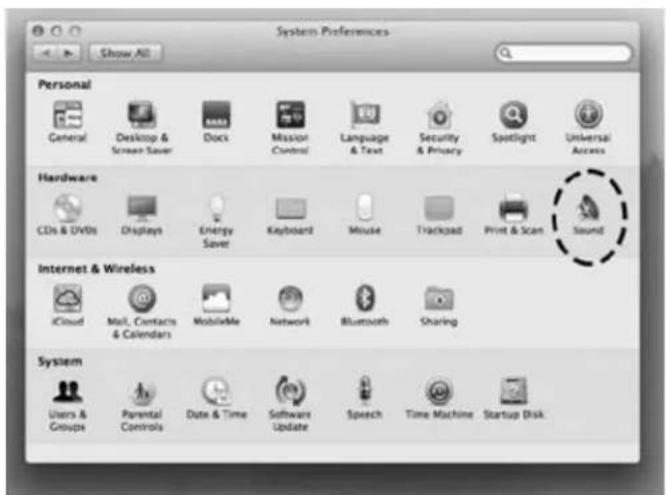
PLEASE NOTE: Depending on your OS Version, the screens may differ but the steps will remain the same.
- Click on the Apple Menu and select System Preferences » Sound.
- On the Output tab. select "Headphones".
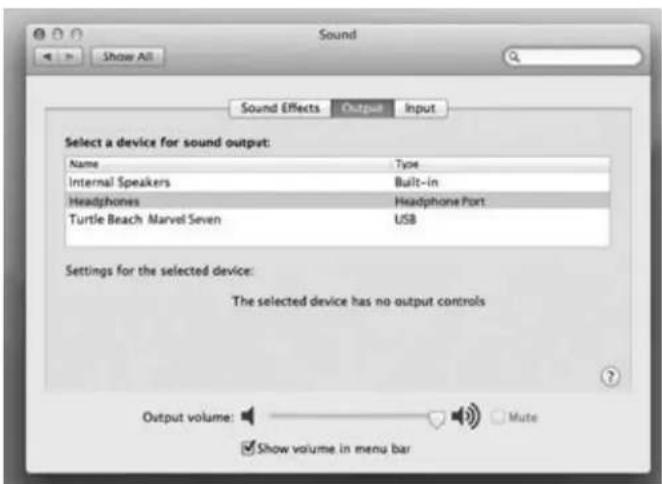
- On the input tab, select "TURTLE BEACH MARVEL SEVEN".

NOTE: In order to maintain independent volume controls for chat and game, please make sure to set "TURTLE BEACH MARVEL SEVEN" as both the recording and playback device in the audio setting for your voice chat application.
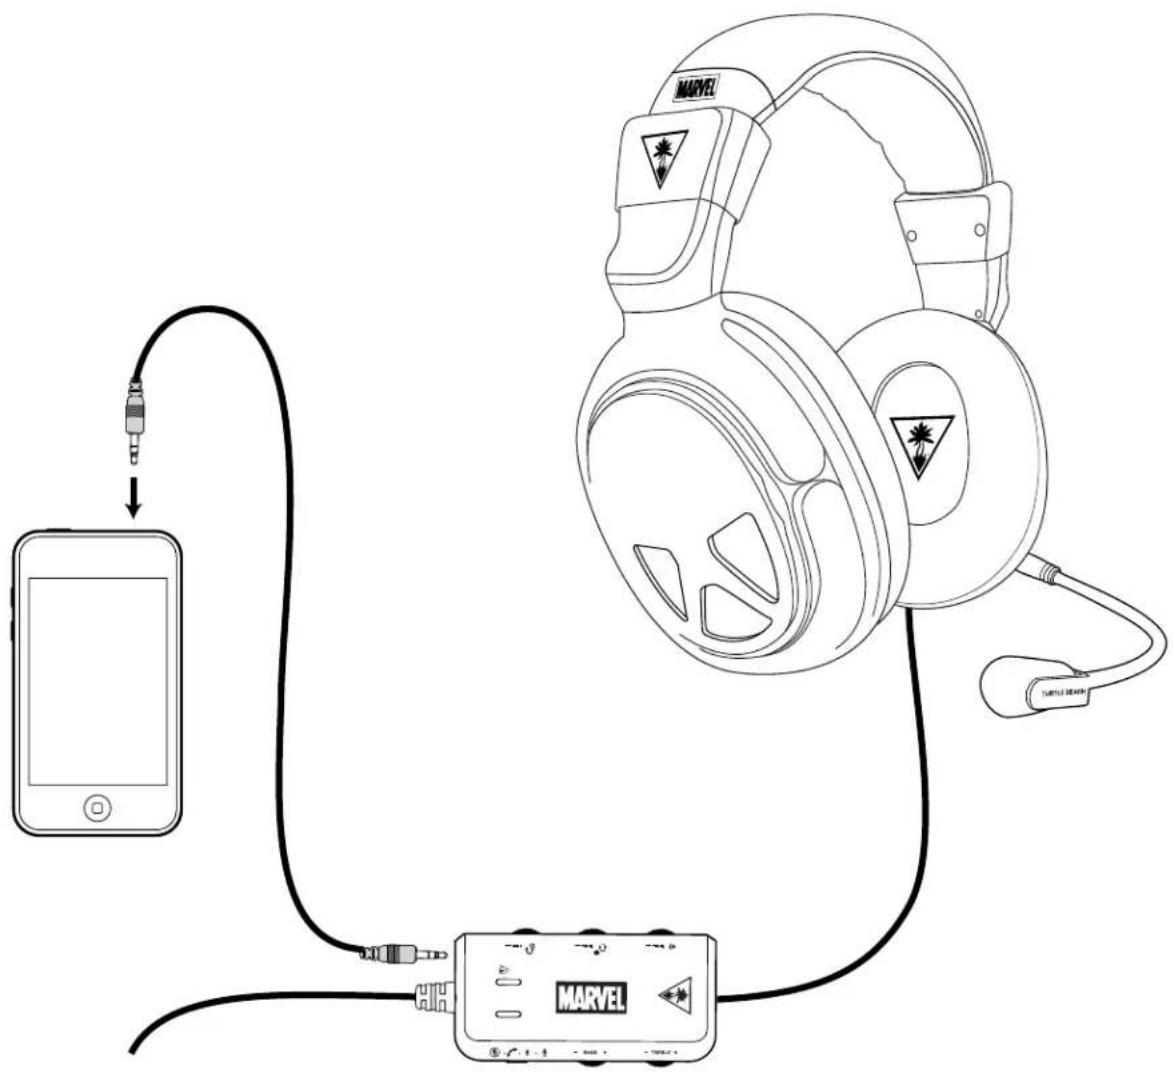
Mobile Device Setup with the In-Line Amplifier
Once your MARVEL SEVEN headset is set up and ready to use with your game console, you are ready to utilize the functions of the InLine amplifier to full effect. You can use the Auxiliary cable to play music and answer calls from your mobile device while gaming.
PLEASE NOTE: The In-Line Amp must be in phone call mode or your voice will be routed over your PC/Console's chat channel. You will hear the caller and other players no matter where the switch is set but if not in the phone call mode, your caller will not hear you.
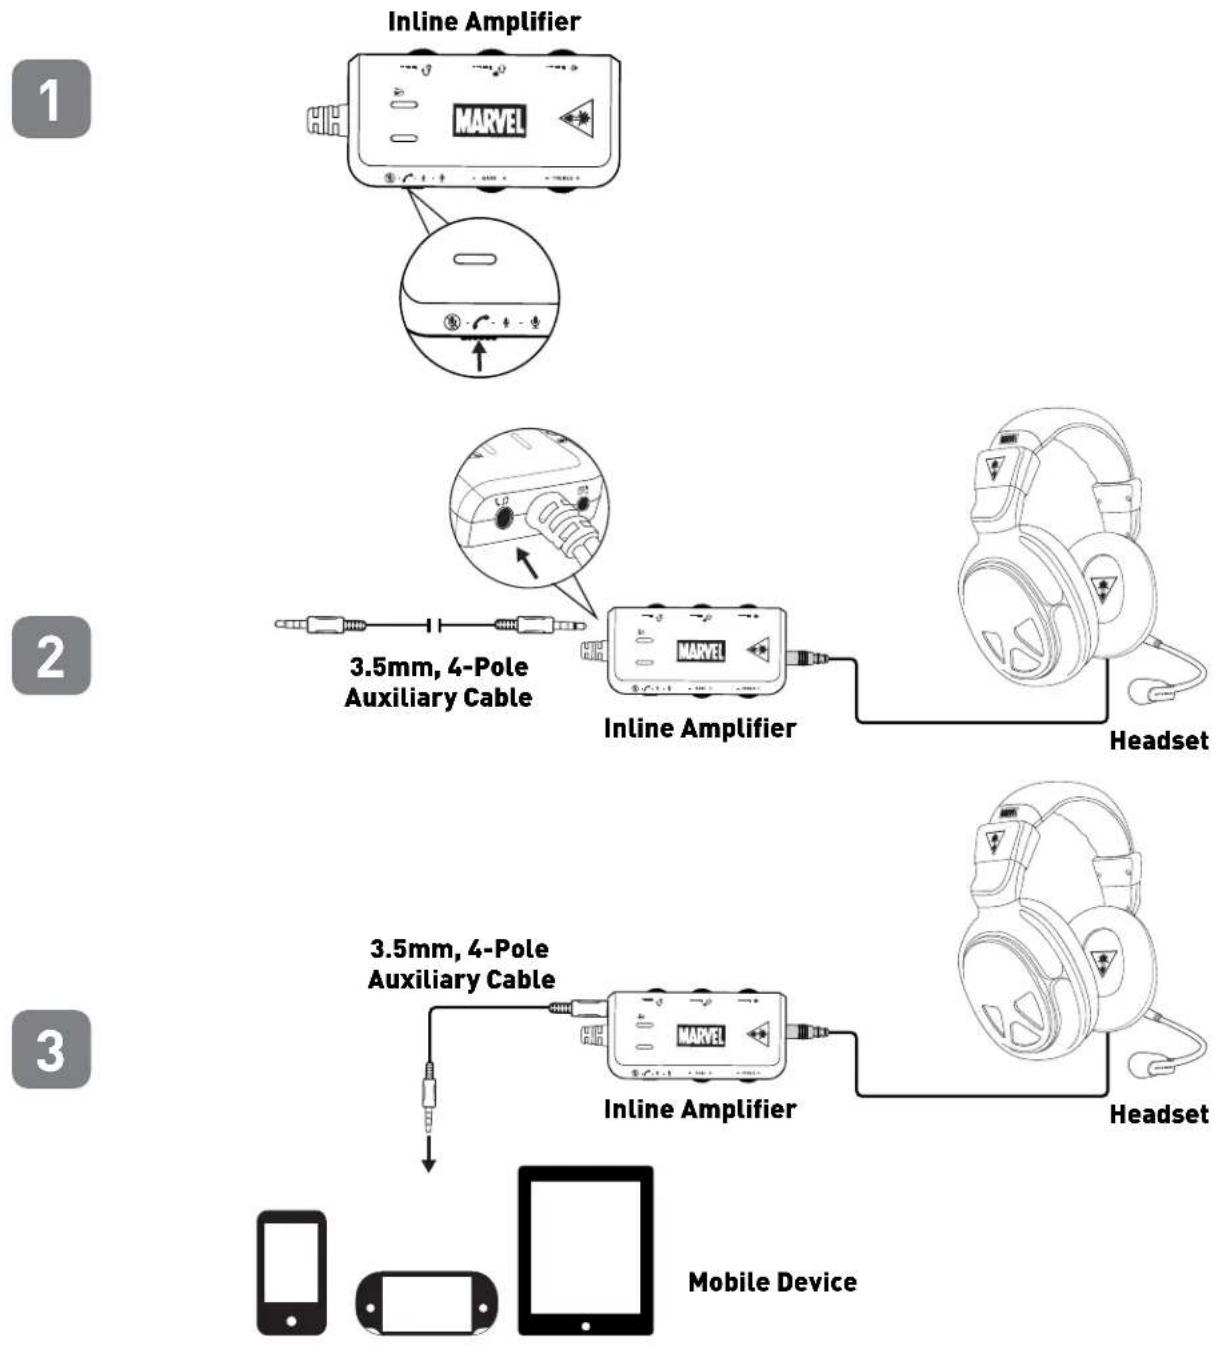
flowchart
graph TD
    A["1: In-line Amplifier"] --> B["2: 3.5mm, 4-Pole Auxiliary Cable"]
    B --> C["3: In-line Amplifier"]
    C --> D["4: Headset"]
    C --> E["5: Headset"]
    C --> F["6: Headset"]
    C --> G["7: Headset"]
    G --> H["Mobile Device"]
Mobile Device Setup with the In-Line Amplifier
Mic Settings
| [Y20A] | Mic on High | Bright Blue LED |
| [###] | Mic on Low | Dim Blue LED |
 | Mic routes to Aux Path | Purple LED |
| [2AZT] | Mic Muted | Red LED |
Mobile Device Setup without the In-Line Amplifier
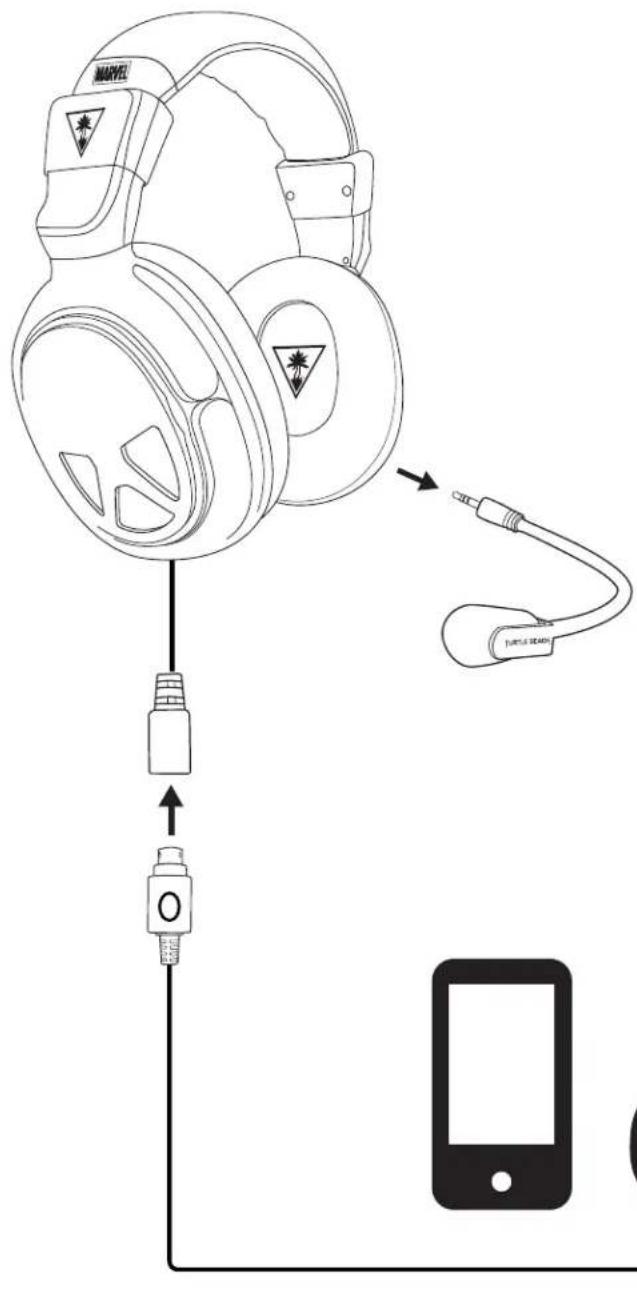
- Remove the mic boom.
- Disconnect the MARVEL SEVEN headset from the amp
- Exchange the breakaway cable for the Mobile Adapter Cable (with InLine mic)
- Connect to mobile device
Speaker plates
Your Marvel SEVEN headset comes with one set of interchangeable limited edition MARVEL Thor Plates. Your MARVEL SEVEN headset speaker plates may be removed and replaced with other speaker plates according to your preference. To purchase additional speaker plates, visit: www.turtlebeach.com/products/accessories/speaker-plates. Limited edition themed speaker plates may also be available from time to time.
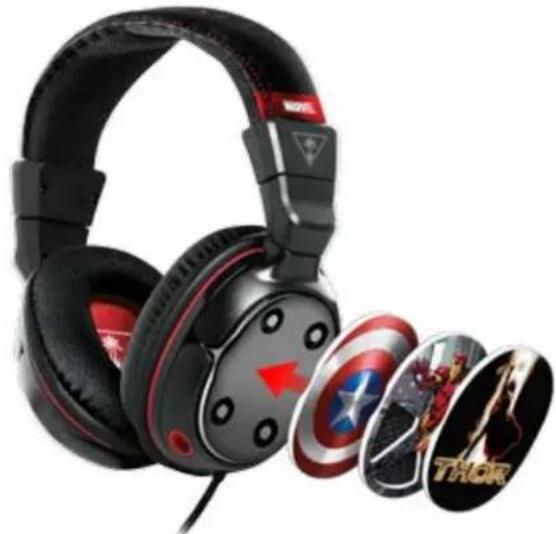
natural_image
Black and red headboard with various video head covers including Marvel, Thor, and Michael (no visible text or symbols on the headphones or covers)Troubleshooting
Microphone not working.
- Make sure the headset is plugged securely and completely into the inline amplifier until it clicks (see page 7).
- Disconnect the microphone boom, then reconnect it as described in "Initial Setup". If the mic boom is loose, this can cause intermittent mic connection, or cause others to hear unwanted crackling sounds.
On Windows PC or Mac, the Game, Bass, and Treble controls appear inactive.
- Make sure both the USB and 3.5 mm plugs are connected to your computer, and your audio settings are configured correctly (see PC setup instructions on page 17, and Mac setup instructions on page18).
One speaker not working.
- Make sure the headset is plugged securely and completely into the InLine amplifier until it clicks (see page 7). A loose connection can cause either or both of the speakers to stop playing audio.
- Test the headset by disconnecting it from the In-Line amplifier, and instead connect it to a portable music player and play a track. If you still hear problems in audio playback, then contact our support team at the web address below.
To submit a Technical Support request, please visit: http://www.turtlebeach.com/contact-support
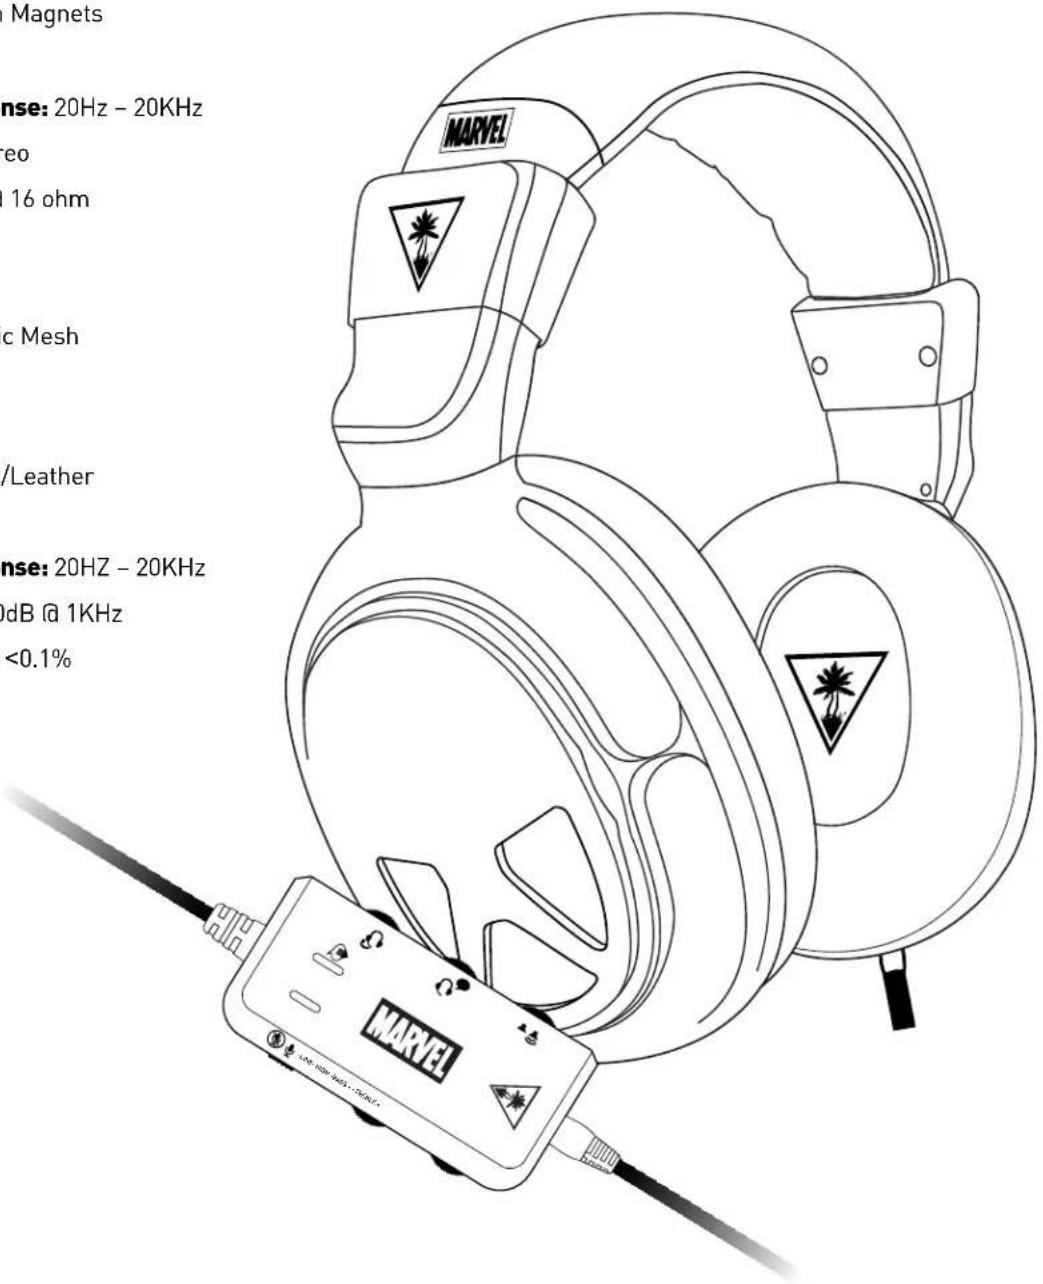
Specifications
- Speaker Dimensions: 50mm
- Speaker Core: Neodymium Magnets
- Speaker Impedance: 32Ω
- Speaker Frequency Response: 20Hz - 20KHz
- Headphone Amplifier: Stereo
- Output Power: 27mW/Ch @ 16 ohm
- Earcup Style: Around Ear
- Cushion Material: Foam
- Earcushion Material: Fabric Mesh
- Headband Design: Metal
- Headband Cushion: Foam
- Headband Material: Fabric/Leather
- Acoustic Design: Closed
- Acoustic Frequency Response: 20HZ - 20KHz
• Sound Pressure Level: 120dB @ 1KHz
• Total Harmonic Distortion: <0.1%
Regulatory Compliance Statements for the EAR FORCE MARVEL SEVEN Models
Federal Communications Commission (FCC) Compliance Notices
Class B Interference Statement
This equipment has been tested and found to comply with the limits for a Class B digital device, pursuant to Part 15, Subpart B of the FCC Rules. These limits are designed to provide reasonable protection against harmful interference in a residential installation. This equipment generates, uses, and can radiate radio frequency energy and, if not installed and used in accordance with the instructions, may cause harmful interference to radio communications. However, there is no guarantee that interference will not occur in a particular installation. If this equipment does cause harmful interference to radio or television reception, which can be determined by turning the equipment off and on, the user is encouraged to try to correct the interference by one or more of the following measures:
- Reorient or relocate the receiving antenna.
- Increase the separation between the equipment and receiver.
- Connect the equipment into an outlet on a circuit different from that to which the receiver is connected.
- Consult the dealer or an experienced radio/TV technician for help.
FCC Caution:
This device complies with Part 15 of the FCC Rules. Operation is subject to the following two conditions: (1) This device may not cause harmful interference, and (2) this device must accept any interference received, including interference that may cause undesired operation.
Canadian ICES Statements
Canadian Department of Communications Radio Interference Regulations
This digital apparatus does not exceed the Class B limits for radio-noise emissions from a digital apparatus as set out in the Radio Interference Regulations of the Canadian Department of Communications. This Class B digital apparatus complies with Canadian ICES-003.
European Union and European Fair Trade Association (EFTA) Regulatory Compliance
This equipment may be operated in the countries that comprise the member countries of the European Union and the European Fair Trade Association. These countries, listed below, are referred to as The European Community throughout this document:
AUSTRIA, BELGIUM, BULGARIA, CYPRUS, CZECH REPUBLIC, DENMARK, ESTONIA, FINLAND, FRANCE, GERMANY, GREECE, HUNGARY, ICELAND, IRELAND, ITALY, LATVIA, LICHTENSTEIN, LITHUANIA, LUXEMBOURG, MALTA, NETHERLANDS, NORWAY, POLAND, PORTUGAL, ROMANIA, SLOVAKIA, SLOVENIA, SPAIN, SWEDEN, SWITZERLAND, UNITED KINGDOM
Declaration of Conformity
Marking by this symbol:

indicates compliance with the Essential Requirements of the EMC Directive of the European Union (2004/108/EC). This equipment meets the following conformance standards:
Safety: EN 60950-1: 2006 + A11 + A1 + A12 (T-Mark License)
Also Licensed for Standards:
IEC 60950-1: 2005 + A1: 2009, (CB Scheme Report/Certificate),
UL60950-1 (NRTL License), CSA22.2, 60950-1 (SCC License)
Additional licenses issued for specific countries available on request
Emissions: EN 55022: 2010, EN 50332-1: 2000, EN50332-2: 2003
EN61000-3-2: 2006 +A1: 2009 +A2: 2009, EN61000-3-3: 2008
CISPR 22: 2010
Immunity: EN 55024: 2010, EN61000-4-2: 2008, EN61000-4-3: 2010,
EN61000-4-4: 2011, EN 61000-4-5: 2005, EN 610004-6: 2008,
EN61000-4-11:2004
The products are licensed, as required, for additional country specific standards for the International Marketplace. Additional issued licenses available upon request.
Environmental: Low Voltage Directive 2006/95/EC,
RoHS 2002/95/EC
REACH 1907/2006/EC
WEEE 2002/96/EC
Warning!
This is a Class B product. In a domestic environment, this product may cause radio interference, in which case, the user may be required to take appropriate measures.
Achtung!
Voyetra Turtle Beach, Inc. ("VTB") warrants to the original end-user purchaser ("Purchaser") that the retail Turtle Beach hardware product herein ("Product") will be free of defects in materials and workmanship for a period of one year from the date of purchase by the Purchaser ("Warranty Period"). Any Extended Warranty or Service Plans purchased through a Retail store are not honored by VTB. The Warranty refers to the repair/replacement of a defective product during this period and not a refund.
This limited warranty is extended only to the original Purchaser of a new product, which was not sold "AS IS". It is not transferable or assignable to any subsequent purchaser. This limited warranty is applicable only in the country or territory where the Product was purchased from an authorized VTB retailer and does not apply to a Product that has been purchased as used or refurbished or was included as part of a non-VTB product.
WARRANTY SERVICE:
In the USA and CANADA Warranty Service is provided by our Turtle Beach USA offices and in all other Countries it is provided by our local International Distributors when available. Refurbished/Recertified products are sold on an AS IS basis with a 90-day Warranty or less in accordance with each vendor's policy.
VTB does not warrant uninterrupted or error-free operation of the Product and is under no obligation to support the Product for all computer operating systems or future versions of such operating systems.
If a defect should occur during the Warranty Period, Purchaser must contact VTB to obtain a Return Merchandise Authorization ("RMA") number on the basis of the dated purchase receipt. Purchaser will be responsible for shipping costs incurred in returning the defective Product to an authorized VTB service center, or to the repair facility located at VTB's corporate headquarters. VTB will not be responsible for other products or accessories included with the defective Product sent to VTB. The RMA number must be clearly indicated on the outside of the package. Packages without an RMA number will be refused by VTB or its representatives and returned to sender at the sender's expense.
In the event of a defect, Purchaser's sole and exclusive remedy, and VTB's sole liability, is expressly limited to the correction of the defect by adjustment, repair, or replacement of the Product at VTB's sole option and expense. VTB owns all Products it has replaced and all parts removed from repaired Products. VTB uses new and reconditioned parts made by various manufacturers in performing warranty repairs and building replacement products. If VTB repairs or replaces a product, the original Warranty Period is not extended, however, VTB warrants that repaired or replacement parts will be free from defects in material and workmanship for a period of thirty (30) days from the date of repair or replacement, or for the remainder of the Warranty Period, whichever is greater.
This warranty does not apply to any Product that has had its serial number altered, removed or defaced, or any Product damage caused by shipping, improper storage, accident, problems with electrical power, abuse, misuse, neglect, ordinary wear, acts of God (e.g. flood), failure to follow directions, improper maintenance, use not in accordance with product instructions, unauthorized modification or service of the Product or damage resulting from the use of the Product with hardware, software or other products not provided by or specifically recommended by VTB.
NOTES:
- Replacement Parts and accessories that are subject to "wear and tear" such as earpads, mic foam covers, talkback cables, etc. have a three (3) month Warranty.
- Replacement Parts for Discontinued Products are sold on an AS IS basis, they are not supported and come with a 30 day Warranty.
THIS LIMITED WARRANTY IS PURCHASER'S SOLE AND EXCLUSIVE REMEDY AND IS IN LIEU OF ALL OTHER WARRANTIES, EXPRESS OR IMPLIED. TO THE EXTENT PERMITTED BY APPLICABLE LAW, VTB HEREBY DISCLAIMS THE APPLICABILITY OF ANY IMPLIED WARRANTY OF MERCHANTABILITY, FITNESS FOR A PARTICULAR PURPOSE OR USE FOR THE PRODUCT. IF SUCH A DISCLAIMER IS PROHIBITED BY APPLICABLE LAW, THE IMPLIED WARRANTY IS LIMITED TO THE DURATION OF THE FOREGOING LIMITED WRITTEN WARRANTY.
IN NO EVENT SHALL VTB BE LIABLE FOR ANY INDIRECT, INCIDENTAL, SPECIAL, PUNITIVE OR CONSEQUENTIAL DAMAGES, OR DAMAGES, INCLUDING BUT NOT LIMITED TO ANY LOST PROFITS, DATA, OR LOSS OF USE, ANY THIRD PARTY CLAIMS, AND ANY INJURY TO PROPERTY OR BODILY INJURY (INCLUDING DEATH) TO ANY PERSON, ARISING FROM OR RELATING TO THE USE OF THIS PRODUCT OR ARISING FROM BREACH OF THE WARRANTY, BREACH OF CONTRACT, NEGLIGENCE, TORT, OR STRICT LIABILITY, EVEN IF VTB HAS BEEN ADVISED OF THE POSSIBILITY OF SUCH DAMAGES.
This warranty supersedes all prior agreements or understandings, oral or written, relating to the Product, and no representation, promise or condition not contained herein will modify these terms. Some states do not allow the exclusion or limitation of incidental or consequential damages, so the above exclusion or limitation may not apply to you. This warranty gives you specific legal rights. You may also have other rights, which vary from state to state. Any action or lawsuit for breach of warranty must be commenced within eighteen (18) months following the purchase of the Product.
EXCLUSIonS FRoM LIMITED WARReAnTY:
This Limited Warranty shall not apply and VTB has no liability under this Limited Warranty if the Turtle Beach Product:
- is used for commercial purposes such as "LAN, Call Centers" (including rental or lease);
- is modified or tampered with;
- is damaged by Acts of God, power surge, misuse, abuse, negligence, accident, wear and tear, mishandling, misapplication, or other causes unrelated to defective materials or workmanship;
- serial number is defaced, altered or removed;
- is not used in accordance with the documentation and use instructions; or
- is repaired, modified or altered by other than authorized repair centers.
- Product is no longer available because it was discarded.

Watch Turtle Beach product training videos at: youtube.com/TurtleBeachVideos

Product support and warranty information: TurtleBeach.com/support
Copyright © 2013 Voyetra Turtle Beach, Inc. (VTB, Inc.) All rights reserved. Turtle Beach, the Palm Tree Logo, Voyetra, and Ear Force are trademarks or registered trademarks of VTB, Inc. Xbox, Xbox 360, and Xbox LIVE are registered trademarks of Microsoft Corporation. PlayStation is a registered trademark and PS3 is a trademark of Sony Computer Entertainment, Inc. Mac is a registered trademark of Apple, Inc. Netflix, Hulu, and Skype are trademarks owned by their respective companies. All other trademarks are properties of their respective companies and are hereby acknowledged. Actual product appearance may differ from package imagery.
TM & © 2013 MARVEL & Subs. marvel.com
This product is compliant with the Consumer Product Safety Improvement Act of 2008, Public Law 110-314 (CPSIA)
- LIMITED EDITION PREMIUM AMPLIFIED GAMING HEADSET
- MARVEL
- Table of Contents
- Package Contents
- Features
- Amplifier Features
- Basic Hardware Setup
- PS3 Setup (HDMI)
- PS3 Setup (RCA)
- PS3 System Settings Configuration
- PS3 Audio Output Setup
- PS3 Chat Setup
- Xbox 360 Setup - All Models
- Xbox 360 Setup (HDMI)
- Xbox 360 Setup (RCA)
- Xbox 360 E Setup (HDMI)
- Xbox 360 System Settings Configuration
- Xbox 360 Configuration
- Voice
- Voice Output
- PC/Mac Setup
- PC System Settings Configuration
- Mac System Settings Configuration
- Mobile Device Setup with the In-Line Amplifier
- Mobile Device Setup without the In-Line Amplifier
- Speaker plates
- Troubleshooting
- Microphone not working.
- On Windows PC or Mac, the Game, Bass, and Treble controls appear inactive.
- One speaker not working.
- To submit a Technical Support request, please visit: http://www.turtlebeach.com/contact-support
- Specifications
- Regulatory Compliance Statements for the EAR FORCE MARVEL SEVEN Models
- Federal Communications Commission (FCC) Compliance Notices
- Class B Interference Statement
- FCC Caution:
- Canadian ICES Statements
- European Union and European Fair Trade Association (EFTA) Regulatory Compliance
- Declaration of Conformity
- Warning!
- Achtung!
- WARRANTY SERVICE:
- NOTES:
- EXCLUSIonS FRoM LIMITED WARReAnTY:
Brand : TURTLE BEACH
Model : Earforce Seven Marvel
Category : Headphones