
BBS 1100 - Drill AEG-ELECTROLUX - Free user manual and instructions
Find the device manual for free BBS 1100 AEG-ELECTROLUX in PDF.

| Product type | Belt sander |
| Brand | AEG-ELECTROLUX |
| Model | BBS 1100 |
| Power consumption | 1100 W |
| Belt speed at no load | 400 m/min |
| Belt width | 100 mm |
| Belt length | 560 mm |
| Sanding surface | 100 x 140 mm |
| Weight | 5.0 kg |
| Supply voltage | Single-phase alternating current (check nameplate) |
| Double insulation | Yes (according to standards) |
| Noise level | 88 dB(A) (intensity), 101 dB(A) (level) |
| Arm vibration | < 2.5 m/s² |
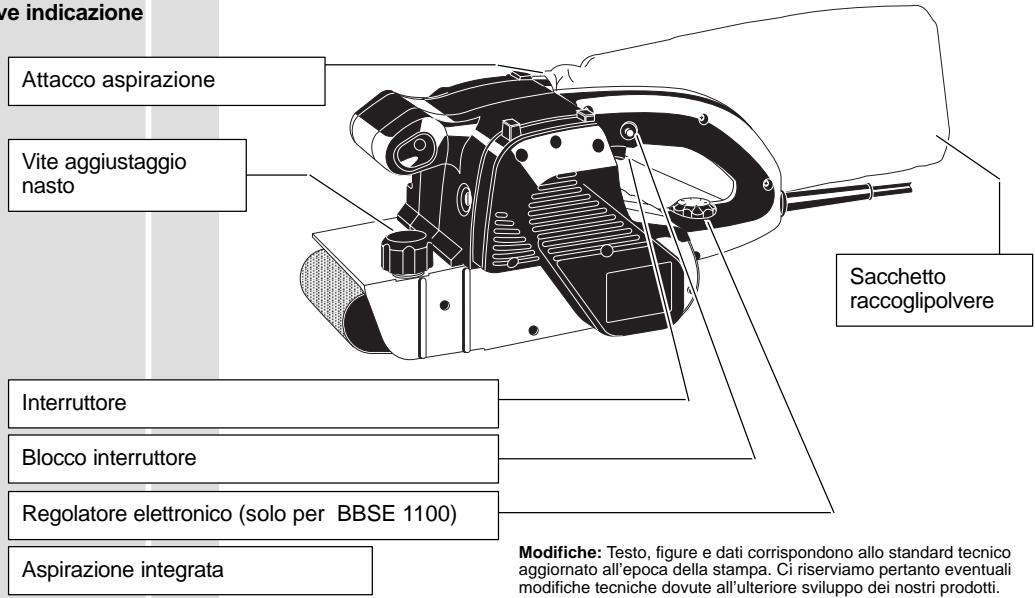
| Dust extraction function | Integrated with sleeve |
| Speed adjustment | No (only on BBSE 1100) |
| Belt tracking | Adjustment screw |
| Belt change | Unlocking lever |
| Application | Wood, plastics, metal |
| Maintenance | Clean the ventilation slots |
| Safety | Safety glasses, disconnect before maintenance |
Frequently Asked Questions - BBS 1100 AEG-ELECTROLUX
User questions about BBS 1100 AEG-ELECTROLUX
0 question about this device. Answer the ones you know or ask your own.
Ask a new question about this device
Download the instructions for your Drill in PDF format for free! Find your manual BBS 1100 - AEG-ELECTROLUX and take your electronic device back in hand. On this page are published all the documents necessary for the use of your device. BBS 1100 by AEG-ELECTROLUX.
USER MANUAL BBS 1100 AEG-ELECTROLUX
natural_image
Technical line drawing of a hand operating a manual tool or power shaver (no text or symbols present)GB Instructions for use
Please read and save these instructions.
D Gebrauchsanleitung Bitte lesen und aufbewahren.
F Instruction d'utilisation
Prière de lire et de conserver.
I Istruzioni d'uso
Si prega di leggere le istruzioni e
di conservarle.
E Instrucciones de uso
Lea y conserve estas
instrucciones por favor.
P Instruções de serviço
Por favor leia e conserve em seu poder.
NL Gebruiksaanwijzing
Lees en let goed op deze adviezen.
DK Brugsanvisning
Vær venlight at læse og opbevare.
s Bruksanvisning
Var god läs och tag tillvara dessa instruktioner.
FIN Käyttöohje
Lue ja säilytö
TR Kullanım kılavuzu
Lütfen okuyun ve saklayin
RUS Инструкция по использованию
Пожалуйста, прочтите и сохраните настоящую инструкцию
| Introduction | You have high standards and expect to purchase quality goods – quality offered by AEG.We have built a durable and reliable electric power tool for you.Please read the instructions for use before first operation so you can handle your power tool effectively and safely.We are sure that buying an AEG Electric Power Tool was the right choice! | ||
| Technical Data | BBS 1100 | BBSE 1100 | |
| Nominal power . . . . . . . . . . . . . . . . . . . . . . . . . . . . . . . . . . . . . . . . . . . . . . . . . . . . . . . . . . . . . . . . . . . . . . . . . . . . . . . . . . . . . . . . . . . . . . . . . . . . | 1100 W1100 W | ||
| Belt speed no load . . . . . . . . . . . . . . . . . . . . . . . . . . . . . . . . . . . . . . . . . . . . . . . . . . . . . . . . . . . . . . . . . . . . . . . . . . . . . . . . . . . . . . . . . . . . . . . . . . . Sanding width . . . . . . . . . . . . . . . . . . . . . . . . . . . . . . . . . . . . . . . . . . . . . . . . . . . . . . . . . . . . . . . . . . . . . . . . . . . . . . . . . . . . . . . . . . . . . . . . . . . Weight . . . . . . . . . . . . . . . . . . . . . . . . . . . . . . . . . . . . . . . . . . . . . . . . . . . . . . . . . . . . . . . . . . . . . . . . . . . . . . . . . . . . . . . . . . . . . . . . . . . | |||
| Advice for your safety | ■ Please pay attention to the safety instructions in the attached leaflet!■ Dust that arises when working in wood or using the tool on industrial material can be dangerous to health. In this case connect the tool to a suction device.■ Appliances used at many different locations including open air must be connected via a current surge preventing switch.■ Always wear goggles when using the machine. It is recommended to wear gloves, sturdy non slipping shoes and apron.■ Sawdust and splinters must not be removed while the machine is running.■ Do not pierce the motor housing as this could damage the double insulation (use adhesives).■ Always disconnect the plug from the socket before carrying out any work on the machine.Only plug-in when machine is switched off.■ Keep mains lead clear from working range of the machine. Always lead the cable away behind you.■ When sanding metal the dust suction facility should not be used, because of the risk of fire from flying sparks. | ||
| Measured sound value | Typically the A-weighted noise levels of the tool are:Sound pressure level = 88 dB (A)Sound power level = 101 dB (A).Wear ear protectors! Measured values determined according to EN 50 144. | ||
| Measured vibration value | Typically the hand-arm vibration is below 2.5 m/s^2 .Measured values determined according to EN 50 144. | ||
| Mains connection | Connect only to a single-phase AC current supply and only to the mains voltage specified on the rating plate. Connection to sockets without earth protection is possible as the appliance features protective insulation to DIN 57 740/ VDE 0740 and CEE 20. Radio suppression complies with the European standard EN 55014.When fitting the plug, make sure that the brown (live) wire of this appliance is connected to the plug terminal marked L or coloured red, and the blue (neutral) wire of this appliance is connected to the plug terminal marked N or coloured black. Under no circumstances must the wires of this appliance be connected to the earth terminal of the plug marked either E, with the earth symbol or coloured green or green/yellow. | ||
| Use | The belt sander can be used for sanding wood, plastics and metal.Do not use this product in another way as stated for normal use. | ||
| ENGLISH | 1 | BBS 1100, BBSE 1100 | |
Brief description

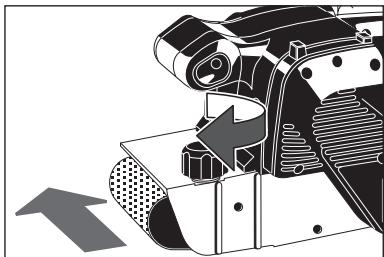
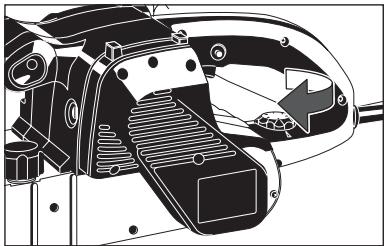
Changing the belt

Always disconnect the plug from the socket before carrying out any work on the machine.

Prior the changing belt, adjust sanding belt by turning the belt adjusting screw approx. 2–3 cm in the direction of the open side of the machine beyond the rollers, whilst the machine is running, as the new sanding belt can sometimes brush against the machine housing.
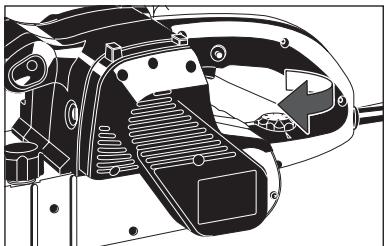
- Pull the clamping lever forwards
- Remove the worn belt and fit the inside of the belt is pointing in the same direction as the arrow on the machine.
- Push the clamping lever back again
- Taking a test run, position the sanding belt with the aid of the belt adjusting screw so that it is flush with the outer edge of the sanding belt support.
natural_image
Technical illustration of a mechanical device with directional arrows indicating movement or force (no text or symbols present)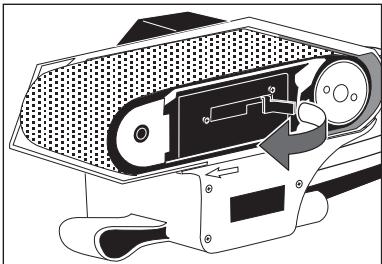
natural_image
Technical illustration of a mechanical device with internal components and directional arrows (no text or symbols)Setting speed of rotation
(only applicable for BBSE 1100
The speed is adjusted by means of the electronic thumb wheel.
1 = lowest speed
6 = highest speed
natural_image
Technical line drawing of a mechanical component with no visible text or symbolsnatural_image
Technical illustration of a mechanical device with directional arrows indicating movement or force (no text or symbols)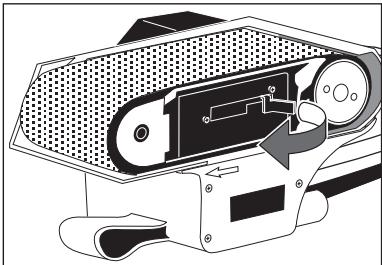
natural_image
Technical illustration of a computer monitor with ventilation slots and scroll wheel (no text or symbols)Drehzahl einstellen
(nur bei BBSE 1100
natural_image
Technical line drawing of a mechanical component with no visible text or symbolsDEUTSCH
natural_image
Technical illustration of a mechanical device with an arrow indicating direction (no text or symbols present)
natural_image
Technical illustration of a mechanical device with internal components and a handle (no text or symbols)natural_image
Technical line drawing of a mechanical component with no visible text or symbols| Mise en marche/arrêt | Marche momentanéeMise en marche: appuyer sur l'interrupteurMarche/ArrêtArrêt: lâcher l'interrupteur Marche/ArrêtMarche continueMise en marche: appuyer d'abord sur l'interrupteur marche/arrêt puis sur le bouton de blocage, lâcher l'interrupteur marche/arrêt.Arrêt: appuyer sur l'interrupteur marche/arrêt et lâcher.Avant la mise en route, maintenir la machine en l'air avec les deux mains. |   | |
| Conseils pratiques | Il n'est pas nécessaire, lors du ponçage, d'exercer une pression particulière sur la machine, son propre poids suffit. | ||
| Aspiration de la poussière | Pour le poncage du bois, utiliser le sac à poussières.Si le rendement de l'aspiration baisse, vider le sac.Si le volume de poussières est particulièrement important, un aspirateur peut être raccordé sur la buse d'aspiration.En raison des risques d'incendie, il est déconseillé d'avoir recours au sysrême d'aspiration pour le ponçage des métaux. |  | |
| Entretien | Tenir toujours propre les orifices de ventilation de la partie moteur.N'utiliser que des pièces et accessoires AEG. Pour des pièces dont l'échange n'est pas décrit, s'adresser de préférence aux stations de service après-vente AEG (voir brochure Garantie/Adresses des stations de service après-vente).Si besoin est, une vue éclatée de l'appareil peut être fournie. S'adresser, en indiquant bien le numéro à dix chiffres porté sur la plaque signalétique, à votre station de service après-vente (voir liste jointe) ou directement à AEG Elektrowerkzeuge, Max-Eyth-Strasse 10, D-71364 Winnenden, Germany. | ||
| Accessoires | Consulter nos catalogues qui vous renseignent sur notre programme d'accessoires avec leur référence. | ||
| FRANÇAIS | 9 | BBS 1100, BBSE 1100 | |
| Premessa | La vostra richiesta ed aspettativa è quella di acquistare merce d'elevata qualità - qualità offerta da AEG. Noi costruiamo per voi utensili elettrici durevoli e affidabili. Si prega di leggere attentamente le istruzione al primo utilizzo cosicché si possa utilizzare l'utensile elettrico in modo più sicuro e corretto. Siamo sicuri che acquistare gli utensili elettrici AEG sia la scelta migliore. | ||
| Dati tecnici | BBS 1100 | BBSE 1100 | |
| Potenza assorbita . . . . . . . . . . . . . . . . . . . . . . . . . . . . . . . . . . . . . . . . . . . . . . . . . . . . . . . . . . . . . . . . . . . . . . . . . . . . . . . . . . . . . . . . . . . . . . . . . . . . | 1100 W . . . . . . . . . . . . . . . . . . . . . . . . . . . . . . . . . . . . . . . . . . . . . . . . . . . . . . . . . . . . . . . . . . . . . . . . . . . . . . . . . . . . . . . . . . . . . . . . . . . | ||
| Velocità a vuoto . . . . . . . . . . . . . . . . . . . . . . . . . . . . . . . . . . . . . . . . . . . . . . . . . . . . . . . . . . . . . . . . . . . . . . . . . . . . . . . . . . . . . . . . . . . . . . . . . . . Larghezza levigatura . . . . . . . . . . . . . . . . . . . . . . . . . . . . . . . . . . . . . . . . . . . . . . . . . . . . . . . . . . . . . . . . . . . . . . . . . . . . . . . . . . . . . . . . . . . . . . . . . . .Lunghezza nastro . . . . . . . . . . . . . . . . . . . . . . . . . . . . . . . . . . . . . . . . . . . . . . . . . . . . . . . . . . . . . . . . . . . . . . . . . . . . . . . . . . . . . . . . . . . . . . . . . . . Dimensioni levigtura . . . . . . . . . . . . . . . . . . . . . . . . . . . . . . . . . . . . . . . . . . . . . . . . . . . . . . . . . Peso . . . . . . . . . . . . . . . . . . . . . . . . . . . . . . . . . . . . . . . . . . . . . . . . . . . . . . . . . . . . . . . . . . . . . . . . . | 10 | ||
| Norme di sicurezza | ■ Si prega di leggere con attenzione le istruzioni riguardanti la sicurezza, nel volantino allegato. ■ Per lunghe lavorazioni nel legno o con altri materiali che producono poveri dannose alla salute, e' prescritto l'utilizzo sull'utensile dell'aspirazione polvere. ■ Gli apparecchi mobili usati all'aperto devono essere collegati interponendo un interruttore di sicurezza per guasti di corrente. ■ Durante l'uso dell'apparecchio utilizzare sempre gli occhiali di protezione. Inoltre si consiglia di usare sistemi di protezione per la respirazione e per l'udito, oltre ai guanti di protezione. ■ Non rimuovere trucioli o schegge mentre l'utensile è in funzione. ■ Evitare di forare la carcassa dell'utensile per non danneggiare l'isolamento. (Utilizzare placchette adesive). ■ Prima di effettuare qualsiasi lavoro sulla macchina togliere la spina dalla presa di corrente. Inserire la spina solo con interruttore su posizione "OFF". ■ Tenere sempre lontano il cavo di collegamento dall'area di lavoro dell'attrezzo. ■ Per levigatura di metallo non aspirare la polvere causa scintille e pericolo di incendio. | ||
| Livello di rumorosità | La misurazione A del livello di rumorosità di un utensile è di solito: Livello di rumorosità = 88 dB (A) Potenza della rumorosità = 101 dB (A). Utilizzare le protezioni per l'udito! Valori misurati conformemente alla norma EN 50 144. | ||
| Livello di vibrazione | Le vibrazioni sull'elemento mano-braccio di solito sono inferiori a 2.5 m/s^2 . Valori misurati conformemente alla norma EN 50 144. | ||
| Collegamento alla rete | Alimentazione dell'utensile: corrente alternata monofase. Importante: la tensione della rete deve corrispondere a quella riportata sulla targhetta dell'utensile. Il collegamento é possibile anche con prese non munite di contatto di protezione: é previsto infatti un isolamento di protezione conforme a norme DIN 57740/VDE 0740 (CEE 20). La schermatura contro i radiodisturbi é conforme alla norma europea EN 55014. | ||
| Possibilità' di utilizzo | La levigatrice a nastro è adatta per trattare superfici piane di legno, plastica e metallo. Utilizzare il prodotto solo per l'uso per cui è previsto. | ||
| ITALIANO | 10 | BBS 1100, BBSE 1100 | |
Breve indicazione
natural_image
Technical illustration of a mechanical assembly with no visible text or symbols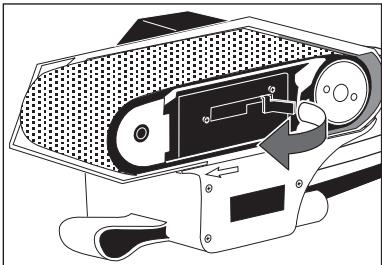
natural_image
Technical illustration of a mechanical device with internal components and directional arrows (no text or symbols)natural_image
Technical line drawing of a mechanical component with no visible text or symbolsnatural_image
Technical illustration of a mechanical assembly with no visible text or symbols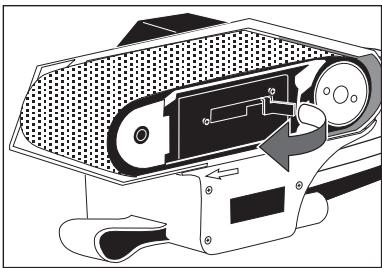
natural_image
Technical illustration of a mechanical device with internal components and no visible text or symbolsnatural_image
Technical line drawing of a mechanical component with no visible text or symbols| Control de conexión - desconexión | Conexión momentáneaConexión: Presionar el interruptor de co/desconexión.Desconexión: Soltar el interruptor de co/desconexión.Conexión permanenteConexión: Presionar el interruptor de co/desconexión y entonces el botón de bloqueo, soltar el interruptor de co/desconexión.Desconexión: Presionar el interruptor de co/desconexión y entonces soltarlo.En cualquier caso, antes de conectarla deberá sujetarse la máquina con las dos manos. Se conectará solamente cuando esté levantada, es decir, no apoyada.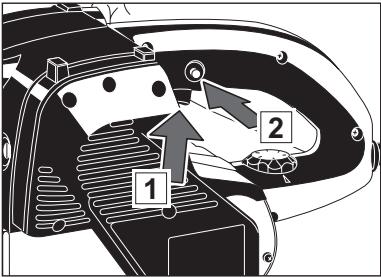 | ||
| Sugerencias de trabajo | El conductor de conexión, durante los trabajos, se echará hacia atrás para que no resulte dañado. | ||
| Trabajar de manera ecológica |  | Cuando lije madera emplee Vd. la bolsa para el polvo.Cuando se note disminución de la potencia aspiradora, vacíar el saco de polvo.Para lijados de grandes superficies se puede conectar al racor una manguera de aspiración.Cuando lije metales no emplee Vd.aspiración alguna debido al peligro de incendio por formación de chispas.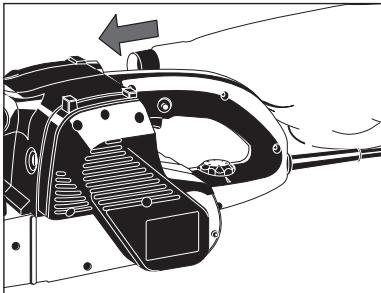 | |
| Mantenimiento | Las ranuras de ventilación de la máquina deben estar despejadas en todo momento.Solo se deben utilizar accesorios y piezas de repuestos AEG. Piezas cuyo recambio no está descrito en las instrucciones de uso, deben sustituirse en un centro de asistencia técnica AEG (Consulte el folleto Garantia/Direcciones de Centros de Asistencia Técnica).En caso necesario, puede solicitar un despiece de la herramienta. Por favor indique el número de impreso de diez dígitos que hay en la etiqueta y pida el despiece a la siguiente dirección: AEG Elektrowerkzeuge, Max-Eyth-Strasse 10, D-71364 Winnenden, Germany. | ||
| Accesorios | Los accesorios y sus correspondientes números para pedido, están reflejados en nuestros catálogos. | ||
| ESPAÑOL | 15 | BBS 1100, BBSE 1100 | |
| Preâmbulo | Como pessoa exigente decidiu-se pela qualidade – qualidade AEG. Construimos para si uma ferramenta eléctrica duradoura e segura. Um trabalho eficiente e tanto quanto possível isento de perigo só é, no entanto possível se ler e observar as presentes instruções de serviço. Queremos que também no futuro se decida pelas Ferramentas eléctricas AEG. | ||
| Características técnicas | BBS 1100 | BBSE 1100 | |
| Potência absorvida . . . . . . . . . . . . . . . . . . . . . . . . . . . . . . . . . . . . . . . . . . . . . . . . . . . . . . . . . . . . . . . . . . . . . . . . . . . . . . . . . . . . . . . . . . . . . . . . . . . . | 1100 WVelocidade da cinta em vazio . . . . . . . . . . . . . . . . . . . . . . . . . . . . . . . . . . . . . . . . . . . . . . . . . . . . . . . . . . . . . . . . . . . . . . . . . . . . . . . . . . . . . . . . . . . . . . . . . . . Largura de lixagem . . . . . . . . . . . . . . . . . . . . . . . . . . . . . . . . . . . . . . . . . . . . . . . . . . . . . . . . . . . . . . . . . . . . . . . . . . . . . . . . . . . . . Comprimento da cinta . . . . . . . . . . . . . . . . . . . . . . . . . . . . . . . . . . . . . . . . . . . . . Supericie de lixagem . . . . . . . . . . . . . . . . . . . . . . . . . . . . . . . . . . . . . . Peso . . . . . . . . . . . . . . . . . . . . . . . . . . . . . . . . . . . . . . . . . . . . . . . . | ||
| Indicações sobre segurança no trabalho | ■ Observar as instruções de segurança na folha!■ Se a máquina fôutilizada para trabalhar madeira durante um período mais longo, ou se a mesma for utilizada profissionalmente em materiais que produzam poeiras nocivas à saúde, torna-se necessário ligá-la a um dispositivo de aspiração adequado.■ Aparelhos não estacionários, utilizados ao ar livre, devem ser protegidos por um disjuntor de corrente de defeito.■ Usar sempre óculos de protecção ao trabalhar com a máquina. Recomenda–se a utilização de luvas de protecção, protectores para os ouvidos e máscara anti–poeiras.■ Não remover aparas ou lascas enquanto a máquina trabalha.■ Nunca abrir furos no corpo da máquina; caso contrário, é afectado o isolamento de protecção (só utilizar chapas auto-colantes).■ Antes de efectuar qualquer intervenção na máquina, tirar a ficha da tomada. Ao ligar à rede, a máquina deve estar desligada.■ Manter sempre o cabo de ligação fora da zona de acção da máquina.■ Ao lixar metal o dispositivo de aspiração de poeiras não deve ser usado, devido ao risco de fogo causado pelas chispas. | ||
| Níveis de ruído | Normalmente os níveis de ruído mais elvados da ferramenta são:Nível da pressão de ruído =88 dB (A)Nível da potência de ruído =101 dB (A).Use protectores auriculares! Valores de medida de acordo com EN 50 144. | ||
| Nível de vibrações | Normalmente o nível de vibração do braço e mão é abaixo de 2.5 m/s^2 .Valores de medida de acordo com EN 50 144. | ||
| Ligação à rede | Ligar unicamente a tomadas de corrente alternada monofásica com a tensão indicada na chapa de características do aparelho. Pode também ser ligada a tomadas sem terra, porque dispõe de isolamento de protecção conforme DIN 57 740/VDE 0740 ou, respectivamente, CEE 20. A supressão de interferências rádio-eléctricas corresponde à norma europeia EN 55014. | ||
| Aplicação | A lixadeira de cinta pode ser usada para lixar madeira, plásticos ou metal.Não use este produto de outra maneira sem ser a normal para o qual foi concebido. | ||
| PORTUGUES | 16 | BBS 1100, BBSE 1100 | |
Breve descrição
natural_image
Technical illustration of a mechanical device with no visible text or symbolsnatural_image
Technical illustration of a mechanical device with internal components and directional arrows (no text or symbols)natural_image
Technical line drawing of a mechanical component with no visible text or symbolsPORTUGUES
natural_image
Technical illustration of a mechanical device with no visible text or symbols
natural_image
Technical illustration of a mechanical device with internal components and directional arrows (no text or symbols)natural_image
Technical line drawing of a mechanical component with no visible text or symbolsnatural_image
Technical illustration of a mechanical device with no visible text or symbols
natural_image
Technical illustration of a mechanical device with internal components and directional arrows (no text or symbols)Omdrejnings- tal indstil- les
(Kun på BBSE 1100
Omdrejningstallet indstilles med det elektroniske stillehjul.
1 = mindste omdrejningstal 6 = største omdrejningstal
natural_image
Technical line drawing of a mechanical component with no visible text or symbolsnatural_image
Technical illustration of a mechanical device with no visible text or symbols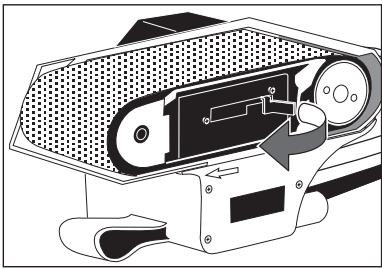
natural_image
Technical illustration of a mechanical device with internal components and directional arrows (no text or symbols)natural_image
Technical line drawing of a mechanical component with no visible text or symbolsnatural_image
Technical illustration of a mechanical device with directional arrows indicating movement or force (no text or symbols present)natural_image
Technical illustration of a mechanical device with internal components and directional arrows (no text or symbols)natural_image
Technical line drawing of a mechanical component with no visible text or symbolsnatural_image
Technical illustration of a mechanical device with no visible text or symbols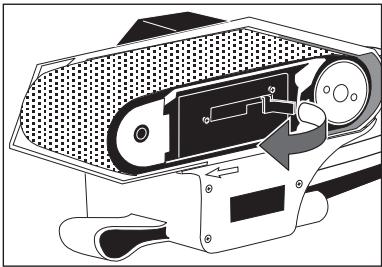
natural_image
Technical illustration of a mechanical device with internal components and a handle (no text or symbols)Devir sayısı ayarı
natural_image
Technical line drawing of a mechanical component with no visible text or symbolsnatural_image
Technical illustration of a mechanical device with no visible text or symbolsnatural_image
Technical illustration of a mechanical device with internal components and no visible text or symbolsnatural_image
Technical line drawing of a mechanical component with no visible text or symbolsEC-DECLARATION OF CONFORMITY
We declare under our sole responsibility that this product is in conformity with the following standards or standardized documents.
EN 50144, EN 55014-1, EN 55014-2, EN 61000-3-2, EN 61000-3-3, in accordance with the regulations 98/37/EC, 89/336/EEC
DEUTSCH
DÉCLARATION "CE" DE CONFORMITÉ
Manager Product Development


Brand : AEG-ELECTROLUX
Model : BBS 1100
Category : Drill